i need one adsense account needed .Use this name and address
Name :Nabinkumar karki
Country: Nepal
Address: Kritipur 10
House no :468
Milan chowk
city: Kathmandu
State: bagmati
Postal code:0977

Freelance Projects, Design and Programming Tutorials
i need one adsense account needed .Use this name and address
Name :Nabinkumar karki
Country: Nepal
Address: Kritipur 10
House no :468
Milan chowk
city: Kathmandu
State: bagmati
Postal code:0977
Hi Designers & Developers,
Greetings!
We are in requirement of a Logo + Home Page design for an Auction site for ourselves.
We are looking for a company or an Individual for an original design (NO Template) that will be used in brand building worldwide for our company. We want a Corporate Look for our Logo for an Auction site of our’s.
Graphic designer must deliver print ready files, and statement releasing all ownership rights to any designs submitted which will become the property of the company who will retain all copy write rights and exclusive use of any designs.
Need all formats of designs, Vector, CDR, Tiff, EPS, JPEG, also black and white copy. You must provide samples of your past designs when BIDDING for the Project.
Please provide samples of past designs.
Our timeframe for completion is within 1 week of selection of the Programmer / Developer.
You are requested to quote seperately for the Logo design and Homepage designing fees.
Happy Scripting & Designing!
EditorsPick
I am looking for someone to convert my website to Zen Cart. Right now my site is hosted at and using the shopping cart of BigCommerce.com. I need these done because of the payment gateways I need to use wont work in BC
I would think this would be pretty easy because they allow full access to all codes and templates. I might be interested in a small update to make it look “cooler” if we have to start from fresh, But I dont think we will.
I will also need 3-6 pre made modules installed or worked into the site so I can have some of the extra features I need that I had at BC
I really need this done ASAP because of my banks new gateway, It wont work in BC anymore which means I can’t take payments right now
the website is legalbudhigh.com
BC = big commerce
Has anyone got a program that they sale me, that allows me to select individual numbers and set the betting strategy, and also allow it to test numbers from a file to see its performance?
Need this program asap.
I am looking for PHP+MySQL+Ajax programmers for one month under following condition.
1. skill and talented, extra experienced on oscommerce.
2. must be honest, hard worker and sincere.
3. willing to work 4-6 hour daily and minimum 150 hour in whole month.
4. Programmers, who available on talk daily.
5. bill would pay after each 10 hour you successfully end work.
6. payment should pay via sl
Please mention clearly how much you charge for per 150 hour/month is for your services. Your application will not be considered without this information. if you not able to work more then 4 hour in a days ,don’t bid here.
regards
How tile engines simplify the game design process and how to apply them to different game types.
We found this awesome author thanks to FlashGameLicense.com, the place to buy and sell Flash games!
Let’s take a look at the final result we will be working towards:
Move your mouse to make the little square walk towards it, and click to make it jump. Hit space to change tile currently underneath the cursor.
The simplest way to describe tiles is to show you images from games that have used them in the past. This is a portion of a screenshot from The Legend of Zelda:
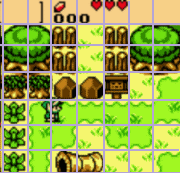
When you look at older games, you can see that a lot of the art in the game is reused. The same tree appears twice, the same rocks appear twice, the wild grass is there three times on the screen and the fence is seen four times. And all the art is perfectly aligned to a grid. Each one of the little squares in the grid I drew over this screenshot is a tile.
Instead of making each level individually from scratch, the people who designed the Legend of Zelda decided to put the game on a grid. Then, they attached premade art to that grid. This method has a lot of benefits in game design.
Most beginners who use Flash don’t know much about tile based methods and what benefits they ……..
Read more
In the second part of this intermediate 2-day tutorial, Konstantin Muromtsev will be showing us how to finish up this futuristic aircraft scene using Cinema4D. After adding in the remaining ship, we’ll create the environment, add lighting, and make use of the Camera shader from MoGraph 2. Finally, we’ll then take a look at how Advanced Render post-effects such as Highlights and Glow can be used when compositing in Photoshop.
We’ll start off by creating the Display ship by utilising many of the same tools as we did for Day 1. So, first select the copy of the original ship made in Step 21 of Day 1 and make it visible. Select 6 polygons on the side of the ship as shown and use the Extrude Inner tool on them with an offset of approximately 3m. This will become the main display area.
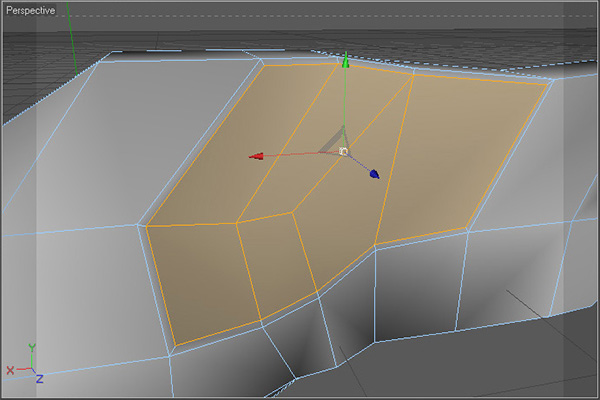
Extrude the selected polygons with a negative offset value of approximately 3m, and then use Extrude Inner on them with a similar negative offset value.
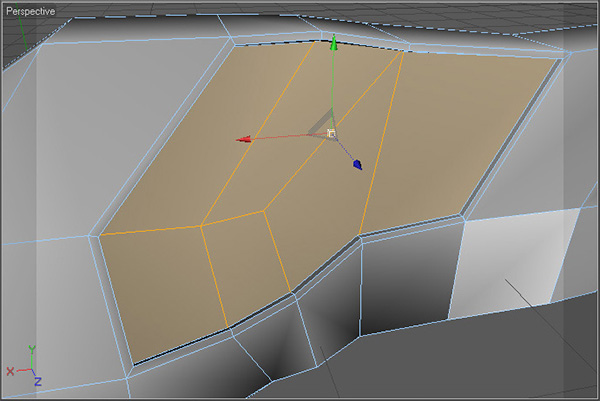
Select 6 polygons on the front of the ship, and cut them in half using the Knife tool, with the Mode set to Plane, and the Plane set to X-Z.
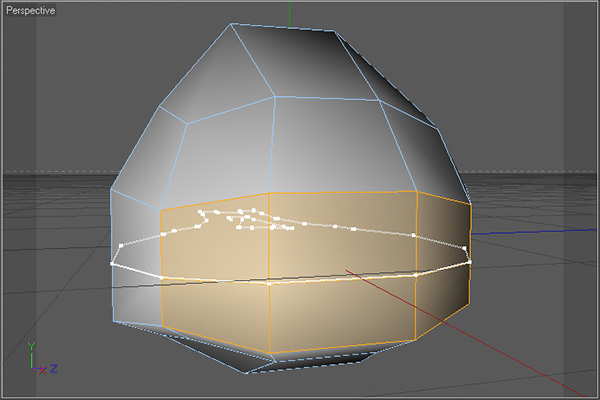
Select these 9 polygons and use the Extrude Inner tool to inset them as shown.
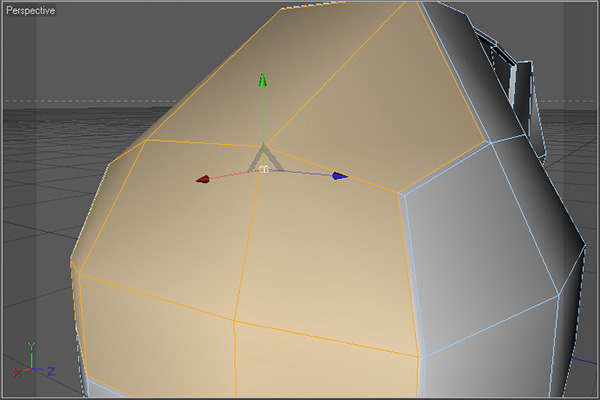
Extrude the selected polygons into the ship by using a negative offset value, and then use Extrude Inner as shown.
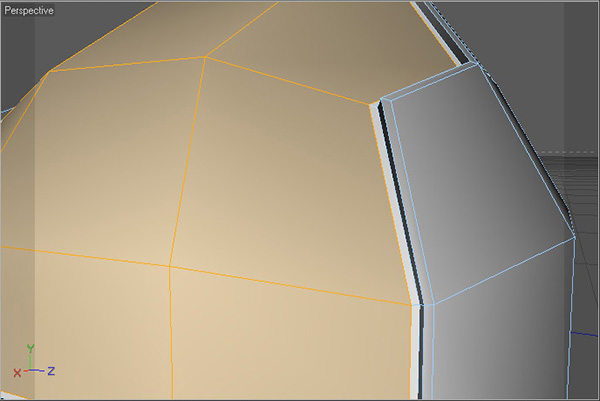
Finally Extrude the selected polygons back out so that they are on the same level (or just higher) than the main body of the ship. Use the Set Selection command as outlined in Day 1, Step 21.
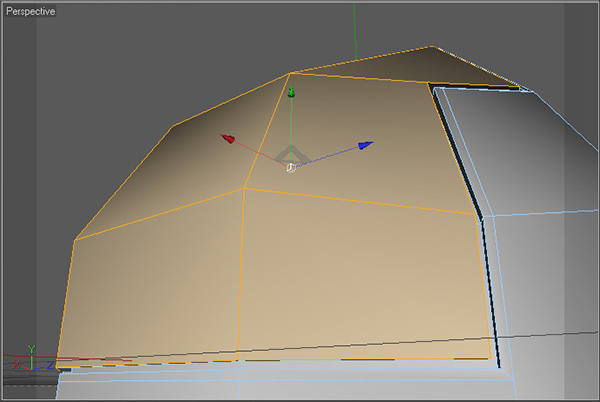
Select these 3 polygons on the sides below our previous extrusion, and cut them using the Knife tool with Mode set to Plane, the Plane set to X-Z, Cuts set to 2 with a Spacing of approximately 25m.
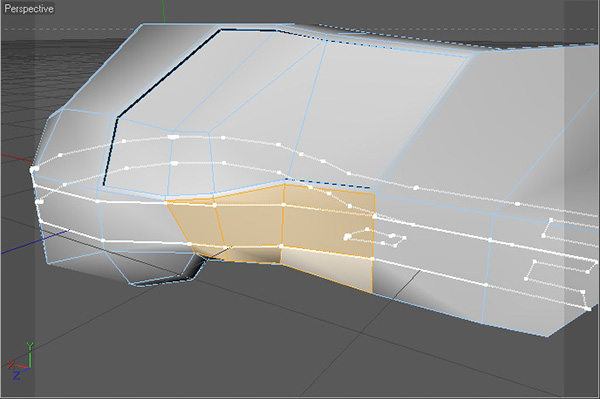
Select the 3 polygons that run horizontally across the center of our newly cut section and Extrude them twice as shown.
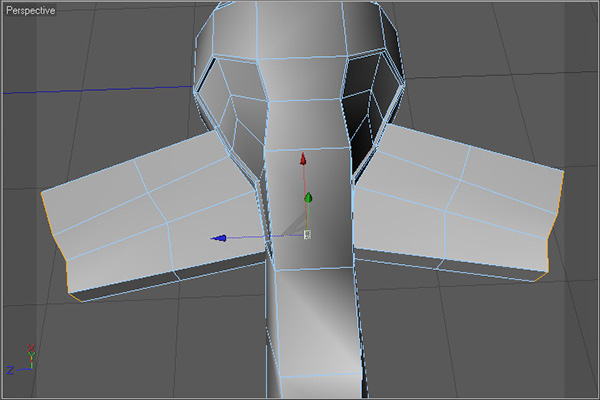
Now use Extrude Inner on our wing-tips, and then Extrude the polygons into the body of the wing as shown using a negative offset value. With this done, use Extrude Inner one more time on the selected polygons, however this time only use a very small distance – it should be barely noticeable! This is just to add a crease to the inside edge. Finally, add the selected polygons to a selection set called Nozzle using the Set Selection tool as before.
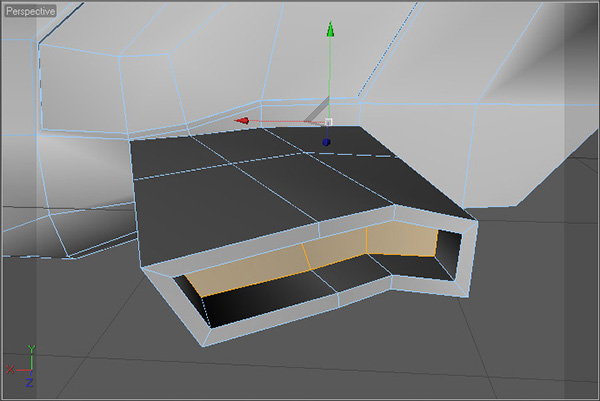
We’ll now move on to adding in the individual displays. First of all create a Cube object with dimensions of roughly 56m x 30m x 7m, and then make it editable.
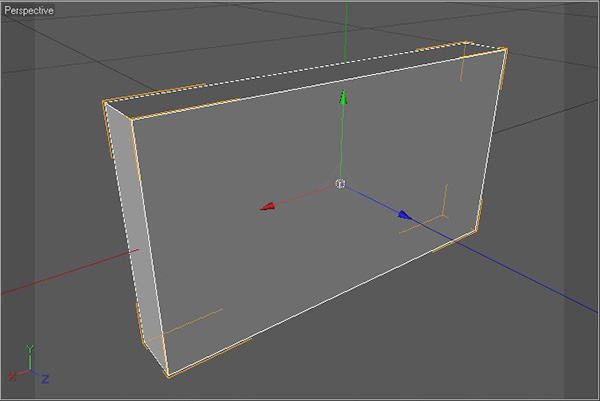
Select one of biggest side polygons, and then use Extrude Inner, followed by Extrude to create the mesh shown.
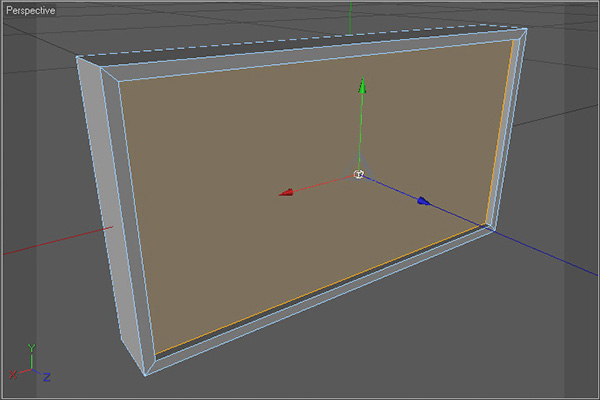
Now, use Extrude Inner again, but this time use a negative offset value to essentially scale up the polygon so that it sticks through the sides of the box. With that done scale the selected polygon down on the Y-axis so it’s only sticking through the sides and not the top and bottom, and then Set Selection.
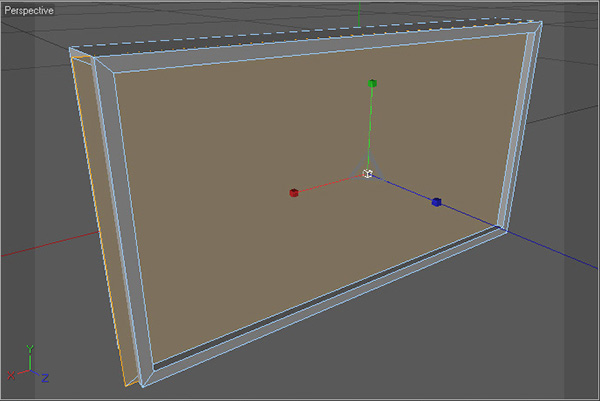
We’ll now add a small amount of detail to the other side of the object, so first select the back polygon, then use Extrude Inner followed by an Extrude to get the following shape.
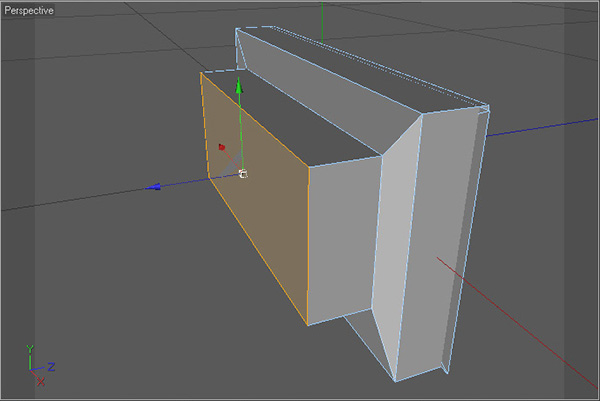
Subdivide the object by going to Functions > Subdivide, and then changing the Subdivisions value to 2 and clicking Ok.

Duplicate the object to fill up the display area. When you’re happy with the layout, group all displays under a single null object by selecting all of the displays and hitting Alt-G.
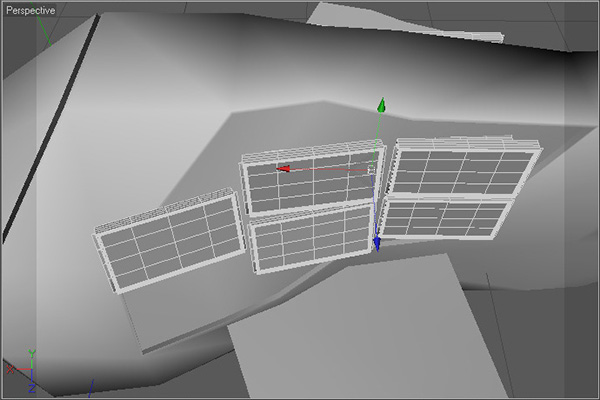
Now we need to group the displays group along with the main body, so select our new null group object, then the main body object and hit Alt-G again. With our new group null selected, we can add all of the objects to HyperNURBS by going to Objects > NURBS and then Alt-Clicking HyperNURBS. Now select the HyperNURBS object from the objects list, and in the Coord. tab of it’s Attributes, change the S.x, S.y and S.z values to 3, 6 and 6 respectively to get the following result. And with that the ship is complete!
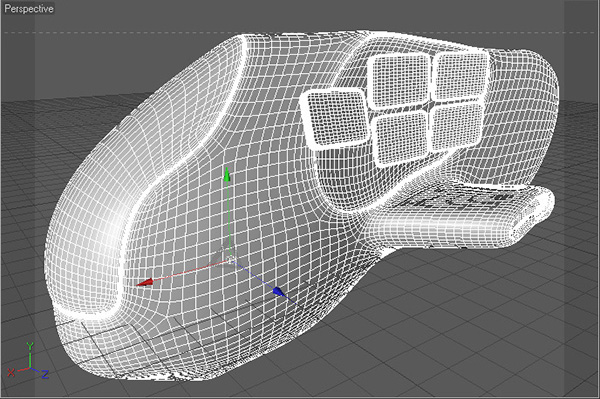
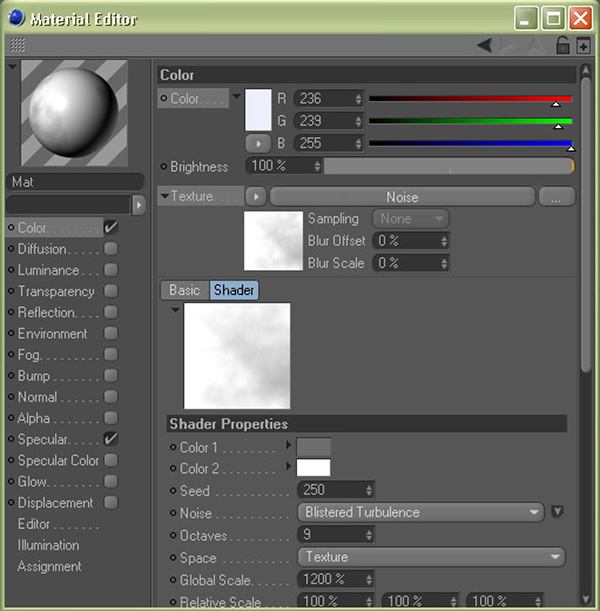
So, onto the materials! First, create a new material and in the Material Editor, change it’s Color to very light blue (in my case I used 236 239 255). For Texture, select Noise and then in the Shader Properties, select a grey for Color 1 and white for Color 2. Now change the Global Scale to something very high, around 1000-1500%, and change the Mix Mode (just off screen here) to Multiply.
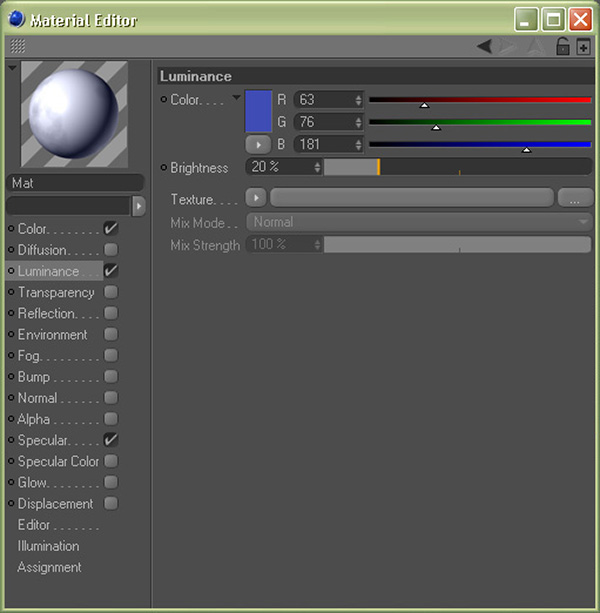
Turn on the Luminance checkbox and in the Luminance properties change Color to blue (in my case 63 76 181), and change the Brightness value to approximately 20%.
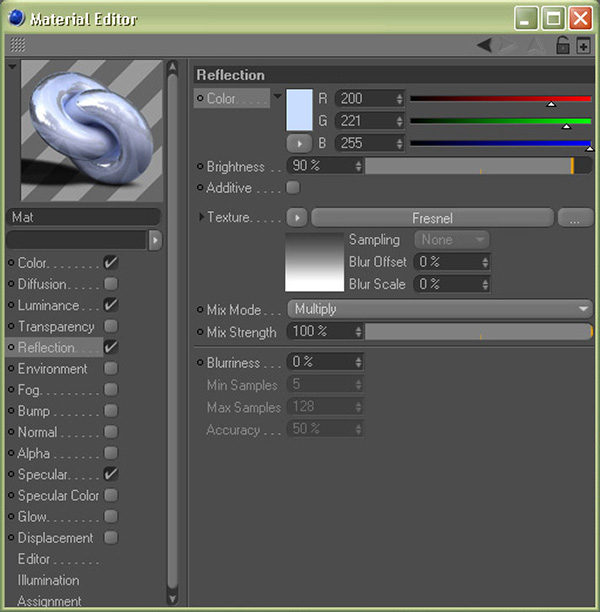
Now turn on Reflection, change it’s Color to a light blue (approximately 200 221 255), it’s Brightness to around 90% and it’s Mix Mode to Multiply. For Texture, add in a white to grey Fresnel.
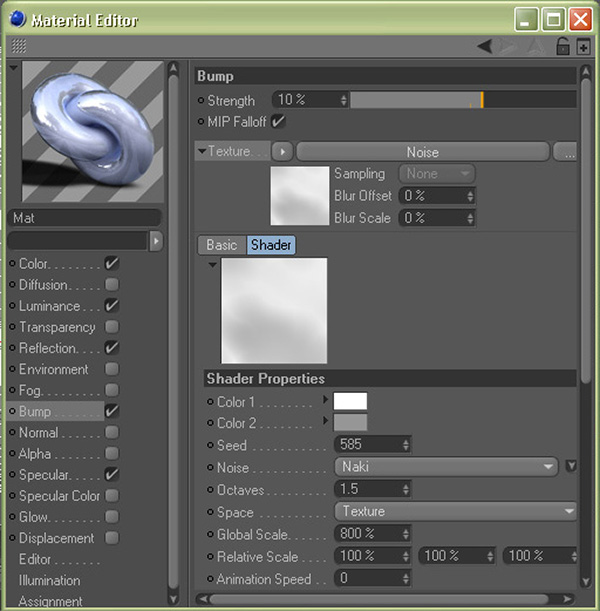
Turn on Bump, change the Strength value to approximately 10%, and in the Texture slot, add Noise with the Color values set to white and grey, and then set the Global Scale to just less than 1000%.
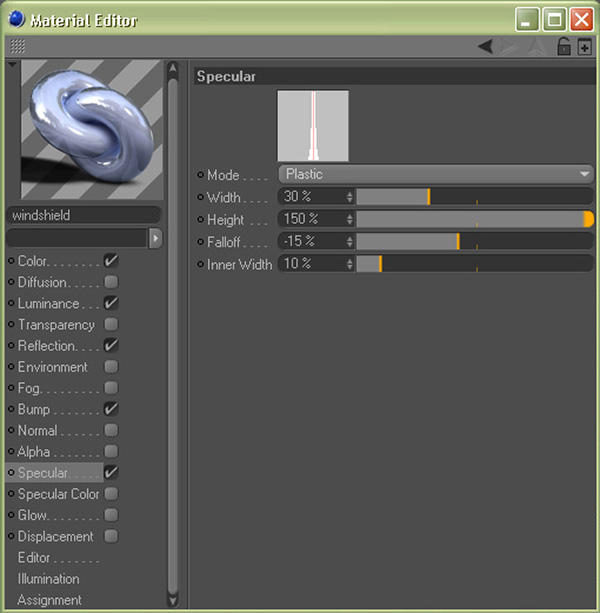
Now to finalise this material, add in Specular. Change the Width to approximately 30%, the Height to around 150%, the Falloff to -15%, and set the Inner Width to about 10%. Our windshield material is now ready.
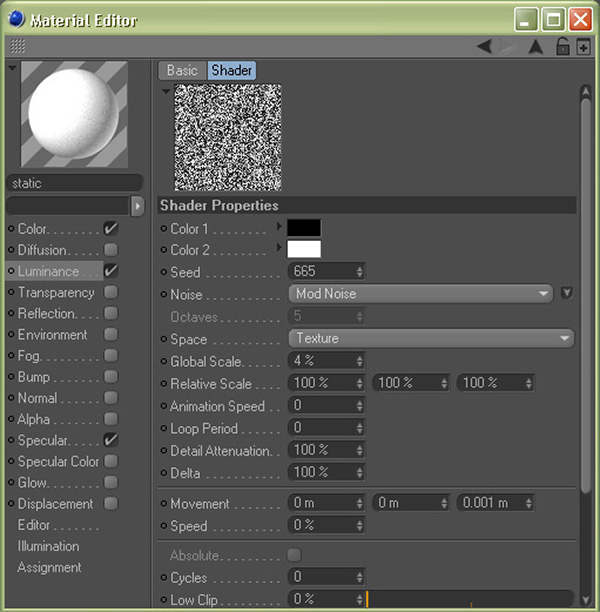
Create one last material for the ship. Turn on Luminance, and use Noise as the Texture, and change the Global Scale to something very low (in my case 4%). Our static display material is ready!
Assign our existing base metal material to both the displays group and the ship.
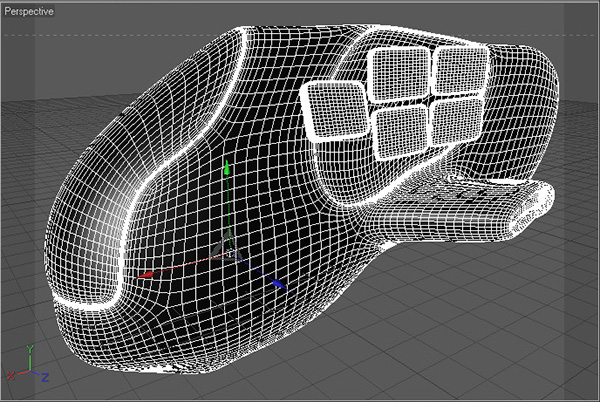
Assign the existing nozzle material to our new nozzles selection set.
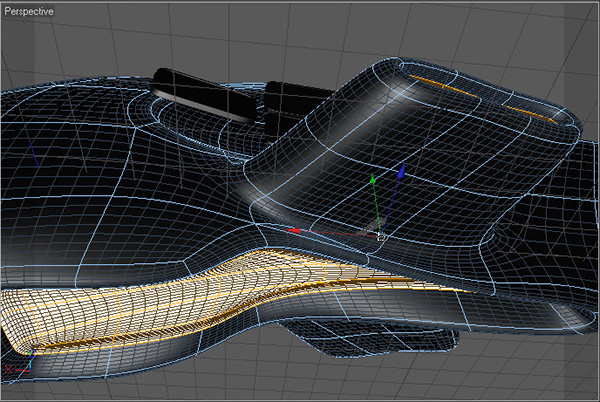
Assign the windshield material to the main windshield area.
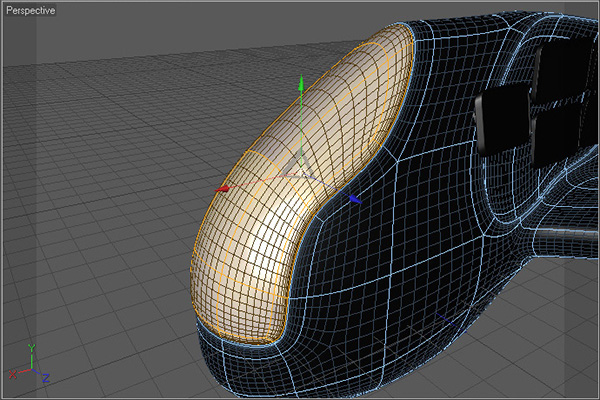
Finally, assign our static display material to any of the displays that you don’t want to be turned on in the final image.
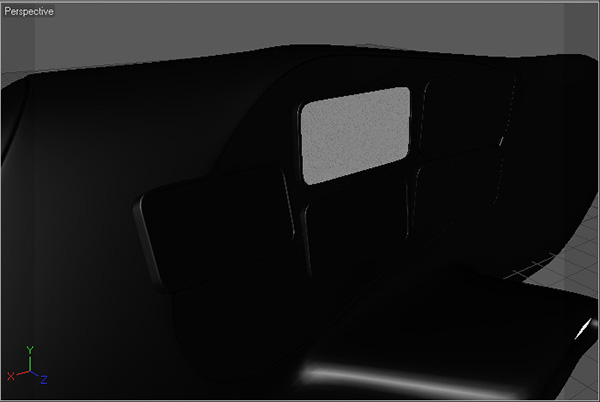
Now onto scene creation! First, create a Landscape object by going to Objects > Primitive > Landscape. In the Object tab of it’s attributes, change the Size to very large values (something like 65000x2500x65000), the Width and Height to approximately 200, the Rough Furrows and Fine Furrows to 100%, and finally the Scale to around 6.

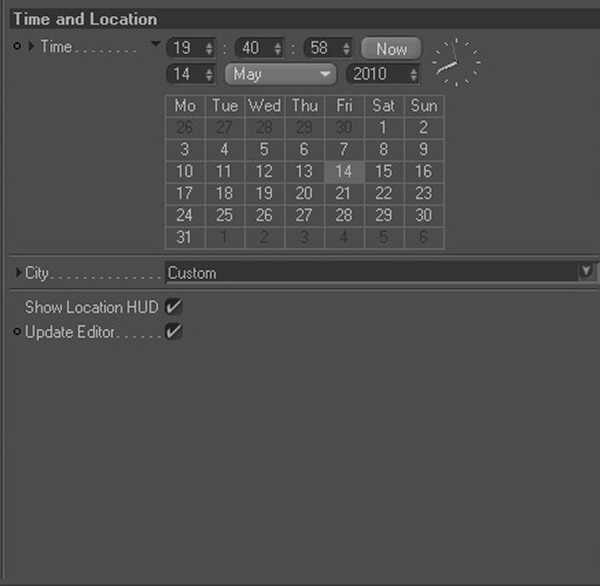
Create a Sky object by going to Objects > Sky > Create Sky. In the Time and Location tab of it’s attributes, change the time to a mid-evening, approximately 20:00. All of the other options are not important for now, however feel free to change them when experimenting with the final render!
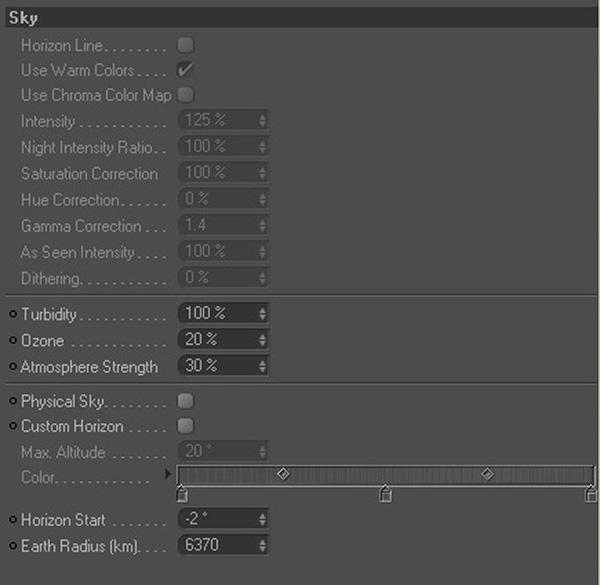
In the Sky tab, change Turbidity to 100%, Ozone to approximately 20%, and the Atmosphere Strength to around 30%. Then uncheck both Physical Sky and Custom Horizon.
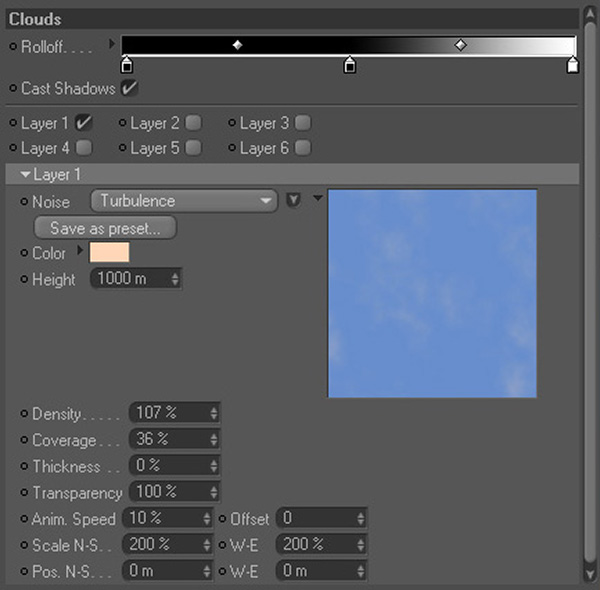
Back in the Basic tab, uncheck Sun and turn on Clouds. Head over to the Clouds tab, and add in a black to white gradient for the Rolloff as shown below. For now, leave only one layer checked and start experimenting with the options to get a look that you like! My settings are shown below :
Check Fog in the Basic tab and then head over to the Fog attributes tab. As we are not at ground level, we need to change the Start Height to a negative value; I used -1500m. Then change the End Height to around 3000-4000m, the Max. Distance to approximately 90000m, and the Density to around 35%. Add in a very big values for the Scale, somewhere around 2000%-6000%. Finally change Shadow density to 5% and the Illumination Intensity to 15%, to ensure that we can see it clearly in our final render.

To light our scene, we’ll create an Infinite Light by going to Objects > Scene > Infinite Light. In it’s attributes, change Color to very light green (in my case 239 246 244), Intensity to around 130%, and finally change Shadow to use Shadow Maps (Soft).
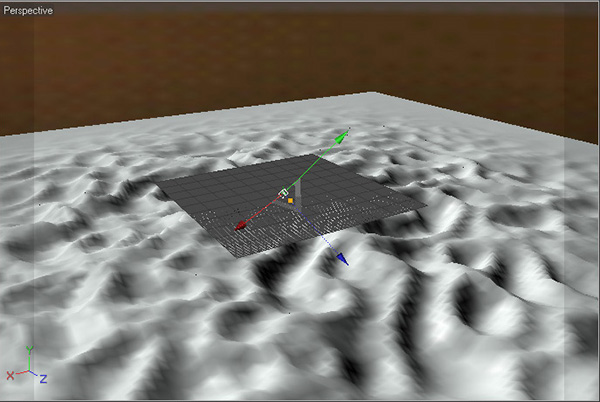
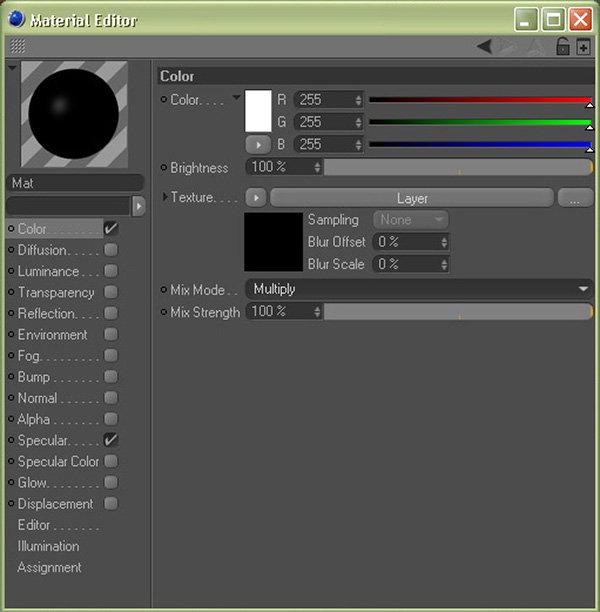
We’ll now move on to texturing the landscape. So first create another new material, change it’s Color to white, it’s Mix Mode to Multiply, and then add Layer in the Texture slot.
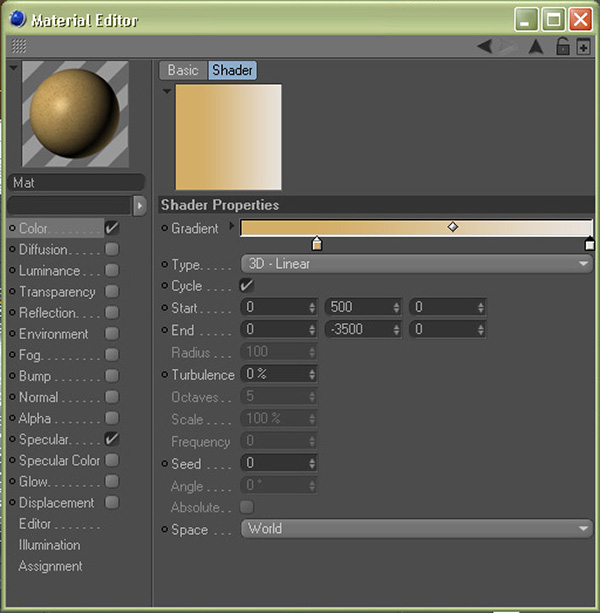
Click on the word Layer to access it’s properties, and then, using the Shader button on the Shader attributes tab, add one Gradient layer and 3 Noise layers. Click on the Gradient thumbnail and set it to be a dark orange to light grey gradient. Then change the Type to be 3D – Linear, the Start to be 0 500 0, the End to be 0 -3500 0, and the Space to World.
Click the back arrow to return to our Layer attributes. Go through each of the Noise layers and change the Scale and Type values to 400% & FBM, 50-100% & Poxo, and 10-30% with Buya noise, respectively.
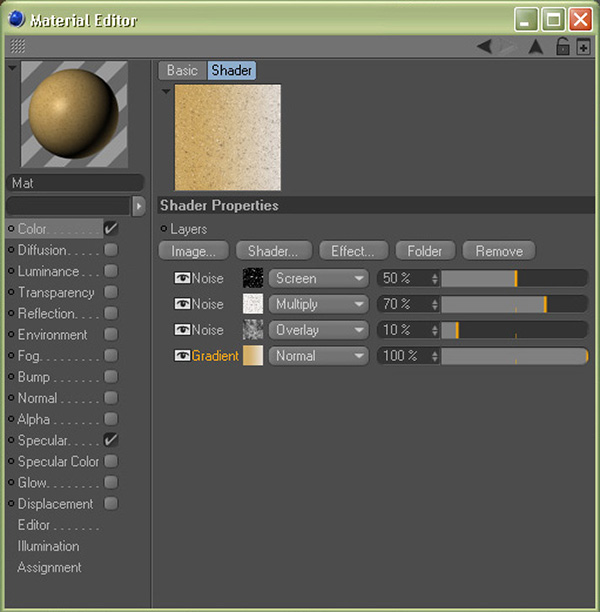
Click back again to return to our main material attributes, and in the Basic tab turn on Diffusion. In the Texture channel, add a Noise shader, and then alter it’s properties so that the Noise type is Luka, and the scale is somewhere between 600%-900%. Back in the Diffusion tab, set the Mix Strength to a low value, around 10%-20%.
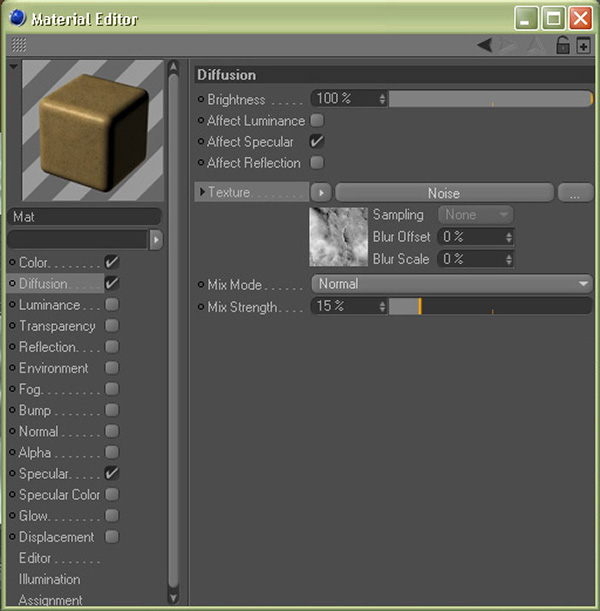
Back in our main material attributes, turn on Bump and change it’s Strength to approximately 70%. Add in a Layer shader in the texture slot. In the Layer shader’s attributes, add two noises as before, the first with a low-scaled Turbulence noise type, and the second with a high-scaled Stupl or Luka noise type.

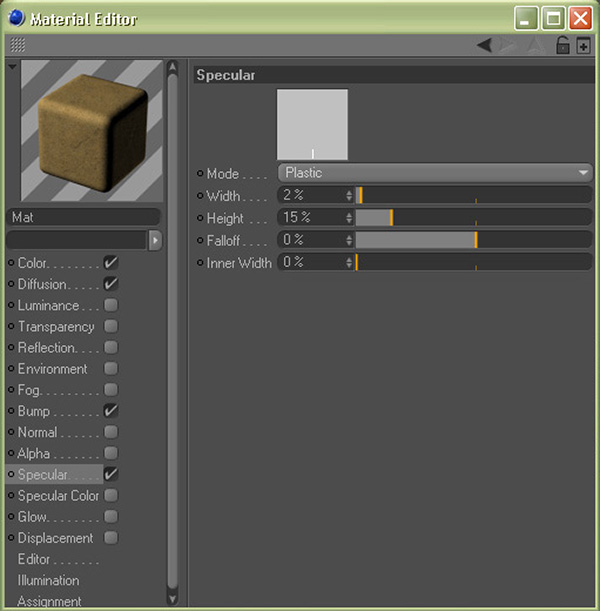
In the Specular attributes for our main material, change the Width to something very low (I used 2%), and then change the Height to 15%.
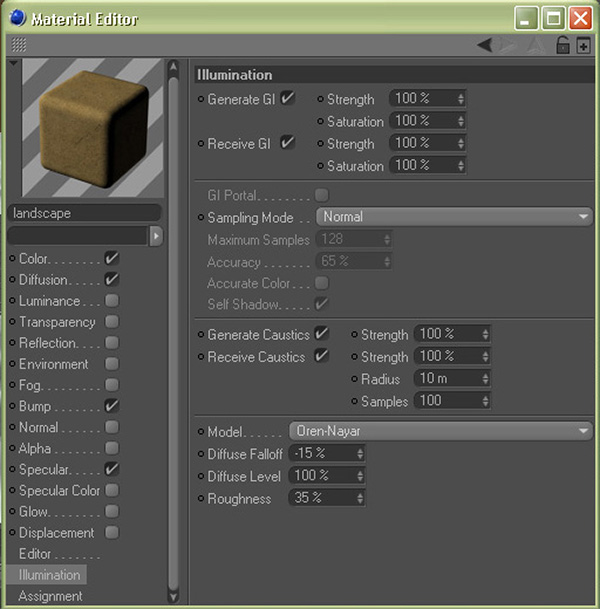
In the Illumination tab, change the Model to Oren-Nayar, the Diffuse Falloff to approximately -15%, and finally the Roughness to about 35%. Our landscape material is complete!
Assign our new landscape material to our landscape object, and then add the object to HyperNURBS.
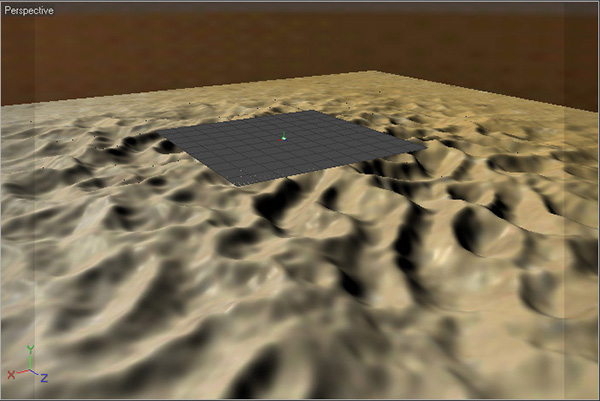
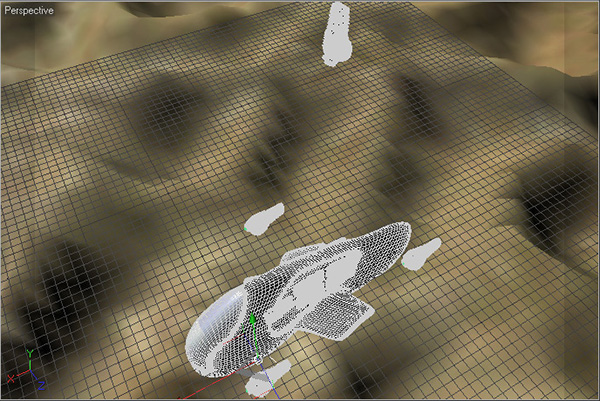
We’ll now finalise the layout of our scene. Position the Display ship and the Camera ships around it. Make sure that the cameras at the very front of the camera ships have good points of view, as this’ll become important in a second!
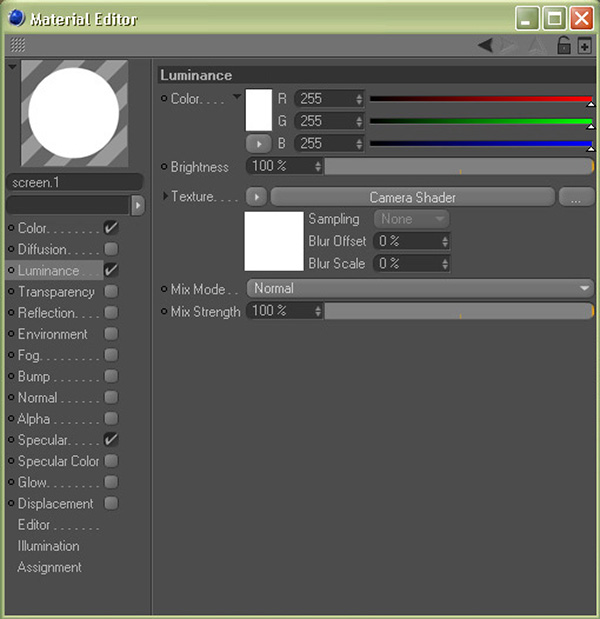
Create one final new material. Turn on Luminance and then in the Luminance attributes, add in a Camera Shader from the Mograph menu option as our Texture. Now duplicate this material for every screen you want to be turned on in the final render!
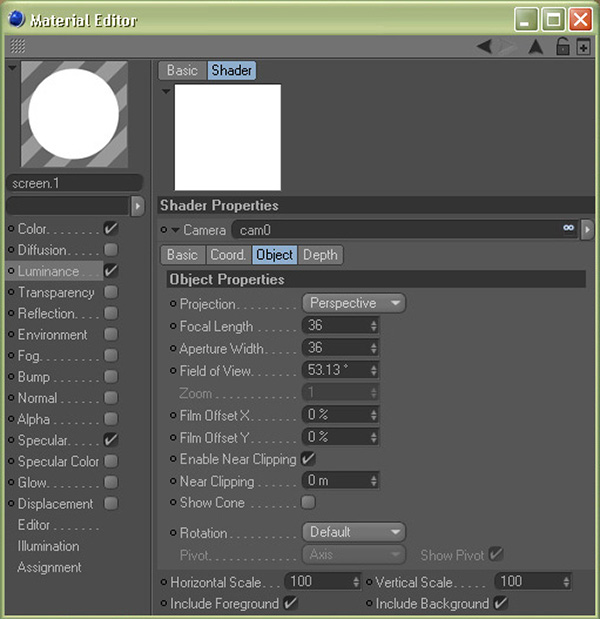
For each material with the Camera Shader applied, go into the Camera Shader attributes, and then drag the relevant camera object from the front of a camera ship into the Camera slot.
Final, assign the materials to the screens on the side of the main ship.
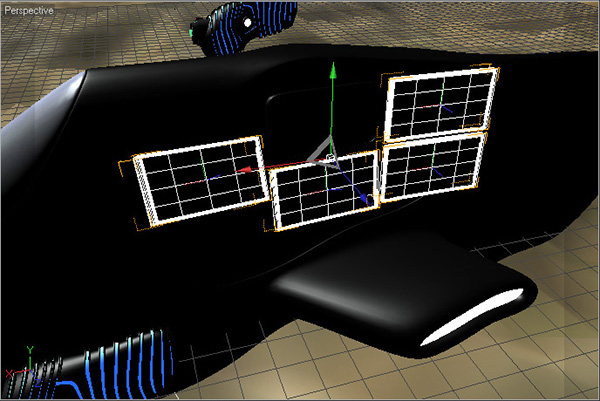
You’ll want to duplicate all of the ships several times so that they have something to reflect in the final render.
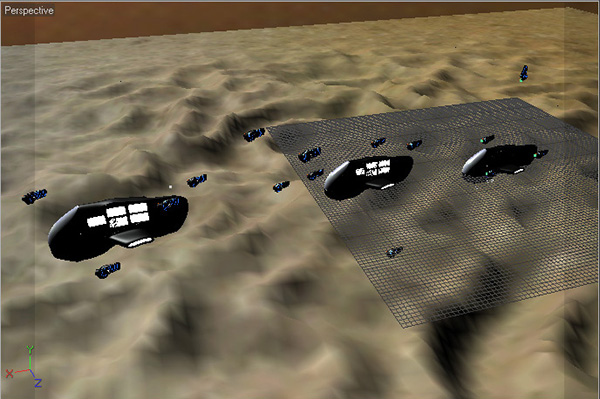
Choose a good point of view using the Editor Camera from the viewport Cameras menu, and once you’re happy, create a new Camera object. With the camera selected in the objects list, go to Tags > Cinema 4D Tags > Compositing to add a compositing tag, and then in the Compositing tag’s attributes, go to the Object Buffer tab and enable the first check-box. This will be used with the glow effect later on in the process.

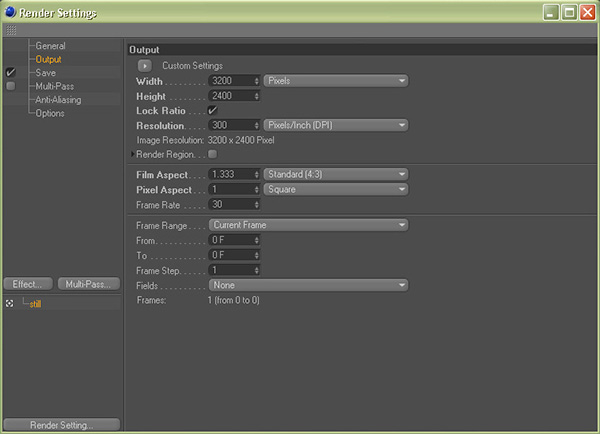
Now open the Render Settings by going to Render > Render Settings, or by hitting Ctrl+B. Tweak the Output and Save options as required. I typically save a Multi-Pass output in .PSD Photoshop format.
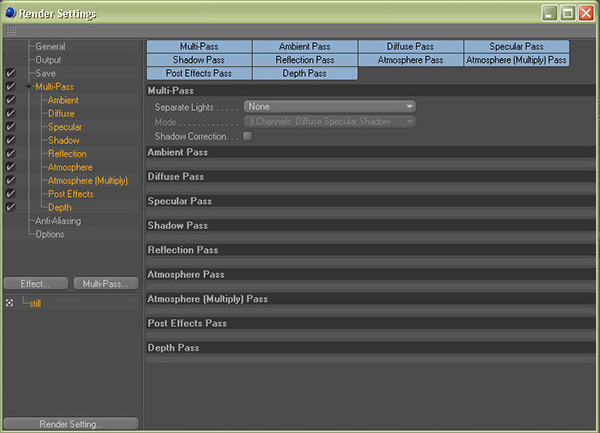
Now check the Multi-Pass option and using the Multi-Pass menu button, add in all of the used channels as seen below, along with the Object Buffer pass :
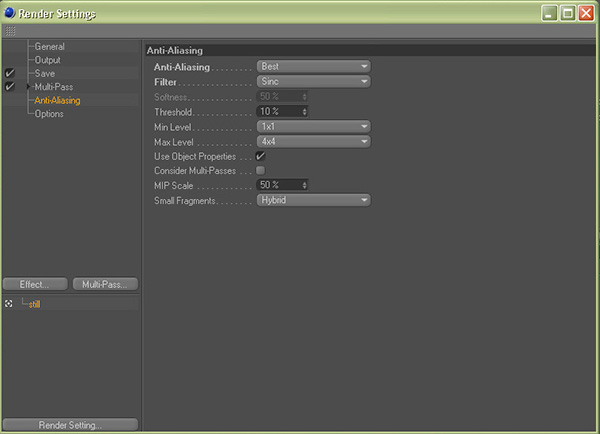
In the Anti-Aliasing section, change Anti-Aliasing to Best and the Filter to Sinc which should give us the sharpest results.
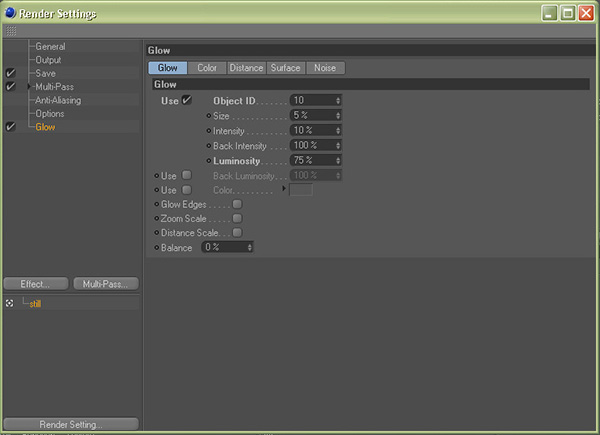
Select Glow using the Effect menu button to add the Glow effect to our scene. In the Glow settings, change the Object ID to match the Object Buffer number found in the camera’s Compositing tag. Here I’ve used 10, though by default this will be set to 1. Now slightly lower the Luminosity value, which will turn down the amount of glow in our scene.
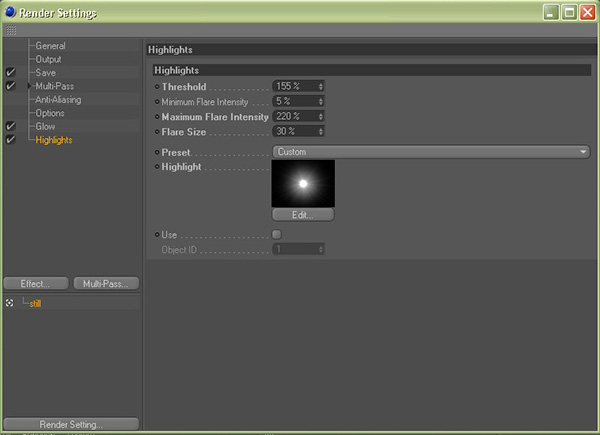
Just as with the glow, add a Highlights effect from the Effects menu button. In the settings, raise the Threshold value to around 150%, and then lower the Maximum Flare Intensity and the Flare Size values as shown. This is to prevent the final render appearing blown-out. Finally, choose a presets that you like or you could even create your own using the Edit button. We’re now ready to render!
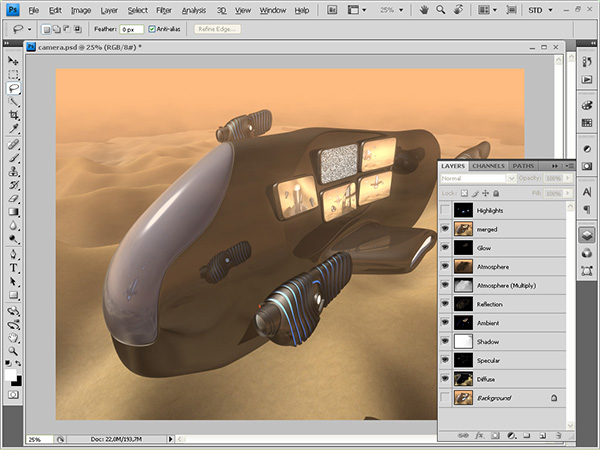
With our scene rendered it’s onto the final post-production! Open the rendered .psd file in Photoshop, and then merge all of the layers except the Highlights layer into a brand new layer by selecting them and hitting Ctrl+E (or CMD-E on a Mac).
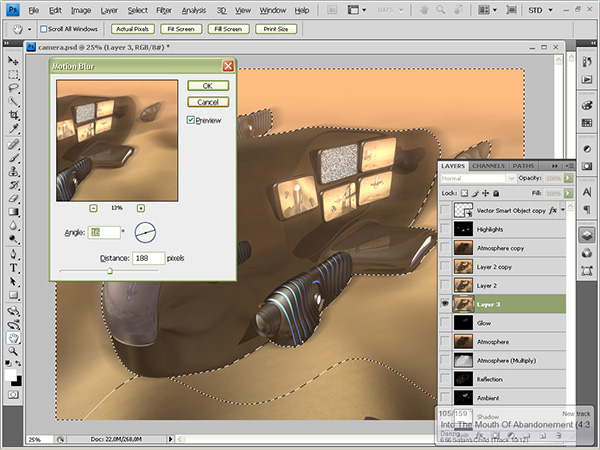
Now we need to add in some motion blue. First of all, switch over to the Channels tab and Ctrl+click on the Depth channel thumbnail. Then invert your selection by pressing Ctrl+Shift+i, which will select everything except the ships (we don’t want these to be blurred! With the merged layer selected, go to Filter > Blur > Motion Blur. In the Motion Blur dialog, choose an Angle that matches the ship’s direction and a large Distance value (I used something around 150-200 pixels). Click OK to apply.
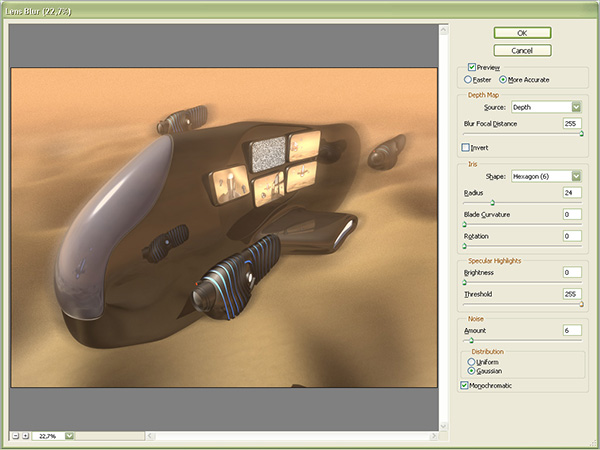
Now, deselect everything using the Ctrl-D shortcut, and then with the same layer selected, go to Filters > Blur > Lens Blur. In the Lens Blur settings, change the Source to Depth, change the Radius to approximately 25 and the noise Amount to around 5. Click OK to apply.
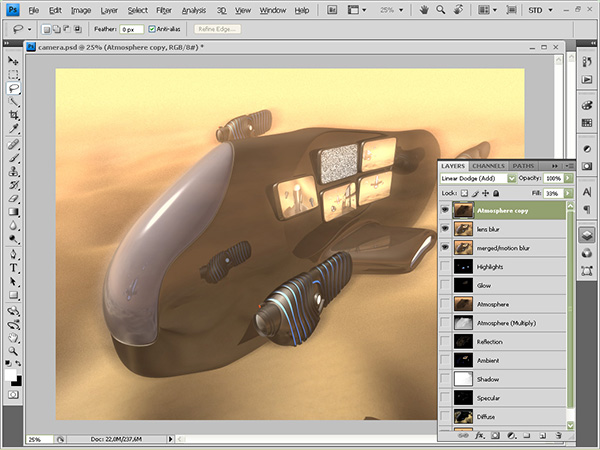
Duplicate the Atmosphere layer by selecting it and going to Layer > Duplicate Layer, and then clicking OK. Place the new copy on top of the layer stack and change it’s fill value to 30-40% to fade it out slightly.
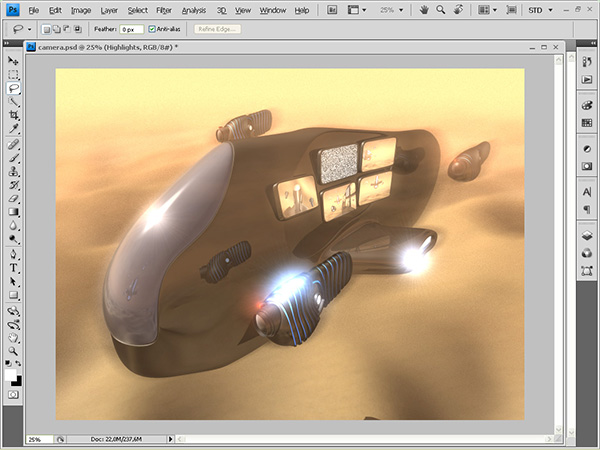
Finally, place the Highlights layer on top of the stack, and if needs be, erase some of the areas where they are a little overblown. The image is now complete! Feel free to leave me any comments below and I’ll try to get back to you when I can. Thanks!
Don’t miss more CG tutorials and guides, published daily – subscribe to Cgtuts+ by RSS.
It’s the weekend!
Put those quick recipes aside for a moment and relax with an ice cold beverage. Take the time…you’ve earned it.
My drink of choice is the frozen margarita. I’ve been drinking them for years and I’ve put that experience to good use; I have come up with the perfect recipe. This is an awesome drink to have at the end of a hard week at the office. Here, ladies and gentlemen, is my frozen margarita recipe:
Pour the following ingredients into a blender.
Run your blender until the liquid is a frothy mixture. Make sure you add enough ice so that there is a decent thickness to the liquid. Slice a small wedge of lime and coat the rim of your margarita glass with the juice. Pour some sea salt onto a dish and place the glass upside down so that the salt adheres to the glass rim. When your drink is through blending, pour into the glass and enjoy!
I believe that this will be the best margarita you have ever tasted. Take it from what my friends call me: Margarita Man.
We’re always on our way somewhere else. We hustle to get to work. Once we’re at work, we make mental to-do lists for chores we have to get done at home. When we make it back home, we’re often too exhausted to spend much time finishing up that to-do list. Instead, we mull over all the big projects coming up at work. The habit of constantly looking ahead to the next thing becomes a cycle of worry and stress that prevents us from appreciating the only thing we really have control over: the present moment.
Focusing on the present moment is the key for letting go of stress you’ve been carrying around. Instead of worrying about everything in your life, you can zone in on the task at hand. And often that task is a lot simpler than you may have thought. Once you get absorbed in what you’re doing, work can feel so much more satisfying. Instead of resisting and struggling, you become engaged, alert and involved.
Here are a few simple tips to help you find that sense of focus and increase your present moment awareness.Take It One Day at a Time
In the book How to Stop Worrying and Start Living, self-help guru Dale Carnegie encourages people to live in “day-tight compartments.” He uses the analogy of a ship to illustrate his idea. Ships are designed to have separate compartments that can be closed off in case of emergency, making the risk of sinking much smaller. If one part of the ship fills with water, you can simply lock off that compartment and continue on your way.
So often, we function like poorly designed ships. We allow one problem (or several) to fill up our whole minds and take over our lives. After awhile, we become immobilized with worry. Dale Carnegie’s solution is to take life one day at a time. Everyone can get through one day. When we take on more than that, we eventually run into trouble.
So try not to worry about your entire life. Don’t even worry about tomorrow. Just live today. Letting go of the need to manage your whole future can free you to live your life and enjoy the journey.
Your thoughts are powerful. Whatever you focus on tends to increase. If you focus on potential problems, they will become bigger and bigger. If you focus on the good things in your life, extraordinary blessings will start popping up everywhere you look. Your life may not be any different, but the way you look at your life changes the way you experience it. Plus, the whole self-fulfilling prophesy effect can play a role as well.
Helen Keller put it this way, “Keep your face to the sunshine and you cannot see the shadow.” What a beautiful reminder. Face the sunshine and start paying attention to what’s working. Celebrate the good things in your life whether it’s a new job prospect, a friendly co-worker or a steady paycheck.
A simple way to focus on the positive is to write out a list of everything you’re grateful for. While you’re at work, you can type it out into a word document. It doesn’t have to be anything elaborate, but taking the time to notice and appreciate all the things that are going right will make you realize how lucky you really are. Your worries will fade into the background.
This may seem obvious, but saying “thank you” is another great way to practice gratitude. When a co-worker successfully completes a tough project, say thanks. When the baristas at the local coffee shop make you a delicious drink, let them know you appreciate it. Building positive connections with the people around you reinforces your sense of well being. It makes everyone else feel better, too.
You’ve heard the saying, “The grass is always greener on the other side.” We know that once we get over there, it isn’t really greener. It just looks that way from a distance. The grass-is-greener myth prevents us from recognizing how good we’ve got it. Instead, we spend our time wishing for something better.
When you were in high school, you might have fantasized about how great it would be to be living on your own. You longed to experience more freedom and independence. But once you were on your own, you couldn’t help but think about how amazing high school was. No worries. No responsibility. No bills. If only you could go back!
That might not be your personal experience, but there may be other phases of life you tend to idealize. Maybe you think your life will really take off when you get married or get promoted or have a baby. While those goals are certainly worthwhile, don’t let them prevent you from appreciating the here and now.
Narrow down your focus to this day, this moment, this place. Then act. Get involved. Find what works. Give thanks. And be present.
Low Frustration Tolerance (LFT)
- Seeking immediate pleasure or avoidance of pain at the cost of long-term stress and defeatism.
- Short-term psychological hedonism.
- (Albert Ellis also jokingly called it “can’t-stand-it-itis,” as in “I just can’t stand it!”)
LFT is a peculiar form of self-defeating behavior: By habitually avoiding short-term frustrations, unaddressed issues and unfinished work grow into much bigger, much more stressful problems. As a sufferer of LFT continues to dodge small, tedious tasks, they inadvertently grow them into large, dreadful problems. Once the problems are bigger, the aversion to the work is greater, building an ever-growing mountain of work to be done (and an ever-growing mountain of stress to match).
High Frustration Tolerance (HFT), on the other hand, is a much better trait for productivity, not to mention mental health. Those with HFT can tolerate the frustration-filled tasks required to do their work and meet their long-term goals. While they’re not delighted with the short-term tedium, they have much bigger things to be happy about in the end.
What is your frustration tolerance? Have you run into “can’t-stand-it-itis” at work?
We’ve discussed corporate speak and touched on buzzwords in the past here at WorkAwesome, but haven’t been able to provide you with a full demonstration of them being put to practice.
That is, until now.
This guy seems to have them all down…
(Video courtesy of TVO’s Search Engine with Jesse Brown.)
I’m getting married.
Yes, I’m thrilled. It’s going to be a small wedding on the shore of the lake. Beautiful spot for a beautiful day.
I’m pretty busy with the wedding planning. Even though it’s going to be small, we still have almost all the elements and decisions that come with a big wedding. Perhaps this is as unromantic as you can get, but it seems to me we’re using project management skills to do all of this. We have calendars, file folders, checklists and meetings.
This is a product launch to be branded as “Mr. and Mrs. Carl Natale.”
Here’s what we’re doing that you can apply to your next project:
That would be my fiancée. She has a head for details and an eye for design – and I’m more than willing to let her run with it. The decisions are ours but she makes them happen. Although she has final authority, she works with me on decisions and we have consensus.
Takeaway: Although someone needs to be in charge, the project manager doesn’t have to rule with an iron fist.
We would like to handle as much as possible but we don’t have the time or skill to pull all this together. We’re bringing together a caterer, florist, photographer, officiant and invitation designer. To find them we researched the web, scoured wedding publications and asked for recommendations from our networks.
Takeaway: Now that they’re hired, we keep in communication to develop a relationship. As the big day approaches, we have become more familiar with each other. This should help keep things running smoothly.
Since I’m a writer, I assumed we would be writing our own vows. But as we talked to our officiant, we found out we could create almost the entire ceremony. Writing is in my wheelhouse so my fiancee handed that off to me. I can’t bake a cake or arrange flowers, but writing the ceremony is my gig.
Takeaway: Make the best use of the talents and passions you have in-house. Better yet, make use of their time as well. You’ll likely have some people who are excited to tackle some major aspects of the project.
I’m a Google Calendar kind of guy. She lives by the month-by-month hanging in the kitchen. I keep an eye on hers for additions and add the appointments to the Wedding calendar I created online. That and constant communication keep us aware of deadlines and appointments.
Takeaway: People work best with different productivity tools. Make sure you can share information despite the difference in tools.
The wedding day is a deadline written in stone. It all needs to be done by then. We can’t move it because the flowers won’t be ready. Everything else before then may be kind of flexible. But every delay will make it harder to squeeze everything in before the wedding.
Takeaway: Having a hard and fast deadline is wonderful motivation for getting everything done in a timely manner.
If you take a similar approach to big project as we have with our big day, you’ll have great results and enjoy the path you’ve taken to achieve them. With a solid foundation in place, they’re also more likely to have a lasting effect.
When I was living in the United States, we had 2 weeks off per year as standard vacation time – although I did work somewhere where we only had 1 week off. Not so in Europe.
Many countries there give employees 5 or 6 weeks off per year. The argument for more time off is usually supported by the fact that everyone needs time to:
Those who support less time off have argued that with too much time off, people cannot concentrate once they’re back in the office.
So, are you for more or less time off for vacation? How much time do you need to recharge your batteries?
As a result, I’ve written another installment to our Google Reader tips which offers 5 cool links that have some great tricks and tools for this feed reader.
A superb Firefox add-on for Google Reader developed by none other than Lifehacker’s founding editor, Gina Trapani.
A nice trick that utilizes a greasemonkey script to show the partial feeds as full articles in Google Reader.
A comprehensive guide on using Google Reader to track backlinks, alerts and competitive intelligence.
This is an old one but still quite useful. It explores various Google Reader tricks and tools to use it more productively.
Yes, you could directly download important articles from Reader as PDF for reading later. The guide explains how to do it.
Feel free to add any Google Reader tricks and tools you have in your arsenal in the comments!
After reviewing the Bokeh Masters Kit a few weeks ago, I’m pleased to let you know that we have three Masters Edition kits to give away to a few lucky readers! Read on to find out how to enter.
What the Bokeh Master’s Kit does is change the shape of the bokeh in an image by filtering the light through a custom-shaped hole on the front of your lens. It can lead to some beautiful effects, and you receive plenty of different styles:
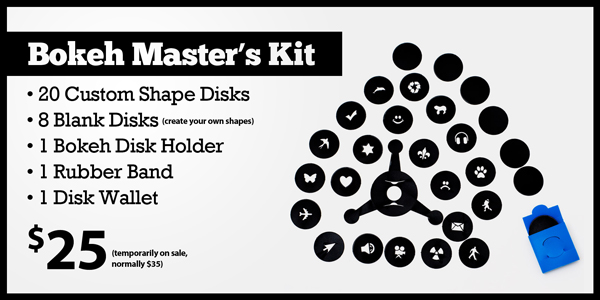
To find out more, our review is a great place to start, or you can visit the product’s website.
Entering is really simple. All you need to do is leave a comment below! We’ll select the winning comment at random when the competition closes.
Make sure to include your correct email address with your comment so that we can contact you. This giveaway is open worldwide, but make sure to get your comment in before midnight on Saturday 24th July, Pacific Eastern Standard Time. We’ll be in touch with the lucky winner shortly after then, and this post will be updated to let you know who won!
Sorry about the incorrect date when we launched the competition – it’s now been updated! Thanks to everyone that pointed this out.
Please Note: Envato staff or people who have written more than two articles or tutorials for Phototuts+ are ineligible to enter.
Good luck, and be sure to subscribe via RSS or follow us on Twitter to find out if you’re a winner!