In today’s Quick Tip, I briefly explain the history of and logic behind a color’s hex value. Jump over to Aetuts+ to check out this video that explains Hex Value. Enjoy!
Freelance Projects, Design and Programming Tutorials
In today’s Quick Tip, I briefly explain the history of and logic behind a color’s hex value. Jump over to Aetuts+ to check out this video that explains Hex Value. Enjoy!
Today, we have another Vector Premium tutorial exclusively available to Premium members. If you want to learn how to create a poster design, in the style of 1950′s air travel tourism. We’ll take a look at the typographic qualities and composition of late 50′s posters, then utilize modern digital rendering techniques to create an illustrated Australia tourism ad campaign.
In the following tutorial you will learn to create a lollipop icon. By using some simple shapes and the Distort & Transform function, you will see just how easy it is to make a great looking icon.
Continue reading “Quick Tip: How to Create a Simple 3D Lollipop Icon”
In this tutorial I will showcase three different approaches for creating simple 3D lettering effects in the context of poster design. Onward and upward we go!
Continue reading “Create a Variety of 3D Lettering Effects for Poster Design”
Just because you missed that awesome conference, doesn’t mean that you can’t still watch the lectures! This weekend, we feature an inspiring talk that Scott Kim did at TED. He designs puzzles in the spirit of MC Escher’s art and Tetris. They are visually stimulating and suffused with broad appeal. He shows examples of his thought provoking work.
In this Quick Tip tutorial you will learn how to use Illustrator to make a simple web form design. By following a few easy techniques you will have clean and modern register form in no time!
Continue reading “Quick Tip: How to Create a Simple Register Form Design”
Choosing the right paper for your printed media can be tricky. Paper tells about the function of the product, it’s feeling and quality. Therefore it’s a crucial part of the overall experience of your final product. Best of all is to start thinking about the choice of paper even before you start your work on the computer, not only to get the feeling right but also because of printing issues and costs. You can then optimize the production and design according to the paper of your choice. Here are some of the things to keep in mind about the use of paper for your printed media production.
The first month of the year was a very busy one for Tuts+. Here’s a catch up of the Editor’s picks from each site in case you missed them!

This month, Anton Vasilescu began his amazing three-part series focused on the creation of a ‘Blueprint Manager’ script in 3D Studio Max. The script allows for a “one click” solution to the time consuming and often challenging task of setting up blueprint images inside the 3ds Max viewports. This is a must see tutorial for any 3ds Max artist interested in learning to utilize the power of MAXScript, a skill that will allow you to tackle many of the repetitive tasks you face on a day to day basis, tremendously improving your productivity. Let’s get started!

This month also marked the launch of Cinema4D master Aleksey Voznesenski’s two-part Xpresso series. The focus of this series is the creation of a dynamic high-rise building asset using C4D’s powerful Xpresso expression system. Speed up your work flow by harnessing the power of this amazing, fast and flexible system!

Abstract scenes are fairly common these days, however there is no denying their usefulness when it comes to learning animating, rendering and compositing techniques. January saw the release of part 1 of this brand new, two-part tutorial, were C4D artist Benoit Lavoie-Lamer shows us how to create a amazing-looking (yet strikingly simple) abstract scene, by first creating the scene in Cinema 4D and then heading into After effects for the final compositing. Enjoy!
More and more relative beginners are taking on their own mastering. This is great but if you plan to get the job done yourself there’s a few key things you should know before starting your first mastering sessions.
One of the key things to look out for is the final level of your finished master and the amount of reduction to your music’s dynamic range. In most cases you will only need to look to your final limiter to address both of these issues. Let’s take a look.
This is a true gem for Mac users especially when most DAWs do not allow you to use multiple audio interfaces. This can be very useful if you have multiple audio interfaces and want to use them together for more simultaneous inputs and outputs. I am sorry about this tutorial will only apply to Macs so Windows users are out of luck.
Most of the world use Windows computers, so the chances are you’re one of them. So if you want to produce music on your computer, what are your options? Fortunately there are a heap of them – most of the big name digital audio workstation software works fine on Windows, and they’re not your only choices. So sit down and take a menu. We list the “big gun” software you can choose from, some inexpensive (less than $100) alternatives, and a few free options.

Have you ever wanted to know what a Giraffe looks like without its spots? If so, this tutorial is for you, you pervert! This tutorial will demonstrate how to undress a giraffe by removing its spots. It will then show how to turn its spots into an outfit that will be draped over an ironing board. Pretty cool!

This quick tip tutorial we will demonstrate how to create a chrome 4×4 vehicle emblem using editable text and layer styles.

We’ve all seen histograms in Photoshop but very few of us probably actually know what they mean. In this tutorial we will explain the Histogram panel; specifically the Shadow/Highlights and Levels adjustments.

Two common misconceptions about Flash Professional: first, you have to buy it in order to make Flash apps and games; second, it’s a decent tool for writing code. Totally untrue.
In this article, we’ll see how to use the free Windows application FlashDevelop to work on Flash projects — both with and without Flash Professional.

When working with Flash and Actionscript 3.0 you may often find yourself repeating code from one project to the next. Creating your own library of reusable code snippets (on snipplr.com for example) is a great way to speed up development. Check out these 15 snippets which you may find useful for integrating into your own code library.

During this tutorial, we’ll use the Project Panel in Flash to create a vertical animated AS3 menu. The whole process will allow you to easily customize all aspects of the menu using the parameterized constructors. Read on to learn more!

Today we will create a poster in the style of PSA (Public Service Ad). These ads are intended to develop new social values. Philippe Patrick Starck, an iconic designer, said: “The designer can and should participate in the search for meaning, the construction of a civilized world.” Well, let’s participate.

Illustrator’s Blob Brush is an intuitive and versatile tool. When used with a graphics tablet, you can create loose, painterly images that venture far from the sharp, clean lines usually associated with vector graphics. These files retain all the benefits of vector files, however, allowing you to experiment and be flexible with scale, color and composition.

In this tutorial I will showcase three different approaches, which result in three different script lettering styles. We will start with a nice simple basic script, touch on a more athletic inspired lettering style and work our way to a classic, fancy script.

Flowers are a beautiful and popular subject, but taking photos of them outdoors is often a frustrating process. You have to wait until the flowers are in bloom before you can even start, and then you are at the mercy of the light and weather. But there’s an easy way to take photos of flowers at any time of the year, no matter where you live take them indoors, where you can control the light and the background. That’s how I took this high key photo of a lily, and in this tutorial I’m going to show you how I did it.

When you look around at TV ads, movie posters, billboards, you see a lot of great styles of photography. You may wonder to yourself, how do they make it look so unique? Well with this tutorial, we hope to demonstrate how you can achieve a very commercial look to photographs through the use of strobes, lighting modifiers, lighting techniques and post-processing!

It’s easy to forget that cameras weren’t always defined by megapixels and the quality of their digital sensors. Once upon a time, photographers had to pay for every photo that they took, and they couldn’t see them for hours or even days after the shoot.
Today we’ll pay homage to the countless cameras that have come and gone, paving the way for our beloved modern DSLRs. Below we’ll take a look at modern images of over a hundred beautiful vintage cameras (along with a quick history lesson!)
This project steps through the basics of path finding in the Corona SDK via the A* path finding algorithm, a staple in the game industry since about 1970. This app lets you add obstacles to a 10×10 grid and view the path determined by A*.
Perhaps you’ve heard about augmented reality—it’s a hot topic in mobile right now. Learn about what augmented reality is and how you can leverage this technique in your Android applications in this introductory article.
In this article we will go through some very basic design topics for the Android platform. Aside from the documentation provided by Google, there are very few resources that provide a high-level view of designing Android mobile apps. This article will make it easy to understand the nuances of Android user interface design.
Today we’ll go over setting up our scene and preparing it for keyframe animation. We’ll begin to build the elements of the V.A.T.S effect such as the outlines, grids, and percentage boxes.
In this tutorial I will show how to create a logo transformation template that can be re-purposed and features the ability to drop in any logo and have the effect and shadows update automatically… similar to something you might see on Videohive. Then, to finish off we will build a simple 3d environment plus some additional scene elements.
Continuing our Aetuts+ Hollywood Movie Title Series, today’s tutorial will explain how to make the “Inception” flying logo style, using Cinema 4D 11.5 and After Effects. In Cinema, we’ll be modeling a maze logo, then using Mograph module (Cinema 4D 11.5 v.), we add the buildings inside of the labyrinth scene. We’ll follow in After Effects putting together the final composition.
Designing for the ‘fold’ has long been a priority for many Web Designers, but with so many devices capable of displaying your website, how on earth do you know where it is? Should we be worried? This article asks how important the ‘fold’ actually is, the variables at play, changing browsing habits and what you can do about it. The Death of the Fold is upon us, at last!
Whether or not web designers should know how to code is a question that’s been around for over a decade now… and one that most designers have agreed on more or less: Yes, web designers should know at least a little bit about HTML/CSS… But as new standards, formats, and languages have been developed, the stakes of this question have gone up quite a bit… so, should modern web designers know how to code?… and how much should they know?
Now Updated with a Coding Tutorial and the free PSD! In this tutorial we’ll be using Adobe Photoshop to design a sleek web interface that can be used for any mobile app website. We’ll be covering an array of techniques including shapes, textures, masks, custom icons, typography and much more that can be easily adapted and applied to your own web designs.

Ever wondered how you can write JavaScript with object oriented principles? Had a hard time understanding prototypes when working with constructor functions? Tried to write JavaScript that would do your laundry? This tutorial is here to help you answer all those questions, and more (actually, you’re on your own for the laundry). With both a written tutorial and -3 hours of screencasts (1280×800 HD).

In this tutorial and screencast, you’ll learn how to turn that old computer you have lying around into a full-featured test bed for your websites! We’ll set up a typical LAMP server with Ubuntu Server 10.10, using Apache 2, PHP 5 , MySQL 5.5 and SQLite3. We’ll also build in support for your Ruby on Rails 3 apps!

This is a premium toolkit designed specifically for bootstrapping entrepreneurs and small business owners who are operating on a budget and canÕt afford to work with a professional graphic or web designer yet.
At the end of 2010, we released an exclusive Mac utility app, called Structurer. This app allows you to rapidly create file/folder structures for your new projects. Less than a month later, the developer, Cesar Tessarin, is back with a much improved version which now provides support for template creation, as well as assigning custom content automatically to newly created files. It’s fantastic, and, even better, 100% free to all of our readers!
There’s an old adage – dating back to the 1700s – which, in English, says: “A kitten dies each time a PHP programmer doesn’t follow best practices.” Okay, not really; but just go with it!
Getting started in PHP can be a daunting experience. With that in mind, these 20 tips will teach you how to follow best practices, and save lives…kitty lives.
For the last three years, I’ve had the pleasure of managing Nettuts+ – a site with 80,000 subscribers, and over 3 million page views each month. In that course of time, I’ve learned a great deal about, not only what it takes to build an active community, but also the economics of running a sustainable and profitable blog. I’d like to share some of these lessons with you today.
At Audiotuts+ we regularly put up a reader track for workshopping and critique (find out how to submit a track). This is how it works: you upload your song, and every week or so we’ll publish one here and step away from the podium. The floor is yours to talk about the track and how the artist can fix problems in and improve upon the mix and the song.
This track has been submitted for your friendly, constructive criticism. They have put their track (and their heart and soul) in your hands to learn and get useful feedback.
Description of the track:
Ambient Indie Track.
Download audio file (EasttwoWestrev4tight.mp3)
Terms of Use: Users can stream the track for the purposes of giving feedback but cannot download or redistribute it.
Have a listen to the track and offer your constructive criticism for this Workshop in the comments section.
Need constructive criticism on your own tracks? Submit them using this form.
Hi everyone. In this tutorial we are going to create a growling pad that has a slow but sharp attack and has motion in the sustain and release. For this tutorial I will be using FL Studio’s Sytrus but any FM synth can work as long as it can have tempo based envelopes. Here is an example of what we will be creating…
Download audio file (final.mp3)
First reset your synthesizer to the default patch so you have nothing but a basic sine wave. Go to your first operator (FM synthesis version of an oscillator) and create a saw wave. Offset the shape of the saw so its slightly skewed on the ends; a value of 45% in Sytrus. For those of you who do not have a shape value the saw should start to become a triangle wave. The volume envelope should be set to tempo based time and the attack, decay, and release are as follows…
Here is what it should sound like thus far…

Download audio file (step_1.mp3)
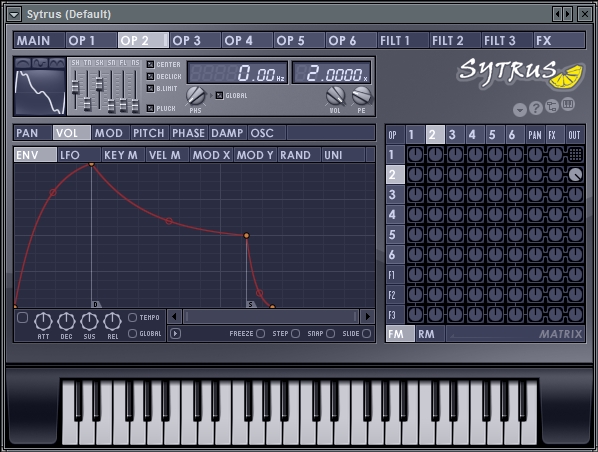
In this next step we will create the two sounds that will modulate our original and help give it some motion. The settings for operator 2 are as follows…
This is what operator two should sound like…
Download audio file (step_2_1.mp3)
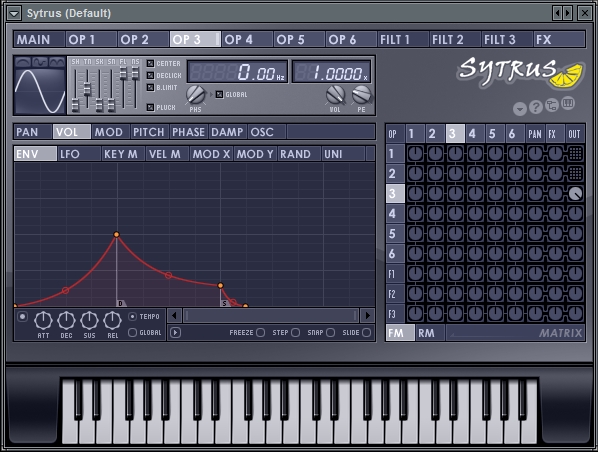
For operator 3 start with a sine wave and bring the noise fader up to maximum so its complete white noise. The frequency ratio should be set to 1.000 instead of the standard 2.000 The volume envelope for operator three should be set to tempo and is as follows…
Here is what this operator should sound like on its own…
Download audio file (step_2_2.mp3)
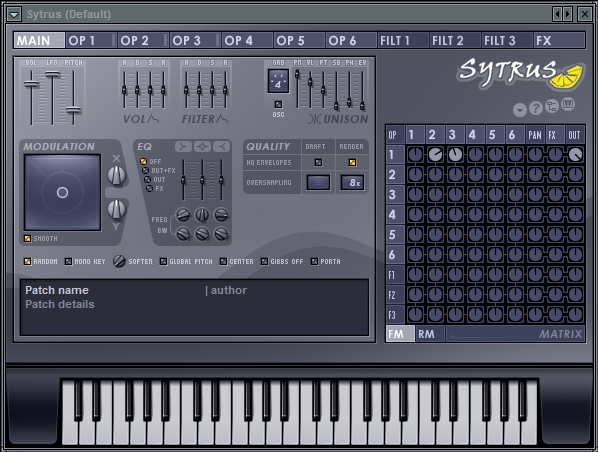
Next we need to apply our operators 2 and 3 to our base sound in operator one. Operator 2 going into operator 1 should have a value of 47% and operator 3 into operator 1 should have a value of -12%. Make sure you turn off operator 2 and 3 from going to output; they are only suppose to modulate operator 1 and not be heard. In the main menu turn down the master pitch down 12 semitones (one octave). In the main tab turn the unison on with an order of 4. Leave the values as is if you are using Sytrus. If you do not have Sytrus the values are as follows…
This is what we have so far…
Download audio file (step_3.mp3)
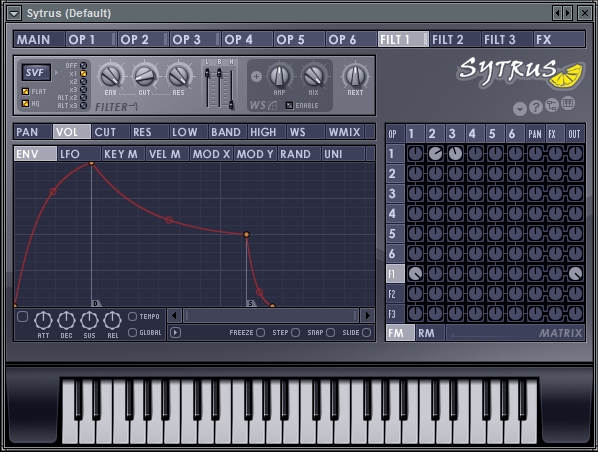
Now that we have crafted the core of the sound we need to filter it to change the timbre. Send operator 1 to the filter 100% and turn on the filters output (make sure the output of operator 1 is shut off now). Next set the filters envelope control to 100%, the cut to 10%, and the resonance to 100%. Adjust the Low, Medium, and High bands so that the Low and Medium are at 100% and the High is at 0%. This is what are sound should sound like at the moment…
Download audio file (step_4.mp3)
Kind of boring right? That is where envelops and LFOs on our filter come in!
To make the sound more interesting we are going to give the cut a little envelope and a tiny bit of LFO at the same time. Let’s start with the envelope by setting it to tempo based time and using the following values…
Here is what it sounds like and what we have so far…
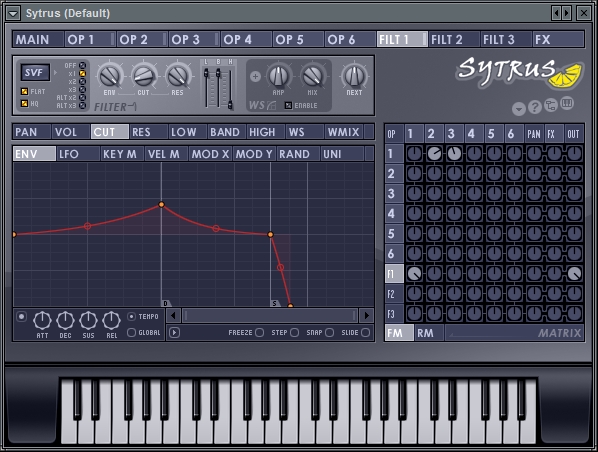
Download audio file (step_5_1.mp3)
Now we need to add the LFO to the cut as well. To do this we are going to use a LFO and envelope combination to control how much and when the LFO will act. Once it is set tempo based time use these values…
Here is what we should have now; notice the little movement from the LFO.
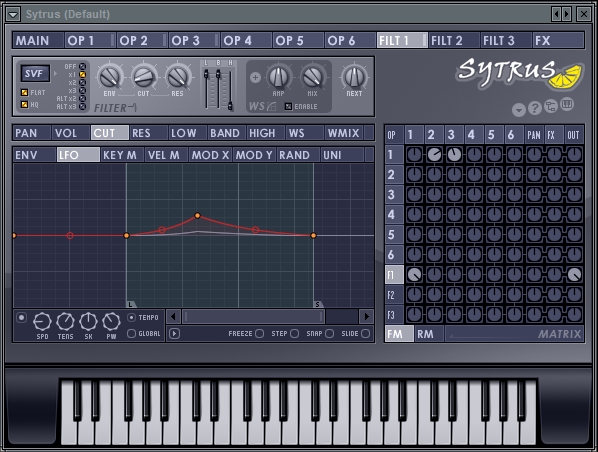
Download audio file (step_5_2.mp3)
The last part of our filtering will involve using a envelope controlled LFO for the resonance. Just like before, using a envelope controlled LFO will help us create more motion and when the LFO actually occurs. Per tradition at this point, set the LFO to tempo and follow these values…
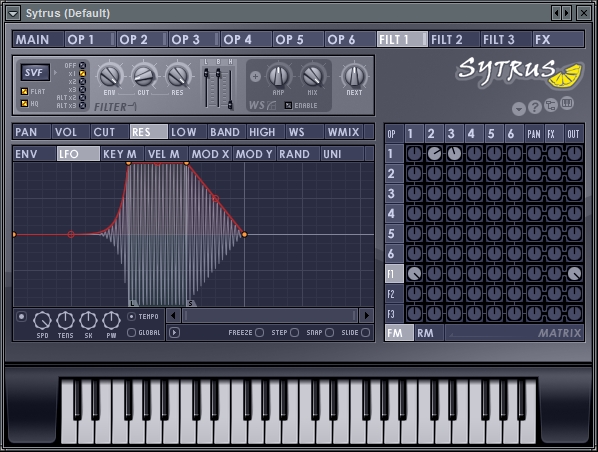
Download audio file (step_6.mp3)
Now that we have some good motion in our sound we need to really flesh it out with some more effects. Start by sending the filter to the FX channel 100% and bringing down the main filter output to about 65%; this way we blend a little bit of the filtered sound in. Under our FX select the chorus and make sure it is a four voice chorus. For Sytrus users, the default settings for chorusing are fine, and for those of you who are who are using another synth here are some guidelines…
Next under the delay tab we need to enable the delay and set it to tempo based delay. For the delay set the feedback to 50%, set the time for 5 seconds, and set the volume to 45%. Move on to the reverb and set it be a warm dark reverb and adjust the length to taste.
Here is what we have now…
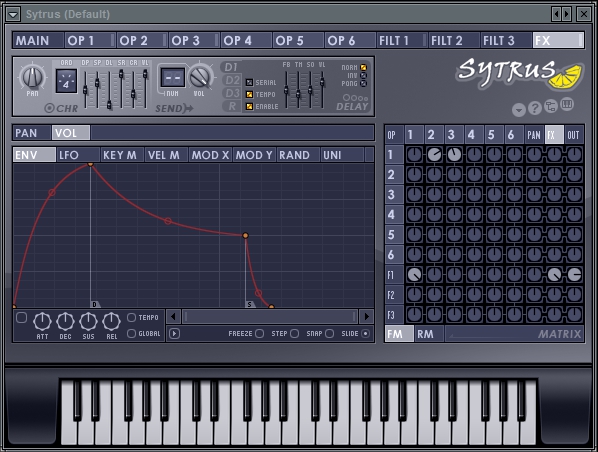
Download audio file (step_7.mp3)
Now that we have created our sound we should create more control over it. To do that go to the resonance and set it so that it can be controlled by the modulation matrix on the X-axis. Next select the cut and set it so it can be controlled on the Y-axis of the modulation matrix. Now by shifting the location of the modulation matrix we can achieve different sounds. Here is one example…
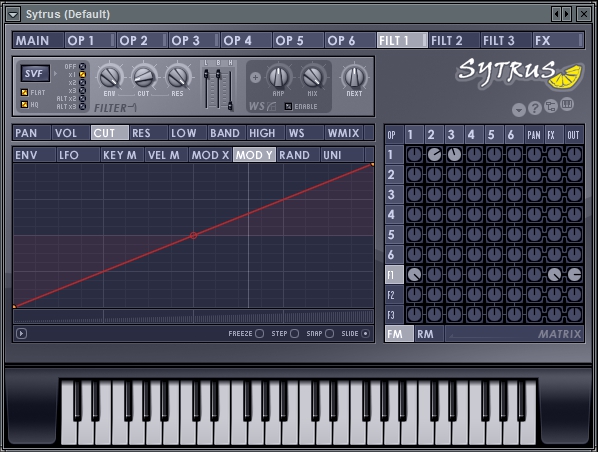
Download audio file (step_8.mp3)
Well that about does it for this sound. Play around with the effects and the modulation matrix as well as the tempo of your song. Remember we tempo based almost everything so a lot of it will change with the tempo of your song (for the reference I was working at 90 BPM). I hope you enjoyed creating this sound and learned a little more about the process of creating a pad!
Do you remember the first time you sat down at a computer or some recording device to create some music? Tell us about it. Were you alone with friends? What role did you play? How did the song turn out? How addictive was it?
Each week we open our mic to readers and lurkers alike to come out of the woodwork and tell us your thoughts and opinion, your experiences and mistakes, what you love and what you hate. We want to hear from you, and here’s your chance.
In December West Latta started an impressive series on getting into the Game Audio business. Today the series continues with twice the detail and double the insights—as a Premium tut. In Part 2 has a detailed look at an all-important (and much-neglected) topic: marketing. If your serious about getting into the industry, don’t miss it!
To learn more about what you get as part of Audio Premium, read this. To take a peek inside this tutorial, hit the jump!
If you’re new to the Games Industry, you may ask yourself, “Why should I focus on ‘selling myself’ when I have only limited relevant experience and little-to-no hands-on experience? Shouldn’t I spend time learning the trade before I try to break in?” The answer to the second question is, “YES,” but it doesn’t negate the answer to the first question, which is, “Your image is one of your most valuable assets. The more polished you are from Day 1, the more likely you are to be able to find the experiences necessary to break in.” Let me explain further…
Let’s say that you want to open a new restaurant in your neighborhood. You research the market, and decide that a sushi bar would be very successful, and you’ve always been interested in Japanese cuisine. So you spend a small fortune getting your lease, setting up shop, hiring staff, stocking your coolers, and you’re ready to open. You open the doors and…only a few customers. What happened? You forgot something VERY IMPORTANT: marketing.
Existing Premium members can log-in and download. Not a Plus member? Join now.
In this tutorial, I will be using the Malstrom synthesiser in Reason to create electronic tones that can be used while designing engine sounds for vehicles in the sci-fi genre of film and other video based media. The Malstrom synth is extremely versatile and its modulators are perfect for creating post production sound effects. The following example will demonstrate the starting point and fundamental structure of sound synthesis for a sci-fi vehicle: the tone, shape and character of the engine sound.
Download audio file (example.mp3)
The Malstrom is a graintable synthesiser that uses a combination of granular and wavetable synthesis to produce sound. The wavetable element of the synths oscillators are ideal for producing sound effects of this nature, as the variation of tone and modulation adds a sense of realism to the synthesised sound.
For designing the engine sound of this sci-fi vehicle, I will be creating two layers: bottom and top. The bottom layer will contain all of the bass energy, being the main body of the synthesised sound; the top layer will add presence and more character to the overall tone. Firstly, create a Mixer and a Malstrom in the Reason rack and draw a one bar note as shown below.

Drawing the note clip
In Oscillator A, select the ‘Saxophone’ patch from the dropdown menu and reduce the Shift parameter of the oscillator to -48. Enable Oscillator B and select the ‘Tibetan Monks’ Patch from the dropdown menu. Adjust this oscillators Shift amount to -16 and change the Motion control to -34. Reduce the volume of Oscillator B for balance and then use the Cent controls to slightly detune both oscillators for a thicker sound. Finally, increase both the attack and release parameters in the ADSR section to shape the envelope of the sound. Experiment with the Shift and Motion controls on each oscillator to produce your own timbre.

The oscillator settings
Download audio file (step2.mp3)
To allow further control over the synthesised sound, we route each oscillator to its own, independent filter: a process known as parallel filtering. Temporarily disable Oscillator B and route Oscillator A to Filter A via the Shaper. Using the Low Pass Filter, adjust the Frequency position to 74 to reduce the higher frequencies of the sound. This will allow more space in the mix for the top layer that will be created later. Use the Shaper if you would like to drive the signal of Oscillator A before it reaches the filter. In this case, I have used a small amount of saturation to give the tone more character.
Enable Oscillator B again and route it to Filter B, select Band Pass as the filter type and adjust the Frequency position to 20. By using the Band Pass Filter, we reduce the range of audible sound to a narrow band of frequencies. In this case, the filter is used to focus on a low frequency position to raise the overall level of bass. Increase the Resonance parameter for more effect.

The filter and shaper settings
Download audio file (step3.mp3)
After the main tone of the bottom layer is shaped and filtered, we then use the modulators to control various aspects of both oscillators and other sections of the synth. The modulators in the Malstrom synth consist of all the standard LFO wave shapes as well as many other complex LFO curves that are very suitable for designing sound effects. In this example, I’ll use the standard sine and triangle wave shapes to produce a pumping sound for the synthesised engine.
Select the second LFO wave shape in Modulator A, raise the Shift parameter in this section to 14 and increase the Rate control to 86. When playing back a sustained note over time, this modulation will cause both oscillators to shift in relation to the wave shape of Modulator A at quite a fast rate. This modulation completely transforms the tone into a moving, animated sound. To increase the realism of the engine effect, we use the second modulator to add variance to the already modulated sound.
In the Modulator B section, use the initial wave shape to modulate Oscillator B only by using the modulation target switch. Adjust the rate control to 52 and the volume parameter to -16. This subtle and slow change of the level of Oscillator B will create variation in the pumping and beating sound of the synthesised engine. By increasing the Modulation to Modulator A control, this subtle modulation will also control the intensity of the effect of Modulator A over both oscillators.

The modulation settings
Download audio file (step4.mp3)
With the basic modulation of the bottom layer complete, the final step in the process is to synthesise a top layer that will enhance the overall character of the sound. For creating this layered sound, I will use an additional Malstrom synth in conjunction with a Combinator device. Right-click the original Malstrom synth and select ‘Combine’ from the dropdown menu.
Create a Line Mixer within the Combinator and reroute the connections to insert it before the Combinator device inputs. Then route the Malstrom to the first available inputs on the Line Mixer to complete the signal path. In the Arrangement section, move the MIDI clip from the Malstrom track to the Combinator track. This will allow both synths to be triggered via the same note track. You can now delete the Malstrom note track, while retaining the device in the rack.
Create a new Malstrom synth within the Combinator and select the ‘Breath Voices’ patch from the dropdown menu in Oscillator A and adjust the envelope in the ADSR section to match the settings of the original synth. Route the oscillator to Filter B and apply a Negative Comb Filter over the signal, adjusting the Frequency position to 70. Increase the Resonance control to intensify the Comb Filters effect, which results in enhanced higher frequencies filling out the top layer of the mix.
Route the signal to Filter A via the Shaper and apply a small amount of low pass filtering. Use Modulator B with a rate speed of 86 to apply similar modulation effects of the original synth to this additional layer. Reduce the Motion control in this section to -15 and the Volume control to -30, completing the layered effect.

Programming of the top layer synth
Download audio file (step5a.mp3)
You can achieve balance between both layers by slightly reducing the level of this new synth using the Line Mixer. Insert a Scream Distortion device after the Line Mixer to process both signals together dynamically, creating a compressed and cohesive sound. In this example, I’ve used the Tape algorithm with subtle Damage and Compression settings. Finally, create a Chorus device to be used as a send effect through the Line Mixer and apply the effect to the top layer only. This will add more space to the higher tone and will help separate the two layers.

Processing the signals with dynamic and spacial effects
Download audio file (step5b.mp3)
This example demonstrates the techniques and processes involved for creating a sci-fi engines fundamental tone, shape and character through synthesis. However, there are endless sounds to be achieved by experimenting with the different patches and settings available on the Malstrom.
I plan to follow up on this tutorial with a series of techniques for vehicle sound design including further sound modulation control using the Combinator, recording and mixing vehicle sounds with Reasons arrangement section and mixer as well as using additional sound effects to blend synthesised tones with recorded material.
At Audiotuts+ we regularly put up a reader track for workshopping and critique (find out how to submit a track). This is how it works: you upload your song, and every week or so we’ll publish one here and step away from the podium. The floor is yours to talk about the track and how the artist can fix problems in and improve upon the mix and the song.
This track has been submitted for your friendly, constructive criticism. They have put their track (and their heart and soul) in your hands to learn and get useful feedback.
Artist’s website: soundcloud.com/acaua
Description of the track:
It’s a different sound in 125 bpm. I have used orchestral loops, hard drums, Master with Tracks-3 plugin. The inspiration came when I had a day of bad luck. I’m a Brazilian producer living in Milano-Italy. For new songs: www.soundcloud.com/acaua.
Download audio file (AcauTrouble.mp3)
Terms of Use: Everybody can download it! This is a unsigned track.
Have a listen to the track and offer your constructive criticism for this Workshop in the comments section.
Need constructive criticism on your own tracks? Submit them using this form.
Number of samples: 16
Audio format: AIF (16 bit, 44100, stereo, normalized -1db)
Genre: Electronic
Most of these kicks have been made in Ableton Live. I used Operator, Analog and Sampler, but I also made some of them with the Roland Juno-106.
Samples contained in this pack are ROYALTY FREE so use them in your projects. As a payment, I will really appreciate your feedback on my Facebook page and your contribution of sharing this page.
Produced by Fred Anton Corvest (Sound Design Addicted!). Check out more samples from Fred on the Sound Design Addicted Facebook page.