Remand call over honeymoon death

Shrien Dewani arriving in court on 24 FebruaryMr Dewani was admitted to hospital on Sunday

A man accused of ordering the murder of his wife on their honeymoon in South Africa should be remanded in custody for his own safety, a court has heard.

South African authorities told Belmarsh magistrates that Shrien Dewani, 31, of Bristol, should have his bail revoked after he tried to kill himself.

His wife Anni, 28, was found shot dead in Cape Town in November after being kidnapped.

The court heard he had taken a cocktail of 46 pills.

He was taken to Bristol Royal Infirmary by ambulance on Sunday evening after being found collapsed in his bedroom by his sister.

He had taken tablets including diazepam, which was prescribed to counter anxiety and help him sleep.

Ben Watson, for the South African authorities, said Mr Dewani had taken a “massive drug overdose” after telling his family he wanted to take his own life.

He said the South African government feared as a result that Mr Dewani might fail to attend court proceedings and that detaining him in custody was “necessary” for his safety.

This article is from the BBC News website. © British Broadcasting Corporation, The BBC is not responsible for the content of external internet sites.

Cameron in Libya response apology

David CameronDavid Cameron said he was “extremely sorry” for the delay in evacuating Britons from Libya

Prime Minister David Cameron has said he is “extremely sorry” for the government’s handling of the evacuation of British nationals from Libya.

He said it had not been an easy situation and ministers needed to “learn the lessons”.

It follows criticism of the government’s response to the crisis.

A plane chartered by oil companies for employees, with 78 passengers, has arrived at Gatwick and a government-chartered flight has also left Libya.

The prime minister said: “Of course I am extremely sorry. They have had a difficult time. The conditions at the airport have been extremely poor.”

A flight chartered by oil companies arrived at Gatwick at about 0715 GMT.

The airport said the plane carried 78 passengers. Earlier reports suggested more people had been on board.

A government-chartered flight, which left Tripoli at 0745 GMT, is now on its way back to the UK with a stop-over in Malta.

It is expected to land in the UK in the early evening.

Man recently returned from Libya

British nationals have started to arrive home from protest-hit Libya

A RAF Hercules C130 aircraft is also expected to return to the UK later with dozens of passengers. A second military plane is on standby in Malta if needed.

The Foreign Office said “a number of additional planes” could be sent to Libya throughout the day.

Meanwhile, the Ministry of Defence has confirmed that Royal Navy frigate HMS Cumberland is now at the entrance to the harbour in Benghazi.

It will help with the evacuation process if needed.

A meeting of Cobra, the government’s emergency planning committee, is being chaired by Foreign Secretary William Hague.

Helena Sheehan, 66, one of the passengers who landed at Gatwick earlier, said she had just experienced “some of the worst hours of her life”.

“Libya is descending into hell,” she said.

“The airport is like nothing I’ve ever seen in my whole life. It’s absolute chaos. There’s just thousands and thousands of people trying to get out.”

The British Red Cross has deployed a team of volunteers to Gatwick airport to provide support to Britons being evacuated.

FOREIGN OFFICE HELPLINEUK nationals in Libya wishing to get on the charter flight are advised to call the following numbers:Gaddafi ‘ordered Lockerbie bomb’ Governments plan Libya evacuation Woman’s ‘traumatic’ Libyan escape Student sit-in over Gaddafi cash

BBC security correspondent Frank Gardner said an SAS contingent has been put on standby for emergency deployment to parts of Libya, backed up by paratroopers of the Special Forces Support Group.

Our correspondent said: “With the situation for some British nationals in Libya fast deteriorating, it’s part of a range of options being considered by the government to rescue those stranded in the North African country.

“Exact numbers and the locations of any staging areas are being kept secret but it’s a scenario that British Special Forces have trained hard for – landing in the midst of a dangerous and chaotic situation then securing the safe passage out of stranded Britons, all hopefully without a shot being fired.”

Several other countries, including France, Russia and the Netherlands have already evacuated some of their citizens.

UK nationals wishing to register an interest in flights out of Libya should call the following numbers: 020 7008 0000 from the UK or 021 3403644/45 from Libya.

The Foreign Office is advising against all but essential travel to Libya.

Around 3,500 Britons had been living in Libya before the crisis but most of those are thought to have left in recent days.

A woman is emotional as her husband arrives on a flight from Tripoli that was chartered by oil companiesPassengers landing at Gatwick expressed relief to have left Libya

However, there is particular concern for some British oil workers thought to be stranded in isolated desert camps.

They are struggling to make contact because the phone networks have been disrupted and their supplies of food and water from Libyan cities are running out.

“Some we know have been subjected to attacks and looting. They are in a perilous and frightening situation,” said Mr Hague.

After a week of upheaval in Libya, protesters backed by defecting army units are thought to have almost the entire eastern half of Libya under their control.

The country’s beleaguered leader Colonel Muammar Gaddafi, who has been in power for 42 years, has vowed to fight to his “last drop of blood” rather than leave the country.

Earlier, Mr Hague told the BBC the “odds were stacking up” against Col Gaddafi, adding: “We have a government, or the remnant of a government, here which is prepared to use force and violence against its own people.”

He said the Libyan leadership will be “held to account” for crimes against its people.

This article is from the BBC News website. © British Broadcasting Corporation, The BBC is not responsible for the content of external internet sites.

Quick Tip: Choose The Right File Format For The Job

Being spoiled for choice, when it comes to exporting audio, is common with most DAWs supporting most audio formats in existence. Audio formats can be categorised into three categories: uncompressed, lossless, and lossy. I will explain the popular formats for audio and provide some recommendations for using the right format for the job.

Audio Codec vs Audio Format. These two terms may seem confusing but they are often used to refer to the same thing. A codec is a program to encode and decode data, coder-decoder. Formats usually refer to the file format or extension. Since the codec and file extension are related, the terms could be used interchangeably for non-technical users.


Uncompressed

This is the highest quality audio in its most raw form and perfect for the recording process. You should be using these formats for recording, archiving, and any other audio that should be in its most pristine quality. You can also archive your tracks in this format with hard drives becoming extremely cheap.

WAVE

The actual encoding of the audio is PCM (Pulse Code Modulation) thus you might see this listed as PCM Wave. There are two formats for WAVE files, Microsoft Wave (WAV) and Broadcast Wave (BWF). They share the same .wav file extension. This is the most recommended and universal format for professional audio as it is cross-platform compatible. Broadcast wave has an additional BEXT chunk which allows embedding of additional metadata like title, time-code, origination, etc. Broadcast wave is extremely useful for post production purposes with the additional metadata.

AIFF

The Apple Interchange File Format was developed by Apple. It uses the same PCM encoding as WAVE. This format is commonly found on the Mac OS platform. Although the quality is equivalent to WAVE, there can be incompatibility issues on other platforms like Windows especially within less popular audio software.

SDII

A format created for earlier versions of Pro Tools, it is no longer recommend for use and should be considered obsolete. Support for the format is not a standard in audio software.


Lossless

Useful for archiving final tracks in smaller sizes or distributing high quality tracks. Lossless files have a compression algorithm which reduces file sizes but not lowering audio quality. Lossless files often allow you to reverse the process to retrieve an uncompressed version of the track. The trouble comes as lossless files need a decoder which are uncommon in portable players and not a standard in media players.

FLAC

FLAC provides lossless encoding for audio with files resulting in being 50-60% of their original size. FLAC also provides the ability for better tagging of audio files, cover art, and fast seeking. FLAC is commonly used for digital transfers of high fidelity recordings like classical music or audiophile content. However, FLAC is not supported on most media players.

Apple Lossless

An audio codec developed by Apple for lossless data compression for audio files. It also uses the MP4 container like AAC with the extension .m4a. It is the only lossless compressed audio format natively supported on the iPod. If you use iTunes to organize your music and have an iPod or iPhone, this is the format that you will be using.


Lossy

Lossy audio formats can achieve small file sizes which is very useful for file distribution and storing more songs on portable devices. However, audio quality is very much reduced due to the file size reduction process. You should always ensure that you have an uncompressed master copy of the audio that you are compressing in case you need a high quality version for other purposes. You should not be using lossy formats during the production process as it will greatly degrade your audio.

MP3

This is a very popular music distribution format. Most music that are distributed over the web is in the MP3 format. It is a standard format for portable music players and supported on all platforms.

AAC

Advanced Audio Coding is a newer format that was designed to replace the dated MP3 format. It is designed to achieve better audio quality at similar bit rates. However, it is co-existing rather than replacing the MP3. Audio encoded in this format uses the MPEG-4 container thus the file extension is usually .m4a.

WMA

Developed by Microsoft for the Windows Media Player, the Windows Media Audio format includes DRM(Digital Right Management). Although the regular WMA file is lossy, there is a WMA Lossless format but it is uncommon. I don’t recommend WMA because of its incompatibility with software and media players, as with most proprietary file formats.

OGG

The actual audio codec is OGG Vorbis. OGG Vorbis is rarely used since its support is uncommon. It is more commonly used with video in the OGG container. The file extension are .ogg and .oga


Recommendations

Recording/Audio Editing

The only format that you should be using is WAV or BWF. These are cross-platform compatible and a standard in the industry. AIFF has a possibility of incompatibility on non-Mac systems.

Archiving Final Mixes

You can archive your final mixes in WAV or BWF. If you want to send lossless files to someone else, you can compress the data into FLAC files to reduce the file size. FLAC encoders and decoders are freely available on the web.

Distribution

If you are distributing CDs, always burn using your uncompressed masters. Do not burn the CD using the mp3 files as you always want to distribute the highest audio quality possible. If you need to compress your files for web distribution, mp3 compression is what you need. Go for a high bit rate to keep your music sounding great. 320kbps could be perceived as CD quality on most systems and 160kbps is the lowest you should go. Higher bit rates keep your music sounding better while lower bit rates trash it.


Final Tip

This final tip only applies to uncompressed audio. Without going into details, you should always be recording at 24-bit 44.1 kHz whenever possible. Only convert your audio to CD quality(16-bit, 44.1 kHz) just before burning to a CD. You will want all the headroom you can get during your production process.


Read More

Workshop #154: Star of David by Ilse Jones

At Audiotuts+ we regularly put up a reader track for workshopping and critique (find out how to submit a track). This is how it works: you upload your song, and every week or so we’ll publish one here and step away from the podium. The floor is yours to talk about the track and how the artist can fix problems in and improve upon the mix and the song.

This track has been submitted for your friendly, constructive criticism. They have put their track (and their heart and soul) in your hands to learn and get useful feedback.

  • Do you enjoy the song or track itself? Does it have potential?
  • Can the arrangement be improved?
  • How did you find the mix? What would you do differently?
  • What do you enjoy about the rhythm track? What can be done to improve it?
  • Is the choice of instruments relevant and effective for the style/song?
  • Are the lyrics (if any) effective? Does the style, arrangement and genre of the song suit them?
  • Can you suggest any specific techniques that might improve the track?
  • Do you have any other constructive feedback?

Star of David by Ilse Jones

Artist’s website: www.bgstudios.co.za

Description of the track:

Songwriting course 2010. Recorded and produced by BGStudios. Got feedback that the mix is all wrong and that the vocalist’s diction is poor. Please listen and give feedback.

Download audio file (StarofDavid.mp3)

Terms of Use: Users can stream the track for the purposes of giving feedback but cannot download or redistribute it.

Have a listen to the track and offer your constructive criticism for this Workshop in the comments section.


Submit Your Tracks for Workshopping

Need constructive criticism on your own tracks? Submit them using this form.


Read More

How to Build Practical Effects Chains

In some cases great multi-effects chains can be simply thrown together and the results of this random approach can be impressive but unfortunately, more often than not, we have to put a bit of work into getting things right.

In this tutorial I’ll cover some of the psychology I use when putting together insert based effects chains. Of course none of this is set in stone and shouldn’t be looked at as ‘rules’, they are simply guidelines based on my experience. Hope you find them useful!


Step 1: Considering the Chain’s Intended Purpose

So, first things first. It may sound obvious but it’s a good idea to start out by thinking about what you want to achieve. Often if you can visualise the job in hand the chain will be easier to put together and some of the obstacles we’ll hit later should be easier to deal with.

For instance if you have a vocal line that needs cleaning up you can start to think about the processes you may want to apply. Some obvious choices will pop into your head such as gating, compression, equalisation and some spatial effects, such as reverb or delay.

Of course the vocal chain is just an example the processors you pick will depend hugely on what the source audio consists of and what you want to do to it. It’s the workflow we are concentrating on here.

Once you have visualised your chain you can start to build it and you should find you already have a plan in mind. This is preferable to throwing a whole load of plug-ins into the mix, making a big mess and producing something that sounds like it was put together by a crazy person.

A useable well thought out vocal effects chain

Download audio file (1.mp3)

Our carefully constructed chain in action

An effects chain constructed by a slightly crazy person

Download audio file (1b.mp3)

The less practical chain plays back


Step 2: Making a Start, Keeping It Simple

I’d say that the first processors you want to insert into your new chain are the most simple ones. These are often the tools you plan to use for more corrective purposes as opposed to ‘special effects’. Try starting with equalisers, compressors and gates. I often like to start by using an EQ to remove and unwanted frequencies and enhance any areas that are lacking.

Download audio file (2.mp3)

A simple plucked guitar before any processing is applied

Follow up this first treatment with any other corrective processes you want to try, so think about dynamics treatment and gating to remove any noise or unwanted signal. Once you have made these initial moves it should be much easier to focus on what the sound needs next.

The guitar is processed with some EQ and compression to enhance it slightly

Download audio file (2b.mp3)

The enhanced guitar


Step 3: Getting Decorative

I tend to divide effects processing into two distinct areas corrective and creative. Once we have the corrective stuff out of the way we should have a real basis on which to apply more decorative, creative processes. These creative processes can be anything really but things like modulation based effects and distortions work very well at this stage.

When you are building more run of the mill chains you may not need these special effects but I find that it can be a good idea to include a few, this way they can be activated or bypassed at will to create ‘spot’ effects at key points in your project.

Finally you will need to add any spatial effects you plan to use, so delays and reverbs are generally best off left until the end of your chain. If you don’t what to include these as inserts then you can obviously set up send / return busses but placing them early in the chain is not always a good idea. We’ll see why in the next step.

The more decorative effects are added

Download audio file (3.mp3)

The effected guitar in action.


Step 4: The Order of Things

Now we get to the real meat of this subject and that’s the order in which the plug-ins are inserted in our chain. This is nothing less than crucial and completely dictates the final sound that is produced by your processing. Alter the order of just one plug-in out of three and your sound can be completely changed.

Let’s think about a few examples. Placing a distortion after a delay or reverb in your chain would not be a great move as this would distort and repetitions or reverb tail. Place the distortion plug-in before the spatial effects and you should get a great effect.

Another good example of this would be where you place a gate in your chain. Placing gates after the same delay effect could completely destroy a good delay patch. Gates should generally be placed very early in your chain.

As you come to the end of putting your chain together it’s worth just taking a step back and thinking about the order you have things in. Maybe experimenting with different set ups to see what sounds best to you.


Step 5: Watching the Signal Path

When you have constructed your effects chain it’s well worth taking the time to quickly the check the level at every stage. This means checking none of your plug-ins are being heavily overloaded. The vast majority of modern plug-ins have amazing amounts of headroom and are very difficult to hard clip but it pays to make sure everything is running well within it’s limits.


Step 6: Save It for Later

Now with everything running correctly you can save your custom chain for use at any time in the future. Get things right here and you should start to compile a really nice, usable library of effects chains for any eventuality.

Saving the effect chain for later use


Read More

Open Mic: Which Web Browser Do You Use?

You know how to surf. Which web browser do you use? Firefox? Chrome? Safari? Internet Explorer? Does it matter? And why?

Each week we open our mic to readers and lurkers alike to come out of the woodwork and tell us your thoughts and opinion, your experiences and mistakes, what you love and what you hate. We want to hear from you, and here’s your chance.


Read More

Getting The Ultimate Guitar Sound – Part 2 – Audio Premium

In this week’s Audio Premium content, Bobby Owsinski continues his series on getting the ultimate guitar sound. Bobby has spent a lifetime achieving just that, and the series is based on his new book, The Ultimate Guitar Tone Handbook.

To learn more about what you get as part of Audio Premium, read this. To take a peek inside this tutorial, hit the jump!

Getting a great guitar sound is a an almost endless journey for most guitar players, engineers and producers that requires time and too much money, to achieve a sound that may be only temporary. This series is based around my new book, The Ultimate Guitar Tone Handbook, where I’ll outline why acoustic and electric guitars, amplifiers, speaker cabinets and effects sound the way they do, and the best way to record and mix them after you’ve gotten the sound.

In Part 2 of the series, we’ll look at the wide variety of elements that gives an guitar amp its sound.

Many musicians, engineers, producers are hip to different types, brands and models of guitar amplifiers, but few know the differences between them, and it’s those differences that often give the amp its unique sound. The special characters of an amp and speaker cabinet have everything to do with how a guitar blends into the mix, which is why the more you know about the gear you’re using, the easier it is to get just the right sound when you need it.

So what affects the tone quality of an amp? Let’s look at all the variables.

Table of Contents

  • Amplifiers
  • Tube Amps
  • Circuit Design
  • Solid State Amps
  • Amplifier Modeling
  • Speaker Cabinets
  • Open or Closed-Back Cabinet
  • Cabinet Size
  • Construction Materials
  • Construction Method
  • The Baffle
  • Speaker Parameters

Existing Premium members can log-in and download. Not a Plus member? Join now.


Read More

Quick Tip: Analogue Tracking in the Digital Domain

The argument of analogue vs. digital is one that is probably not new to anyone here and one which will probably never be definitively answered (especially with many of the great analogue emulations coming out these days). But what can you do if you want to achieve warm analogue sounds without putting up the cash for the analogue tracking equipment? In this quick tip, we will look at one way of giving your ‘in the box’ mixes a warm ‘out of the box’ feel by emulating an analogue tracking session.

The first thing we want to do is think about what it is we are trying to emulate. The gear and signal path that is inherent to an analogue tracking session is paramount to achieving the desired sound. As such, we are going to place accurate emulations of analogue recording gear into the signal path as it would be done in the analogue domain (pre-amp, EQ, compressor, tape).

In the below kick track, I’ve used the Antares ‘Warmth’ plugin (you will most likely have to move on to 3rd party plug-ins in order to find vintage emulations) to get the pre-amp tube saturation. This plugin has the best sound (to me) from the ones I have tried. The controls are simple, yet the sound is fat and robust.

The signal chain

Antares Warmth

For the EQ I am using the UAD Pultec emulation which is great for drums, it has an amazing low end (just running the signal through with no boosts or cuts makes the sound instantly fatter) and has an equally good high end response which allows for drastic boosts/attenuations while maintaining the clarity and smoothness which made the hardware unit famous.

UAD Pultec

As UAD is in the business of making accurate emulations of vintage gear, who better to make an emulation of the classic 1176 hardware unit than the company who makes them? The 1176 is largely a go-to compressor for drums and vocals, and probably everything in between. It is a very fast compressor, with a reversed attack and release dial, making it somewhat counterintuitive, but worth the bit of extra thought as evidenced by its output.

UAD 1176

For the tape saturation, I’ve decided to use Logic’s ‘secret’ tape saturation plugin. A little known fact about Logic’s tape delay plugin is that it comes with a tape saturation control which can be accessed through the disclosure triangle at the bottom of the plugin. Simply turn the feedback down to ’0′ and mess around with the distortion amount at the bottom to get instant tape saturation. There are emulators I like the sound of better, but you can’t beat a first party plug-in you never knew existed.

Logic’s Tape Delay set to tape saturation

Below are MP3′s of the kick before and after processing. Notice how the ‘after’ sounds warmer and overall more musical.

Download audio file (before.mp3)

Download audio file (After.mp3)

Countless companies are coming out with extremely accurate emulations all the time so by no means is the above example exhaustive or necessarily the ‘best’ combination possible. It really all boils down to personal taste and the available technology. UAD has just come out with a great Studer tape emulator and I’ve heard rumor (read speculation) that Waves is soon to follow with their own tape emulator. Until then the best advice I can give is just to try what is out there and find the combinations you think sound best.


Read More

Workshop #153: Sunny by Kinxz

At Audiotuts+ we regularly put up a reader track for workshopping and critique (find out how to submit a track). This is how it works: you upload your song, and every week or so we’ll publish one here and step away from the podium. The floor is yours to talk about the track and how the artist can fix problems in and improve upon the mix and the song.

This track has been submitted for your friendly, constructive criticism. They have put their track (and their heart and soul) in your hands to learn and get useful feedback.

  • Do you enjoy the song or track itself? Does it have potential?
  • Can the arrangement be improved?
  • How did you find the mix? What would you do differently?
  • What do you enjoy about the rhythm track? What can be done to improve it?
  • Is the choice of instruments relevant and effective for the style/song?
  • Are the lyrics (if any) effective? Does the style, arrangement and genre of the song suit them?
  • Can you suggest any specific techniques that might improve the track?
  • Do you have any other constructive feedback?

Sunny by Kinxz

Artist’s website: brainwsh.me

Description of the track:

I would like to have some critique on this track.

Download audio file (sunny.mp3)

Terms of Use: Users can stream the track for the purposes of giving feedback but cannot download or redistribute it.

Have a listen to the track and offer your constructive criticism for this Workshop in the comments section.


Submit Your Tracks for Workshopping

Need constructive criticism on your own tracks? Submit them using this form.


Read More

AudioJungle Author: Catch22Music

Our sister site AudioJungle is a royalty-free stock audio site that helps musicians earn money. In this interview series you’ll learn about those musicians, their gear, and their AudioJungle experiences. Today we feature AudioJungle author Bobby Cole (Catch22Music).

Tell us a bit about yourself. Where are you from, what do you do for a living?

My name is Bobby Cole, and I am from the small fishing of Mumbles which is in the city of Swansea, South Wales. (Wales is the country that is just on the side of England UK.) It’s a beautiful place, right next to the seaside and surrounded by countryside. My studio is situated just a stones throw from the beach and that’s where I make a living.

Growing up in a small village like the Mumbles, I had to find something to do….! Music did not run in the family, but most instruments that I have learnt have all come quite naturally to me. I started drumming at 7 years old, guitar at 9, piano at 14, and recently have started to learn things like the Mandolin, Banjo, Ektara, and many more!

I am lucky enough to say that music is my full time job. I combine a few things including composing music for AudioJungle, teaching music, and doing the odd studio session as an engineer. There are only two decent recording studios within a 50 mile radius where I am from, so there is not that much competition for studio engineers to get work!

Which marketplaces do you belong to? What types of files do you sell?

I belong to AudioJungle, and what a great community it is. So many people wanting to help you out if you have questions, the forums are great and really useful. Loads of great information to be found!

I mostly sell instrumental music tracks, and am looking into selling source files (selling the individual components of a song like the drums, bass, guitar, keys) and also audio loops, but all in good time!

How did you get started? Have you had any formal training?

I got started by creating my own multi-track when I was 8 years old. I recorded something onto one cassette (yes cassettes……!) then played that back, and recorded that and another layer of instrument on top, then I just kept building it up. The quality was awful but it was my first studio!

I studied at the London College of Music and Media, and obtained a specialist BA Hons in Music Technology. It took off from there, and have dedicated my career to this industry.

Describe your home workspace.

My home workspace is actually my work workspace, as I do this for a living. My studio space is basically my haven where I can escape life and create music in my own time.

I have a variety of instruments and hardware, including my KRK V6 monitors (I bought these off Christina Aguilera’s producer in London!) my TL Audio Fat Track which is a great valve mic preamp to give my audio recording some warmth, an Edirol UA 1000 audio interface which can get audio into my computer at DVD quality sampling rates. I use the latest version of Cubase, with a few other gems such as Isotope Ozone mastering, and the East West Quantum Leap Goliath sample packs and Orchestra gold sound library.

I also love instruments. I have my 88 key fully weighted MIDI keyboard for playing everything in, then a Warwick 5 string streamer bass, a standard acoustic, a Nashville strung acoustic, a beautiful Gretsch, some standard Gibson’s and Tele’s, a Lap steel, mandolin, banjo, ukulele, various percussion from around the world, a stylophone, etc. I love collecting instruments, and am currently looking around for an original Fender Rhodes keyboard…. But they are a quite expensive!

I love plug ins and samples, but also love the real thing. One of the studios that I work at as a Hammond C3 organ, a Wurlitzer electric piano, a fender Rhodes mk 2, and a Hohner D6 Clav, all original and 40 -50 years old!!!

Mumbles fishing village to the left.

Describe your creative process. What steps do you normally follow to create your files

I have a few different ways really. One of the first things I do is look at my timeline. I think about various events in the year, and try and compose music a couple of months before an event or holiday is occurring.

For example, throughout August I will composer horror music so that through September and October I can upload it, and that it can have some great exposure on the home page in the lead up to Halloween.

Horror music is one of my strongest genres, and I am trying to carve out a career in the film industry by composing music for a few independent films that are out later in the year. It’s a difficult industry to break into, but I am trying to specialize in this area.

What is your advice to other authors regarding how to create a successful portfolio?

I would have two pieces of advice:

Firstly, always think about what your customers want throughout the year. Think about when the best time would be to upload that Christmas tune….

And secondly, you need to have both quantity and quality. If you only have three files and they are amazing, you will of course sell, but you need both quality and quantity. If you are serious about this then you need to think about how you are going to increase your library up to 500+ tracks.

What do you do to market your files?

A couple of things. I have a large network of social websites (along with my own website) all of which are linked together. I have a Facebook page, a Myspace, a YouTube video, Twitter account, LinkedIn account, Bebo, etc. All with my bio, logo and links to my site. Getting your image out there is important.

I am also on numerous social networking sites specifically for film makers. This is great exposure, as I am getting my image in front of the right sort of people!

What are your three favorite files, and why do you like them?

Halloween Circus Horror Music

Download audio file (preview.mp3)

I love the idea behind this. I tried to portray the sense of a haunted circus or fairground. A great scale to use for any horror work is the harmonic minor, it just scares me straight away!

The Concert Hall Of Love

Download audio file (preview.mp3)

A great relaxed classical piano based piece. I love this track as it is very basic. The melody is so easy and simple and I love how everything kicks in halfway through. To get the large bass drum sound I layered three standard kick sounds with timpani drums and taiko drums, and filtered off all the high frequency, loads of reverb and it creates this really lush big sound!!! It worked out well!

Inside The Mind Of A Killer

Download audio file (preview.mp3)

I love the chords in this. Again minor harmonic, with evolving soundscapes and textures behind it all!

Apart from yourself, who is your favorite marketplace author, and why do you like them?

I love Slavador’s work. Such a great portfolio of work, and all really interesting and unique files, great work!

What do you do in your spare time?

I like to play rugby union, go swimming, go to the gym, play old skool computer games (I still have my original super Nintendo in full working condition from the 1980’s!) and I do a bit of DJing playing old skool funk from the 70s and northern soul!

My new website is www.catch22media.co.uk.


Read More

From Regis Philbin to Wolfgang Amadeus Mozart: The Problem of Meaning in Music

Just because you didn’t get to go to that awesome conference doesn’t mean that you can’t still watch the lectures! Each weekend, we’ll feature a recommended audio lecture on Audiotuts+.

During this presentation Dr. Kutnowski asks: Is music a language? Do musical works have meaning? The lecture will explore answers to these and other questions. Works from the tonal repertoire and musical curtains of well-known TV shows will provide a springboard for this lively and informative discourse.


Read More

How to Write & Record a Song in One Hour or Less – Audio Premium

Has perfectionism ever robbed you of creative energy? Joel Falconer used to regularly write and record songs in an hour of less. Yes, that’s starting with a blank sheet and ending with a finished recording in less than an hour! In this week’s Premium tutorial he tells us in detail how that practice got him out of a creative rut, and helped him optimize his creative process.

To learn more about what you get as part of Audio Premium, read this. To take a peek inside this tutorial, hit the jump!

Writing and recording a song in an hour or less is a daunting task. Musicians spend weeks, months and sometimes even years working on their songs. One needs only to look at Guns N’ Roses’ Chinese Democracy to see how far a musician will go to perfect their work—an album that was in development for at least nine years according to most accounts.

Unfortunately, the level of perfectionism most musicians bring to their work can cause a myriad of problems. Perfectionism can completely block an artist out of the creative zone, or render them unable to release anything they’ve actually finished recording. Coming up with new songs becomes an emotionally stressful event, and more than a few musicians have thrown in the towel altogether because the ghost of perfectionism haunts them.

Several years ago, this attitude towards music became a problem for the band I fronted. It got to the point where we hadn’t written anything new in a couple of months and were just going over and over our existing songs. One day, perhaps the day I officially lost my sanity, I said “That’s it—we’re going to write a song and record a basic version in the next hour, tops.”

Here’s an example of one of Joel’s one-hour songs. (Warning: This song contains two words of profanity.)

Download audio file (9Zeroes.mp3)

Table of Contents

  • Setting the Bar (Really, Really Low)
  • Getting Fast Inspiration
  • Process is Everything
  • Structure
  • What Do You Do Next?
  • Taking Song Sketches to the Next Stage

Existing Premium members can log-in and download. Not a Plus member? Join now.


Read More

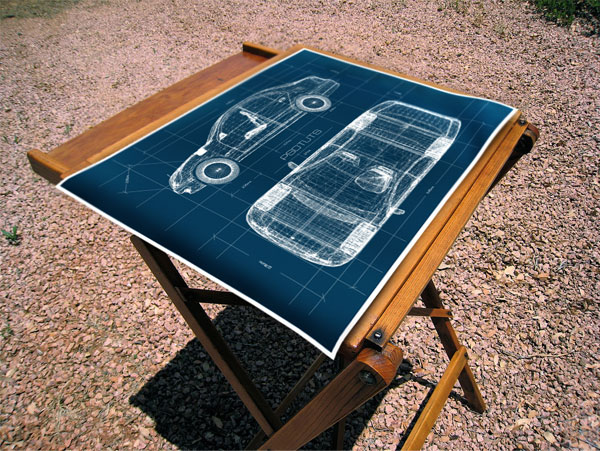
Create a Realistic Blueprint Image From a 3D Object


In this tutorial, we’ll create a a quick mock-up of a 3D car blueprint. Then we’ll place it on an image of a drafting table. This time we’ll use a particular Photoshop 3D Render Mode to create this awesome effect. Let’s get it started!


Editor’s note: This tutorial was originally published on Psdtuts in July of 2008.

Step 1

Weeks ago, when I published my tutorial about the 3D airplane, I was looking everywhere for a free 3D model with a Creative Commons license. In my quest to find it, I notice some cool websites with absolutely awesome 3D objects to available to play with. For this tutorial, we will use a nice 3D car downloaded from CGIndia.org. When I opened the car in Photoshop I saw the axis planes (X, Y, Z) were part of the model too. This inspired the idea of creating a blueprint of the different views of the car.

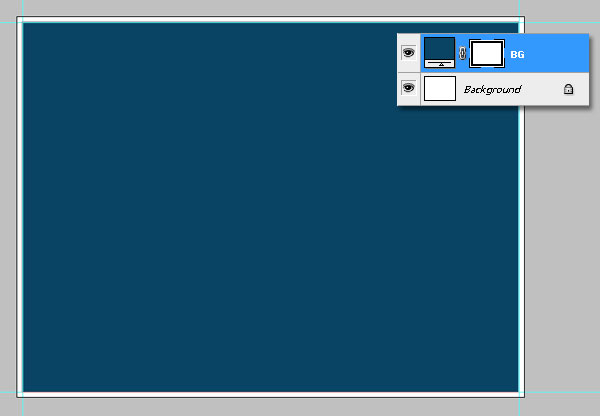
After downloading the car model, create a new blank document 1024 pixels by 768 pixels. Then select a white background. Then create a blue (#094464) square over the white layer. This creates a white margin.


Step 2

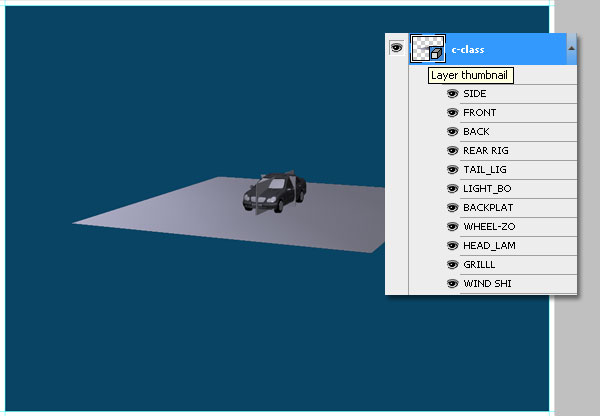
Create a new 3D layer by going to Layers > 3D Layers > New layer from 3D file. Then find the "3D car" file and press OK.


Step 3

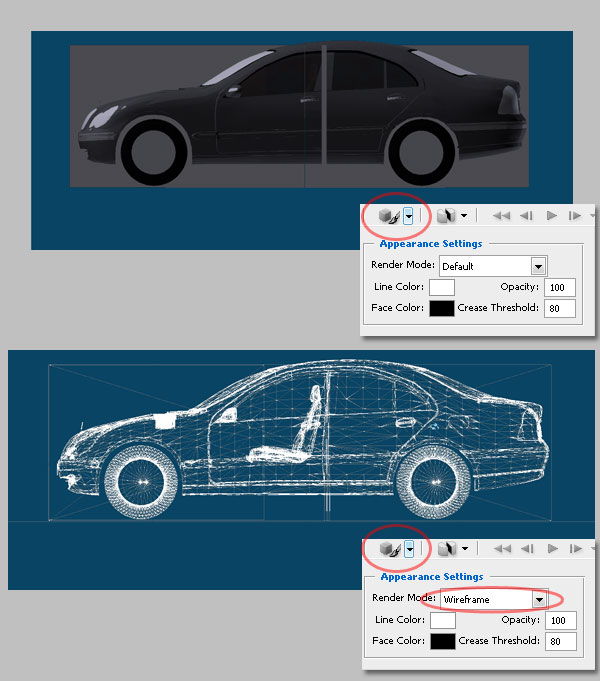
Double-click the 3D layer to edit it. Change the size of the car by making it bigger. Then change the View to Left or Right (depends on you and the model you’re using). I don’t know why, but on my PC this is the Front view. The trick to creating the blueprint is to change the Render mode from Default to Wireframe.


Step 4

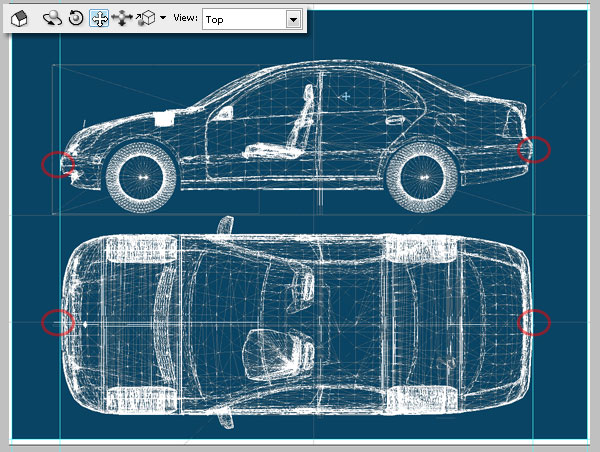
Now Alt+Drag to duplicate the 3D layer. Then change the copy’s view to Top. Place the copy below the first view. Also, add some guides to ensure the car’s width is the same in both layers.


Step 5

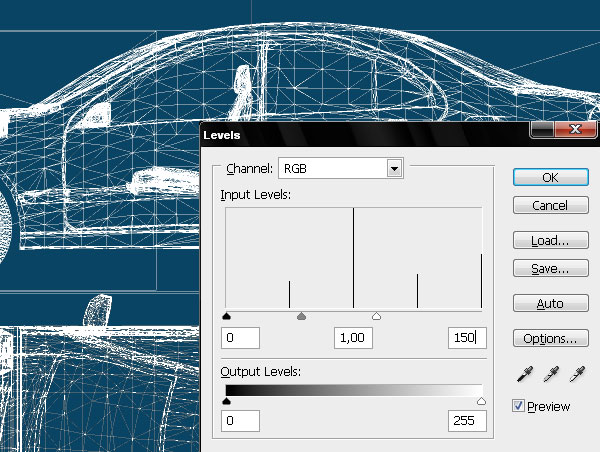
Rasterize both 3D layers by going to Layer > Rasterize > 3D. Then adjust each layer levels to increase the white of the lines using these values.


Step 6

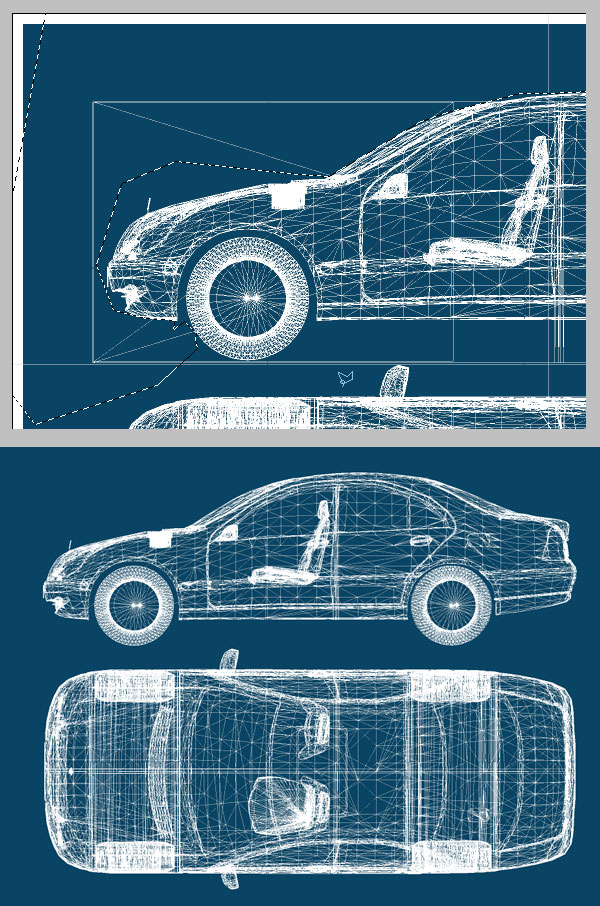
Delete all the extra lines using the Lasso Tool.


Step 7

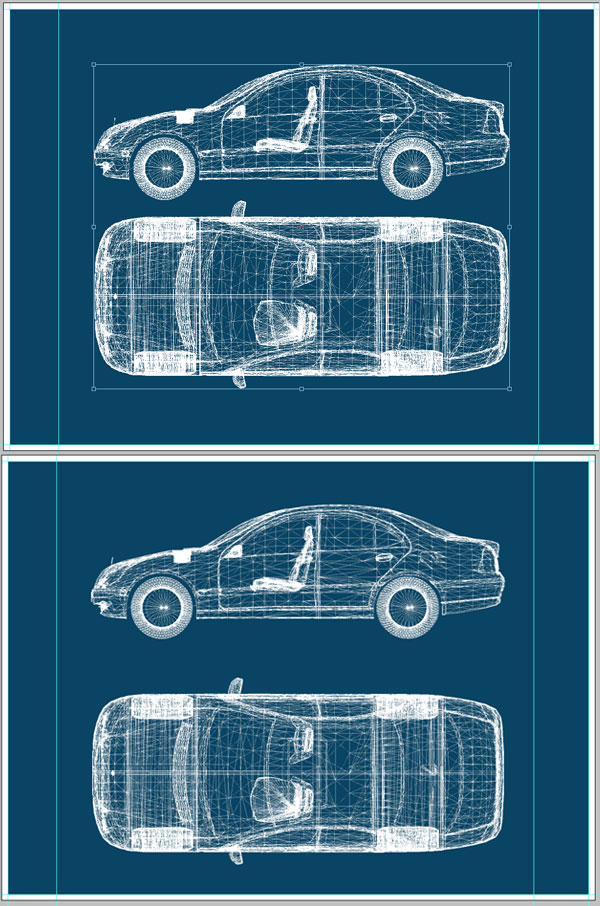
Now resize both layers, by the way I named them "Car Side" and "Car Top." Also, add some space between them.


Step 8

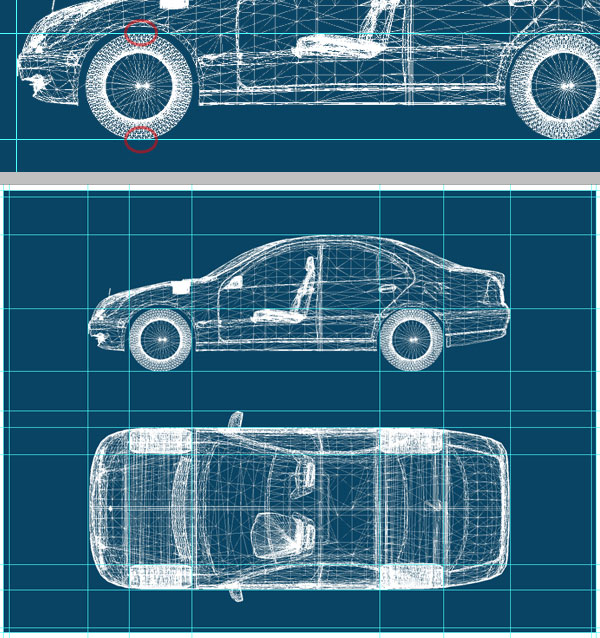
Next we’ll create some lines to get a more realistic blueprint result. First, show the Ruler CTRL+R. Then click the Ruler and drag the cursor to draw a guide. Make sure the guides touch the critical points of your views, like the wheel’s diameter, or the car’s width and height. Try to get something like the image below.


Step 9

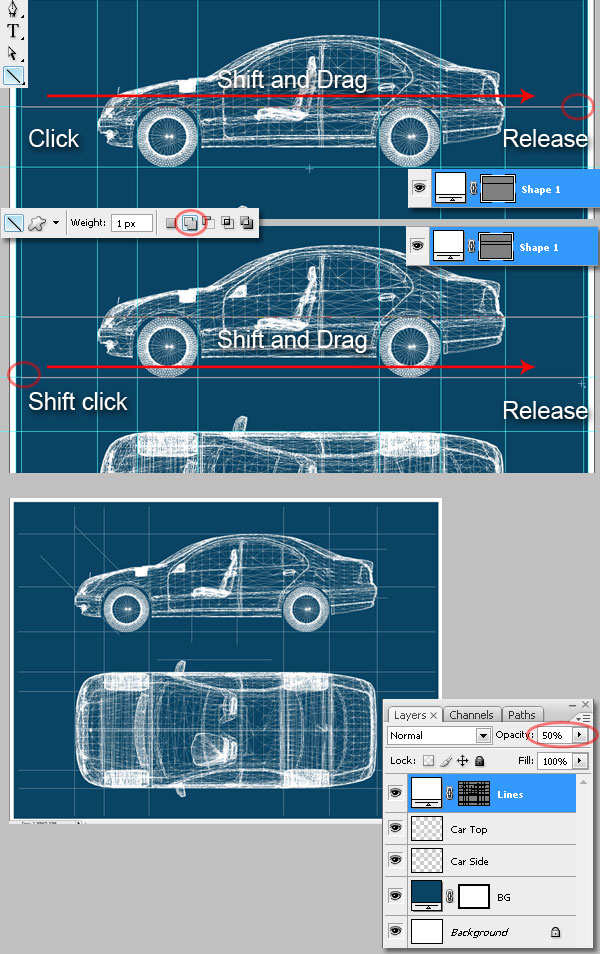
Using the guides, start drawing some lines. Grab the Line Tool and select a white foreground and 1px weight. Then Shift + click and drag to draw the lines (by using shift and drag you will draw perfect horizontal, vertical, or 45º lines).

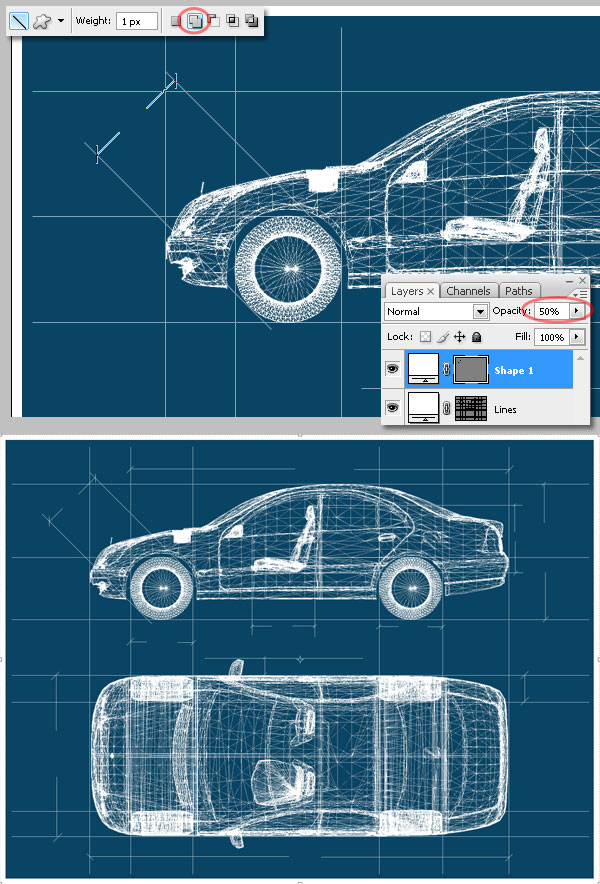
Draw a line first, then Shift + click to start the second one. This will activate Add to Shape to add the second line into a unique Layer Mask. Using this step draw as many lines as you want, not too many, but not too few either. Change the layer Opacity to 50%.


Step 10

Using the same steps, create a new layer and draw some white lines on it. These lines will show some of the car’s dimensions. Create some of this lines between two of the previously draw lines. Again, use the Add to Shape option to add all the lines into a single Vector Mask. Then change the Layer Opacity to 50%.


Step 11

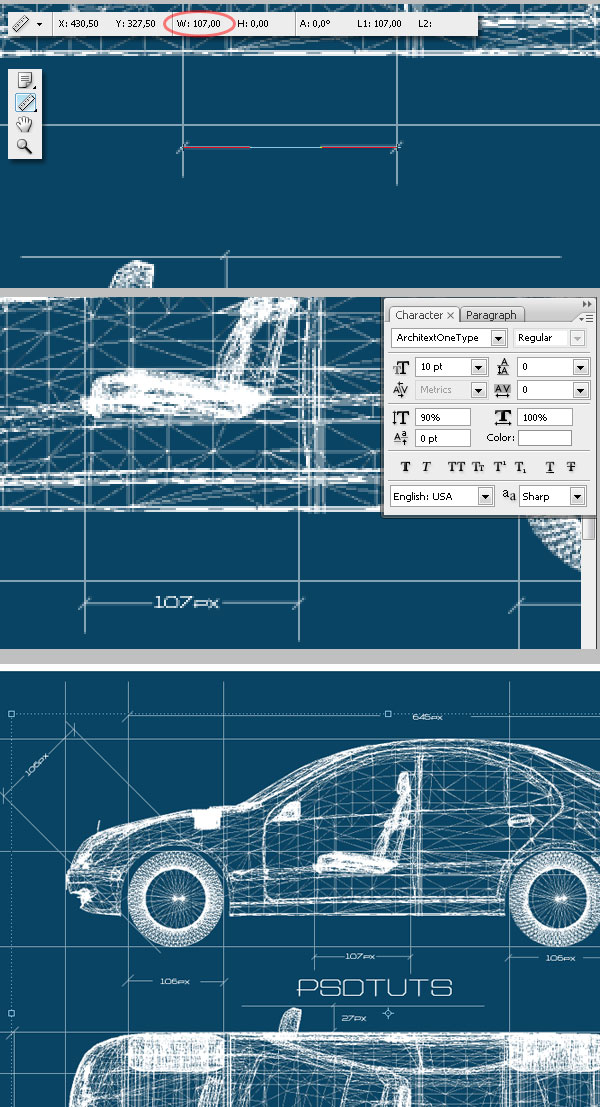
Now add some measurements. You can use some random numbers, but imagine that this is a mock-up of a real-life 3D model, like a house. So, you must transcribe the right dimensions to please the client. For this use the Ruler tool, and select pixels as the measure unit. Finally type the dimension; I used this font to create the text.


Step 12

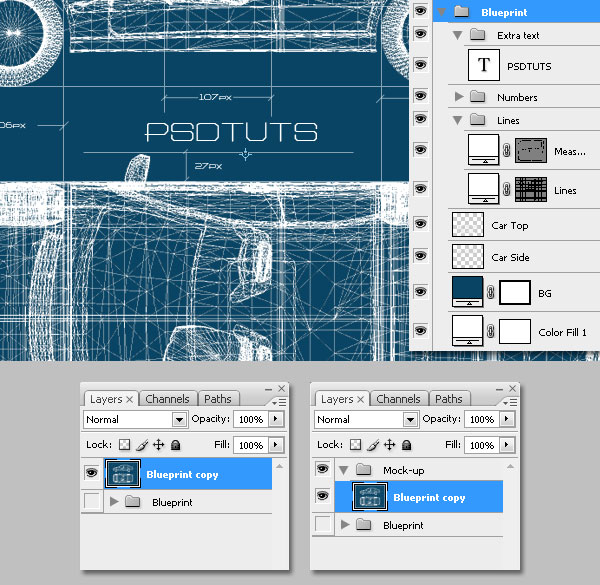
Let’s organize the layers a little bit. Create a Layers Group and name it "Blueprint." Then put all the layers inside it, also create a folders for the numbers, lines and all the extra text. Then duplicate the "Blueprint" group. Then hit Ctrl+E to Merge it. Create a new group outside and name it “Mockup.” Then put the "Blueprint copy" inside of it, and hide the “Blueprint” group.


Step 13

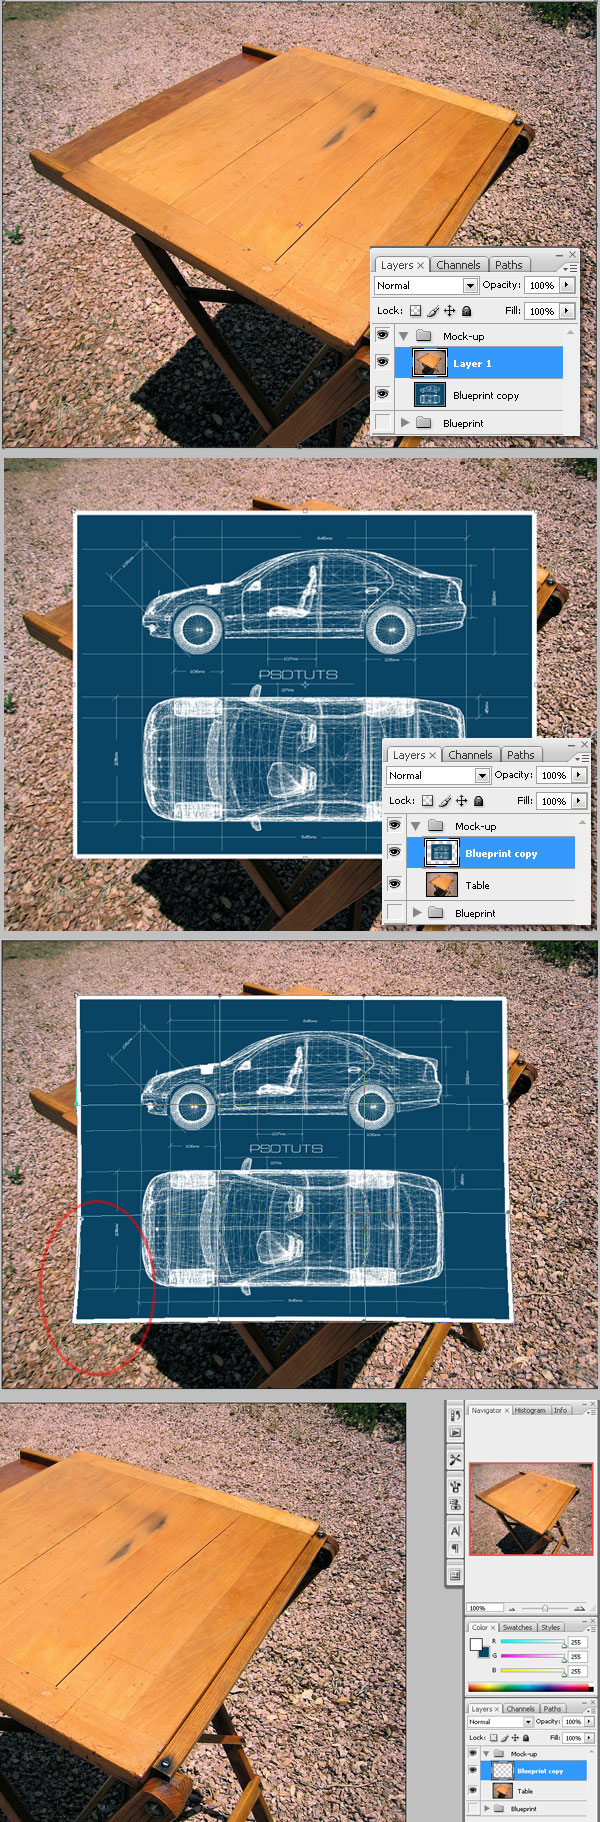
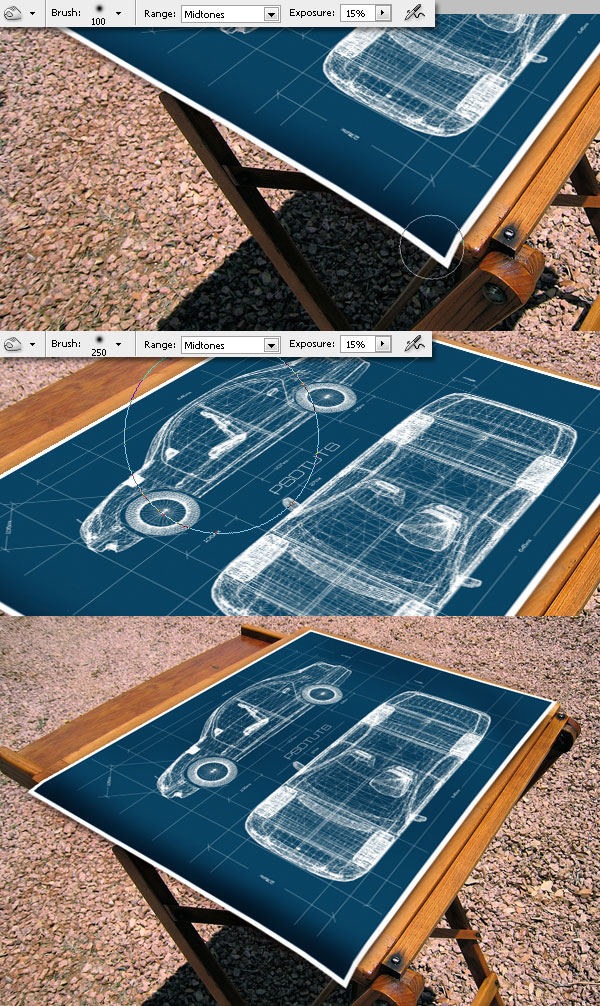
Paste this image into a new layer. It’s a picture of a nice drawing table. Resize the “Blueprint copy” to make it smaller. Then use the Warp tool to distort it a little bit, specially the bottom left corner. Finally, Select All (Command+A) and Cut (CTRL+X) the “Blueprint copy” layer.


Step 14

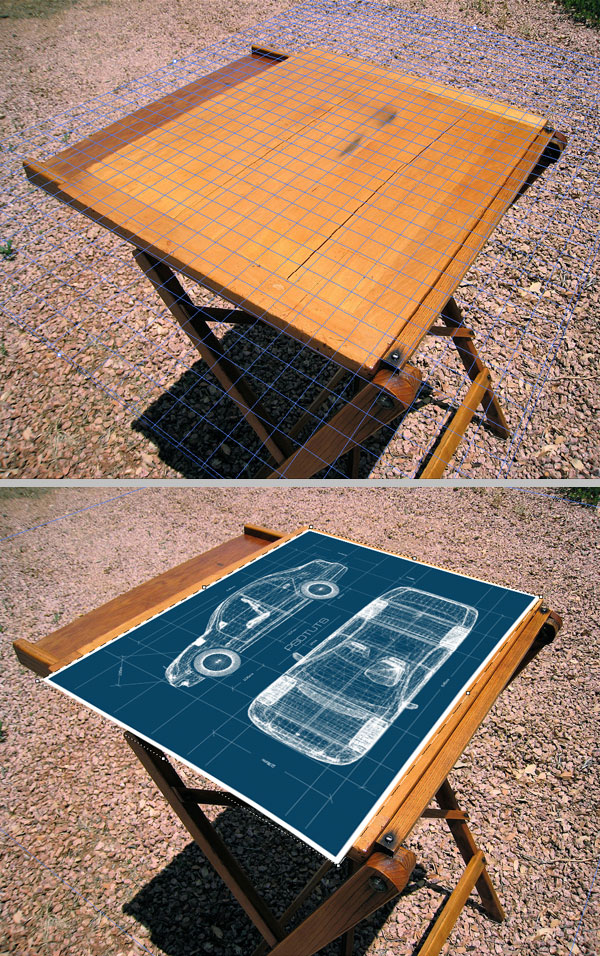
Select the empty "Blueprint copy" layer. Then go to Filter > Vanishing Point, and draw a plane over the table. Then extend it a little bit, and paste the "Blueprint" as shown in the image below. Try to get the blueprint’s left side out of the drawing table bounds. Then click OK.


Step 15

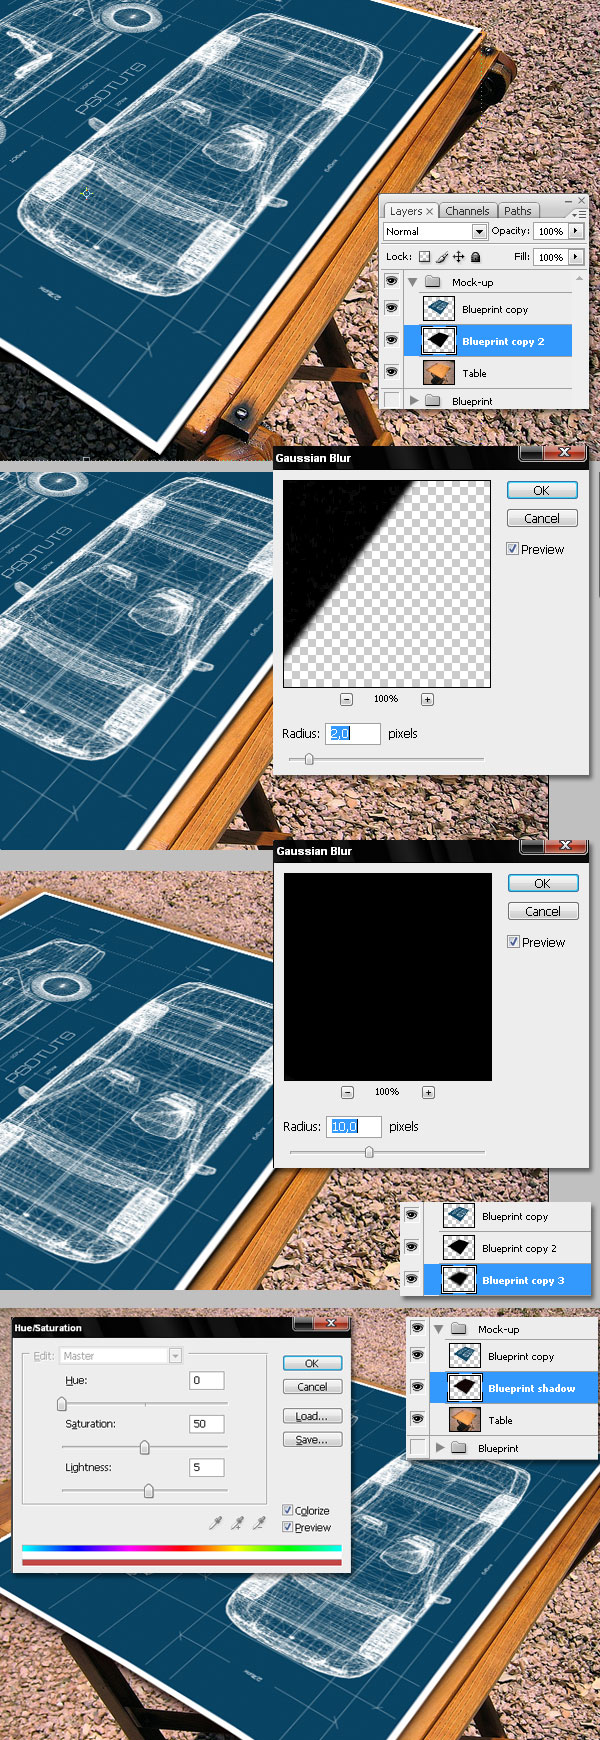
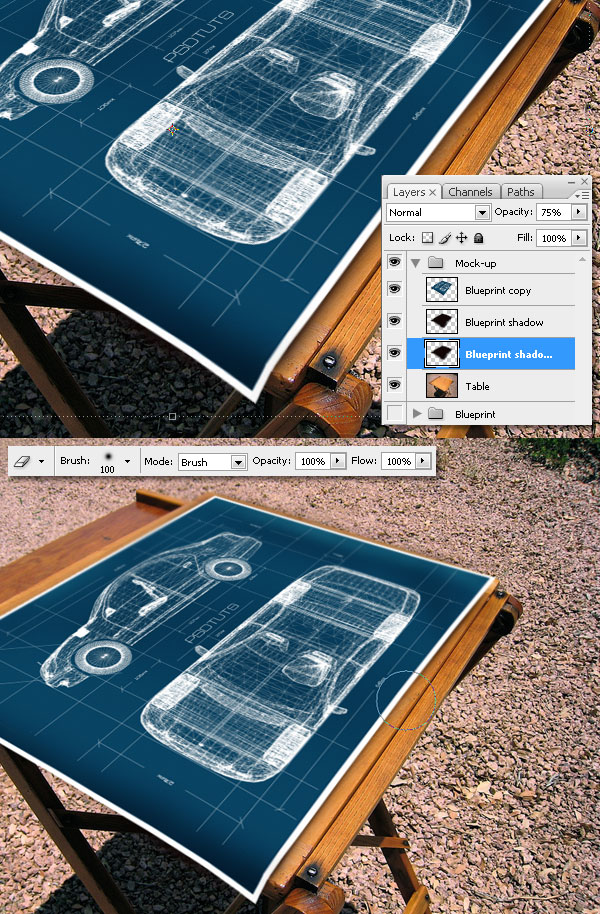
Duplicate the "Blueprint" layer and fill it with black. Then apply a Gaussian Blur with 2px radius. Then duplicate the "shadow" layer, and apply to the copy another Gaussian Blur with a 10px radius this time. Merge both "shadow" layers and adjust the Hue/Saturation using the values shown at the bottom of this image.


Step 16

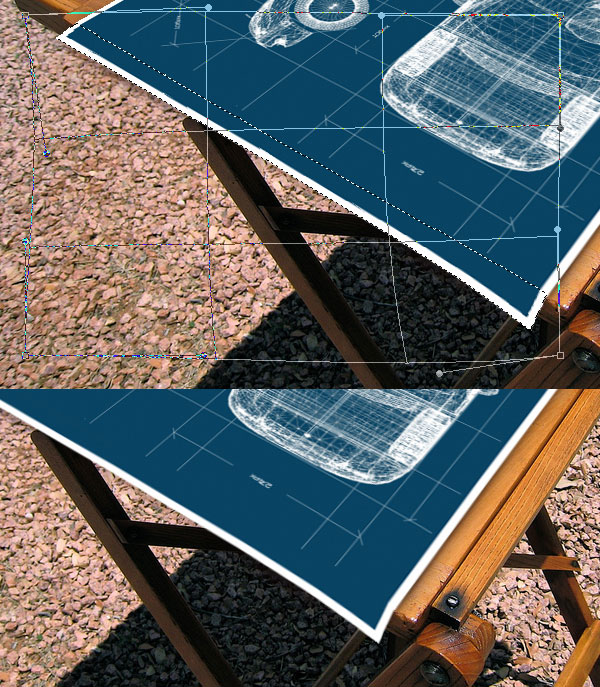
Select all the extra paper out of the left table bounds. Distort it using the Warp tool, just a little bit; ensure that the white border remains the same.


Step 17

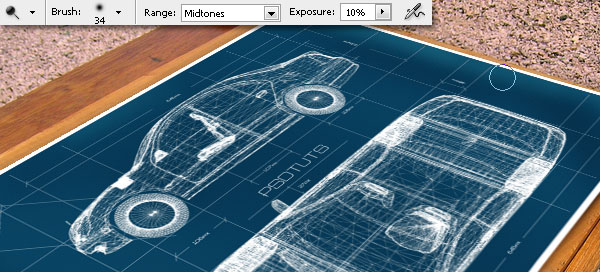
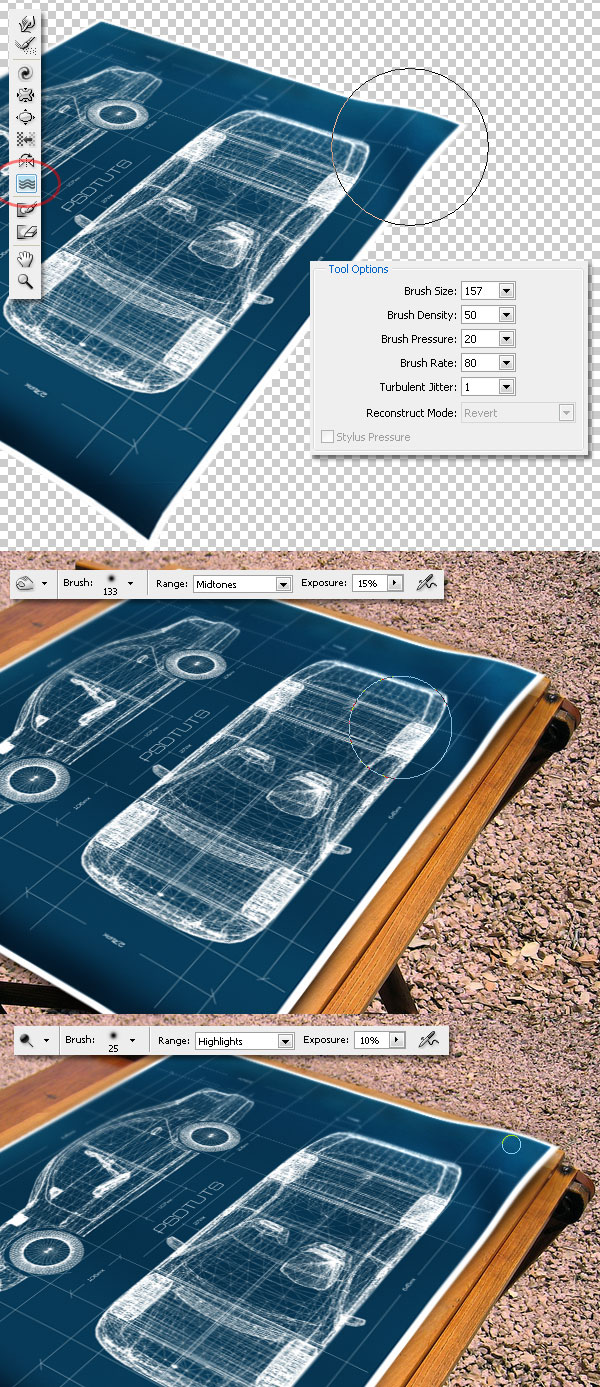
Using a the Burn tool, add some shadows to the folded blueprint. Also, add some random shadows over the entire blueprint surface.


Step 18

With the Dodge tool add some highlights.


Step 19

Duplicate the “Shadow” layer. Then press Ctrl+F to re-apply the last filter again (Gaussian blur 10 px radius). Then use the Eraser tool to delete some areas of the new shadow. Delete all the areas outside the table too.


Step 20

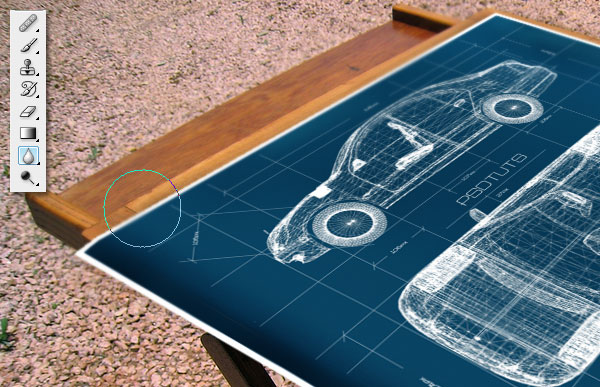
Using the Blur tool, blur the image a little bit at the top and right side of the blueprint. Don’t overdo this, rather apply only the necessary blur amount.


Step 21

Select the “Blueprint” layer of our mock-up. Then click on Filters > Liquify. In the Liquify Filter Window select the Turbulence tool. Then set the values as shown below; just do a few soft click and drags to create more wrinkles over the plane. Then click OK. You can use the Dodge and Burn tools again to get a better result.


Conclusion

This is it! a simple and fast technique to create blueprints of real objects using Photoshop Extended CS3′s 3D tools. Try it using some architectural models like a house or a building. If you work with this kind of design, you can blow your clients minds.

Read More

Does Photoshop Really Cost Too Much?


Let’s be honest, Photoshop isn’t cheap. Most of us have probably complained about the cost of Photoshop, and Adobe products in general at some point in our careers. The fact is that none of us could do our job without it. It’s an advanced application meant for professional users. It is used by people in all walks of life, from photographers to web designers; but is it worth the $699 price tag? In this article, we will take a balanced look at whether or not Photoshop costs too much, not enough, or if it is priced just right.


Before we get started let’s take a look at what inspired this article. A few months ago, former Digg CEO Kevin Rose (@KevinRose) posted the following tweet:

He’s not alone in that sentiment, of course. In addition to Rose, other users feel the price tag is way too high. When I posed the question about Adobe pricing on Twitter user @cothrift replied with, "Photoshop’s price is steep, [and] the constant updates every year makes affording it hard." Another Twitter user, @BreRoz responded, "I think the software is expensive but I’ve been lucky enough to have had my employers provide it for me. I don’t know if I would be able to get it otherwise."

Right now, the latest version of Adobe Photoshop CS5 sells for $699 to buy or $199 if you upgrade from a previous version. If you are lucky enough to be eligible for student or educator rates you’ll be shelling out $199 for the full "Extended Teacher and Student Edition." But are these prices worth it? As usual, there are two sides to the story.

If you look at it from a business standpoint, you can argue that such pricing levels are justifiable based on the amount of Research and Development that goes into constantly building up and improving the product. Designers are continuously pushing the envelope with their creations, which translates into needing bigger and better products.

Secondly, the chances of a designer making that money back – and then some – are high so this can be viewed as a professional investment. If you have doubts, calculate your ROI…how many projects will you have to land in order to make your money back based on your current hourly or project rate? If you’re able to spare the initial investment then your upgrades down the line are about a third of the cost.

Todd Hemker, co-owner of the design company Yellowshed breaks it down this way: "It’s not like there’s a formula for it – but if I were buying Photoshop as a stand-alone application the initial cost is $699 and the average lifespan of any particular version is roughly two years and we don’t purchase every upgrade. If you use it daily, for example, that brings the cost to under $2.00 a day." Or roughly $60 a month. Chances are most designers, freelance or not, make at least $60 a month or the equivalent. "However," he concedes, " if we were just out of school and working as freelance designers – there’s no way we would be able to put down that kind of cash!"

Now that he’s a more established designer, Hemker’s solution is to buy the bundled pack. Adobe’s Creative Suite 5 Standard costs $1299 to buy and $499 to upgrade from a previous version. The Suite includes the latest versions of Photoshop, InDesign, Illustrator and Acrobat Pro. If purchased separately, all of these components would cost around $2440, nearly double the Suite price. So if a person uses both Photoshop and InDesign, they would essentially receive Illustrator and Acrobat free if they get the Suite. Bulk pricing at its finest, right? Who doesn’t love a "Buy 2-Get 2 Free" deal?

Finally, when compared to other apps like Logic Studio, Pro Tools, Final Cut Pro, the cost is about the same or more leading some to believe that Photoshop is getting a bad rap because it’s the big kid on the block.


The Flip Side

Chances are, however, if you’re a freelancer or a small design firm owner, $1299 – or even $699 for that matter – isn’t pocket change, especially for those just starting out. Many designers turn to alternatives that don’t have the full capabilities of Photoshop. But in reality, there are very few legitimate alternatives to Photoshop on the market and most designers are faced with either paying the full price, pirating a copy, or not buying it at all.

It’s no secret that software piracy – whether it’s Microsoft products or Adobe’s – is a huge problem that these companies are taking a hard stance on. For example, Adobe’s "Anti-piracy initiative" takes the position that software piracy doesn’t just hurt the company, but it hurts retailers ("they may have to limit their selection to titles that won’t be devalued by pirated copies floating around on the Internet.") as well as the consumer. While there are no hard stats on piracy rates specifically for Adobe software (c’mon who’s going to admit to that?), companies DO have their ways of smoking out the culprits. Gregory Fair was convicted a year ago of selling $1 million in pirated Adobe software and sentenced to three-and-a-half years in prison and was ordered to pay the company $743,098 in damages according to the Software & Information Industry Association (SIIA), of which Adobe is a member. In other words, these companies aren’t taking piracy lying down.

A couple of designers (who shall remain nameless, of course) privately responded to my inquiry on Twitter that as design students or new freelancers, they have had to turn to getting their copy from "non-official" places. Many schools require that their students own their own version of Photoshop. So they need it to pursue their education; and at its current cost, they said, they simply can’t afford it.

Over all, it may seem as if small business owners and freelancers are getting the short end of the stick, but not just with Adobe Photoshop. In response to consumer pressures and increased competition, Microsoft has lowered the price of their MS Office Suite of products over the last few years…for their home users. The standard student and home edition is a respectable $149 yet their professional edition for businesses is a huge jump at $499 with the difference being the addition of Outlook, Publisher and Access.  That begs the question, if Adobe were to follow suit, would this cut down on piracy problems and increase legitimate sales?

So what is a freelancer or small business owner to do? Do you think lowering the prices on these products will increase sales and cut down on piracy issues or is it worth paying "elite" prices for what some consider an "elite" product?

Read More

The Cosmos: Create a Supernova and a Ringed Planet in Photoshop


This entry is part 2 of 2 in the series The Cosmos

When stars die, they explode in a brilliant burst of light that releases more energy than our sun releases in its lifetime. This brilliant burst of light is so bright that for a brief moment can outshine an entire galaxy. Supernovas occur in our galaxy about once every 50 years. Put another way, somewhere in the universe, a star explodes every second. This is important because the left over debris from these explosions eventually become planets, moons, air, water, and even life itself. Today’s tutorial will demonstrate how to create a supernova that is about to devastate an entire solar system. Our scene will depict a ringed planet and a fleet of ships struggling to get out of the way in time.

Today’s tutorial is part of a 4-part series depicting the journey of the inhabitance of a dying world that must travel into the unknown to find a new world to call home. In this series, we will explore the cosmos from the perspective of this fictional civilization making their way through the universe and will demonstrate the techniques that you can use in Photoshop to depict your own cosmic scenery. In addition to written content, this tutorial also includes over an hour of video instruction to help you along the way. So what are you waiting for? Will our fleet of ships survive this massive explosion? Let’s get started!


Tutorial Assets

The following assets were used during the production of this tutorial.


Step 1 – Giant Planet

We will start up by creating the foreground main character the big ringed planet, and we will do this using this texture, so follow the link up there for the planet texture and download it.

Ok once you have it open it in Photoshop and duplicate the layer and rotate the copy 190 degrees counter clock wise.

Set this new layer to overlay so we get nice intense colors and then merge the layers.

Next up let’s apply a motion blur completely horizontal like shown below, and repeat the filter about 6 times.

Ok perfect now let’s get creative, grab the smudge tool with a big soft brush as shown below.

And let’s start smudging horizontally with a bit of wrist action so we create some forms in our stripped texture and eliminate all completely straight lines.

Now let’s reduce the size of our brush a bit as shown here so we can smudge some greater detail all over the texture, the screens here give you some insight on how to do this but you are better off watching the video for this part and then get creative yourself with the smudging.

Perfect, once we are happy with the texture and have smudged out all traces of the motion filter let’s create a new layer.

Once the layer it’s created, let’s sample a light blue from the canvas, and the custom brush indicated below.

Now let’s modify this brush a bit by adding some settings in the brush palette. First of enable transfer and shape dynamics as shown below and enable pen pressure for both opacity jitter and size jitter as shown below.

Now let’s set up these settings for the brush tip shape. And as you can see in the preview we are getting a nice cloudy looking brush.

Ok now let’s start brushing some tiny clouds as shown below, riding the streams of swift layers below and following these shapes.

Ok right here you can see what I came up with, so now let’s give this cloud a bit of a shadow so it looks a bit over the general surface of the planet streams with the settings shown below.

Perfect, now sample some dark color from the image and let’s paint in some darker spots over the cloud so it has more depth as shown here with the same brush and settings.

Now repeat the process in a couple of more cloud groups, but don’t overdo it; it’s just detail.

Next grab the smudge tool back and smudge some wisps out of the cloud edges as shown below, just to make them integrate just a bit with the flows below.

Once we are satisfied let’s merge both layers back together.

Now its time to create our final piece document and start working on it so let’s do this size shown and fill the background with black.

Perfect, now just copy and paste our texture on to this new document in a new layer

And now just scale it down within the borders of our new canvas.

Next up let’s grab the elliptical marquee tool and drag a perfect round selection holding shift and if needed scale it right to the edge of the texture by right clicking on it and selecting "transform selection" as shown below.

Great, now invert the selection and delete whatever its outside so we have a perfect circle.

Now let’s invert the selection back and spherize it so that we have the planet look on our texture; now for gas giants like this I spherize much less than usual for other planets so just apply the settings below or experiment to your liking.

Now that we are done with that let’s just scale it a bit and rotate it if you want to give our composition something more dynamic.

And finally let’s apply a levels adjustment layer to our planet with the settings below so we can create a shadow for it.

Ok Now we have a dark planet all around so let’s grab a big soft brush as shown and mask off the darkening effect using black as shown below. And that gives us a nicely light exposed section of the planet.


Step 2 – Sun Flare and Perspective Grid

Next up we will be creating a flare so that we know where the light is coming from and also a perspective grid to keep our sights in the right place. So first we need our big soft brush and less intense orange such as this below and we will be continuously reducing the brush and increasing the brightness and color.

So next up we reduce our brush a bit and select a muted yellow to add to the first orange stroke.

And we keep adding the same process to the flare selecting a much brighter yellow and a much smaller brush

So we repeat the process as needed until we have what we want, but remember right now we only want a flare to remind us of the position, we will build on this much deeper later.

Ok let’s move on and create a perspective grid to help us keep our creations in place. We will need a new layer for this and then just select the vanishing point filter.

Now just click to create a 4 point grid and drag the corners until you get something like this below. And then select render grids to Photoshop so that the grid appears in our new layer.

And there it is exactly as we traced it; now let’s just reduce the opacity a bit so it helps us but doesn’t intrude.


Step 3 – Planet Rings

Now let’s create some rings for our planet; there are several ways to do this, this one has a great deal of control over the look of the rings and its pretty straight forward. So we will create a new document with the settings shown below so we get big defined rings.

Now select a medium gray and fill your canvas with it.

Ok now grab your circular shape tool and define a big circle that sits well within the edges of our document and center it.

Ok now double click on the shape color and change it to black as shown here.

Perfect now to create our rings we will be using the outer glow and inner glow in the layer style settings, so double click on the layer so you get this.

Ok do no for the outer glow select a white to transparent simple gradient, it is also included in the project files if you need it. And then set the opacity size and quality contour as shown below.

Now the custom contour its also included in the project files, but if you wish to edit one yourself, just select any contour and then click on the small thumbnail so you get this screen where you can drag and add points to the curves and immediately see the changes in the rings.

One you are finished with your experimenting with the curves then apply these settings to the inner glow so you get more rings defined inside the circle; load the custom contour or make another one you like.

Ok now it’s very important to set the range and jitter for our contours plus select the anti-aliasing option so we get smooth rings. The range and jitter control for the quality of the contour affects the appearance of the rings directly, you can test this and see the results so you can choose the look of your rings.

Ok then we need to duplicate the layer to keep it safe if we need to modify something on the rings. Then hide the original layer and rasterize the copy and create a new layer so we can merge both the copy and the empty layer. This flattens everything in the layer styles.

We now need to drag a circular selection over the center of the resulting layer and transform it to fit perfectly centered inside the rings; once this is set right click on the selection and choose feather to apply a 50 px fade to it. Then just delete the center.

Perfect now we can copy and paste the rings to our main document and set the layer mode to screen.

Ok as rings are made from small particles, we will create this effect by applying some grain to them, with the grain filter and the settings shown below.

The resulting grain has much coloring and we need to eliminate this so let’s desaturate our layer so we get only black and white information as the result shows below.

Perfect we are finished with the effects now let’s scale and rotate our rings into place as I show below.

Once you have the rings in place drag the layer on top of the planet and create a layer mask for it that we will use to mask off part of the ring so it looks like it surrounds the planet. We need to mask off only inside the circumference of the planet so make a selection of the planet sphere by hitting Command/Ctrl + click on the planet layer thumbnail.

And now with a big brush just mask off with black all the rings that would be behind the planet as shown below.

Next let’s create some shadow for the rings too the same as we did for the planet, so create a levels layer and select clipping mask so it only affects the rings; then adjust the levels as shown below.

Now we need a big soft brush to mask off the darkening effect from the lit areas, so grab this brush and set the opacity of it about half way down.

Now just mask of everything but leave a shadow as shown below that represents the planet shadow falling over the back section of the rings as shown below.

Ok now just to finish it up for now reduce the opacity of the rings a bit so the appearance its a bit more subtle. And that is it for this step.


Step 4 – Blast Effects Perspective

To begin building up the main action of our image we will start up by establishing a perspective and flow for this effect following the perspective offered by our grid created previously. Ok grab the circular selection tool and define a big selection inside the boundaries of our image and create a new layer to start painting.

Then select a bright yellow as shown here and grab a fairly small brush like the one below.

Now paint some strokes in a circular pattern close to the center of the selection and apply a radial blur with the settings shown below.

We get the results here, and we are going to increasingly build up on it by repeating the process; painting more strokes and applying the radial blur again, this time twice.

And again let’s repeat the same steps, but this time let’s paint a couple of concentric lines of strokes and then apply the radial blur again 3 times.

We will now modify the results of the last radial blur by accessing the fade option and eliminating a bit of percentage of the last filter

You can see that by reducing the effect of the last filter we can still see some of the circular brush strokes, which give a nice layered blast look.

Ok so now let’s use the distort tool to arrange the perspective and size of our blast into position as shown below.

Once in place set this layer mode to screen, then duplicate the layer and set the copy layer mode to overlay.

And this is what we have so far a nice blast base for us to build up around.


Step 5 – Blast Cloud Structure

Next up we will be building up on what we have for the blast cloud right now so for these we need a new layer and let’s pick up a nice bright yellow plus one of our big custom brushes shown below.

Now let’s stamp a few times to get something we like.

Then let’s pick up another brush and make a few additions like shown below.

Once we have something we are satisfied with for this stage, let’s use the distort Command/Ctrl and modify it following the perspective grid guide.

Perfect, now let’s select yet another brush, this time we will add the settings shown below in the brush palette.

Now just add some vertical cloudy strokes in the section shown here; you can undo and redo until you get something nice.

Then I selected a couple of more brushes shown here and added a bit more all over the image.

This is what I came up with so far we have a nice base structure to work with.

It is time to add some personality and unique qualities to this cloud structure, so grab the smudge tool with a brush and size as shown below.

And now start smudging flow and detail all over the image as shown in red.

Next we will need a new layer and yet another brush where we will stamp a new pattern to add to our work as shown below.

And select this other brush and add a bit more variation.

Ok once you are satisfied distort this layer into perspective the same way we did before.

And once again let’s pick up this other brush and add some structures to the top as shown below.

And then we simply grab the eraser with a big soft brush and erase some sections to give the sense of depth.

Now we need to merge down all the layers we have been working on.

Then its time to continue our smudging all over to increase what we did before adding flow and detail all over the cloud; this process benefits quite a bit from the video so you might want to take a good look at it. Also indicated in green below I masked off softly the bottom of the planet so it feel sitting inside the blast cloud.


Step 6 – Color for the cloud

Ok so far we have been working with a mono tone cloud since that way its easier to work with the smudge tool plus the flow and detail of the texture; but now its time to add some color to our work. So let’s make a gradient layer on top of the cloud layer and select the gradient I have prepared for you shown below.

Then set the layer mode to multiply and adjust the gradient as shown here, and drag the center of the gradient on top of the main light in the canvas.

Depending on what you see you might want to change color position a bit or maybe you want to change them into something you prefer.

Once the adjustments are ready, duplicate and rasterize the layer. Then hide the original.

Ok next up we will grab the smudge tool once again and select a brush such as this below.

Now as you can see in these before and after picks, we will distribute the color following the flow of our base cloud.

Now let’s add a couple of adjustment layers to control our gradient. First create a hue saturation layer and add a clipping mask to it.

Now adjust the settings for the layer as shown here.

Now let’s grab our paintbrush soft and big so we can mask off this layer effect from our image as shown below.

Now we also need a color balance layer and adjust as shown below.

And again we mask it off where we don’t want the effect to go through.

And then one more layer this time a levels layer and adjust as shown below.

We repeat the process masking of the effect where we don’t need it marked here in red.

Now to pair up the ringed planet with the new colors, we must go down to the planet adjustment layers and make some work there. Let’s first add a hue saturation for the planet sphere layer and adjust as shown here.

Now fill the layer mask completely with black so the effect disappears completely.

And now with the same big soft brush and white we mask IN the yellow effect only where we need it as shown here.

Now select the levels layer we already have for the planet, and readjust as shown here.

Now go back to our original gradient fill layer, duplicate and rasterize it.

Drag the layer all the way to the top and set its mode to screen.

Now just reduce its opacity to 18%

And again grab our big soft brush and mask off this layer influence where we don’t need it as shown below.

So let’s add first a hue saturation layer for the rings as shown here.

Then just adjust the settings as shown here which gives us the hue needed to pair it up with the image.


Step 7 – Small Planets

Ok for this next step we will be adding a couple of far away small planets to enhance our composition. So first off let’s grab the ellipse shape tool and define a big enough shape as shown here.

Then rasterize the layer and lock the pixels as shown below.

Now let’s use these two brushes below to stamp some texture in our circular shape using black.

Now by holding the Command/Ctrl key, click on the layer thumbnail to make a quick selection of the circular shape and let’s go to the spherize filter.

Apply the filter twice with the settings shown here.


Now scale the result quite a bit and move it into position as shown below.

Now we will need a couple of adjustment layers for the planet, let’s start with a levels layer, and clip it to the planet as shown below.

Then adjust the levels layer as seen here

Now using a small soft brush let’s mask off the darkening effect of this layer, to create the light side of this planet.

Next create a hue/saturation layer and adjust it as shown below.

And then follow the process once again to create another small planet we will place at the right side.

Here are both planets set and a cool addition to our image.

Now let’s go to our top gradient layer and grab our elliptical lasso tool.

Now define a shape behind the planet as shown here that points in the opposite direction of the light source. And then right click on the defined selection to apply feather to its border with a radius of 5 pixels.

Once we have the selection feathered, grab the paintbrush back and set its size as shown, plus select a soft brush.

Now just mask off with this brush on the gradient layer to get the effect shown here.

Repeat the same steps for the other planet as shown here.

And here we have it both planets with a nice shadow streak behind them.

Now increase the opacity of the layer just a bit and grab our soft brush once again.

With this brush just soften up the shadow as needed and eliminate the brighter effect masking it of, behind the planet and where darkness should remain as shown below.

Steps 8-12 Continued on Page 2

The rest of this tutorial can be found on page 2 below.

Read More