Twice a month we revisit some of our reader’s favorite posts from back in the archives of Aetuts+. Today we’ll look at a tutorial originally published in March 2009 by Tan Wei Yan. Enjoy!
In this tutorial you will learn how to create and animate a beautiful and fully animatable 3D flower that can be the star or simply a design element of any motion graphics piece.
Tutorial
Step 1
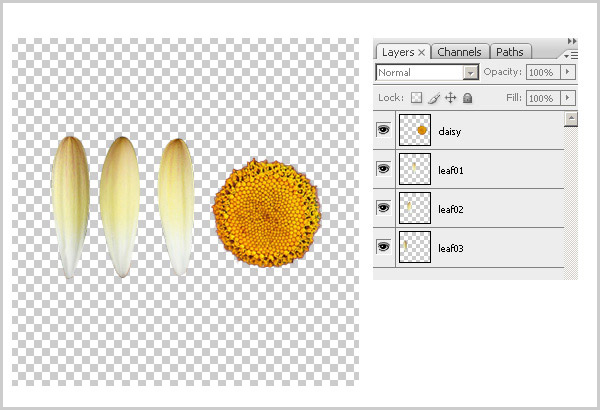
Before we start, I was used Adobe After Effects CS3 and Photoshop and no 3rd party plug-ins were used in this tutorial. I believe if you are using AE6.0 and above, you should be able to achieve this tutorial. I am assuming you have some basic knowledge regarding 3d layers in After Effects. First, I prepared a few daisy flower leaves in the Photoshop. As you can see this is a very simple shape and you can trace it out from the photo and separate each on different layers.
Step 2
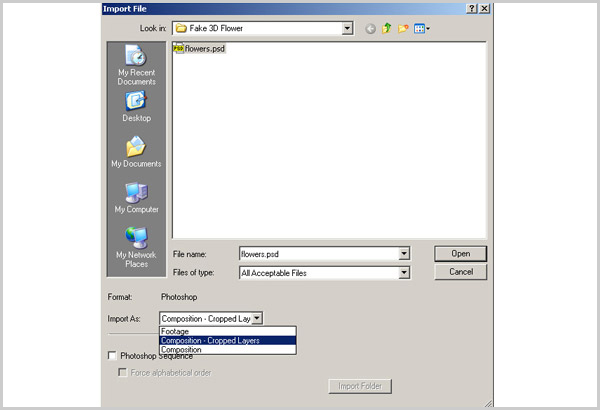
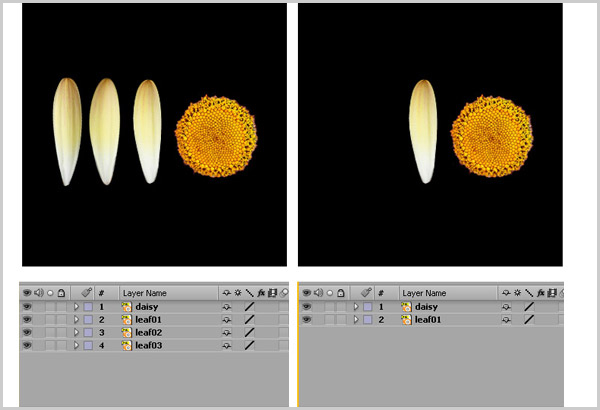
Open After Effect, go to File > import > File, choose the destination of your PSD file and import as “Composition – Cropped Layers”. This will create a composition for your PSD layer file. Double click to open the composition you will see all the layer in PSD is nicely appearing in the composition.
Step 3
Delete 2 layers and leave only one leaf. (In this case I am only using one leaf, but if u wish u can use all together to achieve a nicer flower). And “solo” the leaf as we only need to see one leaf at this moment.
Step 4
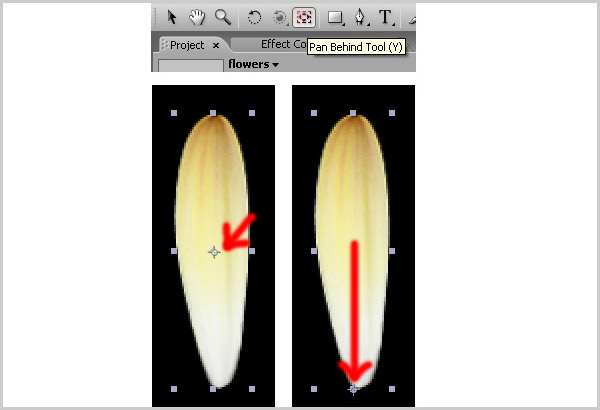
Now, go to the toolbar at the top and click on Pan Behind Tool, then, click on the center anchor point of the leaf and drag it to the bottom.
Step 5
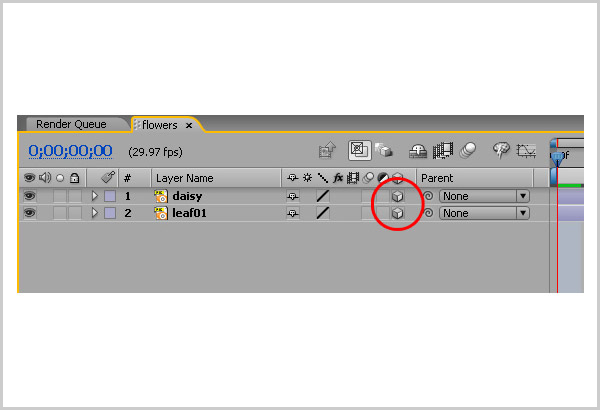
Switch on the 3d layer for all layers.
Step 6
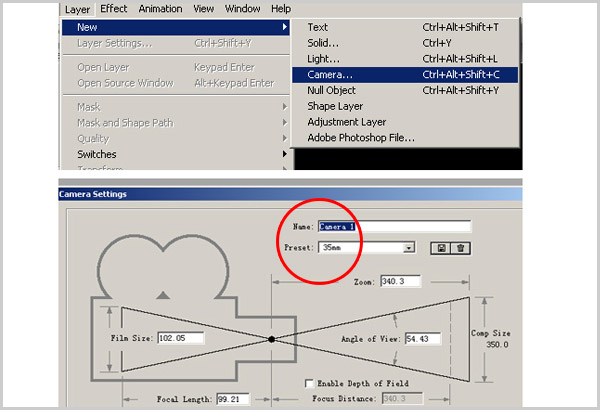
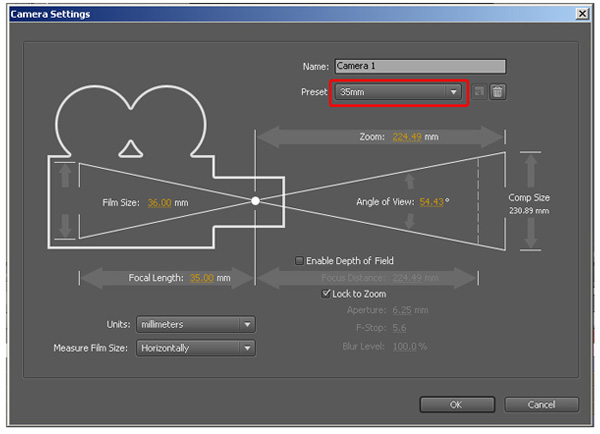
Go to Layer > New > Camera > Set the camera Preset to “35mm”. Click OK.
Step 7
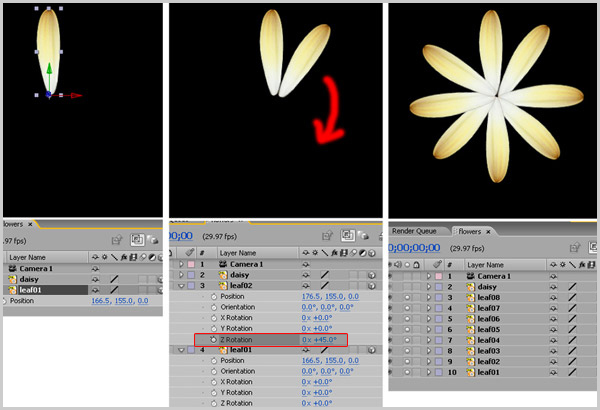
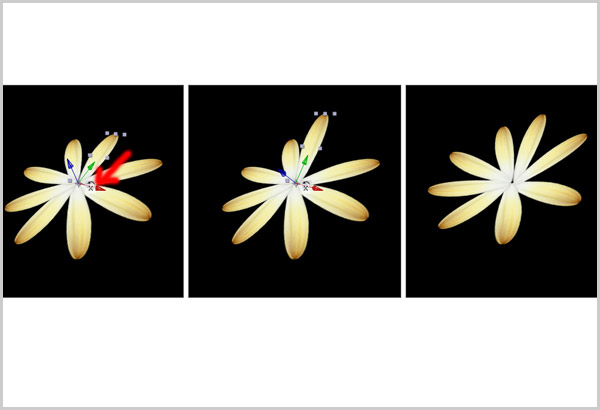
Move the leaf01 a little bit. By selecting the leaf01 layer, press on “Crt + d” to copy another layer, rotate it 45 degree. Repeat this step by copy out 8 layers and rotate it like photo below.
Step 8
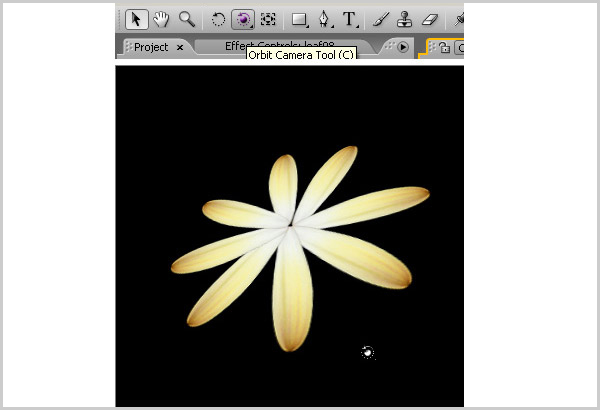
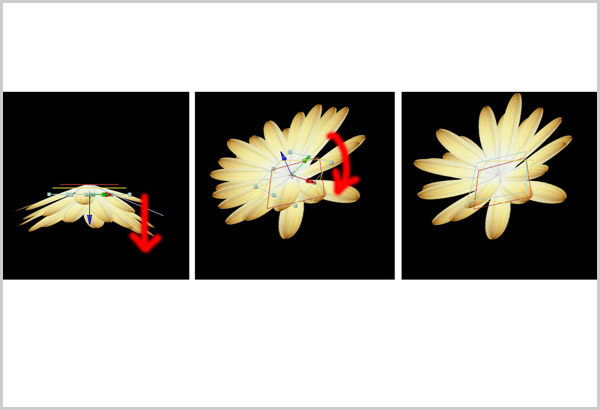
Now, click on the Orbit Camera Tool at top of the toolbar, inside the composition area try to rotate and you will see it starts to look 3d.But this is not enough.
Step 9
Click on the Rotate Tool at top of the toolbar. Select one of the leaf layer and rollover the x position (Red color) and rotate it. Repeat this for the other layers and you will see it starts to looks nicer in the 3d layer view.
Step 10
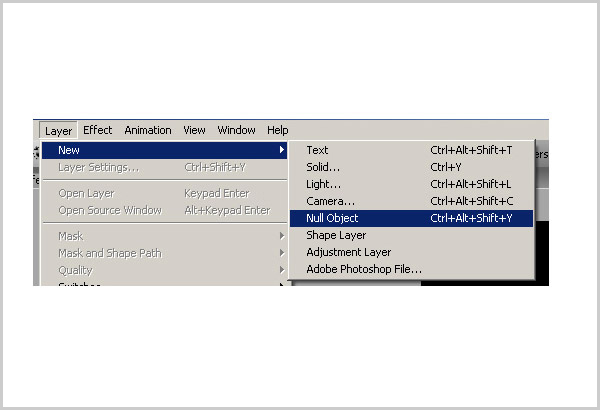
Go to Layer > New > Create a Null Object.
Step 11
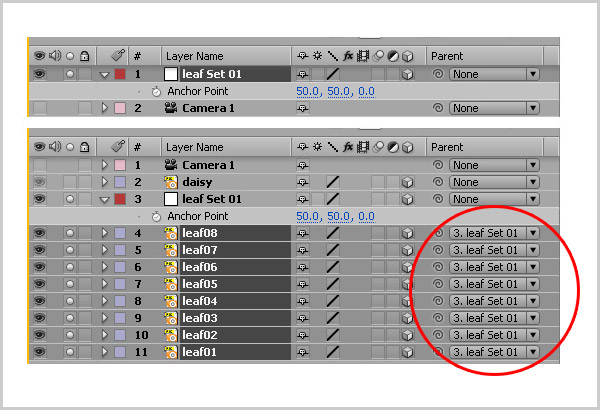
Rename the Null object to “leaf Set 01”.Position it to the center of the leaf. Turn on the 3d switch for the layers. (This is important because the null object is to control the set of leaves in 3d space.)
Step 12
Set the null object Anchor Point to 50 , 50 , 0.After that, Select all the leaf layers and parent them to the leaf Set 01.
Step 13
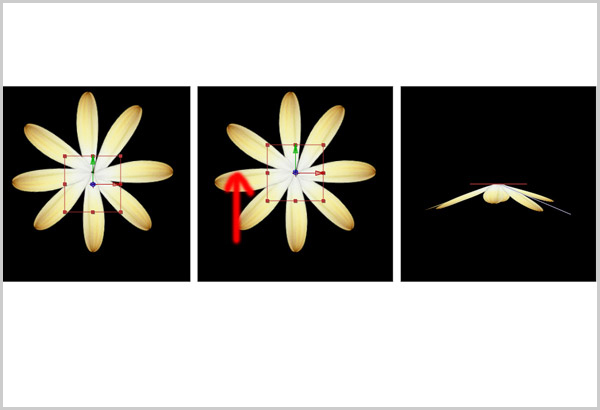
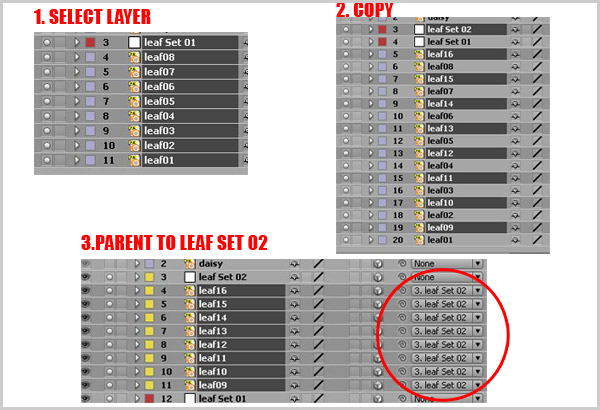
And now we need to create another set of leaves. By selecting all the leaf layers and null object together, press “Crt + d” to copy a set of layer, move all to the top, you can change the label color in order to not confuse the layer sets. Now is the important step, select the layers from leaf09 – leaf16 and “Parent” them to leaf Set02.
Step 14
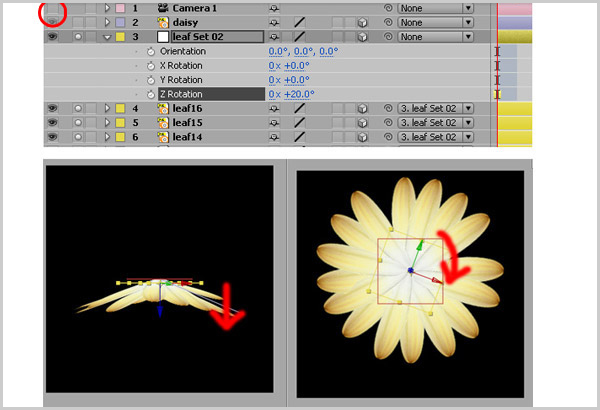
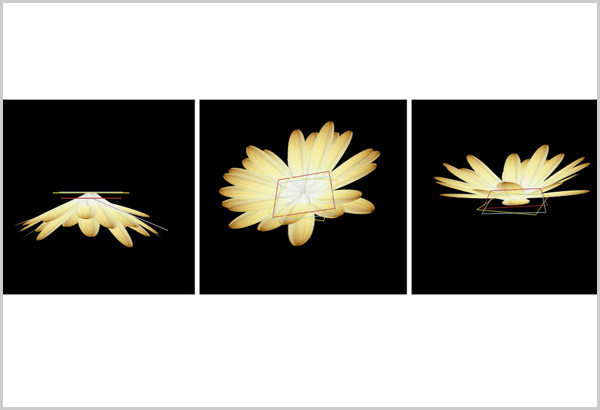
Hide the camera. Select the leaf set 02 and start to move the “Z” position from the top view.
Step 15
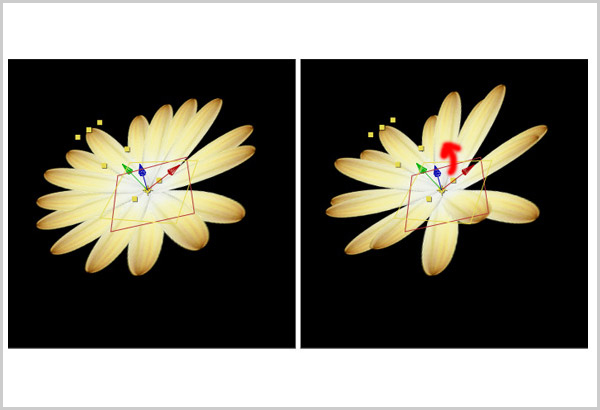
Unhide the camera again, but the leaf looks a bit flat. So now we repeat the Step09 and rotate a bit angle for layer leaf09 – leaf16.And now you will see it look more depth and nicer 3d feel.
Step 16
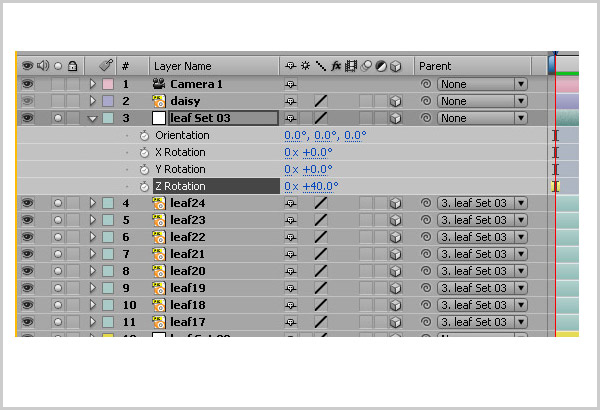
Repeat the step 13 to create another leaf layer set.
Step 17
This time only rotate the null object to get a nicer 3d depth feel.
Step 18
You can position it until you are satisfied with the flower leaf by just rotating and moving the null object that we created.
Step 19
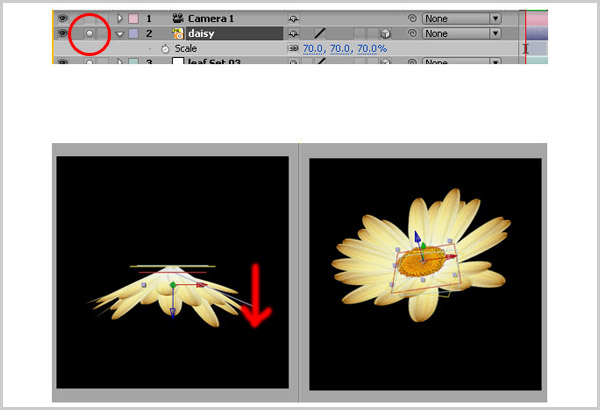
Now we solo the daisy layer. Position it at the center of the leaf.
Step 20
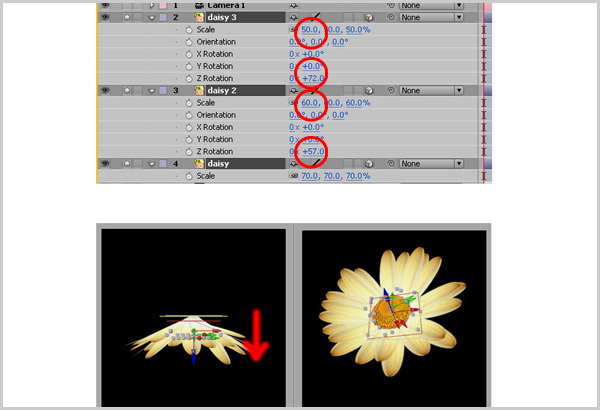
Copy 2 more layers and move on the top in order to get a nicer 3d depth. You can scale it and rotate the z position so it will not look like a repeated image.
Step 21
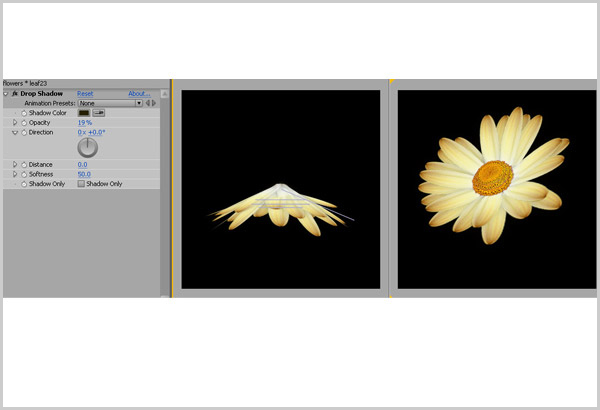
The flower is done! You can always use the orbit camera tool to view your flowers. At last, you can try to put some drop shadow effect in each leaf in order to make it more interesting!!
Step 22
Animate the Blooming Flower
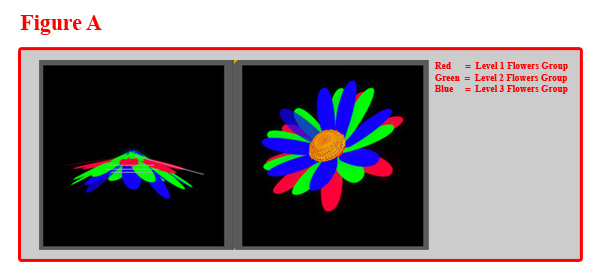
Before we start animation of blooming flower. I prepared Figure A to show you the level group of the leaf. This will help you have a clear mind when I continue with next steps on rotating the orientation of the leaves.
Step 23
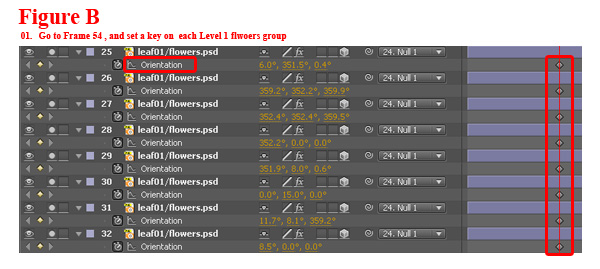
Now select the set layer of "level 1 flower group", go to frame 54, and set the key like figure B below. In this step we don’t need to rotate or change value because we need to keep this as the last keyframe.
Step 24
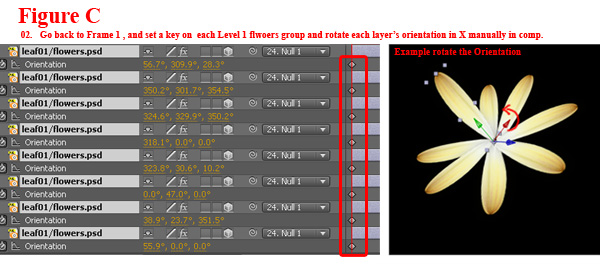
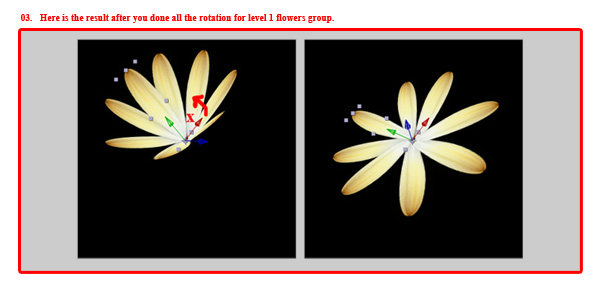
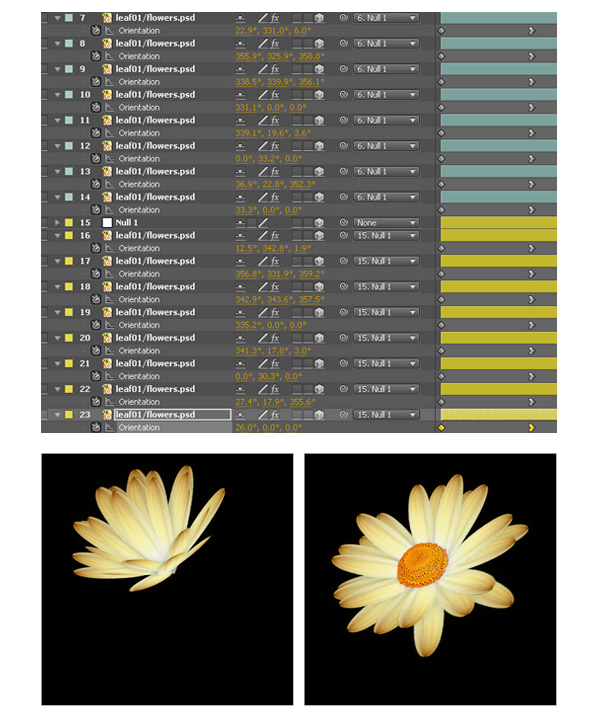
Go back to frame 1 and set the key on level 1 flowers group. Click on the Rotate Tool at top of the toolbar. And start to rotate orientation “X” position in comp for each layer. It depends on how you want the flowers to be opened and setting up your orientation that’s why in this state you can decide yourself how you want the flower to bloom out. Remember this is only level 1 flowers group layer and try not to rotate too much or else you will get a overlapping when you animated others level group.
Step 25
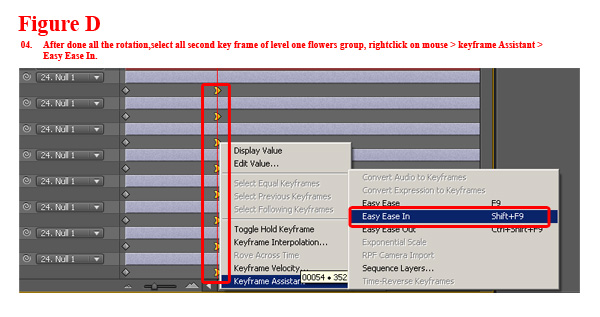
After you done animate each layer, select second keyframe of each layer in level 1 flower group , right click on your mouse > keyframe assistant > easy ease in to smooth out the transition.
Step 26
Note : Repeat the Step 23-25 and apply on other level flower groups – LEVEL 2 & LEVEL 3 Flower Group. And you should see the animation result now.
Step 27
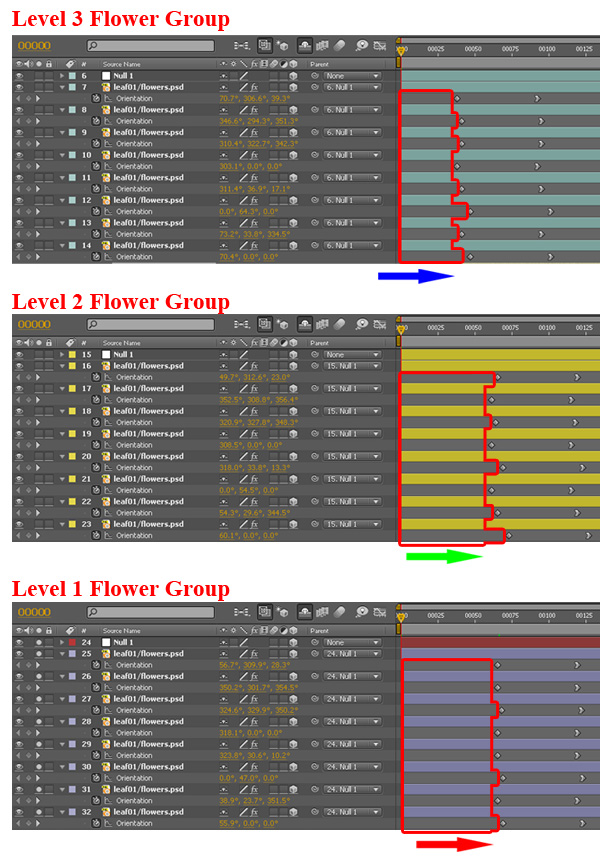
When you complete all set of setting the rotation keys, it’s time to make some different timing within each leaf in order to get a natural blooming look of the flower. Here is the timeline I used to make the timing different. I started from level 3 flower group and then level 2 and lastly level 1.For level 3 I was trying to make the timing start after frame 25.Level 2 was start after frame 50, and level 1 was start after frame 65. You don’t have to follow the same timing but it is roughly there. You are free to adjust how the flower opening is to be animated.
Step 28
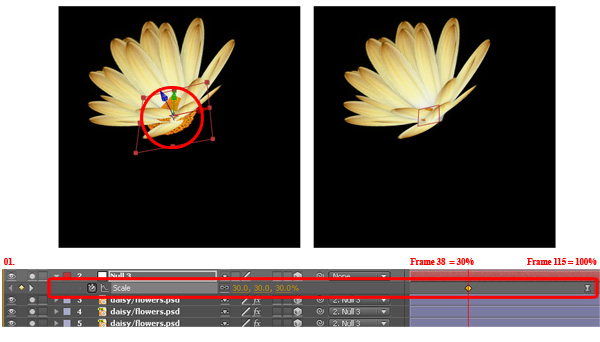
Now that the petals are animated, the last step is to animate the whole daisy. But this time we only need to animate the null object since it’s the parent of the daisy. Go to frame 38 and set the first key on Scale size to 30% , and go to frame 115 and set the Scale size on 100%. After this state you will see a nice blooming flower!
Step 29
Combine Particle Effect.
This is an optional step in this tutorial and requires the Trapcode Particular plugin
1. Composition > New composition, name it as “Particle Comp”.
2. Go to Layer > New > Solid, name it as “Particle”.
3. Click on Effect > Trapcode > Particular.
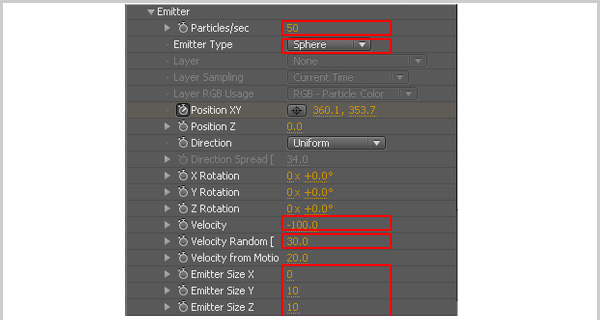
4. Now click on open the Emitter panel and change the particle/sec to 50 , Emitter type to Sphere.
5. Change the velocity to -100 and Velocity Random to 30.
6. Set the Emitter Size X to 0 , Emitter Size Y to 10 , Emitter Size Z to 10.
Step 30
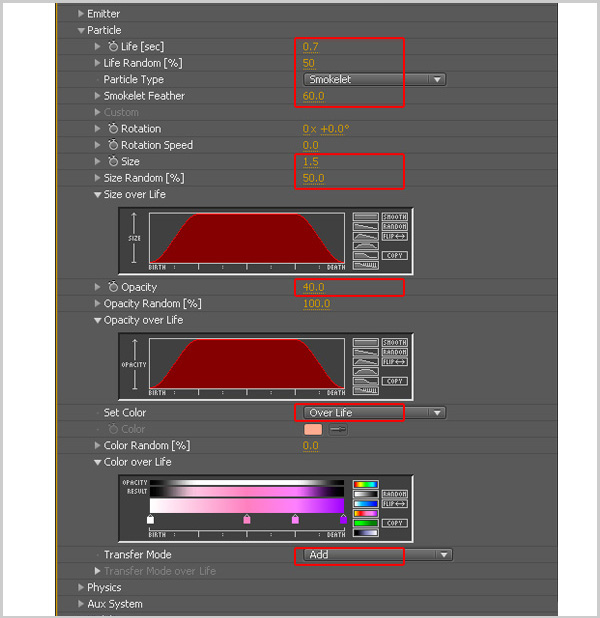
1. Open the Particle panel; change the life to 0.7 and life random to 50 %.
2. Change Particle Type to “Smokelet” and Smokelet feather to 60.
3. Then set the size to 1.5 and size random as 50%.
4. Change the opacity to 40 and set the color to “Over Life”.
5. Transfer Mode set to “Add”.
Step 31
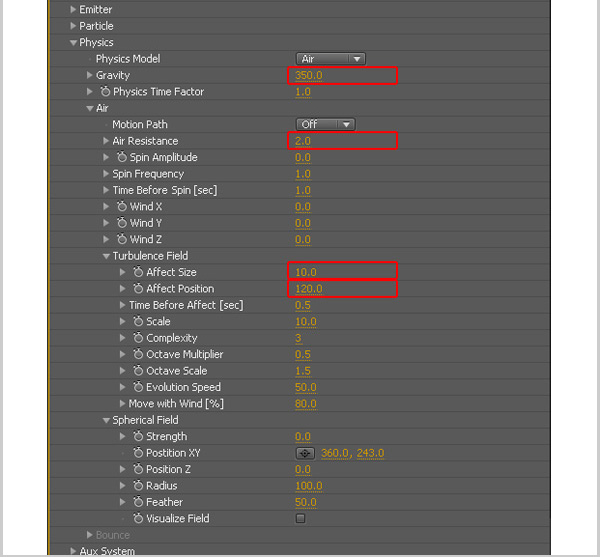
1. Now, we need to set some physics in order to make the particle more organic and more random. Open the physics panel. Set the Gravity to 350.
2. Set the Air Resistance to 2.
3. Last, we need to put in some turbulence so when the particle is moving it will random on size and position. Change the affect size to 10 and affect position to 120.
Step 32
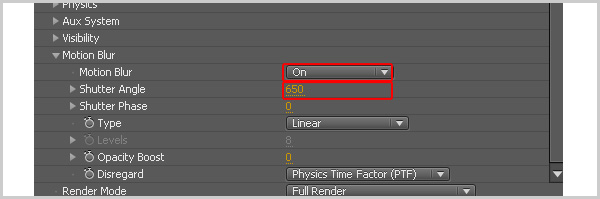
Put some motion blur on the particle. So, turn the motion to On. And Set the Shutter angle to 650.
Step 33
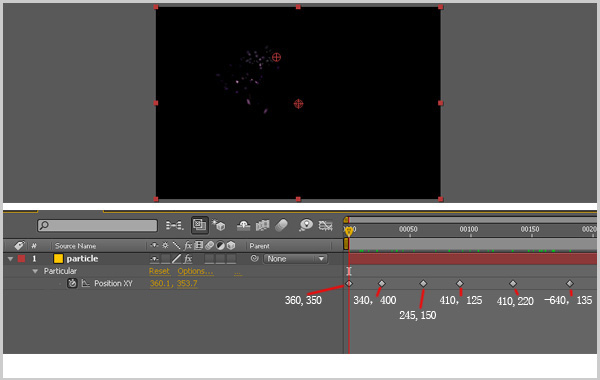
The final step is to animated the position of particle. Try to set the key and animated the position like figure below. And you will see the cool result!
Step 34
Create Water Wave Effect.
Now , we need to create a simple water wave.
1. Composition > New composition, name it as “Wave”. Click ok.
2. Go to Layer > New > Solid.
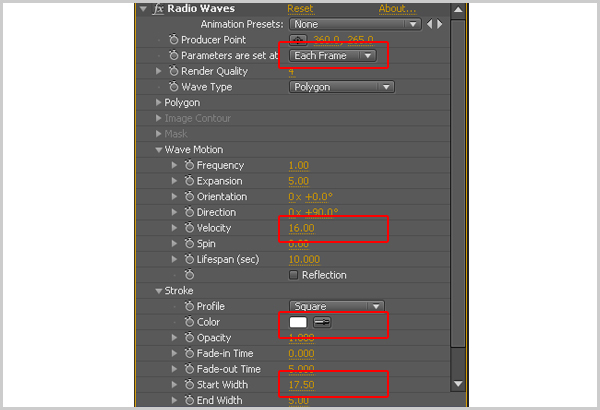
3. Click on Effect > Generate > Radio Waves, set the value like below.Parameter to "Each Frame".
4. Open the Wave Motion panel and set the velocity to 16
5. Open stroke and change the color to white.Start width to "17.50".
Step 35
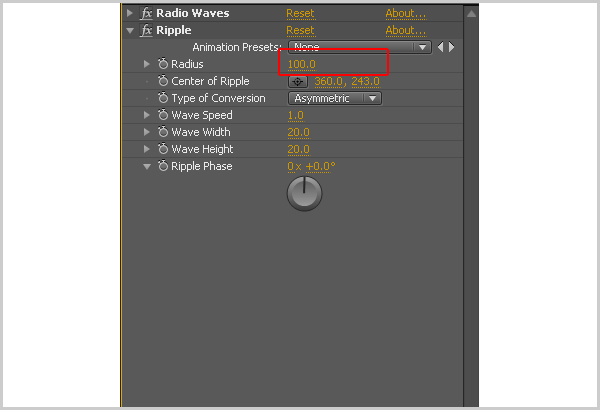
Now, we need to add a little bit of ripple effect.Click on Effect > Distort > Ripple , and change the radius to 100.So if you drag on your timeline now you can see the animation result.
Step 36
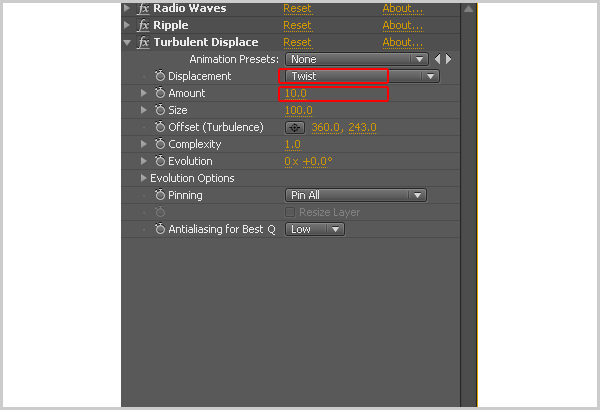
And i always like to add a bit of distortion.So, Click on Effect > Distort > Turbulent Displace. Then set Displacement to “Twist” and amount to 10.
Step 37
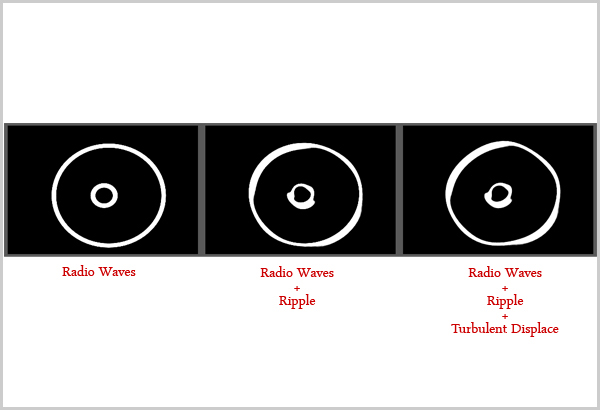
So you will see the result on the figure.And you will see the cool result!I see you on next tuturial for combine this water wave & particle with flower and logo animation. I hope you enjoy this tutorial! Thank you.
Step 38
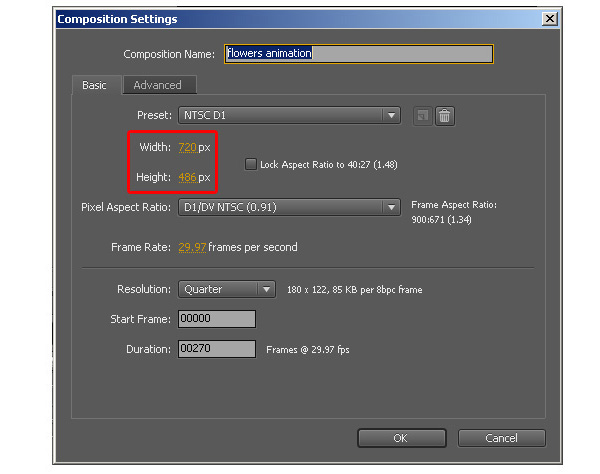
1. Go to Composition > New composition and set your comp size to 720 x 486.Name it as “flowers animation” (You can name whatever you like.)
2. Go to Layer > New > Camera. Setting up the lens like below.
Step 39
Animated the fall down flower
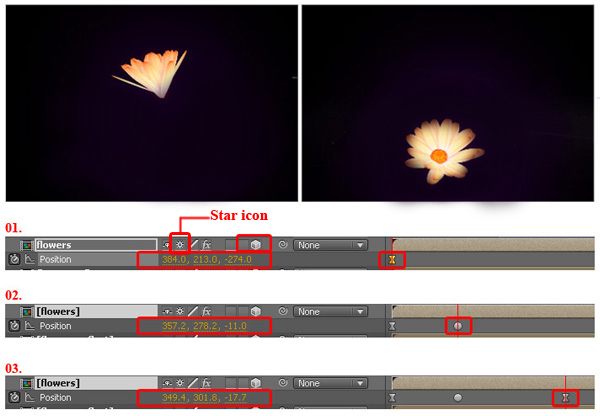
Now, drag your flower into comp and turn on the 3d layer. And you need to turn the "star" icon as well.With this turn on it will showing 3d layer inside your comp.Set the first keyframe value as 384 , 213 , -274.Set the second key at frame 45 and the value 357 , 278 , -11. Last, set the third key at frame 119 and the value are 349, 301, -17.
Step 40
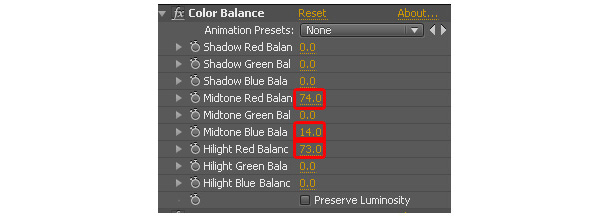
Before we go next step I need to adjust the color of the flower. Go to Effects > Color Correction > Color Balance, and change the value like below.
Step 41
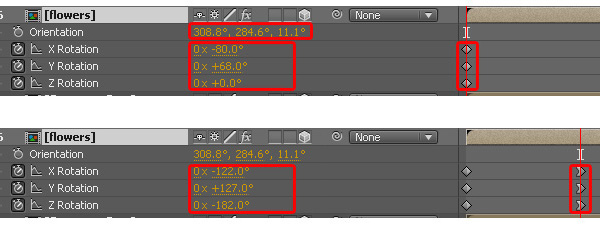
Open transform panel and change the orientation value to 308, 284, 11.Now we need to rotate the flowers. Set the first key on each x, y and z. rotation. Value X as -80 , Y as 68 , Z as 0.After that set the second key frame at frame 66.X as -122 , Y as 127 and Z as -182.And now you should see the animation result of the flower.
Step 42
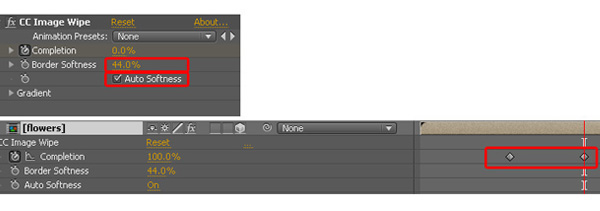
Here we add some effect on the flower to make a different type of dissolve. I like to use this effect which is CC Image Wipe. Go to Effects > Transition > CC Image Wipe. Turn on the “Auto Softness” and set the Border Softness to 44. Now we set the first key at Frame 70 with completion at 0.Second key at frame 128 at 100.
Step 43
Create Reflection of the Flower.
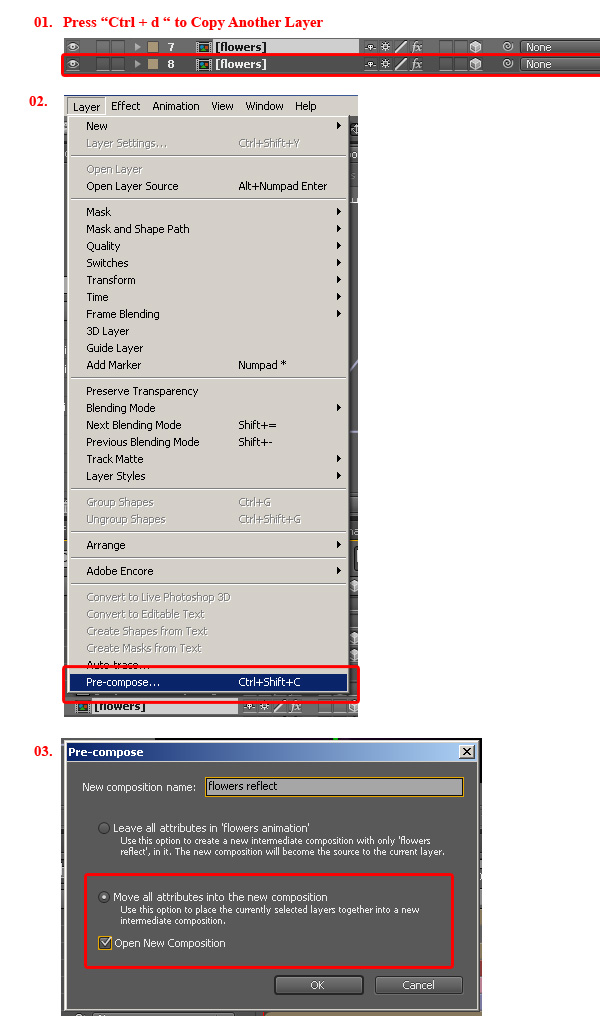
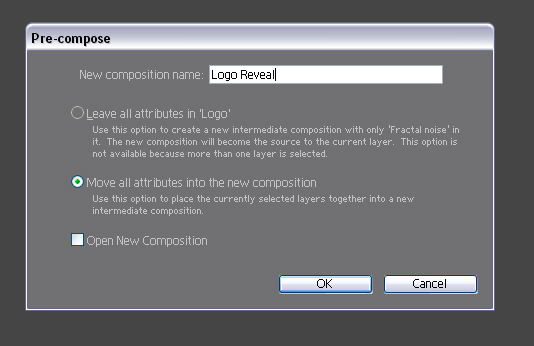
By selecting the flower comp, press “Ctrl + d” to copy another layer. Select the duplicated layer and go to Layer > Pre-compose. Pre-compose is a function that can create a composition inside another composition. In the Pre-Compose dialog box you can name your composition as “Flower Reflect” and click on “Move all Attributes into the new composition”, check on the “open new composition” as well. In this case you will jump into the composition that you just created.
Step 44
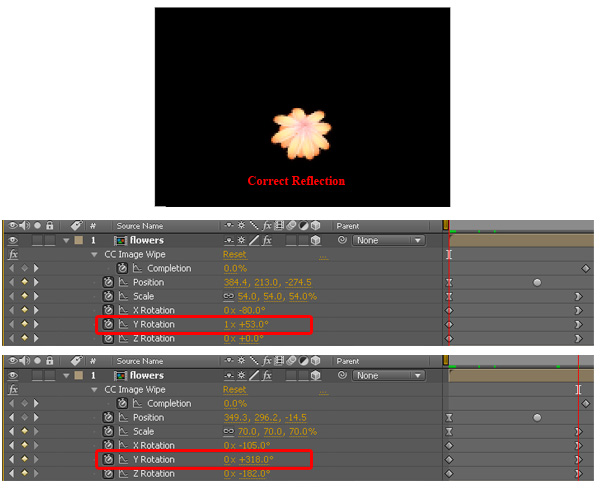
Make sure you are in “Flower Reflect” comp and you will see all the animation you created before. Now we only want to rotate some value of the flower to make a proper reflection. Change the first key of Y Rotation frame like value below: 1 x 53 , and go to second key and change it to 318.
Step 45
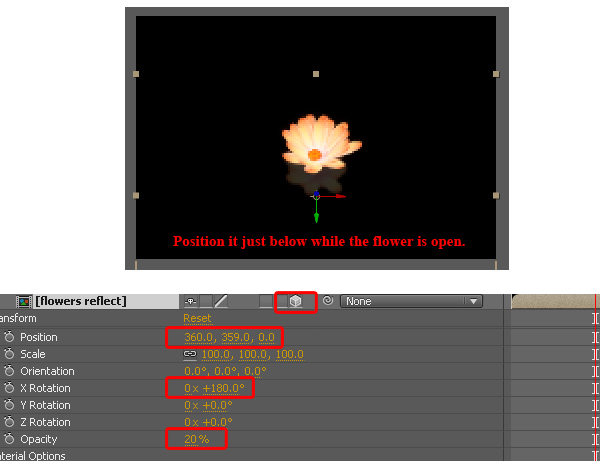
Now we need to go back to“flowers animation” comp. Select the flowers reflect layer, turn on the 3d layer. In this case we need to position the flowers reflection layer below the flower. Change the position to 360 , 359 , 0. Then, change to X rotation to 180 , so you will get a reflect flower result. Last change the Opacity to 20.And you done the reflection!
Step 46
Combine water wave effect
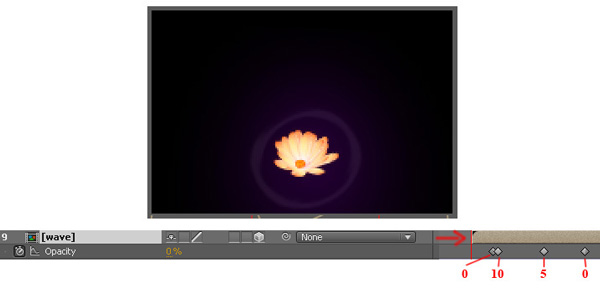
Now it’s time to add the wave ripple to create an illusion that the flower drops on top of the water. Drag the wave comp in and drag the timeline start at frame 25.Now we need to dissolve the wave. Go to frame 42 and set the wave Opacity to 0.At frame 46 set the opacity value to 10.At frame 82 set the opacity to 5.At frame 114 set the opacity to 0.
Step 47
Create a Camera Move
We need to create a camera move so that can show that the camera move from down to the top to show the sky and AETUTS logo. And I like to create a null object to control the camera. Go to layer > new > null object to create a null object. Name is as “camera control”. Turn the 3d layer on. Set the anchor point to 50 , 50, 0.
Step 48
Parent the Camera to the null object. Now we set the position value on 359, 228, -364 at first key frame. Go to frame 104 set the value to 357 , 178 , -360. Go to frame 163 and set one more key on value 322 , -11 , -474.Last , go to frame 269 and set a key. Position value as 318 , -27 , -481.
Step 49
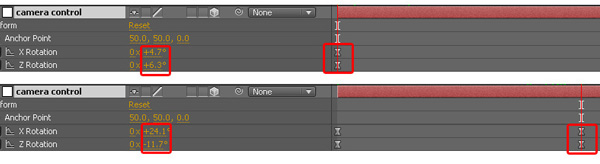
Now we have to set the rotation of the null object. Set key on X and Z rotation. The first key was X as 4.7 and Z as 6.3.And second key on frame 144, X as 24 and Z rotation as -11.
Step 50
Create a background
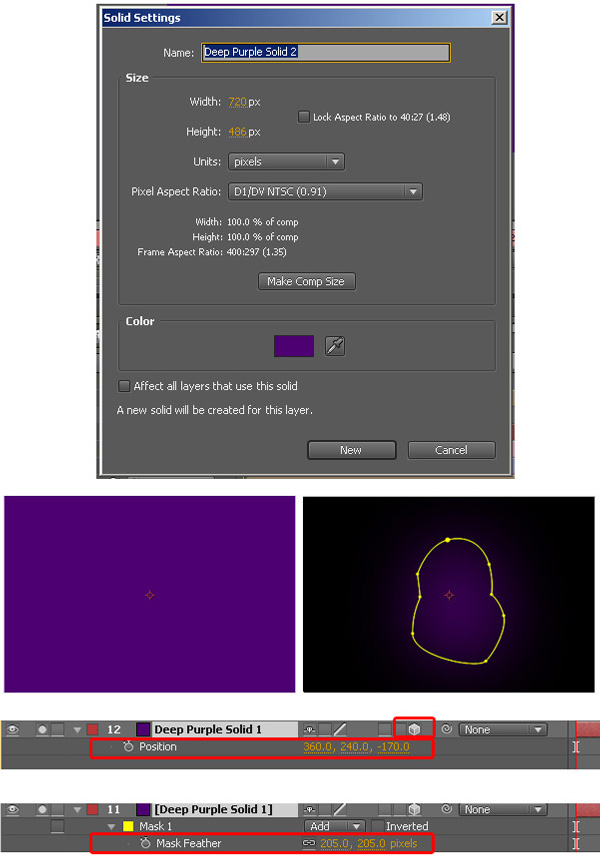
Now we need to create a solid as a background. Go to Layer > New > Solid. Choose purple color.Then, turn on 3d layers. Set XYZ position value to 360, 240, and 170.Now, use pen tool and try to mask the solid color like below. After that open the mask option and change the mask feather to 205,205.
Step 51
Import the nigh scene Sky
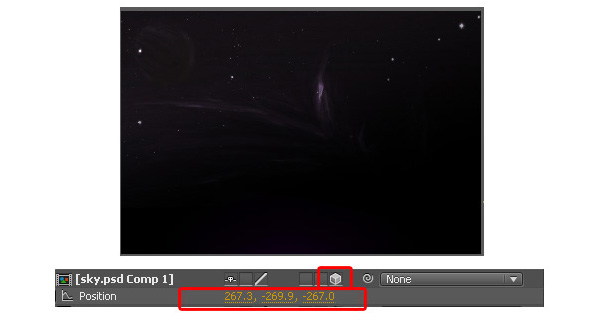
Find and Import a photo of a starry night sky. Turn on 3d layer. And set the position value to 270 , -270 , -265.
Step 52
Create a logo transition
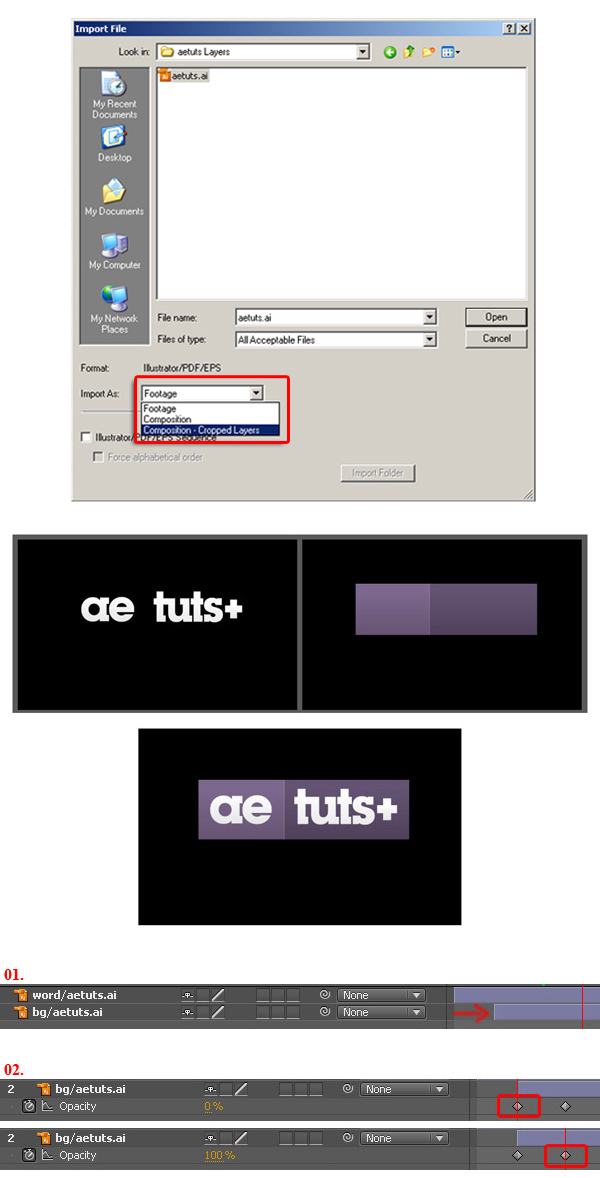
Import your logo as a separate composition to create a simple logo transition. I have prepared the AETUTS logo and separate it to 2 layers which are the word and background. Drag the background layer and start it from frame 18.Set a key on the Opacity at value 0.Set another key on frame 40 and opacity value 100.So in this case you get a result which is the background dissolve out later on.
Step 53
Drag the logo comp into “flowers animation” composition. Position the logo at the center. Drag the layer and start from frame 158.
Step 54
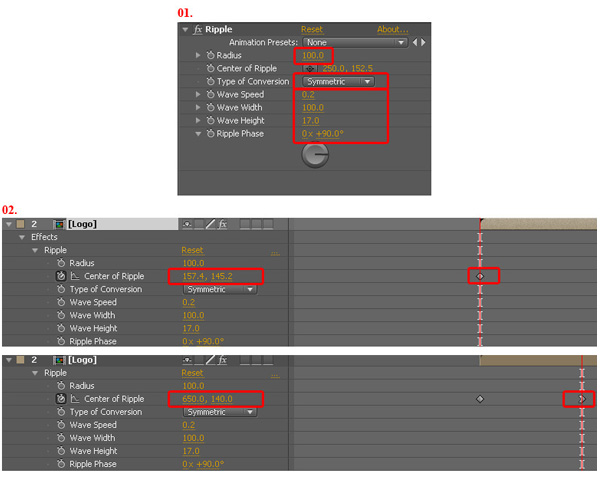
Now we need to add some ripple effect to the logo. Go to Effects > Distort > Ripple .Change the radius to “100”.Type of conversion to “Symmetric”. Wave speed to 0.2.Wave Width to 100 and Wave height to 17.Ripple Phase to 90.Now we move the center of ripple from left to right. Set the first key and the value to 157 , 145 and set one more key at frame 245 with value 650, 140.And now when you play back u should see the ripple effect.
Step 55
The last step for the logo transition is to dissolve out. Set a key frame and change the opacity value to 0.After that set another key at frame 200 and the opacity value change too 100.
Step 56
Last Drag in your particle comp on top of the logo. And start at frame 47. And it’s done! Now you should see the result when you play back. I hope you enjoyed this tutorial.