Bruce McCall: Nostalgia for a Future that Never Happened


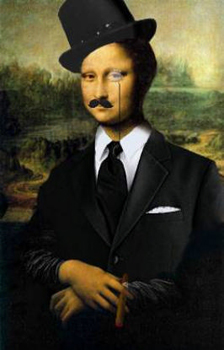
Just because you missed that awesome conference, doesn’t mean that you can’t still watch the lectures! This weekend, we feature an inspiring talk by Bruce McCall that showcases his unique viewpoints as an illustrator. He has a penchant for illustrating idealistic futures that never happened and witty visuals. This is a fascinating talk touching on topics such as Retro Futurism.

Continue reading “Bruce McCall: Nostalgia for a Future that Never Happened”

Premium Vector Pack – Fashion Silhouettes


We have a new set of vector illustrations available exclusively for Vector Premium members. Crafted by the group over at Designious, there are numerous classic, fashionable, women vector illustrations in this set. You can use them in your next project where simple elegance is needed. Learn more at the jump!

Continue reading “Premium Vector Pack – Fashion Silhouettes”

Give a 3D, Vector Robot a Realistic Feel in Photoshop


In this tutorial you are going to learn how to combine different methods from Illustrator and Photoshop to enhance your 3D vector art. Through the process you will learn how to use the appearance panel, 3D extrude and 3D revolve. You will also create a custom art brush, and your own symbol. I am going to show you how to create masks using Channels and Layers, as well as creating Clipping Masks in Photoshop.

Continue reading “Give a 3D, Vector Robot a Realistic Feel in Photoshop”

Dorian Mode Workshop – Audio Premium

In this week’s Audio Premium content, Toby Pitman starts a new series of premium guitar tuts with an in-depth look at how you can use the Dorian mode in your playing. He looks at how the mode is constructed, and how you can play arpeggio-based runs built on the Dorian Mode and Dominant Pentatonic Scale.

To learn more about what you get as part of Audio Premium, read this. To take a peek inside this tutorial, hit the jump!

The Dorian mode is a well used scale in most genres based around Rock, Blues and Jazz as well as featuring in Celtic and Folk styles. You might say it’s pretty popular!

In the tutorial I’m going to show you how you can get a lot more out of this scale by looking at how it’s constructed and using that information to play lines that are based around it’s arpeggios instead of just running up and down the scale. Well also look at some alternative Pentatonic ideas that aren’t generated by the root note of the scale. This is sometimes referred to as Pentatonic Substitution.

We’ll also take a look at the Dominant Pentatonic scale and how we can incorporate this into the Dorian Mode. Some of these ideas are technically quite advanced so you’ll need to warm up those fingers before we get started!

Here’s the kind of music you’ll be able to create once you harness the knowledge inside:

Download audio file (example.mp3)

Table of Contents

  • How Is The Dorian Mode Constructed
  • Extracting The Harmonized Information
  • Understanding The Parent Scale
  • Generating The Chords Of A Mode
  • Breaking Down The Chords
  • Arpeggio Ideas (6 Examples)
  • Going Beyond Root Note Pentatonics
  • Pentatonic Ideas
  • Dominant Pentatonics
  • Why It’s So Cool!!!
  • Conclusion

Existing Premium members can log-in and download. Not a Plus member? Join now.


Read More

Quick Tip: Epic Drum Sequencing with QL Stormdrum – Part 2

Getting the most out of drum samples is very important, because it can give “life” to your mixes, especially when we talk about epic cinematic music where percussion instruments are very important. In this second part of the tutorial we will be talking about stereo doubling. Using stereo enhancer effects and playing around with stereo is a great way to add variation to your music. For those of you, who bought some of East West Quantum Leap’s products and haven’t tried the stereo double yet, I’d strongly recommend using it – it will definitely add colour to your music.


What Is the Stereo Spread Technique?

In the 50s there was a technique called “double tracking”, where the sound engineers want to give more depth to a singer’s voice and therefore record the same take again and pan it differently. Then they had two separate mono audio files with the same melody and lyrics, but slight differences in rhythm.

This technique though was very time-consuming (making so many takes to get things perfect) that in the 60s a special analogue-recording technique was developed – automatic double tracking (ADT). This technique simply created a delayed copy of the recorded track.

In my humble opinion it’s best to use the “manual” double tracking technique, because the automated one can lead to phasing issues. (So be very careful and precise when using it). Yet, as I’ve already told you, it is very time-consuming.

This technique is widely used in pop, rock and in all kinds of music. If you’re further interested, Joey Falconer wrote an amazing article about stereo doubling in distortion guitar sounds: How to Create Rich Depth with Doubling Techniques.


And What Is the Connection Between This and Stormdrum?

There is a stereo double / stereo spread / stereo enhance button in East-West products’ new PLAY interface. It actually is an automatic double tracker tool and does exactly what I spoke about earlier.

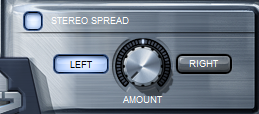
Look at the picture above – this is how this tool looks like in the PLAY’s Stormdrum interface. You have a knob that goes from 0% to 100% and two buttons – LEFT and RIGHT.

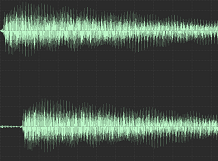
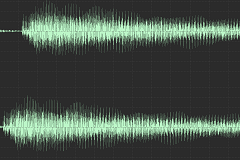
These buttons define which channel should be delayed, and which will stay as it was recorded. For example if we click on the left button and apply the knob to 50%, then the left channel would be untouched, the right will be slightly off and we’ll get the feeling the the left channel has its volume increased. Listen to this sampled guitar (by Quantum Leap Goliath) with effects applied and observe how the stereo wave changes.

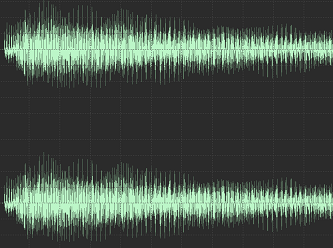
This is the original stereo wave of the guitar sound.

This is the stereo wave applied after clicking the “LEFT” button

This is the stereo wave applied after clicking the “RIGHT” button

Now listen to the demo – it changes from MONO to LEFT, then MONO to RIGHT. (By “left” and “right” I mean the buttons of the stereo spread tool.)

Download audio file (StereoEnhancer01.mp3)


I Still Can’t See the Connection Between This and the Epic Drums!

Yes, we were talking about guitars and channels, but if you got that right, you could add this effect right to your percussive tracks. Have in mind that large hits with lots of low-end frequencies must be in the centre of our stereo field (mainly because we are accustomed to listening to low-frequency instruments—bass drum, bass, etc.—there and changing this would result in lack of stability in our mix).

So the best instruments for stereo doubling are the high-end percussion – shakers, cymbals, tambourines, bells, wooden sticks etc.

Finally here are two demos that I made specially for you. In the first one you can hear some very epic drums. I used layered bass drums that are in the centre and with them I have some darbukas and log drums that are stereo spread L and R accordingly (you can hear them in the beginning). After that I introduce some shakers and cymbals.

Download audio file (PercussionEnhanced.mp3)

The second demo is an excerpt from the whole track – with strings, effects, vocals.

Download audio file (EnhancerDemo.mp3)

I sure hope that this lesson was useful for you. Stay tuned for the final part of the series!

Be inspired,

George.


Read More

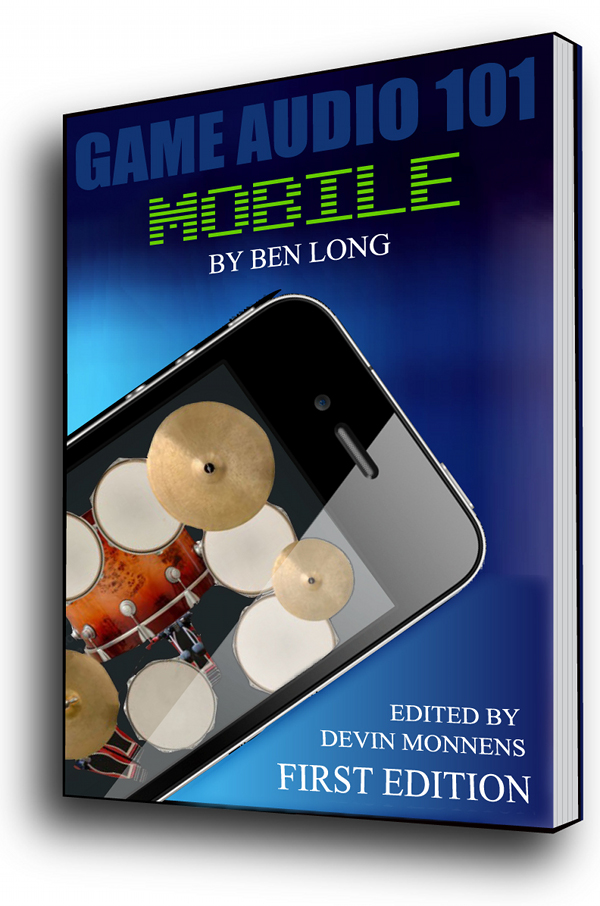
Win a Copy of the Ebook "Game Audio 101"

This Tuesday author Ben Long will be launching his new audio ebook “Game Audio 101: The Insiders Guide to Music & Sound for Mobile Games” during his talk at SXSW Interactive. We’re giving away a copy on the same day. To enter, just leave a comment! One random commenter will be chosen as winner. Too easy.

Game Audio 101: The Insiders Guide to Music & Sound for Mobile Games

Here are some details about the book:

Mobile is by far, the fastest growing sector of the video game industry. New mobile devices appear almost weekly, each promising heightened user experience. This has created new challenges for audio professionals. Join Ben Long as he reveals the creative, technical and business aspects of audio in mobile games, including:

  • The #1 secret to mixing audio for mobile apps
  • Overlooked methods of breaking into game audio
  • Free music / sound resources for mobile developers

Learn unpublished techniques for working with game audio on multiple platforms. Get the inside story behind todays top grossing mobile games

About the Author

Ben Long is a composer, sound designer and audio director. Over the years his sonic signature has become a secret weapon for game developers worldwide. In addition to games, his music can be heard across every major TV network. His new book, “The Insiders Guide To Music & Sound for Mobile Games” covers the creative and technical aspects of today’s fast paced, mobile game development industry. Ben is featured in three game design textbooks and recently spoke at GDC China.

Learn more at www.gameaudio101.com. And if you’re at SXSW, don’t forget to say hello!

How to Win

For the chance to win, all you need to do is comment. If you like, tell us why you need this DVD. Make sure to include your correct email address with your comment so that we can contact you. This giveaway is open worldwide, but make sure to get your comment in before midnight this Tuesday, Pacific Eastern Standard Time.

Please note: Envato staff and people who have written more than two tutorials/articles for a Tuts+ site are not eligible to enter.


Read More

AudioJungle Author: Palmtreep

Our sister site AudioJungle is a royalty-free stock audio site that helps musicians earn money. In this interview series you’ll learn about those musicians, their gear, and their AudioJungle experiences. Today we meet Derek Palmer (Palmtreep).

Tell us a bit about yourself. Where are you from, what do you do for a living?

I was born smack-dab in the middle of the United States in Monett, Missouri. Yes that’s right… corn fields, cows and silos all around. Actually, that’s not how it looks out here where I live. I live in a pretty good sized city. I currently work at a restaurant and I also do music work (obviously).

After getting more serious about my music, I started my website up. After getting that set up, I found AudioJungle. I mainly found it from ActiveDen (FlashDen back then) to use some items on my website. I thus began my selling of items on AudioJungle.

I also produce Trance music, a type of electronic music. I mainly produce what is called “Uplifting Trance”. After some convincing from friends, I sent some demos out to labels and got signed to Winter1212 Records. My first CD is expected to be released in early September.

Which marketplaces do you belong to? What types of files do you sell?

Currently I only sell items on AudioJungle. I became amazed at how music sounded in film scores, specifically film trailers. Fast and intense music accenting the video on the screen.

I searched around to find this music, only to find that the companies that make it do not sell to the general public. Realizing that there is a market for “High Impact” music, that’s the type of music I make. Most of the music you will find are energetic, emotional, climactic music cues designed for using in film trailers and the like.

I also have other files that are good for using in addition to film trailer style music. Rises, effects, drum hits and other things that could be used to accent the music.

I may at some time begin doing 3D animation work and video work. But for the moment, I’ll stick with the music. :P

How did you get started? Have you had any formal training?

I took an interest in music at a very early age. I remember when I was about six or seven, setting up buckets in the backyard and banging on them like they were a drum kit. At about the age of twelve I started taking music classes and lessons. I’ve been playing drums for over fourteen years and piano for over six years.

I then went on to college at Missouri Southern State University (MSSU), majoring in Music Studies and Percussion Studies, taking classes in Music Theory, Music Composition and Technical Music Studies.

Describe your home workspace.

My home workspace is pretty basic. I just got a brand new computer, and that is where most of my work comes from. I have two keyboards/synths that I use. I’m thinking of getting a third one at the moment.

The speakers I use are 5.1 surround sound speakers. A little much you think? Haha. I actually need those speakers for my video editing as well. So they double up, musicly and for videography.

If you like tech specs, just send me a message, I’ll be glad to share any hardware or software details with you!

Describe your creative process. What steps do you normally follow to create your files?

First I have to start with some sort of inspiration. This could come from an experience, a film, a video game, or even other music. Sometimes I think of different parts before others. Sometimes I will think of a melody, sometimes I will think of a drum groove.

Before I start, I try to figure out what direction I want to go with the music. What kind of sound do I want to have? Is this more action oriented or is it more laid back? Do I want it to be heavy on drums or have very short punchy instruments? These are all questions I ask myself.

After figuring out what type of sound I want to go for, I record the initial idea; whether it be a drum groove or a simple chord structure from the strings. After that has been recorded, I can loop the playback and “jam”, so to speak, until I find other elements that may work in the final track.

After that has been done, the hard part comes – actually arranging the music. I record every instrument individually. Sometimes I have to make changes because instruments may clash at times.

The hardest part for me in every song is the ending. A lot of trailer music ends with just a sustained note. Some end with a very short stab at the end. I usually try three or four different endings before I choose one.

Same goes for melodies. I may have six, seven or even ten different melody ideas before coming to the final version. I also try to add in key changes, tempo changes and time signature changes where I can. This helps a great deal in moving the flow of the music and getting away from the “looped” sound that some trailer music seems to have.

After the track is finished, I render it out and send it over to another program where I will add the mastering touches (EQ adjustments, level adjustments, limiters, compressors, etc.). This just adds a final touch on the music and will help it sound the way it needs to sound.

Overall it can be a very long process, taking me weeks to months of work for one song. I also never spend too much time working on a track. Just as your eyes need a break from reading or watching a TV screen, your ears need a break from listening to music. I usually work on a track a few hours a day, then skip a day or two, then come back. This often lets me think up new ideas and make the overall track sound better and more emotional.

What is your advice to other authors regarding how to create a successful portfolio?

Not to have a set mind on what is already out there. Have your own style. Don’t try to copy what has already been done. The more unique your file is, the more it will stand out in the long run. Also, long and hard work will pay off. Don’t rush things just to get the file finished. If you rush something, you could make a mistake or worse yet, make the file feel unfinished. Also, try using new techniques. Learn something new and think of how you can impliment it into your tracks. Experiment and try new things. You’ll be suprised what you can learn and find out by trial and error.

What do you do to market your files?

There’s many ways I market my files. I have audio demos up on a lot of different website, the main one being my personal website (www.dp-studios.org). I also promote using Facebook, MySpace and YouTube.

Marketing, for me at least, isn’t the hard part. The hard part is actually coming up with new ideas. :D

What are your three favorite files, and why do you like them?

It’s hard to pick out my top three files. I enjoy all the music I make. But if I had to pick, I’d pick these three:

1. Lucius Dei

Download audio file (preview.mp3)

Lucius Dei, for me, was a great leap in my music composing. It was the first track that I actually used a choir singing real words. For the first time, I was able to capture an emotion from my music that I hadn’t been able to before. For me, this is one of my pride and joys.

2. The Final Battle

Download audio file (preview.mp3)

The Final Battle is one of my faves because it is straight up action. Intense and not letting up until the final blow at the climax…

3. Devia Vita

Download audio file (preview.mp3)

Devia Vita, for me, was a very emotional track. At the time of writing it, I was going through a lot of bad times. It was tough being able to make it through the next day. So I wrote this track at first as just a way to get how I felt at the time out of me. It ended up striking such an emotion from myself and people who listened to it, I decided to share it with the world.

Apart from yourself, who is your favorite marketplace author, and why do you like them?

There are so many talented artists here. It’s hard to pick any one over the other. They all bring their own style and sound into the marketplace. Audio, video, flash… you name it, there is a lot of great talent here. If I had to pick a few, I would say:

Audio wise: Leto, he has some really good pieces. Some great orchestral work too. Soundroll as well. They both have so much variety in their files. So much to choose from.

Video wise: I check out a lot of video stuff. There’s lots of talent there as well. InlifeThrill, Elements, Sharky all do awesome work. I look forward to their new projects all the time.

What do you do in your spare time?

When I’m not working on music, I try to spend time with friends and play with my dog. I also take an interest in videography and photography. Making videos and other artwork. I also draw and paint often and read books.

Once and a while I play a video game or two and catch a sports game on the TV. But most of the time, I actually write more music in my free time. It’s what I love to do, and what I will always love to do. Music, for me, is a way of expressing myself and a creative outlet to help relieve the day’s stress.


Read More

How Architecture Helped Music Evolve

Just because you didn’t get to go to that awesome conference doesn’t mean that you can’t still watch the lectures! Each weekend, we’ll feature a recommended audio lecture on Audiotuts+.

As his career grew, David Byrne went from playing CBGB to Carnegie Hall. He asks: Does the venue make the music? From outdoor drumming to Wagnerian operas to arena rock, he explores how context has pushed musical innovation.


Read More

How to Process and Improve Home Recorded Vocals

Twice a month we revisit some of our reader favorite posts from throughout the history of Audiotuts+. This tutorial was first published in July 2008.

So, you’ve recorded a vocal, and now you want to mix it and process it so it sounds great in your mix. We’re not going to look at tracking vocals in this tutorial. Instead, we’re going to focus on how to process vocals once you’ve recorded them. Depending on your room, your mic and placements, your pre-amps and inputs and, above all, your skill-level, the quality of your recorded vocal sound is going vary.

Vocal processing can seem like a bit of a dark art when you’re just trying to get by recording your material at home with budget equipment. But, no matter how bad your initial sound is, you can improve it.

Note: this tutorial contains embedded audio that will not display in a feed reader. To hear audio, click back to the tutorial or download the Play Pack for this tut (scroll down to the end).

In this tutorial, we’re going to look at some areas that can get pretty complicated, and bring them back down to earth so we can begin to understand what makes them tick and how to apply them to your vocals. These areas are compression, EQ, and reverb. There will be a few minor edits to the audio region, too, but there’s nothing “dark-artsy” about that.

If you’re recording at home, you should have a set of monitoring headphones. If you’ve gone and dropped $3,000 on studio monitors without having an acoustically treated room first, I’m sorry to say that your money just went down a drain. While it’s best to mix with monitors in a balanced room, good headphones are the second best option.


Step 1

Import the Original Vocal

Have a listen to the original vocal I’ve pulled from a Pro Tools session. We’ll be using Logic in this tutorial, but the same principles would apply in any DAW.

1 Raw Vocal.mp3

We’ve got a good starting point as far as sound quality is concerned here; the sound was pulled from a proper recording room, using a good Avalon pre-amp and a personal favorite mic of
mine, the Rode Classic II.

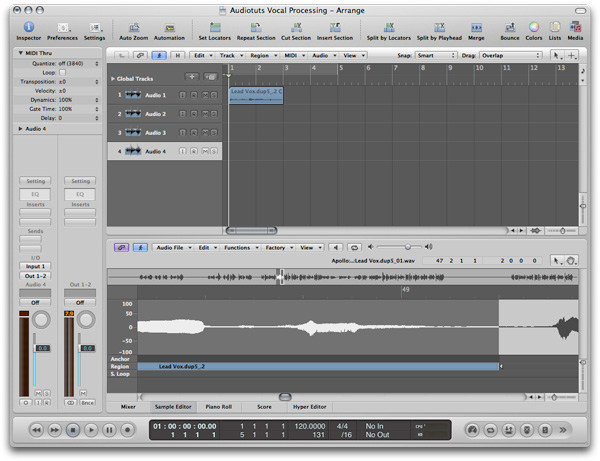
The first step of the process, of course, is to get your audio into the application. If you’re tracking and mixing in the same app, using the same session, you’ve already got it. Otherwise, drag the wave file into the arranger or use File > Import Audio File.


Step 2

Apply Vocal Compression

The biggest difference between our raw vocal as it is and the vocal you hear on, for instance, one of your favorite albums is that it’s totally uncompressed. If you’re using the same file as me, that’s actually not true—the Avalon preamp did some compression, but not too much, so that we could have more room to make adjustments later on. If you’re recording at home there’s a pretty good chance your raw signal is totally uncompressed.

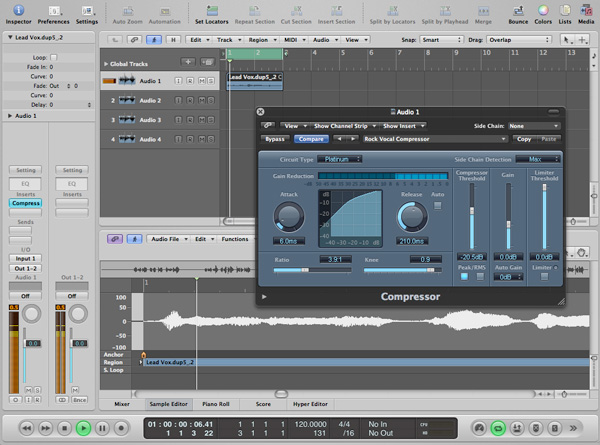
Apply a compressor insert. I’ve used the one found under Dynamics > Compressor. If you’re recording at home and reading this, you may not be familiar with all the compression variables, so begin with a preset and tweak the settings to suit from there. Don’t try starting from scratch until you’ve read up on the topic and understand how compression works.

2 Compressed Vocal.mp3

If you’ve got a vocal that jumps around in dynamic range a lot, you’ll need to make the attack shorter so that the compressor kicks in faster. While you’re fiddling, dial-up the attack as high as you can and play your file back so you can hear the difference in sounds side-by-side; before the compressor kicks in, and after.

Once you’ve tweaked the compressor to suit your vocal, you’ll need to compensate for the loss of level that compression causes. Most compression plug-ins have a “Gain” variable—tweak this until an A/B test (using the Bypass button) produces approximately the same volume.


Step 3

Use Equalization to Remove Bad Frequencies

Again, while this file had some analogue EQ done thanks to the preamp, yours probably won’t. We need to clean up the frequencies in the audio a bit so that it’ll sound better on its own, and mesh with the rest of the instruments in our song.

This means cutting frequencies that the vocal isn’t meant to occupy, and perhaps some slight boost in frequencies where the vocal should stick out, but remember that subtractive EQ is always better than additive EQ.

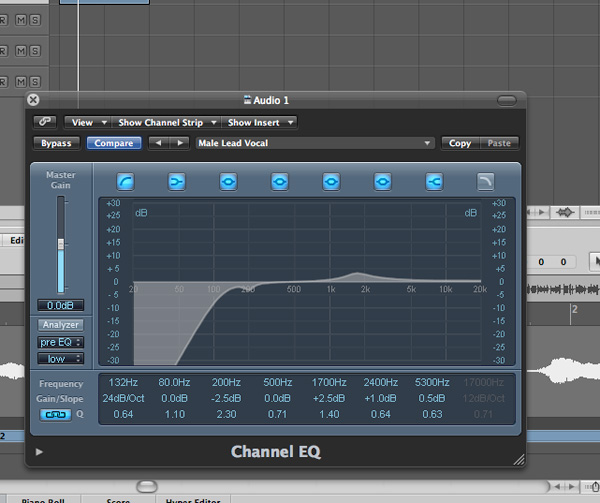
I’ve loaded the plug-in found under EQ > Channel EQ. Here we want to scoop out a bunch of the very bottom end, a slight dip in the 200Hz area, and give a slight boost to the natural frequency range of the human voice around 2.5kHz.

The human ear has evolved to lock in on the human voice. It locks in based on frequency, which is why we’re just as easily distracted by other noises in the same frequency range. So it’s always good to accentuate that frequency in your vocals and get some attention.

3 Equalized Vocal.mp3

Many musicians struggle with the idea of scooping out large chunks of a given frequency. It’s important to understand that recorded music is about creating a controlled environment and deciding in advance which instruments are going to take up which frequencies, and sculpting them to adhere to this. It’s essential to create “holes” in some sounds to let other sounds shine through.


Step 4

Create Space with Reverb

Our vocal sounds incredibly dry at this point. Obviously this is partly because it was recorded in a deadened room that has been specially treated for recording purposes, but you’re usually going to apply some sort of reverb no matter how dead or live your initial recording is.

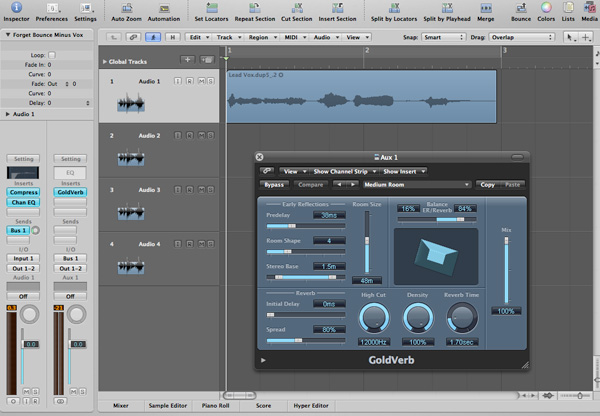
Even though we’re only working with one file at this point, it’s good to get in the habit of using an auxiliary send for resource intensive plug-ins such as reverb. Route a Send (under Inserts) to Bus 1, and Logic will create an auxiliary channel strip and place it next to the vocal channel strip. Change the input (under I/O) of the aux track to Bus 1, and place a reverb unit on the aux as an insert. Make this reverb as wet as possible—we’ll control how much is sent through via the send.

Somewhere between -20dB and -10dB is a good place on the send. -20dB is where I prefer to start, and -10dB is really quite wet. Experiment until you’re happy.

4 Reverberated Vocal.mp3


Step 5

Clean Up the Audio

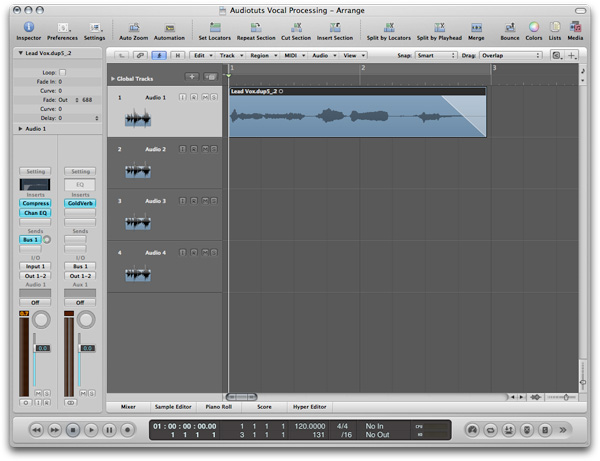
You probably noticed the breath at the end of the audio file. We don’t want this hanging around. When working with larger sections of audio, we’d crossfade or insert a silence in spots like this, but since it’s an isolated file just switch to the Crossfade cursor and drag from just before the end of the last word, to the end of the file. Play back and tweak until you can no longer hear the breathiness at the end.

Your cleaned up audio should sound like this:

5 Faded Vocal.mp3


Step 6

Thicken the Sound

Now our vocal is starting to get somewhere, but it’s still a bit thin. The best thing to do is double track your vocals in the studio. Just have the singer sing the line again on a new track and mix them together. But sometimes you don’t have the opportunity or the time to go back in for extra recording, and you have to make do with what you’ve got.

Copy the audio file to a new track and apply some compression, EQ and reverb, just as we’ve done with the original. Now, get a pitch shifter on an insert. I’ve used the insert plug-in found under Pitch > Pitch Shifter II.

Ensure that Semitones is set to 0. We don’t want massive multi-tone harmonies, we want to double a bit, so having anything but 0 set here is bad.

Now, change the Cents variable to about -20 and drag the Mix all the way up to 100%. If you play back, you’ll hear the doubled effect. It’s not as natural as real double tracking and doesn’t sound as good, but it does the job.

6 Doubled Vocal.mp3


Step 7

Vocal Mix via Aux

As projects get more complicated, it gets increasingly hard to alter the mix to compensate for new elements without throwing out a finely-tuned balance between two or more other elements. So, we’ll mix the two vocals here together, then route them through an auxiliary channel to control the vocal as a whole.

When we have more instruments involved, we can alter the vocal level using one fader and without altering the relative mix between one vocal and another.

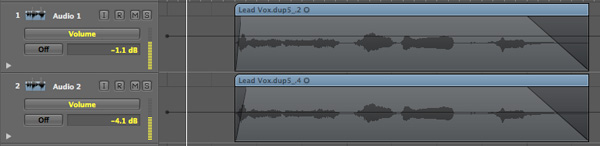
Get a good balance between your vocals—in this case I liked having the doubled vocal well below the level of the lead vocal, more of a backing than anything else. With a good double-tracked vocal, recorded separately, I would’ve had them roughly equal and panned to either side.

Once you’re satisfied with the balance, route the output (under I/O on the channel strip) of both vocal tracks to Bus 2. Like with our reverb aux, the vocal aux will be created automatically and show up next to our channel strip. I threw on a gentle compressor and a limiter here, to help our vocals cut through the mix (though at this stage there’s nothing else to cut through).

7 Mixed Vocal Aux.mp3


Step 8

Perform a Relative Mix

So far we’ve been unable to truly mix the vocal as a whole because mixing requires having something to mix against. Make sure you mix your vocal to a guitar, at the least, during your early guide tracking, unless the song is acapella, in which case this step is irrelevant for the most part.

For this example I dug up the instrumental guide tracks for this song. Because they’re guides they’re far from polished, but it provided something to mix against. This song was meant to have more of that classic hard rock sound. To achieve this you need to do the opposite of the pop rule of thumb, which is having vocals way out in front of everything else, and place it somewhere closer to the guitar (but still cutting through on top).

Here’s our finished vocal, that has gone from raw to processed and mixed:

8 Relative Mix.mp3

Download the Play Pack for this tutorial (2MB)

Contents

  • Audio files
  • Printable PDF tutorial


Read More

Quick Tip: The Importance Of Gain Structure In The Mix

In one of my previous mixing tutorials I briefly touched on the subject of proper gain structure within Logic (and all DAWs for that matter) but did not go in depth as to some of the concept’s finer points. In this quick tip, we will take a look at a few reasons why it is necessary to maintain a proper gain structure even within the 32-bit floating point architecture which most DAWs employ.


What Is 32-Bit Floating Point?

Without getting too technical, 32-bit floating point (in audio) is basically a method for representing very large or very small values pertaining to audio dynamics. The resulting dynamic range of a 32-bit float system far outmeasures the dynamic range of the normal working bit depth of 16- or 24-bit files, thereby fitting them nicely within its expanded range.

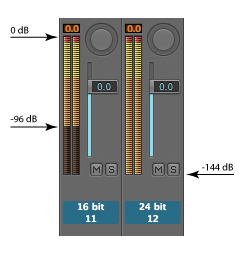
16-bit audio files have a dynamic range of 96 dB while 24-bit audio files have a range of 144 dB. 32-bit floating point, as it is computed differently from the basic integer system of 16- and 24-bit, has a dynamic range that exceeds 1,500 dB and is easily capable of allowing even large overloads of 0 dB full scale without clipping.

As such it is virtually impossible to clip within your mix session simply by overloading the channel. The only place clipping like this can occur is on the master fader which is the point in the signal chain where the 32-bit float is converted back to integer. Here, if you clip, it will create digital distortion; an effect similar to putting a bit reduction plugin on your entire master as any bits over 0 dB will be clipped.

The above shows 16- and 24-bit dynamic range. As neither can reach above 0 dB, the added range is added to the softer portions of the sound.


Why Bother With Gain Structure Within The Mix?

Other than the fact that it is just good practice and helps reinforce the understanding you have of your mix session, some processors (especially dynamic processors) will not work properly on an overloaded signal. A noise gate, for example, is especially affected by an overloaded signal as its threshold control is not capable of going higher than 0 dB. As such, much of the overloaded signal will pass through the gate untreated and only be affected after the value drops below the 0 dB threshold, rendering the gate ineffective.

Another reason for proper structure comes in the instance when using a plugin (or series of plugins) which can not handle overloaded signals and therefore impart distortion artifacts onto the audio. A worst case scenario of this would be an EQ boosting a signal to overload and then a compressor knocking the signal back down to under 0 dB, imparting distortion onto the signal in doing so. In such a scenario clipping is occurring after the EQ and is then distorting the compressor. The compressor knocks the signal back down to under 0 dB which the channel fader shows without indicating the clipping and distortion earlier in the chain.

Yet another place where gain structure is important is when using plugins which have inherent noise. Several analogue modeling plugins I have come across have noise inherent to them (many settings on certain guitar amp and classic channel strip emulators come to mind). When dealing with noise, much like in the analogue domain, it is quite easy to decrease the signal to noise ratio* and raise the noise floor with an improperly structured gain.

*Signal to noise ration (SNR) is basically the level of noise (dB) vs. useable signal (dB) within a stream of audio.

A decent looking gain structure.


How To Structure Gain Properly

One of the best ways to ensure proper gain structure is to treat your mix as you would in the analogue domain. A few ways of doing this are to:

  • Make sure your recordings are loud to begin with. 3-6 dB of headroom are ideal with 12 dB being on the lower limit of acceptable. This ensures that the level will not have to be boosted excessively at any point while maintaining a good level throughout the signal path.

  • Do not lower the level of a signal only to raise it again later in the signal chain. This ensures that if any plugins impart noise onto the signal, the SNR is not decreased.

  • Monitor the input level of plugins to make sure they are not trying to process an overloaded signal. If they are, attenuate the signal with either the output gain control of the offending plugin, or attenuate the input gain control of the plugin just after it. If neither of these controls are available, insert a gain plugin between the two and adjust accordingly.

  • Try to keep every channel from clipping and never clip the stereo output. Making sure no channels clip makes it less likely the master will clip and helps reinforce your understanding of the mix session itself. If, after all this, the master continues to clip you can simply turn down the master fader (otherwise known as a scaling fader) to an appropriate level with no sound quality loss. However, in such an instance it is recommended to use a gain plugin on the offending channel as solving the problem at the source is a better way of working and ensures that any possible plugin distortion due to overloads is weeded out.

Remember to be a proper gentle(wo)man when mixing and adhere to proper gain structure.

In adhering to the above concepts, you should be able to avoid digital distortion in your mixes at every stage of the signal path and it will hopefully lead you on your way to create cleaner and more accurate mixes.


Read More

Workshop #158: More Than You Can See by Alex Moraes

At Audiotuts+ we regularly put up a reader track for workshopping and critique (find out how to submit a track). This is how it works: you upload your song, and every week or so we’ll publish one here and step away from the podium. The floor is yours to talk about the track and how the artist can fix problems in and improve upon the mix and the song.

This track has been submitted for your friendly, constructive criticism. They have put their track (and their heart and soul) in your hands to learn and get useful feedback.

  • Do you enjoy the song or track itself? Does it have potential?
  • Can the arrangement be improved?
  • How did you find the mix? What would you do differently?
  • What do you enjoy about the rhythm track? What can be done to improve it?
  • Is the choice of instruments relevant and effective for the style/song?
  • Are the lyrics (if any) effective? Does the style, arrangement and genre of the song suit them?
  • Can you suggest any specific techniques that might improve the track?
  • Do you have any other constructive feedback?

More Than You Can See by Alex Moraes

Artist’s website: estudiotrilhasonora.wordpress.com

Description of the track:

Hello from Brazil.

We recorded this track for a client called Rafaela Ruette. She’s 12 years old and composed 10 brand new songs for her debut album (to be released in 2011). Please send us some feedback about the mixing, mastering, compositions, arrangments, and so on…

Recorded, edited, mixed and mastered in ProTools M-Powered 7.3.

Drums: Helio Cunha
Guitars, Acoustic guitars, keyboards, bass, effects programming: Alex Moraes
Mixed and Mastered by Alex Moraes.

Thank you all!

Download audio file (RAFAELARUETTEMorethanyoucanseeMaster.mp3)

Terms of Use: This track is copyrighted. Don’t redistribute it. Please buy the original CD.

Have a listen to the track and offer your constructive criticism for this Workshop in the comments section.


Submit Your Tracks for Workshopping

Need constructive criticism on your own tracks? Submit them using this form.


Read More