Guest Bloggers And iOS Developers Positions

Guest Bloggers

Hey iCoders! We are looking for some guest bloggers to write iOS tutorials, code snippets, tips, tricks, you name it for iCodeBlog.

How to apply:

1. Shoot an email to [email protected] with a link to your current blog (or iOS articles you have written)
2. We will check your stuff out and most likely give you contributor status to iCodeBlog
3. ???
4. Profit (OK, no profit (yet), but you get exposure(link your blog) AND the good feeling that you are contributing to the incredible iOS developers )

iOS Developers Wanted

ELC Technologies is hiring iPhone AND/OR Android Developers.  Here is the official posting.

Mobile Developer

We’re a bunch of solo programmers turned collective working on interesting projects, from internal initiatives, to some of the largest Mobile applications in the world. We are founders of iCodeblog.com, one of the most popular iPhone development tutorial websites.

We’re currently hiring experienced Mobile developers for both iOS and Android.

Qualified applicants:

  • Have been working with Mobile apps for at least 1 year.
  • Have at least one app in the store or marketplace.
  • Are able to work productively in distributed teams.
  • Enjoy working with new and emerging technologies.
  • Enjoy programming in your own time.

Skills Required:

  • Demonstrable knowledge in Objective-C and/or Java.
  • The ability and desire to write clean, commented, reusable code.
  • Solid understanding of MVC design principles.
  • The ability to communicate effectively with clients.

Skills/Knowledge Preferred:

  • Bachelors degree in Computer Science or equivalent work experience.
  • Experience working with RESTful web services, git, open source projects.
  • Email your resume and code samples to [email protected].Send links to any mobile applications that you have created and published.

    Update: ELCImagePickerController

    I recently spent some  time with ELCImagePickerController.  For those of you who’ve worked with UIImagePickerController, you might have noticed one of its major drawbacks: you can only select one photo at a time.  ELCImagePickerController solves this issue by cloning the UI of UIImagePickerController, but with the added bonus of allowing you to select multiple assets.  Collin Ruffenach (@cruffenach), who authored the the first version of the picker, has done an awesome job of making ELCImagePickerController look, feel, and behave like a native image picker.  For this post I’m going to go through some recent improvements I made to ELCImagePickerController and pass along some lessons learned from working with the AssetsLibrary Framework.

    This is my first foray into the AssetsLibrary Framework which was introduced with iOS 4.0.  If you’re not already familiar with the framework, I highly suggest checking out both of these posts:

    Asset Libraries and Blocks in iOS 4

    Cloning UIImagePickerController using the Assets Library Framework

    These should give you a solid picture of how to work with ALAssetLibrary, ALAssetGroup, and ALAsset.

    One of the obvious changes I’ve made to the project is a reorganization of the code.  Classes are broken out for clarity as you can see here:

    Old Tree:

    New Tree:

    I’ve also renamed several classes to avoid confusion w/ Apple’s and ELC’s respective classes.

    On major change to the project is how you present the new ELCImagePickerController.  This is mainly due to an issue we uncovered with a redundant call to [super init] which was causing a substantial memory leak.  Here’s the new way of showing the image picker:

    ELCAlbumPickerController *albumController = [[ELCAlbumPickerController alloc] initWithNibName:@"ELCAlbumPickerController" bundle:[NSBundle mainBundle]];ELCImagePickerController *elcPicker = [[ELCImagePickerController alloc] initWithRootViewController:albumController];
     
    [albumController setParent:elcPicker];
     
    [elcPicker setDelegate:self];
     
    ELCImagePickerDemoAppDelegate *app = (ELCImagePickerDemoAppDelegate *)[[UIApplication sharedApplication] delegate];
     
    [app.viewController presentModalViewController:elcPicker animated:YES];
     
    [elcPicker release];
     
    [albumController release];

    One interesting optimization I was able to make was on the loading of large albums which was previously taking several seconds.  Since ALAssetGroup uses a block to enumerate assets, I just fire off a reloadTable call after a short delay:

    // Show partial list while full list loads
     
    [self.tableView performSelector:@selector(reloadData) withObject:nil afterDelay:.5];

    Then when the block is finished enumerating, it’ll call reloadTable as well.  On an album with roughly 1500 photos, it was pretty tough to reach the bottom of the tableview before the block finished enumerating.  So this is a pretty decent solution to the issue.  Originally, I experimented with lazy loading the assets as the user scrolled through the table, but ultimately wasn’t able to get the performance I wanted out of it.

    This release of ELCImagePickerController should perform faster, and with a smaller memory footprint than before.  I hope you enjoy it.

    You can follow me on twitter @matt_tuzzolo or get in touch with us at http://www.elctech.com

    ps. for an extra bonus, check out [ELCAsset toggleSelection];

    Zaxwerks 3D Serpentine: Unlocking the Full Potential – Day 1

    This entry is part 1 of 1 in the series Zaxwerks Serpentine

    In case you’re not familiar, Zaxwerks 3d Serpentine allows you to create awesome 3D path extrusions right inside After Effects. Zaxwerks agreed to provide us an amazing 40% off discount code with this set of tutorials. It’ll expire soon so use it while you can!

    In part 1 of this two-part tutorial, you’ll find all the basics you need to get you started with Zaxwerks 3d Serpentine. But more importantly, you’ll learn a technique that allows you to avoid any unexpected kinks, and get smooth results and full control over your serpents.

    Zaxwerks Discount Code: AETUTS40


    Tutorial

    Download Tutorial .mp4

    File size: 138.3 MB

    Additional Aetuts+ Resources


    Read More

    The Rotation Problem Explained

    The Guerrilla CG Project website is down by restricted access but some of the video lives on Vimeo. In honor of Pi Day, below are a couple of videos on rotation by Andrew Silke, The Rotation Problem and Euler Rotations Explained

    Euler Rotations, the most common method for orienting objects in 3d. It’s by-product “gimbal lock” can cause headaches for animators because the animated motion can move in strange ways. Here we learn how euler’s “rotation order” is a bit like hierachies, and how changing this order can help us to avoid gimbal problems. This is demonstrated with a solution to a common camera problem, by finding the correct rotation order.

    Chris and Trish Meyer explain this (Euler XYZ vs. the quaternion Orientation) and related issues for After Effects in Creating Motion Graphics. There’s more of course in AE Help.


    Read More

    Paper Cut-Out Stop Motion Animation Effect

    In this tutorial we’ll be going through the steps used to create a stop-frame animated paper cut-out effect that appeared in the Mystery Jets music video that I directed a few years back. We’ll cover techniques for optimizing resolution when shooting against green screen and using after effects to create a quirky low-fi animation look.


    Step 1

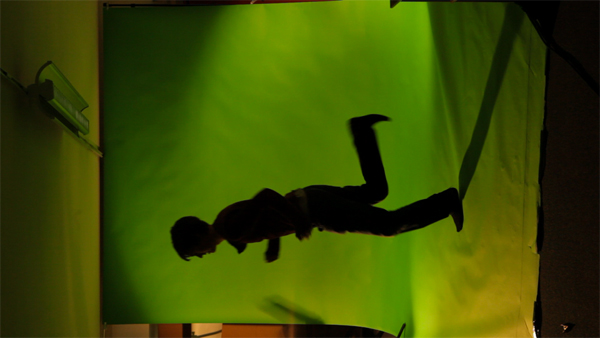
    To begin with, you will need to film your action against a green screen. For the original video, we used a large green screen studio with a treadmill for the actor to run on at a constant speed. For the purposes of this tutorial we will create a low budget version of this (running_loop.mov supplied), which I think is equally as effective.

    Securely pin up a large sheet of bright green paper or fabric and allow it to curve onto the floor so that the actor can stand on it. Tape it down so it can’t move about.

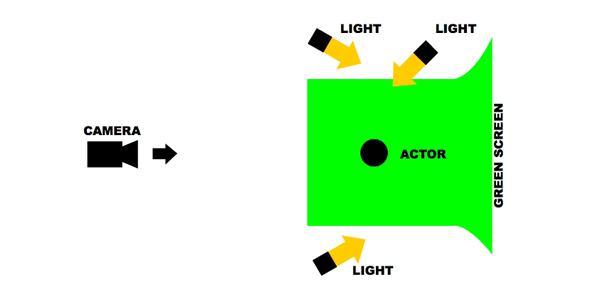
    Light the green screen with three lights. Situate two of the lights either side of the green screen and point them at the backdrop to light it as evenly as possible. Place the remaining light at the back and point it towards the camera in order to remove as much shadow as possible from the floor.

    Don’t worry too much about lighting the actor as the effect is essentially a silhouette anyway.


    Step 2

    Tilt the camera at a right anlge to a portrait orientation (“Dutch tilt”) so that the actor fills as much of the screen as possible. As he will be keyed out, this gives us a larger resolution to work with in post; a useful practice for a lot of special effects filming.

    Instead of using a treadmill, the actor can just run on the spot. After a few practice runs, start filming. It is important to make sure that the actor’s action is exaggerated so that it can be clearly seen in the final effect. What we are trying to achieve is a running action that we can loop after about a second.

    Capture your footage and name your file appropriatley (I’ve called mine running_loop.mov)


    Step 3

    Next, we need to screw up some paper and scan it in.

    We want a nice paper texture for our animated running man. Screw up 13 different pieces of paper and then flatten them back out. They should now have a nice wrinkled texture.

    Use a scanner to scan them individually into your computer at a high resolution (1920 x 1080px, 72 dpi will do it).  It is good to use a different sheet for each scan in order to get a different texture each time (I’ve used some old envelopes).


    Step 4

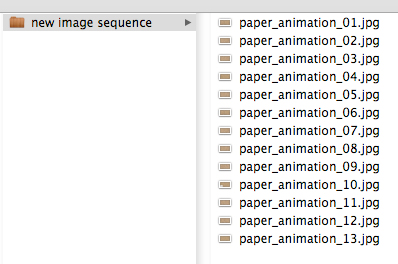
    Name the files paper_animation_01.jpg through to paper_animation_13.jpg.

    In order to be able to import them as an image sequence later on, it is important that these image files are all stored together in the same folder and numbered as a sequence (01-13).


    Step 5

    We also want to create the background. Scan in another piece of paper at the same resolution. To provide a nice contrast make sure it is a bit of a different texture from the previous ones.

    The backdrop of a real stop-frame animation would rarely be tampered with, therefore the effect will be more convincing if our backdrop paper texture is quite flat rather than wrinkled.

    Save the image file as background.jpg.


    Step 6

    Set up your After Effects project.

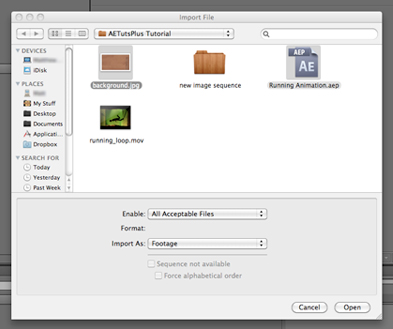
    Open After Effects and import your green screen footage and background image (select File > import > File and select the files from their folder). Make sure the Import As is set to Footage.


    Step 7

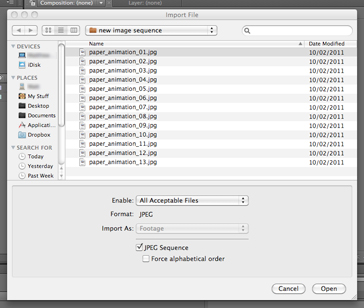
    Import the screwed up paper as an image sequence (select File > Import > File and select paper_01.jpg and make sure you check the JPEG Sequence checkbox at the bottom of the import window).

    Save your After Effects project (select File > Save As) as Running animation


    Step 8

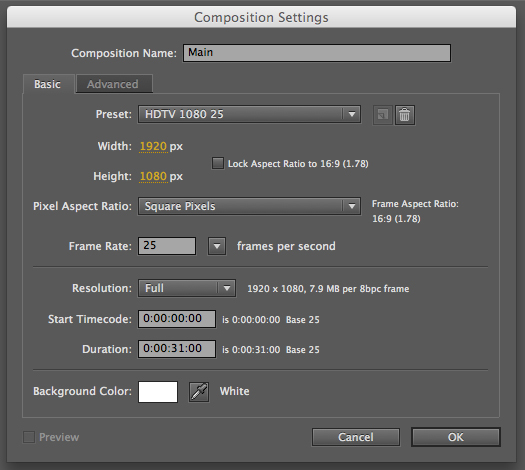
    Create a new composition (select Composition > New Composition), rename it Main and select the appropriate Preset from the drop down menu (in this case HDTV 1080 25). Change the Background Color to white. Press OK.


    Step 9

    Drag your footage from the Project panel into the Main composition.
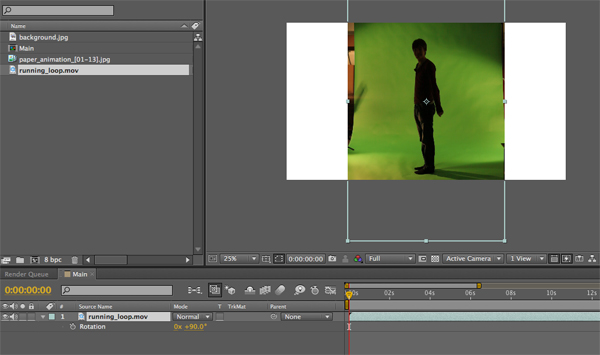
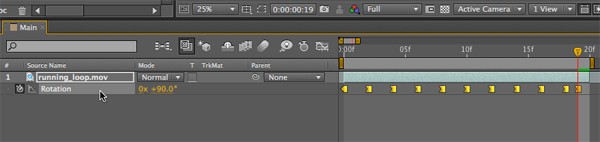
    As we filmed the footage with a tilted orientation, we need to correct this. Select the footage layer and press R. The Rotation properties will drop down. Adjust the Rotation setting to 90.0? and the actor should now be standing upright. You may also need to adjust the Scale (press S) and/or Position (press P).


    Step 10

    We need to find loop points of the actor from the green screen footage.

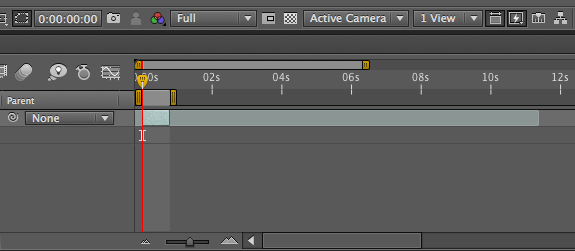
    To find a loop point by looking at the position of the arms and legs. Select the layer and trim the footage. Use Alt + [ to Trim In Point and Alt + ] to Trim Out Point. The In Point and Out Point frames of the footage should look as similar as possible.
    Drag the Current Time Indicator to the beginning of the timeline and set In Point ([ ) to shift the beginning of your loop to the beginning of the timeline.

    Set the work area to duration of the footage (Windows: Ctrl + Alt + B or Mac: Command + Alt + B).


    Step 11

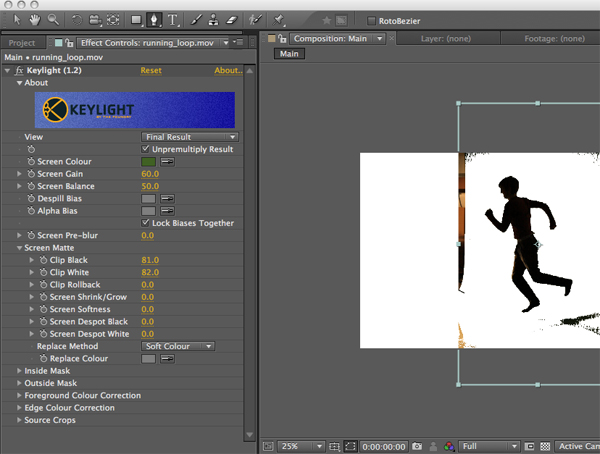
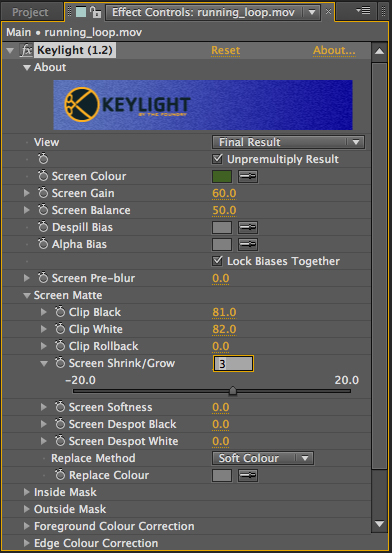
    Select the running_loop.mov layer and key out the green screen using Keylight (select Effect > Keying > Keylight). In the Effect Control panel, using the pipette (from the Screen Color option), select the color of the green screen in the Composition Preview panel. Back in the Effect panel’s Keylight Controls, drop down the Screen Matte option and adjust the Clip Black and Clip White settings to fine tune your key around the actor.


    Step 12

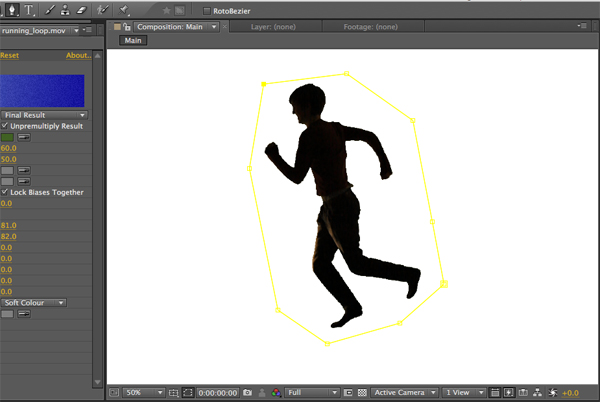
    Select the Pen Tool from the tool bar at the top to mask out any green that still remains on the edges of frame. With the Pen Tool selected, draw a simple, closed shape around the actor.
    You should now have isolated your actor.


    Step 13

    Stop-frame animators can often use “twos” (doubling up on frames to save time) and the position of animated objects can often move with charming imperfections. We want to recreate these qualities to sell in the stop-frame look.

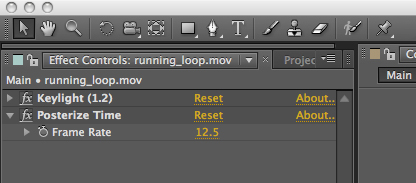
    It is quite straight forward to create the doubled up frame effect. Select your running_loop.mov layer and then select the Posterize Time effect (Effect > Time > Posterize Time). In the Posterize Time options in the Effect Control panel, simply adjust the Frame Rate to 12.5.


    Step 14

    In order to achieve the ‘wiggly’ stop-frame movement we will turn to the Wiggler (select Window > Wiggler).
    We want to adjust both Position and Rotation.
    We’ll begin with Position.

    In your timeline, select the Running_loop.mov layer and press I to move to the first frame.


    Step 15

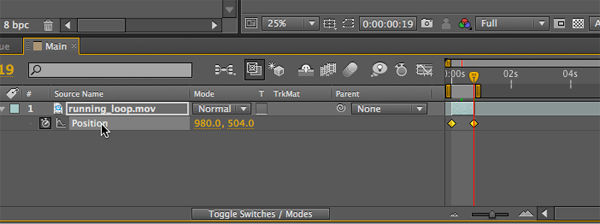
    Press P to reveal the Position properties and click on the Stop Watch icon to insert your first keyframe.
    Press O to move to the Out Point and insert another keyframe, by pressing Alt + Shift + P. Click on the property name (Position) to select both keyframes.


    Step 16

    In the Wiggler panel adjust the Frequency to 12.5 and change the Magnitude to somewhere around 30 ( the larger this number obviously the more our actor will jump around the screen).  This will synchronise the Position movement with the new frame rate.

    Next, select All Independently from the Dimensions drop down options and click the Apply button.
    New keyframes will automatically be created. As default, the Position will animate between these keyframes.


    Step 17

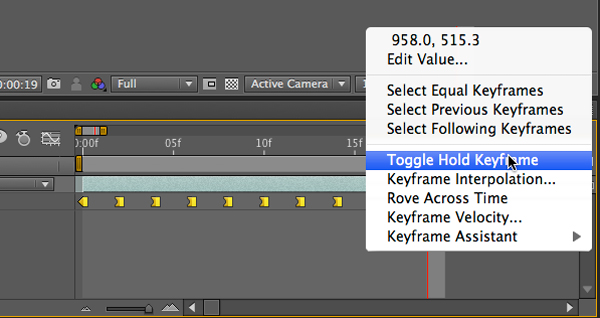
    In order to get that ‘stop-frame’ look, we need to make sure it appears as if each frame has been individually photographed. Make sure that all the Position keyframes are selected (so click on the property name to do this), right-click on any Position keyframe and select Toggle Hold Keyframe.
    We have now stop-frame effected the position.


    Step 18

    Repeat this same process (Steps 15-17) for the Rotation properties, but just use the shortcut R in  place of P (for example press Alt + Shift + R to insert a keyframe) and adjust the Wiggler Magnitude to somewhere around 5 (as now we are working in degrees not position). Also, you don’t have to worry about the Dimensions drop down menu as this is irrelevant for Rotation.


    Step 19

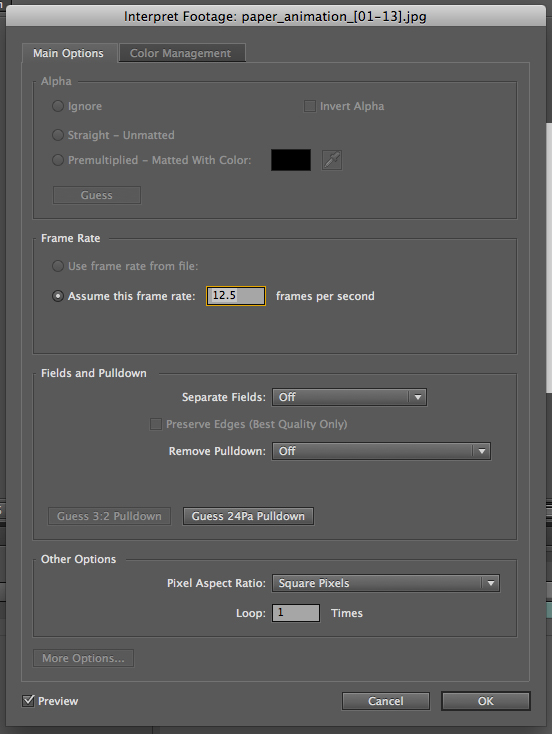
    We need to change the image sequence frame rate to be the same as the rest of the project. In the Project panel, right-click on the image sequence and select Interpret footage > Main. The Interpret Footage window will open and under the Frame Rate section, adjust the Assume this frame property to 12.5 frames per second. And click Ok.


    Step 20

    Drag your paper_animation image sequence from the Project panel onto your Main composition timeline and place it below the running_loop.mov layer. Click on the Toggle Switches / Modes button at the bottom of the screen to reveal the Track Matte (TrkMat) option. Click on the TrkMat drop down menu on the paper_animation layer and select the Alpha Matte option.
    Your paper texture should now be cut out in the shape of the actor.


    Step 21

    To accentuate the look of the paper cut out, select the running_loop.mov layer and in the Keylight controls in the Effects panel, increase the Screen Shrink / Grow option to make the matte a little bit ‘fatter’. This will make it look like it has been cut out a little less precisely and enhance the effect.


    Step 22

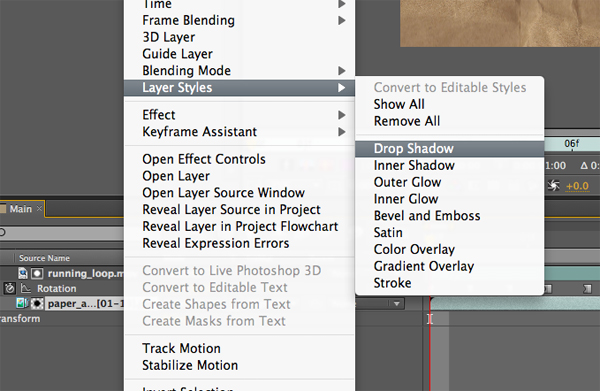
    In the timeline, right-click on the paper_animation image sequence layer and select Layer Styles > Drop Shadow. This will create the effect that the paper animation is slightly lifted from the background.


    Step 23

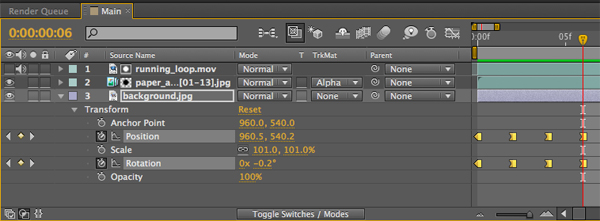
    In the Project panel select background.jpg and drag it into the timeline (under the other two layers). Use the Wiggler again to animate the Rotation and Position in the same way you did for the running_loop.mov layer (Steps 15-17), but this time be a lot more subtle with your Magnitude (between 0.2 and 1). You should also increase the Scale of this layer slightly to about 101%.


    Step 24

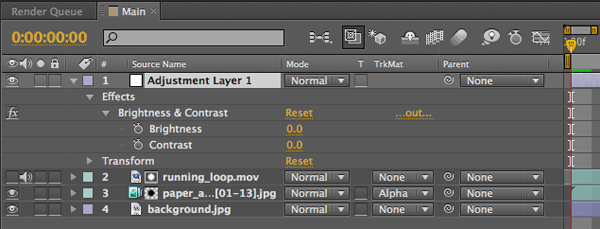
    Create an Adjustment Layer (select Layer > New > Adjustment Layer) and add the Brightness & Contrast effect (select Effect > Color Correction > Brightness & Contrast).


    Step 25

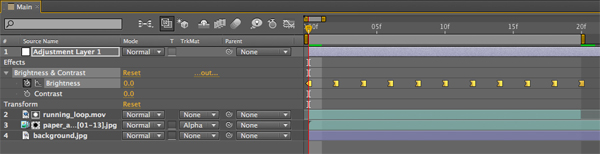
    Use the same process that we used in Steps 15-17 but this time adding keyframes to the Brightness properties of the Adjustment Layer instead of to the Position or Rotation properties. For the Wiggler Magnitude I would suggest something around 5.


    Final Image

    Your stop-frame animation effect is now complete. It should look something like the image below. You can loop the footage in an editing package to create a constant stop-frame running effect.


    Read More

    Fixel LightIT, Contrastica, EdgeHancer, +

    AE Scripts recently released 3 4 Pixel Bender plug-ins from Fixel: LightIT, Contrastica, and EdgeHancer. These sorts of image-processing filters are always interesting, though in some cases it’s hard to determine advantages over the plethora of filters already built into Adobe tools.

    For example, it’s not clear how Edgehancer differs from Sharpen Edges unless you give it whirl when you find you want fine control and don’t want to mess with with an uncertain gaggle of procedural masks made with Find Edges and other filters. It’s clear though that Fixel tools are all 32-bpc, GPU-accelerated, and compatible with both After Effects and Photoshop CS4+.

    Below are some descriptions based on the promotional materials, plus a quick demo video below for each filter.

    Fixel LightIT is a local color correction plug-in with a novel algorithm that’s based on non-linear masking to identify the shadows in the image. LightIT applies an optimized operation for correcting the colors in the shadows regions, without affecting the other tonal ranges.

    Fixel Contrastica, which also features a novel algorithm, can enhance and boost local & global contrast. Contrastica enables you to control the contrast all over tonal range (Shadows & Highlights) to reveal hidden details.

    Fixel EdgeHancer too uses a novel algorithm, which unlike “classic” sharpeners, emphasizes the edges exclusively instead of increasing the contrast of the surrounding pixels.

    Update: Fixel has added another Pixel Bender, Fixel Coloritivity, a 5 way tinting filter.


    Read More

    CMG Hidden Gems: 3D, Camera, Lights

    Chris and Trish Meyer recently posted some tips on orienting yourself in After Effects 3D.

    If you’re an advanced user (aren’t we all), be warned, you’re entering known space on 3D Space, Cameras, and Lighting in 3D. And the Photo Filter effect.

    CMG Hidden Gems: Chapter 13 – 3D Space covers the basics of working with 3D layers in After Effects and includes moving, rotating and animating layers in 3D space, offsetting their anchor point in Z, as well as auto-orientating layers along a 3D path. Also covered is using the Composition’s 3D Views, View Layouts, and Axis Modes, along with the rendering order when mixing 2D and 3D layers.

    CMG Hidden Gems: Chapter 14 – Camera covers creating and animating a camera, including creating camera rigs and taking advantage of auto orientation, as well as showing how to cut between multiple cameras. They conclude by discussing the camera’s parameters in more detail, including how to fake focus and depth of field effects.

    CMG Hidden Gems: Chapter 15 – Lighting in 3D discusses the different types of lights and their parameters, how lights interact with layers and their Material Options, the many secrets of shadows, creating gels and gobos, faking reflections, adjustment lights, projection lights, and using 3D lights to re-illuminate already-shot 2D footage.

    This last article has a bonus movie on the Photo Filter effect (more in AE Help).


    Read More

    Blurs: Effects A-Z + More

    Motionworks has a new quicktip, Effects A-Z: Box Blur, which leverages A Tale of Three Blurs, a Prolost article from 2006, to illustrate the key differences between Box Blur, Fast Blur, and Gaussian Blur.

    There’s a few more resources below to explore blurs further.


    Read More

    Aetuts+ Photoshop Contest – Winners Announced!

    A HUGE congrats to our Aetuts+ Photoshop Contest winners! Instead of just announcing the winners, I figured I’d let you see the standings, just because honestly… everybody want to know how they did comparatively… There was a total of 853 votes all told.


    Contest Winners: Seth Piguet from Orlando, Florida; and Austen Henry from Wichita, Kansas

    I’ve been putting together some ideas for my creative director on different ways to show destination footage and had been thinking about using the tilt-shift lens effect to make things look miniature. Allstate and Disney had nice campaigns using the effects. When I saw the contest, I searched Psdtuts+ and found 53 Crazy-good Digital Photography Tutorials – including #28 on the list for tilt-shift fakery. I expanded on the technique in the tutorial by making objects in the foreground have more blur than in the distance, as you see in macro photography (thanks roto-brush). Bumping the speed of the footage up to 200-300% and adjusting the frame rate to 15fps adds a bit of stop-motion feel to the footage. I was surprised to be selected for the top 20 and honored to be picked as a winner. Thanks for your votes. Aetuts+ rocks, I look forward to the next contest. – Seth Piguet

    When I first found out about Psdtuts+, the Dark and Rainy Crime Scene tutorial was the latest one, and I absolutely loved it. When Aetuts+ recently announced the contest I began to brainstorm and tried to figure out which tutorial I would convert. But soon after coming across that tutorial, I knew that it was going to be the tutorial I would use for this contest. My brother and I have been working in our basement for the past two years learning as much as we can about this industry, so we really appreciate the opportunity Aetuts+ has given us in our efforts to become filmmakers/VFX artists. We are really stoked about this, thank you to everyone who voted/supported us and to Aetuts+ and Psdtuts+ for hosting this contest! – Austen Henry


    Read More

    Series on Character Animation in AE

    Daniel Gies posted 8 videos so far in his free series on character animation in After Effects. He discusses bones for puppets, sliders to control a rigged character, rigging multi-layered characters (in 3 parts), rigging clothes, and basic head rotations using 3D layers, distortion mesh & expressions in After Effects.

    For more resources on character animation in AE, see Animate a character in After Effects at AE Portal (especially the links to Todd Kopriva’s references and breakdowns on other tutorials).

    See also Learn How to Rig and Animate a Character and Create your Own Odyssey Day 1 and Day 2 by Marcin Zeglinski, and Advanced 2D Cartoon Lip Sync Animation – AE Premium by Dave Scotland here at AEtuts+.

    Here’s a sample of the new stuff by Daniel Gies (also on YouTube):


    Read More

    Create a Stunning Website Demo Presentation

    Twice a month we revisit some of our reader’s favorite posts from back in the archives of Aetuts+. Today’s tutorial was originally published in April 2009… Enjoy!


    As our world moves more and more onto the internet there are lots of websites that are worth showing off. In this tutorial Markus shows us how to create a clean and elegant solution to show off your favorite site.

    Tutorial

    Download Tutorial .mp4

    File size: 122 MB


    Read More

    Convert Regular Footage To Stereoscopic 3D

    Learn to do a basic track in Mocha and how to export the tracking data both as shapes and transform data into After Effects. We’ll also cover how to make depth mattes from those shapes and position data. Even though your footage will take on a whole new dimension… the jokes are still in 2D. :)


    Tutorial

    Download Tutorial .mp4

    File size: 71.8 MB


    Read More

    How to Create a Hair Braid Pattern Brush in Illustrator


    In today’s tutorial, I’m going to show you how to create a deceivingly complex yet easy to make patterned hair brush using Adobe Illustrator. You’ll learn how I illustrate braids/plaits and then how to apply this element yourself in your hair designs.

    Continue reading “How to Create a Hair Braid Pattern Brush in Illustrator”