Sony’s WF-1000XM3 earbuds are down to an all-time low at Amazon as part of deal that also includes a gift card.
Category: Tutorials
Tutorials,freelance,projects,joomla,php,mysql,wordpress,blancer.com
Hyundai now owns robot dog maker Boston Dynamics
Hyundai has acquired Boston Dynamics from Softbank in a deal that values the robotics company at $1.1 billion.
The best Apple deals we’ve found on Prime Day so far
Here are the best Amazon Prime Day 2021 deals on Apple devices you can get, including AirPods, MacBooks and more.
The Morning After: Amazon Prime Day 2021 kicks off
Today’s headlines: NASA is struggling with a computer glitch on the Hubble Space Telescope, Amazon’s Prime Day 2021 kicks off with discounts on the usual suspects, and YouTube’s iOS app is finally getting picture-in-picture.
24 Best WordPress Slider & Carousel Plugins of 2021
{excerpt}
Read More
22 Best WordPress Slider & Carousel Plugins of 2021
{excerpt}
Read More
How to Curve Text in InDesign


Wondering how to curve text in InDesign? Then look no further! In this quick tip tutorial, we will be learning how to arch text in InDesign using the Text on a Path Tool. We’ll be using a circle for our curve to create a simple curving effect. You’ll then be able to apply this technique to create any curve shape you need for your text!
For the purposes of this tutorial, we’ll be using this Theater Poster from Envato Elements to help get us started. This will provide a nice starting point for us as we learn how to arch text in InDesign. You can also follow along with your own project, of course!


What You’ll Learn in This Tutorial
- How to create a path in InDesign
- How to curve text in InDesign
- How to arch text in InDesign
Follow along with us on our Envato Tuts+ YouTube channel.
If you’re looking for InDesign flyer templates to help you get started with curving text in InDesign, there is a wide selection available to you on Envato Elements. There are a lot of choices for InDesign graphic templates, which include flyers, brochures, and just about anything else you can think of.


1. How to Create a Curved Path in InDesign
Step 1
First we will need to create a curved path in InDesign in order to arc our text. While we’re going for a simple arc, we will still need to create a path. We’ll do this by using the Ellipse Tool to create a circle.
Open up your InDesign project. In our case, we are using this Theater template from Envato Elements.


Step 2
Let’s recreate the header so that we can create a new header which follows a curve. Using the Selection Tool, click the existing header and then press Delete to remove it.


Step 3
Before we can get started with curved text, we will have to create a path for it to follow. As we just want a simple curve we will use a simple circle. Select the Ellipse Tool from the toolbar.
Tip: As it’s not the default shape tool, you may have to click and hold the icon to see it.


Step 4
With the Ellipse Tool selected, hold down Shift and then click and drag to create your circle shape. This circle is what our text is going to curve on, so keep that in mind.


Step 5
Make sure that both the base color and stroke color are turned off so the path is not visible. You can change these settings in the Properties panel while the shape is selected.
Tip: You can find the Properties panel by going to Window > Properties.


2. How to Curve Text in InDesign
Step 1
Now let’s move on to the type! Select the Type on a Path Tool from the toolbar.
Tip: Click and hold the Text Tool to reveal it.


Step 2
Now, with the Type on a Path Tool selected, click on the circle when you see the “add text” icon shown below.


Step 3
Go ahead and type the text you need for your project!
Tip: To adjust the settings of your type, you can go to Window > Type & Tables > Character. You can also change the color by clicking on the color palette in the toolbar.


Step 4
Now that you have your text typed, you’ll want to move around the curve. Using the Selection Tool, select the shape and move towards the text anchor point. You will see an icon with an arrow when you’re at the right point. Click, hold, and drag to move your text around the curve.


Step 5
Now let’s take a look at the various settings we can use for Text on a Path. With the text selected, go to Type > Type on a Path > Options.


Step 6
This will open the Type on a Path Options window. From here, we can change all kinds of settings in relation to the curve.
Flip will flip the anchor point around to the inside of the curve.


Step 7
The default Effect is Rainbow, which is a nice balance. However, you can try out the other options too, such as Skew.


Step 8
Now you will want to check out the Align options dropdown. The default, Baseline, will put the base of the text on the outside of the path. Center will align it to the center. Ascender is a great way to place InDesign type inside a circle. Try out all the different align settings!


Step 9
You may have noticed when trying out different alignment options that the spacing changed dramatically. We can manually change the spacing to ensure all of our text lines up to meet our needs. Use the Spacing arrows to increase or decrease the spacing as needed.


Step 10
When you’re satisfied, go ahead and press OK. You can adjust the shape of the path, the type itself, and the settings as much as you see fit.


There you have it! Now you know how to convert InDesign text to curves. You can use the Ellipse Tool to place InDesign type inside a circle too. Using this technique, you’re not limited to using a circle shape. Try out different-shaped paths and see where your creativity takes you!
Speaking of creativity, are you looking for a spark of inspiration or a start on your next InDesign project? Then you should check out some of these InDesign templates from Envato Elements.
1. Art Gallery Flyer (INDD, AI, PSD, AI)


Check out this Art Gallery flyer! It comes in an easy-to-use InDesign template. Just download and open up with InDesign, and you’re ready to go!
2. Magazine InDesign Template (INDD, PSD)


This magazine template could be a great start to your next printed magazine project. It comes in a neatly laid-out InDesign file with plenty of opportunity to change InDesign text to curves.
3. Healthcare Flyer Template (INDD, AI, EPS, PSD)


Looking for a neatly organized healthcare flyer? Then check this one out! It comes with an INDD file which makes it easy to get going and add your own custom content.
4. Sale InDesign Flyer Template (INDD, AI, EPS, PSD)


This InDesign template design is perfect for promotions and sales. It’s a great opportunity for learning to curve text with InDesign. It comes with an INDD file, so it’s straightforward to get working quickly.
5. Speaker Poster (INDD, PSD, EPS, AI)


Check out this eye-catching event flyer template for InDesign. It comes with a handy INDD file so you can download it and get started right away!
Looking to learn more about InDesign? Then check out these amazing tutorials from Envato Tuts+!

 Adobe InDesignA to Z of InDesign: Tips, Tricks, & Hacks!Daisy Ein
 Adobe InDesignHow to Create Gradients in Adobe InDesignJonathan Lam
 Print DesignLearn Restaurant Menu Design in Adobe InDesignAndrew Blackman
 Adobe InDesignHow to Do a Drop Cap in InDesignDaisy Ein
 Adobe InDesignLearn Adobe InDesign From Scratch in Our New CourseAndrew Blackman
{excerpt}
Read More
Weekly Short Story: Enantiomorph
On Monday mornings, I send out a story via email: ultra-brief tales of 1,000 words or more, usually in genres including science fiction, horror, and the supernatural. Those stories collectively are called Once Upon A Time. I’ve also published four ebooks and one paperback anthology of those stories so far.
I’d love to have you as a subscriber to the weekly free story. You can subscribe via email here, or use the form below. Unsubscribe any time, from the link in every issue.
15 Beautiful Resume and CV Web Templates
{excerpt}
Read More
How to Create a Pixel Effect in Photoshop


In this tutorial, you’ll learn how to pixelate an image in Photoshop. I’ll explain everything in so much detail that everyone can create the effect, even those who have just opened Photoshop for the first time.
Don’t have time and want to create this effect in seconds? Check out this 8 Bit Pixel Art Photoshop Action over on Envato Elements, where you can find thousands of creative Photoshop Actions.
What You Will Learn in This Pixel Effect Tutorial
- How to select the subject in Photoshop
- How to make pixel art in Photoshop
- How to create a stroke around the subject
- How to change a background in Photoshop
- How to make the final adjustments
What You’ll Need
To recreate the design above, you will need the following resources:
1. How to Get Started
First, open the photo that you want to work with. To open your photo, go to File > Open, choose your photo, and click Open. Now, before we get started, just check a couple of things:
- Your photo should be in RGB Color mode, 8 Bits/Channel. To check this, go to Image > Mode.
- For best results, your photo size should be 2000–4500 px wide/high. To check this, go to Image > Image Size.
- Your photo should be the Background layer. If it is not, go to Layer > New > Background from Layer.


2. How to Select the Subject in Photoshop
Step 1
In this section, we are going to make a selection of our subject and then copy the subject to a separate layer. Choose the Quick Selection Tool (W) and select the background of the photo. Use the Shift-Alt buttons on your keyboard to add or subtract areas from the selection. After you’ve made a perfect selection, press Control-Shift-I to invert the selection.


Step 2
Now go to Select > Modify > Smooth and set the Sample Radius to 2 px. Next, go to Select > Modify > Contract and set Contract By to 1 px. Finally, go to Select > Modify > Feather and set the Feather Radius to 1 px.


Step 3
Press Control-J to create a new layer using the selection. Name this new layer Subject.


3. How to Make a Photo Look Pixelated
Step 1
In this section, we are going to transform our Photoshop image to pixel art.
Press Control-J on your keyboard to duplicate the current layer, and name this new layer Temp. Then, hide the Subject and Background layers, go to Select > Color Range, and set the Select to Highlights. After that, press Control-J to create a new layer using the selection, and name this new layer Highlights.


Step 2
Now hide the Highlights layer and select the Temp layer. Go to Image > Adjustments > Levels and enter the settings below:


Step 3
Go to Select > Color Range, and set Select to Shadows. After that, press Control-J to create a new layer using the selection, and name this new layer Shadows.


Step 4
Now hide the Shadows layer and select the Temp layer. Then, go to Filter > Sketch > Photocopy and set the Detail to 10 and Darkness to 5.


Step 5
Go to Image > Adjustments > Levels and enter the settings below. Then, go to Filter > Sharpen > Unsharp Mask, and set the Amount to 500%, Radius to 25 px, and Threshold to 0 levels.


Step 6
Now change the Blending Mode of this layer to Multiply and name it Outlines. Then, show all the layers in the layers panel, select the Highlights layer and change the Blending Mode of this layer to Screen and set the Opacity to 50%. After that, select the Shadows layer, change the Blending Mode of this layer to Multiply, and set the Opacity to 50%.


Step 7
Select the Subject layer, go to Filter > Pixelate > Mosaic, and set the Cell Size to 20 square. Then, do the same for the Outlines, Shadows, and Highlights layers.


4. How to Create a Stroke Around the Subject
Step 1
In this section, we are going to create a stroke around the subject. Go to Layer > New > Layer to create a new layer, and name it Stroke.


Step 2
Now Control-click on the Subject layer to make a selection of this layer. Then, go to Edit > Stroke, and enter the settings below. After that, press Control-D to deselect the selection.


5. How to Change the Background in Photoshop
Step 1
In this section, we are going to change the background. Select the Background layer, go to File > Place Embedded, select the second stock photo, and click Place. Then, set the Width and Height to 85.95%, and position the photo as shown below. Name this layer Background Photo.


Step 2
Now go to Filter > Pixelate > Mosaic and set the Cell Size to 40 square.


6. How to Make the Final Adjustments
Step 1
In this section, we are going to make the final adjustments to the pixel effect. Select the Stroke layer, go to Layer > New Adjustment Layer > Vibrance to create a new vibrance adjustment layer, and name it Overall Vibrance/Saturation.


Step 2
Now Double-click on this layer thumbnail and, in the Properties panel, set the Vibrance to +50 and the Saturation to +25.


Step 3
Go to Layer > New Adjustment Layer > Levels to create a new levels adjustment layer, and name it Overall Brightness.


Step 4
Now Double-click on this layer thumbnail and, in the Properties panel, enter the settings below:


You Made It!
Congratulations, you have succeeded! You’ve learned how to turn a picture into pixel art in Photoshop. Here is our final result:


5 Best Photoshop Image to Pixel Art Actions
Want to see some of the best Photoshop pixelate filter actions? Check out this list of pixel effect Photoshop actions from Envato Elements.
8 Bit Pixel Art Photoshop Action (ATN)
Convert a photo to an 8-bit pixel art Photoshop effect in no time! Open your photo, brush over your subject, and just play the action! The action will do all the work for you, leaving you fully layered and customizable results that you can further modify. You can choose from the three pixel sizes included (small, medium, and large), and you can change the background with a single click using the actions included.
Pixelated Photoshop Action (ATN)
If you are a fan of dispersion effects, you’ve got to love this pixel effect Photoshop action. You simply brush over your photo where you want to pixelate it, and play the action! The action comes with a video tutorial demonstrating how to set up your file before using the action, and it also covers customization techniques in detail.
Pixelum: Digital Pixelation Photoshop Action (PSD)
Here’s another interesting pixel image Photoshop action. There are four actions included with different directions (up, left, right, and down). All you have to do is to brush the area that you want, choose the direction, and click play. It’s a one-click Photoshop action.
Pixel Poster Photoshop Action (ATN, ABR)
With this Photoshop pixelate filter, you can create a professional pixel effect with not only pixels, but also geometric and abstract style elements. The result includes fully editable layers, colors, and elements.
Pixel Artist: Photoshop Action (ATN, TXT)
Using this pixel image Photoshop action you can turn your images into their pixeled version in just a few clicks! The way that the action works is you just open the your image, and click play. The action will create 25 different pixeled versions that you can choose from. Once you choose the version that you like the most, you can customize the result to achieve 8-bit retro effects!
Did you like how to make pixel art in Photoshop tutorial? Then you may also like:
-


How to Create a Shatter Photoshop Effect Action
In this tutorial you will learn how to create an amazing shatter effect. Everything will be explained in so much detail that everyone can create it, even… -


How to Create a Sketch Effect Action in Adobe Photoshop
In this tutorial, I’m going to teach you how to create a Photoshop sketch effect. You will learn how to turn your photos into amazing, advanced sketches. I… -


How to Create a Photo to Art Text Effect Photoshop Action
In this beginner’s Photoshop tutorial, you will learn how to create a Photoshop action to transform a photo into an art text effect. -


How to Create an Awesome Dispersion Action in Adobe Photoshop
In this tutorial you will learn how to create an amazing dispersion effect. First we will create several patterns that we will use for creating the dispersed… -


How to Create a Sparkle Effect Photoshop Action
In this tutorial for Photoshop beginners, you will learn how to create a colourful sparkle photo effect in Adobe Photoshop.
{excerpt}
Read More
How to Trace an Image in Illustrator


Wondering how to trace an image in Illustrator or how to trace in Adobe Illustrator for photos? Then you’re in the right place! In this Quick Tip tutorial, we’ll explore how to trace in Illustrator. We’ll use the Image Trace Tool in Illustrator to convert an image into a vector format. We’ll start by tracing a logo, and then we’ll move on to tracing a photo. Adobe Illustrator trace can do both.
What You Will Need
This tutorial uses the following assets to explore how to trace in Adobe Illustrator:
Use these assets to try out image trace in Illustrator, or try using raster files of your own. The process will be the same.
Want to Create a Quick Logo Without Software?
Want to create a logo easily and simply, without software? If you’re looking to create a logo or other project quickly, check out Placeit. It’s a browser-based tool with a ton of options. Placeit is a great tool for creating logos with a large assortment of assets to get your designs going. Try it out!


Follow along with us over on our Envato Tuts+ YouTube channel:
1. What Is “Image Trace”?
In Adobe Illustrator, tracing allows us to easily convert a raster image into a vector image. This means we could trace a photo or image in Illustrator to make it a vector. While it’s not always perfect, and you may sometimes need to make tweaks, use Illustrator to trace an image to vector as a quick and simple option.
Ready to give image trace in Illustrator a try? Let’s get started.
2. How to Use Image Trace in Illustrator
Step 1
Let’s begin with how to trace an object in Illustrator. To get started with learning how to trace an image in Illustrator, we’ll use this logo. Images with simple forms and shapes like this logo will transfer into the vector format well! We’ll be using a JPG, but you can also use other raster image formats such as PNG and GIF.
We’ll be using the JPG version of this Cardinal Bird Logo from Envato Elements. You can feel free to use any logo or other image too, but I suggest something with simple forms and limited colors, especially if you’ve never used image trace in Illustrator before.
With Illustrator open, go to File > Open to navigate your desktop and open your JPG file. Again, we’re starting with Illustrator trace, image to vector. We’ll trace an image on Illustrator, so start with a simple raster image, like this example file.


Step 2
Now, we have the image open. As this is a raster image, if you try to change the size of the image it can get fuzzy and blurry. We can fix this by converting it to the vector format.
So, where is image trace in Illustrator? First let’s open up the Image Trace window by going to Window > Image Trace.


Step 3
Next, let’s start looking at image trace in Illustrator. With the Image Trace window open, go ahead and click the image to select it. Consider this your trace tool; Illustrator lets us do a lot here.
We will now have access to the options.
Tip: If you don’t have the image selected, the options will be grayed out.


Step 4
From here, we will need to decide how many colors we want our vector image to use. The fewer colors, the lower the file size and the easier the vector artwork will be to work with. In this case, we want to retain the colors and shape of the logo as accurately as possible.
Again, we’re looking at the Adobe Illustrator Image Trace panel. From the Mode dropdown, select Color.


Step 5
The default settings will be fine in this case. Colors set at 30 will be more than enough colors for this image trace in Illustrator.
Go ahead and click Trace on the bottom right of the window.
Note: Depending on your image size and settings, this could be a time-consuming process. One of the best ways to learn how to trace an object in illustrator is to experiment with these settings. Give it a try.


Step 6
There you have it! You now have traced an image using Illustrator. You can now change the size of the image freely without worrying about losing quality. Illustrator auto trace is quick and handy.
In this case, we explored Adobe Illustrator image trace and used it to convert this raster logo into a vector logo.


3. How to Trace a Photo in Illustrator
Step 1
Next, let’s trace a photo in Illustrator. Auto trace can help us with that too.
Tracing a photo in Illustrator is a very similar process, but you will have to keep in mind the limitations of vector. If a photo is converted exactly as it is into a vector format, it would result in an image that is very large in file size and difficult to work with. For this reason, raster image formats such as JPG and PNG are much better suited to using photos. With that being said, we can turn the limitations of the vector format into fun stylistic images which work with the format.
Go ahead and open your photo by going to File > Open to navigate your desktop and open your JPG file. We’ll use this toucan image from Envato Elements.


Step 2
Now our photo is open. Let’s explore how to trace in Illustrator for more advanced and detailed content, like this photo.
Where is image trace in Illustrator? Make sure you have the Image Trace window by going to Window > Image Trace. Remember, this is our trace tool; Illustrator has our options there.


Step 3
With the Image Trace window open, go ahead and click the image to select it. We will now have access to the options.
Tip: If you don’t have the image selected, the options will be grayed out.


Step 4
First, let’s go ahead and convert this to a Black and White vector image.
On the Mode dropdown, select Black and White, and then click Trace on the bottom right.


Step 5
There you go! We converted our photo to a black and white vector image. You can try adjusting other settings to get some interesting results.
Let’s go ahead and make a limited color version of the photo instead. Undo the Image Trace by going to Edit > Undo Image Tracing.


Step 6
Working with color requires a little more creative thinking. We will need to limit the number of colors to create a workable image, but we can also use this to create something that is visually appealing.
From the Mode dropdown, select Color.


Step 7
Make sure that Palette is set to Limited.


Step 8
The number of colors you use will have an important effect on the visual style. I like the look of smaller palette sizes as they will create dramatic highlights and shadows.
Go ahead and select around 20.


Step 9
Now select Trace from the bottom right.
Note: This process might take a while, depending on your settings.


Step 10
There you have it! A visually distinctive vector version of your photo. There are many more settings you can adjust and change. One of the major benefits of this is that not only can you create some visually distinctive versions of your photos, but you can also take advantage of the scalable nature of the vector format.


How to Trace an Image in Illustrator With More Control
If you are looking for more control, you can also trace images using the drawing tools in Illustrator. This is a more time-consuming process, but it also gives you a lot of creative control over your project. This will require extensive use of the Pen Tool. If you’re looking for a crash course in Adobe Illustrator, check out this amazing free Adobe Illustrator course from Envato Tuts+!
Check Out These Logo Designs on Placeit
Looking for logo designs that you can quickly edit yourself? Then check out this collection of Placeit templates you can use.
1. Olympic Abstract Logo
Check out this sophisticated and sporty logo template! You can customize everything about this logo by following the link!


2. Arts & Crafts Logo Template
Check out this arts and crafts logo! It comes with some great starter content to build from. Add your own text and change up the fonts to match your project’s needs.


3. Olivia Grace Make Up
Check out this graceful logo that would work great for a project that needs an elegant flair! Just follow the link to adjust the text to your own custom needs.


4. Vintage Logo Template
Check out this vintage-inspired template! This custom template can be changed up to suit your needs—just swap out the text or even the background image.


5. Technology Logo Template
Looking for a sleek logo for a tech company? Then check out this template that offers a great base for creating a custom logo.


What Will You Create With Adobe Illustrator Image Trace?
You can trace a photo or an image in Illustrator. There are plenty of options here. Now that you know how to use image trace in Illustrator, what will you create?
Remember, if you’re looking for a quick and simple tool with tons of options, check out Placeit. It’s an online, browser-based tool, and you can get started right now, for free. Check out Placeit today.
Looking to spruce up your Illustrator skills? Check out these amazing Adobe Illustrator tutorials from Envato Tuts+.

 Flat DesignHow to Create a Mountain Landscape in Flat Style in Adobe IllustratorAliaksei Kruhlenia
 Adobe IllustratorHow to Crop in IllustratorMonika Zagrobelna
 Adobe IllustratorHow to Use Illustrator on iPadJonathan Lam
 Print DesignHow to Create a Pamphlet Template in IllustratorAndrei Marius
 Illustrator BrushesA Huge Compilation of 40 Free Illustrator BrushesSonali Vora
{excerpt}
Read More
Human Anatomy Fundamentals: Basic Body Proportions
In this human body drawing tutorial, you’ll learn basic human body outline drawing techniques. If you’ve practiced capturing energy in the previous tutorial, you’ll have acquired a good feel for loose sketching of people. We’re going to start giving structure to that feeling-based groundwork by studying the body with a more scientific eye.
Let me say that it will take many sessions to cover the wonders of the human body. Not only is it among the most sophisticated animal structures in nature, it is also one of those with the most variations: few other species come in so many shapes and colors. Nobody, therefore, should feel frustrated for having trouble drawing people; it is an ambitious undertaking.
We’re going to build up this skill from the ground up, in the same order as the drawing process, starting with a simplified body drawing skeleton (the basic figure or stick figure), moving on to the volumes of muscle structure, and then finally the details of each part of the body and face.
The first fundamental skills to acquire are human proportions drawing techniques. And we’re going to be practicing with this basic figure for a while to become familiar not only with the conventional “ideal proportions”, but also with the way they vary with gender, age, and even ethnic background.
If you’re drawing digitally, perhaps you want your work to look as if it’s created with pencil and paper. If this is the case, may we recommend one of the many Photoshop brush sets available on GraphicRiver, including this Classic Art Brush Pack.


What You Will Learn in This Human Body Drawing Tutorial
- How to draw the human body step by step
- Basic human body outline drawing
- Human profile drawing techniques
- Human body proportions drawing
- Body drawing practice exercises
How to Draw a Body: The Basic Figure
Create Your Chart From Heads
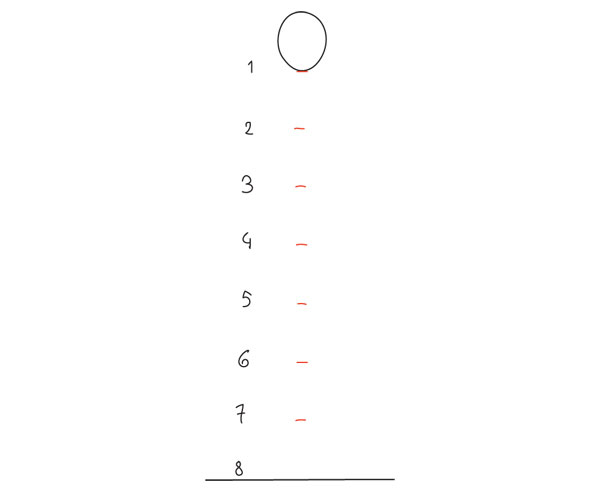
Let’s begin with human drawing basics. A well-proportioned figure, regardless of variations due to gender and such, is defined by the alignment of the joints, which is invariable (that is, we perceive something odd if it does vary). This is our groundwork for proportions. Draw your own chart with me as we go—it really helps with learning the material.
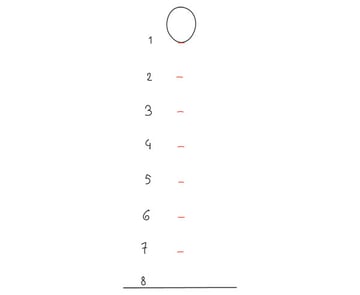
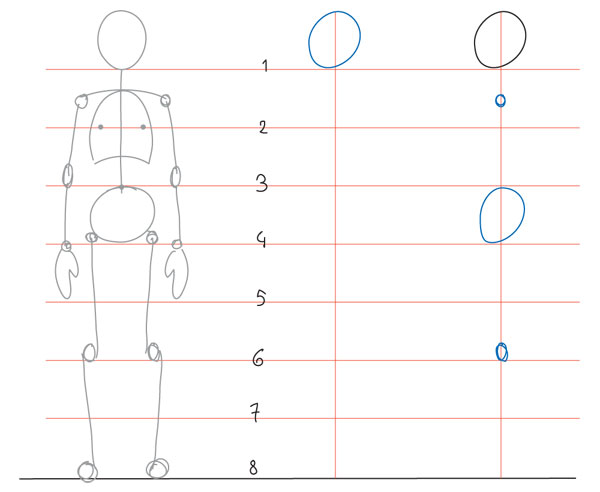
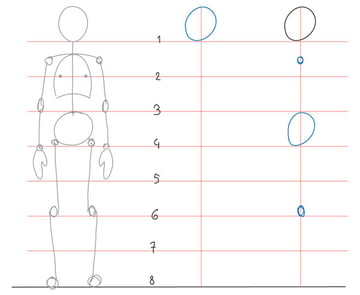
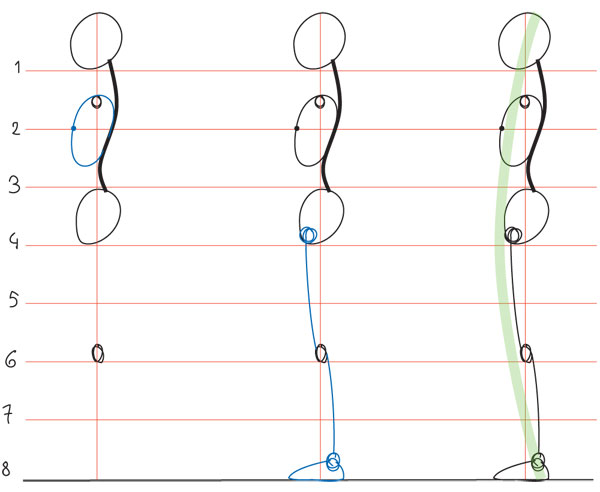
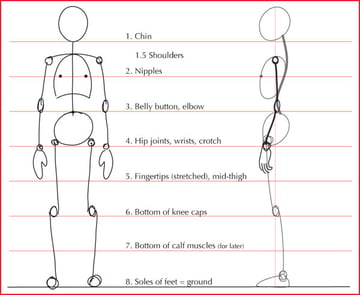
To learn how to draw a body, we start with the head. Start by drawing an oval or egg shape (pointy end down) for a head, and mark down eight measurements, the last one being the ground.
The measurement (ideal male height = eight heads) was set down during the Renaissance as an idealization of the human form. It’s rather obvious that very few people are actually eight heads tall (even Northern Europeans, who served as the basis for this model, are closer to seven heads), but this is still the best model to start with, as it makes it easier to grasp the alignments.
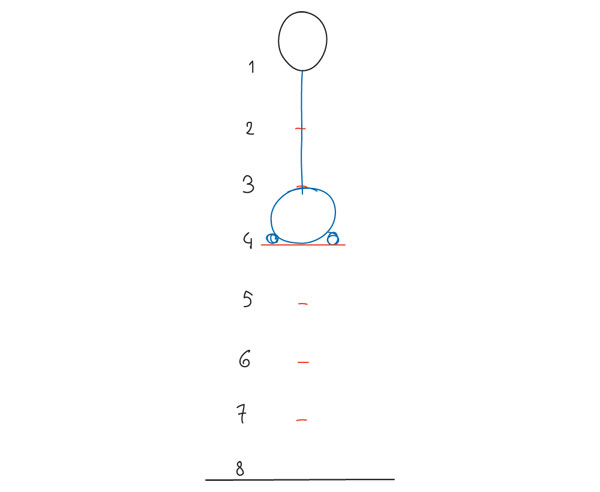
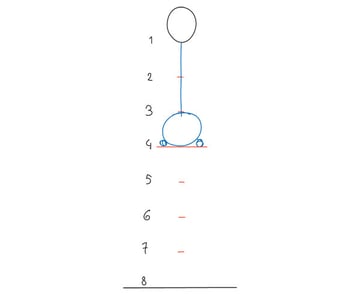
The Pelvis
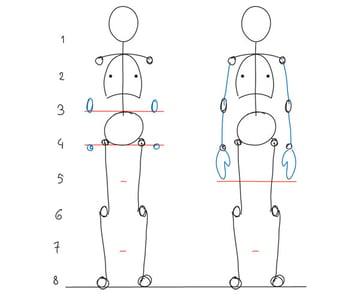
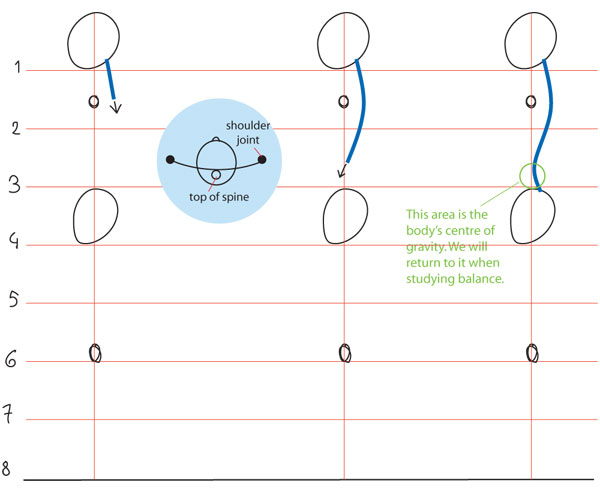
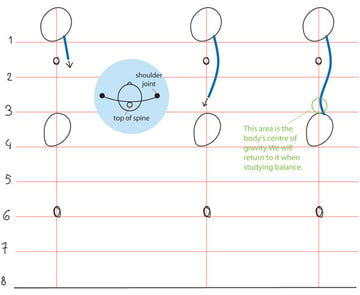
Add the pelvic bone next, simplified as a flattened circle between marks 3 and 4, with the hip joints sitting on 4. Its width is roughly 1.5 to 2 head-widths. You can now draw the spine connecting the head to this most important part of the body, its center of gravity and stability.
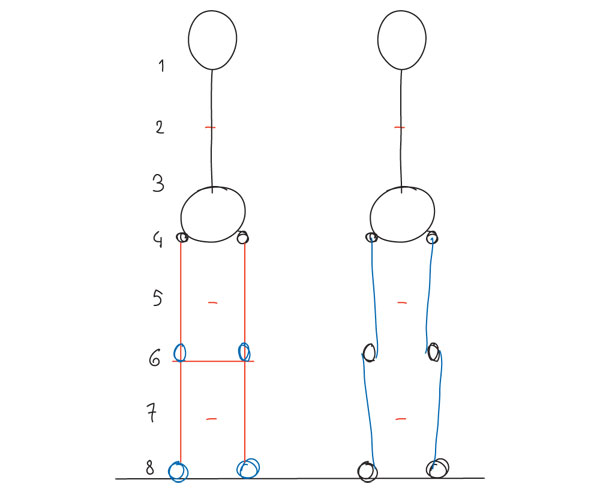
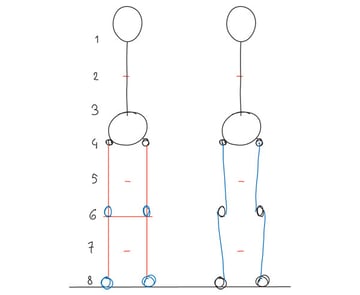
The Legs and Knees
Let’s assume this figure is standing with the feet vertically aligned with the hip joints. The knee joints sit on mark 6, as that line corresponds to the bottom of the kneecaps.
When the leg is stretched out, the knee joint is placed on a straight line with the hip and ankle (left). But this straight line is virtual: to complete the leg, connect the hip joint to the inside of the kneecap, and then again, the outside of the knee to the inside of the ankle (right). This is a very simplified but accurate representation of the actual bone structure, and it helps in drawing the natural look of the human leg, which tapers in from the hip, then staggers out at the knee, and tapers in again. It also helps with placing the muscles at a later stage.
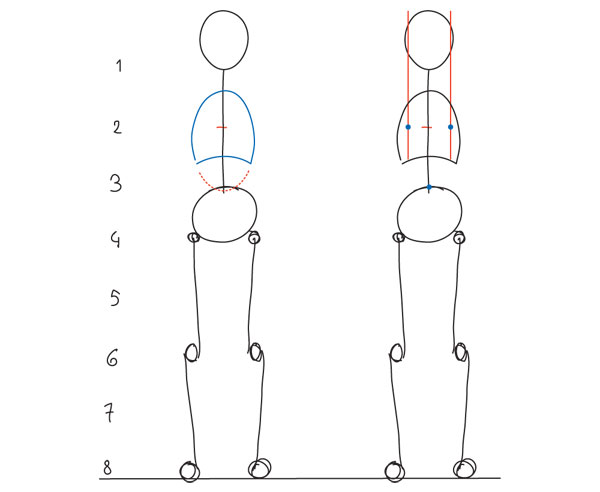
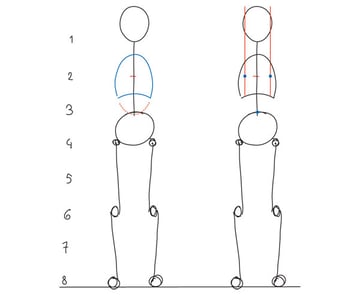
The Ribcage, Nipples, and Belly Button
The ribcage-lungs group is the third important volume of the body, after the head and the pelvis. Simplified, it is an oval that starts halfway between 1 and 2, down to mark 3; but it is best to chop off the lower part of it as shown here to imitate the actual rib cage, as the empty part between the two volumes is important: it is soft and subject to change (flat belly, soft belly, wasp waist) and it is also where the most torsion and movement happens in the spine. It’s good to be aware of that and not to attach the torso and pelvis together like two blocks, as that would “block” your drawing’s range of motion. The width of the oval is roughly the same as the pelvis for now.
Two more details here: the nipples fall on mark 2, just inside the sides of the head, and the belly button on mark 3.
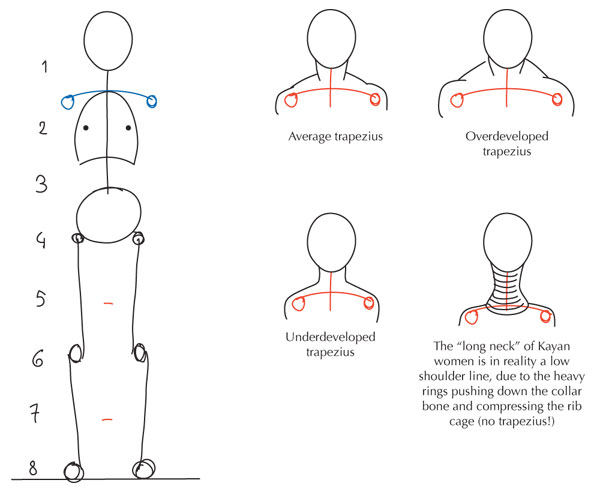
The Shoulders
The shoulder line is about halfway between marks 1 and 2, with the shoulder width 2 to 3 head-widths, but its apparent position can vary a great deal. To begin with, it’s slightly curved down, but in tension the shoulders tense up and the curve can itself turn up and look higher. Furthermore, the trapezius muscle, which from the front appears to connect the shoulder with the neck, is highly individual; if it’s very muscular or carries much fat, it can make the shoulder line look so high there’s no neck; inversely, an underdeveloped trapezius, often seen in very young women, gives the impression of a long neck.
This brief digression into non-skeletal details is to ensure there’s no confusion between the actual position of the shoulder line and its apparent placement in a fleshed-out body, some examples of which are shown below.

The Arm, Wrists, and Hands
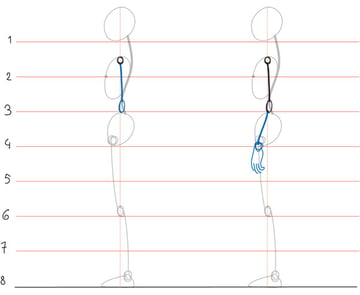
Finally, the arms. The wrists are on mark 4, slightly below the hip joints, which sit on it (you can test it out for yourself by standing up and pressing your wrists against your hips). The fingers end roughly at mid-thigh, which is mark 5. The elbows are a slightly complicated joint that we’ll examine in detail later, but for now it’s helpful to mark them as elongated ovals sitting on level 3.

We’re done… almost. Before summing this up, let’s extend those marks into lines and see how this works in profile.
How to Draw a Body: The Basic Profile
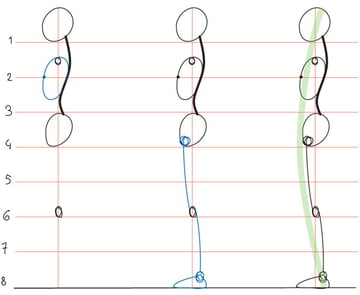
The next step in learning how to draw a body is the profile. Start by drawing the head again, the same egg shape but with the end pointing diagonally down, and drop a vertical line from the crown to the ground.
In an erect posture, you can place the pelvic bone (a narrower version of the head’s egg), the shoulder, and the knee roughly on this vertical line. They are on the same level as before: all the joints are, but the others are not on the same plane as these.
The Spine in Profile
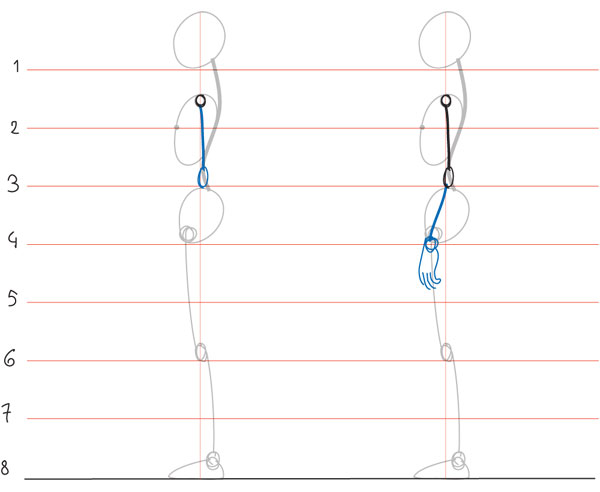
From the side, the spine is revealed as being shaped like a flattened “S”. From the base of the skull, it moves down and back till it reaches its furthest point at the level of the shoulders (between the shoulder blades). Note the shoulder joints are ahead of the spine! This is because, again, the shoulder “line” is in reality an arc: the medallion shows a top view of it.
The spine then comes back forward, and peaks again (inward) a little above the pelvis (the small of the back, which varies in depth and can make for an arched back). Finally it changes direction again briefly and ends in the coccyx or tailbone.
The Ribcage and Legs in Profile
The ribcage is closely attached to the spine, and, in a reasonably fit body standing erect, the chest is naturally pushed forward.
The hip joint is ahead of our vertical axis, and this is counterbalanced by the ankle being a bit behind it. So our hip-knee-ankle line is slanted backward, and staggered again: from the hip joint to the front of the knee joint, and from the back of the knee joint to the ankle.
The overall effect of this posture is a visual arc from head to chest to feet (in green), and when it’s flattened or reversed, we perceive an uncertainty or slouch in the posture.
The Arms in Profile
Finally, the arms. The upper arm falls fairly straight from the shoulder, so the elbow can be aligned with the latter (or fall slightly backward). But the arm is never fully stretched when at rest, so the forearm is not vertical: the arm is slightly bent, and the wrist falls forward, right over the hip bone. (Also, when the hand is relaxed, the fingers curl a little, as shown here).
How to Draw a Body: Summary
This completes the basic, undifferentiated human proportions drawing tutorial. Here’s a diagram to sum up all the human body outline drawing techniques we reviewed:

Human Body Proportions Drawing Reminders
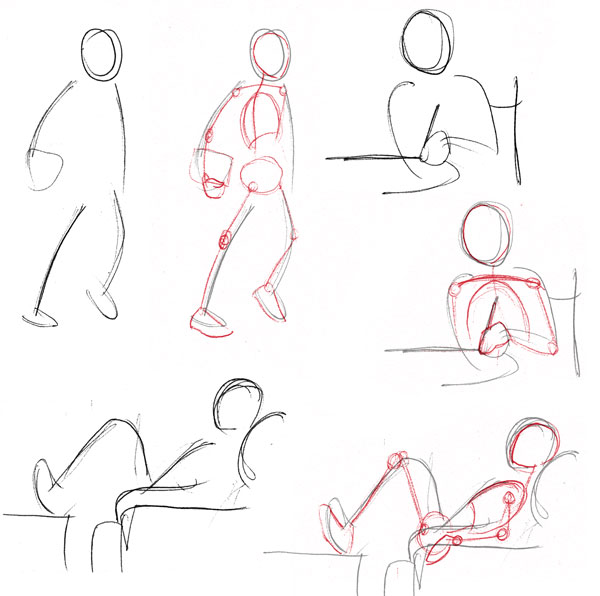
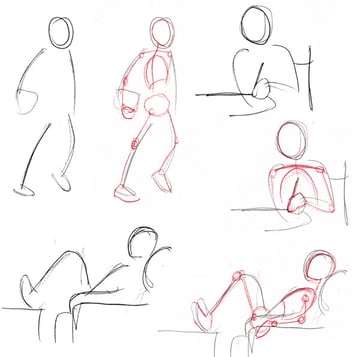
The following human proportions drawings are a few useful visual reminders based on the body. They come in handy when the body is not standing upright.


Body Drawing Practice Exercises
We’ve covered a lot of material in this body anatomy drawing tutorial. Now is a good time to pause the studying and familiarize yourself with this basic figure and the principles of drawing human body proportions. Then, we’ll move on to the differences between male and female structures (and others). For instance, you can integrate this new knowledge into your daily human drawing sketching practice by overlaying a quick energy sketch with this correctly proportioned basic figure.
Human Proportions Drawing Tips
I consistently start with the head, but it doesn’t really matter what part of the body you start drawing, if you’re comfortable and get a good result. If you’re unsure or are having a hard time, then I suggest trying with the head first.
Get used to drawing this basic figure with a light hand, since the finished body will be built up over it. Traditionally, the final lines are inked and the guidelines then erased (hence the importance of a light hand), but even when I’m sketching with a ballpoint pen with the intent of inking on a different sheet by transparency, keeping a light hand ensures I can see what I’m doing.
Discover More Awesome Human Drawing Tutorials
I hope you’ve enjoyed this tutorial about how to draw the human body step by step. If you want to learn even more, we’ve got this great learning guide: Human Anatomy Fundamentals. There you’ll find detailed human drawing tutorials and resources like these:

 DrawingHuman Anatomy Fundamentals: Learning to See and Draw EnergyJoumana Medlej
 DrawingHuman Anatomy Fundamentals: Advanced Body ProportionsJoumana Medlej
 DrawingHuman Anatomy Fundamentals: Basics of the FaceJoumana Medlej
 DrawingHuman Anatomy Fundamentals: How to Draw HandsJoumana Medlej
 DrawingHow to Draw Anime Heads and FacesMonika Zagrobelna
 DrawingHow to Draw Anime CharactersMonika Zagrobelna
 PortraitHow to Draw Natural, Textured, Afro Hair (How to Draw Curly Hair)Daisy Ein
 DrawingHow to Draw Disney CharactersMonika Zagrobelna
Editorial Note: This post has been updated with contributions from Maria Villanueva. Maria is a staff writer with Envato Tuts+.
{excerpt}
Read More
How to Use a Mini Shoulder Brace or Half-Rig to Create Stable Handheld Video
{excerpt}
Read More
9 Black and White Photo Conversion Techniques for Photoshop (How To)
{excerpt}
Read More
Google may be adding Bluetooth detection to its Find My Device service
Google may be working on expanding Android’s Find My Device functionality to more closely match the capabilities of Apple’s Find My network.