
Category: Tutorials
Tutorials,freelance,projects,joomla,php,mysql,wordpress,blancer.com
Konami says Sony made the call to drop ‘PES 2019’ from PS Plus freebies

IHMC’s Atlas robot can navigate its own way through tight spaces

Extreme E reveals the car that will race across glaciers and deserts

30 Royalty-Free Anime Sound Effects
Anime is the incredibly popular Japanese animation that has been taking the world by storm for years now. It often deals with fantastical elements which makes its stories vibrant, fun and very entertaining.
But just like anime has a very characteristic look and themes, it also has very characteristic sounds. That’s why, if you have an anime project in the works, you should click through this post.
In it, you’ll find the best royalty-free anime sound effects available on AudioJungle.
.jpg)
1. Save Crystal 001
Magic is often a theme in anime. Make its presence be known to your audience with the ding of a crystal.
2. Star Shine
If you want an audience to hear the sound of a shiny object sparkling in the distance, this is the sound effect to do it with.
3. Cartoon Dog Bark
Dogs bark even in magical adventures. If you need your dog’s bark to be voiced with a human voice, this is the track for you.
4. Magic Selection 002
You never know when your anime project will be in need of a splattering. But when it does, this is the effect for it.
5. Force Field Effect 001
Don’t leave your anime characters unprotected in the middle of a battle. Give them a force field sound effect to hide behind.
6. Robot Warp Explosion
Robots and explosions are two important elements in anime. Guarantee they have a strong presence with the perfect sound effect.
7. Cartoon Voice Laugh
Anime characters are often quirky and funny. Give yours a silly little laugh with the ‘Cartoon Voice Laugh’ effect.
8. Electric Charge 001
Get an anime project ready for lift off or an intense sequence with this next royalty-free anime sound effect.
9. Harp Glissando
There will also be magical, tender, sweet moments in your anime projects. To convey them correctly, use ‘Harp Glissando’.
10. Cartoon Voice Wow
In anime, there’s always a surprise around every corner. If that’s the case, help the characters be surprised.
11. Aqua Pulse
Does your anime project take place under water? If it does, it’s probable that you’ll need an effect like ‘Aqua Pulse’.
12. Cute Cartoon Sheep Baa
Sheep make for great companions in certain adventures. If your animated project features a sheep, make it ‘baa’.
13. Cartoon Cow Moo Emotions
If, on the other hand, your audiovisual endeavour features a sarcastic cow, here are the sound effects for it.
14. Save Crystal 005
You can also employ this royalty-free sound effect to add a magic element to anime.
15. Magic Selection 005
And speaking of magic, you can use this effect if you need some variety in anime’s magical sounds.
16. Background Destruction Noise Loop
Animes are action-packed and epic. In all of that hectic-ness, something is bound to get destroyed, so make it sound like it.
17. Cartoon Stretch 03
This next sound effect is very dynamic. Listen to it and discover the multiple ways in which you could employ it.
18. Cartoon Voice Yoopeee
Anime characters can get excited. If you need them to say ‘Yoopee’, here are some options for it.
19. 8bit Jump 02
If at some point, you need a second of a high-energy sound, make use of ‘8bit Jump 02’.
20. Cartoon Malicious Laugh
Villains are very much a part of anime storylines. Give your villain a malicious laugh with this royalty-free anime sound effect.
21. Cute Cartoon Sheep
For a few more cute options to make your anime sheep say ‘Baa’, listen to the ones compiled in this pack.
22. Cartoon Mouse Squeak
Sheep aren’t the only animals allowed in anime. If you have a mouse in there, too, make it squeak.
23. Airy Transition 1
A strong gust of wind signifies a number of things in anime. Here’s ‘Airy Transition 1’ for when you need it.
24. Save Crystal 002
An apparition, a spell, the magic touch of a wand, among other similar events could use a royalty-free sound effect like this one.
25. Barrier FX 001
If the previous sound effect of a force field wasn’t to your liking, hopefully this alternative is more your speed.
26. Dramatic Game Ability 4
A character being teleported, suddenly appearing, or showing a lot of strength could use this sound effect.
27. Machinery Game Fail 01
This sound effect fits in a variety of different scenarios and could signify whatever your imagination tells you to.
28. Cartoon Sword 01
Swords are often used in anime. If you want the ones in your project to have a strong presence, use this effect.
29. Cartoon Bleat
Do you have the use for a variety of bleat cries in your multimedia projects? Then this is the pack for you.
30. Mecha Ability
To finalise this list, prepare to be transported into another dimension with this royalty-free sound effect.
Conclusion
Half of the thrill of an anime project is in its sound effects. Without a magical swoosh or a thundering blast, the animation could fall flat.
If you’ve been searching for the right royalty-free anime sound effects to fill in the silence, go through this post.
Remember that there’s a variety available on AudioJungle to fulfil your needs.

{excerpt}
Read More
How to Create a Cartoon Rainbow Text Effect in Photoshop

Text effects and Photoshop text styles can be a lot of fun—they can be expressive, dynamic, and communicative! In this tutorial, we’ll create a rainbow text effect in Adobe Photoshop, using text effects, layer styles, and some other tricks, too!
Tutorial Assets
The following assets were used in this tutorial:
1. How to Arch Text in Photoshop
Step 1
First, begin with a New Document in Adobe Photoshop. You’re welcome to follow along with my settings, as shown below, but there is no wrong answer here! Choose a size that you prefer.

Step 2
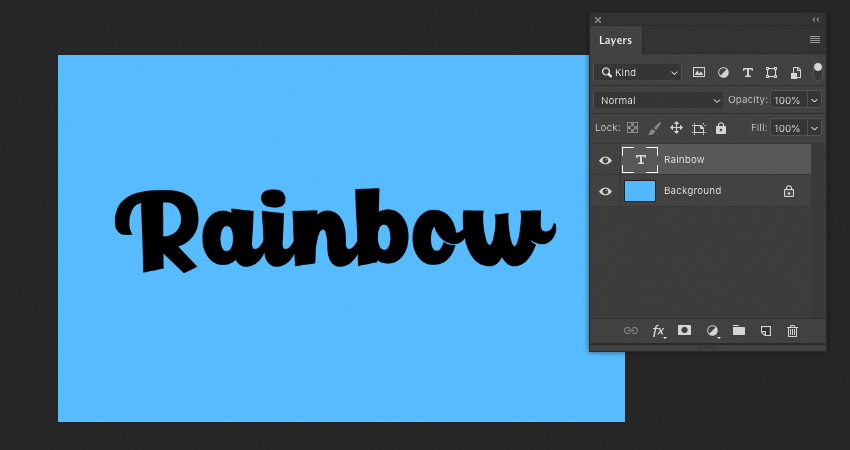
Now, let’s begin with our text. Using the Type Tool, write out the word of your choice.
I used the word “Rainbow” for this tutorial, but feel free to use any that you like. The techniques we’ll use in this walkthrough could apply to any typeface of your choice, as well.
I used the font Paladise.
Step 3
To push the rainbow aesthetic further, we’re going to give the type an arch.
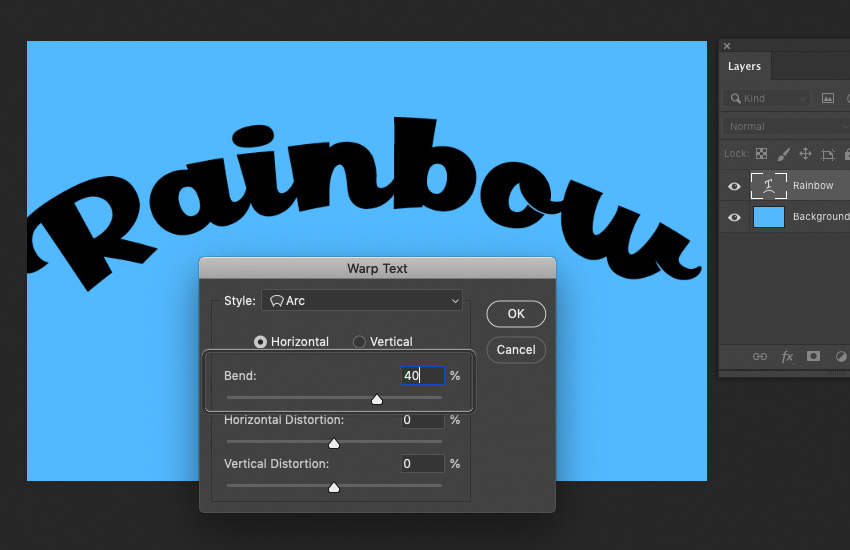
Ever wondered how to curve text in Photoshop? With the Type Tool selected, choose Create Warped Text from the Options Bar. Doing so will bring up the dialog box displayed below.
We want to apply an Arc to our text. Select Horizontal and experiment with the values until you get a curvature that you like. Voila, you know how to arch text in Photoshop! In this case, I chose to set the Bend to 40%.
Step 4
After warping the text, the type might not fit your canvas the way it did prior. In my case, it stretched things out and made the text bigger than I’d originally wanted the text design. Use the Move Tool and your Transform Controls to adjust the type, if necessary.

2. How to Create the Rainbow Text Effect
Step 1
Now, let’s create the rainbow itself. There’s no right or wrong way to do this, but here is one way you could try.
Start by using the Ellipse Tool to create a rounded shape. Try to follow the curvature of the type.

Step 2
Copy the ellipse and Move it upwards, changing its color each time. Once I was happy with my colors, I Flattened the ellipses onto one layer.
The red, however, needs to cover more space, to fully cover the top of the type. In this case, I created a New Layer beneath my ellipses and simply created a red rectangle. You could do this with your Shape Tools or simply Fill a selection made with your Selection Tools.
Again, this is a case where this could be achieved in many ways. You could, for example, draw the rainbow by hand with a drawing tablet, or you could use the Pen Tool to achieve a similar effect.
Choose the method you prefer—the important part is that the arc of the rainbow is inspired by the type and that the color completely covers the text area.

Step 3
Once you’re happy with your rainbow, make sure it has all been Flattened onto one Layer. We’re going to Create a Clipping Mask on this Layer.
To do so, Right-Click on the layer (on PC) or Control-Click on the layer (on Mac) to open the Options seen below. Select Create Clipping Mask.

Step 4
Tah dah! Our rainbow has now been applied to the type area. Notice how, when the Clipping Mask is applied, the Layer has a little downwards arrow on it, indicating this.
If you’re unhappy with how your rainbow looks, you can draw directly on this Layer and the contents will still stay confined to the type area. Don’t be afraid to go in and make adjustments!

3. How to Add Text Effects
Step 1
Now, let’s add some fun effects to push the aesthetic here further.
Rather than using the Drop Shadow Layer Effect, here in Photoshop, let’s create one by hand.
First, I took our Text Layer and the Clipping Mask Layer and put them into a Folder. This will help keep things organized.
Copy the folder. I labeled these two folders “Rainbow Text Top” and “Rainbow Text Bottom”. The bottom folder is the start of our Drop Shadow. Use the Move Tool to move it downwards.

Step 2
Now, let’s create a New Layer, right above the rainbow colors applied to our text. Create a Clipping Mask on this Layer, just as we did earlier in this tutorial.
Fill this Layer with a solid, black color (or, a different color of your choice, if you’d like!). Set the Opacity to 50%—this way, we still see the rainbow colors, but they look a little darker, like a rainbow-tinted shadow.

Step 3
Next, let’s give our text some depth.
Copy the rainbow Text Layer and move this Copied Layer to the top of your list of Layers. Change the Color to white.
I have turned off visibility on my other rainbow text layers, so I can visually focus on this one (click the Eye Icons to the left of each Layer to Toggle Visibility On and Off)

Step 4
We’re going to apply two Layer Effects to the white Text Layer that we just copied. The first one is Bevel & Emboss.
Feel free to copy my settings, as shown below—but again, there is no wrong answer here. Experiment so you get a feel for what the values do! It is, however, important to note that the Highlight Mode is set to Screen and the Shadow Mode is set to Multiply.

Step 5
Now, let’s also add an Inner Glow. Again, I recommend experimenting with these values to get a feel for what they do (Tip: Keep Preview checked so you can see what changes these values make, in real time). Note that the Blend Mode is set to Screen.
Once you’re happy with the values you’ve selected, click OK.

Step 6
Change the layer’s Blending Mode to Multiply. Notice how the white text disappears into the background, but we’re still left with visible Layer Effects.

Step 7
Toggle the visibility on for any hidden layers, so we can see everything together now.
Use the Move Tool to adjust the position of the layer with our Layer Effects, as necessary. I bumped it a little upwards and to the side to get the effect I wanted.

4. How to Create Background Elements
Step 1
To push the rainbow aesthetic even further, I thought it would be cute to add in some raindrops.
I used a drawing tablet to draw some white lines with the Brush Tool. The default Soft Round Brush will do! Then, in varied spots, I drew little spots and dashes to resemble splashes, where the raindrops hit the letters.
If you don’t have a drawing tablet, that’s okay too! The artwork itself doesn’t have to be perfect—you could use your mouse or the Line Tool, for example, to get the basic shapes down.
Then, apply a Gaussian Blur (located under Filters > Gaussian Blur) to smooth things out and match the hazy white glow at the type of the type. Now, we have a rainy look!

Step 2
Let’s finish things off with a fun background.
First, on a New Layer below all of the type, I created some simple clouds in a solid, white color. Again, I used my drawing tablet and the Brush Tool to do so—but you could use Shape Tools to achieve a similar result.
I also added a Gradient, below. The goal was to make the base of the background a little darker than the top. You can do so with the Gradient Tool.

Step 3
Finally, Copy the clouds and Move them so they create a repeated pattern. It doesn’t have to be perfect or symmetrical! Once you’re happy with where you’ve placed them, apply a Gaussian Blur and lower the Opacity of the layer to 80%.

And There You Have It!
We’ve created a cartoon rainbow text effect in Adobe Photoshop! Photoshop text effects aren’t as tough as they look, right? I hope these techniques benefit your next project.
Thank you for following along, and I hope you enjoyed this tutorial!

If you enjoyed this tutorial, here are some others to check out!
 Text EffectsHow to Warp Text in Adobe PhotoshopAbbey Esparza
 Text EffectsHow to Create a Coconut Text Effect in Adobe IllustratorDiana Toma
 Text EffectsHow to Create a Cartoon Gradient Text Effect in Adobe PhotoshopPavlo Manachyn
 Text EffectsHow to Create a Cartoon Text Effect in Adobe PhotoshopJan Stverak
 Text EffectsHow to Create a Fun Felt Photoshop Text EffectJohn Negoita

{excerpt}
Read More
How to Remove Haze from Photos in Lightroom in 60 Seconds
{excerpt}
Read More
Walk and Talk: How to Film Dialogue in Motion
{excerpt}
Read More
Netflix pulled 66 episodes of Chelsea Handler’s canceled talk show

Lyft outlines its disaster response strategy

Use the WooCommerce API to Customize Your Online Store
{excerpt}
Read More
Facebook, Twitter and Live Chat Buttons: Creating a Social-Savvy WordPress Site
{excerpt}
Read More
Google Photos will let you manually tag faces it doesn’t recognize

Superhuman email client turns off location tracking after ‘spying’ controversy

Lotus’ electric hypercar is named ‘Evija’
