Learn how to create this charming jewelry box using Extrude, Gradient and the Appearance Panel. You will learn valuable skills in how to create realistic mirror effects and perspective by following this detailed and informative tutorial.
Continue reading “How to Create a Charming Jewelry Box”
Category: Tutorials
Tutorials,freelance,projects,joomla,php,mysql,wordpress,blancer.com
Workshop #73: The Untitled by Plüton!
At Audiotuts+ we irregularly put up a reader track for workshopping and critique (find out how to submit a track). This is how it works: you upload your song, and every week or so we’ll publish one here and step away from the podium. The floor is yours to talk about the track and how the artist can fix problems in and improve upon the mix and the song.
This track has been submitted for your friendly, constructive criticism. They have put their track (and their heart and soul) in your hands to learn and get useful feedback.
- Do you enjoy the song or track itself? Does it have potential?
- Can the arrangement be improved?
- How did you find the mix? What would you do differently?
- What do you enjoy about the rhythm track? What can be done to improve it?
- Is the choice of instruments relevant and effective for the style/song?
- Are the lyrics (if any) effective? Does the style, arrangement and genre of the song suit them?
- Can you suggest any specific techniques that might improve the track?
- Do you have any other constructive feedback?
The Untitled by Plüton!
Artist’s website: pluton.bandcamp.com/
Description of the track:
We’re a band of two, Plüton! from Istanbul. We did couple of electronica covers of rock & pop songs from the 90’s. This is the first song of ours. We’ll re-take vocals and guitars to finalize this, so we thought it’d be good to have some feedback on other elements. This version of the track is available for free download on our bandcamp. Enjoy!
Download audio file (01TheUntitled.mp3)
Terms of Use: We’d prefer people to download the track on our bandcamp as far as we’re building a mailing list there. Thank you.
Have a listen to the track and offer your constructive criticism for this Workshop in the comments section.
Submit Your Tracks for Workshopping
Need constructive criticism on your own tracks? Submit them using this form.
Quick Tip: Apply a Vintage Effect to Several Images Using Actions
Have you ever wanted to apply the same effect to several images at once? This is an issue that most designers face at some point in their career. In some situations, you might be able to apply an effect individually one photo at a time. That takes time however, and if you have dozens or even hundreds of images to process, that is simply not possible. The solution is to create an action and apply it using a batch process. In today’s quick tip tutorial we will demonstrate how to create an action and apply it to several images using Photoshop’s batch process function.
Step 1
In my particular case , I decided to apply a vintage effect to all the photos in a folder on my machine. So the first step is to open a folder with all the photos you want to apply an effect to.

Step 2
Next, choose a random photograph and open it in Photoshop.

To apply the same effect to all the photos you will need to create an action. Go to the actions panel and press the New Action button. Name it Action 1.
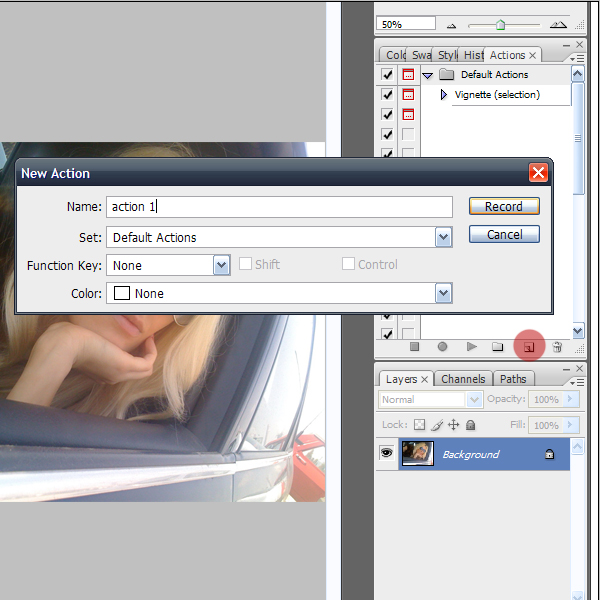
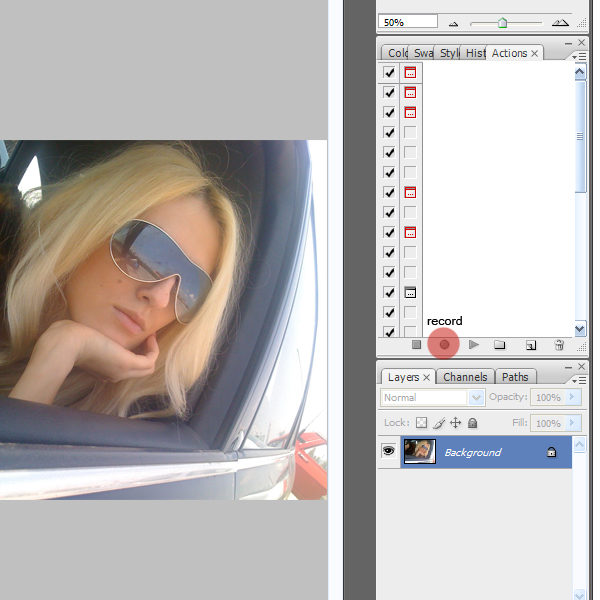
Press record.
Step 3
In this step I will detail all the steps I took to apply a vintage effect to my images but you should feel free to apply any effects that you see fit, depending on your project. Keep in mind that you are recording so every step you take from this moment on will be recorded until you press the Stop button.
Apply an Adjustment Layer > Hue/Saturation.

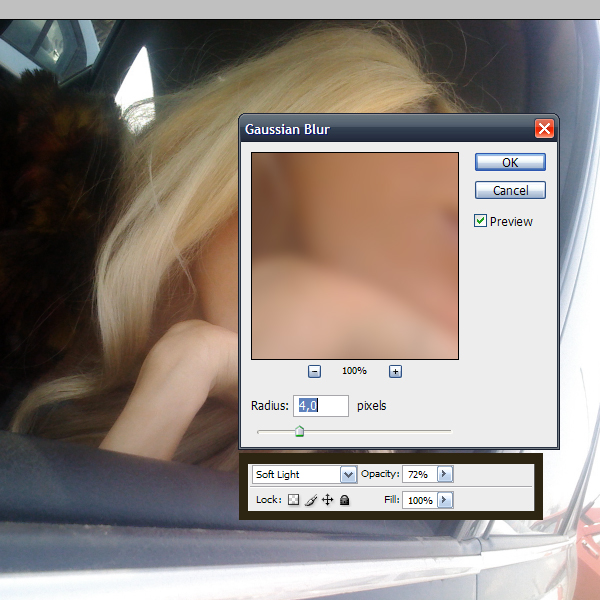
Go to Filter > Blur > Gaussian Blur: 4 px. Layer Blending Mode: Soft Light. Opacity: 70%.
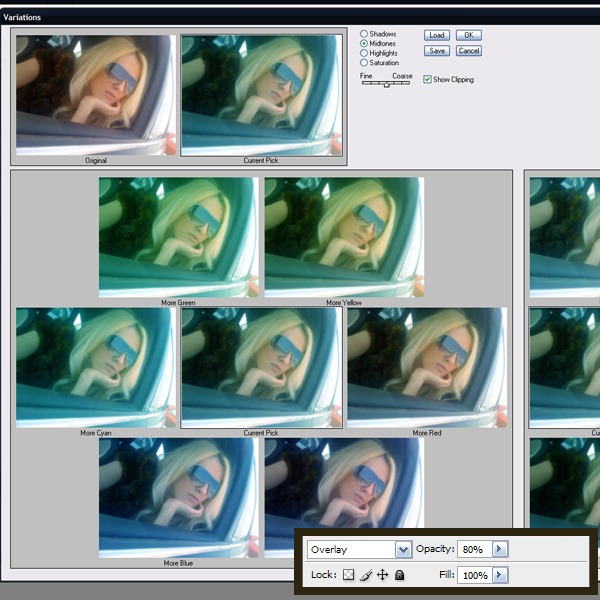
Go to Image > Adjustments > Variations (2 clicks on more cyan ). Blending mode: Overlay. Opacity: 80%.
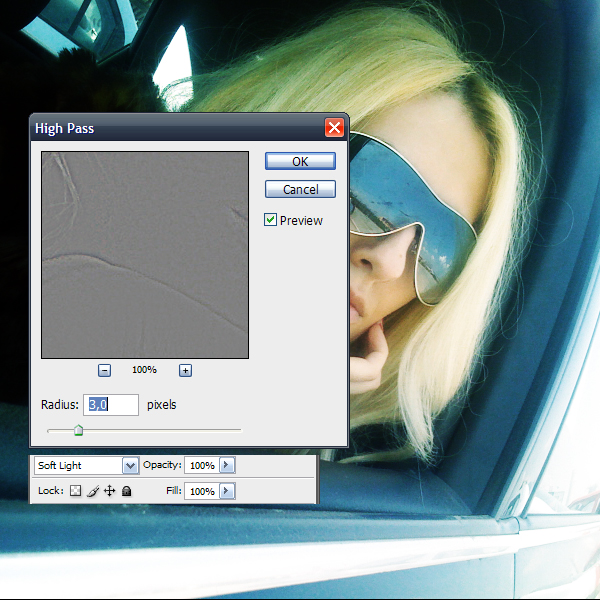
Go to Filter > Other > High pass: 3 px. Layer Blending Mode: Soft Light.
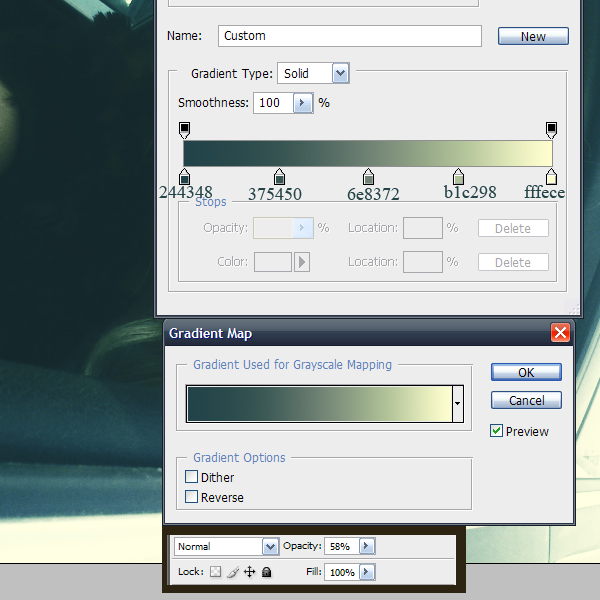
Go to Adjustment Layer > Gradient Map. Opacity: 60%.
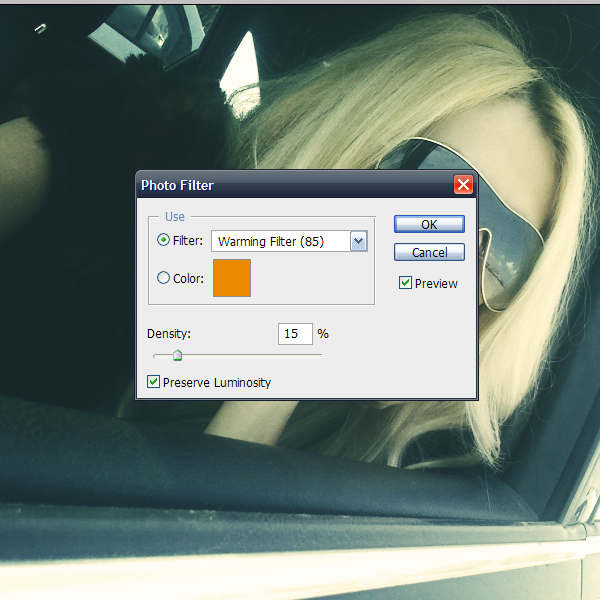
Go to Adjustment Layer > Photo Filter: 15%.
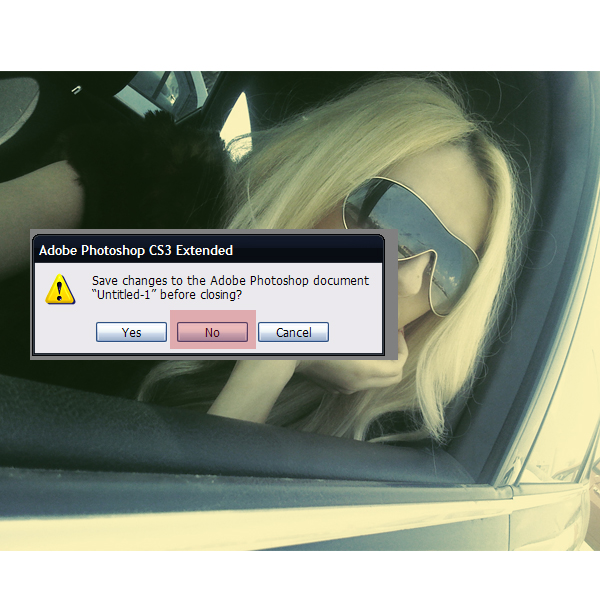
Now let’s save our work as a JPEG. This is very important because it needs to be recorded as an action. Name it as Copy as shown below.
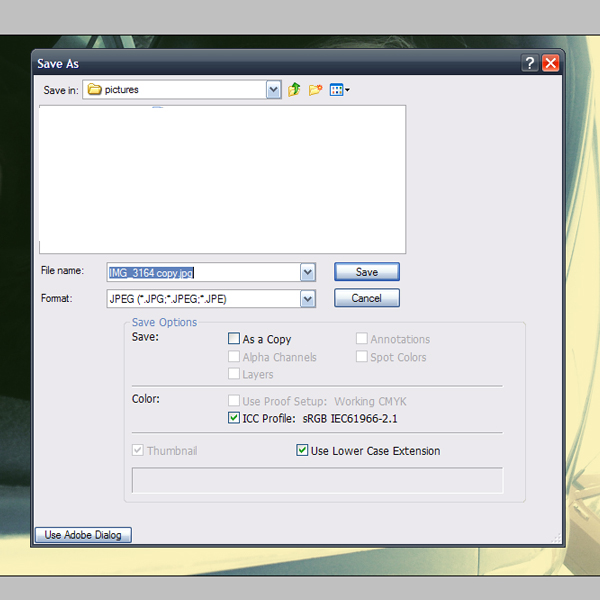
Next, close the document. When prompted to save the changes in a PSD, select No. This is necessary because otherwise Photoshop will ask you the same question for all your photos.
Step 4
Now the action is ready. Press the Stop button.

Step 5
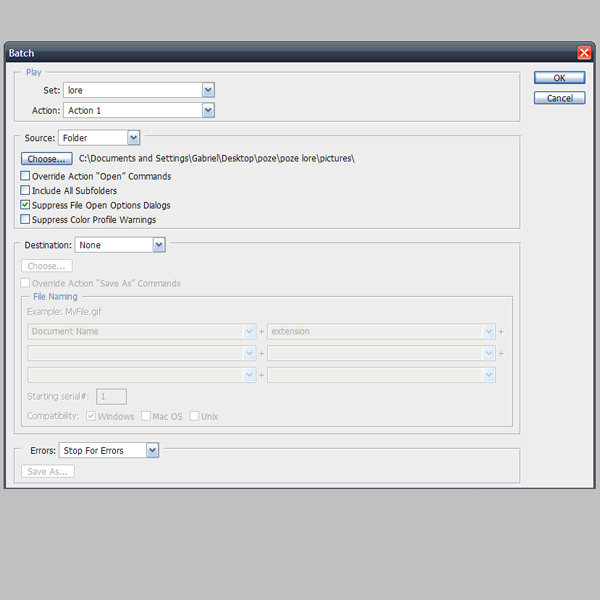
Go to File > Automate > Batch. Select Action 1, go to Source and select the folder in which your photos are located. Check Suppress File Open Options Dialog and press Ok.
Step 6
Sit back and watch as Photoshop does all the work for.

Conclusion
That’s it! We’re finished! Hope you learned something new!

How to Create a Moving Image Optical Illusion – Basix
Ever notice how sometimes images can play tricks on you? In today’s tutorial I will demonstrate how to create an optical illusion that appears to move, even though in reality, it is standing still. Let’s get started!
Step 1
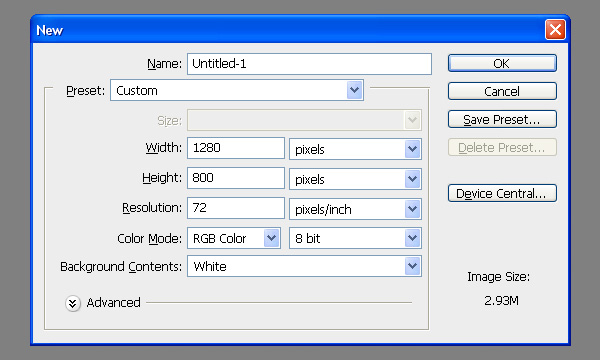
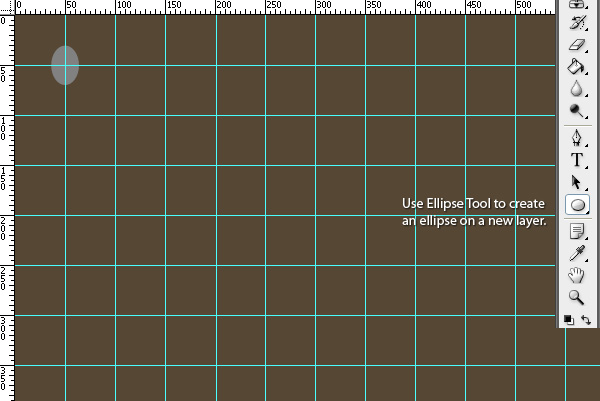
Create a new document with dimensions set to 1280px by 800px.
Step 2
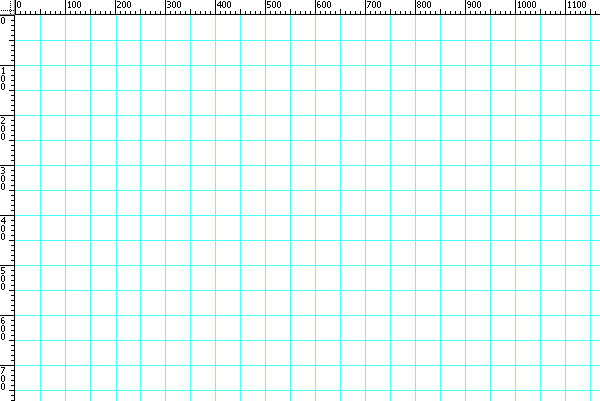
Hit CMD + R to enable rulers if you don’t have them turned on by default. Make sure they are displaying pixels. Create a new guideline every 50 pixels both vertically and horizontally. You can create them by going to View > New Guide or by clicking on a ruler and by dragging it onto the canvas. If you prefer to use a dialog box then you’ll have to turn it on several times and simply type in values starting from 50px to 1250px in case of vertical guidelines and 50px to 750px in case of horizontal guidelines.
Step 3
Fill the background layer with #564734 using the Paint Bucket Tool (G). Grab an Ellipse Tool (U) and create an ellipse on a new layer (hit CMD + Shift + N and Enter to create a new layer). My ellipse has 46px by 34px including a 3px black and white border. So, I’d recommend something that has between 43px by 31px at first but it doesn’t have to have exactly these dimensions. Its dimensions don’t make a huge difference but your ellipses have to be placed close together. Large gaps will produce poor results.
Step 4
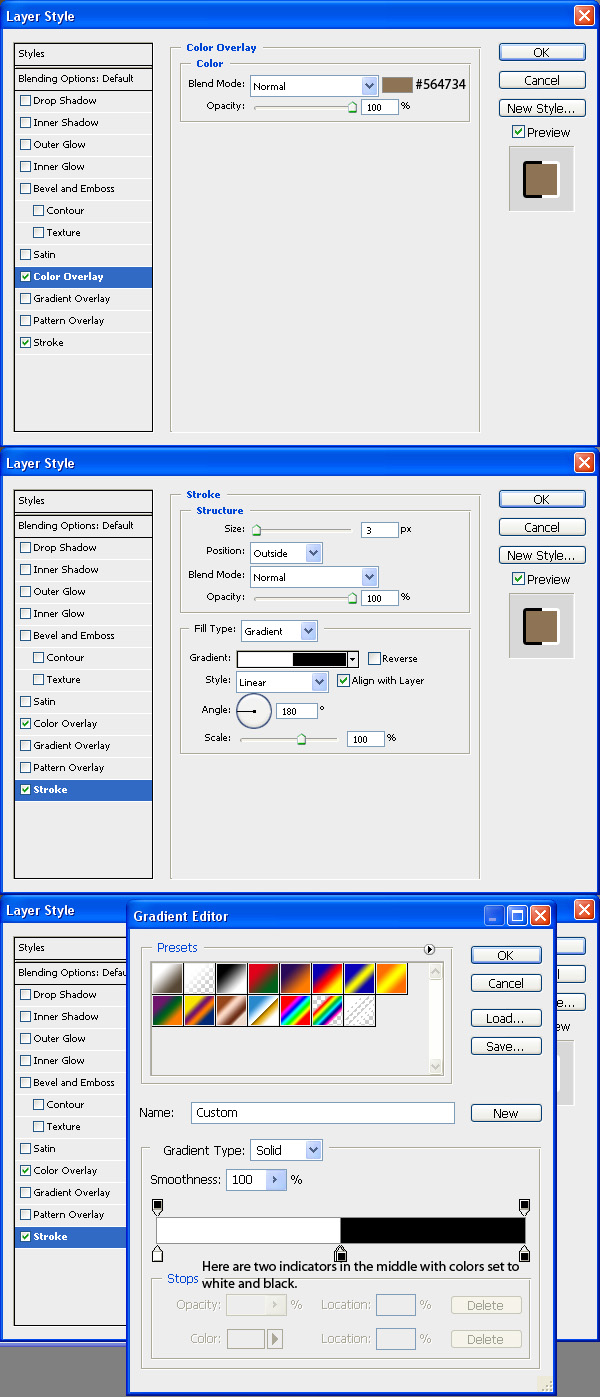
Double-click on the thumbnail of your layer with ellipse and apply the following style. Turn on Stroke. Change Fill Type from Color to Gradient. Change Angle from 90 degrees to 180 degrees. Click on the gradient bar and a new window should pop up. Create two additional indicators in the middle of the bar. Set first two indicators to white (#ffffff) and the last ones to black (#000000). Also enable Color Overlay and change its color to #564734 for instance.
Step 5
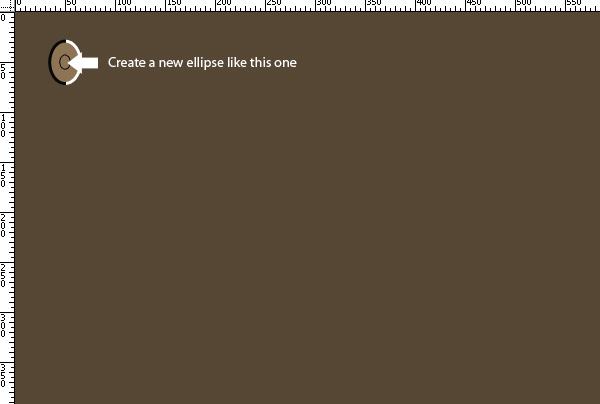
Now grab the Ellipse Tool (U) again and create a new layer above your previous layer (hit CMD + Shift + N and Enter). Draw a smaller ellipse inside your last one. Its size is up to you. Just make sure everything looks like on the image below.
Step 6
Group these two layers by selecting them and hitting CMD + G. Right-click on the group and choose Merge Group.

Step 7
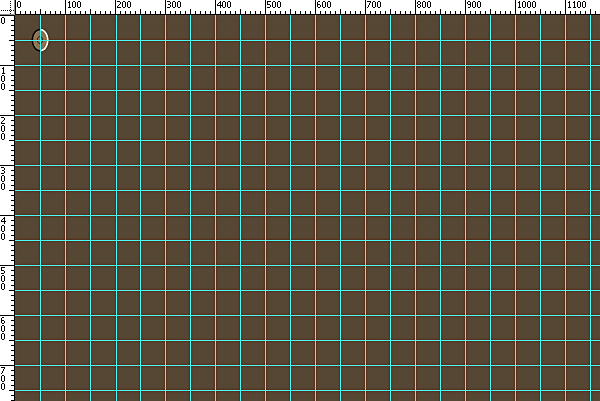
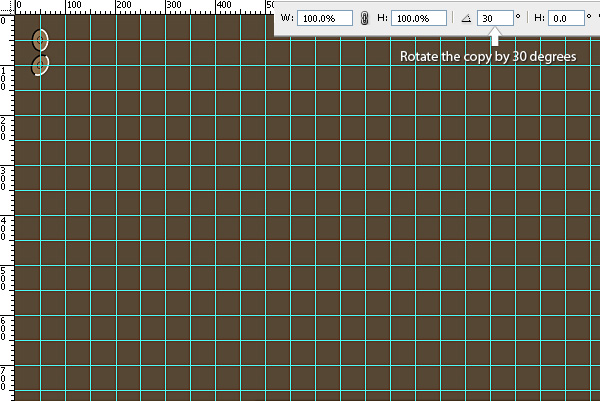
Move your first layer there where the two guidelines cross in the top left corner as shown below.
Step 8
Hit CMD + J or go to Layer > Duplicate Layer in order to duplicate this layer. Place the copy right below your first layer. Once it’s exactly in the middle of the two crossing guidelines hit CMD + T. Rotate the copy by 30 degrees. You can do that in the top toolbar (see the screenshot below).
Step 9
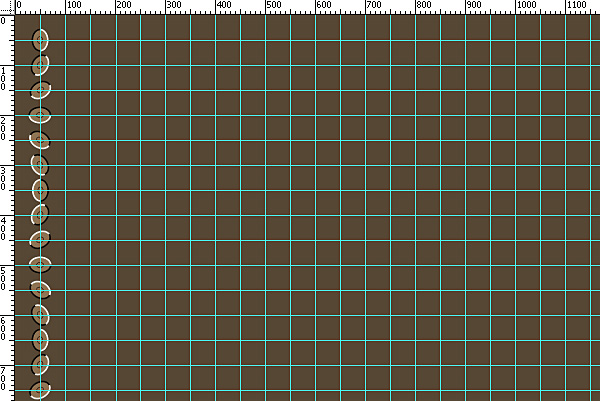
Keep copying THE FIRST ellipse and rotate each copy by multiples of 30 degrees. Place each copy on top of everything else (that’s also very important). Once you get to 180 degrees you won’t be able to type in 210 degrees so just use negative values. So, third copy would have 60 degrees, fourth 90 degrees, seventh 180 degrees, eighth -150 degrees and so on. Once you are done you should have 15 copies in total. Select each copy by selecting the first one in layers’ palette, holding Shift key and selecting the last one. All the copies in between should have become selected. Hit CMD + G to group them.
Step 10
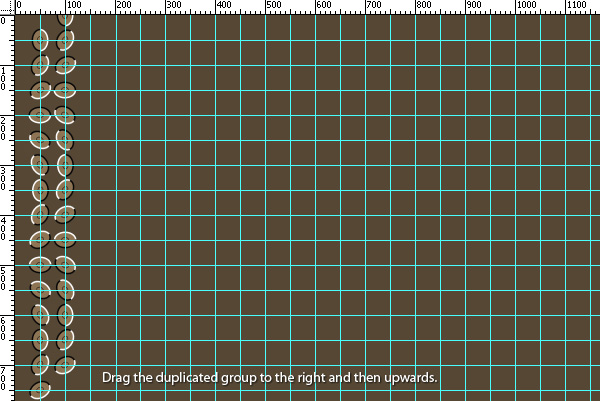
Go to Layer > Duplicate Group and duplicate it. Select your Move Tool (V) and drag this group like one the image below.
Step 11
Open up your newly created copy of the group and remove the very bottom layer (which should be your very top ellipse). Then duplicate the third layer counting from bottom of this group which should be your third layer counting from top of the ellipses. If you’re unsure which layers should be removed and which moved then take a look at the image below.

Step 12
Repeat the 11th step several times until you get the final image.

When Does This Effect Work?
This effect will work in several instances.
- You can use many different shapes to achieve the same effect. Circles and ellipses seem to work the best but rectangles or squares would do the trick as well.
- Each shape should be lighter on one side and darker on the other. This could be a black and white border like in my case or just a gradient with any color as long as there is a visible contrast between them.
- You can put something inside the shape to make it more detailed.
- Your image should consist of many similar shapes and each one has to be really close to one another.
- Your image should be large enough so that it makes your eyes constantly move.
- You can create just about any pattern from these circles or ellipses.
- You should rotate your shapes step by step so that their darker sides (black in my case) are right next to the lighter ones (white in my case). It is very good idea to rotate each circle a bit (like 15 degrees or 30 degrees). If you don’t rotate them it should still work fine but it would ‘move’ vertically or horizontally.
Other than that you won’t get this kind of effect or it wouldn’t be as much observable.
How Does This Effect Work?
When we look at the image below, our brain tries to convert it from 2D to 3D. This is because the borders around the ellipses are inconsistent. This confuses us and creates an illusion of movement.
Final Image
Take a look at the final image below.
Quick Tip: Pure CSS Text Gradients
With the latest advancements in CSS, we now have access to powerful styling techniques, including box shadows, rounded corners, background gradients, etc. However, we don’t currently have the ability to apply gradients to the text itself. Luckily, with a bit of trickery, we can force this effect — at least in webkit browsers! I’ll show you how in today’s video quick tip.
Subscribe to our YouTube page to watch all of the video tutorials!
Prefer to watch this video on Screenr?

Final Code
<!DOCTYPE html>

<html lang="en">
<head>
	<meta charset="utf-8">
	<title>Text Gradients</title>
	<link href='http://fonts.googleapis.com/css?family=Lobster' rel='stylesheet' type='text/css'>

	<style>
	body {
		background: #292929;
		padding: 1em;
	}

	h1 {
		position: relative;
		font-size: 70px;
		margin-top: 0;
		font-family: 'Lobster', helvetica, arial;
	}

	h1 a {
		text-decoration: none;
		color: #666;
		position: absolute;

		-webkit-mask-image: -webkit-gradient(linear, left top, left bottom, from(rgba(0,0,0,1)), color-stop(50%, rgba(0,0,0,.5)), to(rgba(0,0,0,1)));
	}

	h1:after {
		content : 'Hello World';
		color: #d6d6d6;
		text-shadow: 0 1px 0 white;
	}

	</style>
</head>
<body>
     <h1> <a href="#"> Hello World </a> </h1>
</body>
</html>
I originally learned this technique from the guys over at NiceWebType.com. Be sure to visit their website to learn more! So what do you think?
HTML Parsing and Screen Scraping with the Simple HTML DOM Library
If you need to parse HTML, regular expressions aren’t the way to go. In this tutorial, you’ll learn how to use an open source, easily learned parser, to read, modify, and spit back out HTML from external sources. Using nettuts as an example, you’ll learn how to get a list of all the articles published on the site and display them.
Step 1. Preparation
The first thing you’ll need to do is download a copy of the simpleHTMLdom library, freely available from sourceforge.
There are several files in the download, but the only one you need is the simple_html_dom.php file; the rest are examples and documentation.

Step 2. Parsing Basics
This library is very easy to use, but there are some basics you should review before putting it into action.
Loading HTML
$html = new simple_html_dom();

// Load from a string
$html->load('<html><body><p>Hello World!</p><p>We're here</p></body></html>');

// Load a file
$html->load_file('http://net.tutsplus.com/');
You can create your initial object either by loading HTML from a string, or from a file. Loading a file can be done either via URL, or via your local file system.
A note of caution: The load_file() method delegates its job to PHP’s file_get_contents. If allow_url_fopen is not set to true in your php.ini file, you may not be able to open a remote file this way. You could always fall back on the CURL library to load remote pages in this case, then read them in with the load() method.
Accessing Information

Once you have your DOM object, you can start to work with it by using find() and creating collections. A collection is a group of objects found via a selector – the syntax is quite similar to jQuery.
<html>
<body>
    <p>Hello World!</p>
    <p>We're Here.</p>
</body>
</html>
In this example HTML, we’re going to take a look at how to access the information in the second paragraph, change it, and then output the results.
# create and load the HTML
include('simple_html_dom.php');
$html = new simple_html_dom();
$html->load("<html><body><p>Hello World!</p><p>We're here</p></body></html>");

# get an element representing the second paragraph
$element = $html->find("p");

# modify it
$element[1]->innertext .= " and we're here to stay.";

# output it!
echo $html->save();
Using the find() method always returns a collection (array) of tags unless you specify that you only want the nth child, as a second parameter.
Lines 2-4: Load the HTML from a string, as explained previously.
Line 7: This line finds all <p> tags in the HTML, and returns them as an array. The first paragraph will have an index of 0, and subsequent paragraphs will be indexed accordingly.
line 10: This accesses the 2nd item in our collection of paragraphs (index 1), and makes an addition to its innertext attribute. Innertext represents the contents between the tags, while outertext represents the contents including the tag. We could replace the tag entirely by using outertext.
We’re going to add one more line, and modify the class of our second paragraph tag.
$element[1]->class = "class_name";
echo $html->save();
The resulting HTML of the save command would be:
<html>
<body>
    <p>Hello World!</p>
    <p class="class_name">We're here and we're here to stay.</p>
</body>
</html>
Other Selectors
Here are some other examples of selectors. If you’ve used jQuery, these will seem very familiar.
# get the first occurrence of id="foo"
$single = $html->find('#foo', 0);

# get all elements with class="foo"
$collection = $html->find('.foo');

# get all the anchor tags on a page
$collection = $html->find('a');

# get all anchor tags that are inside H1 tags
$collection = $html->find('h1 a');

# get all img tags with a title of 'himom'
$collection = $html->find('img[title=himom]');
The first example isn’t entirely intuitive – all queries by default return collections, even an ID query, which should only return a single result. However, by specifying the second parameter, we are saying “only return the first item of this collection”.
This means $single is a single element, rather then an array of elements with one item.
The rest of the examples are self-explanatory.
Documentation
Complete documentation on the library can be found at the project documentation page.

Step 3. Real World Example
To put this library in action, we’re going to write a quick script to scrape the contents of the Nettuts website, and produce a list of articles present on the site by title and description….only as an example. Scraping is a tricky area of the web, and shouldn’t be performed without permission.

include('simple_html_dom.php');

$articles = array();
getArticles('http://net.tutsplus.com/page/76/');
We start by including the library, and calling the getArticles function with the page we’d like to start parsing. In this case we’re starting near the end and being kind to Nettuts’ server.
We’re also declaring a global array to make it simple to gather all the article information in one place. Before we begin parsing, let’s take a look at how an article summary is described on Nettuts+.
<div class="preview">
    <!-- Post Taxonomies -->
    <div class="post_taxonomy"> ... </div>
    <!-- Post Title -->
    <h1 class="post_title"><a>Title</a></h1>
    <!-- Post Meta -->
    <div class="post_meta"> ... </div>
    <div class="text"><p>Description</p></div>
</div>
This represents a basic post format on the site, including source code comments. Why are the comments important? They count as nodes to the parser.
Step 4. Starting the Parsing Function
function getArticles($page) {
    global $articles;

    $html = new simple_html_dom();
    $html->load_file($page);

    // ... more ...
}
We begin very simply by claiming our global, creating a new simple_html_dom object, then loading the page we want to parse. This function is going to be calling itself later, so we’re setting it up to accept the URL as a parameter.
Step 5. Finding the Information We Want

$items = $html->find('div[class=preview]');

foreach($items as $post) {
    # remember comments count as nodes
    $articles[] = array($post->children(3)->outertext,
                        $post->children(6)->first_child()->outertext);
}
This is the meat of the getArticles function. It’s going to take a closer look to really understand what’s happening.
Line 1: Creates an array of elements – div’s with the class of preview. We now have a collection of articles stored in $items.
Line 5: $post now refers to a single div of class preview. If we look at the original HTML, we can see that the third child is the H1 containing the article title. We take that and assign it to $articles[index][0].
Remember to start at 0 and to count comments when trying to determine the proper index of a child node.
Line 6: The sixth child of $post is <div class=”text”>. We want the description text from within, so we grab the first child’s outertext – this will include the paragraph tag. A single record in articles now looks like this:
$articles[0][0] = "My Article Name Here";
$articles[0][1] = "This is my article description"
Step 6, Pagination
The first thing we do is determine how to find our next page. On Nettuts+, the URLs are easy to figure out, but we’re going to pretend they aren’t, and get the next link via parsing.

If we look at the HTML, we see the following:
<a href="http://net.tutsplus.com/page/2/" class="nextpostslink">»</a>
If there is a next page (and there won’t always be), we’ll find an anchor with the class of ‘nextpostslink’. Now that information can be put to use.
if($next = $html->find('a[class=nextpostslink]', 0)) {
    $URL = $next->href;

    $html->clear();
    unset($html);

    getArticles($URL);
}
On the first line, we see if we can find an anchor with the class nextpostslink. Take special notice of the second parameter for find(). This specifies we only want the first element (index 0) of the found collection returned. $next will only be holding a single element, rather than a group of elements.
Next, we assign the link’s HREF to the variable $URL. This is important because we’re about to destroy the HTML object. Due to a php5 circular references memory leak, the current simple_html_dom object must be cleared and unset before another one is created. Failure to do so could cause you to eat up all your available memory.
Finally, we call getArticles with the URL of the next page. This recursion ends when there are no more pages to parse.
Step 7 Outputting the Results
First we’re going to set up a few basic stylings. This is completely arbitrary – you can make your output look however you wish.

#main {
    margin:80px auto;
    width:500px;
}
h1 {
    font:bold 40px/38px helvetica, verdana, sans-serif;
    margin:0;
}
h1 a {
    color:#600;
    text-decoration:none;
}
p {
    background: #ECECEC;
    font:10px/14px verdana, sans-serif;
    margin:8px 0 15px;
    border: 1px #CCC solid;
    padding: 15px;
}
.item {
    padding:10px;
}
Next we’re going to put a small bit of PHP in the page to output the previously stored information.
<?php
    foreach($articles as $item) {
        echo "<div class='item'>";
        echo $item[0];
        echo $item[1];
        echo "</div>";
    }
?>
The final result is a single HTML page listing all the articles, starting on the page indicated by the first getArticles() call.
Step 8 Conclusion
If you’re parsing a great deal of pages (say, the entire site) it may take longer then the max execution time allowed by your server. For example, running from my local machine it takes about one second per page (including time to fetch).
On a site like Nettuts, with a current 78 pages of tutorials, this would run over one minute.
This tutorial should get you started with HTML parsing. There are other methods to work with the DOM, including PHP’s built in one, which lets you work with powerful xpath selectors to find elements. For easy of use, and quick starts, I find this library to be one of the best. As a closing note, always remember to obtain permission before scraping a site; this is important. Thanks for reading!
Dealing With The Impossible At Work
The novel Catch-22 by Joseph Heller is a “satirical critique of bureaucratic operation and reasoning.” The book is famous, unique and hilarious, but the term “Catch-22? itself has become more popular than the book it came from. The phrase may seem old and obscure, but it’s still part of the English lexicon, and it’s been used most recently in popular TV shows like Lost and The Office.
Catch-22
n.
- A situation in which a desired outcome or solution is impossible to attain because of a set of inherently illogical rules or conditions.
- A situation or predicament characterized by absurdity or senselessness.
- A contradictory or self-defeating course of action.
Unfortunately, Catch-22 situations are a common occurrence in the workplace: If two managers have differing plans for a project, they might ask their employees for two completely different outcomes. If a poorly written policy contradicts an existing one, employees will be forced to break one rule by following another. When people say they’re being “asked to do the impossible” at work, it may not be an embellishment. Consider the following examples:
- You can’t get a job without work experience, and you can’t gain experience without getting a job first.
- To save money (and trees), your company institutes a new policy mandating that all documents be printed on double-sided paper. As the keeper of such files, you are instructed to throw away any single-sided submissions and reprint them…to save paper.
- Your supervisor wants the written copy for your next marketing brochure to be “edgy, creative and different,” but also requires you to stay within the bounds of industry standards and your company’s rigid style guidelines.
Solutions, Not Excuses
So, how does one approach one of these absurd “Catch-22” dilemmas? Should you just try to work around the problem? Rarely are these issues single, isolated incidents. They are usually creatures of habit, and a temporary, “band-aid” workaround will look like a sloppy job and land you in the same exact predicament later. If there is truly no acceptable way to do the work, you have to show your colleagues what’s hindering you. Your peers and your boss don’t always have time to understand the details of your dilemma, and unless you point out the predicament, they’ll assume that you’re mishandling some straightforward work through your own laziness or lack of ability.
But, don’t point out the problem without offering a solution to resolve it. If you only point out the problem, it will sound like complaining, making you the bigger issue to deal with. Your boss and your co-workers want solutions, not excuses or grumbling. Offer some sensible ways to resolve the dilemma, and you’ll instantly transform yourself from a griping, disgruntled employee into a savvy efficiency expert. Rather than getting the typical “I feel your pain” empathy from your colleagues, you’ll get what you really want, a permanent fix to a frustrating problem.
Catching The Big One
“Catch-22” quagmires aren’t always small, tedious problems; some have been lurking unchecked for a long time, and they’ve been allowed to grow into gigantic monstrosities. Maybe your overly-ambitious company is perpetually planning new projects, and never leaves any time to actually complete them. Maybe your company’s attempt to “branch out” with new products is rendering their old products obsolete, resulting in more work and less revenue. These types of quandaries, regardless of size or scope, are never too big to fix. In fact, they might be too big not to fix. As long as your solutions to them are sound, you can show off your problem-solving skills on a grand scale. Fixing a company-wide crisis will always win you more praise than fixing an accounting bug or a problematic paragraph in the employee manual.
Are there any risks that come with taking on one of these dilemmas? Yes, sometimes. Pointing out one of these problems might expose a co-worker’s oversights. Suggesting that you have a better way to do the job might look like a challenge to the status quo. But, in almost all cases, the risks are worth taking. They don’t call it “sticking your neck out” because it’s easy and risk-free. Remember, a good company will always be receptive to potential improvements, and if you’ve got the perfect solution, it will be hard for even the most stubborn supervisor to dismiss. It’s far riskier to ignore these kinds of problems, and allow them to hinder your own performance, and that of your company.
Catch-22 situations happen all the time. While they are by definition “no-win” scenarios, there is a still a good and bad way to handle them. Don’t be the “complainer” or the “whistle-blower.” Instead, find the fix and the gumption to pitch it to your peers. Most importantly don’t let these conundrums defeat your positive attitude and ruin your day, week, month, or career. If Joseph Heller can make them funny, then surely we can laugh about them.
Make a Dynamic Copyright Notice in Flash: Part 2 – Basix
During Part 1 of this lengthy tutorial we covered several useful programming techniques including planning, preparing and loading XML, variable and function declaration, scaling, alignment and plenty of others. Let’s now finish off our deceptively simple (and very flexible) copyright notice..
Step 25: TextFormat Object Properties
If you recall from Part 1, all our text-formatting variables now hold the relevant values. We can assign those variables to the properties of the TextFormat object we created even earlier. This time let’s skip the generic model and just do it:
		//ASSIGN THE VARIABLES TO THE PROPERTIES OF THE TEXT FORMAT

		//font

		tfCopyright.font=theFont;

		//size

		tfCopyright.size=theFontSize;

		//color

		tfCopyright.color=theFontColor;

		//url

		tfCopyright.url=theLink;

		//target

		tfCopyright.target=theTarget;

		//bold

		tfCopyright.bold=theFontBold;

		//italic

		tfCopyright.italic=theFontItalic;

		//underline

		tfCopyright.underline=theFontUnderline;
Step 26: Auto-Size the TextField
Since our TextField displays text dynamically, and the text can theoretically be of any length, we should auto-size the text field. To do that, we’ll also have to align the text left or right. I say left:
		//AUTO-SIZE THE TEXT FIELD AND LEFT-ALIGN THE TEXT IN IT

			txtCopyright.autoSize=TextFieldAutoSize.LEFT;
Step 27: Apply the TextFormat Object
All our fine text formatting work would be for nothing if we didn’t apply it to the actual TextField. Now would be the good time to do that:
		//APPLY TEXT FORMAT TO THE TEXT FIELD

			txtCopyright.setTextFormat(tfCopyright);
As you can se, we are using the setTextFormat() method of the TextField class, passing the name of our TextFormat variable as a single argument.
We’ve just completed the text formatting part of our code. Here’s what our main function should look by now:
		//THE MAIN FUNCTION

		function makeCopyright(copyright:XML):void {

			//Get the initial year from XML
			initialYear=copyright.initialYear.text();

			//Get the copyright holder text from XML

			theHolder=copyright.theHolder.text();

			//Get the statement text from XML

			theStatement=copyright.theStatement.text();

			//Get the current year from the local system

			currentDate = new Date();
			currentYear=currentDate.getFullYear();
			currentYearString=currentYear.toString();

			//Create the text field object

			txtCopyright = new TextField();

			//Add the TextField object to the Display List

			addChild(txtCopyright);  //or stage.addChild

			//Display text in the TextField

			txtCopyright.text="COPYRIGHT © "+initialYear+"–"+currentYearString+" "+theHolder+" "+theStatement;

			//FORMAT THE TEXT

			//Create TextFormat object

			tfCopyright = new TextFormat();

			//GET THE STRING AND NUMERIC VALUES FOR TEXT FORMAT FROM XML

			//theFont

			theFont=copyright.theFont.text();

			//theFontSize

			theFontSize=copyright.theFontSize.text();

			//theFontColor

			theFontColor=copyright.theFontColor.text();

			//theLink

			theLink=copyright.theLink.text();

			//theTarget

			theTarget=copyright.theTarget.text();

			//CONVERT STRINGS TO BOOLEANS AND HANDLE POSSIBLE ERRORS

			//theFontBold

			theFontBoldString=copyright.theFontBold.text();

			if (theFontBoldString=="true") {
				theFontBold=true;
			} else if (theFontBoldString == "false") {
				theFontBold=false;
			} else {

				//Handle the error

				txtCopyright.text = "Please set the correct Boolean value in theFontBold XML item.";
			}

			//theFontItalic

			theFontItalicString=copyright.theFontItalic.text();

			if (theFontItalicString=="true") {
				theFontItalic=true;
			} else if (theFontItalicString == "false") {
				theFontItalic=false;
			} else {

				//Handle the error

				txtCopyright.text = "Please set the correct Boolean value in theFontItalic XML item.";
			}

			//theFontUnderline

			theFontUnderlineString=copyright.theFontUnderline.text();

			if (theFontUnderlineString=="true") {
				theFontUnderline=true;
			} else if (theFontUnderlineString == "false") {
				theFontUnderline=false;
			} else {

				//Handle the error

				txtCopyright.text = "Please set the correct Boolean value in theFontUnderline XML item.";
			}

			//ASSIGN THE VARIABLES TO THE PROPERTIES OF THE TEXT FORMAT

			//font

			tfCopyright.font = theFont;

			//size

			tfCopyright.size=theFontSize;

			//color

			tfCopyright.color=theFontColor;

			//url

			tfCopyright.url=theLink;

			//target

			tfCopyright.target=theTarget;

			//bold

			tfCopyright.bold=theFontBold;

			//italic

			tfCopyright.italic=theFontItalic;

			//underline

			tfCopyright.underline=theFontUnderline;

			//AUTO-SIZE THE TEXT FIELD AND LEFT-ALIGN THE TEXT IN IT

			txtCopyright.autoSize=TextFieldAutoSize.LEFT;

			//APPLY TEXT FORMAT TO THE TEXT FIELD

			txtCopyright.setTextFormat(tfCopyright);

            } // Closes the main function
And this is what we should see after we resave the .as and republish the .swf:

All the text formatting values have been passed from XML correctly, and the look of our copyright notice can now be modified from XML. I encourage you to experiment by changing the text formatting values in the Copyright.xml file. You will also notice that our copyright notice is now a link that opens the new page in the new browser window.
Step 28: Position and Opacity Values
The second major part of code in our main function will position our copyright notice at the place set in the XML file, with or without animation. To make that happen, we need to get the rest of the values from XML. The way it’s done is already familiar from the previous steps, so let’s just write the code. Don’t know about you but I’m having a major deja vu right now:
			//GET THE VALUES FROM XML FOR THE VARIABLES THAT POSITION THE TEXT FIELD AND CONTROL ITS OPACITY

			//theXOffset

			theXOffset = copyright.theXOffset.text();

			//theYOffset

			theYOffset = copyright.theYOffset.text();

			//relativeTo

			relativeTo=copyright.relativeTo.text();

			//leftOrRight

			leftOrRight=copyright.leftOrRight.text();

			//Convert String to Boolean for slideIn

			slideInString=copyright.slideIn.text();

			if (slideInString=="true") {
				slideIn=true;
			} else if (slideInString == "false") {
				slideIn=false;
			}

			//slideInSpeed

			slideInSpeed = copyright.slideInSpeed.text();

			//slideInSpeedIndex

			slideInSpeedIndex = copyright.slideInSpeedIndex.text();

			//Convert String to Boolean for fadeIn

			fadeInString=copyright.fadeIn.text();

			if (fadeInString=="true") {
				fadeIn=true;
			} else if (fadeInString == "false") {
				fadeIn=false;
			}

			//fadeInSpeed

			fadeInSpeed = copyright.fadeInSpeed.text();

			//fadeInSpeedIndex

			fadeInSpeed = copyright.fadeInSpeed.text();

			//initialAlpha

			initialAlpha=copyright.initialAlpha.text();

			//finalAlpha

			finalAlpha=copyright.finalAlpha.text();
Step 29: Convert String to MovieClip Name
We have only one more value to pass from our XML file to ActionScript, and that value is held in the movieClipName item of our XML file. Let’s get the string value first:
			//movieClipName name

			movieClipName=copyright.movieClipName.text();
We need that variable to get its value from XML because we want to be able to position our copyright notice relative either to the stage or any MovieClip we may choose. Presumably, our Flash project will have a number of MovieClips in its root Timeline, and we may want the copyright notice to appear at the bottom of one of those clips. Knowing the instance name of that clip, we want to be able to set it in the XML file so that we can position the copyright notice without needing to republish the .swf file.
Our movieClipName variable already holds the value passed from XML. In our XML file we set the movieClipName arbitrarily to the value of mcContentModule (and you may remember that such is the instance name of the reference MovieClip we placed near the top of the stage in our .fla file). After we receive that value in our ActionScript code, it becomes “mcCopyrightModule”: a String value in double quotes. We need to convert that value from String to a MovieClip instance name (to remove the quotation marks, so to speak), and to select that instance name from the instance names of all the MovieClips we may have on stage in our Flash project.
To select one MovieClip of many that may be located in the root Timeline of a .fla project, we can use the MovieClip conversion and square brackets syntax, like this:
MovieClip(root[movieClipName])
To be able to manipulate the MovieClip instance that was created outside of our class, we’ll need to reference that MovieClip in the class. To do so, we’ll use the variable of the MovieClip data type we’ve declared just for that occasion:
referenceClip = MovieClip(root[movieClipName]);
We’ll now proceed to write statements and functions that will position and animate our copyright notice, but first let’s see what our main function looks like so far:
		//THE MAIN FUNCTION

		function makeCopyright(copyright:XML):void {

			//Get the initial year from XML

			initialYear=copyright.initialYear.text();

			//Get the copyright holder text from XML

			theHolder=copyright.theHolder.text();

			//Get the statement text from XML

			theStatement=copyright.theStatement.text();

			//Get the current year from the local system

			currentDate = new Date();
			currentYear=currentDate.getFullYear();
			currentYearString=currentYear.toString();

			//Create the text field object

			txtCopyright = new TextField();

			//Add the TextField object to the Display List

			addChild(txtCopyright);

			//Display text in the TextField

			txtCopyright.text="COPYRIGHT © "+initialYear+"–"+currentYearString+" "+theHolder+" "+theStatement;

			//FORMAT THE TEXT

			//Create TextFormat object

			tfCopyright = new TextFormat();

			//GET THE STRING AND NUMERIC VALUES FOR TEXT FORMAT FROM XML

			//theFont

			theFont=copyright.theFont.text();

			//theFontSize

			theFontSize=copyright.theFontSize.text();

			//theFontColor

			theFontColor=copyright.theFontColor.text();

			//theLink

			theLink=copyright.theLink.text();

			//theTarget

			theTarget=copyright.theTarget.text();

			//CONVERT STRINGS TO BOOLEANS AND HANDLE POSSIBLE ERRORS

			//theFontBold

			theFontBoldString=copyright.theFontBold.text();

			if (theFontBoldString=="true") {
				theFontBold=true;
			} else if (theFontBoldString == "false") {
				theFontBold=false;
			} else {

				//Handle the error

				txtCopyright.text = "Please set the correct Boolean value in theFontBold XML item.";
			}

			//theFontItalic

			theFontItalicString=copyright.theFontItalic.text();

			if (theFontItalicString=="true") {
				theFontItalic=true;
			} else if (theFontItalicString == "false") {
				theFontItalic=false;
			} else {

				//Handle the error

				txtCopyright.text = "Please set the correct Boolean value in theFontItalic XML item.";
			}

			//theFontUnderline

			theFontUnderlineString=copyright.theFontUnderline.text();

			if (theFontUnderlineString=="true") {
				theFontUnderline=true;
			} else if (theFontUnderlineString == "false") {
				theFontUnderline=false;
			} else {

				//Handle the error

				txtCopyright.text = "Please set the correct Boolean value in theFontUnderline XML item.";
			}

			//ASSIGN THE VARIABLES TO THE PROPERTIES OF THE TEXT FORMAT

			//font

			tfCopyright.font = theFont;

			//size

			tfCopyright.size=theFontSize;

			//color

			tfCopyright.color=theFontColor;

			//url

			tfCopyright.url=theLink;

			//target

			tfCopyright.target=theTarget;

			//bold

			tfCopyright.bold=theFontBold;

			//italic

			tfCopyright.italic=theFontItalic;

			//underline

			tfCopyright.underline=theFontUnderline;

			//AUTO-SIZE THE TEXT FIELD AND LEFT-ALIGN THE TEXT IN IT

			txtCopyright.autoSize=TextFieldAutoSize.LEFT;

			//APPLY TEXT FORMAT TO THE TEXT FIELD

			txtCopyright.setTextFormat(tfCopyright);

			//GET THE VALUES FROM XML FOR THE VARIABLES THAT POSITION THE TEXT FIELD

			//theXOffset

			theXOffset = copyright.theXOffset.text();

			//theYOffset

			theYOffset = copyright.theYOffset.text();

			//relativeTo

			relativeTo=copyright.relativeTo.text();

			//leftOrRight

			leftOrRight=copyright.leftOrRight.text();

			//Convert String to Boolean for slideIn

			slideInString=copyright.slideIn.text();

			if (slideInString=="true") {
				slideIn=true;
			} else if (slideInString == "false") {
				slideIn=false;
			}

			//slideInSpeed

			slideInSpeed = copyright.slideInSpeed.text();

			//slideISpeedIndex

 			slideInSpeedIndex = copyright.slideInSpeedIndex.text();

			//Convert String to Boolean for fadeIn

			fadeInString=copyright.fadeIn.text();

			if (fadeInString=="true") {
				fadeIn=true;
			} else if (fadeInString == "false") {
				fadeIn=false;
			}

			//fadeInSpeed

			fadeInSpeed = copyright.fadeInSpeed.text();

			//fadeInSpeedIndex

			fadeInSpeedIndex = copyright.fadeInSpeedIndex.text();

			//initialAlpha

			initialAlpha=copyright.initialAlpha.text();

			//finalAlpha

			finalAlpha=copyright.finalAlpha.text();

			//movieClipName name

			movieClipName=copyright.movieClipName.text();

			//Convert the string into a MovieClip name

			referenceClip=MovieClip(root[movieClipName]);

                } //Closes the main function
Step 30: Setting Relative Coordinates
We are now going to create a new function within our main function. This new function will be responsible for setting relative X and Y coordinates for our copyright notice when our movie first loads, and for setting those coordinates again if a user resizes the browser window. All we need to do in this step of our tutorial is define the function:
			//SET RELATIVE COORDINATES

			function setRelativeCoordinates():void {

            }
Step 31: Position the TextField
The possible position of our copyright notice will be determined by three main variables: relativeX, relativeZeroX and relativeY. If the copyright notice is placed near the right edge of the stage or MovieClip, its X coordinate will be based on the value of the relativeX variable. If the copyright notice is placed near the left edge of the stage or a MovieClip, its X coordinate will be based on the value of the relativeZeroX variable. The Y coordinate of the copyright notice will in both cases be based on the value of the relativeY variable.
The actual values of relativeX, relativeZeroX and relativeY variables should, in their own turn, depend on the value of the relativeTo variable which can hold either “stage” or “movieclip” strings.
If the relativeTo variable holds the “stage” string, relativeX should be equal to the width of the stage, relativeZeroX should be equal to 0, and relativeY should be equal to the height of the stage.
If the relativeTo variable holds the “movieclip” string, relativeX should be equal to the sum of the referenceClip’s X coordinate andd the width of the referenceClip, relativeZeroX should be equal to the X coordinate of the referenceClip, and relativeY should be equal to the sum of the Y coordinate of the referenceClip and its height.
That took a lot of ink to be described in plain English, but can be expressed in a very compact bit of code that we place inside the setRelativeCoordinates function:
			//POSITION THE TEXT FIELD RELATIVE TO THE STAGE OR A MOVIECLIP

			if (relativeTo=="stage") {
				relativeX=stage.stageWidth;
				relativeZeroX=0;
				relativeY=stage.stageHeight;

			} else if (relativeTo=="movieclip") {
				relativeX=referenceClip.x+referenceClip.width;
				relativeZeroX=referenceClip.x;
				relativeY=referenceClip.y+referenceClip.height;
				}
Step 32: Draw a Shape for a Mask
When we use slide-in animated effect and position our copyright notice relative to a MovieClip, we don’t want our copyright notice to pop suddenly into existence somewhere in the middle of the stage and then slide along the MovieClip to its final X coordinate. That would be a little too crude. Instead, we want our copyright notice to slide in gracefully out of nowhere. We need a mask to make this happen.
In this step, we’ll draw the shape for the mask, and in the next step, we’ll set the mask to reveal our TextField object when necessary.
You may remember that when we declared our mask variable we assigned it to the MovieClip data type. Let’s now stick the new MovieClip into our variable, and place the variable within the second clause of the code that we wrote in the previous step:
			//POSITION THE TEXT FIELD RELATIVE TO THE STAGE OR A MOVIECLIP

			if (relativeTo=="stage") {
				relativeX=stage.stageWidth;
				relativeZeroX=0;
				relativeY=stage.stageHeight;

			} else if (relativeTo=="movieclip") {
				relativeX=referenceClip.x+referenceClip.width;
				relativeZeroX=referenceClip.x;
				relativeY=referenceClip.y+referenceClip.height;

				//DRAW THE MASK

				copyrightMask = new MovieClip();
			}
When we position the copyright notice relative to a MovieClip, we want our mask to be as wide as the MovieClip, minus theXOffset value multiplied by two (one offset on the left and one on the right). We want the mask to be of the same height as our TextField. We want to place the mask at theXOffset distance from the left edge of the MovieClip (that would center the mask horizontally) — and at theYOffset distance from the bottom edge of the MovieClip.
Now let’s draw the mask.
				//DRAW THE MASK

				copyrightMask = new MovieClip();

				copyrightMask.graphics.beginFill(0xFF0000,0);
				copyrightMask.graphics.drawRect(0, 0, referenceClip.width-(theXOffset*2), txtCopyright.height);
				copyrightMask.graphics.endFill();
				copyrightMask.x=referenceClip.x+theXOffset;
				copyrightMask.y = (referenceClip.y+referenceClip.height)-(txtCopyright.height+theYOffset);
Step 33: Reveal the TextField
Let’s set the mask to reveal the TextField if it’s positioned relative to a MovieClip. The shape of our mask is ready, and we just need to assign the mask to the TextField and add the mask to the Display List:
				//ASSIGN THE MASK TO THE TEXT FIELD

				txtCopyright.mask=copyrightMask;

				//ADD THE MASK TO THE DISPLAY LIST

				addChild(copyrightMask);
Now let’s take a look at what we have so far in this part of our code:
			//POSITION THE TEXT FIELD RELATIVE TO THE STAGE OR A MOVIECLIP

			if (relativeTo=="stage") {
				relativeX=stage.stageWidth;
				relativeZeroX=0;
				relativeY=stage.stageHeight;

			} else if (relativeTo=="movieclip") {
				relativeX=referenceClip.x+referenceClip.width;
				relativeZeroX=referenceClip.x;
				relativeY=referenceClip.y+referenceClip.height;

				//DRAW THE MASK

				copyrightMask = new MovieClip();
				copyrightMask.graphics.beginFill(0xFF0000,0);
				copyrightMask.graphics.drawRect(0, 0, referenceClip.width-(theXOffset*2), txtCopyright.height);
				copyrightMask.graphics.endFill();
				copyrightMask.x=referenceClip.x+theXOffset;
				copyrightMask.y = (referenceClip.y+referenceClip.height)-(txtCopyright.height+theYOffset);

				//ASSIGN THE MASK TO THE TEXT FIELD

				txtCopyright.mask=copyrightMask;

				//ADD THE MASK TO THE DISPLAY LIST

				addChild(copyrightMask);
			}
Step 34: Set the Relative Y Coordinate
If our copyright notice is positioned relative to the stage, the distance from the bottom edge of the stage to the copyright notice should remain the same, even when the stage is resized. Similarly, if our copyright notice is placed relative to a MovieClip, the distance from the bottom edge of that MovieClip to the copyright notice should also remain the same. We can write a single statement that will take care of the relative Y coordinate for the TextField that displays our copyright text.
If we make Y coordinate of the TextField equal the relativeY, the top of our TextField will be placed even with the bottom of the stage or MovieClip. We need to subtract the height of the TextField from the relativeY. We may also want to subtract the value of theYOffset variable, if we want our copyright notice to appear slightly above the bottom edge of the stage or a MovieClip.
All of this translates into the following line of code:
			//SET THE RELATIVE Y COORDINATE FOR THE TEXT FIELD

			txtCopyright.y=relativeY-(txtCopyright.height+theYOffset);
Step 35: Assign Values to the Coordinates
Our copyright notice should slide into its final position if the slide-in animated effect toggled on in XML, or just appear at that position of the slide-in effect is toggled off. In both cases, the final X coordinate for the copyright notice is the same.
If our copyright notice is set to appear at the right edge of the stage or a MovieClip, we should subtract the width of the copyright notice and the value of theXOffset from the relativeX. If our copyright notice is set to appear at the left edge of the stage or a MovieClip, we should add theXOffset to the relativeZeroX.
Therefore, we need a left final relative coordinate and a right final relative coordinate:
			//ASSIGN VALUES TO THE FINAL LEFT AND RIGHT X COORDINATES FOR THE TEXT FIELD

			xFinalRight = relativeX-(txtCopyright.width+theXOffset);

			xFinalLeft=relativeZeroX+theXOffset;
Step 36: Final Relative X Coordinate
We need to generalize the final X coordinate for our TextField but placing it into its own variable whose value would change depending on the value of the leftOrRight variable. We do this by the means of the if…else if conditional statement:
			//ASSIGN THE VALUE TO THE FINAL RELATIVE X COORDINATE

			if (leftOrRight=="right") {
				xFinal=xFinalRight;
			} else if (leftOrRight == "left") {
				xFinal=xFinalLeft;
			}
Step 37: Reposition the TextField on Resize
Assuming that all MovieClips in our main Flash project are of a fixed size, the stage is the only object that will require our copyright notice to update its position if a user resizes the browser window. We’ve already set the relative Y coordinate that will update whenever the stage is resized. If the copyright notice is positioned at the left edge of the stage, resizing the browser window will not affect the relative X coordinate of the TextField. However, if the copyright notice is positioned at the right edge of the stage, the final relative X coordinate of the text field will have to update every time the browser window is resized. The task is very clear and all we need to do is explain it to Flash in its own language:
			//REPOSITION THE TEXT FIELD ON RESIZE IF ITS PLACED RELATIVE TO STAGE AT THE RIGHT

			if (leftOrRight=="right"&&relativeTo=="stage") {
				txtCopyright.x=xFinalRight;
				}
This completes the setRelativeCoordinates function, and the whole function should look like this:
			//SET RELATIVE COORDINATES

			function setRelativeCoordinates():void {

				//POSITION THE TEXT FIELD RELATIVE TO THE STAGE OR A MOVIECLIP

				if (relativeTo=="stage") {
					relativeX=stage.stageWidth;
					relativeZeroX=0;
					relativeY=stage.stageHeight;

				} else if (relativeTo=="movieclip") {
					relativeX=referenceClip.x+referenceClip.width;
					relativeZeroX=referenceClip.x;
					relativeY=referenceClip.y+referenceClip.height;

					//DRAW THE MASK

					copyrightMask = new MovieClip();
					copyrightMask.graphics.beginFill(0xFF0000,1);
					copyrightMask.graphics.drawRect(0, 0, referenceClip.width-(theXOffset*2), txtCopyright.height);
					copyrightMask.graphics.endFill();
					copyrightMask.x=referenceClip.x+theXOffset;
					copyrightMask.y = (referenceClip.y+referenceClip.height)-(txtCopyright.height+theYOffset);

					//ASSIGN THE MASK TO THE TEXT FIELD

					txtCopyright.mask=copyrightMask;

                    //ADD THE MASK TO THE DISPLAY LIST

					addChild(copyrightMask);
				}

				}

				//SET THE RELATIVE Y COORDINATE FOR THE TEXT FIELD

				txtCopyright.y=relativeY-(txtCopyright.height+theYOffset);

				//ASSIGN VALUES TO THE FINAL LEFT AND RIGHT X COORDINATES FOR THE TEXT FIELD

				xFinalRight = relativeX-(txtCopyright.width+theXOffset);

				xFinalLeft=relativeZeroX+theXOffset;

				//ASSIGN THE VALUE TO THE FINAL RELATIVE X COORDINATE

				if (leftOrRight=="right") {
					xFinal=xFinalRight;
				} else if (leftOrRight == "left") {
					xFinal=xFinalLeft;
				}

				//REPOSITION THE TEXT FIELD ON RESIZE IF IT'S PLACED RELATIVE TO STAGE AT THE RIGHT

				if (leftOrRight=="right"&&relativeTo=="stage") {
					txtCopyright.x=xFinalRight;

				} //Closes the conditional statement
			} //Closes setRelativeCoordinates
Step 38: Animation Create Timer
Animation in Flash can be frame-based or timer-based. The speed of the frame-based animation depends on two factors: the frame rate set in the main Flash project and the speed of the computer playing the animation. The slower the computer, the more likely is the actual frame rate of the animation to be lower than its declared frame rate. If the computer is busy with other tasks, the animation may lag.
The speed of the timer-based animation is independent from the speed of the computer that runs it. That speed only depends on the unsigned integer value passed as an argument to an object of the Timer class that controls the animation. That integer sets the period between the “ticks” of the Timer object in milliseconds. That’s why if we want our animation to be smooth, it’s better to make it timer-based.
To control the speed of our animated effects, we have numeric variables holding values received from XML: slideInSpeed, slideInSpeedIndex, fadeInSpeed and fadeInSpeedIndex. Changing their values in XML will change the speed of the animated effects. We also have two Timer variables slideInTimer and fadeInTimer. We’ll get to using the slideInSpeedIndex and fadeInSpeedIndex variables and to creating the Timer for the fade-in effect a bit later, but now it’s time to create the Timer for the slide-in animation. To put a Timer object into the slideInTimer variable we just need to call the constructor of the Timer class, and to pass the slideInSpeed variable to it as the argument:
			//CREATE THE TIMER FOR SLIDE-IN ANIMATION

			slideInTimer = new Timer(slideInSpeed);
Step 39: Animation Create Function
First, let’s define the function, as usual:
			//SLIDING FUNCTION

			//slideCopyright

			function slideCopyright():void {

			} //Closes slideCopyright
We want some easing for our slide-in effect to make that effect look a little more lifelike, but all we need is a simple ease-out, and that’s why, as we agreed earlier, it would make no sense for us to import one of the huge, option-rich popular tweener classes like Caurina or TweenLite. We’ll just include the ease-out into the code for our slide-in animated effect. Ideally, it would be great to write the code for the slide-in effect in such a way that both the sliding and the easing are done by the same statement. And we happen to have just the thing for that!
What I’m about to say is obvious but easy to forget. Flash doesn’t create motion. It can’t. It wouldn’t be able to move anything even if its digital life depended on it. All Flash can do is position a visual object at new coordinates every time an instance of a certain event object is created. In our case, every time a Timer event is dispatched, Flash can assign new coordinates to the TextField that displays the copyright information received from XML.
“Easing out” means changing the coordinates of a visual object in such a way that with each next dispatched event, that object is placed closer to the final coordinates at decreasing intervals. To say it another way, for example, if the distance from the current X coordinate of our TextField to its final X coordinate is 80 pixels, and that distance gets divided by two whenever the timer ticks, then at the first tick of a timer our TextField object is repositioned 40 pixels closer to its final X coordinate, at the second tick the TextField is repositioned only 20 pixels closer to its final X coordinates, at the third tick it’s repositioned by 10 pixels, at the fourth tick, by 5, at the fifth tick, by 2.5, at the sixth tick, by 1.25 and so on. In terms of illusion of motion, it would appear that the TextField moves towards its final X coordinate, gradually slowing down. Dividing the distance by two would actually create a really fast animation. But the distance doesn’t have to be divided by two, it can be divided by a higher number. The higher the number, the slower the animation.
To translate that into programmatic terms, we’ll need this data:
- The current X coordinate of our Text Field object, updated with each Timer event
- The final X coordinate the Text Field object should arrive to – that value is contained in our xFinal variable
- The distance between the current X coordinate of the TextField and its final X coordinate, also updated with each Timer event – we’ve prepared the xDistance variable to hold that value
- The division index that would chop off a certain percentage of the xDistance every time the Timer event is dispatched – that index is being passed from XML into the slideInSpeedIndex variable
Having the data, we can now write the code. First, let’s tell Flash how to calculate the distance between the current X coordinate of the TextField and the final X coordinate:
xDistance = xFinal-txtCopyright.x;
This makes perfect logical sense because the definition of a distance is the difference between the current position and the reference position: I am currently in New York and the difference between the coordinates of New York and Paris approximately equals the distance from the coffee cup on my desk to someone else’s steaming coffee cup on the table in Le Cafe Constant.
Now for the actual easing:
txtCopyright.x=txtCopyright.x+xDistance/slideInSpeedIndex;
We’re telling Flash to update the current X coordinate of the TextField by adding to it the numeric value obtained by dividing the current distance to the final X by the index contained in the slideInSpeedIndex variable
We’ve just written the code that does the most important bit of math for our ease-out sliding animation, and yet the animation wouldn’t occur. Why? We haven’t yet started the timer and haven’t created the event listener that would listen for events dispatched by the timer and would run our animation function every time an event is dispatched. But we’re not going to start the timer and add the event listener just yet: we’ll start and add them a bit further in our code, and very soon you’ll see why. On the contrary, we’re now going to stop the timer we haven’t yet started and remove the event listener we haven’t yet added!
I know how crazy that sounded just now, but what I described is actually good coding practice. We should make sure to stop the timer and remove the event listener when they are no longer needed (in our case, when the TextField arrives to its destination), so that the timer stops ticking and the event listener stops checking for events that will never reoccur. In that way we free some of the processing capacity of a user’s computer and, in the long run, save precious natural resources. We may forget or lack time to do that later, when we would have to scroll up from way below and find our slide-in function, so why not do it now when we’re writing the function? In general, you may often find yourself stopping timers and removing event listeners before you started/added them. There’s nothing unusual about that, it’s quite common.
So here’s what we apparently need to write:
  			//Stop the timer and remove the event listener

			if (txtCopyright.x==xFinal) {
				slideInTimer.stop();
				slideInTimer.removeEventListener(TimerEvent.TIMER, slideRight);
			}
We just told Flash to stop the timer and to remove its even listener when the TextField object reaches its final coordinate. The code seems perfectly fine, and yet it won’t work. The problem is, our TextField will never arrive to its final coordinate. Due to the nasty Dichotomy Paradox that has full power over Flash, the TextField will just keep repositioning itself by increasingly smaller increments all through infinity, getting imperceptibly ever closer to the final x coordinate whilst never reaching it.
But we can solve the problem easily by rounding the current X position of the TextField object to the nearest integer. When the TextField is near enough to the xFinal for its coordinate to round to the value equal the value of xFinal, the timer will stop and the event will be removed:
  			//Stop the timer and remove the event listener

			if (Math.round(txtCopyright.x)==xFinal) {
				slideInTimer.stop();
				slideInTimer.removeEventListener(TimerEvent.TIMER, slideRight);
			}
If we want to make it just about perfect, we can also force the TextField object to accept the xFinal coordinate:
  			//Stop the timer and remove the event listener

			if (Math.round(txtCopyright.x)==xFinal) {
        		txtCopyright.x=xFinal;
				slideInTimer.stop();
				slideInTimer.removeEventListener(TimerEvent.TIMER, slideRight);
			}
But perfect is not always best, because, depending on the values we’ll be passing from the XML, if we force the TextField into the final position, that may add a little accentuated movement at the very end to our slide-in animation. We may or may not want that, so I would comment out the line of code that does it, and comment it as optional. Other than that, our sliding function is done, and that’s how it looks:
 			//SLIDING FUNCTION

			//slideCopyright

			function slideCopyright():void {
				xDistance=xFinal-txtCopyright.x;
				txtCopyright.x=txtCopyright.x+xDistance/slideInSpeedIndex;

				//Stop the timer and remove event listener

				if (Math.round(txtCopyright.x)==xFinal) {
					//txtCopyright.x=xFinal; //optional
					slideInTimer.stop();
					slideInTimer.removeEventListener(TimerEvent.TIMER, slideCopyright);
				}

			} //Closes slideCopyright
Step 40: Placement Without Animation
Compared to the major feat of programming we’ve just accomplished, the function that would place our TextField at its final X coordinate if the slideIn item in our XML file is set to false is really modest:
			//NON-SLIDING FUNCTION

			//placeCopyright

			function placeCopyright():void {

				txtCopyright.x=xFinal;
			} //Closes placeCopyright
Step 41: Define the Positioning Function
We’re about to create the function that will take all the code we’ve written so far and make it come to life. Let’s call that function positionTheCopyright and let’s start by defining it:
			function positionTheCopyright():void {

			}
Step 42: Add a Resize Event Listener
If the copyright notice is positioned relative to the stage, whenever the stage is resized, the coordinates of copyright notice will need to be readjusted. We need an event listener to check for the stage being resized, and an event handler to reposition the TextField that holds the copyright text. The good news is, we’ve already created the event handler, and it’s none other than setRelativeCoordinates function we’ve created what seems like ages ago. Now let’s add the event listener:
			//Add the resize event listener

			stage.addEventListener(Event.RESIZE, setRelativeCoordinates);
Step 43: Dispatch a Resize Event
Our code now depends on the resize event, and nothing would happen before a resize event takes place. But what if nobody actually cares to resizes the stage to set things in motion? To make sure that the TextField receives the command to position itself, we’re going to trigger a single resize event from inside our code. The stage won’t actually get resized (or you can think of the stage being resized from its current width and height to to the same exact width and height), but the Flash will receive the instruction to do perform the same operations it would perform if the stage did get resized:
			//Fire a resize event

			stage.dispatchEvent(new Event(Event.RESIZE));
Step 44: Set the Initial X Coordinate
Our TextField will first materialize at its initial coordinate. If the slide-in animated effect is toggled on, the TextField will slide gently from that initial coordinate to the xFinal position. If the slide-in effect is toggled off, the TextField will instantly jump to the xFinalposition. Such a jump won’t be seen because the initial coordinate of the TextField will make it first appear either off-stage (if the relativeTo variable holds the “stage” value) or outside of the mask (if the relativeTo variable holds the “movieclip” value. In any case, the TextField won’t be seen in its initial position:
		//Set the initial X coordinate for the TextField

			if (leftOrRight=="right") {
				txtCopyright.x=relativeZeroX-txtCopyright.width;
			} else if (leftOrRight=="left") {
				txtCopyright.x=relativeX;
			}
Step 45: Final Coordinate
We should now invoke our two placing functions, slideCopyright and placeCopyright. Which one gets to do its job would depend on the Boolean value held in the slideIn variable. Let’s set the structure first:
			/*Slide in the text field, if slideIn in XML set to true
			or place the text field if slideIn in XML set to false*/

			if (slideIn==true) {

				//Slide the TextField

				slideCopyright();

			} else if (slideIn == false) {

				//Place the TextField without sliding

				placeCopyright();

			}
Step 46: Start the Timer
Remember how we stopped the timer that we never started and removed an event listener that we never added? It’s time to start that timer and add that event listener. The timer first:
			//Start the timer

			slideInTimer.start();

			}
Step 47: Add the Event Listener
Now the event listener
			//Add the event listener

			slideInTimer.addEventListener(TimerEvent.TIMER, slideCopyright);
The event listener that we just added can hear only the Timer events, and every time such event occurs, the event listener invokes the event handler that we (surprise!) have already created. The inventively named slideCopyright function is that event handler.
I am sure you can see now why we actually stopped the timer before starting it and removed the event listener before adding it. It works like this: when the timer starts ticking, the event listener reacts to every tick and each time invokes the slideCopyright function. That function runs as many times as necessary for the TextField to slide close enough to its xFinal coordinate to trigger the code that stops that timer and removes the event listener. I know it feels a bit like solving the Rubik’s cube, but that’s really the best way to do it.
Step 48: Cache the TextField as a Bitmap
This wouldn’t alter the look of the animation but will take a bit of strain off the computer that will play it. When the TextField is cached as a bitmap, Flash won’t have to re-draw it each time its coordinates change.
			//CACHE AS BITMAP

			txtCopyright.cacheAsBitmap=true;
That concludes the part where we write the positionTheCopyright function, and the whole function should look like this:
			//POSITION AND REPOSITION THE TEXT FIELD

			function positionTheCopyright():void {

			//Add the resize event listener

			stage.addEventListener(Event.RESIZE, setRelativeCoordinates);

			//Fire a resize event

			stage.dispatchEvent(new Event(Event.RESIZE));

			//Set the initial X coordinate for the TextField

			if (leftOrRight=="right") {
				txtCopyright.x=relativeZeroX-txtCopyright.width;
			} else if (leftOrRight=="left") {
				txtCopyright.x=relativeX;
			}

			/*Slide in the text field, if slideIn in XML set to true
			or place the text field if slideIn in XML set to false*/

			if (slideIn==true) {

				//Start the timer

				slideInTimer.start();

				//Add the event listener

				slideInTimer.addEventListener(TimerEvent.TIMER, slideCopyright);

				//CACHE AS BITMAP

				txtCopyright.cacheAsBitmap=true;

				//Slide the TextField

				slideCopyright();

			} else if (slideIn == false) {

				//Place the TextField without sliding

				placeCopyright();
			} //Closes the else if clause
		} //Closes positionTheCopyright
Step 49: Call the Function
We’ve written the function, but we haven’t called it yet. Well, we should:
			//CALL THE FUNCTION

			positionTheCopyright();
Now after we resave the .as file and republish the .swf we can test the movie by changing values in XML. Let’s take a look at some of the possible results. (Click anywhere in the images to replay the animations.)
Relative to the stage, slide in right.
Relative to a MovieClip, slide in right.
Relative to a MovieClip, slide in left.
Now let’s test the resizing function: in the following full-screen example, the leftOrRight value in the XML is set to right, and the relativeTo value in XML is set to stage. Resize the browser window it a few times to see how the copyright notice adjusts its position according to the new the size of the window.
Step 50: Fade-In Animated Effect
The fade-in effect is based mostly on the same techniques as the slide-in effect we programmed: it uses the Timer object to dispatch regular events, the event listener to listen to those events and to call the handler whenever a Timer event is dispatched. One of the differences is that since in this case we are not nesting an event listener within another event listener that listens for a different type of event (as we did before), we can write the event handler after the event listener. We can therefore stop the timer after we started it and remove the event listener after we added it… and that’s a big relief.
Here’s the whole event listener/event handler combo:
			//Fade in the text field, if fadeIn in XML set to true

			if (fadeIn==true) {
				txtCopyright.alpha=initialAlpha;

				//Create and start the fade-in timer

				fadeInTimer=new Timer(fadeInSpeed);
				fadeInTimer.start();
				fadeInTimer.addEventListener(TimerEvent.TIMER, fadeInText);

				//Fade in the text field

				function fadeInText(event:Event):void {

					txtCopyright.alpha+=fadeInSpeedIndex;

					//remove event listener after fade

					if (txtCopyright.alpha>=finalAlpha) {
						txtCopyright.alpha=finalAlpha; //optional
						fadeInTimer.stop();
						fadeInTimer.removeEventListener(TimerEvent.TIMER, fadeInText);
					}//closes if clause

				}//closes the fadeInText function

			} else if (fadeIn == false) {
				txtCopyright.alpha=finalAlpha;
			}// closes the else if clause
I’m sure you can figure out easily what happens in that code, but I’d like to point out one more thing. The approximate nature of Flash equations is giving us a bit of trouble again when we need to stop the timer and remove the event listener in this function. The opacity of the TextField may never actually equal the finalAlpha, but in this case we cannot round the current value to the nearest integer simply because alpha in ActionScript 3.0 is set in decimals. We could of course multiply the value by a hundred and manipulate the result of multiplication, but we’ll use a more elegant solution instead.
By telling Flash to add the fadeInSpeedIndex value to the current alpha at every tick of the timer, we’re effectively instructing Flash to overshoot the finalAlpha value at some point, and as soon as it happens, the timer is ordered to stop and event listener is removed. So we can get the timer to stop and the event listener to self-remove by using the >= operator instead of the == operator. This bit of code takes care of that:
				if (txtCopyright.alpha>=finalAlpha) {
					txtCopyright.alpha=finalAlpha; //optional
					fadeInTimer.stop();
					fadeInTimer.removeEventListener(TimerEvent.TIMER, fadeInText);
				}
Let’s test the fade-in effect now by making the appropriate modifications to the XML file, saving all the files and republishing the .swf. (Click anywhere in the image to replay the animations.)
Relative to the stage, static left, fade in
Now let’s hold our breath for a moment and admire the result of our work. Take a look back at your AS file. It’s huge!
Conclusion
There’s nothing spectacular and nothing particularly advanced about the copyright notice class that we’ve created, but in creating it, we covered a lot of ground and became very familiar with a collection of diverse programming techniques. I hope that you find some of them useful in your everyday work. I encourage you to play with the values in the XML file a little more and see for yourself how everything works. You can also test the stopping of the timers and the removal of event handlers by calling the trace() global function right above the statements that tell Flash to remove listeners and stop timers, for example like this:
	//Stop the timer and remove event listener

				if (Math.round(txtCopyright.x)==xFinal) {
					//txtCopyright.x=xFinal; //optional

                    trace("The timer is stopped and the event listener is removed.");

					slideInTimer.stop();
					slideInTimer.removeEventListener(TimerEvent.TIMER, slideCopyright);
				}
If you test the code in that way, you’ll see that all our event handlers get removed when the animations finish playing and our timers stop ticking when they are told to.
If for any reason you need to use the material described in this tutorial as the basis for a class implemented as a non-document class, you will have to make a few changes to the code in the ActionScript file. These changes are beyond the scope of this tutorial, but you will find a few additional lines of code in the downloadable version of our Copyright class. The additional lines are commented out, and you will need to uncomment them in order to make the class work as a non-document class.
Thank you for reading this tutorial and working through it till the end.
Friday Photo Critique #33
Friday Photo Critique is our weekly community project, where we publish a photograph submitted by one of our wonderful readers, then ask you all to offer constructive feedback on the image. It’s a great way to learn more about photography, express your viewpoint, and have your own image critiqued!
Quick Ground Rules
- Play nice! We’ve deliberately chosen photographs that aren’t perfect, so please be constructive with any criticism.
- Feel free to offer any type of advice – composition, lighting, post-processing etc.
- You can also link to photographs that you feel offer a great example of this type of image shot exceptionally well.
Without further ado, here is this week’s candidate for Friday Photo Critique!
The Photograph

Photographer: Aaron Parker
Please let us know what you think in the comments – how would you have approached the scene or taken the photo differently? A massive thank you to everyone who commented last week.
The most constructive and helpful comments will be featured on the site, and you’ll also be given priority to feature your own work in a future Friday Photo Critique!.
A Guide to Spicing Up a Sweep Noise in Reason
Today is the time to create something new! Have you ever wondered how to improve your simple noise sweep? I’m going to show you how to do the trick – step-by-step guide from the basics.
Step 1: Setting Up Subtractor
Before we do anything, we need a mixer and a Combinator in our rack. If you don’t already have one, right-click and choose create > Mixer 14:2. Do the same process with the Combinator. This will be what our synth is fed into, so we can control it’s overall volume
When you’re done, right-click on Reason’s interface inside the Combinator and click Create > Subtractor Polyphonic Synthesizer. This will make a brand new instance of Subtractor that we can get started on. The Combinator is a very important device in our project, because later on, we are going to program some parameters to create more flexible sweeps.
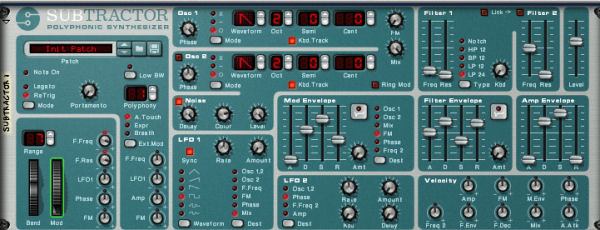
At first, we have to create a Subtractor in our Combinator which will generate the noise. Right-click Subtractor and click “Initialize Patch” to remove the default (or any existing) patch settings and give us a clean workflow to work with. Also, before we forget – double-click on the name tag and change it to “Sweeping Noise”, because it will make us easier to see what device is it in the mixer.
Now it’s time to add a long note. I’ve drown an eight bar loop so I can easily hear what’s going on while the noise are moving. Click the Loop On/Off button to turn on the loop – make sure that the L and R loop points are around the whole area you’ve created. In other words, make sure that you’re hearing the entire loop.
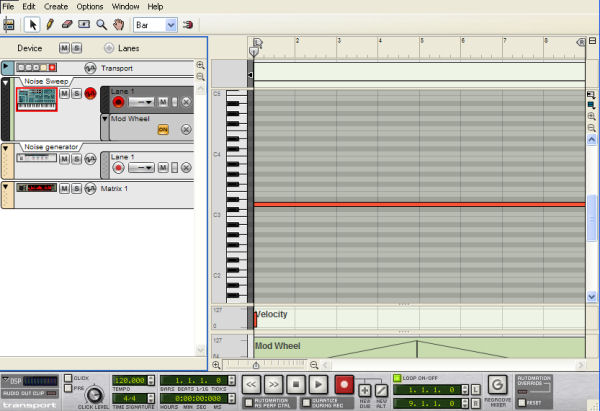
As you see I’ve already drawn some automation. You’ll find out why I’ve done this just in a few lines.
Step 2: Make the Noise Oscillator
Now it’s time to start making the synth patch. We’ll be using the noise generator to make a massive, white noise sound.
We won’t be using Oscillator 1, but unfortunately we can’t turn it off. Important note: If two waves have the same frequency and are 180 degrees out of phase with an other, one waveform reaches its peak while the second is at its trough, which means, that no sound will be produced. Using this kind of principle will change the phase 180 degree and the signal will cut, so the result is going to absolute silence.
We just need a simple noise generator which would pass through Oscillator 2 before it enters the signal chain.
Turn the decay and level to maximum, and the color to 3 – you can change these settings depends on what kind of noise you are going to work with. We omit the filter and mod envelope.
The amp envelope settings are the following A:0 D:91 S:111 R:0. Because we’re working with long notes in our loop, you might notice they are losing volume over time. To prevent this, turn the “S” up in the “Amp Envelope” section to full – this is the sustain of the note. This means that it will not lose any volume at all, which is great for big synth sounds or noises.
One essential part of a great sweep line for me is the inclusion of a resonant low pass filter. We are going to use low pass filter 24 because it more dramatic than the 12. Set the filter cut off to almost 0, and turn the resonance to 0 as well. Now turn the resonance and filter frequency knobs to maximum – they’re right next to the modulation wheel so we can simply automate the modwheel to archive the sweeping effect.
It’s worthy of note that you don’t need automate if you are using filter envelopes, but I personally use the modwheel and automate by myself, so I can see how the filter cuts are moving. With this method, I have more control. Subtractor looks like the following:
Step 3: Create a Matrix Pattern Sequencer
So we already have the Subtractor. If you’re curious how is the sound looks like so far, here’s a sample.
Download audio file (simple noise.mp3)
Now the fun part begins. Create a matrix pattern sequencer by pressing and holding shift while right-clicking, and create a matrix from the pop up hardware selector so we create our own routing schematic. Press tab and put the curved CV cable to the Subtractor gate underlay. Routing of the pattern to the gate is achieved by using a simple cable. Now switch bipolar from unipolar, because we would like to control the gate so that it can’t become a negative value.

Next press tab and draw some columns on the pattern sequencer which will give the gradual sweeping effect. You can change the resolution, it’s up to you. I suggest you to create several patterns – don’t worry, I’m going to explain you how to change between these patterns.

Step 4: Apply Some Distortion
So we now have the noise and the gate toy, but we need some more anticipation. One simple and effective way to increase your sweeping noise (and also the perceived volume) is to use some form of saturation. Scream 4 is very good sound destructor unit which has several distortions and saturation abilities. It’s mainly used to add ‘colour’ and ‘character’ to a sound. These processors are extremely simple to use and features few controls. I’ll use feedback this time, which will give some excitement during the sweep. It looks like this:

I always turn off the body feature because it just gets confusing and overkills the signal. You can play with the knobs in the Damage section. Watch out for the damage control parameter and don’t turn it too much, because the result will be devastated by distortion, and bear in mind it can also cause clipping.
Step 5: The Effects
Do you want some depth and wide or some phasing effect? Of course you do! To the average listener, wide stereo sounds are immediately impressive. Apply some reverb on this sweep and you get a much wider sweep. By the time your finished, you should have more decorative sound spanned nicely across the stereo field. I created an own patch from RV7000 reverb unit, which is looks like this:
</
At the end of the signal I applied a heavy phaser effect. P-90 is the obvious choice, but you can also try different effects.

</
Step 6: Programing Custom Controls
The final step here was to create some custom controls for the Combinator. Thanks to the excellent programming system the Props have put together for us, this process is pretty straight forward.
So we have a lot of effects and many sequences, but it’s confusing and hard to automate, so we have to simplify our project. The Combinator programming section can be handy now. First rename the knobs and the buttons as I did. I started with adding controls for the really key features of the effect such as Damage types and pattern select for the navigation among the patterns on the matrix. pattern sequencer. I also added on/off buttons for each effects. The damage type knob controls the ‘damage type’ on the Scream 4 unit.

When we’re done, open up the programmer and select Matrix 1 from it. Set the Rotary 1 to Pattern Select and give the value 0-9.
After that, select Scream 1 and set Rotary 2 to Damage Type – values are 0 and 9 again. Set Rotary 3 to Parameter 1 and give the values 0-127. Do the same for Rotary 3. Finally, set Button 1 to Enabled and give the values 1-2.
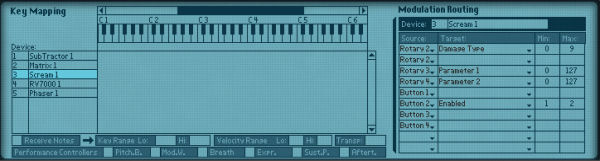
Our next job is the reverb. Set Button 3 to Enabled with the values 1-2, because the 0 means off and the signal will close and the sweep will silence in a moment – and actually no one will want that.
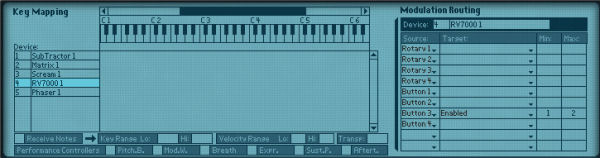
Our next objective is the phaser. It’s the same as the reverb, just instead of Button 3 choose Button 2.
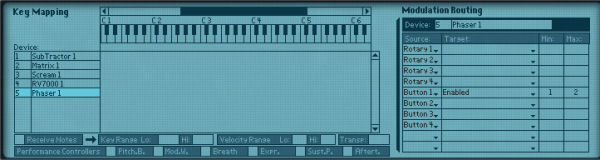
Once the patch is finished, save it for later use. It’s probably a pretty good idea to save the settings of any key devices within complete patches like this, for instance saving the Subtractor’s filter settings may save you time when constructing other effects patches.
Download audio file (sweeping noise effected.mp3)
So that’s all. Now we can easily automate and create different noise sweeps and apply to our projects. Thanks for reading, and don’t forget leave your comments!
Quick Tip: How to Set Up Cubase 5 – Part 2
This series of quick tip screencasts shows you how to set up Cubase 5 once and for all. Part 2 covers file backup, the pan control, and the monitoring mode.
This screencast features a loop courtesy of the band “Your Happy End“. This is an extract from their album “Seven Windows for Six Dreamers”.
If you missed Part 1, you can catch it here.
A Comprehensive Guide to Photoshop’s Liquify Tool
The Liquify filter may be one of the most commonly used filters in Photoshop’s arsenal. The Liquify filter allows us to distort the pixels in a given image without losing quality. Some designers are a bit intimidated by the Liquify filter, others may use in improperly. Today, we will explain the features of this very powerful filter in detail so you can use it in your work.
What is it?
From photo retouching, to artistic effects, the Liquify filter is a powerful tool for every Photoshop user. This filter allows us to push, pull, rotate, reflect, pucker, and bloat the pixels of any image. Today, I will show you the basics of this filter. Grab a bunch of images to practice with and let’s get it started!
The Liquify filter may be applied to any bitmap Layer but unfortunately cannot be applied to a Smart Object. You can access the Liquify Filter window by clicking Filter > Liquify, or by pressing Shift + Command (Ctrl) + X on your keyboard.
Once the filter is open, you’ll see a window with the following areas:
- Toolbar, located on the left of the screen, there you’ll find the following tools: Forward Warp, Reconstruct, Twirl, Pucker, Bloat, Push, Mirror, Turbulence, Freeze / Thaw Mask, Hand and Zoom.
- The actual image or the object you are editing.
- The Options Panel, where you’ll find the following options: Brush, Reconstruct, Mask and View. Each group of options controls the behavior of the active tool, we will see how to work with those options later on.
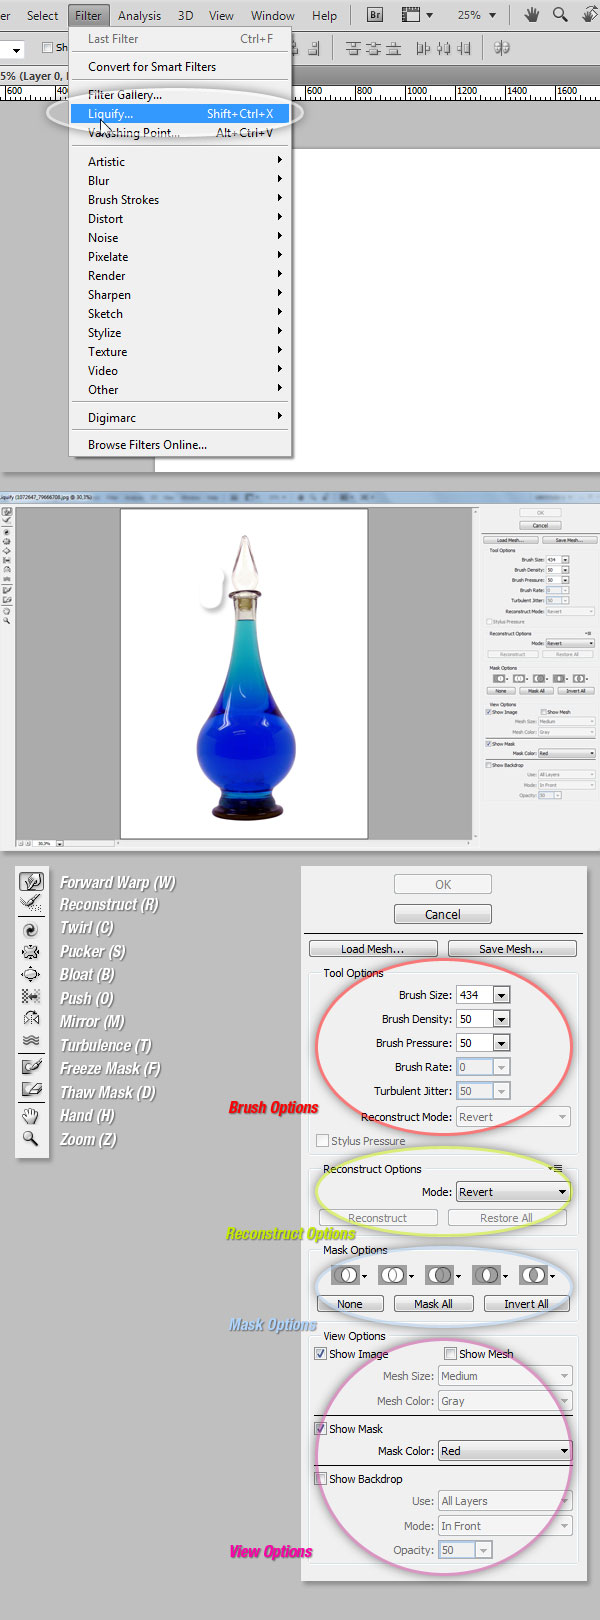
Tools
Forward Warp Tool (W)
The most basic tool that you may use is the Forward Warp, basically pushes the pixels of the image forward as you drag. You can control the amount of pixels pushed by changing the brush size in the Brush Options on the right panel. The larger the brush the more pixels will be pushed forward. Once you apply this effect, you must click on the OK button on the right panel to commit the changes.
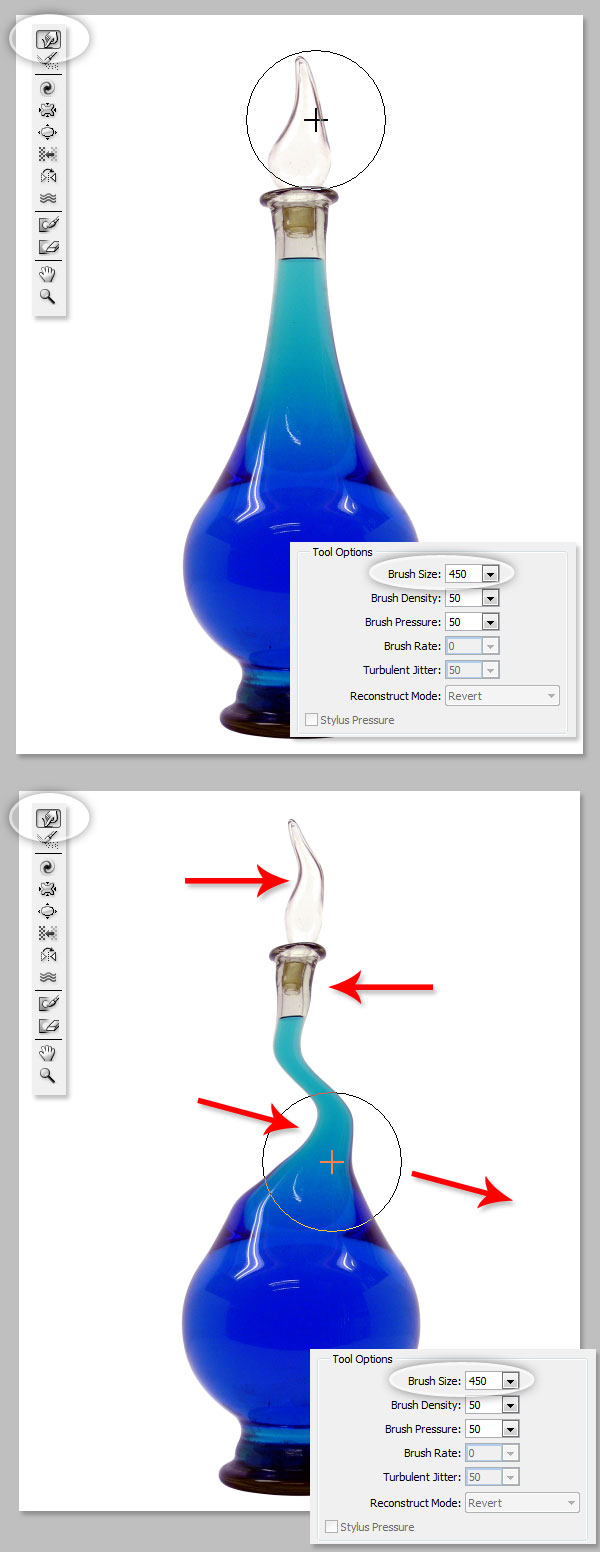
Brush Density
This value controls how a brush feathers on the edge, by default a Liquify effect is stronger in the center of the brush and softer on the edges, you can increase the Brush Density value from 0 to 100. The larger the value, the stronger the effect on the brush tip’s edges.
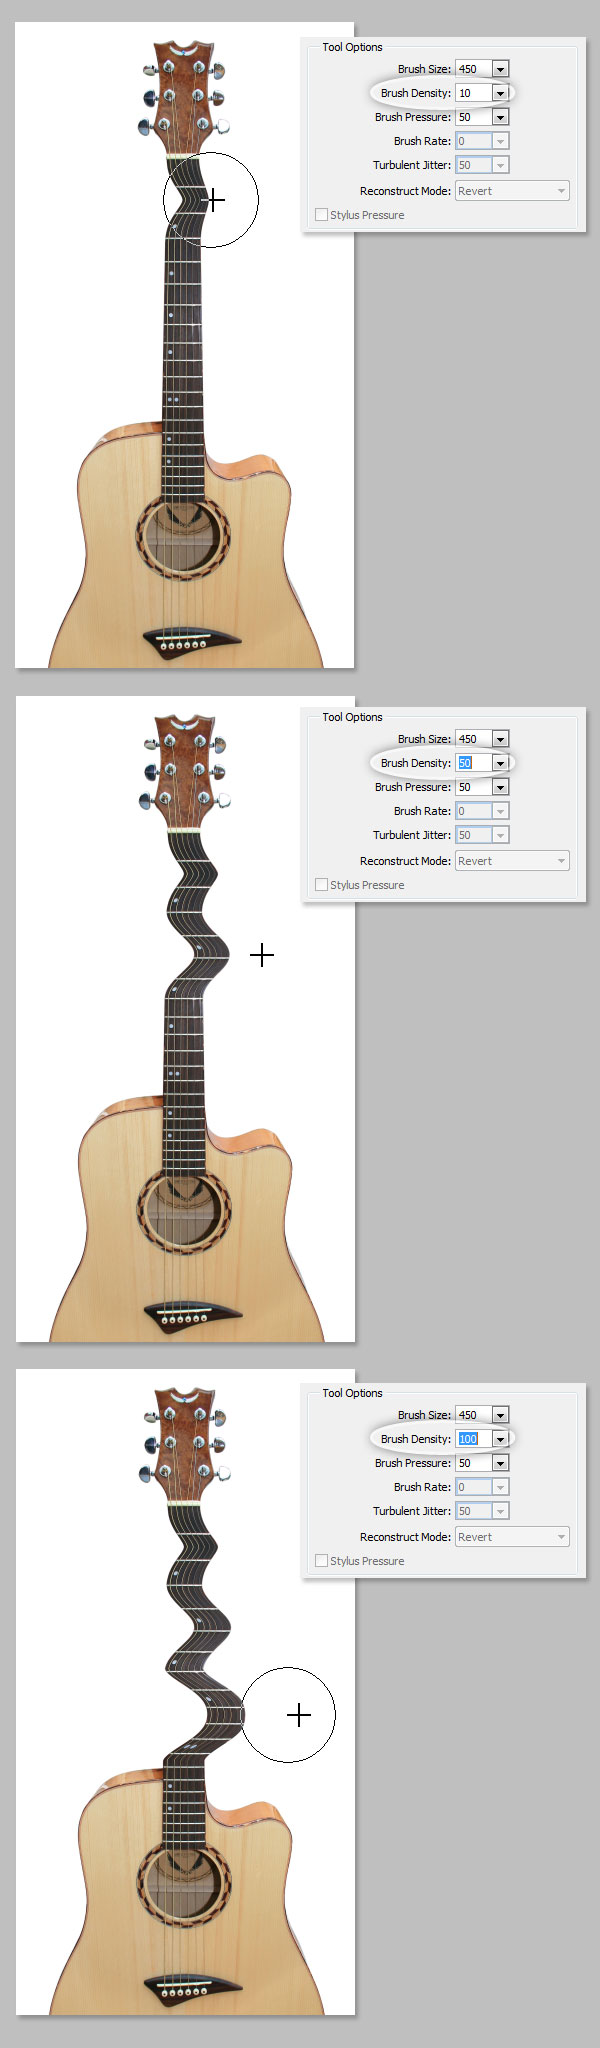
Brush Pressure
This value controls the speed at which distortions are made when you drag the brush. This value can be set from 0 to 100, being 0 the lowest pressure and 100 the highest. Using a low brush pressure makes changes occur more slowly, so it’s easier to stop them at exactly the right moment.
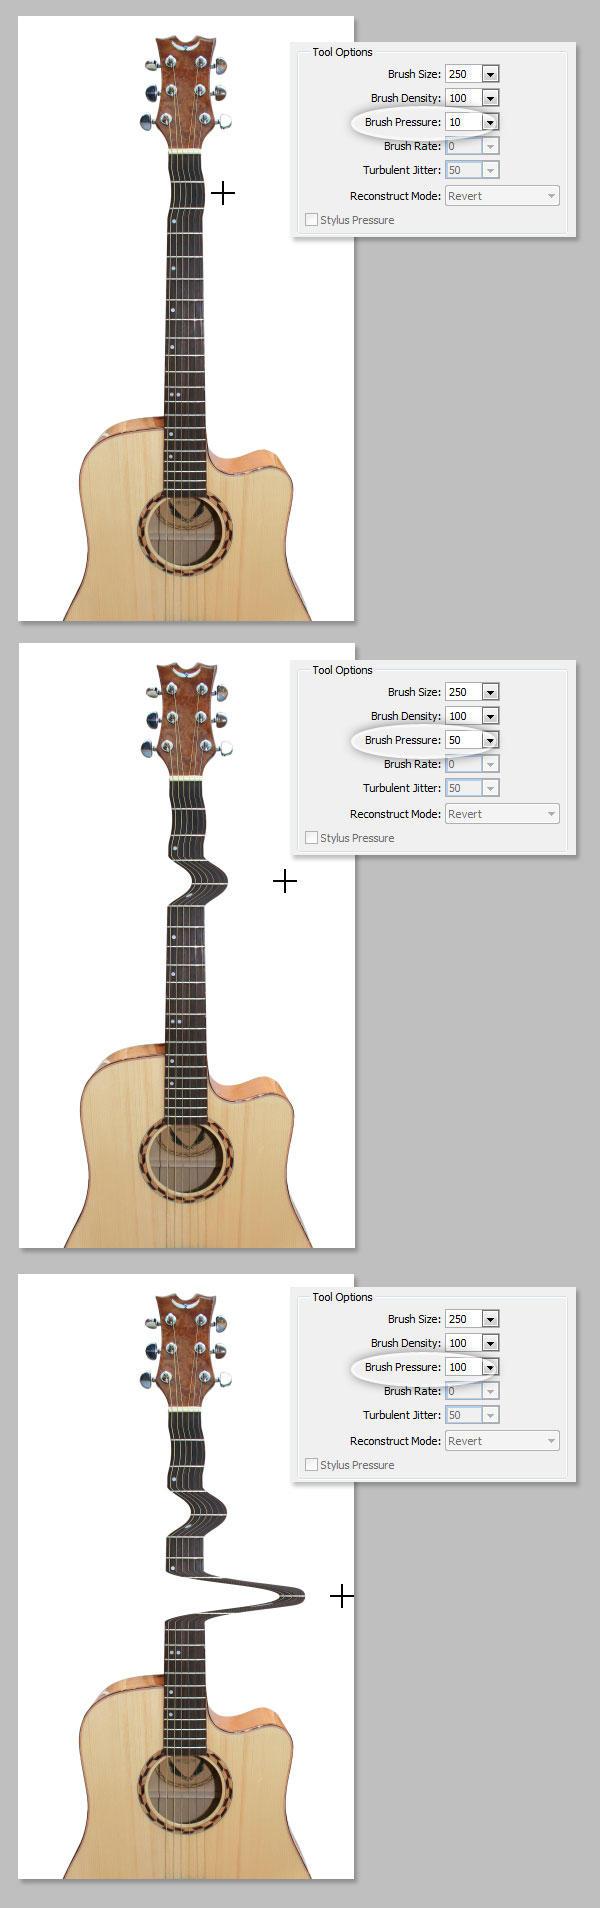
Twirl Tool (C)
This filter rotates pixels clockwise as you click or drag, in order to Twirl pixels counterclockwise, just hold the Option (Alt) key while you’re clicking. The Brush Rate value comes in handy here, it controls the speed which distortion is applied while the mouse is still stationary, the higher the number the faster the effect.
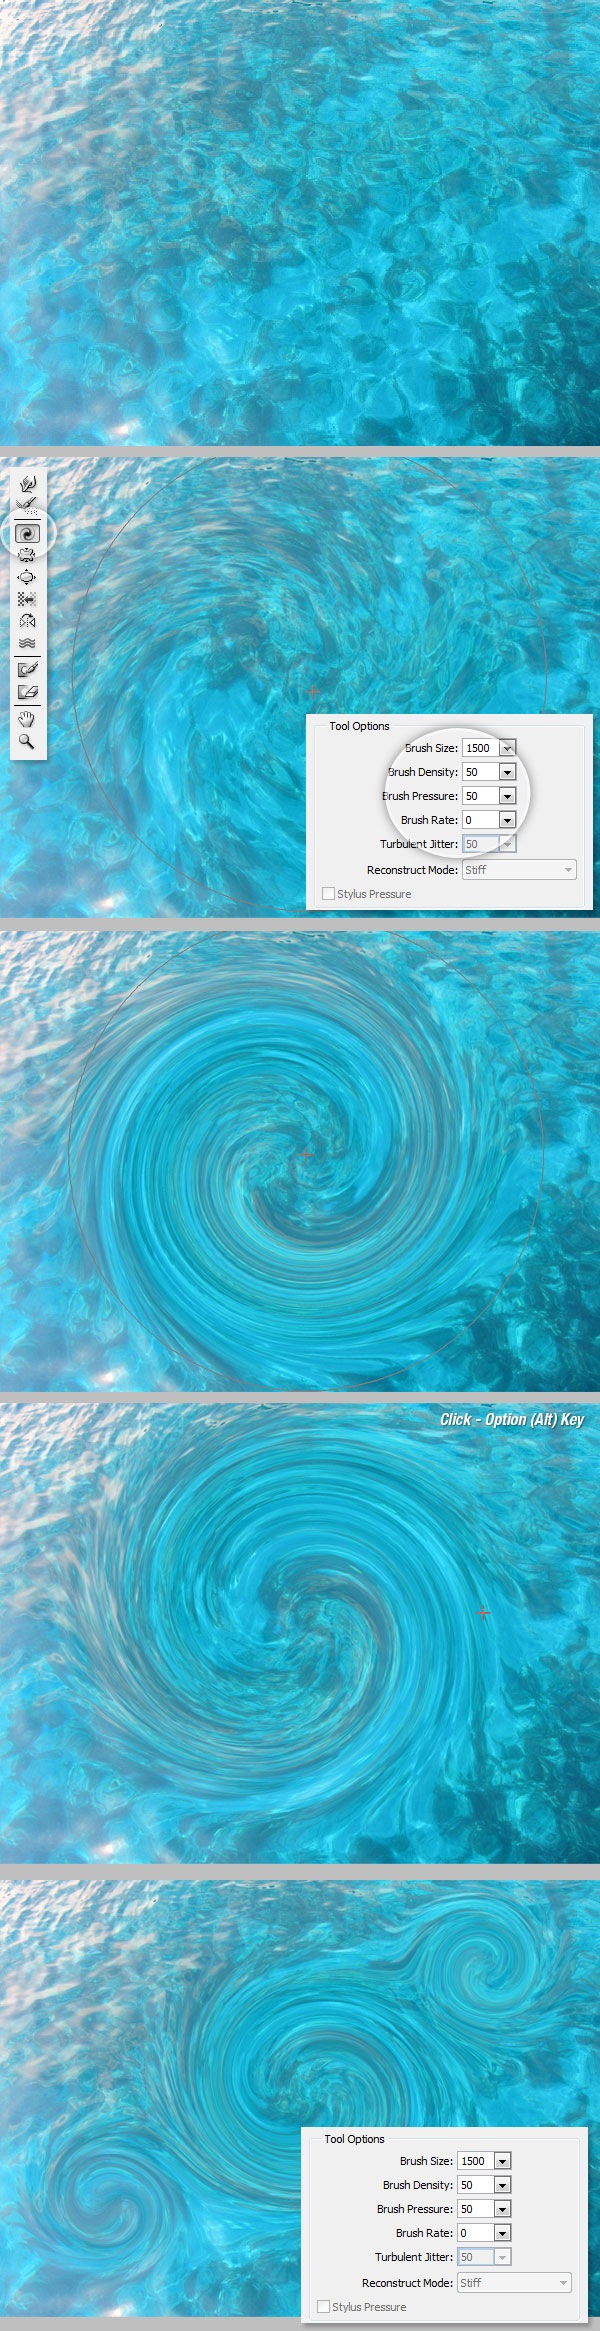
Pucker (S) and Bloat (B) Tools
The Pucker Tool moves pixels towards the center of the brush area and the Bloat Tool moves pixels away from the center as you click or drag on the image. This is pretty useful when you want to inflate or deflate something.
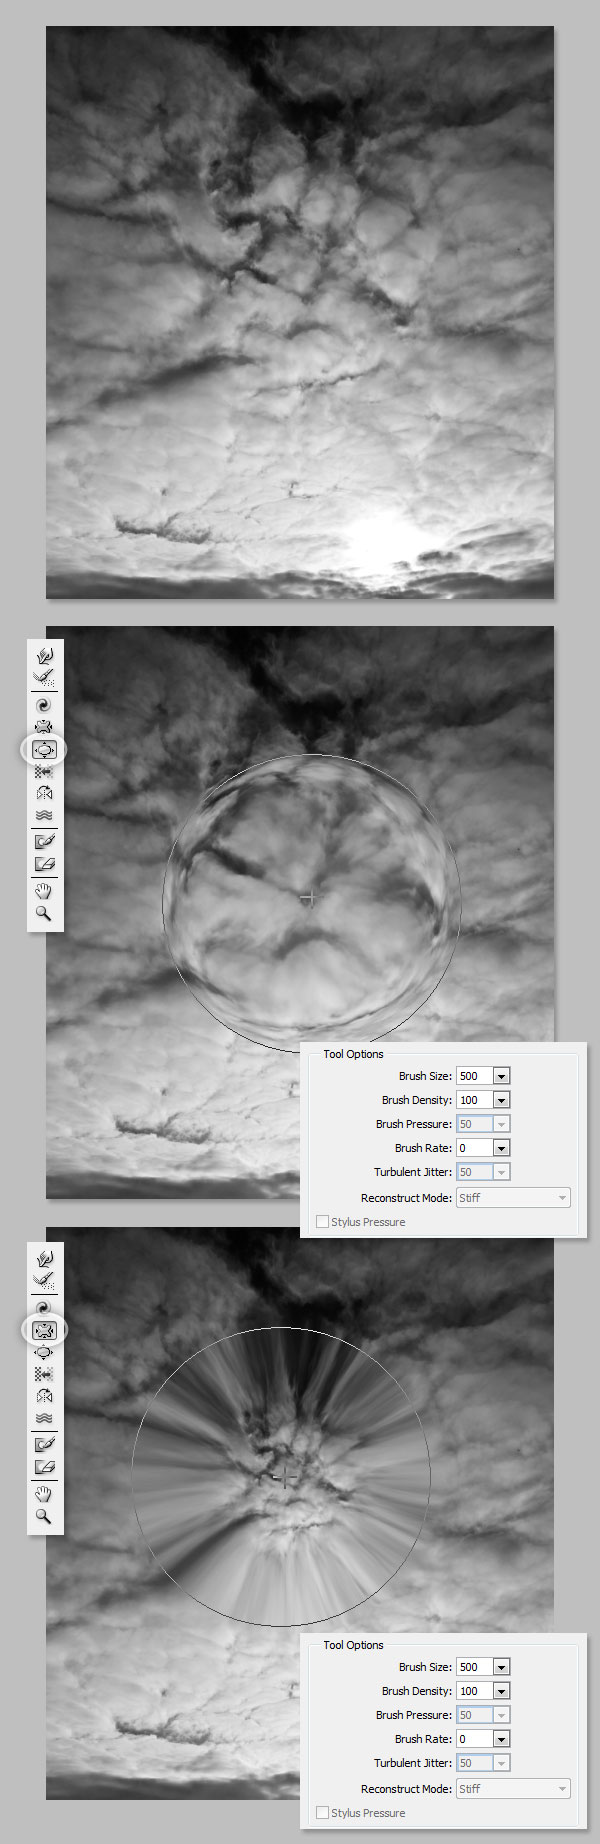
Push Tool (O) Vertical
This tool moves pixels to the left when you drag the tool up and to the right when you drag it down. You can also drag clockwise around an object to increase its size, or drag counterclockwise to decrease its size. To invert the direction (left or right) hold down the Option (Alt) key as you drag.

Push Tool (O) Horizontal
Moves pixels up when you drag the tool left to right, and down if you drag right to left.

Mirror Tool (M)
This tool works exactly like a mirror. The pixels perpendicular to the direction of the stroke will be duplicated depending on the stroke direction the mirror pixels could be below (left – right stroke) or above (right – left). This works much better if you make horizontal or vertical parallel strokes. Hold the Option (Alt) key while drag will invert the reflected pixels’ source to the opposite angle.
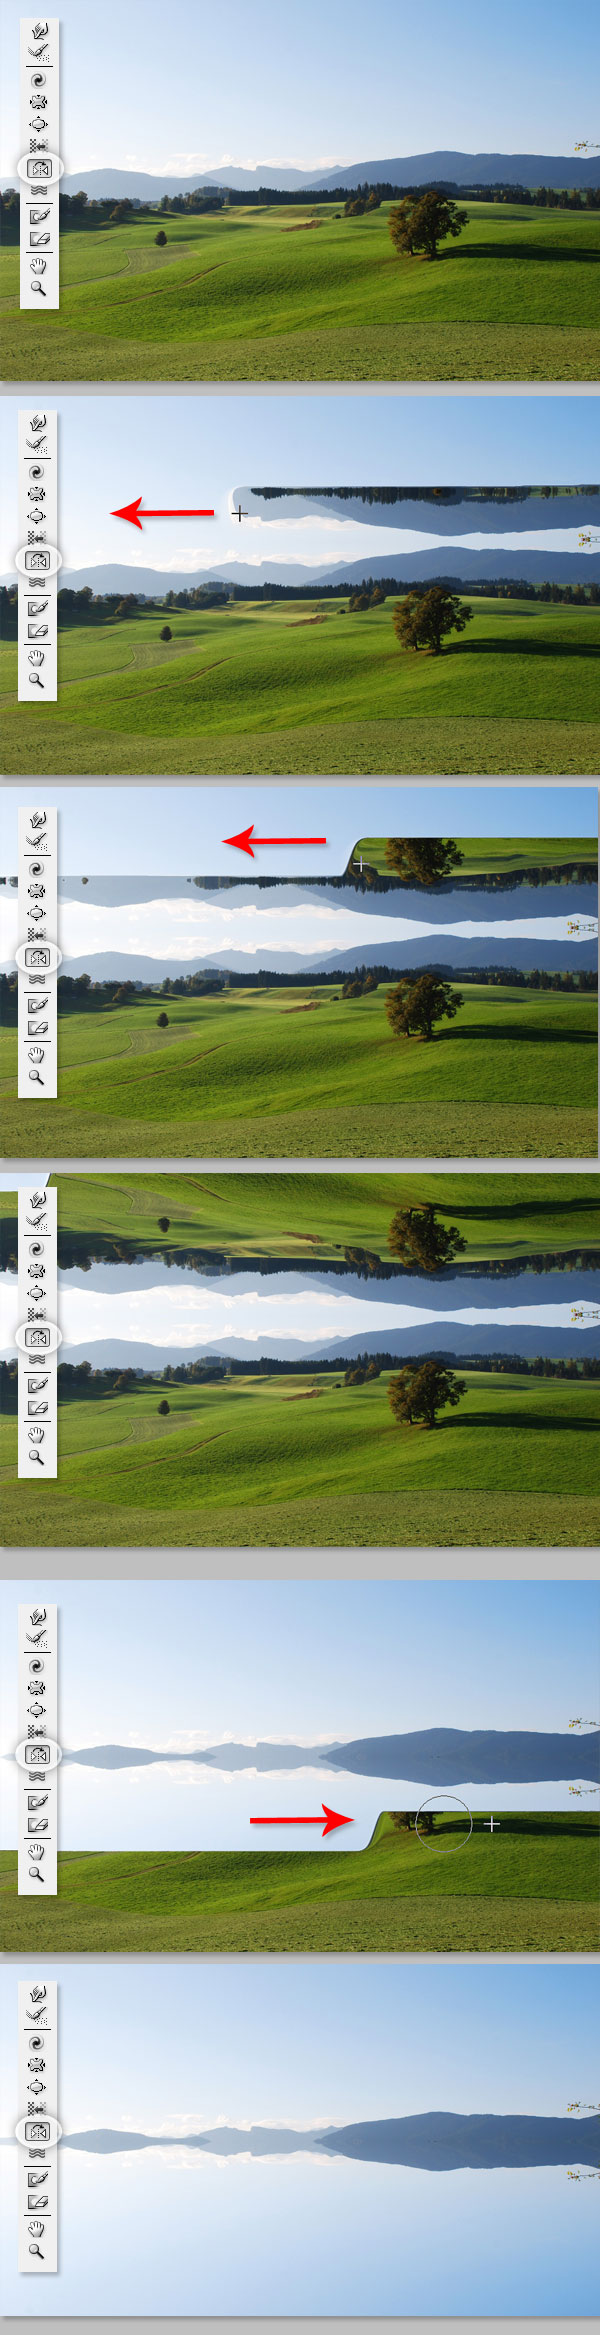
Turbulence (T)
Smoothly scrambles the pixels while dragging. With this tool you might find the Turbulent Jitter value very handy; a high number here means a lot of turbulence.

Masks – Freeze and Thaw Masks
You can protect some areas of the image from changes by using a Freeze Mask. In the Tool bar, click on the Freeze Mask button and paint the areas you want to keep unchanged. The Thaw mask works just like a mask eraser. Use this tool like the other Liquify tools; you can control the brush’s Size, Density and Pressure. After Masking an area and applying it, the masked area will remain unchanged.

Mask Options
The mask Options panel, at the right side of the Liquify window allow you to choose Selection, Layer Mask, Transparency, or Quick Mask to create masks on the image.
You can also edit previously created masks as well by choosing Replace, Add, Subtract, Intersect or Invert.

Reconstruct All
After distorting, you may need to reconstruct some areas here and there. There are many creative ways to reconstruct the distortions with the Liquify filter. The simplest way to do this is by clicking the Restore All Button on the Reconstruct Options Panel.
Reconstruct Tool and Reconstruct Options
The Reconstruct Tool allows you to use a Brush to reconstruct certain areas of the previously distorted image. By default the Reconstruct Mode (at the Reconstruct Options panel on the right side) is Revert, which means the image will return to its original state. There are many other options with different behaviors depending the distortion position relative to a frozen area. These options are very interesting but a little complicated, so we will leave them for another (more practical) tutorial.
Auto Reconstruct
On the Reconstruct Options Panel, there’s a button labeled Reconstruct. By pressing it you can auto reconstruct the image using one of the options on the list.
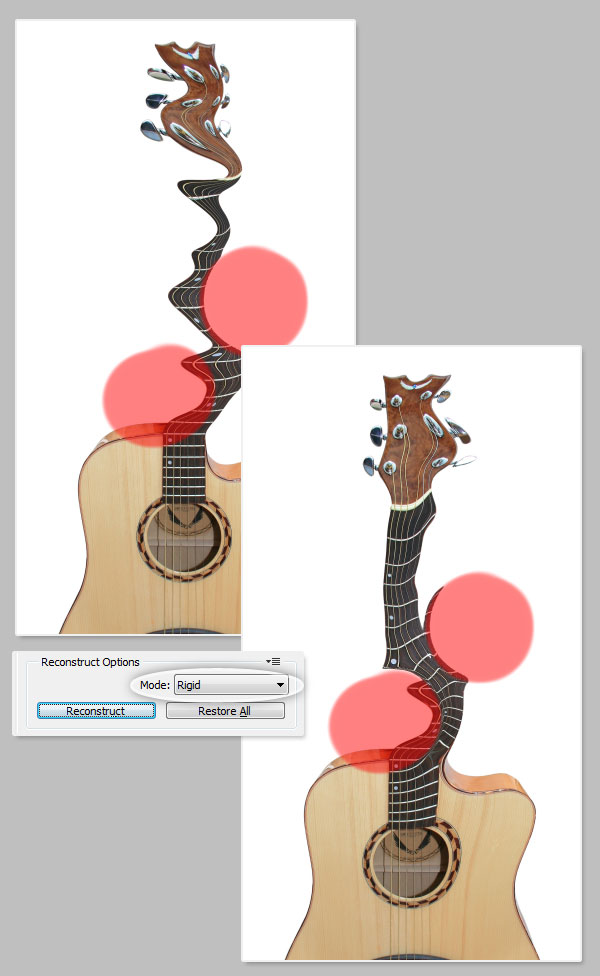
View Mesh and Masks
The Mesh is a bi-dimensional grid than can be shown or hidden in the View Options Panel. You can increase or decrease the Mesh Size, and change its color. The Mesh and Masks can be shown or hidden from this panel and its color can be changed.
Every distortion made with any of the previously mentioned tools can be saved as a Mesh, to do this, click on the Save Mesh button in the Options Panel. A saved Mesh can be opened and be re-applied to any other image by clicking on the Load Mesh button.
Backdrops
Backdrops show additional layers aside from the Layer actually being edited. In a multiple layer document, chose the layer you want to distort and open the Liquify Filter Window. On the View Options Panel check the Show Backdrop checkbox to show the additional layers in the document. You can easily show or hide them, or change its opacity.
More on Backdrops
You can chose the layer being shown as a backdrop or even select all the layers as well. In addition, you can control the position of the backdrops, bring them to the front, or leave them behind the active object in the Mode option.
Only the active layer is distorted, the backdrop layers are only for visual aid.

Alternative to Plastic Surgery
The Forward Warp Tool can be easily used to fix imperfections on any photograph. In the following example, we use two brush sizes to transform this girl’s nose and chin, and even make her smile just a little bit.
But remember, with great power comes great responsibility. You can fix almost anything in a picture with this tool but try to be ethical in your approach.

Conclusion
The Liquify tool is one of Photoshop’s most beloved features and it is an important tool to learn and master. Hopefully, you found this guide useful and will use it to help you in future projects.
Model, UV, and Texture a Mac-10 Submachine Gun, Day 3- CG Premium Tutorial
In the third and final part of this monstrous, 10 hour CG Premium tutorial series available exclusively to Premium members, freelance CG artist, Ben Tate, will demonstrate how to create realistic high resolution textures for his high-end Mac-10 submachine gun model. This series is a must see for any artist that wants to level up their skills in high quality CG weapon creation, or just become better at texturing in general! Can’t wait to get started, Become a Premium member, or learn more at the jump!
Learn the Secrets to Realistic Weapon Texture Creation
Follow freelance CG artist, Ben Tate, as he demonstrates how to use a perfect combination of professional hand painting techniques, and careful photo source selection, to create highly detailed and very realistic texture maps for his Mac-10 gun model! With a strong emphasis on universally transferable professional texturing approaches and techniques, Ben will show you how to paint the diffuse, bump, and specular textures in the most efficient way possible.

Want to Join Plus?
The Tuts+ network runs a membership service called Premium. For $9 per month, you gain access to exclusive high quality screencast tutorials, downloadable content packs, and freebies at CGtuts+, Psdtuts+, Vectortuts+, Audiotuts+, Nettuts+ and Aetuts+! For less than the price of a movie, you’ll learn from some of the best minds in the business all month long!!. Become a Premium member today!
Don’t miss more CG Premium tutorials and content packs, published weekly – subscribe to Cgtuts+ by RSS.
Simple PHP Class-Based Querying
Though it is usually advisable to use some sort of framework or CMS, sometimes a project is small enough such that those options would weigh down the development. However, even in smaller projects, separating presentational elements from backend querying should not be ignored. This tutorial will walk you through creating a basic class-based querying engine for PHP and MySQL.
Step 1. Setup the Project
The first thing we are going to want to do is make some specific files and directories. Here’s how I like to setup my projects. You can, of course, feel free to change the names and structure to your liking. Just make sure you change the require’s later on as well.
Make directories
We’ll need a new directory to hold everything. In this case, I called it tut. Inside of that, I put my configuration files in a directory called conf. Then, I will make an inc directory (short for include) and put a “class” directory inside of that.
Add Files
Then, inside /conf, we will make config.php. Inside /inc/class we will make DAL.php. Finally, in the root directory, we will make index.php.
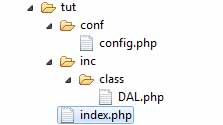
DAL stands for “Data Access Layer” or “Data Access Link”.
In multi-tiered architecture, it is essentially used to translate database query results into objects and vice-versa.
Step 2. Setup the Database
We need to make a database and populate it with some data. For the purposes of this tutorial, it will just be a two-table database with a single one-to-many relationship. This is just so we can show our querying engine spanning at least one relationship.
Create tables
So, in a database named “tut”, let’s make a table called makes and a table called models. The makes table will have fields “id” and “name” and the models table will have fields “id”,”make”, and “name”.
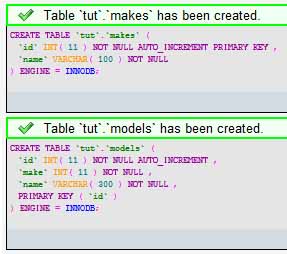
Add some data
Now we can just add some makes (like Ford, Chevy, etc.) as data in the makes table and some models that those manufacturers are responsible for.
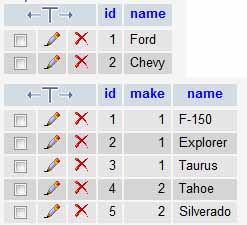
This tutorial assumes you have some working knowledge of databases and SQL, so I won’t go into details about the relation/foreign key setup.
Step 3. The Database Connection
Usually, I don’t like working with raw constants in PHP. I will typically define a bunch of things then make some functions to hook into those constants. For this example, let’s just keep things simple and use the constants.
Define connection variables
In our /conf/config.php file, let’s setup our database connection variables. While we are at it, let’s throw an include to our DAL.php script.
<?php

// Include DAL
require_once(dirname(dirname(__FILE__)) . '/inc/class/DAL.php');

// Database
define ( 'DB_HOST', 'localhost' );
define ( 'DB_USER', 'root' );
define ( 'DB_PASSWORD', 'password1' );
define ( 'DB_DB', 'tut' );

?>
This setup assumes you are running MySQL on it’s default port.
Create connection function
Now, inside /inc/class/DAL.php, we will make a function that we will use to connect to our database.
The connection, as well as all forthcoming queries, will live inside a class named DAL. Wrapping all database involvement inside a single class allows us to manipulate our queries later without needing to touch business or presentation layer scripts. Also, it provides some degree of mock namespacing.
In the case of this class, we will add a constructor even though it doesn’t need to do anything.
<?php

class DAL {

  public function __construct(){}

  private function dbconnect() {
    $conn = mysql_connect(DB_HOST, DB_USER, DB_PASSWORD)
      or die ("
Could not connect to MySQL server");

    mysql_select_db(DB_DB,$conn)
      or die ("
Could not select the indicated database");

    return $conn;
  }

}

?>
Notice that the scope of the dbconnect method is private. This is because we should not need to connect to the database from outside our DAL. Instead, we will have public query methods which will call the dbconnect from inside the DAL. A little confusing? No worries, read on.
Step 4. Create Generic Query Tools
To abstract our queries so that we can reuse short pieces of code, we will need two things. First, we will need some sort of “generic query result” class. Second, we will need a generic querying method inside our DAL.
Create generic query result class
The purpose of all of this is to be able to convert SQL queries into objects and minimize use of the ugly while($row = mysql_fetch_array($result)) loop. Objects are far easier to work with and allow us to use properties instead of array keys.
In short, we want to make a class that will create property names on the fly and store data associated with those properties.
We will put this class inside our /inc/class/DAL.php script. Since it is a new class, it will be outside the DAL class.
class DALQueryResult {

  private $_results = array();

  public function __construct(){}

  public function __set($var,$val){
    $this->_results[$var] = $val;
  }

  public function __get($var){
    if (isset($this->_results[$var])){
      return $this->_results[$var];
    }
    else{
      return null;
    }
  }
}
Create generic query method
Now, inside our DAL class, we need to make a generic querying method that will turn SELECT queries into DALQueryResult objects.
Basically, we want to turn each returned field name into a property of the DALQueryResult object.
private function query($sql){

  $this->dbconnect();

  $res = mysql_query($sql);

  if ($res){
    if (strpos($sql,'SELECT') === false){
      return true;
    }
  }
  else{
    if (strpos($sql,'SELECT') === false){
      return false;
    }
	else{
	  return null;
	}
  }

  $results = array();

  while ($row = mysql_fetch_array($res)){

    $result = new DALQueryResult();

    foreach ($row as $k=>$v){
      $result->$k = $v;
    }

    $results[] = $result;
  }
  return $results;
}
Here is a private function that accepts a SQL query. It connects to the database and runs the query. Then, it checks to see if there are any results. If there are not any results, it returns null on a SELECT query, false on other queries. If the query was successful and the query was not a SELECT query, it will return true. If it was a SELECT, then it converts the results into an array of DALQueryResult objects. This mimics the results that one would normally get from a mysql_query.
Step 5. Write a Specific Query
Now we are ready to actually write a SQL query. DAL queries should be very specific both in name and purpose. Let’s make one that finds all models of a given make.
This will be our first public method.
public function get_models_by_make_name($name){
  $sql = "SELECT models.id as id, models.name as name, makes.name as make FROM models INNER JOIN makes ON models.make=makes.id WHERE makes.name='$name'";
  return $this->query($sql);
}
Here we are just writing the query and returning the result in the form of DALQueryResult objects. Our generic query method takes care of the itterations and decision making.
Finished DAL
At this point, our DAL.php script is finished. It should look like the following.
<?php

class DALQueryResult {

  private $_results = array();

  public function __construct(){}

  public function __set($var,$val){
    $this->_results[$var] = $val;
  }

  public function __get($var){
    if (isset($this->_results[$var])){
	  return $this->_results[$var];
	}
    else{
	  return null;
	}
  }
}

class DAL {

  public function __construct(){}

  public function get_models_by_make_name($name){
    $sql = "SELECT models.id as id, models.name as name, makes.name as make FROM models INNER JOIN makes ON models.make=makes.id WHERE makes.name='$name'";
    return $this->query($sql);
  }

  private function dbconnect() {
    $conn = mysql_connect(DB_HOST, DB_USER, DB_PASSWORD)
    	or die ("<br/>Could not connect to MySQL server");

    mysql_select_db(DB_DB,$conn)
    	or die ("<br/>Could not select the indicated database");

	return $conn;
  }

  private function query($sql){

    $this->dbconnect();

    $res = mysql_query($sql);

    if ($res){
      if (strpos($sql,'SELECT') === false){
        return true;
      }
    }
    else{
      if (strpos($sql,'SELECT') === false){
        return false;
      }
      else{
        return null;
      }
    }

    $results = array();

    while ($row = mysql_fetch_array($res)){

      $result = new DALQueryResult();

      foreach ($row as $k=>$v){
        $result->$k = $v;
      }

      $results[] = $result;
    }
    return $results;
  }
}

?>
Step 6. Use the DAL
Now, let’s finally head over to our /index.php script and display our results using the DAL.
All we need to do is include our /conf/config.php file, instantiate the DAL, and do something with the data.
Here’s an example.
<?php
// include configuration
require_once(dirname(__FILE__) . '/conf/config.php');

// instanciate a new DAL
$dal = new DAL();

// array of makes to check
$makes = array('Ford','Chevy','Honda');

// cycle through the makes
foreach ($makes as $make){
  $results = $dal->get_models_by_make_name($make);
  echo "<h1>Models by $make</h1>";

  // check if there were any results
  if ($results){
  	echo "<ul>";

	// cycle through results
	foreach ($results as $model){
  		echo "<li>$model->make $model->name (Database ID: $model->id)</li>";
  	}
  	echo "</ul>";
  }
  else{
    // Display a message concerning lack of data
  	echo "<p>Sorry, we have no information regarding that manufacturer.</p>";
  }
}
?>
As you can see, we now have results that we can call the field names as properties of a PHP object.
Step 7. Taking Things one Step Further
Often, it will be useful to convert the generic DALQueryResult into a more specific object. In this case, you can write business objects that accept a DALQueryResult as a constructor parameter. Then, you just use that to build the new object.
Here’s an example
<?php

class CarModel{
  private $_id;
  private $_make;
  private $_name;

  public function __construct(DALQueryResult $result){
    $this->_id = $result->id;
    $this->_make = $result->make;
    $this->_name = $result->name;
  }
  public function __get($var){
    switch ($var){
	  case 'id':
	    return $this->_id;
		break;
	  case 'make':
	    return $this->_make;
		break;
	  case 'name':
	    return $this->_name;
		break;
	  default:
	    return null;
	    break;
	}
  }
  public function __toString(){
    return $this->_name;
  }
}

?>
Then, just write a query to return an array of these objects instead of an array of generic DALQueryResult objects.
Remember, always name your queries very specifically.
public function get_models_by_make_name_as_CarModel($name){
  // Reuse existing query
  $results = $this->get_models_by_make_name($sql);

  // check for results
  if (!$results){
    return $results;
  }
  else{
    // array to hold CarModel objects
    $object_results = array();
    // cycle through and convert to CarModel objects
    foreach ($results as $result){
      object_results[] = new CarModel($result);
    }
    // return array of CarModel objects
    return object_results;
  }
}
Building specific objects can become very useful when calculations are needed to extract meaningful data from fields.
Hope you all enjoyed the tutorial! Good luck.
Recreate The Matrix Chopper Scene
In this 3ds Max/AE combo tutorial, you will learn how to make a stream of raining bullets using PF source in 3DS Max and then combine all the elements together in AE to give a stunning “Matrix-like” effect.
Preview
Want access to the full AE project files and assets for every tutorial on Aetuts+, including this one? Join Ae Premium for just $9/month. You can view the final effect preview video below.
Tutorial
Step 1
First of all launch 3DS Max and selecting the front view hit “ALT+B” on the keyboard to get “View port Background” appeared. While selecting “Match Bitmap”, “Display Background” and “Lock Zoom/Pan” , click on “Files” and browse for the reference image of the bullet.
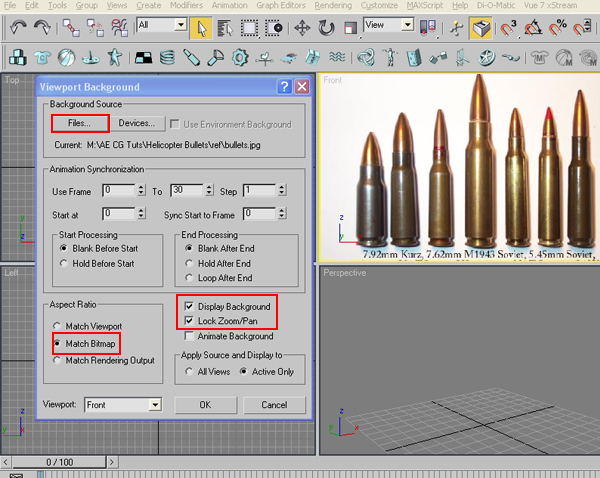
Step 2
Pick the Line tool and draw the shape according to the middle bullet.
<img
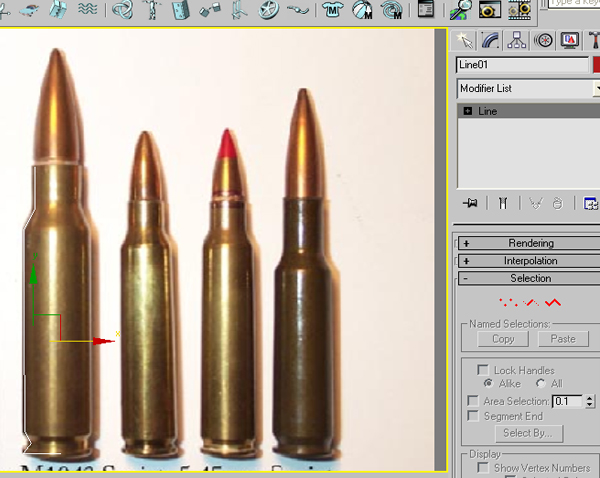
Step 3
Apply “Lathe” modifier on the spline and click on “Max”.
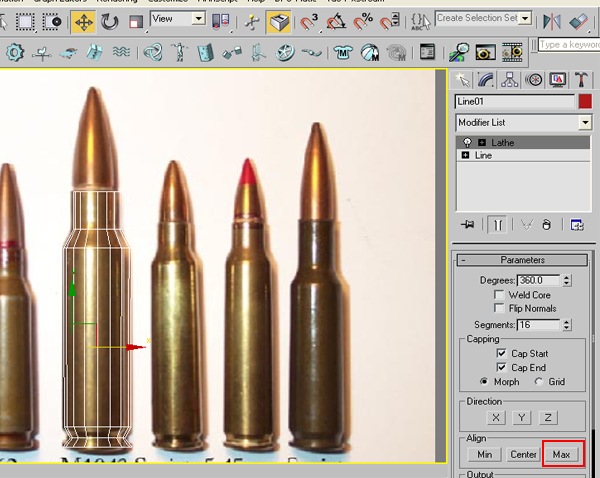
Step 4
Apply a “Shell” modifier on it and increase the inner amount to something like 2.0 to give some thickness to the shell.
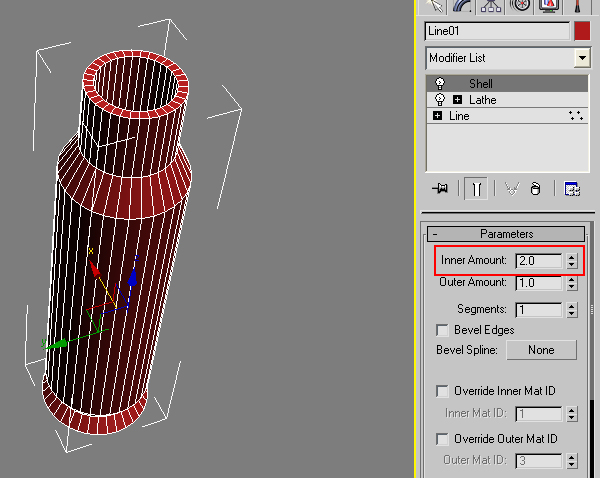
Step 5
Press “M” on the keyboard to open Material Editor. In the diffuse channel choose the color as something like brass, give the Specular level as 125 and the Gloss value as 50. And apply it to the shell.
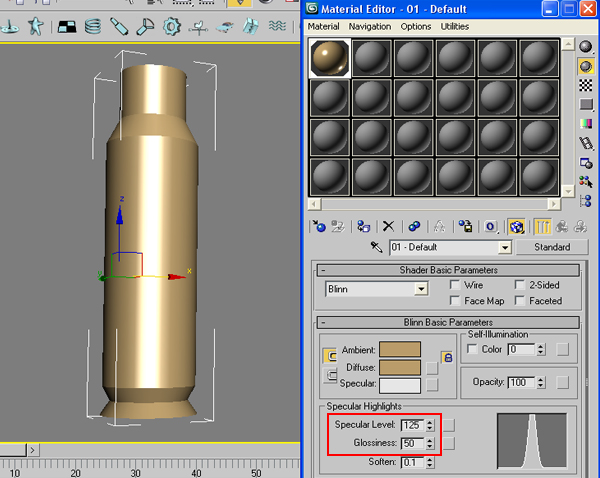
Step 6
Now drag a PF source icon in the view port.

Step 7
Hit “6” on the keyboard to open the Particle View window. Adjust the values of Birth > Emit Start, Emit Stop and Amount as shown in the figure.
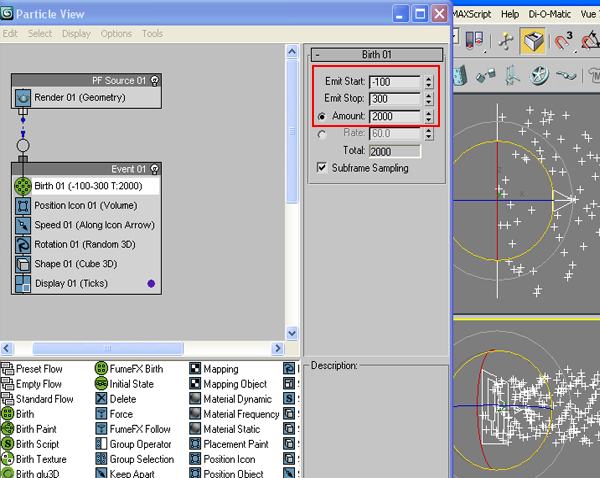
Step 8
Put “Shape Instance” in the event instead of “Shape”, and pick the bullet from the scene as Particle Geometry Object.
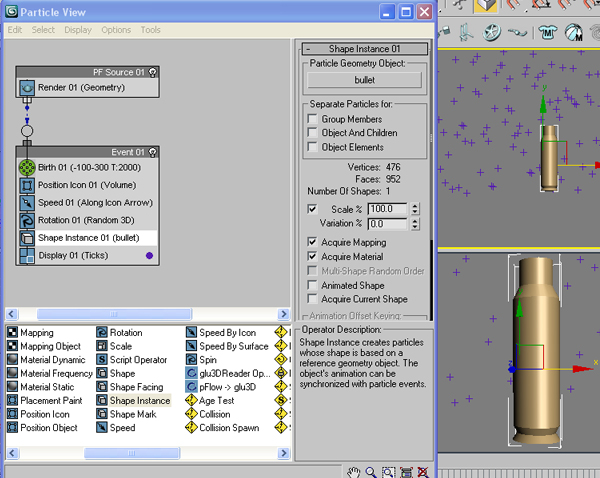
Step 9
Now, if you choose the Display type as “Geometry”, you will see that all the particles have taken the shape of bullet.
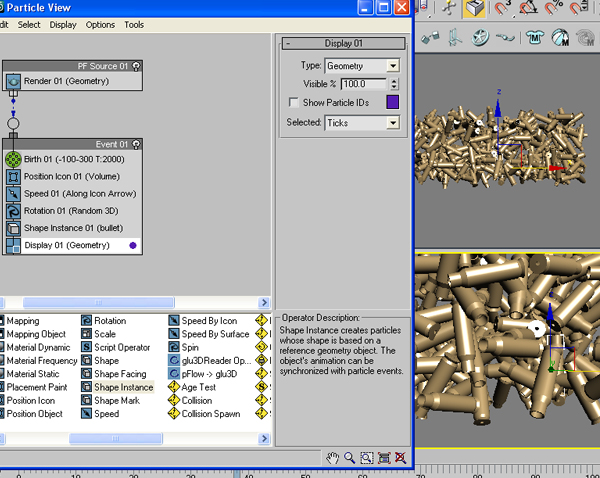
Step 10
Drag a Gravity force in the view port. Put a Force operator in the event and choose the gravity in “Force Space Warp” section. By doing this you will see the bullets going downwards.

Step 11
Again go to “Shape Instance” operator and down the scale to 25%.
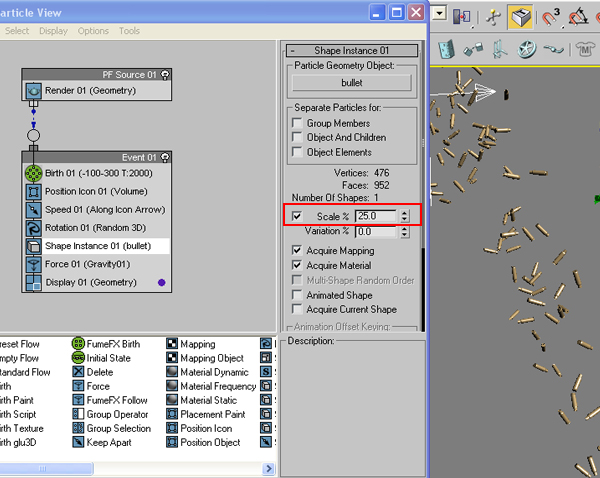
Step 12
Draw a Box in front of the PF source icon to make a building .
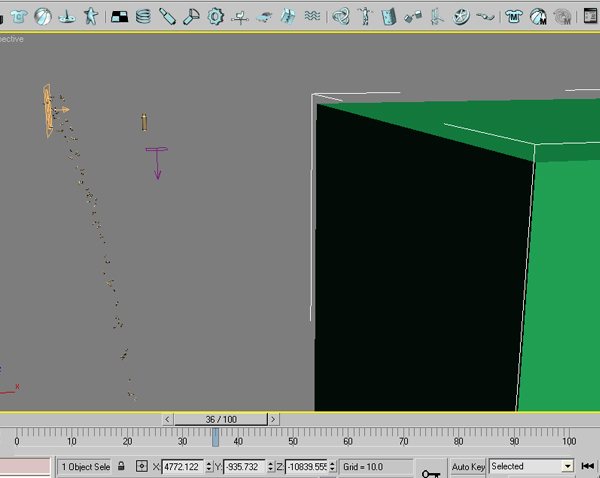
Step 13
Make a camera and place it on the ground level so that the scene should look like this. Add some lights also to lit the scene and the bullets.
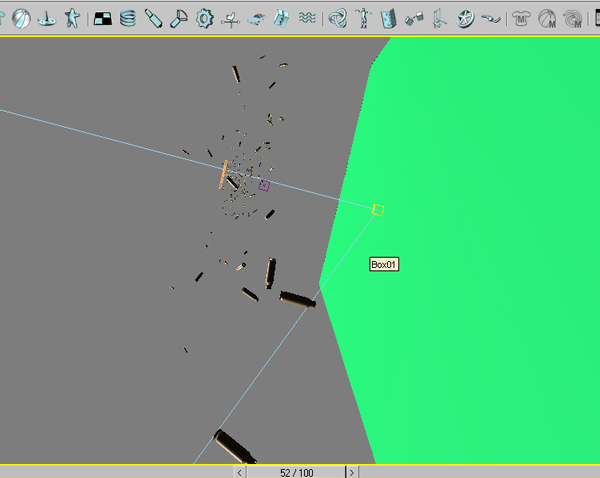
Step 14
Press “M” on the keyboard and apply this kind of texture to the building.
Step 15
Give “Raytrace” in the Reflection tab and put the value to 20. In this way some reflection of the bullets would come on the building.
Step 16
Now go to Time Configuration and choose 100 frames per second, since we need it in slow motion.
Step 17
Now this is the time to render the scene. Hide everything except the bullets and then save the animation in .TGA format with alpha channel. Same would be done with the building also.
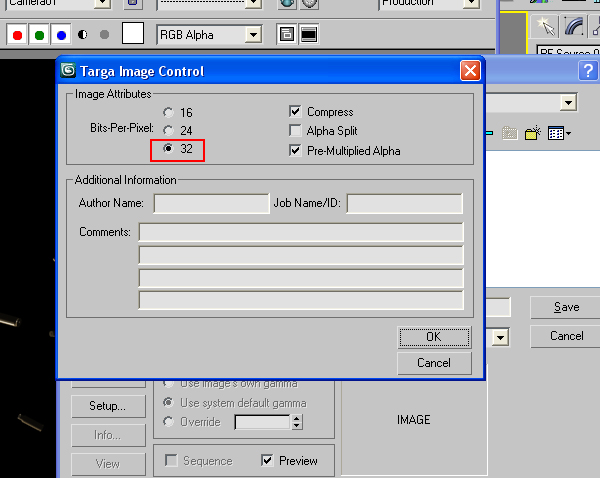
Step 18
Next, in Photoshop, I took an image of helicopter from internet and then separated its blades and the body in two different layers as “Heli” and “blades”, so that later I could use it separately. I hope, the readers know the technique how to do that, since this is a very basic procedure in Photoshop. If not, then I would recommend you to visit www.psd.tutsplus.com to watch some basic as well as advance tutorials on Photoshop.
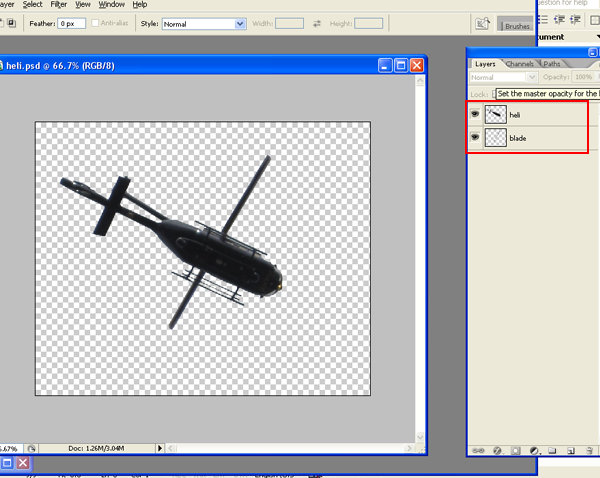
Step 19
Now lets move to After Effects. Make a new composition as “Final” with 720/576 dimension.
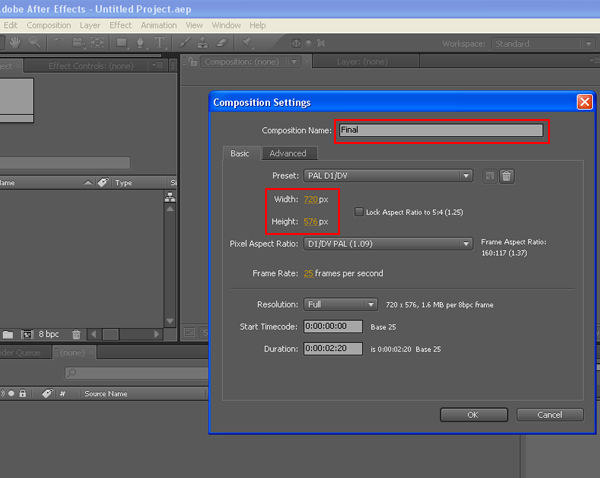
Step 20
Import the Building and the Heli_Bullets files and drag these into the Final Comp. Import a Sky footage also and put it beneath all the layers.
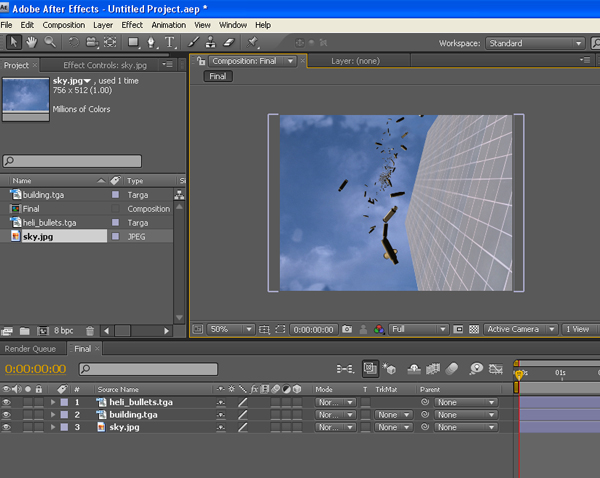
Step 21
Now import the “Heli.Psd” file which has been separated in two different layers in Photoshop. While importing it at the first time, choose the “heli” layer which is the body of the helicopter and then drag it into the Final Comp.

Step 22
Do the same again and choose “blade” this time.
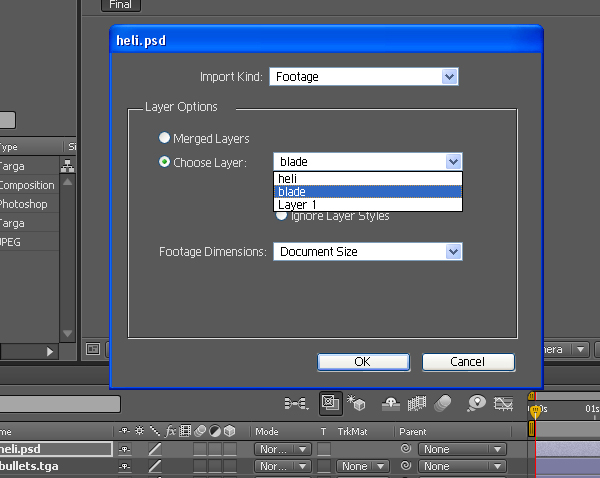
Step 23
Select the “Pan Behind Tool” and move the pivot of the blade to the center of the Helicopter. By doing this the blades will rotate around its right axis.
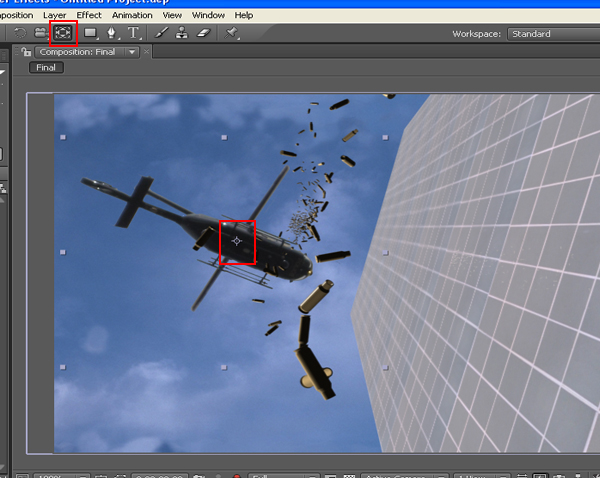
Step 24
Select both of the layers of “heli” and “blade” and adjust these parallel to the building.

Step 25
Select the “blade” layer, open its rotation and animate the rotation of the blade in clockwise direction.
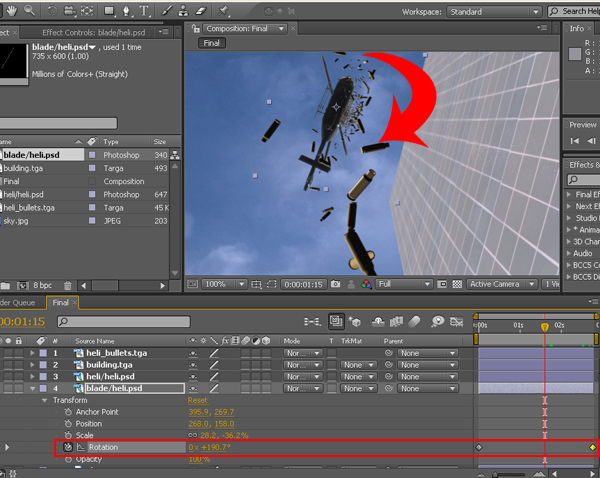
Step 26
Now select the “Building” layer and apply color balance effect on it. Adjust the color to match with the scene.
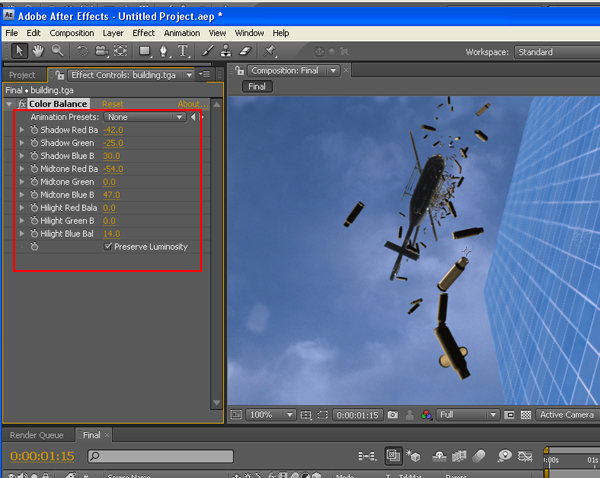
Step 27
Now its time to make muzzle flash. I used one of the suitable muzzle flashes from VideoCoPilot’s action essential 2. You can buy it from www.videocopilot.net.
I duplicated the muzzle flash layer several times by pressing “Ctrl+D” and lined these up so that it could give the feel of continuous fire rounds.

Step 28
Select all these muzzle flashes layers and goto Layer>Pre-Compose. And rename the Pre-Composed layer as “Muzzle Flash”.
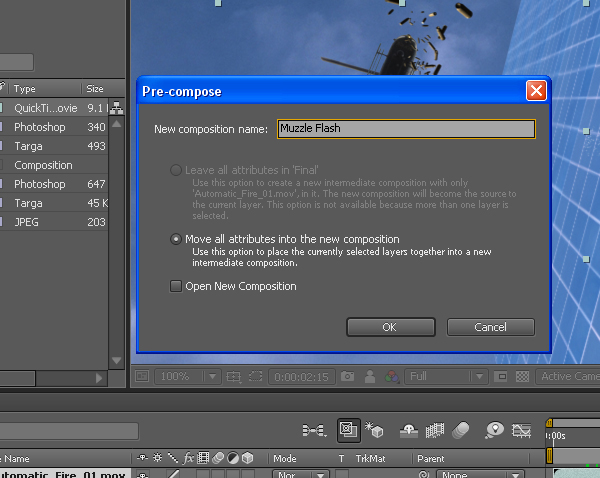
Step 29
Put the Pre Composed “Muzzle Flash” layer beneath Bullets, Building and Helicopter layers. Adjust the rotation of Muzzle Flash layer a bit.
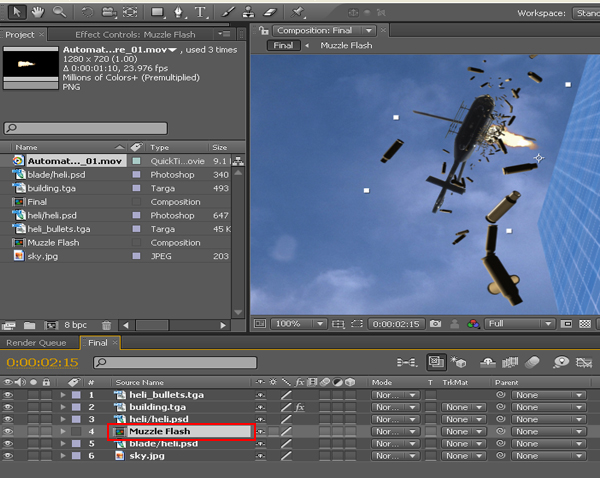
Step 30
Make the duplicate layer of Muzzle Flash, Helicopter and Bullets layer and mirror these layers so that the reflection of these layers could appear on the Building.
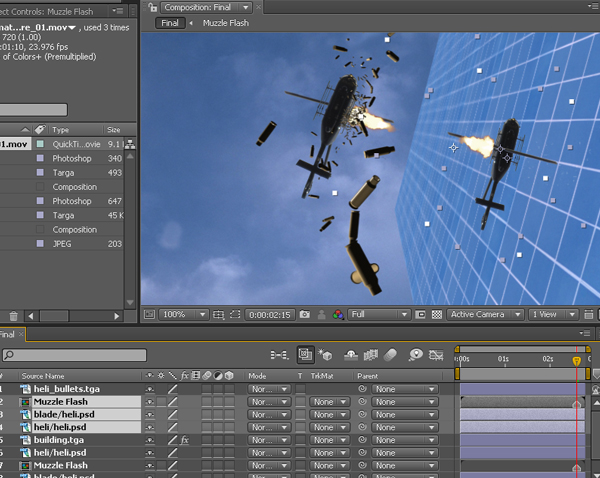
Step 31
Select these duplicated layers and pre compose them as Reflective Materials.
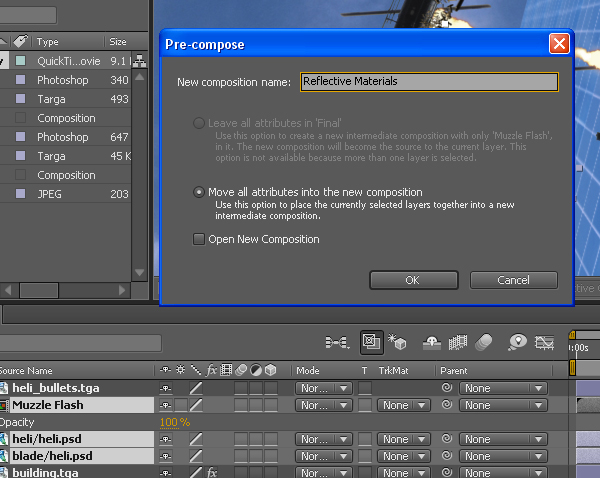
Step 32
Now select the Reflective Materials layer, right click > blending mode> soft lights. Now it gives a cool reflection on the building.
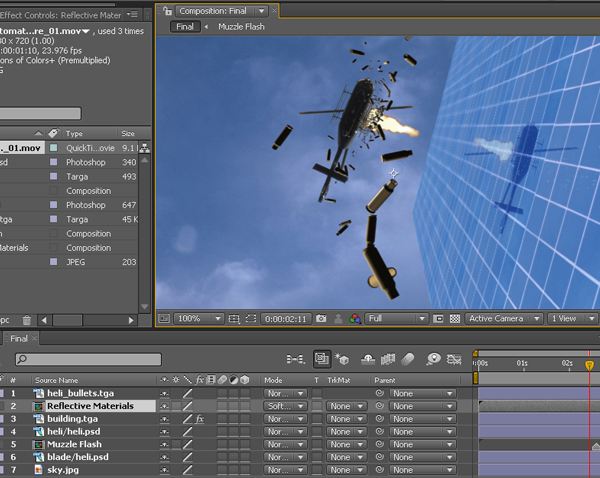
Step 33
I used some dust elements taken from again Action essentials 2, but in a different manner. First simply import the dust element in the Final Comp, and apply Distort > Twirl effect on it . It gives a cool effect of wind simulation due to fan blade of the helicopter.
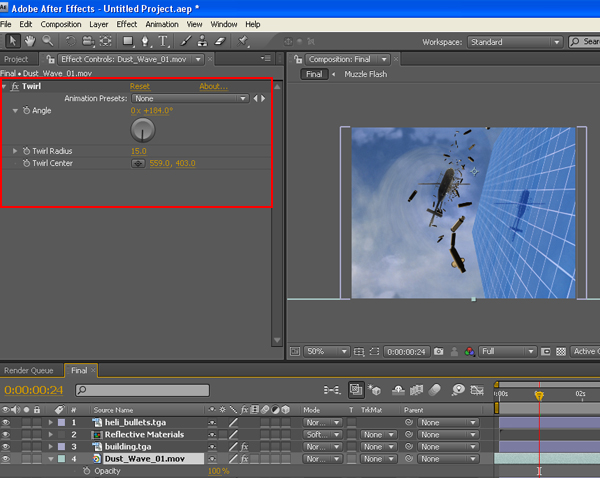
Step 34
Now make an Adjustment Layer at top of the all layers and apply Effect> Sapphire Stylize> S_film Effect. This effect gives some glow and grain on the footgae with overall color corrected effect. You can get the plugin from www.genarts.com.
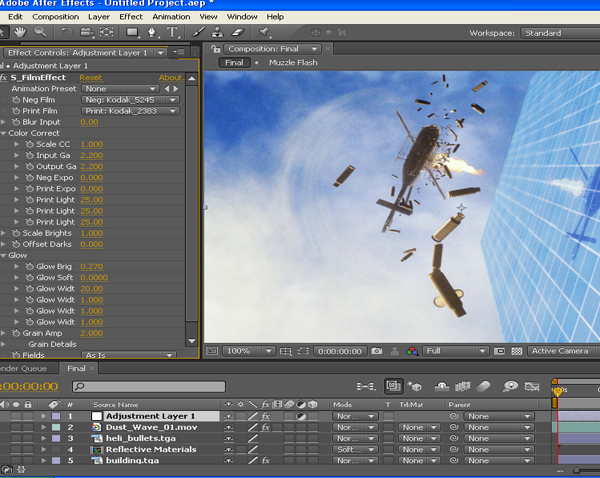
The End
Now render the scene and see the effect. You can always play with the values and options of the effects to get desired result.