Workshop #92: Gotta Be Me by pensivemusic

At Audiotuts+ we irregularly put up a reader track for workshopping and critique (find out how to submit a track). This is how it works: you upload your song, and every week or so we’ll publish one here and step away from the podium. The floor is yours to talk about the track and how the artist can fix problems in and improve upon the mix and the song.

This track has been submitted for your friendly, constructive criticism. They have put their track (and their heart and soul) in your hands to learn and get useful feedback.

  • Do you enjoy the song or track itself? Does it have potential?
  • Can the arrangement be improved?
  • How did you find the mix? What would you do differently?
  • What do you enjoy about the rhythm track? What can be done to improve it?
  • Is the choice of instruments relevant and effective for the style/song?
  • Are the lyrics (if any) effective? Does the style, arrangement and genre of the song suit them?
  • Can you suggest any specific techniques that might improve the track?
  • Do you have any other constructive feedback?

Gotta Be Me by pensivemusic

Artist’s website: myspace.com/pensivemusic

Description of the track:

“Gotta Be Me.” I wrote this song for a “Sizzle Reel” about a school who educates kids with autism, bi-polar disorder, etc. I needed it to be upbeat and familiar, so I went for a “universal” vibe and aimed for a Rolling Stones sound. The vocal’s a bit up front because I wanted the viewers of the video to be able to decipher the lyrics. I welcome feedback on all aspects of the music creation process from songwriting to mixing. I wrote performed, produced, and mixed it myself. I run ProTools 8 on an iMac. The guitars are miked, and the bass is DI). I programmed the drums using Steven Slate EX.

Download audio file (GottaBeMeMix1C41310.mp3)

Terms of Use: Users can stream the track for the purposes of giving feedback but cannot download or redistribute it.

Have a listen to the track and offer your constructive criticism for this Workshop in the comments section.


Submit Your Tracks for Workshopping

Need constructive criticism on your own tracks? Submit them using this form.


Display dates as “time ago”, the easy way

To display human readable dates on your blog, you have to use the human_time_diff() function. The following piece of code will show a post date like “Posted 6 days ago”.
Paste it anywhere within the loop, save the file, and you’re done.

Posted <?php echo human_time_diff(get_the_time('U'), current_time('timestamp')) . ' ago'; ?>

Credits: PHP Snippets.

Looking for WordPress hosting? Try WP Web Host. Prices starts at $5/month and you can try it for free!

Display dates as “time ago”, the easy way

Core Art Skills: Part 2, The Sketchbook


The humble sketchbook is greatly underestimated as an integral part of a designers working practice, certainly with those using a predominantly digital workflow. This old favorite shouldn’t be overlooked, it’s a great tool for any process. In the second installment of Core Art Skills, Ben Mounsey will show you why, and how to get the most out of your sketchpad.

Continue reading “Core Art Skills: Part 2, The Sketchbook”

The Art of Improvisation – Audio Premium

In this week’s Audio Premium content, Toby Pitman waxes lyrical about the art of improvisation, and gives us some practical tips about how to develop our ability to improvise.

To learn more about what you get as part of Audio Premium, read this.

Whether your a stand up comedian or a musician knowing how to improvise is an essential craft. Although this article won’t teach you ‘how’ to improvise it will give you an insight into the thought process behind it and the tools you’ll need to start.

In musical terms ‘Improvisation’ is the process of performing or composing music in real time, on the fly, in the spur of the moment, off the cuff or whatever you choose to call it. Basically your making it up as you go along! This can include the creation of new musical ideas or a new interpretation of an existing melody or composition. The whole point is that it’s not preconceived but flows naturally from you as you play taking any direction you wish.

Table of Contents

  • What is Improvisation?
  • Not Everyone’s Cup of Tea
  • It’s Not Just About Solos You Know!
  • Ordered Chaos
  • When In Rome!
  • What Are You Trying To Say?
  • Reading, Writing And Communicating With Other Musicians
  • Teach a Man to Fish!
  • Useful Tips and Exercises
  • Conclusion

Existing Premium members can log-in and download. Not a Plus member? Join now.


Use the Mixer Brush in Photoshop CS5 to Turn a Photo Into a Realistic Painting


Before Photoshop CS5, transforming a photo into a realistic-looking painting was quite tricky. Now that CS5 has been released we now have some new tools to help achieve this effect a bit more realistically. In today’s tutorial we will demonstrate how to use Photoshop CS5’s new Mixer Brush tool to transform a photo into a masterpiece in minutes.


Step 1

Let’s get started by first opening a photo. You can download the photo we used here. Otherwise, just open any photo you would like to convert to a painting.


Step 2

Duplicate the background layer by dragging it to the "Create New Layer" icon in the layer palette or by Pressing Cmd (Ctrl) + J.


Step 3

Now, click and hold the Brush icon in the toolbar then select the Mixer Brush Tool and release.


Step 4

While selecting the Mixer Brush, right click on your image to display this menu. You can also go to Window > Brushes.


Step 5

Choose the brush as shown below.


Step 6

Click on the icon in the top left of the brush parameters toolbar or press F5 to open the Brush dialog box.


Step 7

After the dialog has opened, enter the following parameters.


Step 8

If you are using a tablet, check the "Airbrush" Option as I’ve done here.


Step 9

Choose a fairly large sized brush, I’ve chosen 177 px but you can choose a larger or smaller one if you like. Let’s focus on the tree for now. Start moving your brush in circular movements on the right side of the tree. You can see how this works in this animation. Once you’ve finished, you should have something that looks like the image below.


Step 10

Use the same technique on the left side of the tree. Feel free to adjust the size of the brush as needed to paint in some details.


Step 11

Now let’s start working on the trunk of the tree. This time, we will use another technique, which is to start from a point and drag the brush along the trunk. Be careful to pick a brush that is the same size as the trunk and then vary it to work with the details. For this step, I used two brushes as shown below.


Step 12

Your image should now look similar to below.


Step 13

Now let’s work on the fence. For this I used the same brush as in Step 11 using the same technique.


Step 14

Your image should now look similar to below.


Step 15

Now let’s work on some additional areas. Keep making circular movements with your brush until your image looks similar to below.


Step 16

We can now start on the grass. To do this, we need to change the stiffness of the brush to 98% to get a more diffused effect. Perform some more circular movements on the grass varying the brush size to give it more detail.


Step 17

Your image should now look similar to below.


Step 18

Now select the Sharpen tool and select a brush size of 400 px. Apply it to the image as shown.


Step 19

Now go to edit, then fade the Sharpen effect, to 45% as shown.


Step 20

Your image should now look similar to below.


Step 21

Now let’s apply an Artistic filter, go to filter > Artistic > Dry Brush, and enter the settings 0, 10, 3. The, go to Edit > Fade Dry Brush and enter 35%.


Step 22

Apply a surface blur, go to filter > Blur > Surface Blur, and enter the settings 3, 4. Then go to Edit > Fade Surface Blur and enter 15%.


Final Image

Take a look at the final image.

An Introduction to Microsoft Silverlight 4 – Part 1

ActiveDen aren’t the only ones broadening their horizons. Today sees the beginning of regular Microsoft Silverlight content being published on Activetuts+ and I’m thrilled to say we have Silverlight Evangelist Mike Taulty on board to help us meet demand!

This is the first of two screencasts (with the second coming tomorrow) demonstrating how to build a simple Silverlight 4 map application, using Visual Studio and the C# programming language. You’ll get a decent overview of the Silverlight workflow, and learn what advantages it has over …similar technologies.

Go on – check it out and let us know what you think!


Section 1: Setting Up Silverlight and Bing Maps

Don’t like ads? Download the screencast, or subscribe to Activetuts+ screencasts via iTunes!

Scroll down to see a list of all the links in the text file that Mike writes in this tutorial.


Section 2: Calculating Walking Routes

Don’t like ads? Download the screencast, or subscribe to Activetuts+ screencasts via iTunes!

By the end of this part, you’ll have created an app that lets users choose any two points on a map, and displays a route for them to walk between those places.


Resources: Useful Links

About Mike:

Mike Taulty Microsoft (UK): http://mtaulty.com: [email protected]: twitter.com/mtaulty

Where to download Visual Studio and the other software required for Silverlight development:

Working with Bing Maps:

How to fix the Web Service issue, if it comes up:

Where to download Expression Studio: (You won’t need this till the second part of the tutorial, but feel free to grab it in advance :) )

Don’t forget to check back tomorrow to learn how to use Expression Blend to change the design of your app.

An Introduction to Microsoft Silverlight 4 – Part 2

Part two of our Silverlight Introduction tutorial. In this screencast, Mike shows you how to save your walking routes to disk, and how to improve your app’s design using Expression Blend.


In the first part of this Silverlight introduction, you learned how to use Silverlight and Bing Maps to create a simple web app for calculating walking routes between any two places.

Now, you’re going to let the user save these routes to their hard drive, and display them in a list so they can easily be loaded later.

And once the app is feature-complete, you’ll learn how to use Microsoft Expression Blend to improve the design of the app. In particular, you’ll see how to define two different “states” for the app, and generate smooth transitions between the two with a few clicks.


Screencast: Route Lists, File I/O, and Design

Don’t like ads? Download the screencast, or subscribe to Activetuts+ screencasts via iTunes!


Resources: Useful Links

Mike Taulty Microsoft (UK): http://mtaulty.com: [email protected]: twitter.com/mtaulty

Where to download the Expression Studio trial:

Introduction to Smoke Simulation in Blender 2.5 – Day 2

In the second part of our invaluable, in-depth series looking at smoke and fire simulation techniques within Blender 2.5, Gottfried Hofmann shows us how to create fire! The incredible (and let’s not forget, completely free) result could be used as a flamethrower, dragon breath, a rocket trail…the possibilities are endless!

Techniques covered in this second video include :

  • How to correctly set up the particle system.
  • Using a second voxel data texture along with the dissolve setting to fake fire.
  • Learn how to adapt the particles to the domain divisions.
  • How to avoid a few more common pitfalls!

So let’s get going!


Video 1

Download

Note: click the ‘Monitor’ icon to view tutorial in full-screen HD.

The Screencast Key Status Tool used in this tutorial is available here.


This tutorial is Day 2 in a series – Go to Day 1.


Don’t miss more CG tutorials and guides, published daily – subscribe to Cgtuts+ by RSS.

Kaleb Says Goodbye and Matt Says Hello!

As you may have seen or heard we’ve got a new editor doing the rounds at Cgtuts+, Matt Brealey.

Kaleb had to finish his duties with Cgtuts+ at the start of May after successfully landing a position with EA as an Environmental Artist, well done! We’d like to thank Kaleb for the incredible work that he put in with Tuts+ over the last year, including the launch of the Cgtuts+ Premium Program, join us in wishing him all the best with EA!

Final words from Kaleb

Thanks to all the readers whose devotion and enthusiasm has made Cgtuts the amazingly involved and supportive community that it is today, to all the authors whose incredible talents and tireless efforts are responsible for making Cgtuts the unparalleled resource that it has become, and to Envato whose unwavering vision and limitless generosity have made it all possible. I’ve truly enjoyed my time here at Cgtuts, and I’m certain that it will forever be one of the most rewarding experiences of my career.

Introducing Matt Brealey

In the hunt for a new site editor we were lucky enough to find Matt Brealey, an established author for Cgtuts+, here’s what he has to say.

Hi everyone! Firstly I’d just like to echo Aaron’s words in thanking Kaleb for the amazing job he’s done for the past year. I’ve personally been visiting the site daily for almost that entire time simply because it was run so consistently well and the tutorials were always outstanding. He has certainly set the bar extremely high for the coming few months, and I wish him nothing but the best for the future. I’d also like to say a huge thank you to Envato for even considering me as a possible replacement.

…I cannot cook in the slightest…

Now, let me introduce myself. For the past 5 years I’ve been working in the UK as a freelance 3D modeler. During that time I’ve completed architectural/product design work and created high-poly models for broadcast and print-campaigns using Maya, Modo and Maxwell Render; I’ve roto’d, keyed and composited VFX for an indie short film or two using Syntheyes, Nuke and After Effects; and I’ve also found just enough spare time to play around with a few other programs such as Houdini, Realflow and Z-Brush (although I am still very much a beginner in that last one. It’s not pretty.) I’ve also had a few Modo tutorials published here myself over the past few months – hopefully they’ve helped at least one or two of you! Outside of my work I also play guitar, I love science and film, and I cannot cook in the slightest.

I’m really looking forward to hearing what you want from the site, and I can’t wait to see where the next few months take us.

Cheers!
Matt

Say hello to Matt in the comments below and feel free to let him know what you’re after!

Quick Tip: An Introduction to Light-Mapping in UDK

Light-mapping for the Unreal Engine used to be an extremely tedious process, as it could only be prepared in an external program such as Max or Maya. Well, thankfully there is a solution! In the first of our Unreal Dev Kit tutorials, Jarlan Perez walks us through how to first prepare a model, and then setup light-mapping entirely within the UDK itself.

In the RefFiles.zip file you will find two folders : package and scene. Both the start and end file for this tutorial have been provided inside the scene folder.
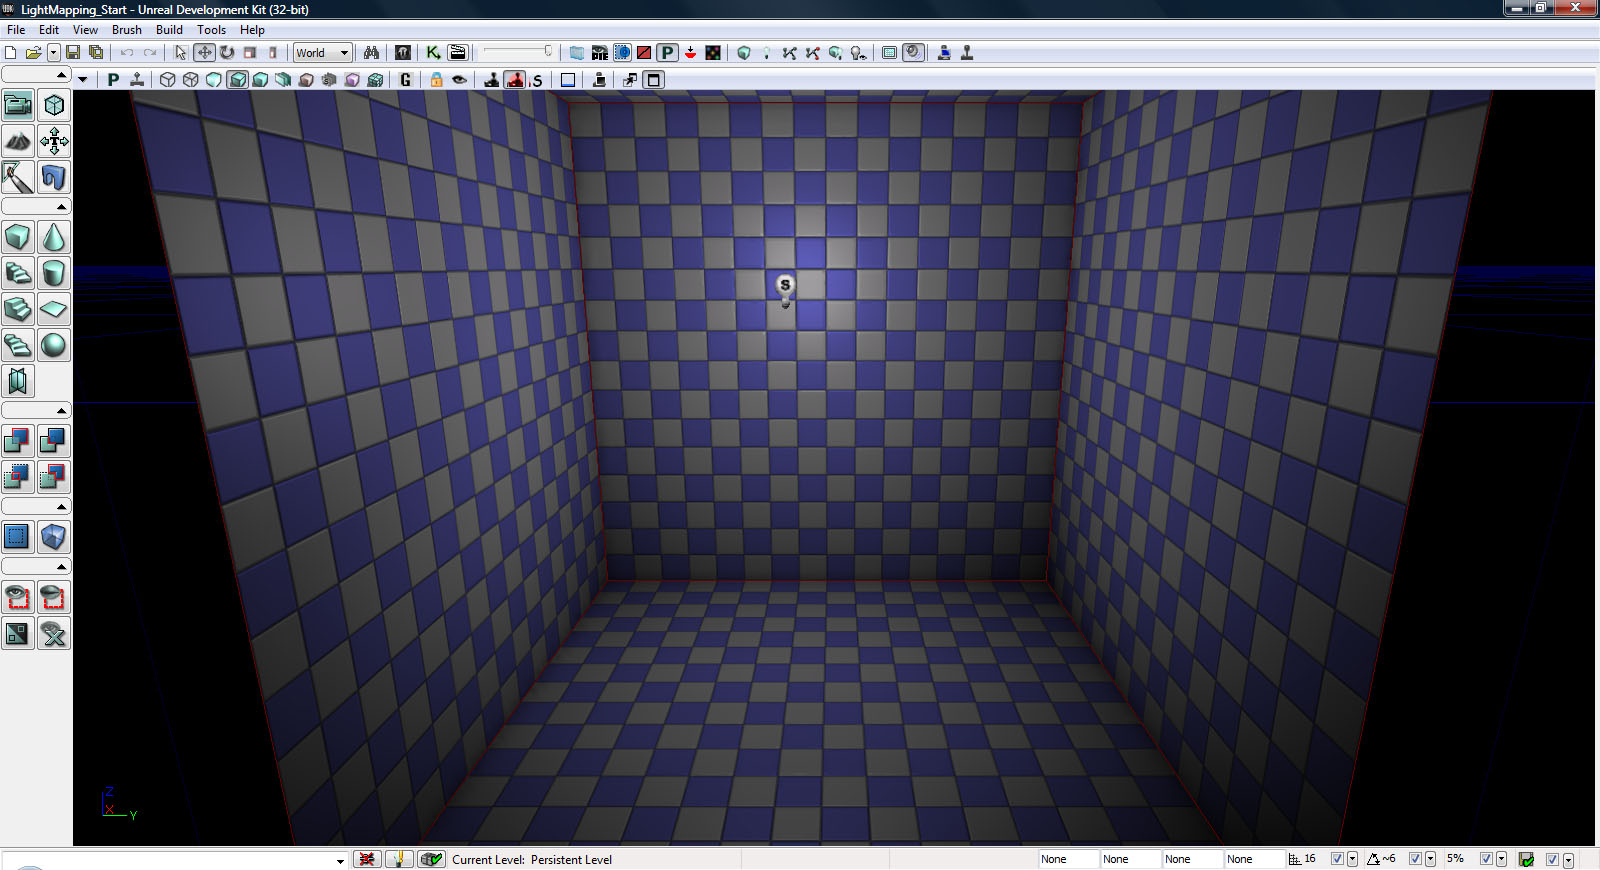

Step 1

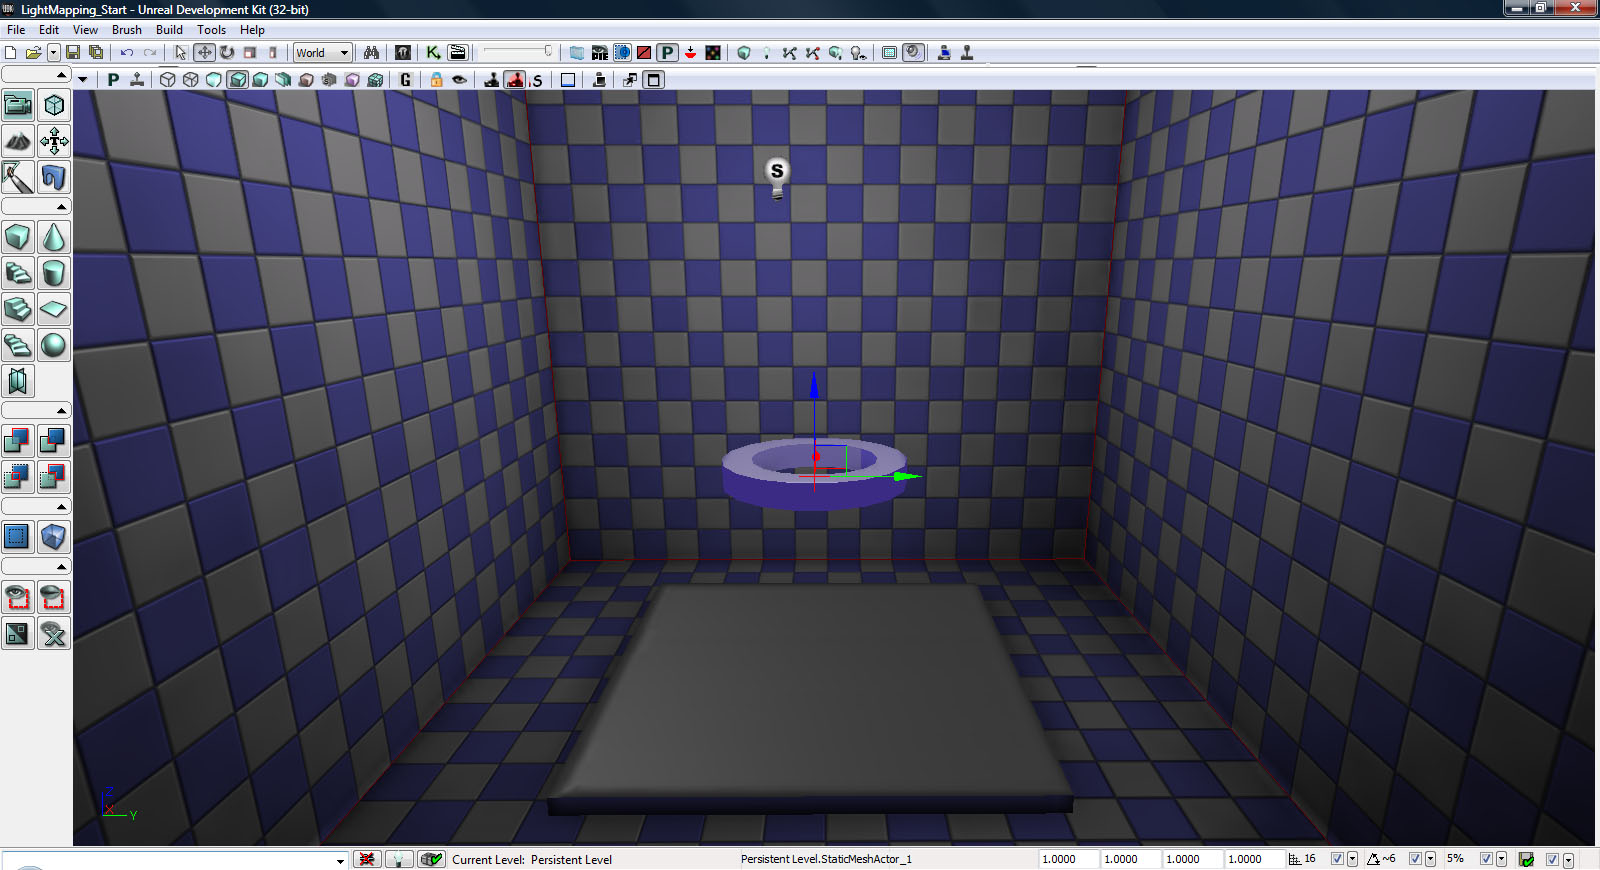
Let’s get started. Launch the UDK and opening up the LightMapping_Start.udk located inside your scene folder. This is a very simple scene consisting of a subtracted cube and a single spotlight as shown below.
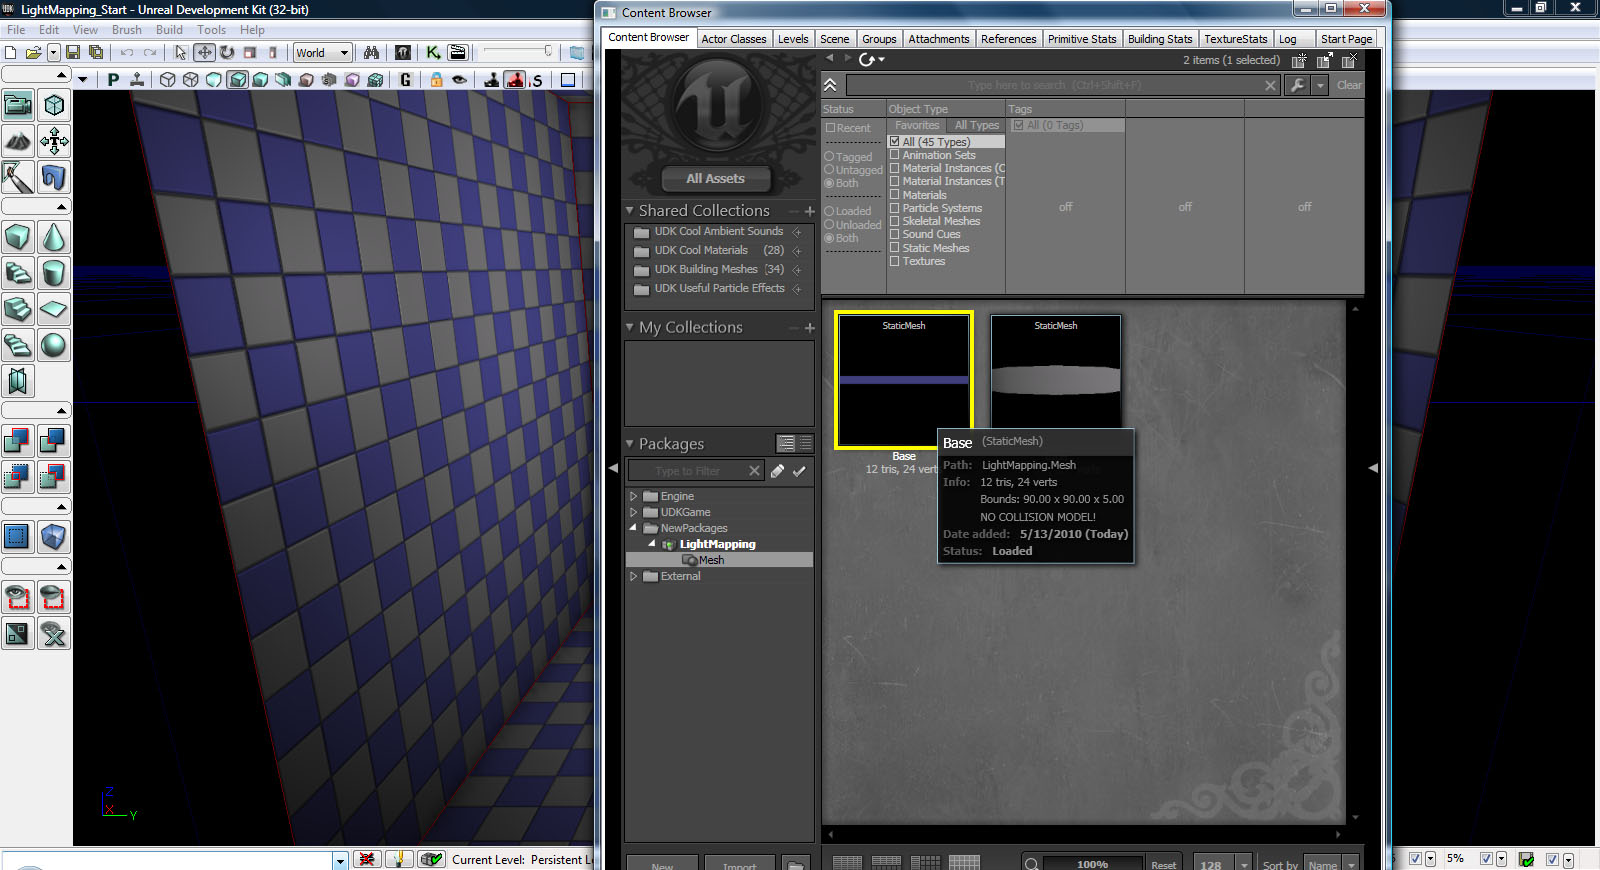
UDK Lightmapping 1

Step 2

Go ahead and open up the Content Browser and load the LightMapping.upk package located in the package folder, as shown below. Inside you will find two static meshes, a cube named base which we will be using for the floor where our shadows are going to be projecting, and a circular tube shaped mesh named tube which will be the mesh casting the shadows.
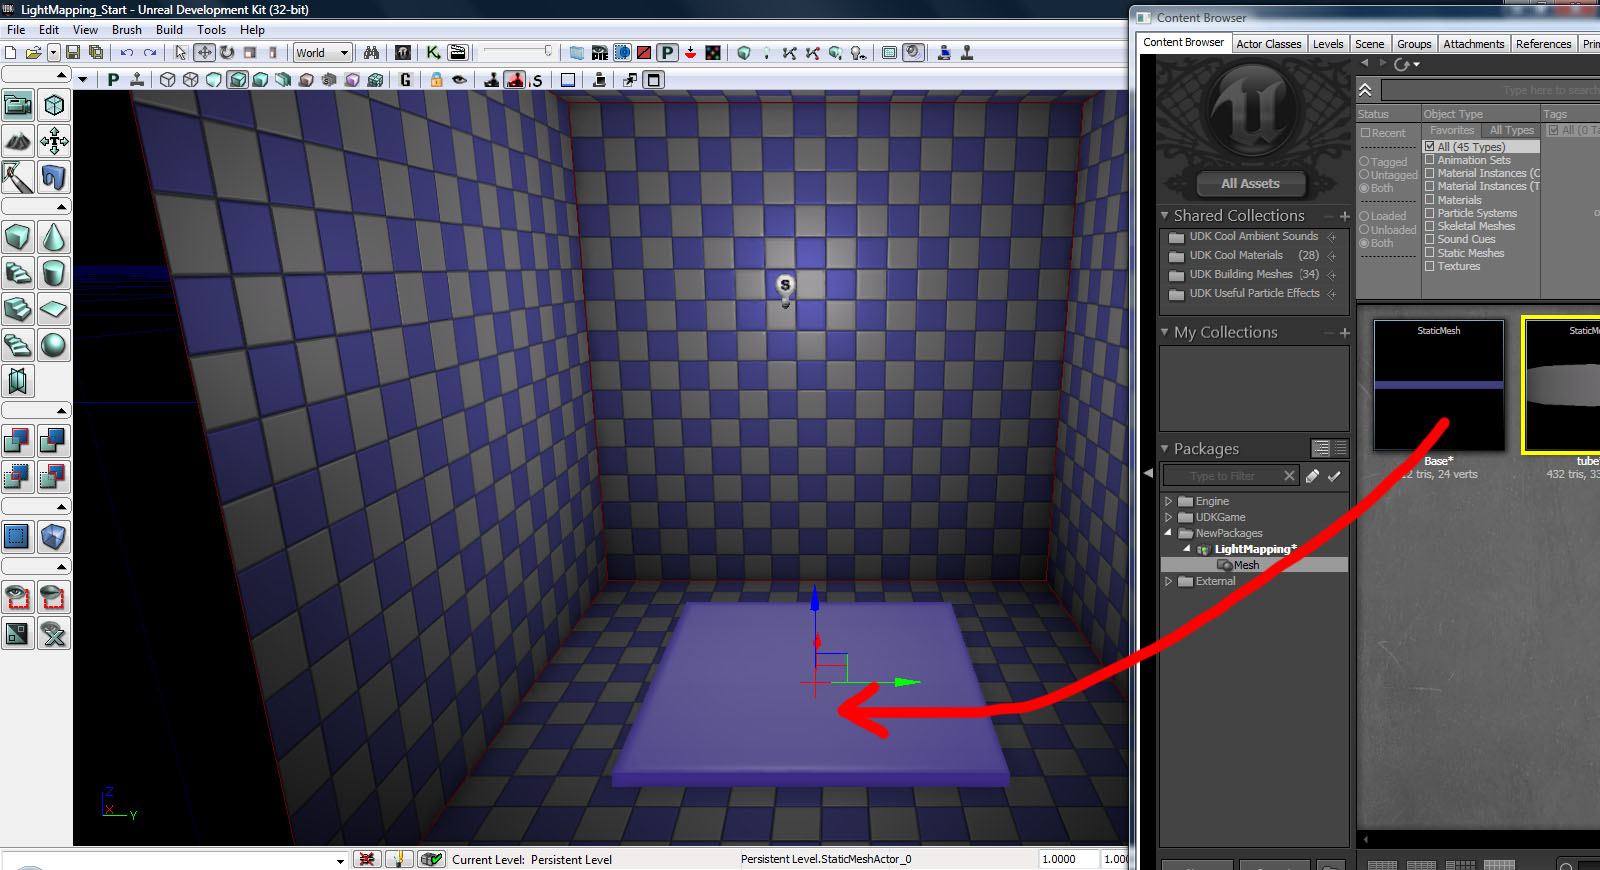
UDK Lightmapping 2

Step 3

Select that base mesh and drag it over to your scene.

UDK Lightmapping 3

Step 4

Next we’re going to drag the tube into the scene. Make sure that you leave a reasonable amount of space between the two meshes so that we can get a pretty clear shadow in the final scene.
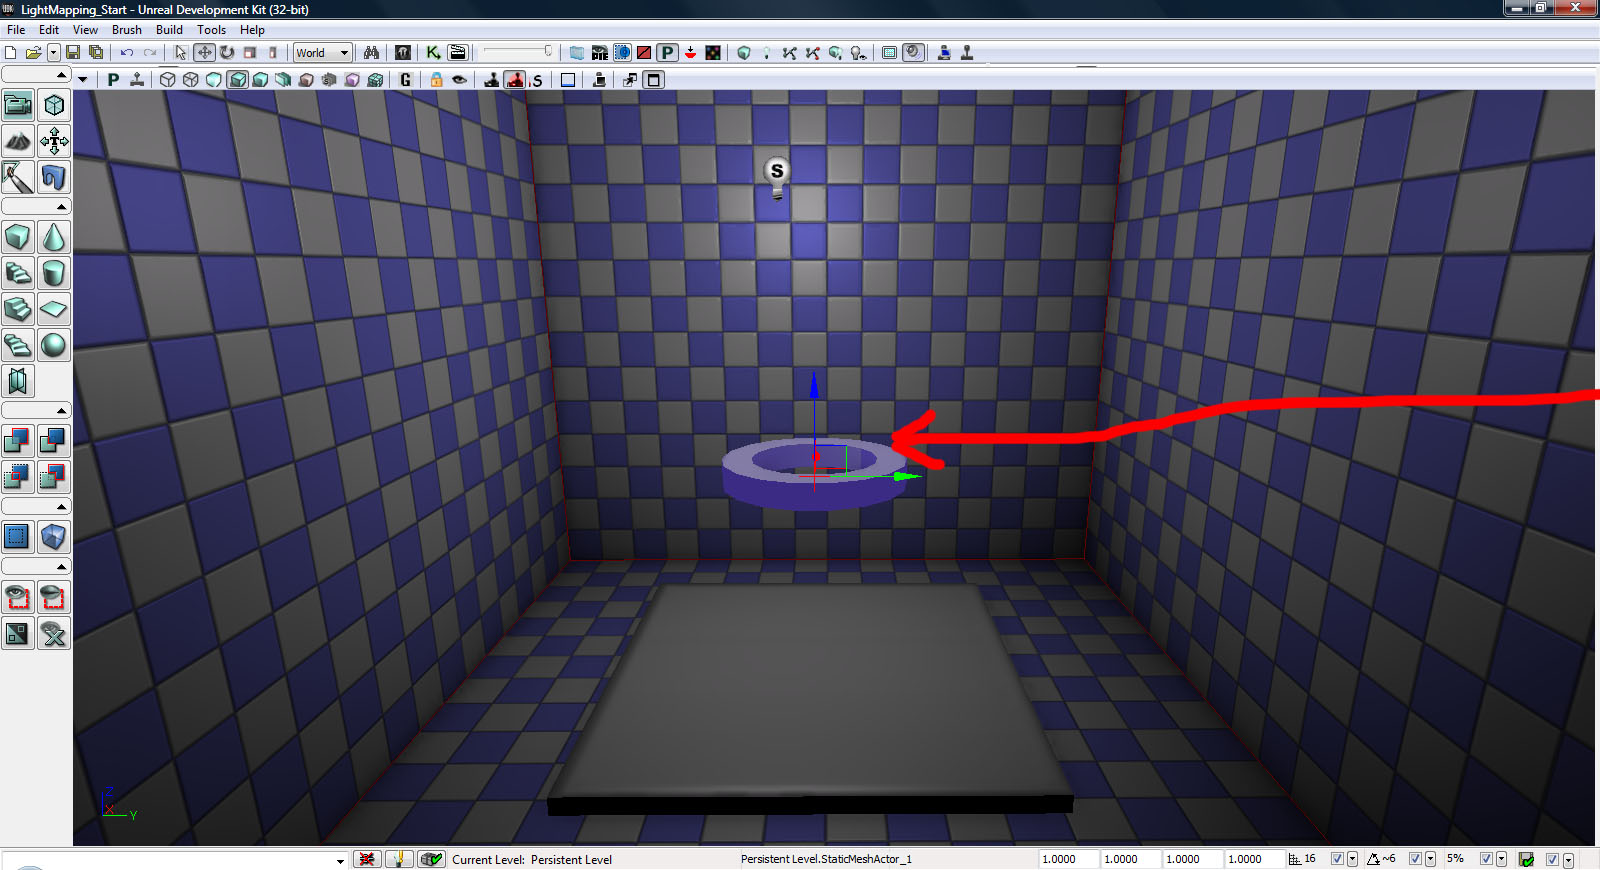
UDK Lightmapping 4

Step 5

Let’s go ahead and test the lighting and see what we get. Make sure to turn off the Use Lightmass option, as simulating GI will greatly reduce your build time and at this point we don’t really have much use for it! Use the settings shown below :

UDK Lightmapping 5

Step 6

You should get something similar to the image below. We’re currently getting extremely soft, subtle shadows, and why are there no shadows on our base mesh? That’s what we’re going to explore.

UDK Lightmapping 6

Step 7

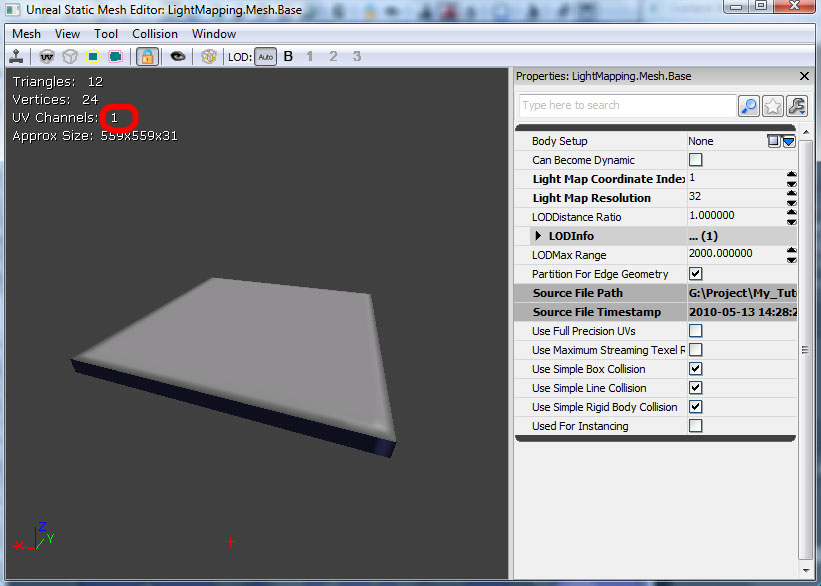
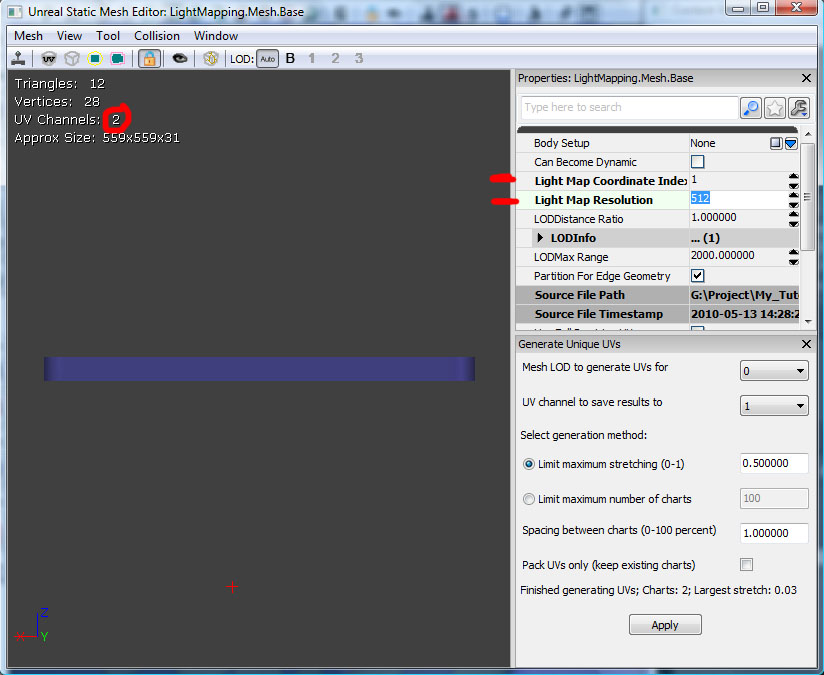
Every single static mesh that is imported into Unreal has its own unique UV set that is used to apply textures. To get the desired, lightmapping effect that we’re looking for we’re going to have to make a brand new UV set that will be used to save the shadows of your Lightmap. As you can see this object only currently has one UV map or channel.

UDK Lightmapping 7

Step 8

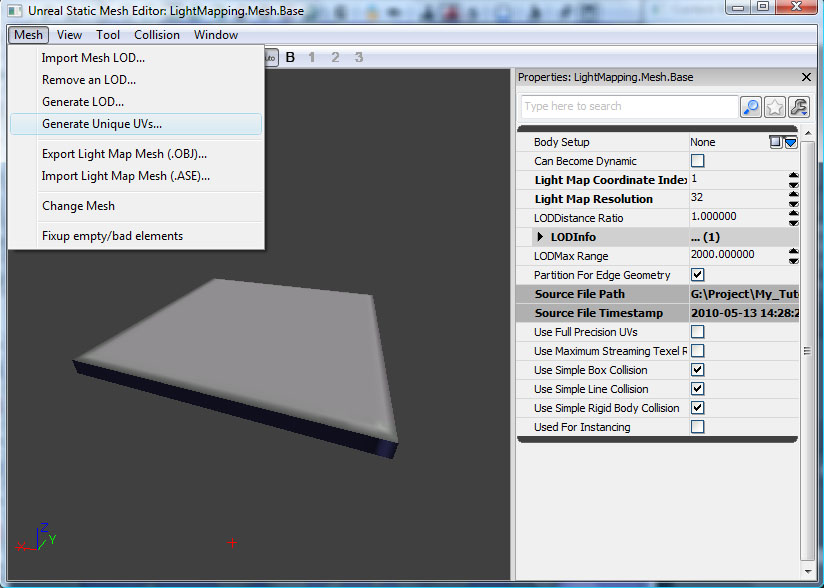
To create our new UV map, first go to Mesh > Generate Unique UVs, as shown below :

UDK Lightmapping 8

Step 9

This will open a small submenu for UV generation. Since these UV maps are only going to be used for capturing shadows, there is no longer any need to export your models to an external program in order to create a new UV channel.

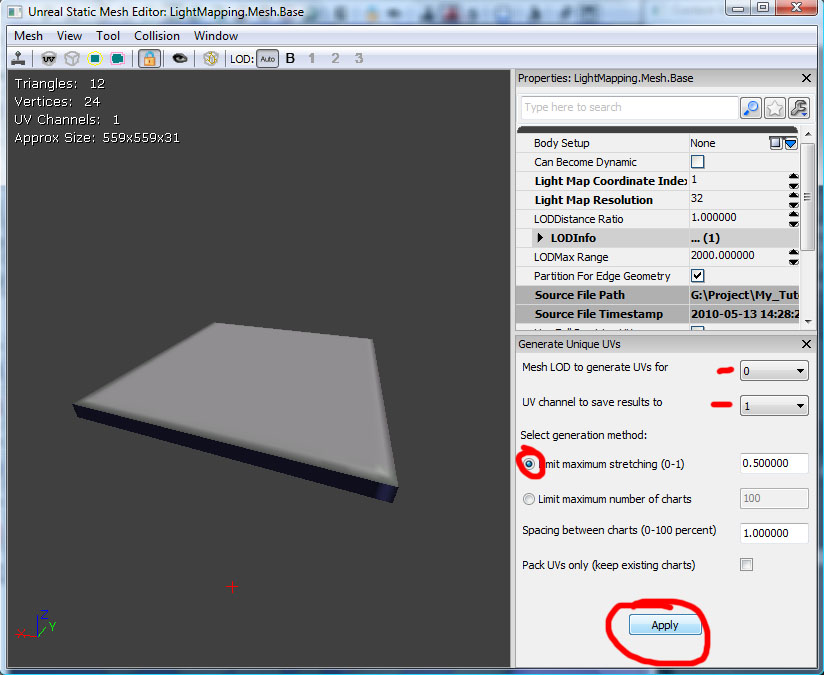
Unreal reads UV channels starting from 0 (e.g. the very first UV channel will be Channel 0.) We’re creating a new map in addition to the existing one, so make sure to set the UV channel to save results to dropdown to 1.

For now, leave the Limit maximum stretching (0-1) at the “0.500000” default value. That’s seemed to work great for me in the past, and I really never found much of a reason to change it. When you have all of the settings in place, as shown below, hit Apply.

UDK Lightmapping 9

Step 10

Let’s take a look at our results. You can clearly see that Unreal has created a 2nd UV set, and now we just have to let Unreal know that we’re going to be using this new UV set for light-mapping.

To do this, go to the field titled Light Map Coordinate Index and set that to our new UV set’s channel, which was 1.

Now we have to set up the resolution for our light maps. Go to the field titled Light Map resolution and set that to 512, which should give us pretty good looking shadows. (If we need to increase shadow detail in the future, we can always double this value to 1024.)

UDK Lightmapping 10

Step 11

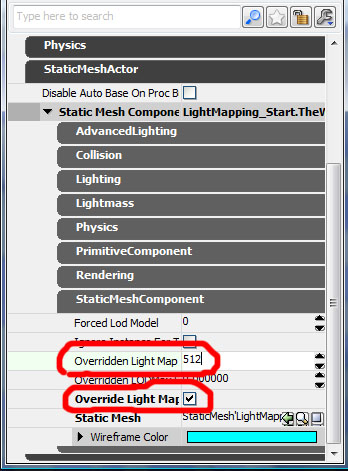
Now there’s just one thing left to do – let the engine know which of the meshes we want to receive shadows. The reason we select specific meshes (and don’t just calculate light-mapping on everything), is to prevent unnecessary processing and save on overall build time. For instance, you could have 50 of the same Meshes in a scene but only want 10 to have very detailed light-mapped shadows. You would designate these 10 items to receive shadows based on your UV map, and the rest would be calculated using Unreal’s default shadow system.

Designating light maps is very simple. Right click on your object and bring up its properties (or you could use the shortcut F4.) Click the StaticMeshActor label, and then in it’s properties section, click the StaticMeshComponent label.

In here we’re only going to be adjusting two things; first of all we want to make sure that Override Light Maps is checked on, and then we want to set the value for the Overridden Light Map field to match the resolution of our UV map, in our case 512.
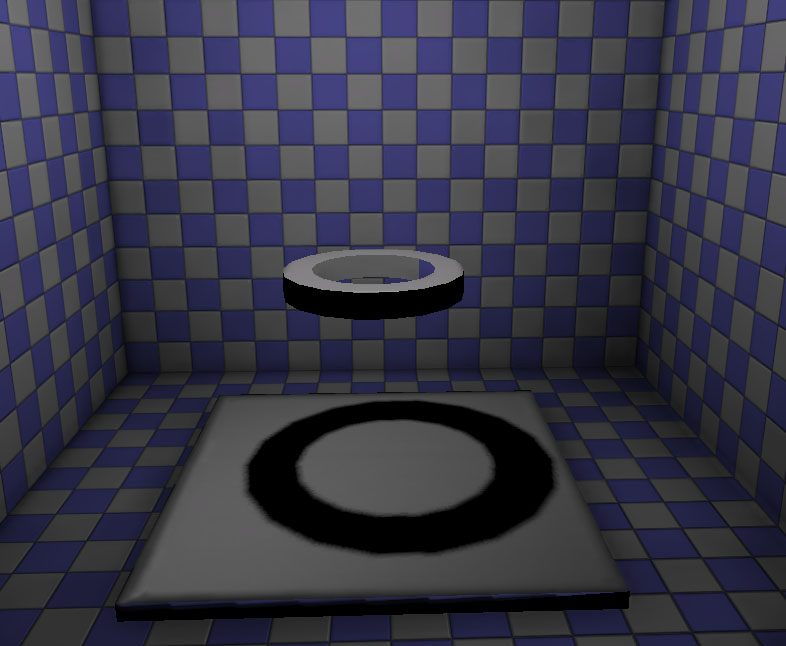
UDK Lightmapping 11

Step 12

Now hit the Build Light button and use the same settings as in step 5 above. Your final image should look something like that below :

UDK Lightmapping 12

And that’s how to set up light-mapping using only the UDK! I hope this demonstration was helpful, and if you have any questions please feel free to leave them in the comments below!


Don’t miss more CG tutorials and guides, published daily – subscribe to Cgtuts+ by RSS.

Desktop or Cloud? What Do You Prefer?

I think one of the primary reasons behind web based tools and services not gaining prominence in the early years of internet was due to the fact that there was only one major browser – Internet Explorer. IE had more than 90-95% of market share at that time. But many developers never liked the browser.

The introduction of Firefox around 6 years back, the rise of Google and the subsequent web 2.0 era  has assured people that “the cloud”  is the future. As a result, today we can find solid web-based alternatives for almost any desktop program out there.

There’s even a cloud-based operating system by Google, called Chromium, in the works.

But are we comfortable with staying in the cloud most of the time? Do you love using online tools more often, or do you think their desktop counterparts are more efficient?

What’s Your Summertime Work Strategy?

Traditionally, summertime means kicking back with a cool drink and escaping to the beach. But some people actually use this time to get ahead, taking advantage of a lighter workload to plan for the rest of the year or tackle long-neglected projects.

Both approaches have their merits.

Obviously, it’s nice to slow down and smell the cool ocean breezes so you can return to work relaxed and rejuvenated. That said, beaches and other vacation destinations are crowded this time of year, so it may make sense to save vacation time and forge ahead at work to show your boss how committed you are. As a self-employed writer, I’m planning to do a little of both this summer.  I may be taking a few half days to catch up on reading –  but otherwise it’ll be business as usual.

What do you plan to do this summer? Will you be observing half-day Fridays, as they do in many companies? Maybe taking a week off for some fun in the sun? Or will you keep things at the status quo?

Listen, Social Media Expert! Tweeting is Easy, Marketing is Hard

Facebook, Twitter and similar services can make connecting with your customers a breeze. It can quickly foster relationships with new clients and create a community around your products or services. But, having a true mastery of these platforms goes well beyond the simple ability to use them. It’s not that difficult to get a basic social media campaign running, but it is hard to build one that is actually generating revenue or visibility for your business. So, think carefully before putting a phrase like “social media guru” on your resume, or taking on a new social media initiative at work. If you don’t have true marketing skills, a commitment of real resources from your company and a solid chunk of daily time to dedicate, it could land you in a serious bind.

A day to learn, a lifetime to master

Services like Facebook and Twitter were designed with painstaking care (and millions of dollars) to be intuitive, so figuring out even the most advanced capabilities doesn’t truly put anyone ahead of the pack in terms of social media expertise. Social media involves connecting with people, not mastering software. In fact, stereotypes would suggest that software mastery is much more likely to land you in a behind-the-scenes, “computer nerd” position than a prominent, visible spokesman role for your company. So, unless you have social media successes that go beyond logging in and posting content, you’re somewhere in the middle of the social media skill spectrum along with the rest of us. Turning on a stove doesn’t make you a chef – even if you know every setting of the machinery you still need know-how, experience and creativity to make the most of it.

The misguided self-perception of “social media expert” can sometimes be a product of your surroundings. You may work with people who got the marketing work done “the old fashioned way” and seem to have little enthusiasm for (or understanding of) social media. To them, it’s a “fad” that’s not worth pursuing. But for most businesses social media is viewed as the “next big thing” to grow their business beyond expectations.

“Seeking Social Media Rock Star…”

“Social media” is at the tip of every hiring manager’s tongue. Thousands of recent job postings contain mandates for “social media expertise” and every business and group on the planet wants “Facebook integration” for their business and a throng of followers on Twitter to support them. Executives drop buzzwords like “crowdsourcing” and “blogosphere” into sentences that sound like radical innovations. The truth is, they want what they’ve always wanted; to sell more products, to gain more supporters, and to get more subscribers to their services.

Don’t put yourself in the precarious position of promising them some sort of “viral social media campaign” that is going to cause an explosion of interest. Ask yourself “Am I really a social media expert?”

  • Have I helped develop a Facebook or iPhone application?
  • Have I written marketing copy on a company blog?
  • Have I put meaningful information on Twitter that has gotten significant attention?
  • Do I have any tangible results from my social media efforts?

Another question to consider is, “Is my company really committed to social media success?” Many companies are not; they don’t allocate any time or resources to it and basically expect a near-instant, automatic surge of followers to spontaneously appear. Despite being a “top priority” in meetings and conversations, it’s conspicuously absent from accounting books and timesheets. If your company truly wants to delve into social media, make sure they mean it.  Then fit it into all of the necessary schedules, budgets and long-term plans.

Social Media Success is Mostly About the Product

Even if you really are a social media expert, you still might struggle if you don’t have a truly valuable product or service to market. The last thing you want to be doing is marketing an inferior item on the web. Contrast said it best, “If [a company] wants a million hits, followers, lists, comments, links, posts, friends, fans and re-tweets, then they should do something meaningful.” If the product is great, the “social media work” is hardly work at all. But if the product is less than great, all of your marketing turns to empty hype and you disappoint the followers you’ve gathered on the web.  More importantly, you disappoint the employers whom you promised viral success.

So be honest with yourself and your employers, and hedge their expectations. If you really are a social media rock star, the product is great and they’ve committed real resources to social media – then swing for the fences. If you’re just a typical social media user, the product is ordinary at best and there’s no tangible commitment…then don’t “tweet yourself into a corner” with empty promises.

Remember: Tweeting is easy; marketing is hard.

Coffee Shop Etiquette for Mobile Workers

When I wrote about productivity tools for road warriors using wifi hotspots, I touched upon manners. Any boorish or inconsiderate behavior could hurt your reputation.

In case you were wondering what would qualify, I asked my social networks what were some of their pet peeves:

  • Buy something: This actually is a commonly held rule for people who don’t own coffee shops. We realize that wifi is offered for free to encourage us to spend money there. So help subsidize your bandwidth.
  • Don’t hog space: Even if you’re a paying customer, you’re only one paying customer. Unless your laptop and papers are buying expensichinos too, don’t spread all over a four top. Leave room for more customers to gather and subsidize your bandwidth. If you end up at a table larger than needed, offer to share it when someone else is looking for a seat.
  • Don’t overstay your welcome: Like the first item on the list…only longer.
  • Don’t hog bandwidth: You really don’t need to be watching Office reruns on Hulu.com. You really don’t need video chat either. Be realistic about what you need to do so the rest of the patrons don’t start taking the router’s name in vain.
  • Keep it down: Use headphones so the rest of us aren’t forced to listen to your entertainment. A few “You Got Mail” notices every once in a while aren’t awful.
  • Take it outside: There seems to be a gray line here concerning if you should use your cell phone. Some suggest you take the call outside. I’m in the camp that believes a cell phone conversation is the same as talking to someone at the table.
  • Clean up after yourself: Don’t make the staff clean up after you.

Think of the coffee shop as a community or networking opportunity. It’s likely that you will get to know other regulars – including the staff. It’s important to make a good impression.