iPhone Predicted To See Huge Surge in Demand

ChangeWave has released interesting survey findings that indicate sharply rising demand for Apple’s iPhone over the next quarter.  The result contradicts some expectations that Apple may be gambling away its customer trust by ignoring the iPhone reception issues, but then we do know that the company may be addressing some questions in an upcoming press conference and an iOS update.

The survey concluded that the iPhone leaves its users far more satisfied than any other phone: RIM with 30%. Especially Blackberrys seem to have lost their cool factor and Research in Motion has to think about ways to regain traction. The same goes for Motorola, which has lost consumer interest over the past quarter. Onbly 6% (down from  14%) of smartphone buyers are looking into a Blackberry and only 9% (down from16%)  into a Motorola device. Interest in the iPhone has jumped from 31% to 52%, while HTC’s Android devices have also shown more traction: 19% of respondents said they were looking into an Android HTC phones (up from 12%).

According to ChangeWave, “the momentum for Apple and HTC is occurring at the expense of other smart phone manufacturers – Motorola and Research in Motion in particular. […] The market situation for RIM appears far more problematic, at least short term. RIM’s customer satisfaction ratings have plummeted for the past 7 quarters, and planned buying among consumers is at the lowest levels ever recorded for RIM in a ChangeWave survey.”

Writing Effectively in InDesign Using Book


InDesign allows you to collect all documents in a Book. Using Book, you can easily synchronize styles in every document and maintain a consistent layout throughout your project. In this tutorial, we will create a book made from 3 chapters, complete with Table of Content, Introduction, and a Cover. You will learn the concepts of InDesign, from applying styles, adding page numbers, warping text, using variables and master pages. Let’s get started!

Continue reading “Writing Effectively in InDesign Using Book”

Quick Tip: Single Low/High Pass Filter for Ableton Live

In this quick tip, I’m going to show you a neat way of implementing a low/high pass filter using the Auto Filter device in Ableton Live. By that, I mean that we are going to be able to construct a filter that goes from a full low pass to a full high pass with the turn of one knob, leaving the unprocessed signal to pass in the middle position.


Setting Up

Quick tip before we start. I am going to show you a way of implementing a low pass and a high pass filter in one EQ3 device as two separate controls, though. On the EQ3, turn the GainLow and GainHi all the way down and set the GainMid to 0dB.Set FreqLow all the way down to 50.0 Hz and FreqHi all the way up to 18.0kHz. FreqLow acts now as a high pass filter and FreqHi as a low pass one.

Now, let’s start again by dragging an Auto Filter device, then grouping it so that is occupies a place in a chain inside an Audio Effect Rack. Rename it to Lo-High Filter. Set the Filter Type to Lowpass and map the Filter Cutoff and Filter Q to Macro 1 Macro Control. Hit Map Mode and set the Auto Filter’s Resonance Min value to 0.40. Hit Map Mode again to exit the Macro Mappings.

Copy the existing chain to create another one and set the new Auto Filter’s Filter Type to Highpass. Notice that all Macro mapping are also copied from the initial rack. Rename the first chain to Lowpass and the second to Hipass.

Hit the Chain button to show the Show Chain Selector Editor. For both racks define a range between 1 and 126. Click the first rack’s right Fade Range handle and drag it all the way to the left. Click the second rack’s left Fade Range handle and drag it all the way to the right. Finally, map the Chain Select Ruler to Macro Knob 1(by right-clicking and selecting Map to Macro 1).

Turning the knob from left to right executes a full filter sweep from low pass to high pass. What we are doing is morphing or crossfading between the two filter types. The Macro knob at 0 setting prevents any audio from passing through, same thing happens by turning the knob all the way to the right after the high pass has been executed. We need to do that since extreme highpass and lowpass Auto Filter’s settings don’t silence the audio completely. Since audio is not passing through the filters, we also save on CPU resources.

Listen to a sample:

Download audio file (sweep1.mp3)


Fine-tuning the Effect

Although the effect sounds good, there are certain issues that could be addressed. For once, when the 2 filter types are being mixed into each other, there is never a clean lowpass or highpass signal since there will always be an opposing signal fading in or out. Also, on the middle Macro knob 1 position with the value of 63, we don’t get a clean, unprocessed signal, instead the signal is still affected from both filters.

On the first chain, set a zone range from 1 to 63. Drag the right edge of the Fade Range all the way to the right. On the second chain, set a zone range from 63 to 126. Drag the right edge of the Fade Range all the way to the left.

Make a copy of the first chain and rename it to LowpassFadeOut. Drag a Utility plugin to the newly created chain and select the Invert preset. Set a zone range between 48 and 62. Drag the left side of the Fade Range all the way to the right. Make a copy of the second chain and rename it to HighpassFadeOut. Drag a Utility plugin to the newly created chain and select the Invert preset. Set a zone range between 63 and 78. Drag the right side of the Fade Range all the way to the left. Finally, create a fifth empty chain with no effects and rename it Dry. Set a zone between 48 and 78. Drag the left Fade Range edge towards the right to a value of 63. Drag the right Fade Range edge towards the left to a value of 63.

Let me explain: As we turn the knob to the right the low pass filter is activated from range 1 to 48. From 48 to 63 its inverted signal(LowpassFadeOut rack) is gradually mixed in meaning that at the mid point of 63 the low pass signal is going to be cancelled out completely(silence). Meanwhile le the dry unprocessed signal is mixed in(bottom rack). At point range of 63 we get only the dry signal playing. Then as we continue turning the knob the high pass filter is activated but is initially also cancelled out by its inverted one(HipassFadeOut rack) allowing the dry signal to fade out completely at point 78 and the highpass one to be mixed in as well.

Listen to a sample:

Download audio file (sweep2.mp3)

I think, once you see the source files you will get what’s going on. The good thing about the whole setup is that you are able to make use of the Auto Filter’s filter modulation capabilities, as well. Finally, you can use any filter or EQ plugin of your choice.

Download the Play Pack for this tutorial (14 KB)

Contents

  • Ableton Live Source Files


Showcase of Macintosh Dashboard Widget UI Designs


There are various ways an application (or more specifically, a widget) can be presented to its users; some bad, some good and some tremendously well. Other than a widgets purpose, its user interface is the most important aspect; it makes the widget look good and (hopefully) makes it easy to use, making it compelling and user friendly, which is what all application developers should be aiming to achieve. Dashboard widgets are actually relatively easy to make, and most web designers/developers can produce them without much difficulty. They are developed using HTML, CSS and JavaScript, meaning everything that is possible on the web, is possible in a dashboard widget, making it relatively easy to achieve a great looking and easy to use widget.

This inspirational compilation post showcases a collection of 32 creative, unique and easy to use Apple Macintosh Dashboard Widgets, including a selection of default widgets that ship with your Apple Mac, and a good handful or two of third party widgets.


Participate in this Session’s Group Project

Jump over to this Session’s creative project on Create an Application Icon or Dashboard Widget. Choose the project to participate in that best fits your skill level and interest. This session’s Beginner/Intermediate project the brief is to make an icon for applications, which is great practice for building your GUI skills.

coda

We also have an Advanced project where you design a widget, which is a great way to get some hands on experience with designing interfaces, as they are typically smaller apps with a tight focus. You can post your projects in the comments here and get some feedback from the community.


Default Dashboard Widgets

A selection of default dashboard widgets that ship with Macintosh computers as standard. These are no doubt some of most elegant dashboard widget UI designs to date.

Weather

The weather widget allows users to quickly check the current and upcoming weather forecasts for towns and cities all over the world.

Unit Converter

Unit Converter is an incredibly easy to use widget, allowing you to convert all kinds of figures, from currency to weight and distance to energy.

iTunes

The iTunes widget allows you to view the current song playing, pause, play, skip and change your settings (i.e. repeat and shuffle) at the speed of light.

Calendar

Calendar is a very basic widget that simply allows you to scroll through months and view dates. It’s handy to check which dates fall on which days.

Dictionary

The Dictionary widget actually triples up as a dictionary, a thesaurus and an “Apple dictionary” that allows you to check different Macintosh words to find out their true definition (i.e. “spotlight”).

Calculator

A very straight-forward calculator widget that does what it says on the tin, it’s not used very much due to the ability of being able to calculate sums directly into the Spotlight search bar.

Flight Tracker

A slightly more complex widget that allows you to check incoming and outgoing flights from all over the world.

Ski Report

A funky designed app making good use of wooden texture, reporting current ski conditions from over the globe.


Third Party Dashboard Widgets

Loremify

Loremify is a one-click tool to copy Lorem Ipsum. It lets you wrap in html, specify the amount of text, and copy it to your clipboard—all in one click.

Prototype Reference

A simple dashboard widget to allow you to get quick access to Prototype JavaScript Framework documentation.

Page Capture

An easy and fast way to take screenshots of entire web pages, no matter how long the page.

ColorSchemer Galleria

A refreshing take of inspiration, allowing you to scroll through the entire collection of color schemes from the ColorSchemer library.

Colourmod Dashboard Widget

A super simple way of finding out a color value (Hex, RGB, CMYK and HSV modes) without having to open up a demanding applications such as Photoshop.

Color Theory

The Color Theory widget allows you to create your own color schemes for your websites, your interior designs or even to help you choose your outfits in the morning. It can even simulate various forms of color blindness!

Hangman! Dashboard Edition

Hangman! Dashboard Edition is a version of the popular puzzle game. In this case, it has been completely reproduced to work as a Mac Dashboard Widget, and has a dictionary of 500 words.

Symbol Caddy

Symbol Caddy keeps a bunch of common “special” characters and HTML codes right on your dashboard, making it super easy to find, copy and paste those tricky symbols that are hard to remember when writing up copy for a new website or blog post.

Tags – CSS

Tags – CSS is a library for CSS properties and attributes, featuring an easy to use search feature. You can also copy the properties, making editing your stylesheets a breeze.

GoDaddy.com Domain Name Search

The Official GoDaddy.com Domain Name Search tells you if a domain name is taken in seconds, and if not presents you with various options and prices.

Dashalytics

Dashalytics offers quick and direct access to your Google Analytics website statistics, meaning you can take a brief look over your statistics within seconds, any time of the day.

The Weather Channel Widget

The Weather Channel Widget provides detailed weather forecasts from all over the world, and even includes maps and severe weather warnings.

Albi und Nero RSS Widget

Albi und Nero RSS Widget is a simple RSS reader, delivering the latest updates and news from their own website.

Amazon Total

The Amazon Total widget allows you to search Amazon’s site, whether site wide or a specific category.

SafariBar

A quick and easy way to search the web for content, images, video, news, maps and blogs via Apple’s web browser, Safari.

SafariSearch

Another widget that allows you to search Safari from your dashboard, this time a traditional Safari themed UI.

FontSee

FontSee is a very helpful and unique widget that allows you see preview text in various fonts from your system; you can either choose the font you want to test, or “play” through them and view your dummy text in every font on your system.

Currency Converter

Currency Converter is an easy way to convert over 200 world currencies, including old legacy European, world legacy and unrecognised currencies.

Sudoku

Sudoku is a logic-based, combinatorial number-placement puzzle, right on your dashboard.

iStat Nano

iStat Nano is an advanced system monitor in a tiny package, featuring beautifully animated menus and transitions. It allows you to view detailed performance stats from your Mac, including CPU usage, memory usage and HDD space.

BBC News Widget

BBC News Widget is a news widget direct from the BBC, and is available to read in 32 different languages. All styled up in an elegant and easy on the eyes UI design.

TV Forecast

TV Forecast allows you to select your favorite TV shows and have them be display in a simple list, informing you of when they are next on TV. You’ll never miss your favorite TV shows again!

World Weather

Get simple weather forecasts (much like those in the standard Weather widget) wrapped up in a sleek, modern UI design.

Simsen

Simsen is a widget that allows you to send free SMS text messages to other mobile phones in Germany, Austria, Switzerland and many other countries.


Orange Grunge Textures – Psd Premium Texture Pack


Today, we have a new set of Premium Textures available for Psd Premium Members. This set was crafted by Caleb Kimbrough of Lost and Taken and includes 32 high resolution orange grunge textures. If your next project calls for some grungy textures with pealing orange paint, than this set is perfect for you. Learn more at the jump!


New High Resolution Orange Grunge Textures

This new Premium Psdpack Pack is available for Psd Premium Members today and includes 32 high resolution orange grunge textures (3264px by 2448px). Members can Log in and Download! Otherwise, Join Now! You can view a preview of the textures below.

sample

This new Premium Psd Texture Pack was created by Caleb Kimbrough of Lost and Taken and is available for Psd Premium Members to download today. Caleb is a freelance blogger and the brains behind Lostandtaken.com, a blog solely focused on giving away free, high-res textures. We’re excited to partner up with him on this release.

pack

Psd Premium Membership

As you know, we run a Premium membership system that costs $9 a month (or $22 for 3 months!), which gives members access to the Source files for tutorials as well as periodic extra tutorials, and Premium Packs like this one! If you’re a Premium member you can log in and download the tutorial. If you’re not a member, you can of course join today!

Create an Image Cropping Application in Flash with ActionScript 3 – Active Premium

It’s that time of the week again; today we have an awesome Active Premium tutorial exclusively available to Premium members. Follow the prolific Carlos Yanez as he explains how to build an image cropping app – all with Flash and AS3..


This Premium Tutorial is Filled with Creative Tips

Using the Flash Tools we’ll create an attractive interface that will be powered by several ActionScript 3 classes like MouseCursor, Bitmap, BitmapData, Rectangle, Point, Tween, FileReference and even external libraries. A nice looking mac-like interface will power our code, involving multiple timeline based buttons, custom cursors and more.

The user will be able to crop an image multiple times to later select the best option and save it to disk.


Professional and Detailed Instructions Inside

Premium members can Log in and Download! Otherwise, Join Now! Below are some sample images from this tutorial.

Demo

Example Images


Active Premium Membership

We run a Premium membership system which costs $9 a month (or $22 for 3 months!) which periodically gives members access to extra tutorials, like this one! You’ll also get access to Psd Premium, Vector Premium, Audio Premium, Net Premium, Ae Premium and Cg Premium too. If you’re a Premium member, you can log in and download the tutorial. If you’re not a member, you can of course join today!

Also, don’t forget to follow @activetuts on twitter and grab the Activetuts+ RSS Feed to stay up to date with the latest tutorials and articles.

Quick Tip: Embed a Transparent Flash Movie with CSS – Basix

Learn how to export a Flash Movie with a transparent background and embed it in an HTML file.


Step 1: Brief Overview

Using a publish option in Flash and a little bit of CSS, we’ll embed a transparent Flash Movie on top of HTML content.


Step 2: Choose a Flash File

Select the file you want to use with a transparent background, I used the Random Ease Candle template included in Flash CS5.


Step 3: Publish Settings

With your file open, go to File > Publish Settings, click in the HTML tab and change the window mode to Transparent Windowless.

Click the Publish button to export the corresponding swf and html file.


Step 4: HTML

You can get the exact same result by setting a parameter in the HTML file you’re using.

Let’s take a look at that part, starting in the flashContent div.

<div id="flashContent">
	<object classid="clsid:d27cdb6e-ae6d-11cf-96b8-444553540000" width="320" height="240" id="Transparent" align="middle">
		<param name="movie" value="Transparent.swf" />
		<param name="quality" value="high" />
		<param name="bgcolor" value="#ffffff" />
		<param name="play" value="true" />
		<param name="loop" value="true" />
		<param name="wmode" value="transparent" />
		<param name="scale" value="noscale" />
		<param name="menu" value="true" />
		<param name="devicefont" value="false" />
		<param name="salign" value="" />
		<param name="allowScriptAccess" value="sameDomain" />

The highlighted line is the parameter that sets the movie in transparent mode.


Step 5: A Little CSS

Opening the html file in your browser will give you the transparent background we’re looking for, but without content it will be impossible to notice.

To fix that we’ll use a little bit of CSS, open the file and add the following to the flashContent ID.

#flashContent { width:100%; height:100%; position:absolute; left: 0; top: 0;}

This will place the flash movie on top of the content revealing the effect.

Note: Bear in mind that any interactive HTML content (hyperlinks for example) behind your Flash movie will be rendered unusable.


Conclusion

Now you know how to publish this kind of movie, it’s your job to implement it in a creative way. Experiment!

Thanks for reading!

Create a Dynamic Deep Linking Flash Web Site with SWFAddress

In this tut, we will be exploring the wonder that is SWFAddress, discussing why your site should have deep linking, and the processes involved in implementing deep linking in your Flash projects.

This website is XML driven. Also we shall be looking at SWFAddress’s built in functions and how they are used to create the final result. Enjoy!

Check out the demo above in a new window. Notice how your browser’s URL changes as you navigate through the mini-site.


Step 1: Why use Deep Linking?

Deep linking is a great way to structure a website and also is great way to structure code.

Deep linking is basically giving the user a chance to link to a certain area of a Flash movie through a simple URL.

For example if you wanted to show a portfolio to a client and you gave them the link to a Flash website without deep linking. Well their guess is as good as yours where to find that content within the SWF. But with deep linking you can link to any content in a Flash movie — for example: website.com/#/portfolio/section_3. This may seem a complex task but it isn’t with SWFAddress deep linking.

Deep linking has other benefits (for example, SEO) and it basically turns a boring Flash movie into an expandable application.


Step 2: Getting Prepared

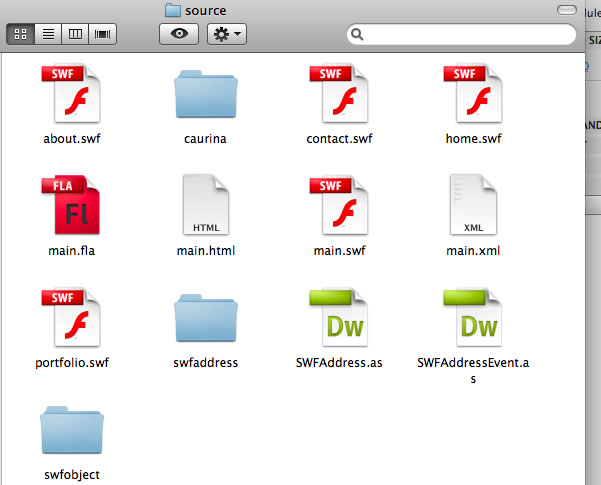
You will need for this tut: Caurina Tweener, SWFAddress for AS3, SWFObject.

You’ll also need main.html from the Source download.


Step 3: Import, #include, what??

If you have previous experience with swfaddress, you may have come in contact with this issue. You have tried to use the import directive to use swfaddress or if that failed you tried #include 'SWFAddress.as'. Well the truth is you don’t have to do anything at all.

All you need to do is put the SWFAddress.as file where your swf is and swfaddress is automatically available for actionscript.


Step 4: File Structure

Create an empty main.fla. (I would normally write code in external as files but I think all the code in one place is better understood).

From the SWFaddress download get the swfobject and swfaddress folders and place them in the main folder. If you are having trouble finding these just download them from the source at the top of the page.

And of course get the SWFAddress.as and SWFAddressEvent.as and place them in the main folder. They are also in the Source download if you are having trouble finding them.

Download the source and copy main.html to the main folder.


Step 5: Create Four SWFs

Create 4 dummy SWFs; for example, SWFs with some random text in them, each with a different title and color of font. There are four random ones included in the Source download.


Step 6: Create the XML File

<?xml version="1.0" encoding="UTF-8"?>
<xml>
	<menu>
		<item item_name = "Home" item_module = "home.swf" />
		<item item_name = "About" item_module = "about.swf" />
		<item item_name = "Portfolio" item_module = "portfolio.swf" />
		<item item_name = "Contact" item_module = "contact.swf" />
	</menu>
</xml>

Call it main.xml. We will use xml to store our data. Now we have created the xml file we will start the good stuff, coding…


Step 7: Create the Menu Array

Below is the code required to load the xml menu in Flash. The comments in the code guide you through the process.

Go to frame 1, Layer 1 in the main .fla file you created earlier.

Add this code. It’s well-commented to help you understand what it does.


// set stage settings

var fileStage:Stage = this.stage;
fileStage.scaleMode =  StageScaleMode.NO_SCALE;
fileStage.align = StageAlign.TOP_LEFT;

// import caurina tweener

import caurina.transitions.Tweener;

// main timeline object

var index:Object = this;

// New Xml Object

var fileXml:XML;

// check how many menu items we have.

var totalMenuItems:Number;

// New URL Request - Add a COMPLETE event listener to load the site once the XML load has been completed.

var xmlLoader:URLLoader = new URLLoader(new URLRequest ("main.xml"));
xmlLoader.addEventListener(Event.COMPLETE, createSite);

function createSite (e:Event):void {

// store the xml file in our xml variable	

	fileXml = new XML(e.target.data);

// use a constructor function to use the xml 	

	index.createMainMenu(fileXml.menu);

} 

function createMainMenu(xmlData:XMLList):void {

	// create the length of our menu 

	index.totalMenuItems = xmlData.*.length();

	// create a movie clip with the instance name menu_clip and add it to the stage.

	// then use a <code>for</code> loop to create our menu

	for (var i:uint = 0; i < index.totalMenuItems; i++) {

		/*
		create a movieclip and export for actionscript with the class name: menuItem
		it should contain one dynamic textbox with the instance name of menu_item_text.
		*/

		// create our new menu item

		var menu_item:menuItem = new menuItem();

		// set the identification 

		menu_item.id = i;
		menu_item.name = "id" + i;    

		// position our menu items dynamically

		menu_item.x = (i * menu_item.width);

		// add the xml values to the text box inside the new item.

		menu_item.menu_item_text.text = xmlData.item.@item_name[i];

		// add the module address to the menu variable / It will come in useful later.

		menu_item.item_module = xmlData.item.@item_module[i];

		/*
		create a new layer and place the menu_clip movieclip onto that layer.
		Give it an instance name of menu_clip
		*/

		// add each menu item to the menu_clip movieclip using addChild()

		index.menu_clip.addChild(menu_item);

	}

}

Step 8: Create Button Actions

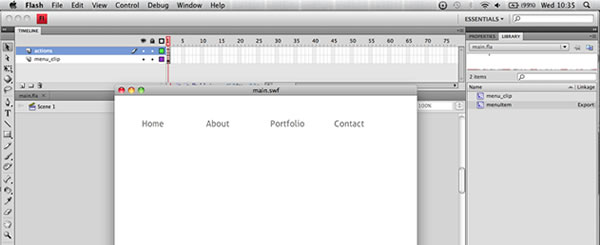
This is what our site should look like now:

So let’s continue by giving button events. The code below should be placed on line 78 on frame 1 actions layer just above the addchild method we used.


	// assign events to menu buttons. 

	// rollover & rollout effects 

	menu_item.addEventListener(MouseEvent.MOUSE_OVER, menuRollOver);
	menu_item.addEventListener(MouseEvent.MOUSE_OUT, menuRollOut);
	menu_item.addEventListener(MouseEvent.MOUSE_DOWN, menuPress);

Add the functions below to handle these events below the createMainMenu function:


function menuRollOver (e:MouseEvent) {

	// menu button variable - We use getChildByName to aim at the correct menu item

	// e.target.id is referring to the menu_item.id we defined earlier.

	var button:MovieClip = index.menu_clip.getChildByName("id" + e.target.id) as MovieClip;

	// set the animation usign caurina tweener

	Tweener.addTween( button, {alpha: 0.5, time: 2, transition:"easeOutExpo"});

}

function menuRollOut (e:MouseEvent) {

	// menu button variable - We use getChildByName to aim at the correct menu item

	// e.target.id is referring to the menu_item.id we defined earlier.

	var button:MovieClip = index.menu_clip.getChildByName("id" + e.target.id) as MovieClip;

	// set the animation using caurina tweener

	Tweener.addTween( button, {alpha: 1, time: 2, transition:"easeOutExpo"});

}

function menuPress (e:MouseEvent) {

	// SWFAddress set value function

	SWFAddress.setValue(e.target.deep_link);

}

Step 9: SWFAddress on Change Function

This is the main event that handles all the swfaddress changes. It is where we will apply our application logic in order for our site to work. Let’s have a look at the main function in detail.


function handleSWFAddress(e:SWFAddressEvent) {

	/*
	set html title names
	*/

	var htmlTitle:String= "XML Deep linking Tutorial";
	for (var i:Number = 0; i < e.pathNames.length; i++) {
		htmlTitle+=' / '+String(e.pathNames[i].substr(0,1).toUpperCase()+e.pathNames[i].substr(1)).split("_").join(" ");
	}

	/*

	To format the HTML title we use the split and join techniques.
	These replace _ with a space. We make it a string to ensure it is useable, like so:

	String(e.pathNames[i].substr(0,1).toUpperCase()+e.pathNames[i].substr(1)).split("_").join(" ");

	*/

	// this function does all the work and  assigns the HTML title

	SWFAddress.setTitle(htmlTitle);

}

// when the SWFAddress.setValue() is fired this event listens for it and inits the function above.

SWFAddress.addEventListener(SWFAddressEvent.CHANGE, handleSWFAddress);

Step 10: setValue() Explanation

SWFAddress.setValue(“somevalue”);

When this event is fired — for example when someone presses the button — the swfaddress value is set and triggers the onChange() listener. Therefore in order to create our modules to load we need to create some code inside the swfAddress onChange() listener.


Step 11: Events Function

Now we are going back up to our menu for loop. We need to add an additonal variable that contains a function:


// Place this code in our <code>for</code> loop below the addEventListeners

		/*
		this variable contains a function that will contain the events when the swfaddress in changed.
		*/

		menu_item.init = function () {

			/*
			create a new movieclip and call it module_clip, then place it on a new layer then give it
			the instance name of module_clip
			*/

			// new variable that has contains the path of the swf we are loading in.

			var module:String = this.item_module;

			// fade out our current module if any, then commence the load of our new module using the tweener's onComplete function

			Tweener.addTween( index.module_clip, {alpha: 0, time: 2, transition:"easeOutExpo", onComplete:function ()
				{

					index.createModule(module);

					// remove the previous module only if it isn't the first load

					if (index.firstLoad == false) {

						index.module_clip.removeChildAt(0);

					}            

				}
			});

		}

Step 12: Creating the Module Function

Before we look at the swfaddress events, we will create the module to load the module in. It is complete with I/O error handling. It is good practice to handle errors when you can.


// At the top of the actionscript place this:

var firstLoad:Boolean = true; // prevents null errors

This is the module function. The comments guide you through the process.

function createModule (url:String) {

	// we create a new loader

    var loader:Loader = new Loader();

	// we create a new url request for our loader

    var moduleURL:URLRequest = new URLRequest(url);

	// we add event listeners to the loader. some are not necessary but I included them for convenience

    loader.contentLoaderInfo.addEventListener(ProgressEvent.PROGRESS, loadProgress);

	// when the module has loaded we trigger loadComplete() with a event listener.

    loader.contentLoaderInfo.addEventListener(Event.COMPLETE, loadComplete);
    loader.contentLoaderInfo.addEventListener(IOErrorEvent.IO_ERROR, loadError);
    loader.load(moduleURL);

    function loadProgress (e:ProgressEvent) {

    }

	// triggered when module has loaded

    function loadComplete (e:Event) {

		// fade in the module

		Tweener.addTween( index.module_clip, {alpha: 1, time: 2, transition:"easeOutExpo"});

		// add the current module to the module_clip movieclip by using addChild

		index.module_clip.addChild(e.currentTarget.content);

		// now we have the first load we set firstLoad to false. It then remains false for the whole session.

		index.firstLoad = false;

    }

    function loadError (e:Event) {

        trace("error");

    }
}

Step 13: Summary

To recap: We have created the menu, created the function that will occur when SWFAddress.setValue() is triggered but we still need to create our application logic. What I mean by application logic is how we are going to use swfAddress to load in certain parts of our application.


Step 14: Creating the Deep Link

Let’s go back to our menu for loop and define the deep link there. Below where we set the menu_item.name place this code. This code creates the deep link value:

// set the menu item deep link plus formatting with split and join. toLowerCase() makes every character lowercase.
menu_item.deep_link = xmlData.item.@item_name[i].split(" ").join("_").split("/").join("_").toLowerCase();

Its use will become clear very soon.


Step 15: Application Logic

Now let’s go back to our function that handles swfaddress events: handleSWFAddress

We now need a certain part of code that will load the correct module. The code below shows you how to apply the correct logic in order for the application to load the correct module. The comments guide you through the process. The new part of this function starts at the creating the for loop.

// function to handle swfaddress events.
function handleSWFAddress(e:SWFAddressEvent) {

	/*
	set html title names
	*/

	var htmlTitle:String= "XML Deep linking Tutorial";
	for (var i:Number = 0; i < e.pathNames.length; i++) {
		htmlTitle+=' / '+String(e.pathNames[i].substr(0,1).toUpperCase()+e.pathNames[i].substr(1)).split("_").join(" ");
	}

	/*

	To format the HTML title we use the split() and join() techniques.
	These replace _ with a space. We make it a string to ensure it is useable, like so:
	String(e.pathNames[i].substr(0,1).toUpperCase()+e.pathNames[i].substr(1)).split("_").join(" ");

	*/

	// this function does all the work and  assigns the HTML title

	SWFAddress.setTitle(htmlTitle);

	// create a <code>for</code> loop to iterate through the total number of menu items. use index.totalMenuitems to do so.

	/*
	You may be wondering why I am using n instead of i in the <code>for</code> loop. Well if there are two <code>for</code> loops in the same function
	and both loops are iterating through the variable i it throws an error. Using n or another var solves this error.
	*/

	for (var n:uint = 0;  n < index.totalMenuItems; n++) {

		// this var is used to iterate through all our menu items

		var button:MovieClip = index.menu_clip.getChildByName("id"+ n) as MovieClip;

		// the if statement below is the most important part of our code. 

		// SWFAddress.getValue() is explained in the next step

		// we need to get rid of the "/" on the front in order for it to equal the button's deep link

		if (button.deep_link == SWFAddress.getValue().split("/")[1]) {

			// if any of button deep links equal the URL set then it initiates the menu_item.init function we set earlier

			button.init();

			// to stop the code we use return.

			return;

		}
	}
}

SWFAddress.addEventListener(SWFAddressEvent.CHANGE, handleSWFAddress);

Step 16: SWFAddress.getValue()

SWFAddress.getValue() is a great way to test your deep linking site without web server. The best way to test your deep linking using SWFAddress.getValue() is to use the trace function. For example:

trace(SWFAddress.getValue());

This will trace the current swfAddress value in the output.


Step 17: Loading the First Menu Item

Why on earth wouldn’t you want to load the first menu item? There’s no good reason, therefore I will show you how to do it. Go to the handleSWFAddress() function and drag it into the createMainMenu() function below all the previous code. Add this code below the second for loop (the one we just created):

// this var is referenced to the first menu item
var firstButton:MovieClip = index.menu_clip.getChildByName("id" + 0) as MovieClip;

// use the dispatch event to fire the press event on the first button. This then sets the deep link. The swfAddress on change listener function inits.
// Therefore the <code>for</code> loop above will load the first module.
firstButton.dispatchEvent( new MouseEvent(MouseEvent.MOUSE_DOWN));

Step 18: Extra Enhancements

We are now going to apply validation to the menu as gift for reading this tut. :)

Go up to the menu_item.init function in the menu for loop.

for (var i:uint = 0; i < index.totalMenuItems; i++) {

	var button:MovieClip = index.menu_clip.getChildByName("id" + i) as MovieClip;

	if( button != this ) {

		button.enabled = true;
		button.addEventListener(MouseEvent.MOUSE_OUT, menuRollOut);
		button.dispatchEvent(new MouseEvent(MouseEvent.MOUSE_OUT));

	} else {

		button.enabled = false;
		button.dispatchEvent(new MouseEvent(MouseEvent.MOUSE_OVER));
		button.removeEventListener(MouseEvent.MOUSE_OUT, menuRollOut);

	}
}

Step 19: Troubleshooting

OK! Now we should have a working project. But don’t throw a party just yet. Check the following things:

  • You have completed every step.
  • DO NOT PUBLISH the SWF, just export the movie otherwise you will override the main.html document you obtained from the Source download.
  • Make sure you have imported all the necessary imports. Well all the imports are necessary without just one the whole thing would not function properly.
  • Make sure the handleSWFAddress() function is in the createMainMenu() function.

Step 20: What does main.html do?

Let’s take a look at main.html:

<html xmlns="http://www.w3.org/1999/xhtml" xml:lang="en" lang="en">
    <head>
        <title></title>
        <meta http-equiv="Content-Type" content="text/html; charset=utf-8" />
        <style type="text/css">
        /*<![CDATA[*/
            html, body, #website {
                height: 100%;
                overflow: hidden;
            }
            body {
                background: #f7f7f7;
                font: 86% Arial, "Helvetica Neue", sans-serif;
                margin: 0;
            }
        /*]]>*/
        </style>
        <script type="text/javascript" src="swfobject/swfobject.js"></script>
        <script type="text/javascript" src="swfaddress/swfaddress.js"></script>
        <script type="text/javascript">
        /*<![CDATA[*/
            swfobject.embedSWF('main.swf', 'website', '100%', '100%', '9',
                'swfobject/expressinstall.swf', {domain: '*'}, {allowscriptaccess: 'always', allowfullscreen: 'true', bgcolor: '#f7f7f7', menu: 'false', wmode: 'opaque'}, {id: 'website'});
        /*]]>*/
        </script>
    </head>
    <body>
        <div id="website">
            <p>In order to view this page you need Flash Player 9+ support!</p>
            <p>
                <a href="http://www.adobe.com/go/getflashplayer">
                    <img src="http://www.adobe.com/images/shared/download_buttons/get_flash_player.gif" alt="Get Adobe Flash player" />
                </a>
            </p>
        </div>
    </body>
</html>

A lot of that is just styling the file, changing the background color, positioning the SWF, things like that. Here are the key lines:

<html xmlns="http://www.w3.org/1999/xhtml" xml:lang="en" lang="en">
    <head>
        <script type="text/javascript" src="swfobject/swfobject.js"></script>
        <script type="text/javascript" src="swfaddress/swfaddress.js"></script>
        <script type="text/javascript">
        /*<![CDATA[*/
            swfobject.embedSWF('main.swf', 'website', '100%', '100%', '9',
                'swfobject/expressinstall.swf', {domain: '*'}, {allowscriptaccess: 'always', allowfullscreen: 'true', bgcolor: '#f7f7f7', menu: 'false', wmode: 'opaque'}, {id: 'website'});
        /*]]>*/
        </script>
    </head>
    <body>
        <div id="website">
        </div>
    </body>
</html>

This includes the SWFObject and SWFAddress JavaScript files, and uses SWFObject to load main.swf in the div element called “website”. That’s all there is to it! Check out this screencast for an intro to SWFObject.


Step 20: The Whole Code Commented

Below is the whole code commented and working.


// set stage settings

var fileStage:Stage=this.stage;
fileStage.scaleMode=StageScaleMode.NO_SCALE;
fileStage.align=StageAlign.TOP_LEFT;

// import caurina tweener

import caurina.transitions.Tweener;

// main timeline object

var index:Object=this;

// New Xml Object

var fileXml:XML;

// check how many menu items we have.

var totalMenuItems:Number;

// prevents null errors

var firstLoad:Boolean = true;

// New URL Request - Add a complete event listener to load the site once the load has been completed.

var xmlLoader:URLLoader = new URLLoader();
xmlLoader.load (new URLRequest("main.xml"));
xmlLoader.addEventListener( Event.COMPLETE, createSite);

function createSite(e:Event) {

    // store the xml file in our xml variable

    fileXml=new XML(e.target.data);

    // use a constructor function to use the xml

    index.createMainMenu(fileXml.menu);

}

function createMainMenu(xmlData:XMLList) {

    // create the length of our menu

    index.totalMenuItems=xmlData.*.length();

    // create a movie clip with the instance name menu_clip and add it to the stage.

    // then use a <code>for</code> loop to create our menu

    for (var i:uint = 0; i < index.totalMenuItems; i++) {

        /*
        create a movieclip and export for actionscript with the class name: menuItem
        it should contain one dynamic textbox with the instance name of menu_item_text.
        */

        // create our new menu item

        var menu_item:menuItem = new menuItem();

        // set the identification

        menu_item.name="id"+i;
        menu_item.id=i;

        // set the menu item deep link plus formatting with split and join. toLowerCase() makes every character lowercase

        menu_item.deep_link = xmlData.item.@item_name[i].split(" ").join("_").split("/").join("_").toLowerCase();

        // give it a button cursor & make the target the button and not its children

        menu_item.buttonMode=true;
        menu_item.mouseChildren=false;

        // position our menu items dynamically

        menu_item.x = (i * menu_item.width);

        // add the xml values to the text box inside the new item.

        menu_item.menu_item_text.text=xmlData.item.@item_name[i];

        // add the module address to the menu variable / It will come in useful later.

        menu_item.item_module=xmlData.item.@item_module[i];

        /*
        create a new layer and place the menu_clip movieclip onto that layer.
        Give it an instance name of menu_clip
        */

        // assign events to menu buttons. place the functions to handle these events below the createMainMenu function

        // rollover & rollout effects

        menu_item.addEventListener(MouseEvent.MOUSE_OVER, menuRollOver);
        menu_item.addEventListener(MouseEvent.MOUSE_OUT, menuRollOut);
        menu_item.addEventListener(MouseEvent.MOUSE_DOWN, menuPress);

        /*
        this variable contains a function that will contain the events when the swfaddress in changed.
        */

        menu_item.init = function () {

            /*
            create a new movieclip and call it module_clip, then place it on a new layer then give it
            the instance name of module_clip
            */

            // new variable that has contains the path of the swf we are loading in.

            var module:String = this.item_module;

            // fade out our current module if any, then commence the load of our new module using the tweener's onComplete function

            Tweener.addTween( index.module_clip, {alpha: 0, time: 2, transition:"easeOutExpo", onComplete:function () {

                    index.createModule(module);

                    if (index.firstLoad == false) {

                        index.module_clip.removeChildAt(0);

                    }

            }});

            for (var i:uint = 0; i < index.totalMenuItems; i++) {

                var button:MovieClip = index.menu_clip.getChildByName("id" + i) as MovieClip;

                if( button != this ) {

                    button.enabled = true;
                    button.addEventListener(MouseEvent.MOUSE_OUT, menuRollOut);
                    button.dispatchEvent(new MouseEvent(MouseEvent.MOUSE_OUT));

                    } else {

                    button.enabled = false;
                    button.dispatchEvent(new MouseEvent(MouseEvent.MOUSE_OVER));
                    button.removeEventListener(MouseEvent.MOUSE_OUT, menuRollOut);

                }
            }
        }

        // add each menu item to the menu_clip movieclip using addChild()

        index.menu_clip.addChild(menu_item);

    }

    // function to handle swfaddress events.

    function handleSWFAddress(e:SWFAddressEvent) {

        /*
        set html title names
        */

        var htmlTitle:String= "XML Deep linking Tutorial";
        for (var i:Number = 0; i < e.pathNames.length; i++) {
            htmlTitle+=' / '+String(e.pathNames[i].substr(0,1).toUpperCase()+e.pathNames[i].substr(1)).split("_").join(" ");
        }

        /*

        to format the html title we use the split and join technique. It replaces _ with a space. We make it a string to ensure it is useable.

        String(e.pathNames[i].substr(0,1).toUpperCase()+e.pathNames[i].substr(1)).split("_").join(" ");

        */

        // this function does all the work and assigns the html title

        SWFAddress.setTitle(htmlTitle);

        // create a <code>for</code> loop to iterate through the total number fo menu items. hence we use index.totalMenuitems to do so.

        /*
        You may be wondering why I am using n instead of i in the <code>for</code> loop. Well Adobe failed to realise that if there are two <code>for</code> loops in the same function
        and both loops are iterating through the variable i it throws an error. Using n or another var solves this error.
        */

        for (var n:uint = 0; n < index.totalMenuItems; n++) {

            // this var is used to iterate through all our menu items

            // this var is referenced to the first menu item

            var button:MovieClip = index.menu_clip.getChildByName("id"+ n) as MovieClip;

            // the if statement below is the most important part of our code.

            // SWFAddress.getValue() is explained in the next step

            // we need to get rid of the "/" on the front in order for it to equal the button's deep link

            if (button.deep_link == SWFAddress.getValue().split("/")[1]) {

                // if any of button deep links equal the URL set then it initiates the menu_item.init function we set earlier

                button.init();

                // to stop the code we use return.

                return;

            }
        }

        var firstButton:MovieClip = index.menu_clip.getChildByName("id" + 0) as MovieClip;

        // use the dispatch event to fire the press event on the first button. This then sets the deep link.

        // Therefore the <code>for</code> loop above will load the first module.

        firstButton.dispatchEvent( new MouseEvent(MouseEvent.MOUSE_DOWN));

    }

    SWFAddress.addEventListener(SWFAddressEvent.CHANGE, handleSWFAddress);

}

function menuRollOver(e:MouseEvent) {

    // menu button variable - We use getChildByName to aim at the correct menu item

    // e.target.id is referring to the menu_item.id we defined earlier.

    var button:MovieClip=index.menu_clip.getChildByName("id"+e.target.id) as MovieClip;

    // set the animation using caurina tweener

    Tweener.addTween( button, {alpha: 0.5, time: 2, transition:"easeOutExpo"});

}

function menuRollOut(e:MouseEvent) {

    // menu button variable - We use getChildByName to aim at the correct menu item

    // e.target.id is referring to the menu_item.id we defined earlier.

    var button:MovieClip=index.menu_clip.getChildByName("id"+e.target.id) as MovieClip;

    // set the animation using caurina tweener

    Tweener.addTween( button, {alpha: 1, time: 2, transition:"easeOutExpo"});

}

function menuPress(e:MouseEvent) {

    // SWFAddress set value function

    SWFAddress.setValue(e.target.deep_link);

}

/*
this is the function that loads the selected module
*/

function createModule (url:String) {

    // we create a new loader

    var loader:Loader = new Loader();

    // we create a new url request for our loader

    var moduleURL:URLRequest = new URLRequest(url);

    // we add event listeners to the loader. some are not necessary but I included them for convenience

    loader.contentLoaderInfo.addEventListener(ProgressEvent.PROGRESS, loadProgress);

    // when the module has loaded we trigger the complete with a event listener.

    loader.contentLoaderInfo.addEventListener(Event.COMPLETE, loadComplete);
    loader.contentLoaderInfo.addEventListener(IOErrorEvent.IO_ERROR, loadError);
    loader.load(moduleURL);

    function loadProgress (e:ProgressEvent) {

    }

    // triggered when module has loaded

    function loadComplete (e:Event) {

        // fade in the module

        Tweener.addTween( index.module_clip, {alpha: 1, time: 2, transition:"easeOutExpo"});

        // add the current module to the module_clip movieclip by using addChild

        index.module_clip.addChild(e.currentTarget.content);

        // now we have the first load we set firstLoad to false

        index.firstLoad = false;

    }

    function loadError (e:Event) {

        trace("error");

    }
}

Conclusion

Thanks for reading this tut. If you have any questions or problems leave them below. By now you should understand how to build a deep linking website without needing to understand how a dynamic website should be coded.

G.I Rendering Techniques in 3Ds Max

Model presentation is a crucial step for every artist when building their portfolio. In this tutorial, Ben Tate takes us through a few techniques for creating a global illumination or “clay” render using 3Ds Max and it’s 3 common render engines – the scanline renderer, Mental Ray and finally V-Ray. He’ll also look at implementing additional lights, adding color variation, removing noise, and how to add image based lighting using HDRI images.


Video 1

Download

Note: click the ‘Monitor’ icon to view tutorial in full-screen HD.


Video 2

Download

Note: click the ‘Monitor’ icon to view tutorial in full-screen HD.


Video 3

Download

Note: click the ‘Monitor’ icon to view tutorial in full-screen HD.


Don’t miss more CG tutorials and guides, published daily – subscribe to Cgtuts+ by RSS.

‘The Skateshop’ – A PFTrack, Maya & AE Workflow, Day 2 – Premium Tutorial

In the second part of this detailed 3-day Premium tutorial series, Alvaro Castañeda continues showing the workflow he uses to integrate CG elements with live action footage – a key aspect of Visual Effects work ‘The Skateshop’ is an unmissable tutorial for anyone looking to learn a PFTrack, Maya and Maya Composite VFX workflow! Can’t wait to get started? Become a Premium member, or learn more after the jump!

Breakdown of Day 2

With the footage tracked, and the skateshop modelled, it’s now time to move on to first creating the UVs and then texturing our skateshop!

Want to Join Plus?

The Tuts+ network runs a membership service called Premium. For $9 per month, you gain access to exclusive high quality screencast tutorials, downloadable content packs, and freebies at CGtuts+, Psdtuts+, Vectortuts+, Audiotuts+, Nettuts+ and Aetuts+! For less than the price of a movie, you’ll learn from some of the best minds in the business all month long!!. Become a Premium member today!


This tutorial is Day 2 in a series – Go to Day 1.


Don’t miss more CG Premium tutorials and content packs, published weekly – subscribe to Cgtuts+ by RSS.

35 Stunning Interior Renders

In this web-roundup, Topher Welsh shares 35 of the best interior renders the web has to offer! Here’s what he has to say : “I can only dream of someday living in a place as beautifully designed and with such perfectly poised furniture and decor as the homes in some of these images. Not only does a great interior render show just how well someone can model, but it also showcases their design sense and their eye for detail. I get jealous knowing that some people have the luxury of living in places like these!”


Aetuts+ Premium Tutorial – Advanced 2D Cartoon Lip Sync Animation

Our sister site Aetuts+ today posted a new Premium tutorial that covers the process of animating an audio voice-over using mask-driven lip sync animation in After Effects. Once completed, this animation is rendered out to a texture and mapped onto a 3D character. So if you’re into character animation, why not check out this excellent tutorial! Preview and link after the jump…

Aetuts+ Link : Advanced 2D Cartoon Lip Sync Animation – AE Premium

Want to Join Plus?

The Tuts+ network runs a membership service called Premium. For $9 per month, you gain access to exclusive high quality screencast tutorials, downloadable content packs, and freebies at CGtuts+, Psdtuts+, Vectortuts+, Audiotuts+, Nettuts+ and Aetuts+! For less than the price of a movie, you’ll learn from some of the best minds in the business all month long!!. Become a Premium member today!

Don’t miss more CG Premium tutorials and content packs, published weekly – subscribe to Cgtuts+ by RSS.

Music at Work: Necessity or Nuisance?

It’s a quiet day at the office.

The sounds of the keyboards a clicking away and you can hear the hum of appliances and the buzzing of fluorescent lighting throughout the room.  It’s kind of nice, but also kind of eerie.  Then a voice is heard that cuts the silence like a knife.

“Do you mind if I put on some music?”

What’s your reaction when a co-worker suggests this? Do you agree that the place is too quiet and needs some sound, or do you immediately nix the idea in favor of silence?

Playing music at work is no big deal for some, but it’s a major distraction for others. Certain businesses have established policies about playing music in the workplace. Some don’t allow it, some allow it in small amounts or at a low volume, and others have top-of-the-line sound systems that pipe music throughout their whole facility (I’ve seen this in many manufacturing facilities. The music gives workers’ ears a break and provides a more pleasant alternative to the constant buzz, hum, or grind of machinery). Workplaces that play music in common areas lean toward classical, jazz, easy listening, or middle-of-the-road rock. Most offices have that one person who wants to crank up the hard rock for everyone to “enjoy”, but there is that respect factor to consider.

But is music a necessity or nuisance? Does it help or hinder productivity?

It’s an individual choice.

We sometimes take music in the workplace for granted, but just think of how much longer that doctor’s appointment would take if they didn’t have that soothing “muzak” playing. I’m one of those people who can’t stand long stretches of quiet. I listen to music on my way to work. I’ve listened to music in some way, shape, or form at every job I’ve had – even bringing in my own CDs to play on the computer if I had to. It’s just easier for me to stay on task if there’s a song playing in the background; it makes the day go much faster.

Setting the mood

Depending on your profession, you might find music to be more of a necessity than others. Certain professions lend themselves to quieter environments—those that involve number crunching, measuring, or any other type of precise task come to mind. If your job requires total concentration or undivided attention for the majority of the time, you’re probably better suited to a quiet atmosphere.

But others thrive on sound—namely, the creative field. Artists, designers, interior decorators, or writers, often use music to set the tone for the day. I know creatives of all kinds who have based their own work on a song or musician. But music can be a great motivator for anyone, no matter what the field. Some of us like to play songs that put us in a certain frame of mind that can provide that extra boost to get through a long-lingering or time-consuming project.

I’m in an office for most of my workday, and although it’s not a wildly creative environment, just playing music helps to put me in a better mood. Though I have busy times when I’m on the road or running to various meetings, most of the time I’m at my computer, and it gets a little tedious if there’s nothing but silence all day. I go to my list of standbys—those musicians I can listen to almost any time of day, no matter what I’m working on. My usual staples for my 9-5 job include Bruce Springsteen, Peter Gabriel, Sarah McLachlan, and Dar Williams. Writing needs a different, mellower playlist—usually jazz, folk, or new age. I use music to keep me motivated at the office just as I use it to relax and get into the “zone” for writing.

Sounds of silence

But I can also respect those who need complete silence in order to be productive. My boyfriend is one of them. As he works on papers for grad school, I respectfully plug in my iPod and we’re both happy. There are times when I don’t mind the quiet but if I know I’ll be in one place, such as my desk or in the car for a long time, I make sure that I have some music handy.

What about you? Do you need music or silence to get the job done?

Is This an Invasion of Privacy?

You’re searching for something you need in the company database.  You stumble across a folder that looks interesting and when you get in, you’re floored.  This folder contains the salary information, performance reviews and management concerns corresponding to all of the people in the company.  You know you shouldn’t have access to this folder, but apparently you do.

What do you do with this information?

  • Close out of the folder without reading any further.  Inform your manager and your IT team that you have access, and suggest they fix that.
  • Make copies of all of the files, and read them at home when you have time.
  • Share the link with your work-buddies.
  • Share the link with everyone in the office – the ultimate in transparency.
  • Hold onto the information for a rainy day – you never know when you might need to play that card.

With security systems less than secure and passwords either known office-wide or easy enough to figure out, being presented with this situation is far from abnormal.

What would you do?

Creating a Custom Letterhead in Microsoft Word

So you need a custom letterhead but you don’t have a budget to hiring a designer and cannot pay for printed stationery. Still, you want to look professional. Well, MS Word can help you out here. Almost everybody that owns a computer has used Microsoft Word at least once in their life. So here is a quick tutorial on how to create custom letterheads.

Step 1

Open up MS Word 2007 and click on the Office Button on the top left.

Step 2

In the pop up click New and choose Blank Document.

Step 3

Save the document by clicking the Save button on the top left (Ctrl + S) and name the document “letterhead”. In the drop down menu(Save as Type)  for document types, choose Word Template(*.dotx). Then save your template in a location of your choice.

Step 4

Now let’s add a Header to the document. Double click the top part of your document and you will see the Header section gets  opened. On the top right you’ll see a tap that says Design.  Set the Header from Top to 2cm. Then start adding your info, for example, your name and address, phone number, fax and email etc.

Step 5

While we are still in the Header, click on the tap that says Page Layout and set the left indent to 2cm. Make sure that you highlighted all your text.

Step 6

Now click on the tap Home and select the text. I only selected the name and set the font to Arial, 16pt and from the font color drop down, I picked red. You can easily change the size and color and font style via this tab.

Step 7

I added all the address, phone and web info on a new paragraph underneath the name. When I highlight the text with the cursor, a pop up window appears in Word 2007. In there you can change the font, color indent etc. This is a very handy tool. I selected white for the font color and  via the small “ab” with pen icon, I set the background color of the highlighted text to red.

Step 8

Just in case you want to change or double check the  paragraph setting, highlight the text and right click, then choose Paragraph from the popup window. This will give you the Paragraph windows and in there you can change things related to the paragraph.

Step 9

To leave the Header section, just double click on the middle section of your document.  Then repeat all the steps with the Footer section. Just double click on the bottom part of the document or  simply click on the Insert tap and select either the Header or Footer icon and select Edit Header/Footer on the bottom of the pop up. I added the address and contact information again, but this time I set the font color to red and the background color to light grey.

Step 10

Double click the middle of the document to close the footer and start adding your text. For example add date, address of the recipient, and your body text.

Conclusion

Here is a quick letterhead template with body text. Just print it out on your home desktop printer. Anytime you need a official looking document with your credential, just open up your template and add your body text and just in case you need to change your phone number or email address, you know now how to do that.