10 life-saving PHP snippets

Highlight specific words in a phrase

Sometimes, for example, when displaying search results, it is a great idea to highlight specific words. This is exactly what the following function can do:

function highlight($sString, $aWords) {
	if (!is_array ($aWords) || empty ($aWords) || !is_string ($sString)) {
		return false;
	}

	$sWords = implode ('|', $aWords);
 	return preg_replace ('@\b('.$sWords.')\b@si', '<strong style="background-color:yellow">$1</strong>', $sString);
}

Source: http://www.phpsnippets.info/highlights-words-in-a-phrase

Get your average Feedburner subscribers

Recently, Feedburner counts had lots of problems and it’s hard to say that the provided info is still relevant. This code will grab your subscriber count from the last 7 days and will return the average.

function get_average_readers($feed_id,$interval = 7){
	$today = date('Y-m-d', strtotime("now"));
	$ago = date('Y-m-d', strtotime("-".$interval." days"));
	$feed_url="https://feedburner.google.com/api/awareness/1.0/GetFeedData?uri=".$feed_id."&dates=".$ago.",".$today;
	$ch = curl_init();
	curl_setopt($ch, CURLOPT_RETURNTRANSFER, 1);
	curl_setopt($ch, CURLOPT_URL, $feed_url);
	$data = curl_exec($ch);
	curl_close($ch);
	$xml = new SimpleXMLElement($data);
	$fb = $xml->feed->entry['circulation'];

	$nb = 0;
	foreach($xml->feed->children() as $circ){
		$nb += $circ['circulation'];
	}

	return round($nb/$interval);
}

Source: http://www.catswhoblog.com/how-to-get-a-more-relevant-feedburner-count

Automatic password creation

Although I personally prefer leaving users to choose their password themselves, a client recently asked me to generate passwords automatically when a new account is created.
The following function is flexible: You can choose the desired length and strength for the password.

function generatePassword($length=9, $strength=0) {
	$vowels = 'aeuy';
	$consonants = 'bdghjmnpqrstvz';
	if ($strength >= 1) {
		$consonants .= 'BDGHJLMNPQRSTVWXZ';
	}
	if ($strength >= 2) {
		$vowels .= "AEUY";
	}
	if ($strength >= 4) {
		$consonants .= '23456789';
	}
	if ($strength >= 8 ) {
		$vowels .= '@#$%';
	}

	$password = '';
	$alt = time() % 2;
	for ($i = 0; $i < $length; $i++) {
		if ($alt == 1) {
			$password .= $consonants[(rand() % strlen($consonants))];
			$alt = 0;
		} else {
			$password .= $vowels[(rand() % strlen($vowels))];
			$alt = 1;
		}
	}
	return $password;
}

Source: http://www.phpsnippets.info/generate-a-password-in-php

Compress multiple CSS files

If you’re using different CSS files on your site, they might take quite long to load. Using PHP, you can compress them into a single file with no unnecessary white spaces or comments.
This snippet has been previously discussed on my “3 ways to compress CSS files using PHP” article.

header('Content-type: text/css');
ob_start("compress");
function compress($buffer) {
  /* remove comments */
  $buffer = preg_replace('!/\*[^*]*\*+([^/][^*]*\*+)*/!', '', $buffer);
  /* remove tabs, spaces, newlines, etc. */
  $buffer = str_replace(array("\r\n", "\r", "\n", "\t", '  ', '    ', '    '), '', $buffer);
  return $buffer;
}

/* your css files */
include('master.css');
include('typography.css');
include('grid.css');
include('print.css');
include('handheld.css');

ob_end_flush();

Source: http://www.phpsnippets.info/compress-css-files-using-php

Get short urls for Twitter

Are you on Twitter? If yes, you probably use a url shortener such as bit.ly or TinyUrl to share your favorite blog posts and links on the network.
This snippet take a url as a parameter and will return a short url.

function getTinyUrl($url) {
    return file_get_contents("http://tinyurl.com/api-create.php?url=".$url);
}

Source: http://www.phpsnippets.info/convert-url-to-tinyurl

Calculate age using date of birth

Pass a birth date to this function, and it will return the age of the person; very useful when building communities or social media sites.

function age($date){
	$year_diff = '';
	$time = strtotime($date);
	if(FALSE === $time){
		return '';
	}

	$date = date('Y-m-d', $time);
	list($year,$month,$day) = explode("-",$date);
	$year_diff = date("Y") – $year;
	$month_diff = date("m") – $month;
	$day_diff = date("d") – $day;
	if ($day_diff < 0 || $month_diff < 0) $year_diff–;

	return $year_diff;
}

Source: John Karry on http://www.phpsnippets.info/calculate-age-of-a-person-using-date-of-birth

Calculate execution time

For debugging purposes, it is a good thing to be able to calculate the execution time of a script. This is exactly what this piece of code can do.

//Create a variable for start time
$time_start = microtime(true);

// Place your PHP/HTML/JavaScript/CSS/Etc. Here

//Create a variable for end time
$time_end = microtime(true);
//Subtract the two times to get seconds
$time = $time_end - $time_start;

echo 'Script took '.$time.' seconds to execute';

Source: http://phpsnips.com/snippet.php?id=26

Maintenance mode with PHP

When updating your site, it is generally a good thing to temporarily redirect your users to a “Maintenance” page so they will not see any critical info such as error messages.
This is generally done using an .htaccess file, but it can be done easily with PHP:

function maintenance($mode = FALSE){
    if($mode){
        if(basename($_SERVER['SCRIPT_FILENAME']) != 'maintenance.php'){
            header("Location: http://example.com/maintenance.php");
            exit;
        }
    }else{
        if(basename($_SERVER['SCRIPT_FILENAME']) == 'maintenance.php'){
            header("Location: http://example.com/");
            exit;
        }
    }
}

Source: http://www.phpsnippets.info/easy-maintenance-mode-with-php

Prevent js and css files from being cached

By default, external files such as javascript and css are cached by the browser. If you want to prevent this from caching, simply use this easy tip:

<link href="/stylesheet.css?<?php echo time(); ?>" rel="stylesheet" type="text/css" /&glt;

The result will look like this:

<link href="/stylesheet.css?1234567890" rel="stylesheet" type="text/css" /&glt;

Source: http://davidwalsh.name/prevent-cache

Add (th, st, nd, rd, th) to the end of a number

Another useful snippet which will automatically add st, nd, rd or th after a number.

function make_ranked($rank) {
	$last = substr( $rank, -1 );
	$seclast = substr( $rank, -2, -1 );
	if( $last > 3 || $last == 0 ) $ext = 'th';
	else if( $last == 3 ) $ext = 'rd';
	else if( $last == 2 ) $ext = 'nd';
	else $ext = 'st'; 

	if( $last == 1 && $seclast == 1) $ext = 'th';
	if( $last == 2 && $seclast == 1) $ext = 'th';
	if( $last == 3 && $seclast == 1) $ext = 'th'; 

	return $rank.$ext;
}

Source: http://phpsnips.com/snippet.php?id=37

Like CatsWhoCode? If yes, don’t hesitate to check my other blog CatsWhoBlog: It’s all about blogging!

10 life-saving PHP snippets

Quick Tip: How to Create Orchestra Hits

When you listen to 80% of the dynamic and action-oriented orchestral music, you’ll notice that when used appropriately, orchestral hits can bring tense feeling to your tracks. In this short tutorial, I’ll give you some advice about how to combine different patches.


Step 1: Planning Your Orchestration

When you write music for orchestra, you write melodies for more than 20 instruments. When it comes to massive musical ideas, such as these orchestral hits, this means that each instrument in a group should play a note dynamically and with tension. OK, how do you know which notes to double and how to plan your notes?

I’d suggest using your ears and insight. Just remember three things:

  1. Use spacial chords in the low-end, in order to avoid the muddy sound in the bass frequencies.

  2. Don’t double unstable tones such as the 3rd or a 7th. You can see in the image above that I double the 3rd of a standart C major chord twice, but in an octave (look for E). Also, try to underline your main tone of the chord (in my case – C) and the fifth (G).

  3. Place your instruments around the octaves. Look over to the image above. The red colour represents strings, the blue brass section and the green – woodwinds. When mixing orchestral music, you can achieve great results without even using EQ. But you must place your instruments in such a way, that they don’t fight each other’s frequencies.


Step 2: Load the Samples and Start Composing!

Okay, after I’ve thought about where to put my instruments on my virtual note sheet, I can start loading samples. If you’ve read my previous quick tip about getting realism with orchestral samples, you’ll probably know that I will choose RR (round-robin) samples. So, first I will load the strings and I’ll have them play an ordinary E-minor chord.

Download audio file (OrchestralHits_Strings.mp3)

By the way, I will load every group of instruments in a separate instance of PLAY (East West’s brand new engine). The purpose of doing this is to get some space for your computer’s CPU.

After that I will load the brass samples…

Download audio file (OrchestralHits_Brass.mp3)

… the woodwinds section:

Download audio file (OrchestralHits_Woodwinds.mp3)

And finally, the drums:

Download audio file (OrchestralHits_Drums.mp3)

You can see for yourself that I loaded 20 instruments and 80% of these are round-robin samples. Be aware that loading so much instruments can cause problems with your machine, especially if it is not powerful enough. You can hear all of these instruments together:

Download audio file (OrchestralHits_WholeOrchestra.mp3)


Step 3: Subtle Touches

In order to get this working well, I’ll do slight humanizing and some velocity changes. Remember that you will have to be really gentle, because we don’t want to get our orchestra sound like a bunch of drunkards!

Download audio file (OrchestralHits_WholeOrchestraHumanized.mp3)

You surely can notice how much the sound changed; everything sounds more spacious and more tense. Now we have to get to our final step, which is…


Step 4: Final Touches – Mixing and Balance, Effects.

The good thing about East West Quantum Leap Orchestra is that the instruments are recorded in the way they should sound like. This means that when you are using the default mic position (hall), you will listen to an orchestra as if you are on a concert. You don’t have to make panorama changes to do stereo tricks and to put back instruments in the mix. Everything is already done for you.

This means that I will need to make some volume correction, to apply some effects. First of all, I’ll boost my low-end drums (the gran casa). Also, I decided that in this hit I would like to hear mostly low-end instruments and mainly our E and B tones. I’ll decrease the volume of the other ones, I’ll tweak them a bit, I’ll apply a master compressor and… et voila!

Download audio file (OrchestralHits_Final.mp3)

The good thing about this is that you can export various chords to .WAV files and use them in your music, without the need of loading more than 20 patches to get orchestral hits. Do your own samples, improvise!

Good luck!


30 Essential iPad Apps for Designers and Creatives


A fancy new iPad is the perfect travel companion for any designer. The richness of the large multi-touch screen makes for some incredibly useful and fun apps that can really drive your creativity.

Today we’ll look at 30 different apps spanning several categories that can help designers out with everything from sketching and wire framing, to making notes and staying on task.

( Continue Reading at iPhone.AppStorm )

Exploring Graphic User Interface Styles – from Minimal to Futuristic


A user interface (UI) can come in many styles ranging graphically from very simple, all the way to extremely complex. In this article we are going to explore a range of styles demonstrating that there isn’t just one recipe for creating a good looking, and ultimately successful user interface. Of course, not every style is represented in this article; we will be exploring several high-quality examples, representing a wide range of graphical styles from simple to complex. Enjoy!


Section 1: Minimal

A minimal style UI relies heavily on type, symbols, and white space to create a clear and simple user experience. Broad solid colors or absence of color altogether are often found in these interfaces. Since graphics are used sparingly, the layout of the elements is extremely important. When done right, this makes for a clear and direct interface.

HelvetiNote™

HelvetiNote™ by cypher13 uses a great mix of font weights and sizes, as well as thoughtfully placed icons and interface elements to form a fantastically minimal UI. This UI proves that you don’t need highly detailed graphics to stand out from the rest of the crowd.

HTC 1 Concept

When designer Andrew Kim decided to concept a new piece of hardware, he envisioned a complete solution marrying the hardware and user interface. In doing so, he created a simple and minimal experience. If you haven’t seen his post about it yet, it’s a must-see.

Things

The guys at Cultured Code created a very simple and graceful UI for Things, a to-do list manager. Available for both Mac and iOS, their design features a muted color scheme, crisp icons, and a very Mac feeling UI.


Section 2: Detailed Graphical

Detailed graphical interfaces rely heavily on graphics to create the user experience. Specifically, you’ll find things like textures, vivid color, gradients, highlights, reflections, and shadows. Though they have a bit more going on than a minimal interface, these UIs are still easy to digest and are generally easy to use.

Bills

Bills uses bright color with an Apple-like bottom menu and wood accents to create a user experience for handling bills that is both unique and inherently familar to iPhone users. With its sharp graphics and user-friendly look, Bills has all the makings of success.

Beats

Using a non-standard color palette is just on of the many things that makes Beats stand out. Bjango’s mix of textures and gradients, crisp pixel-level detail, and unique styling makes this interface a winner.

Dream Touch

Each screen in the Dream Touch UI has its own color palette with a single dominant color. Add glossy effects to that, as well as dramatic lighting and a great presentation, well… you make this list.

Else Mobile

The Else Mobile interface has a unique menu system and interaction method… its subtle glows, background graphics and color give it a progressive and futuristic look.

Note: This interface has aspects of all of the sections: minimal, graphical, and futuristic. It really doesn’t fit in any one category, so I put it in as close to the middle as I could.


Section 3: Highly Detailed/Experimental

These UIs will make you think. With these interfaces, limits are pushed and usability is not always the number one priority. They often have odd shapes, unique layouts, high contrast and feature a very high level of detail. There is almost a subculture for this kind of design and it is not regularly found in the mainstream.

CYMIC – ttplayer skin

The unique lighting and highlights alone make the CYMIC player a great piece. Couple with that a non-standard, high contrast color scheme, and this piece really jumps off the screen.

Quarian

Ok, I had to sneak one of mine on the list, people tend to like this one, hope you do too. It’s shiny.

Insignia

Lance Thackeray’s Insignia takes a Midi Keyboard and a Media Player and mates them into a wonderful fantasy user interface. Each piece of this UI is finely detailed and his muted color scheme with bright accents add that extra touch of class.


Section 4: Futuristic / Fantasy

Found most often in movies and video games, these interfaces usually have a lot going on at once. Things always seem to be moving, flashing, beeping, pulsing, and blinking. Typically there is not a lot of detail in the graphics themselves, but an entire frame is always something to behold.

AdvancedUI: Status Screen

Zane Bien’s AdvancedUI is a piece that you must see in it’s entirety. At 1454×884 in total size, it’s massive yet each tiny piece fits perfectly with the next; the subtle glows and use of color are also fantastic.

Mark Coleran: Fantasy User Interfaces

Mark Coleran is a godfather in this style and is cited as the inspiration for the previous piece, AdvancedUI. Mark’s work has been featured in many blockbuster films, and most of it is on his website too. Make sure you click through and see the videos and screenshots of his portfolio if you’re not familiar with his work.

Ironman PDA UI

Perception created a lot of screen graphics for the IronMan 2 film, one of the standouts being the PDA sequence. Be sure to check out the “Stark PDA Final Shots” video on their website. What was very interesting is they had to design the UI to respond to mock gestures that Robert Downey Jr. made on a blank device beforehand and then composited it all together for the final shot.

3D Boat Information Screen

Stereolize created a series of user interface concepts for informational screens on Yachts. What could have been a boring series of gauges was transformed into a visual playground, displaying information in an extremely interesting and engaging manner.


Note From the Author

I had a lot of fun finding all these epic user interfaces and writing about them; I hope you also enjoyed reading my article. Check me out on my website or follow me on Twitter to keep up with my latest findings, articles and projects.


Colorful, Psychedelic-Style Digital Artwork


Psychedelic art (as you may have guessed) is a type of artwork inspired by psychedelic experiences that are brought on as a side-effect by various drugs and substances known as hallucinations. The art movement began in the 1960′s (known as the “hippy years”) where sex, drugs and rock and roll played a huge role in the culture, and before long this artistic style was being used in concert posters, album art covers, comic books and newspapers. One particular style of psychedelic artwork was inspired by the hallucinations experienced by a drug called LSD, which was known for its kaleidoscopic patterns, similar to those the younger generation experienced with the popular kaleidoscope toy.

As life moves on everything is becoming digital, and over the years digital psychedelic art, although not in vogue, has been slowly increasing in popularity. Bright colors and fractal patterns are fairly easy to produce on a computer, so it only makes sense that psychedelic art is being produced digitally. This showcase presents thirty unique, interesting and out-of-the-ordinary colorful and psychedelic inspired artworks. What’s your favorite, and do you think digital psychedelic art is the way to go, or will it never be quite the same as those produced with traditional media? Let us know in the comments at the bottom of the post!


Sweet Dreams

Sweet Dreams combines doodle style drawings with bright colors, repetitive patterns and photographic textures and stock images to produce an interesting and modern psychedelic style photo manipulation.


Symmetry

Symmetry uses three-dimensional shapes and simple fractal backgrounds in the background of the piece merged with some strong colors and textured images to create a unique piece. The typography is cleverly mirrored; although back to front, it is extremely easy to read.


Line Emotions

Line Emotions is an incredibly simple piece: an black on white illustration brought to life by some vivid watercolor textures.


Black Hole Sun

Black Hole Sun is a t-shirt design (click through link to see t-shirt). It combines clean-cut shapes, splashes, bright colors and subtle textures to create a very visually appealing piece that can have us mesmerised in seconds.


Color Pleasure Machine

Color Pleasure Machine has a very dramatic feel to it, created by the use of glaring, bright light effects and three-dimensional shapes.


Head Explosion

Head Explosion is another piece whose primary shapes are simply black lines on a white background. This piece, however, is brought to life using cleaner and smoother colored shapes rather than the strong textured images that were using in Line Emotions. A subtle texture in the background is also used, bringing out the best of the colors used in the main illustration.


Desire

Desire is a very engrossing piece, making use of a handful of styles, from lighting effects, blurs, and both two-dimensional and three-dimensional shapes.


Psychedelic

This piece is probably the piece that comes closest to traditional psychedelic art in this showcase, combining a bunch of bright and vivid colors that you normally wouldn’t dream of putting together in such a way.


Psychedelic

This psychedelic vector piece of artwork uses quite a minimal color palette but manages to pull of the psychedelic look very well, using certain colors for shadows and others for highlights.


Psychedelic

This slightly more grungy and dull approach to psychedelic digital art combines textures and light, fractal-style patterns to produce an interesting and gripping piece.


Psychedelic Wool

Psychedelic Wool is an amazing and beautiful fractal piece, merging the use of a vivid color palette and superb highlighting and shadowing detail to make it burst with viewing pleasure.


Psychedelic Bomb

Psychedelic Bomb is one of the more subtle and lighter pieces here, and combines the use of psychedelic colors with modern day vector trends such as drips, swirls and light texture.


Psychedelic River

Psychedelic River is a reasonably simple piece, but at the same time is very detailed. It’s bursting with color and full of tiny little images that you can only see when staring at the piece for a longer period of time than that you would looking at most other pieces.


Psychedelic Swirls

Here we have another fractal piece; Psychedelic Swirls, however, is a much more swirly fractal piece of artwork, using the colors from the traditional style and merging it with an increasingly popular modern day trend.


Psychedelic

This three-dimensional rendered digital piece uses the power of a professional rendering software and is then finished off with an image editing application to give it some great texture, colors and glows.


Postmodern Psychedelic

One of my personal favorites in this showcase, Postmodern Psychedelic is an extremely intricate digital piece of art. The highlighting is so detailed that when viewed at full size could be mistaken as a glass painting.


Psychedelic Splendor

Psychedelic Splendor is a very vivid abstract piece of psychedelic art, uniting several circles together and bringing each one to the viewers attention by using shadows and highlights.


Psychedelic Trip

Psychedelic Trip is a powerful piece, and when viewed full size feels like you are being taken into a different world. Almost (but not quite) symmetrical, the piece uses repetitive patterns and vivid colors to draw in and keep the viewers attention.


Psychedelic

This piece, like the above “Psychedelic Trip” piece, uses repetitive patterns to keep the viewer engaged.


Where’s Adam?

The following five pieces (all of which are by the same artist) are packed full of color and lots of different medias, from photographic elements to sketches and vector shapes to patterns. All five pieces are extremely detailed, interesting and compelling.


God Morning


Anthology 001


Anthology 002


Tragiklab Is Dead


Parashroomer

Parashroomer is a modern digital painting, combining some visual effects of those used in traditional psychedelic artwork such as glows and patterns.


Psychedelic Desert Dreams

Psychedelic Desert Dreams is an unusual yet interesting digital piece. The desert floor is made up of circles in various colors and the sky using various glows, highlights and shadows among ray patterns to draw the viewers eyes into the centre of the piece.


Art Is Everywhere

Art Is Everywhere is a remarkable abstract piece packed full of subtle patterns, swirls and gorgeous colors to bring it all to life.


Psychedelic Wallpaper

Repeated flowers, patterns and a strong color scheme bring this piece to life. The use of flowers forming a star shapes makes draws the viewers eyes into the centre of the piece.


Most Beautiful Fractal

This fractal piece titled Most Beautiful Fractal us almost hair like, combining hundreds of thin stroked lines to form a swirly and colorful unique piece.


Psychedelic

Like a piece featured earlier in this showcase (Psychedelic Bomb), this piece combines modern day trends such as vector shapes, drips, sprays and textured images with a psychedelic style color scheme.


You May Also Like…

Create a Full Screen, Scalable Flash Website: Part 3

In the final part of this tutorial, you’ll learn how to load Featured Work and News from XML files (keeping the site’s content easy to change), allow visitors to email you using a Contact form, add a preloader, and enable Full Screen mode.


Final Result Preview

Take a look at the final result we will be working towards. Try it in full screen mode by clicking the button in the top-right corner, and check out all the new changes!


Section 1: Overview, Understanding XML Structure, and Loading XML

Don’t like ads? Download the screencast, or subscribe to Activetuts+ screencasts via iTunes!

The XMLLoader class is available in the Source download.


Section 2: Building the “Featured Work” Page

Don’t like ads? Download the screencast, or subscribe to Activetuts+ screencasts via iTunes!


Section 3: Building the “News” Section

Don’t like ads? Download the screencast, or subscribe to Activetuts+ screencasts via iTunes!


Section 4: Creating the Contact Form with PHP

Don’t like ads? Download the screencast, or subscribe to Activetuts+ screencasts via iTunes!

The PHP file is called mailer.php and is in the Source zip file.


Section 5: Adding the Actual Full Screen Functionality

Don’t like ads? Download the screencast, or subscribe to Activetuts+ screencasts via iTunes!


Section 6: Creating a Full Screen Preloader

Don’t like ads? Download the screencast, or subscribe to Activetuts+ screencasts via iTunes!

The separate FLA used for the preloader SWF is called loader.fla and is in the Source zip file.


Conclusion

That’s the end of this tutorial. Thanks for reading!

Manipulating Particle Motion with Stardust Particle Engine – Part 1

Stardust Particle Engine provides two major approaches to freely manipulate particle motion, namely gravitational fields and deflectors. Gravitational fields are vector fields that affect a particle’s acceleration, and deflectors manipulate both a particle’s position and velocity.

The first part of this tutorial covers the basics of particle motion and gravitational fields. Also, it demonstrates how to create your own custom gravitational fields. The second part focuses on deflectors and how to create custom deflectors.

Prior knowledge of the basic usage of Stardust is required to continue reading this tutorial. If you’re not familiar with Stardust, you can check out my previous tutorial on the subject, Shoot out Stars with Stardust Particle Engine, before going on.


Final Result Preview

Let’s take a look at the final result we will be working towards. This is an example of a custom vortex gravitational field.


Particle Motion Basics

It’s time for some quick flashback on high school physics. Remember basic kinematics? It’s all about displacement, which is just a fancier way to say “position,” and its relation to time. For the scope of this tutorial, we only need a rather simple grasp of the topic.

Displacement

Displacement means the current position of an object. In this tutorial the “objects” we are mainly dealing with are particles in 2D space. In 2D space, the displacement of an object is represented by a 2D vector.

Velocity

An object’s velocity denotes how fast an object’s position changes and the direction of the change. The velocity of an object in 2D space is also represented by a 2D vector. The vector’s x- and y-components represent the direction of the change of position, and the vector’s absolute value denotes the object’s speed, i.e. how fast the object’s moving.

Acceleration

Acceleration is to velocity as velocity is to displacement. The acceleration of an object denotes how fast an object’s velocity changes and the direction of the change. Just like the velocity of an object in 2D space, an object’s acceleration is represented by a 2D vector.


Vector Fields

Another thing worth mentioning is the concept of vector fields. You can basically view a vector field as a function that takes a vector as its input and outputs another vector. Gravitational fields are a kind of vector fields that take position vectors as inputs and output acceleration vectors. For example, in physics simulation, usually a uniform gravity pointing downward is applied to all objects; in this case, the gravitational field representing the gravity is a vector field that outputs a constant vector (pointing down), no matter what the input position vectors are.

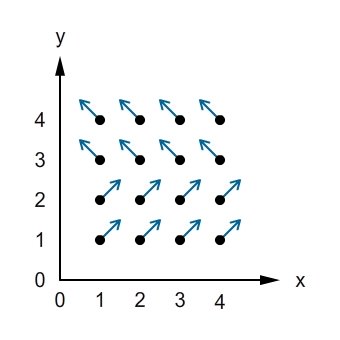
This is a visualized graph of a vector field. The output vector of a given input vector (1, 2) is (0.5, 0.5), while the output of an input (4, 3) is (-0.5, 0.5).

The Field class in Stardust represents a 2D vector field, and its 3D counterpart, the Field3D class represents a 3D vector field. In this tutorial, we’ll only focus on 2D vector fields.

The Field.getMotionData() method takes a Particle2D object, containing a particle’s 2D position and velocity information, as parameter. This method returns a MotionData2D object, a 2D vector “value object” that is consisted of x- and y-components. Combined with the Gravity action, a Field object can be used as a gravitational field, whose output is used to manipulate particle velocity.

That’s all for our high school physics recap. Now it’s time for some real Stardust stuff.


The Gravity Action

As previously mentioned, the Gravity action class makes use of Field objects as gravitational fields to manipulate particle velocity. Here’s how you create a uniform vector field, a vector field that returns a constant vector no matter what input is given, and wrap it into a Gravity action.

//create a uniform vector field pointing downward (remember positive y-coordinate means "down" in Flash)
var field:Field = new UniformField(0, 1);

//create a gravity action
var gravity:Gravity = new Gravity();

//add the field to the gravity action
gravity.addField(field);

This Gravity action is now ready to be used in the same way as any other ordinary Stardust actions.

//add the gravity action to an emitter
emitter.addAction(gravity);

Example: Windy Rain

We are going to create a windy rain effect using the Gravity action.


Step 1: Basic Raining Effect

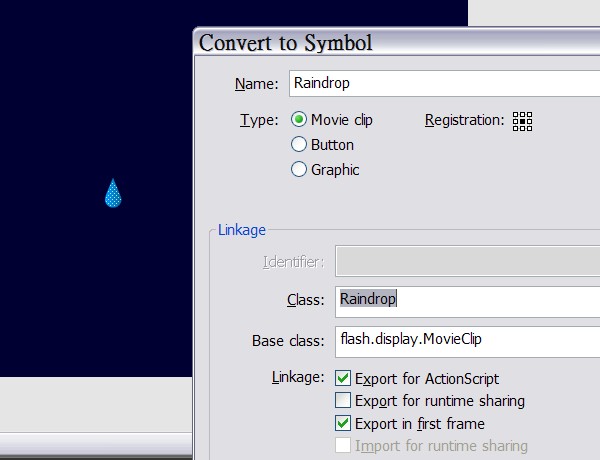
Create a new Flash document, choose a dark color for background, draw a raindrop on the stage, and convert the raindrop to a movie clip symbol, exported for ActionScript with a class name “Raindrop”. Delete the raindrop instance on the stage afterward.

Now we’re going to create an AS file for the document class, and an AS file for the rain emitter. I won’t explain the code here, since I’ve already covered the basic usage of Stardust in my previous tutorial. If you’re not familiar with Stardust or you need some refreshment, I strongly recommend that you read my previous tutorial before moving on.

This is the document class.

package {
	import flash.display.*;
	import flash.events.*;
	import idv.cjcat.stardust.common.emitters.*;
	import idv.cjcat.stardust.common.renderers.*;
	import idv.cjcat.stardust.twoD.renderers.*;

	public class WindyRain extends Sprite {

		private var emitter:Emitter;
		private var renderer:Renderer;

		public function WindyRain() {
			emitter = new RainEmitter();
			renderer = new DisplayObjectRenderer(this);
			renderer.addEmitter(emitter);

			addEventListener(Event.ENTER_FRAME, mainLoop);
		}

		private function mainLoop(e:Event):void {
			emitter.step();
		}
	}
}

And this is the emitter class used in the document class.

package {
	import idv.cjcat.stardust.common.clocks.*;
	import idv.cjcat.stardust.common.initializers.*;
	import idv.cjcat.stardust.common.math.*;
	import idv.cjcat.stardust.twoD.actions.*;
	import idv.cjcat.stardust.twoD.emitters.*;
	import idv.cjcat.stardust.twoD.initializers.*;
	import idv.cjcat.stardust.twoD.zones.*;

	public class RainEmitter extends Emitter2D {

		public function RainEmitter() {
			super(new SteadyClock(1));

			//initializers
			addInitializer(new DisplayObjectClass(Raindrop));
			addInitializer(new Position(new RectZone(-300, -40, 940, 20)));
			addInitializer(new Velocity(new RectZone( -0.5, 2, 1, 3)));
			addInitializer(new Mass(new UniformRandom(2, 1)));
			addInitializer(new Scale(new UniformRandom(1, 0.2)));

			//actions
			addAction(new Move());
			addAction(new Oriented(1, 180));
			addAction(new DeathZone(new RectZone( -300, -40, 960, 480), true));
		}
	}
}

This is what our current progress looks like.


Step 2: Make it Windy

Now we’re going to make the rain effect windy by adding a uniform gravitational field that “pulls” the raindrops to the right. Add the following code in the constructor of the RainEmitter class.

//create a uniformfield that always returns (0.5, 0)
var field:Field = new UniformField(0.5, 0);

//take particle mass into account
field.massless = false;

//create a gravity action and add the field to it
var gravity:Gravity = new Gravity();
gravity.addField(field);

//add the gravity action to the emitter
addAction(gravity);

Note that we set the Field.massless property to false, which is true by default. When set to true, this property causes fields to act like ordinary gravitational fields, affecting all objects equally regardless of their mass. However, when the property is set to false, particle mass is taken into account: particles with larger mass are less affected by the field, whereas particles with smaller mass are affected more. That is why we used the Mass initializer in our previous emitter code, to add some randomness into the rain effect.

Test the movie again, and this is what our outcome looks like. Raindrops are now affected by a gravitational field and are all “pulled” to the right.


Example: Turbulence

Now we’re going to swap the UniformField object with a BitmapField object, returning vector fields based on a bitmap’s color channels, to create a turbulence effect. If you’ve worked with ActionScript for a while, you might be expecting to use the BitmapData.perlinNoise() method when thinking of turbulence, and that’s exactly what we’re going to do.

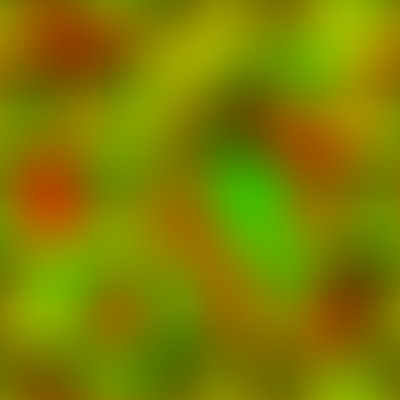
Here’s what a sample Perlin noise bitmap looks like. Perlin noise is an excellent algorithm to generate noise for simulating turbulence, water wave, cloud, etc. You can find more information about Perlin noise here.

Bitmap Fields

You might be wondering, if we’re going to use the BitmapData.perlinNoise() method to generate a perlin noise bitmap, how are we going to use this bitmap as a vector field? Well, this is what the BitmapField class is for. It takes a bitmap and converts it to a vector field.

Let’s say we have a bitmap field whose X channel is set to red and Y channel is green. This means when the field takes an input vector, say, (2, 3), it looks up to the bitmap’s pixel at (2, 3) and the output vector’s X component is determined from the pixel’s red channel, and the Y component is determined from the green channel. When the components of an input vector are not integers, they are rounded first.

A color channel’s value ranges from 0 to 255, 127 being the average. A value less than 127 is regarded as negative by the bitmap field, while a value larger than 127 is taken positive. Zero is the most negative number and 255 is the most positive one. For example, if we have a pixel with a color 0xFF0000 in hexadecimal representation, meaning a red channel with value 255 and green channel with 0, then the bitmap field’s output for this pixel would be a vector with X component of a most positive possible number and Y component of a most negative possible number, where this most positive/negative possible number, or maximum number, is specific to the bitmap field. To be more precise, here’s the formula of the pixel-to-vector conversion.


Step 1: Basic Flying Arrows

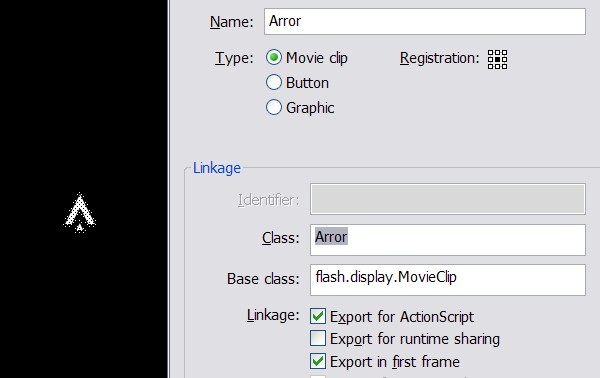
Create a new Flash document. Draw an arrow on the stage, convert it to a symbol named “Arrow” and export it for ActionScript.

Create an AS file for the document class. This is almost the same as the previous example.

package {
	import flash.display.*;
	import flash.events.*;
	import idv.cjcat.stardust.common.emitters.*;
	import idv.cjcat.stardust.common.renderers.*;
	import idv.cjcat.stardust.twoD.renderers.*;

	public class Turbulence extends Sprite {

		private var emitter:Emitter;
		private var renderer:Renderer;

		public function Turbulence() {
			emitter = new ArrowEmitter();
			renderer = new DisplayObjectRenderer(this);
			renderer.addEmitter(emitter);

			addEventListener(Event.ENTER_FRAME, mainLoop);
		}

		private function mainLoop(e:Event):void {
			emitter.step();
		}
	}
}

Create another AS file for our emitter class.

package {
	import idv.cjcat.stardust.common.actions.*;
	import idv.cjcat.stardust.common.clocks.*;
	import idv.cjcat.stardust.common.initializers.*;
	import idv.cjcat.stardust.common.math.*;
	import idv.cjcat.stardust.twoD.actions.*;
	import idv.cjcat.stardust.twoD.emitters.*;
	import idv.cjcat.stardust.twoD.initializers.*;
	import idv.cjcat.stardust.twoD.zones.*;

	public class ArrowEmitter extends Emitter2D {

		public function ArrowEmitter() {
			super(new SteadyClock(1));

			//initializers
			addInitializer(new DisplayObjectClass(Arrow));
			addInitializer(new Life(new UniformRandom(50, 10)));
			addInitializer(new Position(new SinglePoint(320, 200)));
			addInitializer(new Velocity(new LazySectorZone(3, 2)));
			addInitializer(new Mass(new UniformRandom(2, 1)));
			addInitializer(new Scale(new UniformRandom(1, 0.2)));

			//actions
			addAction(new Age());
			addAction(new DeathLife());
			addAction(new Move());
			addAction(new Oriented());
			addAction(new ScaleCurve(10, 10));
		}
	}
}

The current progress looks like this.


Step 2: Make it Turbulent

Add the following code that creates a 640-by-480 Perlin noise bitmap data in the emitter constructor. For detailed explanations on each parameter of the BitmapData.perlinNoise() method, you can refer to this documentation. To make it simple, the following code creates a Perlin noise bitmap with “octaves” roughly of the size 50X50, and the noise consists of red and green color channels.

//create a Perlin noise bitmap data
var noise:BitmapData = new BitmapData(640, 400);
noise.perlinNoise(50, 50, 1, 0, true, true, 1 | 2);

Next, create a BitmapField object and assign the bitmap data to it through the update() method. Then the rest of the code concerning the Gravity action is exactly the same as the previous example.

//create a uniformfield that always returns (0.5, 0)
var field:BitmapField = new BitmapField();
field.channelX = 1; //set X channel to red
field.channelY = 2; //set Y channel to green
field.max = 1; //set the max vector component absolute value
field.update(noise); //update the field with the noise bitmap

//take particle mass into account
field.massless = false;

//create a gravity action and add the field to it
var gravity:Gravity = new Gravity();
gravity.addField(field);

//add the gravity action to the emitter
addAction(gravity);

Now test the movie again, and you shall see our flying arrows are now experiencing turbulence.


Custom Fields

We’ve used the UniformField and BitmapField provided by Stardust, and now we’re going to create our own custom fields by extending the Field class and overriding the getMotionData2D() method.

The getMotionData2D takes a Particle2D parameter as input, which contains the position vector information of the particle, and that’s the input to the field. The method returns a MotionData2D object, representing the output of the field. That’s all you need to know to create a custom field. Let’s create a custom vortex field.

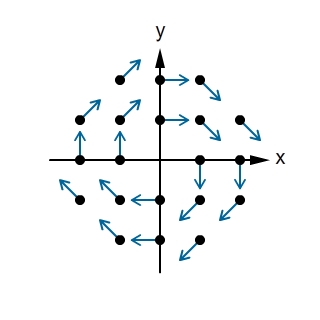
Below is the visualized graph of our vortex field. It’s pretty self-explanatory why it’s called a vortex field.

Here’s the formula for our vortex field.

And the vortex field class is as simple as the code below. We’ve made use of the Vec2D class to do all the dirty work of rotating a vector by 90 degree clockwise and setting the vector’s absolute value. Then, we dump the vector’s x- and y-components into a MotionData2D object, which is of the object type to be returned.

package {
	import idv.cjcat.stardust.twoD.fields.*;
	import idv.cjcat.stardust.twoD.geom.*;
	import idv.cjcat.stardust.twoD.particles.*;

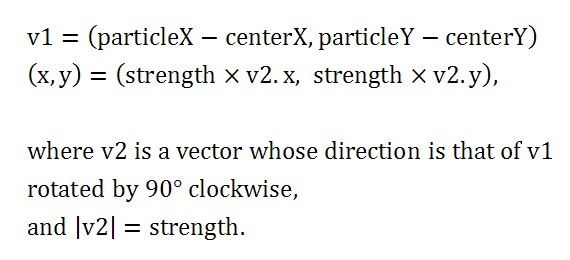
	public class VortexField extends Field {

		public var centerX:Number;
		public var centerY:Number;
		public var strength:Number;

		public function VortexField(centerX:Number = 0, centerY:Number = 0, strength:Number = 1) {
			this.centerX = centerX;
			this.centerY = centerY;
			this.strength = strength;
		}

		override protected function calculateMotionData2D(particle:Particle2D):MotionData2D {
			var dx:Number = particle.x - centerX;
			var dy:Number = particle.y - centerY;
			var vec:Vec2D = new Vec2D(dx, dy);
			vec.length = strength;
			vec.rotateThis(90);

			return new MotionData2D(vec.x, vec.y);
		}
	}
}

Now that we have our custom field, let’s test it out in the following example.


Example: Vortex

This example serves as a test drive for our vortex vector field. It’s as simple as swapping a field with a new one. Change the following code from the previous example from this

//create a uniformfield that always returns (0.5, 0)
var field:BitmapField = new BitmapField();
field.channelX = 1; //set X channel to red
field.channelY = 2; //set Y channel to green
field.max = 1; //set the max vecotr length
field.update(noise); //update the field with the noise bitmap

to this

//create a vortex field centered at (320, 200) with strength 1
var field:VortexField = new VortexField();
field.centerX = 320;
field.centerY = 200;
field.strength = 1;

And we’re done. You may test the movie and see the vortex effect. Sweet!


Conclusion

You have seen how to use the Gravity action and Field class to affect particle velocity. And you’ve learned how to create your own custom vector fields to be used as gravitational fields. The next part of this tutorial will show you how to make use of deflectors to manipulate both particle position and velocity at once.

Thank you very much for reading!

Texture Pack: 14 Hi-Res Bark Textures

This week’s freebie content is brought to you by Jarlan Perez, a passionate texture and game design artist. Jarlan has put together 14 hi-res tree bark images to share with the community, and we can’t wait to see how you use them!

Texture Pack Preview

Jarlan’s portfolio is available to view at http://www.jarlanperez.com and he’d love you to head on over and take a look!

Texture-Pack Download Link : JarlanPerez.com_TreeBarkPack.zip


If you’d like to produce freebie content for Cgtuts+, and have your portfolio/website published for all to see, head on over to our ‘Write for Us’ section to see how to submit. We’re always looking for great content to share with the community!

Don’t miss more CG tutorials and guides, published daily – subscribe to Cgtuts+ by RSS.

Modelling a Luger P08 using Subdivision Surfaces in Maya – Day 1

Hard surface subdivision modeling can be a difficult concept to understand, however as it has become such a big part of today’s production environment, learning it has become much more of a necessity. Using the basic polygonal toolset, this 2-day, narrated timelapse tutorial covers the process of modeling a Luger P08, and is a great introduction to a standard SDS workflow in Maya.

Video 1

Download

Note: click the ‘Monitor’ icon to view tutorial in full-screen HD.


Video 2

Download

Note: click the ‘Monitor’ icon to view tutorial in full-screen HD.


Video 3

Download

Note: click the ‘Monitor’ icon to view tutorial in full-screen HD.


Don’t miss more CG tutorials and guides, published daily – subscribe to Cgtuts+ by RSS.

Introducing The Netsetter 2.0

And then there were three.

Today marks the relaunch of our sister site, The Netsetter. Along with this site and FreelanceSwitch, the new Netsetter creates a “triple threat” in terms of getting better at what moves you.  All three sites offer practical tips that cover topics that can help those who want to get better at what they love doing.

The Netsetter was a blog started by Envato’s CEO, Collis Ta’eed in 2009 as a place to discuss start ups. The second iteration of the site doesn’t stray too far from the initial concept, but has been retooled by the Netsetter team to appeal to a wider audience.

If you’re a true netsetter then you’re already on your way to doing something that you truly love doing.  With The Netsetter, FreelanceSwitch and WorkAwesome, you have an arsenal of resources available to you that can enable you to do what you love at a whole new level.

Are you a netsetter? Then head on over to the newly-revamped Netsetter today!

Dealing with Coworkers: Are They Colleagues or Competitors?

In a typical organization, employees are separated (or self-separate) into groups with similar skills. Whether you’re crunching numbers, reaching out to customers, or designing the next big product, you’re likely working alongside people with similar skills to your own.

Businesses seek a good bit of overlap in skills. Shared proficiencies increase collaboration and help us communicate with our peers. In areas ripe with arcane terminology like marketing or I.T., shared backgrounds are an absolute necessity for proper teamwork.

Similar skills and experiences are great for camaraderie, communication, and getting things done in general. But, they can also blur the line between colleagues and competitors, especially when someone asks you this:

“Hey, you’re the only one who knows how to run that system, right? Would you mind showing me how to use it? You know… just in case you get hit by the proverbial bus…”

Some don’t give a comment like this another thought, but others might wonder if the “proverbial bus” is really a “proverbial pink slip.”

Are you dealing with coworkers who are colleagues or competitors?

The Complete Guide to Going Paperless

No, I won’t start with the hackneyed remarks like “you need to save environment”, “go green” and all. Let’s just forget the environment for a moment and think about ourselves. Going paperless actually makes you more productive.

Just think about the times when you spent hours trying to find that one super-important note in the huge pile of documents, notes, files and what not. Had that note been stored somewhere on your computer, it would have taken seconds to locate it, isn’t it.

This article explores various aspects of going paperless; why you need to do it, what tools could help you do that and the process to follow. People working at big corporations might not be able to go paperless completely, because companies have their own rules on use of resources. But, I suggest them to read it nevertheless.

So…Why Go Paperless?

Digital is omnipresent.
Digital technology has come a long way. You can store an entire movie in that small cellphone of yours. And the good thing is there are tools and apps that can sync your information across various devices. Your data is safe.

It reduces clutter.
A clean and clutter-free workspace not only looks good, but, also has a positive impact on the mind of the person who’ll work there. With no clutter around, you tend to be more focused towards your work and get more done.

Better data protection and security.
It’s hard to recover information from a piece of paper once it’s destroyed (unless you know people who work in forensic labs). But data can be recovered if your computer goes haywire. You could also store everything on the cloud and not worry about data loss ever.

It saves money.
You’d realize how much you are saving when you stop buying those files and A4 sheets.

It helps you go green.
Saving the environment isn’t bad either. When there’s so much talk about going green, why not try to contribute as much as you can towards preserving natural resources.

Okay, so now that you are convinced going paperless is the way ahead, lets talk about the main tools you’d need to begin with the process.

Tools That Will Help

Your computer.
Your computer is where it begins. You gotta transfer the data and organize it there. You should also decide what are the applications you’d need that’d replace your need for using paper.

Your mobile phone.
You’d use your cellphone to store important notes, contacts and other small bits of information, which you usually write in stickies.

Your iPad or iPod Touch.
Didn’t we tell you that you could also use your iPad to lower your carbon footprint. Make use of it in the process of going paperless.

An external drive for data backup.
Although there are online storage options available, it is important that you back it up on an external hard disk too.

A scanner.
A scanner would help you quickly transfer data from paper to PC, especially if you’ve got a huge number of files and documents.

A paper shredder.
Finally, you would need a shredder to dispose of the paper. Well, you could also do that manually, but in case you have access to a shredder, using that would be a better option.

How to Go Paperless

Set aside time.
Going paperless is easier said than done. You should set aside time, in fact, a day if possible to get this work done.

Choose and organize.
Now begins the cumbersome (and boring) part. You need to carefully divide the documents into useful and not necessary. You’d be surprised to find how much trash you’ve got once you start organizing the stuff.  You would also need to create different folders on your computer, and other devices so that the clutter isn’t transferred from your desk to your hard drive.

Start the upload and backup.
Done organizing? Great, now start the process of transferring data and making it go digital. Also, back it up on the external drive as you save it on your computer. No point delaying the backup.

Do a final check.
Go through the papers as well as the data on the computer/cellphone/iPad to see if they match and you haven’t missed anything. Also, check the non-essential list of items again to confirm that all of it is useless.

Shred what’s not needed.
Pat yourself on the back, you have successfully accomplished the herculean task of going paperless and de-cluttering your workspace. Now, just get rid of all the useless documents to give a sparkling clean look to your workspace! Make it look beautiful!

Feel free to share your tips, suggestions and how going paperless has helped you below.

What is Coworking?

Many of us yearn to have the flexibility to work from wherever we choose, but what options do we have? After all, not all of us want to spend the day loitering around the coffee shop. And if we work from home, we face distractions (like laundry) and a lack of office amenities.

To address this issue, coworking facilities are popping up in many cities. These are spaces where freelancers, remote workers and other independent professionals can come to work in a shared office space and take advantage of resources such as internet access, conference rooms, fax machines and, of course, coffee makers. One coworking center may cater to professionals in a specific field, such as designers. Another may double as startup incubator. Most are set up to accommodate a general range of professionals.

I corresponded with Evona Niewiadomska, marketing manager for WorkBar Boston, to get a better sense of what coworking is all about.

Is coworking more about providing a remote worker with professional resources or breeding a sense of community among professionals?

Coworking, at it’s very core, provides an environment to work in, however, it is the unique environment that differentiates the coworking experience. The presence of a community is a crucial part of the experience. The main reason people join coworking spaces is to get out of the house and be around other professionals because they lack a community atmosphere and interaction. Being around other professionals allows for cross pollination of ideas, a shared knowledge resource and the ability to learn from people working in various fields. Community is the “co” in coworking – without which it would just be “working.”

What do you hear from patrons about what they get most out of coworking?

Our members are most appreciative of the fact that we have such a wide range of companies working in our space. We have people in marketing, legal, graphic design, software development and even bio tech. This broad range of industries gives our members the opportunity to interact with all sorts of people working on a variety of projects, which often leads to business relationships. We encourage our members to communicate by offering an open workspace environment which enables communication and the exchange of ideas in order to foster relationship building. We also hold member events such as group lunches and happy hours to introduce new members and get everyone talking.

What would you concede is one thing coworking environments cannot provide?

Coworking is not for the introvert worker who wants to keep to himself/herself.  Interaction and being around other people is the key to a successful coworking environment. People that are looking for isolation will have a hard time filling their needs at a coworking space.

Does coworking breed collaboration or partnerships?

Both! We’ve seen our members collaborate, form relationships as well as barter for their services. Collaboration and partnership are both a natural response when a group of people with different skills, strengths, and industry focuses work around each other. In a friendly and social environment these are the benefits that result from the coworking environment where you see and get to know the people working around you.

Every employee and every job are different. How does a coworking facility aim to meet the needs of many?

There is no set formula that a coworking space must adhere to, which is what differentiates one space from another.  However, there are a few key elements that are consistent and which include; workspace, meeting space and phone areas.  How these elements are arranged will vary.

One thing WorkBar has found to be successful is to provide various styles of workspace and meeting space. Our space has individual desks, multi tables, smaller cafe tables as well as a work bar. We’re learned over time by observing that each of these workstations has a draw to them. Various members have shown a preference to one style over another, which results in an overall equal use of the workspace. This is just one example of how varying a key element in a coworking space can fill the needs of many.

Pricing structures and what they are based on is also an important factor. We base our memberships on access – daytime, night time, weekends and 24/7 – all of which outline when a person might need workspace the most, based on their work schedule.

One thing to remember is that a coworking space will never meet the needs of everyone but it can meet the needs of others, very well.

What Motivates You?

What gets you out of bed and into your workplace every day? Do you feel stimulated or challenged by your job? Are you in a field that you’re passionate about, and that passion means more than your salary? Do you feel that you’re making a difference to your customers, members, or clients?

Boredom and not feeling challenged by job duties is a popular gripe among employees, but very few of us have the option of leaving to find something more stimulating or that would be a better use of our skills. Every job – no matter how unconventional it may be – has its own patterns and routines, whether it’s certain follow-up procedures for particular duties or other day-to-day tasks that must be done. Without new problems to solve or challenges to rise to, it’s very easy to have this routine turn into more of a rut.

So what motivates you? What keeps you showing up fresh every day?

Awesome Links #6: Simplicity, Blog Writing, Time Management

Zen Habits explores what it calls the “Clean Slate Method” to simplify your life by getting rid of things you don’t need.

7 Deadly Blog Writing Sins

A must-read for bloggers, this article talks about the common mistakes bloggers make that causes a decline in their readership.

How Google Works – Infographic

A detailed infographic on the steps Google’s spiders go through before returning you those accurate results for your search queries.

20 Quick Tips For Better Time Management

Use Stepcase Lifehack’s quick tips on time management to make more effective use of your time.

7 Social Marketing Strategy Mistakes That Cripple Your Reputation

And lastly, our sister site Freelance Switch asks you to avoid these social marketing mistakes while finding work online.