Relocating Your Home Office

Moving into a new house or apartment is stressful enough. But when you work from home, and you’re moving both your household and your home office, things get a whole lot hairier, as I discovered during my own move earlier this summer. It’s been a few weeks, and things are finally (!) starting to settle down and I’m getting settled in my new home.

Here are some of the strategies I picked up during my recent move:

Work (and Plan) Ahead

As much as possible, I tried to anticipate the projects I had coming up around the time of my move and complete them early. Depending on the relationship with the client, I might send it in early to wow them or hold off to give myself more time to proofread and polish the assignment. And for the sake of my sanity, I tried not to schedule any important deadlines close to my moving date. Packing and repainting is stressful enough without worrying about missed deadlines! I also made sure to schedule my wifi installation at the earliest opportunity so I wouldn’t be stuck without internet for long.

Keep Your Clients or Customers Informed

Obviously, if you have people snail mailing checks or other important documents to your home, you’ll want to alert them well in advance of your move and file a change of address form with the post office. This also gives you an excuse to reconnect with clients and see if they might have any projects coming up before or after your move. If you anticipate being unavailable for more than a day or two, then let your clients know and try to find a trusted colleague who can cover for you if necessary. Some people also include effective dates and new addresses in their email signature (for safety reasons, I only give out my address by request). If you’re worried about things getting lost between the old and new address, you can also set up a PO box to ease the transition. Since I had some overlap between my old and new place, I was able to go back to my previous apartment and check the mailbox one last time for peace of mind.

Clean Out

Most of us have extra home office equipment or supplies lying around that we don’t really need. Ditto on miscellaneous paperwork, magazines, and so on. Moving is a great opportunity to purge the excess stuff and set up your new space so it’s organized and tidy (not to mention that if you’re moving yourself, you’ll appreciate fewer boxes to carry). I sold a bunch of items on Craigslist so I could buy newer, nicer versions of the things I really need and say sayonara to the rest. Freecycle is also an option for people who have random home office supplies or old computer equipment they don’t need.

Label Office Essentials Carefully

When it comes to packing, the usual wisdom is to pack each room separately and label each box carefully. But the reality is that most of us pack in stages (or we find ourselves frantically throwing stuff into boxes at 2am the night before the movers arrive). I wanted to cram as much as could safely fit into each box, so if there was a hairdryer-sized space left in a box of books, I’d pack that baby with the books (after all, it’s all going the same place). The one exception was my office. The contents of my desk were packed last and lovingly labeled “Susan’s Office” so I could quickly find them later.

Prioritize Your Unpacking

Sure, it’d be nice to immediately find places for my colander or my cream-colored shift dress. But each time I’ve moved, my goal has been to minimize downtime, so I set up my bed (after all, a girl’s gotta her beauty sleep or she’ll be too groggy to please her clients) and office areas early on. First order of business? My laptop and printer/scanner. I also make sure I know where to find extra printer paper, business cards, pens, and paper clips so I don’t waste money buying extras. Even if your laptop is propped up on big brown boxes and your office supplies are stashed in a Tupperware container because you’re waiting for your brand new desk to be delivered, clients will never know the difference. If you’re one of those people who truly can’t work amidst chaos, then you might want to work in a coffee shop or a coworking space in your new neighborhood. That’ll come in handy as you get settled, too.

What about you? Have you moved recently or are you gearing up to relocate? How did you handle this situation?

Where’s the Best Place for Solving Work Problems?

Being a software professional for the past 20 years or so, I have found that I cannot leave my work at the office.  I am constantly trying to figure out answers to problems that I may have at work.

In fact, more often than not, on the drive home, I tend to solve a problem that I may have been having all day long.  Even though I do bring my PC home with me, I may not even turn it on while I am at home.  Simply the process of leaving the office, and getting away from the workplace environment, stirs something within my mind that allows me to figure things out.

Where do you find is the best place for solving work problems?

Learn How to Build a Successful Blog Business

Envato is one of a small number of companies that has learned how to make money from blogs. Today, we gross well over seven figures a year from our blogs.

So it’s no small announcement that CEO Collis Ta’eed has released a book packed with the company’s secrets, detailing a road map you can use to navigate your blog business to success.

How to Build a Successful Blog Business is a straight forward guide to building a publishing business online that covers everything from choosing a niche to hiring staff, registering a business to selling it, finding traffic to monetizing it.

Whether you are interested in creating an additional income stream or building a fully-fledged business, this is an essential read for web entrepreneurs and online publishers.

A Guide to Evernote Trunk

I mentioned Evernote in my post on tools for productive online writing and I am sure almost all of you have heard about it – if not used it. It is probably the best note-taking software out there.

Just a few days back, Evernote announced a new section on their site called ‘The Trunk’. Being a long time user of the tool, I was immediately interested in knowing what it was all about and hence decided to check it out. This article sums up what I’ve discovered about this new offering from the folks at Evernote.

What is Evernote Trunk?

Evernote Trunk is basically a neatly organized collection of apps and tools built by third-party developers using Evernote’s API. It’s like Apple’s App Store or like the collection of Facebook apps built using Facebook’s API.

There’s one unique thing about Evernote Trunk though. The product range showcased includes hardware stuff too. There are sections called ‘Hardware’ and ‘Gear’ that talk about physical tools cameras and printers that work with Evernote.

App Categories

Now, lets see what are the categories under which Evernote has organized all these apps and tools. There are almost 100 items, mind you. It’s a very comprehensive collection for Evernote enthusiasts.

Mobile

Evernote works on all kinds of cellphones. It has apps for iPhone, Android, iPad and other smartphones. Hence, there’s bound to be a section dedicated to mobile users in the trunk. It features all kinds of different mobile apps and add-ons.

You’ll find apps like iNews that can quickly send an item from your mobile RSS feed reader to Evernote, Seesmic to save items from Twitter and Facebook to Evernote, and many more.

Desktop & Web

The Desktop & Web section, as the name suggests, features various Evernote related desktop tools and web applications.

And there are some pretty interesting apps here too. Like Scandrop that can scan documents and transfer them directly to your Evernote account, Nitro PDF Reader for saving PDF documents to Evernote, and many such nifty tools.

Hardware

Now we come to Hardware. As I mentioned earlier, the Hardware section showcases some of the physical tools like printers, scanners etc that could make the job of importing notes directly into Evernote easier.

This section lists Evernote compatible hardware from major vendors like Canon, Fujitsu, Nokia and Sony. One very interesting tool in this category I came across lets you wirelessly send pictures from your digicam to Evernote. It’s known as Eye-Fi.

Gear

If you are big fan of Evernote then you’d love the Gear section. It features all kinds of Evernote branded accessories and tools you could make use of.

There’s the Evernote starter pack, Evernote essentials guide, stickers, all kinds of t-shirts, wallpapaer pack, premium notepad, a podcast to listen and much more.

Notebooks

Finally, we’ve got a section named Notebooks. It’s an interesting category to say the least. You’ll find some familiar names in this section, like Make magazine and Cool Hunting.

What Evernote has done is that it has partnered with some of these publications to create customized content for Evernote users. So, basically, you can import these notebooks to your account and get customized content delivered right inside your Evernote. And they include some really cool stuff. Like, the Make: Projects Home and Garden notebook adds a bunch of DIY projects to your account. On the other hand, the Cool Hunting Travel Notebook comes with a number of essential travel tips.

How to Get Them Into Your Evernote?

Right, so now that you are tempted to try out some of these cool apps in the Trunk, you’d be wondering how to access them. Well it’s pretty simple actually. If you are using the latest version of Evernote on Windows or Mac, you should be prompted to update and once you do, you will see a ‘Trunk’ on the toolbar from where you can get direct access to the all those applications.

For those who prefer to use Evernote on the web, well, just sign in to your account and you’ll see the Trunk link present already, right on top. Click on it and start trying the apps, especially from the ‘Notebooks’ section.

As you can see, this new suite of tools from Evernote has to offer augments an already great note taking solution. If you are an Evernote user, I’d love to hear what you have to say about it.

Friday Photo Critique #43

Friday Photo Critique is our weekly community project, where we publish a photograph submitted by one of our wonderful readers, then ask you all to offer constructive feedback on the image. It’s a great way to learn more about photography, express your viewpoint, and have your own image critiqued!


Quick Ground Rules

  1. Play nice! We’ve deliberately chosen photographs that aren’t perfect, so please be constructive with any criticism.
  2. Feel free to offer any type of advice – composition, lighting, post-processing etc.
  3. You can also link to photographs that you feel offer a great example of this type of image shot exceptionally well.

Without further ado, here is this week’s candidate for Friday Photo Critique!


The Photograph

Photo Critique

Photographer: Ryan Szepan

Please let us know what you think in the comments – how would you have approached the scene or taken the photo differently? A massive thank you to everyone who commented last week.

The most constructive and helpful comments will be featured on the site. Interested in submitting your own photo? You can do so here!

Quick Tip: 5 Easy Ways to Stay on Track With Your Project 365

The first time I tried to complete a Project365 I failed, badly. In less than two weeks I was cheating, uploading photos from multiple days to try to keep up. Shortly after that I just gave up altogether. A month and a half ago I started all over again and this time I’m not struggling at all thanks to a couple of handy strategies I’ve been using, which is exactly what I’m going to share with you today!


Step 1. Do it With Friends

The most tricky part about a Project365 is often just remembering to do it, having a group of friends who are in the same boat helps a huge amount. Having people to talk to about your photos will keep them at the front of your mind, and you’ll have the added benefit that they’ll remind you get that image uploaded.

If you don’t know anyone who is doing a Project365 then all you have to do is join the Flickr Project365 Group – there are thousands of people there, all doing it me included! So go and find some photos which you like, and then leave some comments! Chances are that at least some people will reciprocate, and you’ll start building up your network.


Step 2. Find Inspiration

During my first attempt at a 365 it would get to the latter part of the evening and I would start looking around the room for something (anything) to photograph. This almost always resulted in boring mediocre photos of stuff on my desk.

If you’re short on ideas for the day then one of the best strategies I’ve found is to look through some of the best photos of the day on Flickr and try to replicate one of them in some way. You can easily find the top photos of the day on Flickr by clicking on the “Last 7 Days Interesting” link under “Explore” in the main navigation. This should keep you challenging yourself to produce high quality images without having to spend ages deciding what to photograph when you’re having a mental block.

Finally – subscribe to the PhotoJojo Newsletter, you can’t beat having great photography project ideas emailed straight to your inbox every so often!


Step 3. Get Some New Equipment

It’s amazing how a new bit of gear can breathe new life into your motivation for photography. Picking up a 50mm lens and a really cheap lighting kit helped me in a big way. You don’t have to spend a lot of money, if you’re interested in off-camera flash then you can pick up a cheap umbrella, stand, and flash for less than $100. Playing with studio lighting is a lot of fun, and it opens up so many more possibilities for Project365 shots, especially when you’ve left it till the last-minute and it’s dark outside again.


Step 4. Get A Flickr Pro Account

It’s not impossible to do a Project365 without a Flickr Pro account… but having one makes things much easier. Upgrading (just $24.95 for an entire year) means your monthly bandwidth limits are removed, you can access your original files at full size, and most importantly: you get full statistics on all of your photos.

The first two are handy, but the stats are really useful. In particular, stats let you gauge your own success rate without anyone else needing to tell you. You can see which of your shots got a lot of attention and which got none at all. This might be overly simple but it’s really useful for progressing as a photographer.


Step 5. Don’t Kill Yourself With Rules

Everyone is different and imposing a such a long-term project on yourself is a big deal. If you want to see it through to the end then the best thing to do is to make sure that the project suits you. I work for myself from home and I pretty much never get to bed before 2am. For that reason I now do my 365 according to my sleep cycle, not to the clock. As long as I’m awake – then it still counts.

Don’t be afraid to make small changes to fit the project better to you.

Credits: Hand-holding photo by Ashley Baxter and Rick Nunn for their Project50, Car lighting photo by Ricky Flores, self-beating photo by me, John O’Nolan.

Hints & Tips for Composing a Perfect Photo

Composition can simply be defined as how elements are arranged in a photo. You can choose to stand far away or move close up. You decide what type of lens to use. The basic skills of composition can be learned and practiced, and this tutorial is meant to add some tools to your arsenal, because compositional elements are just that, tools. Each one of these sections is a little trick that can apply to different situations. So let’s get started!


Rule of Thirds

The phrase “rule of thirds” is thrown around a lot in photography, and I have heard at least five different versions of the rule. Here are two interpretations.

One, make a tic-tac-toe board over your photo. Your main subject or an important feature of the subject should be at one of the intersections of two of the lines.

Two, divide your photo into thirds horizontally and vertically (same as above), your subject should be in 1/3 of the frame either horizontally or vertically, not both.

So basically, it’s generally a good idea to keep your subject out of the middle of the frame. Now that wasn’t so hard was it? As you can see in the photo below, the subject lands at an intersection of the lines. This lets your eye flow back into the frame to reveal the environment where the child is playing.


Repetition of Form

When shooting photos, it is often like being on a treasure hunt. You look for compositional elements. You seek them out. While the rule of thirds is a compositional tool that you control by framing up an image, the concept of repetition of form is something you look for and find. You can apply the rule of thirds in almost any situation, but repetition of form will not always be available.

That being said, repetition of form is basically just that, repeating shapes. Think of things that you see everyday; a row of flags or boxes, a line of children, a bunch of balloons. When you encounter these things, shoot the photo to emphasize the repetition. The photo below shows two sets of hand folded in prayer. I think the symmetry of the image shows unity and balance.


Leading Lines

Using leading lines is like repetition of form in that it is a compositional tool you have to seek out and look for, you cannot just apply it at will. Any strong lines that are in your images will lead the viewer’s eye from one end to the other.

The eye naturally follows lines. Imagine railroad tracks with a person walking toward you along them. The lines of the tracks will lead your eye to the person. Look for the edges of shelves, stripes on the road, even telephone wires or a fence. Arrange the lines so the go to your subject.

Usually getting physically closer to the lines helps. If the lines are on the ground, get close to the ground. If the lines are on a wall, get closer to the wall. But even if you’re not going to use lines, be conscious of them. Lines can just as easily lead your viewer away from a subject as toward them.

As in the example, the photo below uses railroad tracks to bring your eye from the railroad worker to the train wreck behind him:


Framing

People frame and mat photos to emphasize them, to draw attention to them. You can use this same technique within photographs. It’s sometimes easier to think about this technique in a different way. Think about it as shooting through objects – look for things to shoot through.

Look for windows, slats or holes in a fence, even the shapes that people can make with their arms or legs. When utilizing the framing technique, the smallest movements can make all the difference. A few inches, or even millimeters, can have a profound impact.

As with all of these techniques, and really all of photography, be deliberate in your image making. Think about what you’re trying to say and use the tools at your disposal that are most appropriate.

In the next photo, the child is framed between the lines of the abacus. In this instance, I think the framing creates a tension that we all remember from our days of doing math homework.


Layering

Photography as an art form has some limitations. At reproducing reality, photography can for the most part not show you time. Video can show time, but neither video or photography can show depth (unless you want to get technical and bring up 3D technology). But there are ways around this.

Layering can make your photos seem more three-dimensional. By having something in the foreground, something in the background, and something in the middle, you can create depth to your image. Your subject can be in any of these positions. Having each of the individual layers add information to the story of the photo can really take your work to the next level.

In the following image, the child drawing on the ground is the foreground element, but the children behind him add an additional layer. It shows that he is participating in an activity with others and isn’t just by himself.


Bright Spots

Like the technique of leading lines, the idea of bright spots (sorry it doesn’t have a more official-sounding name) describes the natural behavior of human vision. People’s eyes are naturally drawn to the brightest part of the image.

This can be good, such as having a light face on a dark background. But this can also cause problems, such having a bright lamp in the background when your subject isn’t lit as well. You can use this knowledge as part of your compositional technique, but it is also just a good idea to keep this in mind while your shooting to avoid a distracting problem in your image.

In the photo below, this technique is exaggerated because the subject in very bright light wearing colorful clothes while the rest of the image is very dark.


Negative Space

The term negative space refers to large areas of blank, empty space, usually contrasting in color, tone, or brightness to your subject. This technique creates a dynamic separation. Depending on how negative space is used, it can create tension or unity in an image.

There are several famous pieces of art and photographs that utilize this technique, but again, it’s usually something that has to be found or created in a studio.

In the next photo, the sky acts as the negative space and balances the buildings in the frame. But toward the left and the right the buildings seem to be reaching up and pushing against the negative space.


Selective Focus

While our eyes do have to focus on things at different distances, they do it very quickly and we normally don’t notice that things closer or farther away from what we’re looking at are not as sharp.

A camera operates differently. A good photo can be many things, but often it is a photo that shows the subject to the viewer in a way that the viewer doesn’t typically see it. We don’t notice what our eyes are focused on in our daily lives, so appropriately choosing and emphasizing focus can work to your advantage.

Selective focus is usually achieved by using a shallow depth-of-field. Depth-of-field is determined by your aperture. For a shallow depth-of-field, you want your aperture as wide open as possible, in other words, you want the lowest number f/stop possible.

If you’re unfamiliar with the term “depth-of-field,” it is a little hard to define, so I won’t go into it here, but it is not hard to find information about it. In the photo below, I used a shallow depth-of-field, selectively focusing on the girl to draw attention to her and separate her from the environment.


Camera Height or Angle

Continuing on with the idea that good photos show things to the viewer in a different way, people are used to seeing things from standing eye-level. So it would stand to reason that simply changing the height or angle of view would give your photos an interesting look. Get on a chair and show the scene from above. Lay down on the floor and look up at everything.

There are also some principles you should remember while changing your height or angle. People shot from a low angle will seem taller and perhaps stronger or more dominating, while people shot from a high angle will seem small and possibly weak or vulnerable.

This is something people perceive on an almost subconscious level. Adults literally look down on children, and when we were children we literally looked up to adults. Use this to your advantage. You could use it to contrast the obvious, or use it to add another dimension to the story your image is telling.


Lensing

Beginning photographers will typical choose the focal length (how “zoomed” in or out they are) of their lens based on their distance to the subject. If close to something, they zoom out. If far from something they zoom in.

For the purposes of this tutorial, let’s pretend we only have two lenses: a wide angle lens and a “longer” telephoto lens. These lenses have unique characteristics other than how close they make things appear. As I mentioned earlier, a telephoto lens has a more shallow depth-of-field than a wide angle lens when they are both set to the same f/stop and focused at the same distance.

Telephoto lenses also achieve a characteristic called compression. Compression makes near and far objects appear closer together and also closer to the same size. Wide angle lenses allow the viewer to feel closer to the subject (but only if you get in close).

Wide angle lenses can also be used to include a lot of the background, while telephoto lenses can be used to eliminate distracting backgrounds.

In the photo below, I shot the same scene using a telephoto and a wide angle lens. As you can see by the lines, in both photos, the top of the frame is the girl’s head and the bottom is the edge of the logo. For the telephoto image, I moved farther away, and for the wide angle image I moved in very close.

You can see the differences in how the images look, like the relative size of the logo to the girl in the frame and how much of the background you can see. Sometimes it is good to “zoom” with your feet. It can be a good exercise to zoom your lens all the way in and then physically back way up until you have what you want in your frame. On the other hand, you can set you lens very wide and then move in close.


Conclusion

This tutorial probably doesn’t cover every element of composition, and it can probably be argued that camera height and lensing aren’t strictly used for compositional purposes. That said, I think that with all of these tools at your disposal, you’ll have a good foundation to starting making and understanding great photos.

Just remember that rules are made to be broken, not every image has to follow the rule of thirds. But remember to look for those compositional elements that naturally occur in our world, like leading lines and repetition of form. Also remember to show your viewers things in a way that they haven’t seen them before.

Now get out there are start composing!

How to Use CakePHP’s Access Control Lists


If you’re building a CMS, you’ll probably need different user roles—superusers, admins, users—with different permission levels. Too complicated to code? Enter CakePHP’s ACL (Access Control Lists). With the right setup, you’ll be checking user permissions with just one line.

Introduction: What Are Access Control Lists?

The ACL lets you create a hierarchy of users with their respective roles. Here’s a quick example.

  • Super Users
    • User #1
  • Admins
    • User #2
    • User #3
  • Users
    • User #4
    • User #5
    • User #6
    • ….

In this tutorial, we will be setting up an ACL for a simple blog. If you haven’t yet checked out Getting Started With CakePHP (and Part 2) here on Nettuts+, please do so and then return, as we will be taking for granted the framework basics.

With this hierarchy, we can assign several permissions for each role:

  • The Super Users can create, read, update and delete Posts and Users.
  • The Admins can create, read, update and delete Posts.
  • The Users can create and read Posts.
  • Everyone else can just read Posts.

Each permission will be given to the group, not to the user; so if user #6 is promoted to Admin, he will be checked against the group permission –not his. These roles and child nodes (users) are called Access Requests Objects, or AROs.

Now, on the other side, we have the Access Control Objects, or ACOs. These are the objects to be controlled. Above I mentioned Posts and Users. Normally, these objects are directly linked with the models, so if we have a Post model, we will need an ACO for this model.

Each ACO has four basic permissions: create, read, update and delete. You can remember them with the keyword CRUD. There’s a fifth permission, the asterisk, that is a shortcut for full access.

We will be using just two ACOs for this tutorial: Post and User, but you can create as many as you need.

The ACL Tables

Let’s proceed to create the database tables. You can find this code in db_acl.sql inside your app’s config/sql directory.

CREATE TABLE acos (
  id INTEGER(10) UNSIGNED NOT NULL AUTO_INCREMENT,
  parent_id INTEGER(10) DEFAULT NULL,
  model VARCHAR(255) DEFAULT '',
  foreign_key INTEGER(10) UNSIGNED DEFAULT NULL,
  alias VARCHAR(255) DEFAULT '',
  lft INTEGER(10) DEFAULT NULL,
  rght INTEGER(10) DEFAULT NULL,
  PRIMARY KEY  (id)
); 

CREATE TABLE aros_acos (
  id INTEGER(10) UNSIGNED NOT NULL AUTO_INCREMENT,
  aro_id INTEGER(10) UNSIGNED NOT NULL,
  aco_id INTEGER(10) UNSIGNED NOT NULL,
  _create CHAR(2) NOT NULL DEFAULT 0,
  _read CHAR(2) NOT NULL DEFAULT 0,
  _update CHAR(2) NOT NULL DEFAULT 0,
  _delete CHAR(2) NOT NULL DEFAULT 0,
  PRIMARY KEY(id)
); 

CREATE TABLE aros (
  id INTEGER(10) UNSIGNED NOT NULL AUTO_INCREMENT,
  parent_id INTEGER(10) DEFAULT NULL,
  model VARCHAR(255) DEFAULT '',
  foreign_key INTEGER(10) UNSIGNED DEFAULT NULL,
  alias VARCHAR(255) DEFAULT '',
  lft INTEGER(10) DEFAULT NULL,
  rght INTEGER(10) DEFAULT NULL,
  PRIMARY KEY  (id)
);

We can begin now creating ARO and ACO nodes, but hey, we don’t have users! We’ll have to create a basic authentication system.


Step 1: A Basic Authentication System

As this tutorial is intended for CakePHP developers with a basic to moderate knowledge of the framework, I will be supplying the code and a brief explanation. However, the authentication system is not the goal of this tutorial.

The MySQL table:

CREATE TABLE users (
  id INTEGER(10) UNSIGNED AUTO_INCREMENT KEY,
  username TEXT,
  password TEXT
);

The User model (models/user.php)

<?php
class User extends AppModel {
    var $name = 'User';
}
?>

The Users controller (controllers/users_controller.php)

<?php
class UsersController extends AppController {
    var $name = 'Users';
    var $components = array('Auth'); 

    function beforeFilter(){
        $this->Auth->userModel = 'User';
        $this->Auth->allow('*');
    } 

    function register(){
        if(!empty($this->data)){
            // Here you should validate the username (min length, max length, to not include special chars, not existing already, etc)
            // As well as the password
            if($this->User->validates()){
                $this->User->save($this->data);
                // Let's read the data we just inserted
                $data = $this->User->read();
                // Use it to authenticate the user
                $this->Auth->login($data);
                // Then redirect
                $this->redirect('/');
            }
        }
    } 

    function login(){
        if(!empty($this->data)){
            // If the username/password match
            if($this->Auth->login($this->data)){
                $this->redirect('/');
            } else {
                $this->User->invalidate('username', 'Username and password combination is incorrect!');
            }
        }
    } 

    function logout(){
        $this->Auth->logout();
        $this->redirect('/');
    }
}
?> 

Since we have new elements, let’s review them. First, we are setting a $components variable. This variable includes all the components in the array. We will be needing the Auth component, which is a core component, as are HTML and Form helpers, but since it isn’t included by default by Cake, we will have to include it manually.

The Auth component handles some basic authentication mechanics: it helps us to login a user and it handles an authenticated user’s session for us, as well as handling the log out and basic authorization for guests. Also, it hashes the password automatically. I’ll be explaining how to call each function in the following paragraphs.

Next, we are creating a function called beforeFilter. This is a callback function and it lets us set some actions before all the controller logic is processed. The Auth component requires us to specify a model to be used, in this case the User. Then, by default, it will deny all the access to users not logged in. We’ll have to overwrite this behaviour with allow() which requires one parameter. That parameter can be an asterisk, specifying that all methods inside said controller can be accessed by unauthenticated users. Or, it can be passed an array with the functions that can be accessed by unauthenticated users. In this case, since we have just three functions, the following lines are the same thing.

$this->Auth->allow('*');
$this->Auth->allow(array('register', 'login', 'logout'));

For the login() function, the Auth component will handle all the login mechanics for us. We will just have to supply the function with an array with two keys: the username and the password. These keys can be changed, but by default, both username and password fields will be matched against the database and will return true if the user has been authenticated.

Finally, the controller’s login function will try to match a username/password combination against the database.

Please note that this code is very basic. You’ll need to validate the username characters, if the username exists, the minimum length for the password, and so on.

The Register view (views/users/register.ctp)

<h2>Register your account</h2> 

<form method="POST" action="<?=$this->here; ?>"> 

<p>
    Username
    <?=$form->text('User.username'); ?>
</p>
<p>
    Password
    <?=$form->password('User.password'); ?>
</p> 

<?=$form->submit('Register'); ?>
</form>

The Login view (views/users/login.ctp)

<h2>Log in to your account</h2> 

<form method="POST" action="<?=$this->here; ?>"> 

<?=$form->error('User.username'); ?>
<p>
    Username
    <?=$form->text('User.username'); ?>
</p>
<p>
    Password
    <?=$form->password('User.password'); ?> 

</p>
<?=$form->submit('Log in'); ?>
</form>

Open /users/register in your web browser and register a new account. I suggest admin as username and 123 as password and if your session expires just go to /users/login and enter the correct username/password combination you just created.


Step 2: Denying Access To Unauthenticated Users

We’re not even working with ACL, but we already can deny posting, editing and deleting posts. Open your Posts controller and add the Auth component.

var $components = array('Auth');

Now go to /posts in your web browser. If you’re logged in, you should see the posts, but if you’re not, you will be redirected to /users/login. By simply including the Auth component, all the actions are by default, denied for guests. We need to deny three actions for unauthorized users: create, edit and delete. In other terms, we’ll have to allow index and view.

function beforeFilter(){
    $this->Auth->userModel = 'User';
    $this->Auth->allow(array('index', 'view'));
}

Go to edit or create a post; if you’re not logged in, you should be redirected to /users/login. Everything seems to be working quite good, but what about the views? The edit and delete links are being shown to everybody. We should make a conditional.

But before going into that, let’s see how Auth’s user() function works. Copy and paste these lines into the index function.

$user = $this->Auth->user();
pr($user); 

Open your /posts in your browser and, if logged in, the pr() will throw something like this.

Array
(
    [User] => Array
        (
            [id] => 1
            [username] => admin
        )
) 

The user() function returns an array just as a model would do. If we had more than three fields (password is not included), they will be shown in the array. If you’re not logged in, the array will be empty, so you can know a user is logged in if Auth’s user() array is not empty.

Now, Auth is a component, meant to be used in a controller. We need to know from a view if a user is logged in, preferably via a helper. How can we use a component inside a helper? CakePHP is so awesome and flexible that it is possible.

<?
class AccessHelper extends Helper{
    var $helpers = array("Session"); 

    function isLoggedin(){
        App::import('Component', 'Auth');
        $auth = new AuthComponent();
        $auth->Session = $this->Session;
        $user = $auth->user();
        return !empty($user);
    }
?> 

Save this snippet in views/helpers as access.php. Now let’s see the code, line by line. First, we are setting up a $helpers var. Helpers can include other helpers, just like $components can. The Session component is required for the Auth component, but we have no access to this component inside a helper. Fortunately we have a Session helper, that will help us.

Next, we create a function and use App::import which will let us import an element that normally we wouldn’t have access to. The next line creates the Auth component in a $auth variable, and now a little dirty hack; since the Auth component reads the session to know if we are logged or not, it requires the Session component, but as we are importing it from a place it shouldn’t belong to, we’ll have to give it a new Session object. Finally, we are using user() and setting it to $user and returning true if the variable is not empty, otherwise false.

Let’s get back to the posts controller and proceed to add the helper.

var $helpers = array('Access');

The access helper is now accessible from the view. Open index.ctp in views/posts and replace this line.

<small><a href="/posts/edit/<? echo $post['Post']['id'] ?>">edit</a> | <? echo $html->link('delete', '/posts/delete/'.$post['Post']['id'], NULL, 'Are you sure?'); ?></small> 

With this one.

<? if($access->isLoggedin()): ?><small><a href="/posts/edit/<? echo $post['Post']['id'] ?>">edit</a> | <? echo $html->link('delete', '/posts/delete/'.$post['Post']['id'], NULL, 'Are you sure?'); ?></small><? endif; ?> 

Go back to your web browser, reload the index page and if you’re logged in, you’ll see the edit and delete links for each post. Otherwise, you’ll see nothing.

While this would be enough if you have an app with one or two users, it is not enough if you have registrations open.


Step 3: Installing ACL

Open the Users controller and add the ACL component.

var $components = array('Auth', 'Acl'); 

Next, let’s create a function to install the ACOs and AROs nodes.

function install(){
    if($this->Acl->Aro->findByAlias("Admin")){
        $this->redirect('/');
    }
    $aro = new aro(); 

    $aro->create();
    $aro->save(array(
        'model' => 'User',
        'foreign_key' => null,
        'parent_id' => null,
        'alias' => 'Super'
    )); 

    $aro->create();
    $aro->save(array(
        'model' => 'User',
        'foreign_key' => null,
        'parent_id' => null,
        'alias' => 'Admin'
    )); 

    $aro->create();
    $aro->save(array(
        'model' => 'User',
        'foreign_key' => null,
        'parent_id' => null,
        'alias' => 'User'
    )); 

    $aro->create();
    $aro->save(array(
        'model' => 'User',
        'foreign_key' => null,
        'parent_id' => null,
        'alias' => 'Suspended'
    )); 

    $aco = new Aco();
    $aco->create();
    $aco->save(array(
        'model' => 'User',
        'foreign_key' => null,
        'parent_id' => null,
        'alias' => 'User'
    )); 

    $aco->create();
    $aco->save(array(
       'model' => 'Post',
       'foreign_key' => null,
       'parent_id' => null,
       'alias' => 'Post'
    )); 

    $this->Acl->allow('Super', 'Post', '*');
    $this->Acl->allow('Super', 'User', '*');
    $this->Acl->allow('Admin', 'Post', '*');
    $this->Acl->allow('User', 'Post', array('create'));
} 

By importing the ACL component, we can access the ACOs and AROs model. We begin by creating an ARO, which is the requester for the objects; in other words, who will be accessing the objects. That would be the user (hence the User string in model). We are creating different roles; Super, Admin, User and Suspended.

Next, we do the same with ACOs, since we just have two objects to manage (Posts and Users), we’ll create two, one for each.

Now, a quick note. The array that we are saving for both ACOs and AROs have four fields: the model name, foreign key (which is useful if you want to give access to one ARO, like a post he created), parent id (which will be used later and is the basic parent-child nodes relationship; we will be creating users below these roles), and the alias (which is a quick form to find the objects).

Finally, we are using ACL’s allow() function. The first parameter is the ACO alias; second, the ARO alias, and third, the permissions given to said ARO. A Superuser has full access to the Post and User models, an Admin has full access to the Post model, and a User can just create posts.

At the function’s beginning, I declared a conditional to check if the Admin role exists in ACOs. You don’t want to install the same thing more than once, do you? It would mess up the database quite badly.

Open /users/install in your web browser, and, since we don’t have a view, CakePHP will throw an error, but just check the MySQL dump. All the relationships have been successfully created, it’s time to work with the child nodes.

Setting users to roles

Let’s clean the users table. Open phpMyAdmin, select your database, the users table and click empty. We’ll get back to the register() function on the Users Controller. Just below this line:

 $this->Auth->login($data);

Paste this code:

// Set the user roles
$aro = new Aro();
$parent = $aro->findByAlias($this->User->find('count') > 1 ? 'User' : 'Super'); 

$aro->create();
$aro->save(array(
     'model'        => 'User',
     'foreign_key'    => $this->User->id,
     'parent_id'    => $parent['Aro']['id'],
     'alias'        => 'User::'.$this->User->id
)); 

In the first line we create a new ARO object. Then we’ll get the parent node in which the user will be created. If there’s a record in the database, we’ll set it to the User ARO, else, the first user should be the Super.

Then we’ll save a new ARO; the model is the one we are working currently on, User, the foreign_key is the last record’s id we just created. The parent_id is the node we began with; we’ll just pass it the id and finally the alias. It is a good idea to call it Model_name, then a separator ::, and then the identifier. It will be much easier to find it.

Now we’re done. Create four users: superuser, adminuser, normaluser and suspendeduser. I suggest the same username and password for testing purposes. Don’t forget that, until this point, only the superuser has a role of Super; all the remaining will be Users!


Step 4: Reading Permissions

Because ACL is a component, it is accessible only within the controller. Later, it will be also in the view; but first things first. Include the ACL component in the Posts controller, as we did in the Users controller. Now you can begin checking permissions. Let’s go to the edit function and do a quick test. In the first line of said method, add this.

$user = $this->Auth->user();
if(!$this->Acl->check('User::'.$user['User']['id'], 'Post', 'update')) die('you are not authorized'); 

ACL’s check() function needs three parameters: the ARO, the ACO and the action. Go and edit a post, and, if you’re not logged in as the super user, the script will die. Go to /users/login and access as the Super user and go back to editing. You should be able to edit the post. Check below the MySQL dump to see the magic. Four database queries: that sure isn’t scalable.

We have two issues. First, two lines for the permissions check. Second, the ACLs aren’t being cached. And don’t forget all the logged users can see the edit link, even if just the Super user can use it.

Let’s create a new component. Let’s call it Access.

<?php
class AccessComponent extends Object{
    var $components = array('Acl', 'Auth');
    var $user; 

    function startup(){
        $this->user = $this->Auth->user();
    }
}
?>

Save it in controllers/components as access.php. The class’s $user var will be initiated as the component is loaded, and startup() is a callback function, so it’s now set in the class. Now let’s create our check() function.

function check($aco, $action='*'){
    if(!empty($this->user) && $this->Acl->check('User::'.$this->user['User']['id'], $aco, $action)){
        return true;
    } else {
        return false;
    }
}

Our check() method will need just two parameters: the ACO and the action (which is optional). The ARO will be the current user for each session. The action parameter will default to *, which is full access for the ARO. The function begins by checking if the $this->user is not empty (which really tells us if a user is logged in) and then we go to ACL. We have already covered this.

We can now include the Access component in our Posts controller and check the permissions with just one line.

if(!$this->Access->check('Post', 'update')) die('you are not authorized');

The same result is achieved with less code, but the error message is ugly. You’d better replace the die() with the CakePHP error handler:

$this->cakeError('error404');

Permissions in views

This might be ugly, but it works. We’ll have to create a helper that loads a component with a custom method for use in the helper.

Add this function in the Access component (controllers/components/access.php).

function checkHelper($aro, $aco, $action = "*"){
    App::import('Component', 'Acl');
    $acl = new AclComponent();
    return $acl->check($aro, $aco, $action);
} 

Now,let’s rewrite the access helper (views/helpers/access.php).

<?php
class AccessHelper extends Helper{
    var $helpers = array("Session");
    var $Access;
    var $Auth;
    var $user; 

    function beforeRender(){
        App::import('Component', 'Access');
        $this->Access = new AccessComponent(); 

        App::import('Component', 'Auth');
        $this->Auth = new AuthComponent();
        $this->Auth->Session = $this->Session; 

        $this->user = $this->Auth->user();
    } 

    function check($aco, $action='*'){
        if(empty($this->user)) return false;
        return $this->Access->checkHelper('User::'.$this->user['User']['id'], $aco, $action);
    } 

    function isLoggedin(){
        return !empty($this->user);
    }
}
?> 

The beforeRender() method is a callback, similar to the component’s startup(). We are loading two components and since these will be used in most functions, it’s a good idea to start all at once, than to manually start them each time the method is called.

Now on your index.ctp view in views/posts you can replace this line.

<small><a href="/posts/edit/<? echo $post['Post']['id'] ?>">edit</a> | <? echo $html->link('delete', '/posts/delete/'.$post['Post']['id'], NULL, 'Are you sure?'); ?></small>

With this one.

<? if($access->check('Post')): ?><small><a href="/posts/edit/<? echo $post['Post']['id'] ?>">edit</a> | <? echo $html->link('delete', '/posts/delete/'.$post['Post']['id'], NULL, 'Are you sure?'); ?></small><? endif; ?>

Just don’t forget to check permissions, both in the views and the controllers!

User data

You can access the user data for a logged user with the user() method in the Auth component. Then you can access the array and get the info you want. But there must be a better way. Let’s add the following function in the Access component.

function getmy($what){
    return !empty($this->user) && isset($this->user['User'][$what]) ? $this->user['User'][$what] : false;
} 

This is quite useful when you need to save a Post with a user_id relationship.

$this->data['Post']['user_id'] = $this->Access->getmy('id');

And in the view, we can do something similar with the helper.

function getmy($what){
    return !empty($this->user) && isset($this->user['User'][$what]) ? $this->user['User'][$what] : false;
}

In your template file you can do something like below to greet a user by his username.

Welcome <?=$access->isLoggedIn() ? $access->getmy('username') : 'Guest'; ?>

Step 5: Modifying Permissions

Let’s say we need to switch roles for the user #4: he needs to be a Super User. So, User’s id is 4 and Aro’s id is 1.

$user_id = 4;
$user_new_group = 1;

Now we need to find the User’s Aro in order to modify its parent Aro.

$aro_user =  $this->Acl->Aro->find('first',
    array(
        'conditions' => array(
            'Aro.parent_id !=' => NULL,
            'Aro.model' => 'User',
            'Aro.foreign_key' => $user_id
        )
    )
); 

Finally, if the $aro_user variable is not empty, let’s update the Aro.parent_id field.

if(!empty($aro_user)){
    $data['id'] = $aro_user['Aro']['id'];
    $data['parent_id'] = $user_new_group;
    $this->Acl->Aro->save($data);
}

Please note that you have to validate both the user’s id and the new aro’s id. If one of these do not exist, it will create a mess in your ACL tables.


Step 6: Optimization

Although the component we just created are both simple and useful, the database is queried with each and every check. It is not ready for production yet. First, the database should be queried as little as possible. To optimize this, we should take advantage of CakePHP’s Cache.

Using Cache will reduce the load quite a bit, but if we have ten posts showing up in the index, and, for each one, we are checking if the user has update permissions for the Post Aco, the framework will be reading and parsing a file to return the same result…ten times for each page load.

That’s the second point: a variable inside the class and some conditionals will make the work lighter, so that a repeated request will be checking against Cache just once.

Both these changes are reflected in access_cache.php, inside the controllers/components directory. So make sure you download the source!


Conclusions

Access Control Lists are a basic features that most apps need. CakePHP has a nice implementation, but lacks in both good documentation and examples. I hope that, with this tutorial, these two issues will now be covered. Thanks for reading!

Quick Tip: One Way Of Using The Noise Gate Creatively

Among the most underrated of mixing tools is the noise gate. It can do wonders for cleaning up loose sounds and emphasizing various aspects of a sound’s dynamics. A lesser known fact is that it can be used as a unique creative processing tool. In this tip we will look at one way of doing this by combining Logic’s noise gate with some creative routing techniques in order to create a dynamic auto panner.

Set Up

If you are unfamiliar with noise gates, the controls are fairly simple and I would suggest looking in your product manual for a more in depth explanation as this tip is going to assume some degree of basic knowledge.

What we are going to make is an effect that pans a signal according to its level. In this case, a reverb which pans left when it’s output is above a certain level and pans right when it’s output is below that same level.

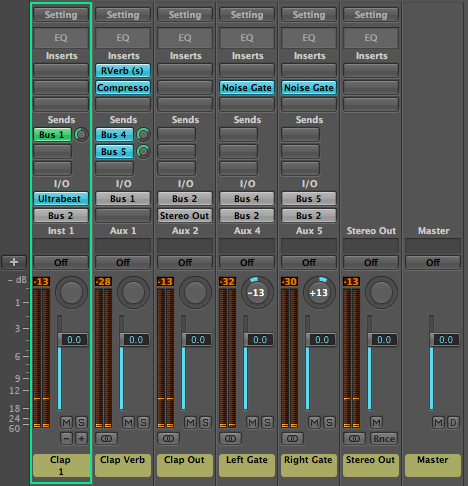
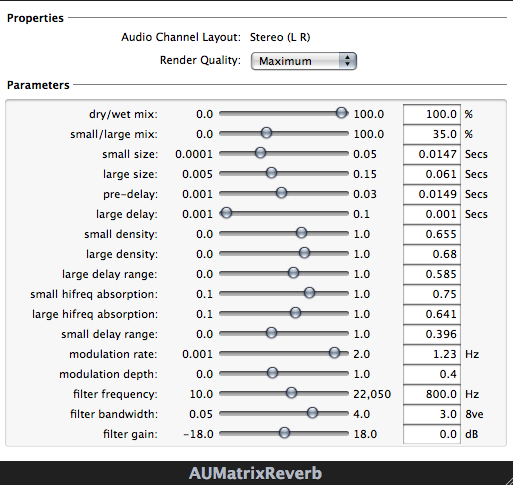
For this example, I have instantiated Ultrabeat and sent a clap to direct out as well as a reverb aux. I have then compressed the reverb (more on why I did this later) and sent the reverb to two aux. channels where I have placed noise gates. I have then sent the two gated verbs and the dry clap to a single aux. (just for added control) and sent that to my stereo out.

Your routing should look something like this.

Closing The Gate

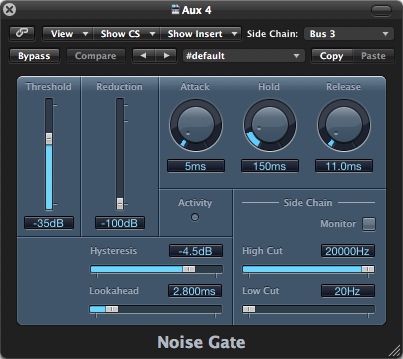
I am now going to solo one of the gates and bring up the threshold until my reverb begins to chatter (the gate opens and closes very fast as the signal is centered around the threshold) which is made more prominent due to the compression evening out the signal earlier in the chain.

First noise gate.

Download audio file (first.mp3)

First noise gate (left reverb).

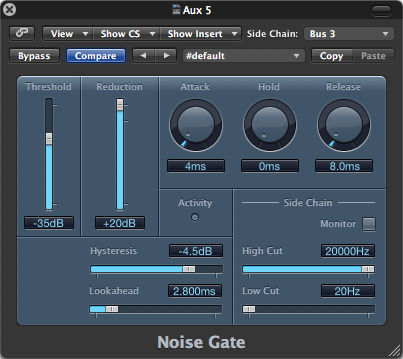
From here, I will input the threshold setting into the second gate, but instead of having it cut the signal at the threshold, I will boost it by reversing the gain slider. Now the first gate will let the signal pass only above the threshold and the second gate will do the opposite and only let the signal pass below the threshold.

Second noise gate.

Download audio file (second.mp3)

Second noise gate (right reverb).

More Possibilities

From here I can pan the two signals to opposite ends of the stereo spectrum or do any other number of things to each channel individually to create an auto panning effect (and then some) that responds to the signal dynamics. The possibilities are literally endless

Download audio file (Both.mp3)

Both gates together.

Download audio file (wclap.mp3)

Reverb with clap.


36 Studio Reels That Will Knock Your Socks Off

No literally they will. I watched the list straight through, and then my fee were bare… wierd. Anywho, these are reels from some of the best, hardest working studios in the industry, and although I couldn’t get all that I wanted in this time… well, lets just say I see this being an awesome continuing series.


The Mill 2010 Showreel

The Mill USA 2010 Showreel

EntityFX Montage Reel

9North 2010 Showreel

Weta Digital’s Various Reels

Base FX 2010 Reel

Ghost VFX Reel 2010

Pictorian VFX & Animation Showreel 2009

Engine 2010 Reel

Royale Winter 2010 Showreel

Random 2010 Reel

Moving Picture Company Various Reels

The Molecule Various Reels

Blacklist Reel

HunterGatherer Summer 2010 Reel

Syndrome 2009 Reel

Double Negative 2010 Showreel

Animal Logic Various Showreels

Hydraulx Various Demo Reels

Zoic Television Reel January 2010

Zoic Film Reel June 2010

Zoic Design Reel December 2009

TheoryFX 2009 Demo Reel

BTRY Show Reel

Spillt Super New Reel 2009

Nylon Spring 2010 Reel

Black Ginger Showreel Montage

Boundary Visual Effects 2010 Reel

Tequila FX Reel

Rising Sun Pictures Reel

Luma Pictures 2010 Reel

Monkeyhead Reel 2010

Make Reel 2010

Rawbot Demo Reel

Method 2010 Reel

Imaginary Forces Reel

If you enjoyed this post, please give it a vote on Digg or a stumble to say thanks!


Core Art Skills: Part 6, Bringing It All Together


This is the final part of the six part series “Core Art Skills”. Ben Mounsey will show you how to use texture, dimension, figure and visual reference as a basis for creating a final piece of artwork. This tutorial is broken down so that the workflow follows stages that replicate the order of the course and reinforces the value of each skill. The final image is the culmination of all the practices covered previously in the series.

Continue reading “Core Art Skills: Part 6, Bringing It All Together”

How The Hell Do I Use Reverb Anyway?!? Basix

Reverb is one of the things that can make or break a mix. Too much and it will either sound like it’s from the eighties or just plain too cluttered to be able to hear correctly. Too little and you feel like every instrument is attacking you at once.

Reverb is used to create space in a mix, realistic or thematic, and a different use of reverb can give the same song a completely different character. Give two mixers the same mix and only allow them to change all the reverbs. Chances are those mixes are going to come out very different from one another.

In the following Basix tutorial I’ll go into the different parameters, reverb modes and use of reverb. With the use of audio examples to demonstrate what I’m getting at, it’s my hope that I can clear some doubts that you have surrounding it.


Typical Reverb Parameters

In every reverb engine we have some of the same parameters to fiddle with. The more basic reverb plug-ins only have one or two parameters but some of the more advanced ones have almost unlimited capabilities for customization. Let’s look at some of the typical parameters we usually see in a reverb.

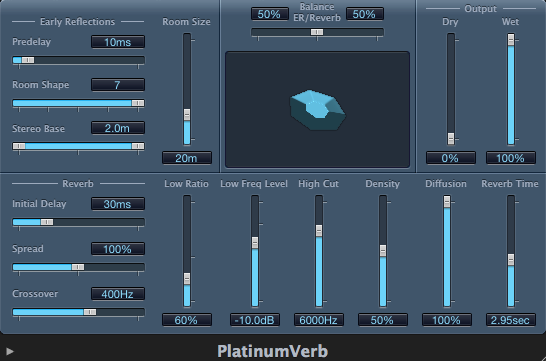
  • Room Size/Type – You can usually choose how big you want your reverb to be. This can be either selected as pre-determined reverb modes(more about reverb modes below) or just the size of the reverb in seconds. A 0.5 second reverb sounds much shorter and smaller than a longer lush 3.3 second one.

  • Pre-delay – You can use pre-delay to distance the reverb from the source sound. Think of pre-delay like the distance to the walls. By adding more pre-delay you are pushing the walls back allowing more time between the source sound and the reverb. This can be good when you have a big ballad with lots of reverb on the vocal but you don’t want to drown out the phrases of the singers with too much reverb.

  • Early Reflections – Early reflections are all the combined reflections that happen after the original source signal. Theoretically, since these early reflections are the first reflections that bounce back from the nearest walls of our imaginary space our ears can pretty accurately gauge how large a room is supposed to be. If the early reflections are nearly instantaneous we are in a small room, but if the reflections don’t bounce back as quickly we can determine that we are in a larger space.

  • Damping – Most rooms have all sorts of things that absorb higher frequencies. The carpet on the floor, the couch in the middle of the room as well as any blankets and clothes you have lying around. By using the damping factor on a reverb you are essentially determining how much high frequency energy is absorbed. Some reverbs have damping parameters for both high and low frequencies, and it works very similar to EQ.

  • Density – How dense do you want your reverbs to be? The more dense a reverb is, the more the reflections continue to reflect and pack together, creating a thicker sound. The lower the density, the more space between each reflections, creating something that’s more similar to distinct echoes instead of a natural reverb.

  • Diffusion – Diffusion determines the rate at which the reflections scatter and die down. A diffuse space is usually a controlled live space, with reflections that don’t pack together but rather disperse and die down.

  • Frequency Filters – Most high quality reverbs have dedicated EQ controls on them, but some reverb engines just have frequency filters that allow you to filter out either unwanted high or low frequencies. This can be good if there is too much low bass in your reverb cluttering up the mix, or if there is too much high energy hiss annoying you.

  • Wet/Dry Mix – Reverb are time based effects and therefore should almost always be used as a send effect rather than an insert. By using them as a send you can treat the reverb separately from the original source, allowing you more control over your source and reverb signals. If send effects confuse you, take a look at Joel Falconer’s tutorial on them here.


The Different Reverb Modes

The spaces around you all sound different. The spacious reverb you get by walking into a European Cathedral is not the same as you would get from walking into your living room.

Spaces interact with each other, sounding bigger and bigger as there is more of it. Audio engineers know how the different spaces sound and what we can accomplish musically by choosing the right space to give to our songs. The different spaces we can choose from in our productions are called room modes. Reverb modes are basically categories of different spaces that have a distinct character and sound.

I’m going to be using a drum beat as an example of the various reverb modes, so before we put different reverbs on it, listen to it dry below.

Download audio file (drumsdry.mp3)

I’m adding the reverb to all of the drum tracks equally for demonstration purposes. Usually, we don’t necessarily need to add reverb to everything. Maybe putting a little reverb on the over-head microphone tracks is enough to give a drum-kit its space, but for the sake of listening we’ll be putting the whole drum-kit into the reverb.

  • Room – Rooms evoke feelings of smallish spaces with low ceilings. It can sound like a bathroom (everybody sounds great singing in the shower right?) or a small studio room. The sound a room makes is not as lush or big as a hall, but it does have its character and uses when you need to give an instrument a little space and depth.

    In the audio sample below I’ve added a realistic 0.7 second room sound to our drum track. Listen to how we’ve put the drums into its own space now.

    Download audio file (drumsroom.mp3)

  • Hall – Hall reverbs are big and plentiful. You can add small halls to things, but it’s not unusual to use hall reverbs to add lush big reverbs to vocals, big drum-kits and other things you want to make sound like it’s being played in a big hall. Small halls still sound bigger than small rooms, and they have a more reflective quality than a room.

    Here is the same drum-beat played with a 2.4 second Hall reverb. The space sounds much bigger, and also more reflective than the room sound.

    Download audio file (drumshall.mp3)

  • Chamber – Chambers were the first kind of real reverb that was created in the studios back in the old days. By playing the music through speakers down in reflective chambers that had a microphone that picked up the music with the reflections of these echo chambers the first natural reverb devices were born. Chambers can sound big but usually do not have many early reflections, giving the sound more space without audible reflections.

    Here is a chamber sound. If you go back to the room sound you can hear the similarities and differences in the sound. You can hear a similar space surrounding the drum kit, but the chamber doesn’t have the immediate slap reflection that the room sound has.

    Download audio file (drumschamber.mp3)

  • Plate – Plates are mechanical reverbs and aren’t really an emulation of any specific space. Plate reverbs are big electro-mechanical plates that vibrate with the music, with pickups picking up the reverb vibrations that the plate is giving off. Typically, since a metal plate reverb vibrates pretty fast, the sound is full of early reflections and high density.

    Plates are popular for drums, especially snares. This audio sample below has a drum plate of 0.7 seconds and it thickens up the sound of the drum-kit and gives it considerable space without adding a long reverb trail.

    Download audio file (drumsplate.mp3)

  • Spring – Spring reverbs are the mainstay of the 60′s Surf music. I wrote a little bit about the surf guitar sound of the 60s in my last Premium tutorial, but spring reverb is typical reverb every guitar amplifier has. Sound is sent through springs which reverberate and create that boingy, springy sound. Spring reverb is mostly used on guitars but don’t be afraid to experiment and see if you can pair your spring reverb with something else entirely.

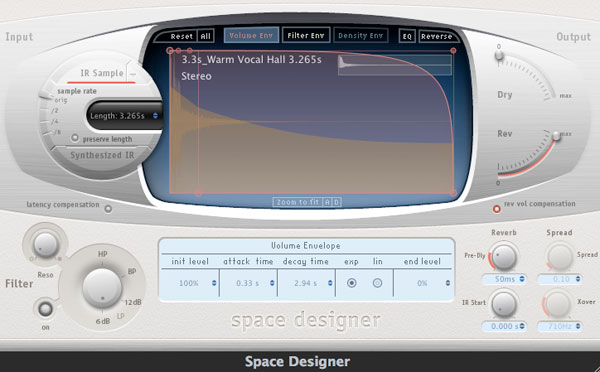
  • Impulse Responses – Impulse Responses (IRs) are like sound pictures of a room. You can take audio snap-shots of famous studio rooms, your own basement or your dining hall and use it in your productions. There are some reverb engines that only work with pre-loaded IRs (Logic’s Space Designer, Altiverb) and they come fully stocked with great sounding rooms, halls, plates and every other room mode you would ever want. Also, just by doing a quick Google search you can find people that have taken IRs of everything they can think of. From the pipes in their sink to the space inside their mouth, you can accomplish some pretty weird reverb sounds using warped and alternative impulse responses.


Using the Right Reverb

Now that we’ve gone over the parameters and reverb modes, you have to know which reverb will work for any given situation. A grand hall reverb might work great on slow piano pieces, or soulful guitar solos, but it might not work that great with heavily distorted rhythm guitars. It doesn’t take a lot of experience to instinctively know which reverb mode or reverb time to use, but once you get the hang of how each reverb usually sounds and what works for each instrument you can work faster and more efficiently on your projects.

Let’s see how a medium hall setting sounds like on two different guitar parts. The first one is a clean chordal part, that’s slow enough to make the reverb shine, but the second one is a rock riff that becomes undefined and muddy once we put the same reverb on it.

Clean chordal part:

Download audio file (mediumhallgtr1.mp3)

Sweet and soulful.

Rock Riff:

Download audio file (mediumhallgtr2.mp3)

Jumbled mess.


Placing Instruments Into a Room

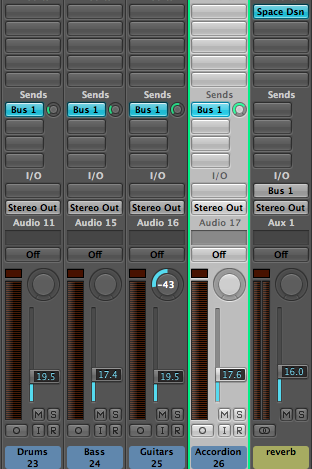
Say we have a song that we want to sound like it was recorded live, with all the instrument together in the room. All the instrument were tracked (recorded) separately in different studios, but they were all fairly dry sounding, meaning we can add any reverb we want to them. By choosing one nice sounding room or hall we can place the instruments together in that room and make them sound like they are all jamming inside a sweet sounding studio room.

A good way to do this is to actually solo the reverb by itself and place each element into the room with sends. By sending each instrument separately you can place them closer or farther away in the room you have created. There is less of the drums sent into the room since I want them to be in the background. The bass is a little louder than the drums but the guitars are more dominant than the bass. Finally, the lead instrument, the accordion has the most amount sent to the reverb.

Essentially, what we are creating here is the illusion of all these instruments playing together in the room. So by placing them with sends as you would preferably hear them together in the room makes them glue together better in the final mix. You can change sounds of the original instruments all you want, but now you’ve established a setting in which these instruments are playing.

Listen to the soloed reverb here. This is only the instrument in the room without the original sounds. It sounds like something you would be hearing coming from a room far away.

Download audio file (stereoreverbwet.mp3)


Taking Out Unwanted Reverb

EQing reverbs is an age old trick. Since you send your source sound to a specific reverb track you can modify and change your reverb sound as much as you want. The most common use is to put EQ in front of the reverb device and EQ out everything you don’t want, or accent a specific frequency that you want to jump out. The most common use is to filter out either highs, lows or both frequency ranges so that a reverb sits better with an instrument.

Here is a drum track that has an overall reverb sound. The low end is a bit much so I’ve decided to filter out all the low end frequencies to about 500 Hz. That way the kick drum and low end of the drum kit doesn’t sound as cluttered but we still end up with a spacious drum sound.

Too much low end reverb:

Download audio file (drumrevnoeq.mp3)

Low end filtered away:

Download audio file (drumreveq.mp3)

You can do this to any instrument obviously, and one trick I learned from one of Bobby Owsinski’s blog posts about reverb is to high- and low-pass filter instruments to achieve that Abbey Road sound. In this next piano part I’ve rolled off everything below 500 Hz as well as everything above 10 Khz. It give the piano part a much punchier sound. It has reverb but it doesn’t have any muddiness or ringing high frequencies to clutter it up.

Piano without EQ:

Download audio file (pianowet.mp3)

A tighter piano sound with EQ:

Download audio file (pianofiltered.mp3)


Just a Little Bit of ‘Verb

If you want a punchy rock mix and don’t want to touch into glam rock dimension you should be sparse on the reverb. Making things sound dry doesn’t necessarily mean you can’t use reverb. You just have to use it sparingly with short reverb times, and have them low in the mix. A really dry sound is unnatural to listen to, so when you are mixing your next track that just needs a little reverb to push the elements into place consider these techniques.

  • Short reverb times – To just add some ambience to an instrument you should use short reverb times, small rooms, plates and small halls to accomplish a liveness without the bigness.

  • Low in the mix – Keep your reverb tracks low in the mix. Gradually add reverb until you can audibly hear it, then back off the volume a little bit. If you don’t notice the reverb but notice something missing when it’s muted you’re on the right track.

  • Filter – Filter out the high frequencies if you want the reverb to blend in better. It will add ambience without high frequency reverb trails.

Here is a short vocal passage that has no reverb on the first phrase and then a small hall to add some extra ambience to it. Notice how dry the voice sounds first and then when the reverb kicks there is more life and excitement in the voice.

Download audio file (vocalreverb.mp3)


Mix and Match Reverbs

You can also have different reverbs on different elements of a mix. Take backing vocals for example. There is usually more reverb on backing vocals than the lead vocal, in order to push the backing vocals away from being the leading element. By using different reverbs on backing vocals you can create different contrasts that can sound pretty or in this case, kind of creepy.

Here is an example of a backing vocal mix I did recently. There are two separate reverbs being used, one 2.2 second hall and one 3.3 second hall. We have dry copies of the main vocals panned across the spectrum as well as an ethereal reverbed backing vocal chanting in the background.

Sounds kinda creepy, but that was the goal. First sample is the complete track with all the instruments and the second are the vocals only.

Download audio file (backingvocals.mp3)

Download audio file (backingvocalssolo.mp3)


Conclusion

Reverb is a necessary ingredient in any mix, regardless if you want it to be heard or not. You can use it to add ambience, create spaces around instruments, construct specific moods or just make things sound punchier. However you use reverb, it is definitely one of the elements that you need to spend the most time with, experimenting with the different parameters, reverb modes and settings in order to familiarize yourself with how everything works and interconnects.

I hope I have shed some light of how you can use the different reverb modes and given you some inspiring examples that you can use in your mixes. Since this is a Basix tutorial I want everyone to comment with any question they have regarding the doubts they have on reverb. No question is too stupid and everybody has scratched their head at some point over the workings of this ever elusive mixing ingredient.


Workshop #100: Antibling by Horns & The Badge

At Audiotuts+ we regularly put up a reader track for workshopping and critique (find out how to submit a track). This is how it works: you upload your song, and every week or so we’ll publish one here and step away from the podium. The floor is yours to talk about the track and how the artist can fix problems in and improve upon the mix and the song.

This track has been submitted for your friendly, constructive criticism. They have put their track (and their heart and soul) in your hands to learn and get useful feedback.

  • Do you enjoy the song or track itself? Does it have potential?
  • Can the arrangement be improved?
  • How did you find the mix? What would you do differently?
  • What do you enjoy about the rhythm track? What can be done to improve it?
  • Is the choice of instruments relevant and effective for the style/song?
  • Are the lyrics (if any) effective? Does the style, arrangement and genre of the song suit them?
  • Can you suggest any specific techniques that might improve the track?
  • Do you have any other constructive feedback?

Antibling by Horns & The Badge

Artist’s Facebook page: facebook.com/hornsandthebadge

Description of the track:

One of the better songs off our last album, it’s a song about what’s wrong with mainstream hip hop. As we are currently in the process of planning and writing for our upcoming album, I’d like to make sure we’re focusing on fixing the right things. Any criticism is welcome, we have tough skin!

Download audio file (HornsandTheBadgeAntibling.mp3)

Terms of Use: Users can download for personal use. It cannot be reposted for download except where permitted by copyright owners.

Have a listen to the track and offer your constructive criticism for this Workshop in the comments section.


Submit Your Tracks for Workshopping

Need constructive criticism on your own tracks? Submit them using this form.


Win ACID Pro 7 At Hitsquad.com

Hitsquad.com has teamed up with Sony Creative Software to give Musicians the chance to win a copy of the full version on ACID Pro 7 worth $299.95.

ACID Pro is a DAW powerhouse that combines full multitrack recording & mixing, MIDI sequencing, and the legendary ACID looping functionality. Whether you’re producing full albums, or making beats, ACID Pro has the power and flexibility you need to get the job done.

Hitsquad is a major music software site, and are celebrating their 15th year online by running a series of competitions for musicians.

Competition details are available here.


Create a Dark and Rainy Crime Scene in Photoshop


We can all imagine what a dark and rainy crime scene looks like. We have all scene them in television and movies. Today, we will learn how to use different tools and techniques to create a scene of our own in Photoshop.


Resources Used

You can download the following textures from the links below. Just sign up for free to download the image.


Step 1

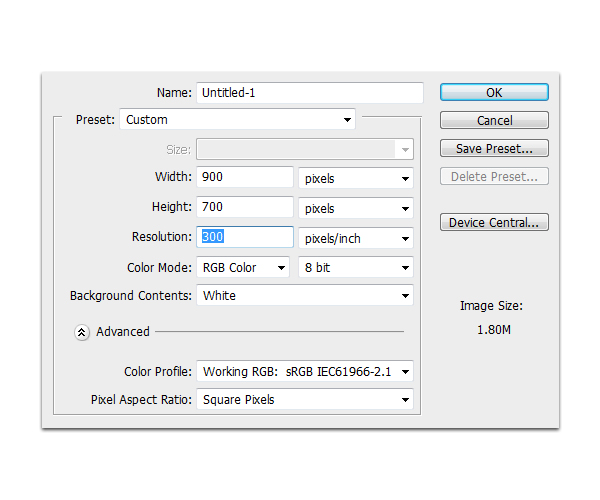
First, create a new file with a size of 900 x 700 px and a resolution of 300 ppi.


Step 2

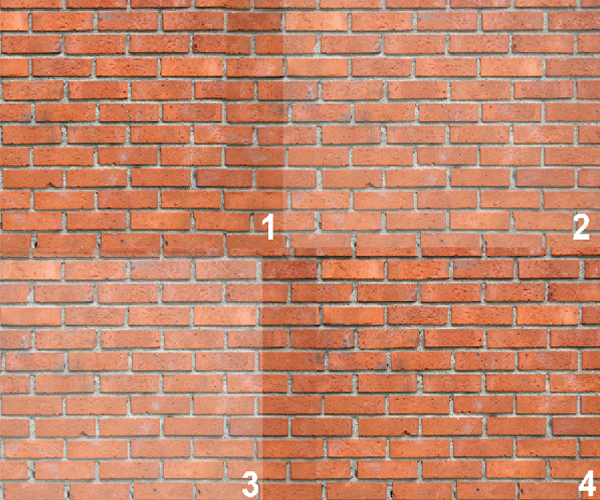
Next, open Brick.jpg then resize it and duplicate it as shown below. We did this because we need smaller looking bricks to be more realistic with this scale. Make sure to overlap each layers seamlessly so that it looks like as a one big wall. Merge all the layers and name it as "Wall."


Step 3

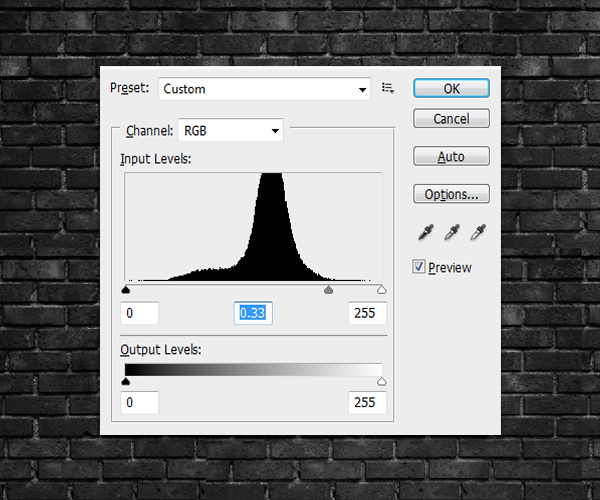
Desaturate the "Wall" layer. To do this go to Image > Adjustments > Desaturate or use the shortcut keys Shift + Cmd/Ctrl + U. After that, go to Image > Adjustments > Levels, Cmd/Ctrl + L and change the values with the ones indicated below.


Step 4

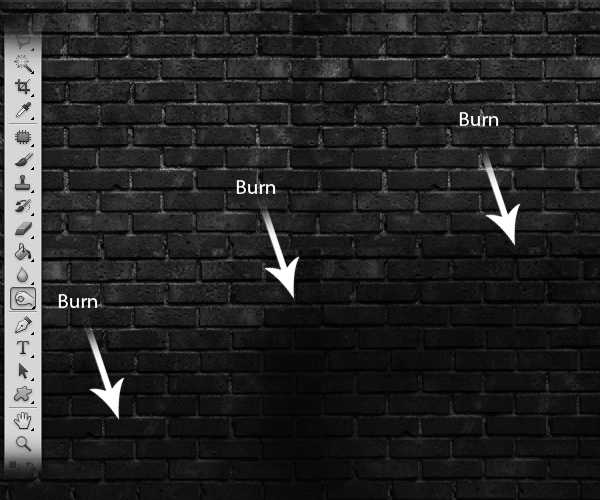
Next, use the Burn tool (O) as indicated below.


Step 5

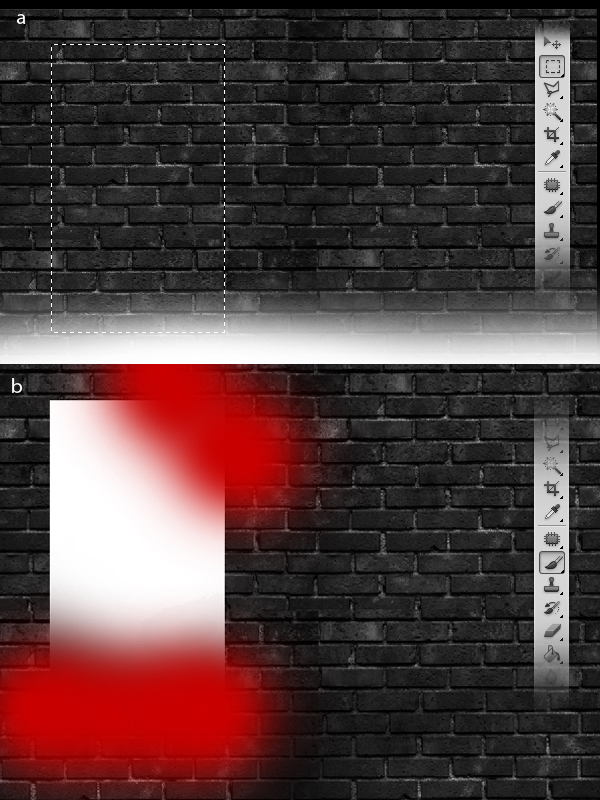
Using the Rectangular Marquee tool (M), make a rectangle (a), then fill it #000000. Next, using a soft brush with #ffffff, apply subtle amounts in the areas indicated below, (b).

Using the Brush tool (B), make a curtain-like silhouette on the left-side of the rectangle.

After that, open the files Splattersmear.jpg and Splatterlong.jpg, then resize then inside the rectangle.


Step 6

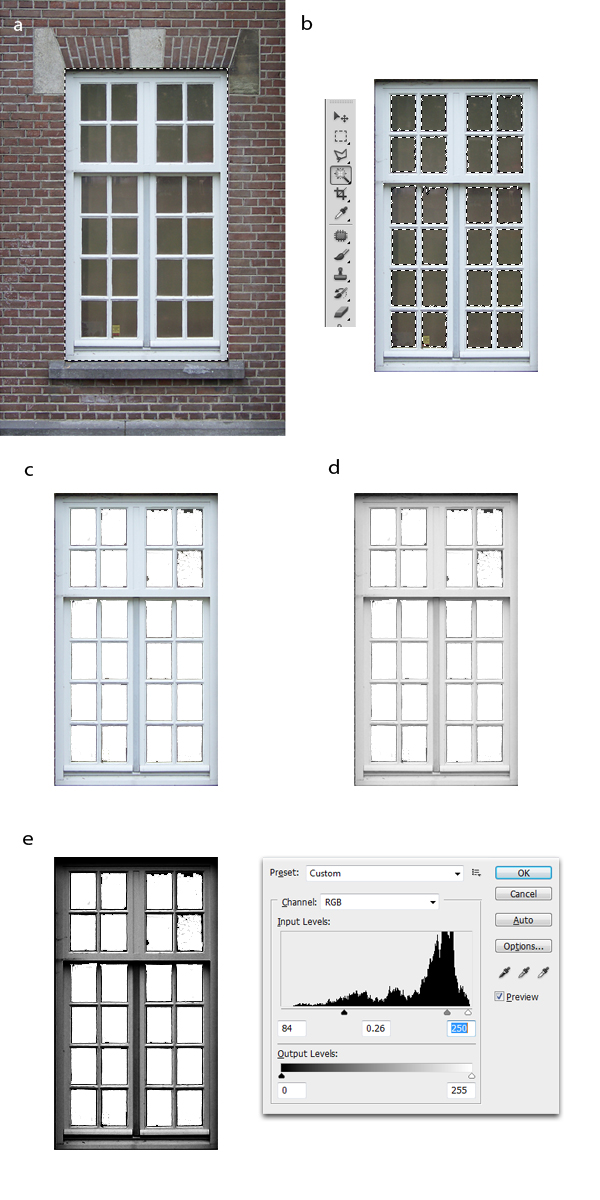
Next, open the file Window.jpg. Using the Rectangular Marquee tool (M), select only the window from the image, (a). Next, using the Magic Wand tool (W), select the glass paneling of the window then hit delete (b), this will leave only the frame of the window, (c). Next, desaturate the image. To do this, go to Image > Adjustments > Desaturate or use the shortcut keys Shift + Cmd/Ctrl + U, (d). The final step is to change the Levels of the image, to do this go to Image > Adjustments >Levels, Cmd/Ctrl + L and change the values with the ones indicated below, (e).

Place the window frame as shown below.


Step 7

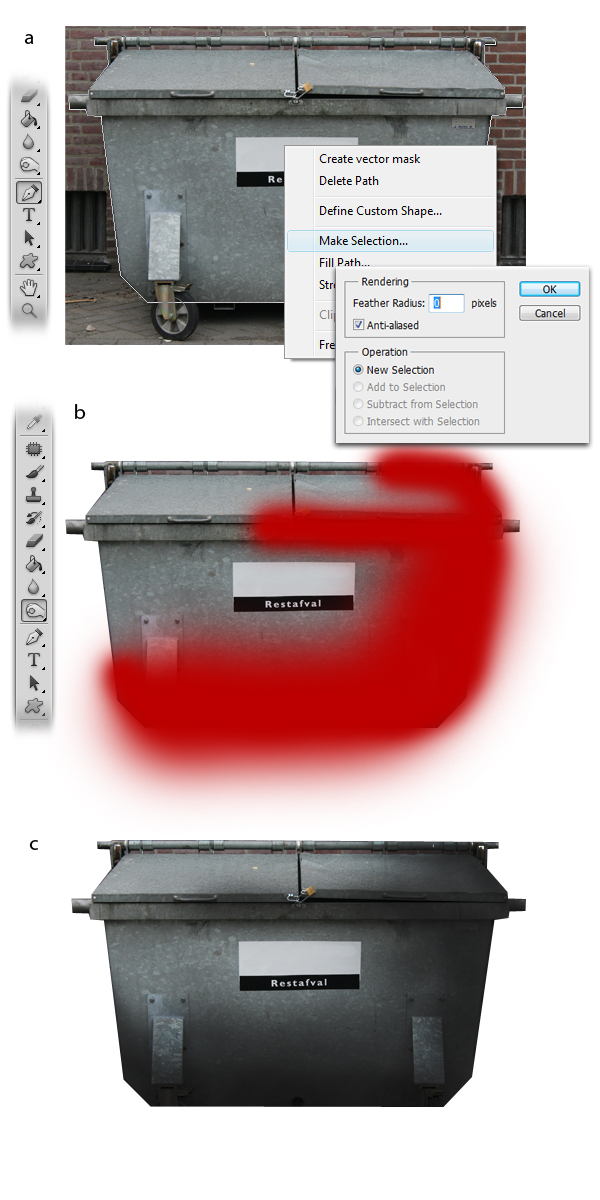
Next we’ll add the garbage container, to do this open Garbagecontainers.jpg. Using the Pen tool (P), select the garbage container leaving the background behind, right-click and select Make Selection from the drop-down menu and from there change the feather radius to 0 px then hit OK, (a). Next by using the Burn tool (O), burn the areas indicated below, (b). The final effect should look like (c).

Place the garbage container in the lower right corner of our image. The final effect should look like the one shown below.


Step 8

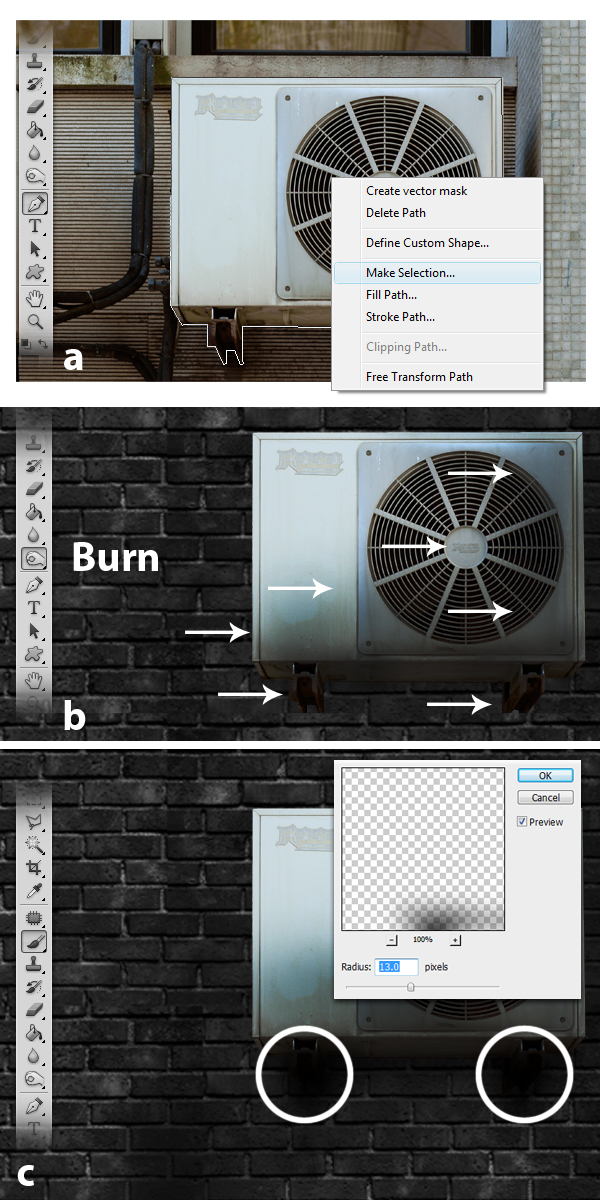
Next is to add the Air conditioner. Open Aircon.jpg, using the the Pen tool (P) make a path all over the outline of the air conditioner including the support structure. Right-click and make a selection from the drop-down menu and press OK, (a). Next, using the Burn tool (O), burn the areas indicated below, (b). Finally, using the Brush tool (O), set to 20 px and hardness 90%, draw some shadows under the air conditioning and the support member. After that go to Filter > Blur > Gaussian Blur and apply the indicated value below, (c)

The final effect is shown below but the image looks rather flat, so for the following steps we need to add some shading and highlights.


Step 9

Using the Burn tool (O), burn the areas indicated below.

Next, using the Brush tool (B) with a size of 60 px and Hardness of 0%, brush the areas indicated below. After that, decrease its opacity level to 50%.


Step 10

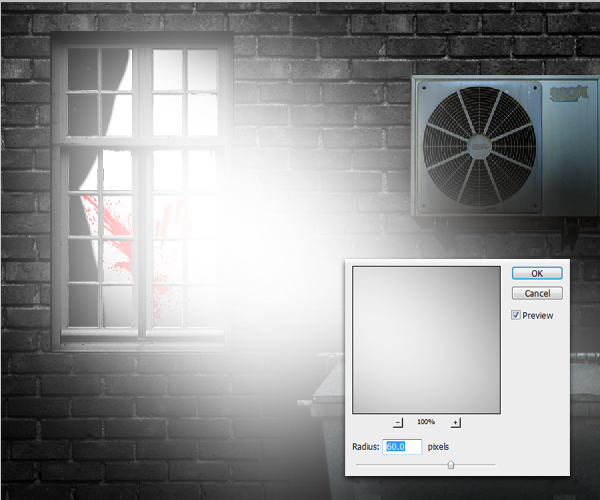
Next, using the Polygonal Lasso tool (L), draw a shape like the one shown below, then using the Paint Bucket tool (G), fill the entire selection with #ffffff.

Now go to Filter > Blur > Gaussian Blur and change the value for the radius to 60 px.

Next, using the Eraser tool (E), erase the areas indicated below.

The final effect should look like the one shown below.

Next, we’ll add some light rays for that extra effect. To do this, use the Pen tool to draw the paths which is then defined to use the Brush tool with a Master Diameter of 19 px and a Hardness of 0%.

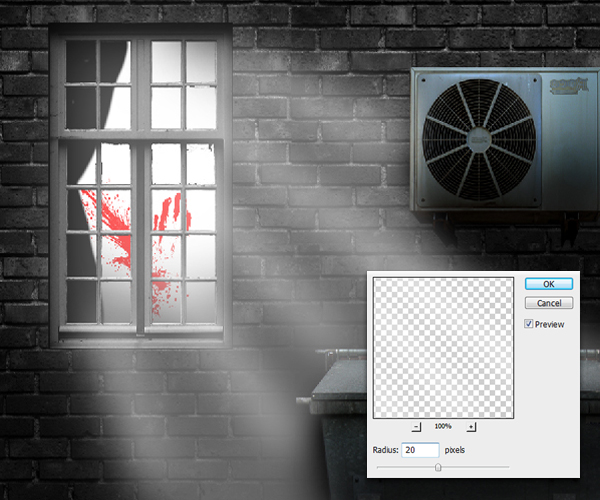
Next, go to Filter > Blur > Gaussian Blur and change its radius to 20 px.

The final effect should look like the one shown below.

Next, by using the Brush tool (B) with a size of 15 px, draw some lines like as shown below.

Next go to Filter > Blur > Gaussian blur and change its radius to 30 px. After that decrease its opacity level to 40%.


Step 11

Next, create a new layer and fill it with #000000. Go to Filter > Render > Clouds. Set this layer’s blend mode to Overlay.

So far so good, the final effect should look like the one shown below.

Next using the Brush tool (B) with color #000000, Master Diameter of 175 px and Hardness of 0%, brush the areas indicted below, then decrease its opacity level to 60%.

Add a new layer and fill it with #006773 then set its Blend mode to Soft Light and Opacity level to 50%.

The final effect should look like the one shown below.


Step 12

Next add a new layer and name it "Rain." Now using the Paint Bucket tool (G), fill the entire layer with #000000. Next, go to Filter > Render > Fibers and follow the indicated values as shown below.

Next, press Cmd/Ctrl + T to activate the resizing tool, rotate this layer to about 45 degrees as shown below. After that, set its Blend Mode to Overlay and decrease its Opacity level to 20%.

Note: If you would like to use another method to create rain, check out this tutorial How to Create a Photo Manipulation of a Flooded City Scene or this one How to Turn Humdrum Photos into Cinematic Portraits.


Final Image

That’s it! I Hope you had fun producing our Crime Scene image.