FaceBreak : Enable FaceTime Over 3G Network

FaceBreak, a new jailbroken app, enables FaceTime over 3G network. By default, you can make FaceTime calls over WiFi network only. But once you’ve FaceBreak installed, reboot your iPhone and enjoy FaceTime calls over 3G.
facetime over 3g

FaceBreak description

“Enable FaceTime over 3G ! With 1 click and no setup, you can get FaceTime running over 3G and use it anywhere you want. No more looking up for nearby WiFi connection to use FaceTime. – Just install and Respring. FaceTime will now also work when on 3G!”

You can always enable/disable FaceTime from the iPhone Settings under “FaceBreak“. Your iPhone 4 MUST be jailbroken. (Jailbreak guide linked at the bottom.)

WARNING!!!
Absolutely do not update to 4.0.2 / 3.2.2. This update does nothing except break your jailbreak! If you have to restore, make sure you use Saurik’s server with your stored SHSH so that you can restore 4.0.1 firmware.

For the safari pdf security patch offered in 4.0.2, you can install Saurik’s patch for this by installing PDF Patch in cydia.

FaceBreak is available for iPhone 4 only in the Cydia store for $1.49.

facetime iphone 4

Also checkout:

You can follow us on Twitter, Join us at Facebook, and also Subscribed to RSS Feed to receive latest updates.

Digg
Twitter
StumbleUpon
Facebook
Reddit
del.icio.us

Downgrade iOS 4.0.2 to iOS 4.0.1, iOS 4.0 (iPhone 4, 3GS, 3G and iPod Touch)

In this guide you’ll learn how to downgrade iOS 4.0.2 to iOS 4.0.1 / 4.0 on iPhone 4, 3GS, 3G and iPod Touch 3G, 2G. Instruction on how to downgrade iPhone, iPod Touch iOS 4.0.2 to 4.0.1/4.0 firmware can be found below.


downgrade ios 4.0.2
iOS 4.0.2 fixes the exploit used in JailbreakMe 2.0, the jailbreak for all iPhones and iPod Touch. So, if you want to jailbreak iPhone 4, 3GS, 3G or iPod Touch 3G, 2G then you MUST downgrade to iOS 4.0.1 or 4.0 first.

In this guide we’ll use TinyUmbrella to downgrade iPhone / iPod Touch firmware. There’s no need to edit any Hosts file that is required in other guides found all over the cloud. We are going to setup downgrade server the TinyUmbrella way: with a single click.

IMPORTANT:

iPhone 4, iPhone 3GS, 3G, iPod Touch 3G and iPod Touch 2G users MUST have SHSH blobs saved for 4.0.1/4.0 firmware in order to downgrade from iOS 4.0.2.

How to: Save SHSH blobs for iPhone, iPod Touch

If you’ve SHSH blobs saved on Saurik’s server via Cydia, download them into your computer first. To do that:

  • Connect your device, Fire up the TinyUmbrella (Download Link below-Step 1) and Check mark the Advanced Options.
  • Select your device, firmware (the one for which you’ve SHSH saved at Cydia; 4.0.1, 4.0) and Cydia as Location.
  • Hit the save My SHSH button. that’s it.

(e.g: to download 3.1.3 SHSH blobs from Cydia see the screenshot below)

downgrade ios 4.0.2 to 4.0.1, 4, 3.1.xdowngrade ios 4.0.2 to 4.0.1, 4, 3.1.xdowngrade ios 4.0.2
Click to enlarge.

NOTE: If iPhone 4, 3GS, iPod Touch 3G and iPod Touch 2G (MC) users do NOT have SHSH blobs saved for an older firmware, they can NOT downgrade unless Apple is signing the Firmware.

Downgrade iOS 4.0.2 to iOS 4.0.1 / 4.0 firmware

*** Read the whole process first and then try.***

Step 1 – Required Stuff

Download TinyUmbrella and desired firmware for iPhone 4, 3GS, 3G, iPod Touch 3G, 2G from the links below:

Step 2 – DFU Mode

Put your iPhone into DFU Mode (How to: enter DFU Mode)

Step 3 – Start TSS Server

iPhone 3G and iPod Touch 2G (Non-MC) please skip to step 4. iPhone 3GS and iPod Touch 3G and iPod Touch 2G (MC) users:

  1. Run the TinyUmbrella
  2. Hit the Display SHSH button to confirm that downloaded SHSH blobs has been cached by TinyUmbrella for 4.0.1 or 4.0. (If you already have them in your PC, drag and drop the SHSH blobs in the TinyUmbrella window then hit the display SHSH blobs button to confirm).
  3. Then hit the Start TSS Server button.

Step 4 – Restoring the Firmware

  1. Now Open the iTunes.
  2. Hold down the Shift (Windows)/Alt (Mac) key and hit the Restore button.
  3. Select the downloaded firmware (from Step 1) and let the restore process complete.

iTunes will bring up error 1015, 1013 or 1011 message. Don’t worry, it’s normal. You’ve successfully downgraded your iPhone/iPod Touch firmware.

downgrade ios 4.0.2

Step 5 – Getting Out of Recovery

Now in order to get out of recovery mode, hit the “Kick Device Out of Recovery” button on TinyUmbrella right below the Start TSS Server button. That’s it!

Now you can jailbreak iOS 4.0.1 and iOS 4.0 using the guides linked below:

How to: jailbreak iOS 4.0.1

How to: jailbreak iOS 4.0

You can follow us on Twitter, Join us at Facebook, and also Subscribed to RSS Feed to receive latest updates.

Digg
Twitter
StumbleUpon
Facebook
Reddit
del.icio.us

The Foundry’s CameraTracker Giveaway! – Winners Announced

A BIG Congratulations for the following winners!

  • Kevin James from Gainesville, FL
  • Mike Griggs, from Hassocks in West Sussex
  • Dan Thompson from Bradford, England.

Following Part 1 and Part 2 of the CameraTracker Overview, we conclude today with Part 3. We’ll composite our 3D light rays into our final scene with dust interaction.


Tutorial

Download Tutorial .flv

File size 156MB


CameraTracker Details


CameraTracker will allow matchmoving directly inside After Effects!

The same production tested algorithm seen in NukeX, a cutting edge VFX tool used on films such as ‘Avatar’ & ‘Iron Man II,’ right inside the After Effects environment. Invaluable for integrating VFX and motion graphics into moving camera shots!


Interview with Sanjay Patel


Sanjay Patel is a animator and illustrator from Southern California who was born in the UK. Sanjay works as a supervising animator and storyboard artist at Pixar Animation Studios, where he has worked on numerous films, including Monsters, Inc, A Bug’s Life, Toy Story 2, Ratatouille, The Incredibles, and Toy Story 3. He has also written and illustrated books on Hindu mythology and he loves how images can tell a story. Read more about Sanjay and his brilliant work in this interview.

Continue reading “Interview with Sanjay Patel”

14 Tutorials that Make Using SONAR a Piece of Cake

SONAR is a digital audio workstation by Cakewalk, a subsidiary of Roland. It is the only major DAW with a scripting language, and you need a Windows PC to run it.

It started life in 1987 as a DOS MIDI sequencer, and has been under constant development ever since. It competes very well with other major DAWs, and the Producer version costs around $400.

Last week’s article covered SONAR’s history and features. This week we learn how to use it. Here are 14 tutorials that make using SONAR a piece of cake.

This article was previously published on the AudioJungle blog, which has moved on to a new format in 2010. We’ll be bringing you an article from the AudioJungle archives each week.

1. Introducing: SONAR 8 Producer & Studio

“Cakewalk’s Product Manager Alex Westner reveals all about the newest versions of our prized digital audio workstation! Learn about all the new features and control assistants added to make this platform the hottest on the market!”

2. Session Drummer 3: Getting Started

“Getting started with Session Drummer 3, new to SONAR 8.5.”

3. Step Sequencer 2.0: Getting Started

“Getting started with Step Sequencer 2.0, new to Sonar 8.5.”

4. Cakewalk Sonar 8.5 Matrix View

“How to use the Matrix View in Cakewalk Sonar 8.5. This is a reformatted excerpt from the free update for Sonar 8.5 to Sonar 8 – Know It All! by Digital Music Doctor.”

5. ProRec 127th AES Coverage: Cakewalk Sonar 8.5 Matrix View

“Rich Curtis from Cakewalk gives us a demonstration of Sonar 8.5′s new Matrix View.”

6. Cakewalk’s SONAR 8 Webinar

“Live from Cakewalk HeadQuarters in Boston, MA. Inaugural SONAR 8 Webinar. Hosted by Seth Perlstein.”

7. SONAR 8: TS64-Transient Shaper

“Introducing SONAR 8′s TS64-Transient Shaper and the effects it has on various instrument loops. Fix, enhance, and completely change the quality of sound of anything you produce.”

8. Using Controllers in SONAR 8

“This is a guide on using pitch wheel controllers in the piano roll view of SONAR 8 Producer edition. You can create or edit controllers such as modulation, velocity and many more in this way.”

9. Sonar 8 Better Piano Sounds

“Just a quickie, well 10 minutes really, on how I get a massive piano sound out of my cheap keyboard using Cakewalk Sonar 8 producer Edition.”

10. AUTOTUNE—SONAR 8

“This video will show you how to load VST plugins.”

11. Chuck Carr showing Cakewalk’s VX-64 VocalStrip

“Chuck Carr – Producer/Songwriter. I spent the last 12 years at PlayStation writing & producing music for 100′s of games & artists. Here’s an example of how I use the Cakewalk VX-64 VocalStrip processor on The Hoff’s voice for an upcoming release.”

12. Editing Clips, Loops, & Groups in SONAR 8

“The Comping and Editing Tools in SONAR 8 can get you that perfect track in no time. Comping means to loop a section of a project and record multiple takes. The best loops and takes can be combined to produce the perfect track. In this video you will learn more about the clip selection groups, the free edit tool, and other edit tool enhancements that will allow you to edit the layers, pick your favorite, and put a great piece of music together FAST!”

13. SONAR 8 PRODUCER / Basic usage of Beatscape

“It introduces a basic usage of Beatscape attached to SONAR8PE.”

14. Sonar 8 Editing Midis Tutorial

“In response to a query about how to edit a midi track you have played wrong on the keyboard i have made a basic video on how to edit the notes after the fact.”


Workshop #107: Vortifeel by OmA

At Audiotuts+ we regularly put up a reader track for workshopping and critique (find out how to submit a track). This is how it works: you upload your song, and every week or so we’ll publish one here and step away from the podium. The floor is yours to talk about the track and how the artist can fix problems in and improve upon the mix and the song.

This track has been submitted for your friendly, constructive criticism. They have put their track (and their heart and soul) in your hands to learn and get useful feedback.

  • Do you enjoy the song or track itself? Does it have potential?
  • Can the arrangement be improved?
  • How did you find the mix? What would you do differently?
  • What do you enjoy about the rhythm track? What can be done to improve it?
  • Is the choice of instruments relevant and effective for the style/song?
  • Are the lyrics (if any) effective? Does the style, arrangement and genre of the song suit them?
  • Can you suggest any specific techniques that might improve the track?
  • Do you have any other constructive feedback?

Vortifeel by OmA

Description of the track:

A quick song inspired by video games / movies atmospheres I loved.

Download audio file (vortifeel.mp3)

Terms of Use: Streaming. Download, redistribute or use on demand.

Have a listen to the track and offer your constructive criticism for this Workshop in the comments section.


Submit Your Tracks for Workshopping

Need constructive criticism on your own tracks? Submit them using this form.


Animating a Merry-Go-Round using Expressions in Maya 2009

Animating using expressions can be a big timesaver, especially when it comes to mechanical objects such as a merry-go-round! In this tutorial, Stephen Ko walks us through a simple expressions-based project, creating a simple UI with sliders to control the different parts of his model. Let’s get started!

Step 1

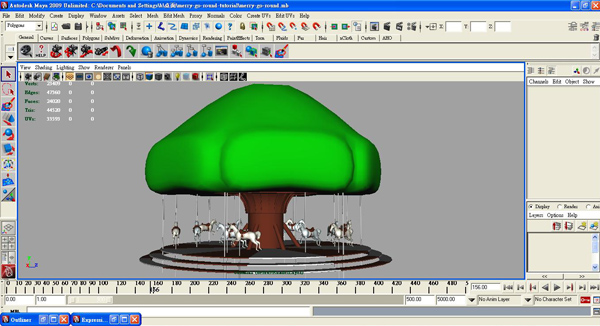
Let’s start! First, open Maya, and if you want to follow along exactly, open the scene-file provided.

Step 01 Image

Step 2

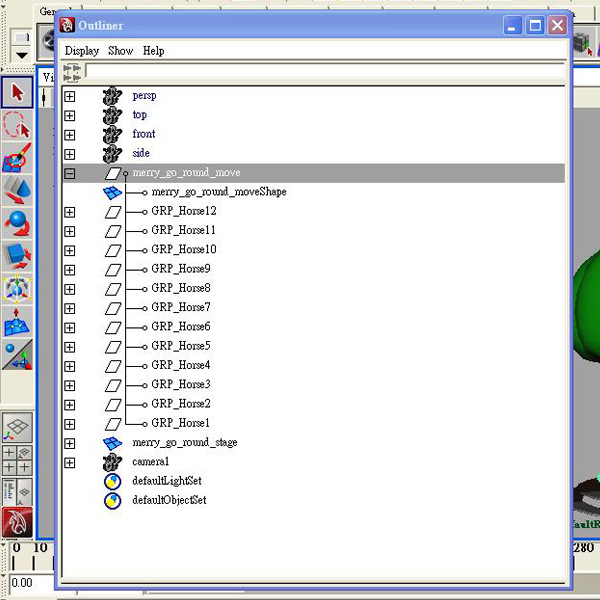
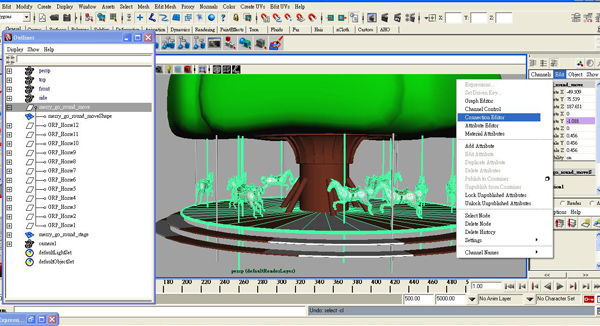
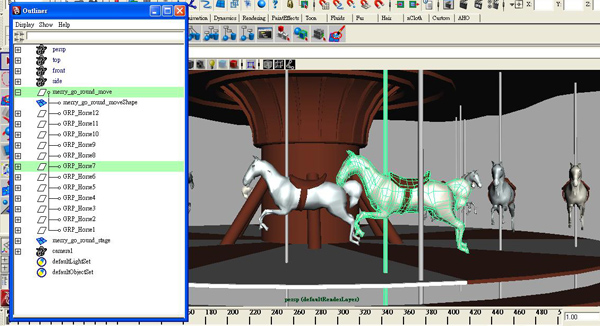
I’m going to briefly describe my model before we start. I’ve divided the model into 2 parts: the merry_go_round_move and the merry_go_round_stage. All the horses are grouped inside the merry_go_round_move group, and are named GRP_Horse1 to GRP_Horse12.

Step 02 Image

Step 3

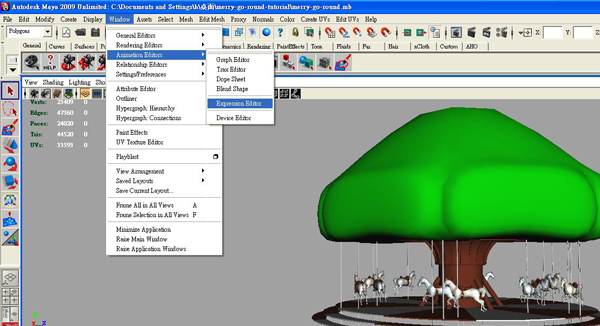
Now we understand the model, lets start writing our expressions. Start by going to Window > Animation Editors > Expression Editor.

Step 03 Image

Step 4

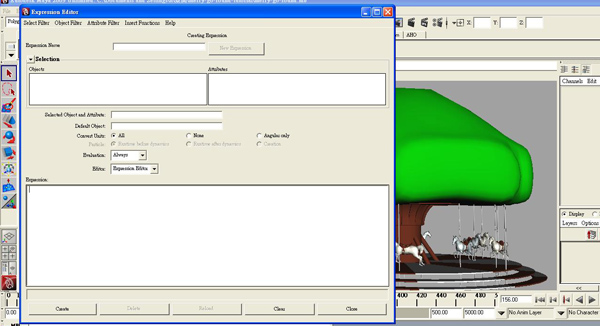
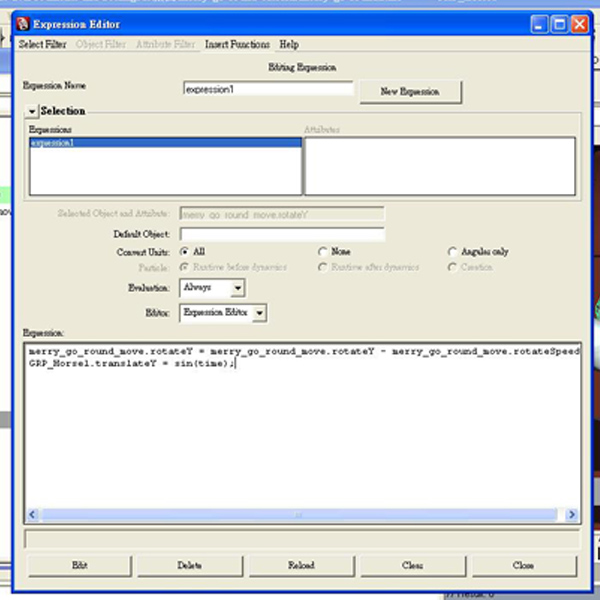
The Expression Editor is divided into the selection section and the expression section. After finished typing anything in the expression section, we name the expression in the Expression Name field, and then click the “create” button to save the expression. It will then appear in the selection section ready to be used, recalled or edited.

Step 04a Image

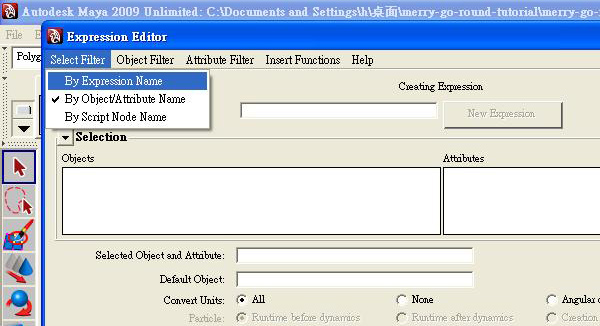
NOTE : If you can’t see the expressions you create, go to Select Filter>By Expression Name. This will show all of the expressions you have previously created, ordered by their name (which is why naming our expressions is so very important!)

Step 04b Image

Step 5

First of all, we need to rotate the merry_go_round_move group. Type the following into the expression section :

merry_go_round_move.rotateY = merry_go_round_move.rotateY-1;
Step 05a Image

Now give your expression a name, and hit Create to save it. So what is this code doing? Well on every single frame of our animation, this expression will look at the merry_go_round_move group’s current Y rotation, subtract one from it, and make that the new rotation Y value. It’s clear to see that as this repeats on every frame as we play through our animation, the group will slowly but surely rotate in the -Y direction, at a speed of 1 degree every frame. Which is not quite fast enough!

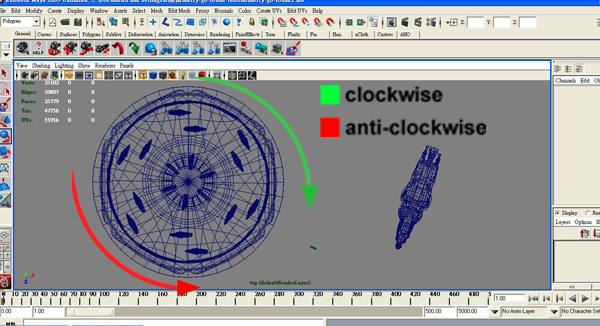
NOTE : This model is designed to rotate clockwise, which is why we’re subtracting 1 degree from the Y rotation value on each frame. If we added 1 degree on each frame instead, the group would rotate in the opposite direction!

Step 05b Image

Step 6

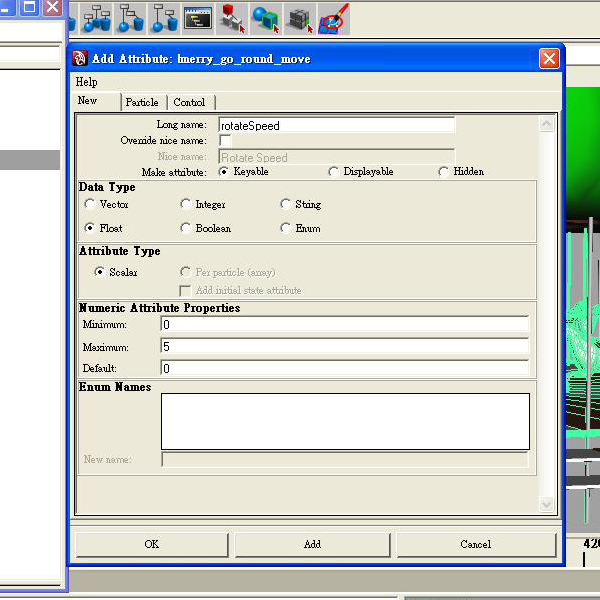
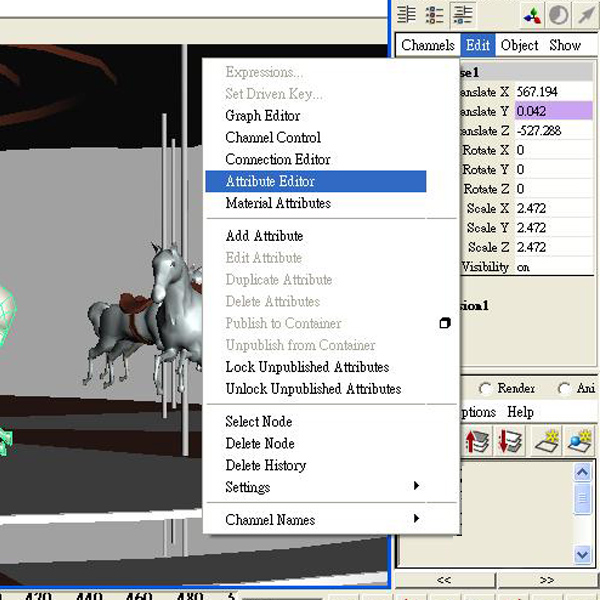
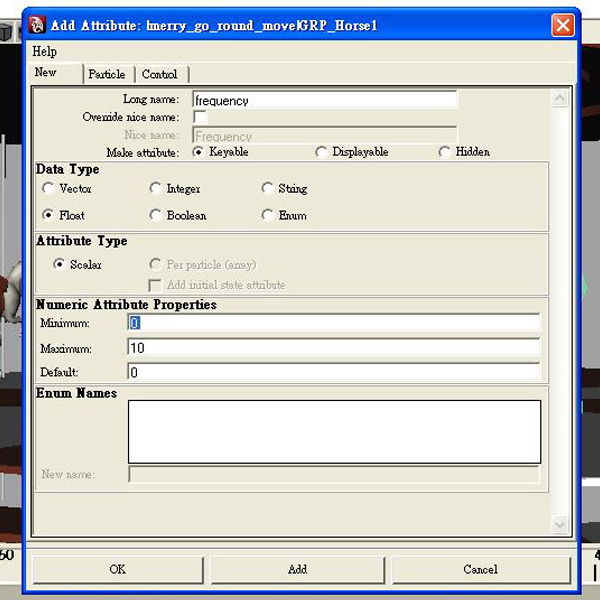
In order to give us more control over the rotation speed, we’re going to add a new attribute to the group. To do this, first select the merry_go_round_move group, and then in the channel box click Edit > Add Attribute.

Step 06a Image

In the Add Attribute dialog box, add in the settings shown in the image below :

Step 06b Image
  • Long name : This is the name of our new attribute.
  • Data Type : Setting the data type to floats allows us to use numbers with decimal places (e.g., 1.7) for the rotateSpeed value.
  • Minimum : This is the smallest value we’ll allow for our rotateSpeed.
  • Maximum : This is the largest value we’ll allow.
  • Default : Finally, this is the default value of the attribute.

Step 7

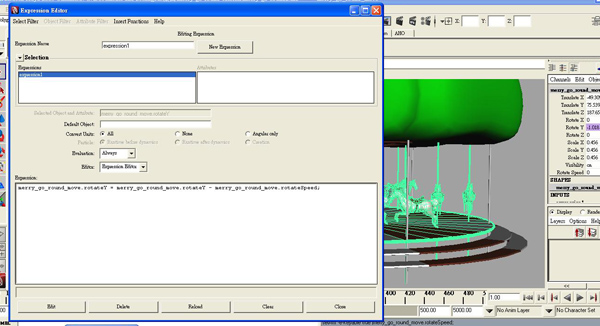
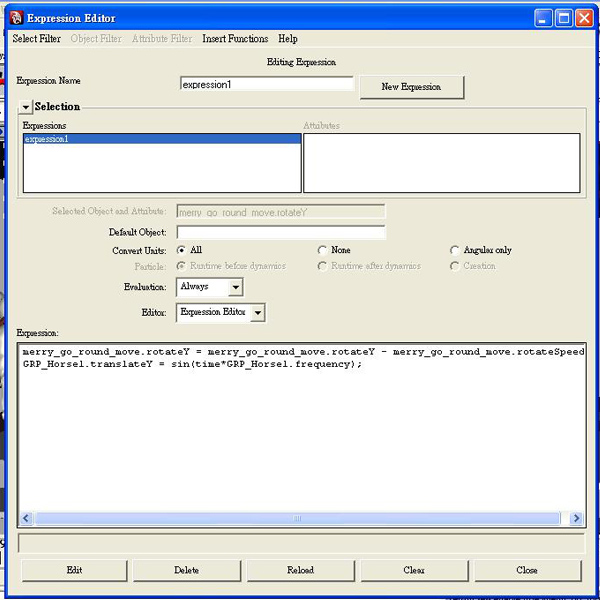
If you click OK you’ll see that our new attribute is in place at the bottom of the channels box. However, right now it’s not connected to anything and therefore doesn’t have any effect on the speed of our rotation. To connect it up, we need to go back to the expression editor and edit our expression. So open the expression editor, choose your expression from the selection section, and change it to :

merry_go_round_move.rotateY = merry_go_round_move.rotateY -merry_go_round_move.rotateSpeed;

Now make sure to click the new Edit button that has replaced the Create button at the bottom of the window. This saves any changes you’ve made to your expression.

As you can see we’ve replaced the -1 value with a link to our new merry_go_round_move.rotateSpeed attribute, but what does this do? Our newly altered expression will now subtract whatever value we put in the rotateSpeed channel from our group’s Y rotation value, on each frame.

For example, imagine our rotateSpeed value is 1. On each frame, our group’s Y rotation value will decrease by the same value – 1 degree. If we were to increase our rotateSpeed value to 10, the rotation value will decrease by 10 degrees on each frame – in other words it’ll rotate 10 times faster! We could also stop it rotating entirely by setting the merry_go_round_move.rotateSpeed to 0.

Step 07 Image

Step 8

Whilst changing values in the Channel Box is relatively easy, it might be fun for us to put together a very basic GUI from which we can control the Merry-Go-Round. Whilst this isn’t a comprehensive Maya UI tutorial, this should give you enough info for you to start experimenting a little!

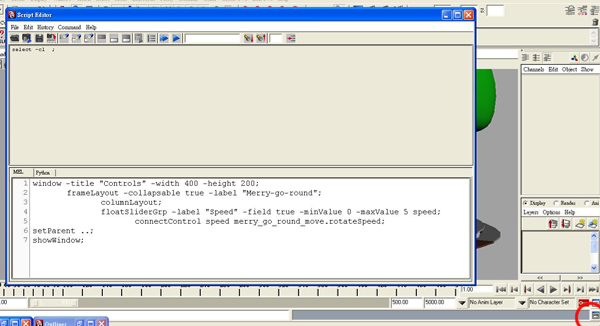
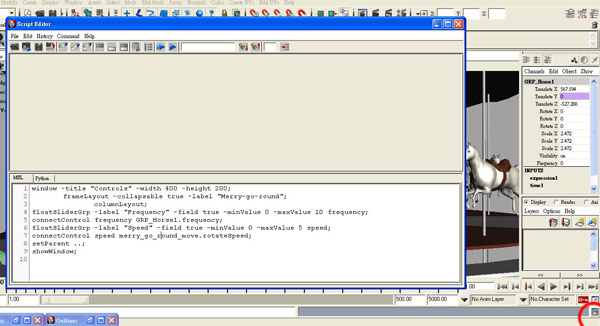
We’re going to make a single window, containing one slider which will control our rotateSpeed attribute. So start by opening the Script Editor by going to Window > General Editors > Script Editor, or by clicking on the Script Editor button in the bottom right of your Maya window. Once opened, type the following into the input box :

window -title "Controls" -width 400 -height 200;
	frameLayout -collapsable true -label "Merry-go-round";
		columnLayout;
		floatSliderGrp -label "Speed" -field true -minValue 0 -maxValue 5 speed;
			connectControl speed merry_go_round_move.rotateSpeed;
setParent ..;
showWindow;

Ok, let’s take a look at that line by line. This first section creates a new UI window 400x200px in size, and sets the title bar to display the text Controls. It won’t appear just yet however, as we have to specifically tell it to show later on in the code.

window -title "Controls" -width 400 -height 200;

This section of code adds something called a layout inside of our window. Essentially a layout is required in order for you to add sliders and buttons into your GUI, and this one, being a Frame layout, will add a frame around everything that we add inside of it. You’ll notice that we’ve also added a label called Merry-go-round, and set the frame to be collapsable, meaning we can fold up our sliders for neatness if our GUI becomes more complicated further down the line.

frameLayout -collapsable true -label "Merry-go-round";

This line adds another layout inside our frame layout. Why? A column layout is very useful for quickly and easily adding controls one above the another into your UI, and it’s often used for easy UI creation! If we didn’t add it in, we’d have to manually position each control, which would take a lot longer!

columnLayout;

This line is where we add in our first control! It’s a floatSliderGrp which is a combination of a slider and an input box, both of which update the connected value. We’ve labelled it Speed, set the minValue of the slider to 0 and the maxValue of the slider to 5. Very importantly, we’ve named the control speed. This is how we’ll access the slider through MEL – if it didn’t have a name, it would be extremely difficult to track down and utilise in our code!

floatSliderGrp -label "Speed" -field true -minValue 0 -maxValue 5 speed;

This is where we connect our brand new slider up to the rotateSpeed attribute we created earlier. It’s a very simple process, and is covered in a lot of detail in the help. Essentially we’re saying to use our speed slider control, to set the value of the rotateSpeed attribute (which in turn controls the rotation speed of our merry-go-round. Simple!)

connectControl speed merry_go_round_move.rotateSpeed;

Finally, we use the SetParent.. command, which, due to the two dots, jumps us from working with the ColumnLayout, up to the FrameLayout, and then to the Window itself, after which we show the window!

setParent ..;
showWindow;

With that done, select all of the code and hit Ctrl+Enter to run it. A window named “Controls” should pop up containing a single slider. If you now hit play, you can move the slider to interactively change the speed of rotation! Awesome!

Step 08 Image

Step 9

So that’s the main body rotating, now let’s move onto the horses. They’ll be moving up and down, so we’re going to have to write an expression to alter their translate Y value.

Step 09 Image

Step 10

So open the Expression Editor back up, and let’s create a new expression. Write the following into the text field :

GRP_Horse1.translateY = sin(time);
Step 10 Image

Sin is one of Maya’s built-in mathematical functions, and when it comes to oscillating motion, it’s a very useful one! A sine curve (as shown in red at the top of this page, ) is a smooth curve that goes up and down over time. With a little editing, we can use this smooth up and down movement to drive the movement of our horse.

With the above code entered, click Create to activate it. If you play back now, the horse will move up and down but not how we want. We need to add in some custom attributes!


Step 11

We’re going to add an attribute to the very first horse grp, to change the frequency of it’s up and down motion. You could add this attribute to any object in the scene, or even a locator if you’d prefer, but remember that you’d have to update the expressions below so that they contained the correct path to the attribute, otherwise they won’t have any affect!

Select GRP_Horse1, and in the channel box click Edit > Add Attribute. Give it the settings shown in the below image :

Step 12a Image
Step 12b Image

Step 12

With our new attribute created, we need to go back to the expression editor to alter the Sin expression. Edit the expression so it matches the code below :

 GRP_Horse1.translateY = sin(time*GRP_Horse1.frequency);

As you can see, we’re multiplying the time value by our new frequency attribute, which has the affect of speeding up or slowing down the speed of the oscillating motion. Pretty cool.

Step 13 Image

Step 13

With our second attribute in place, we’re going to need another slider in our UI! Open the script editor back up and edit the mel script as shown below :

window -title "Controls" -width 400 -height 200;
	frameLayout -collapsable true -label "Merry-go-round";
		columnLayout;
floatSliderGrp -label "Frequency" -field true -minValue 0 -maxValue 10 frequency;
connectControl frequency GRP_Horse1.frequency;
floatSliderGrp -label "Speed" -field true -minValue 0 -maxValue 5 speed;
connectControl speed merry_go_round_move.rotateSpeed;
setParent ..;
showWindow;

As you can see we have two new lines. The first creates a new slider called frequency, and the second connects this frequency slider to our new frequency attribute. Both lines use the same commands as the Speed slider. If you now hit play, you can interactively alter the speed of the Horse’s up and down motion. We’re getting there!

Step 14 Image

Step 14

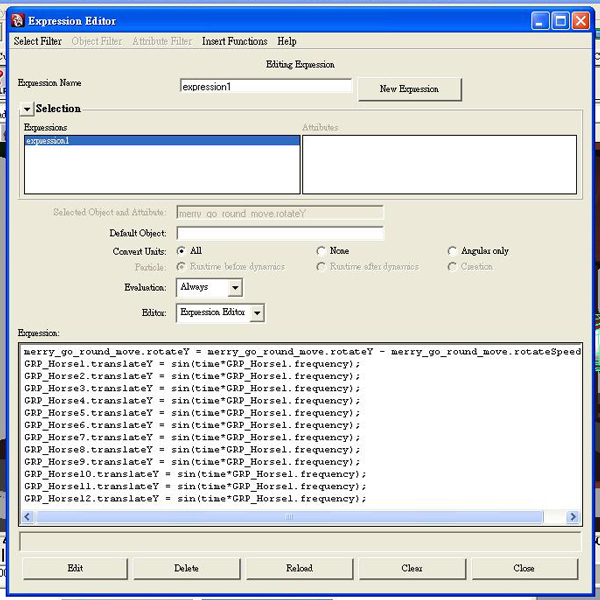
Time to make the other horses move as well! Make 11 more copies of the previous Sin expression, remembering to update the name of the HorseGrps as shown below. As we want to control the speed of all of the horses from the single frequency attribute, the last part of each expression remains the same. Remember to hit Edit when you’re done, and then hit play and move the slider to see the result!

Step 15 Image

Step 15

Brilliant! Except the horses are all moving up and down together which isn’t very realistic. We need to offset the time value for some of the horses, so that they reach the top of their jump at different times. Lets see what it looks like :

Step 17 Image

As you can see I’ve added 45 to some of the horse’s Time values. This can be a random value, however I’ve used 45 as it offsets those horses’ movement by exactly half – they’ll be at the bottom of their jump whilst the rest are at the top! An example for one of the horses is given below :

GRP_Horse2.translateY = sin((time+45)*GRP_Horse1.frequency);

NOTE : Be careful that you add the extra brackets in!


Step 16

Finally, open the script editor back up, select all of the code, and middlemouse-drag it to an empty spot on your shelf! This saves the script as a shelf button, allowing you to open the window easy without re-writing all of the code. Now click the button, hit play and see the results of your expressions-work.

Step 18 Image

And that’s it! I hope you liked this tutorial. If you have any questions, let me know and I’ll try to get back to you. Thanks!


Don’t miss more CG tutorials and guides, published daily – subscribe to Cgtuts+ by RSS.

Productive Kitchen Gadget #2 – Enameled Lemon Squeezer

In an earlier article, I touched upon productive kitchen gadget #1, which was the microplane. In my house, we love kitchen gadgets. There are so many products out there that have sprung up in recent years that can really add to your productivity in the kitchen. It is in this series that I will highlight a lot of these gadgets that can simply make your kitchen life a whole lot easier and more productive.

In this post, the kitchen gadget that I would like to feature is the enameled lemon squeezer.

Now, this isn’t your old-fashioned outdated lemon reamer. This is a brand new design, that makes it extremely simple to get your juice right where it should go; into your food. There are a number of versions of this squeezer that are in different colors. There is one that is green that is a bit smaller that is designed for limes. There is also an orange one that is a little bit bigger that is designed for oranges. You could simply buy the biggest one and use it for all three fruits. We actually own both the lime and the lemon squeezer. I use the lime squeezer for my drinks that require fresh lime juice. My wife uses both of them as she uses a lot of lime and lemon in our nightly cooking.

To use it all you do is slice the lemon or lime in half and place it in the bottom concave portion of the squeezer. Then, you simply apply pressure on the handles and squeeze the top convex section into the concave section. The bottom portion of the concave section has a series of holes that the juice travels through and into your measuring glass or right onto your food. I think the best feature of this gadget is that there is no mess involved and the juice gets to where you want it to go.

This simple kitchen gadget, with its revolutionary design, is one that we use nearly every day. Once you start using it I’m sure you will find it as productive as we do.

Quick Tip: Finding Locations Which You Never Knew Existed

Like most people, I’ve been a little skeptical about the true value of services such as Gowalla. Recently however, I discovered an absolutely fantastic use for them: to pick out secret photo locations which are already nearby but whose existence you had no prior knowledge of.


What You’ll Need

It’s quite simple really. All you’ll need is a GPS enabled smart phone and a copy of the (Free) Gowalla application. We’ll be working primarily from an iPhone, however it should be quite straightforward to apply the same technique to different devices or platforms.

iPhone photo by Jorge Quinteros


How It Works

Gowalla is supposed to be used to check in to locations which you already know about, because you’re already there! However, what it also does is show you nearby locations regardless of whether you knew they existed. It’s this bit of handy functionality that we’ll be exploring.

If you go to the top “Browse” section under the “Spots” menu item, you’ll get a list of options that looks like this:

Normally you probably use the “Nearby Spots” section to check into the locations around you, but today I want you to try something a bit different. Going into the categorized sub-menus is where some great photo locations can reveal themselves. The “Architecture & Buildings” and “Art & Culture” menus in particular often contain nearby landmarks, ruins, and unusual buildings in general.

The first time I came across this I was sitting in my car at the top of a hill, having just tried (and failed) to reach a spot in time to catch the sunset. I was thumbing through Gowalla and I suddenly noticed a nearby spot called “Silent Pool” with a description of “Eerie crystal clear pool of water.” It was literally 200 meters away at the bottom of the hill which I was parked on top of. It sounded pretty cool so I decided that I couldn’t exactly pass that one up!

The location itself was gorgeous – a totally hidden away little pool in the middle of a small forest with a little wooden jetty going a little way out over the water. Unfortunately the final photo was a little grainy due to high ISO and long exposure (remember how I missed that sunset?) and I only had a 50mm prime with me and I was basically unprepared – but I’ll definitely be going back, and I’d realized that this could be a very handy way of using Gowalla.


Improving

Since then I’ve been checking Gowalla for land marks much more regularly and carrying around a wider selection of gear when driving around. Recently that lead to the discovery of Waverly Abbey – a magnificent old ruin in the South of England which made an ideal shoot location.


Conclusion

Keep an eye on that mobile phone! You never know when you might be just a few meters away from an amazing spot that someone else has discovered and geo-tagged. Also, don’t forget to tag locations yourself so that others can find them. Exploring unknown locations purely based on a recommendation coming from your phone is a lot of fun, and sometimes extremely rewarding too!

What do you think? Have you found any good locations by using Gowalla? What about Foursquare? Let us know in the comments!

Apple’s AA batteries are probably Sanyo Eneloops

We don’t want to burst your bubble, but here’s a hard fact: Apple doesn’t manufacture the batteries that come with its recharger. In fact, they don’t manufacture iPhones, iPads, iPods…you get the picture.

That’s why we’re not surprised to learn that the AA batteries that ship with the charger come from a 3rd party. The folks at the website SuperApple have gone through the trouble (translation) of tearing them down. This is certainly the first AA battery teardown we’ve ever seen. What they found was that they’re a near perfect match, both in construction and performance, to the Sanyo Eneloop HR-3UTG.

That’s good news, as Engadget recently raved over those little buggers, claiming that they retained 70% of a charge after 3 years in a drawer. While it isn’t news that Apple is using batteries not manufactured by their employee’s hands, it’s good to know that said batteries are of high quality.

[Via Engadget]

TUAWApple’s AA batteries are probably Sanyo Eneloops originally appeared on The Unofficial Apple Weblog (TUAW) on Fri, 13 Aug 2010 13:00:00 EST. Please see our terms for use of feeds.

Read | Permalink | Email this | Comments

Survey: iPad a preferred leisure device

This week, copywriting firm Cooper Murphy Webb has confirmed what’s been true in my house for weeks: the iPad is beating out television as a preferred leisure device.

In a survey of 1,034 iPad owners in the UK, Cooper Murphy Webb found that 24% of respondents reported using their iPads as their primary entertainment device. The television came in at 19%, while 22% reported using their mobile phones for entertainment and 2% listed the ever popular “other.”

Mathematicians among us will notice that those numbers don’t add up to 100%. That’s because the computer still tops the list at 33%. These numbers are similar to what happens in my household. My wife and I typically go for the iPad first during our evening leisure time, the computer next and the TV last.

[Via Macsimum News]

TUAWSurvey: iPad a preferred leisure device originally appeared on The Unofficial Apple Weblog (TUAW) on Fri, 13 Aug 2010 14:00:00 EST. Please see our terms for use of feeds.

Read | Permalink | Email this | Comments

Rumor: Verizon iPhone to have large screen, new processor

It’s Friday, and that must mean Verizon-on-the-iPhone rumor time. This one comes from the SyFy Network’s DVICE blog of all places and is all about the hardware. They’re claiming that an “inside source” has provided some specs on a new Verizon handset.

According to DVICE’s source, the iPhone will feature a larger screen than what the iPhone 4 has, as well as an internal antenna (we imagine that’s a bit of a sore spot with Apple these days). They also report that Verizon “insisted” on an internal antenna.

As for the display, expect something like 3.7 inches. Finally, DVICE suggests that a zippy 1.2GHz chip will run the whole thing. It’s all speculation, folks, so keep that in mind. Do you buy it?

TUAWRumor: Verizon iPhone to have large screen, new processor originally appeared on The Unofficial Apple Weblog (TUAW) on Fri, 13 Aug 2010 15:00:00 EST. Please see our terms for use of feeds.

Read | Permalink | Email this | Comments

Does the Apple TV need 1080p?

Engadget’s tasty scoop on Wednesday suggests that the long-rumoured but still-mythical Apple TV hardware refresh would lack 1080p output. As is fairly routine now, weblogs, forums, and Twitter exploded with “ZOMG APPLE #FAIL” and similar thoughtful criticism. But assuming it’s true, is this really that surprising? Everyone automatically assumes 1080p is the natural choice but I’m not sure it’s that simple.

Notwithstanding (slightly dubious) recent rumours of a new video codec capable of pushing out 4096×2160, iTunes today can only offer high definition video in 720p. To move that to 1080p would require 2.25 times more disk space on the iTunes servers and the same increase in data bandwidth between those servers and the paying customers. Those are not cheap investments.

In turn, consumers would see a similar increase in streaming requirements. Xbox Live can stream 1080p video, but it requires 8-10meg broadband, which leaves an awful lot of people out in the cold. It has the option of downloading instead, but if you’re out in the sticks on a 2meg stream you’re looking at more than eight hours to download your film at 1080p. You’d best plan your Friday night viewing before leaving for work on Friday morning.

TUAWDoes the Apple TV need 1080p? originally appeared on The Unofficial Apple Weblog (TUAW) on Fri, 13 Aug 2010 16:00:00 EST. Please see our terms for use of feeds.

Read | Permalink | Email this | Comments

App Review: Set Pro HD

The game of Set is now available in more stores than ever before, from big box retailers to independent game stores. Finally, a full-featured digital version is also ready and waiting for your iPad in the App Store.

There have been Set apps before, even one officially licensed by Set Enterprises, but this is the real deal. All the criticisms we had of the other Set app, which was iPhone/iPod touch only, are totally wiped away by this new version, and if you haven’t been introduced to this quick-thinking game of finding matches – or if you’re already a fan – we have no hesitation recommending the new Set Pro HD app. Yes, it’s relatively expensive at $7.99, but it is quite gorgeous and the gameplay is top-notch. Read on to see if it’s time to upgrade your Set cards.

Gallery: Set Pro HD

TUAWApp Review: Set Pro HD originally appeared on The Unofficial Apple Weblog (TUAW) on Fri, 13 Aug 2010 20:30:00 EST. Please see our terms for use of feeds.

Read | Permalink | Email this | Comments

Photoshop Express for iPad is the spawn of the devil, avoid for now

It seemed like such a great idea. Adobe was releasing a free photo editing tool for the iPhone and the iPad. Well, Photoshop Express is out, and it’s a big, honking dog.

It has just about the worst ratings I’ve ever seen on an app from a big time developer, and those ratings are well deserved. On my iPad it launches, crashes, and then picks another app on my iPad to run. In my case it launches Photogene, another photo editing program. Huh?

For those lucky anough to get Photoshop Express running it crashes over and over. And over. Did anybody at Adobe test this thing? I’m sure it will be replaced by a working app at some time, but don’t grab this thing unless you are really a masochist. It may be working fine for a few, but for most users the app is a steaming pile of frustration.

You’ve been warned.

TUAWPhotoshop Express for iPad is the spawn of the devil, avoid for now originally appeared on The Unofficial Apple Weblog (TUAW) on Fri, 13 Aug 2010 21:30:00 EST. Please see our terms for use of feeds.

Read | Permalink | Email this | Comments