Rovio sells 6.5M copies of Angry Birds without advertising once

I got to meet the creators of Angry Birds back at E3 earlier this year, but because of our busy schedules, didn’t get too much of a chance to really talk with them in-depth about their experience on the App Store so far. Fortunately, GamesBeat has done just that, providing a nice profile of Rovio’s Peter Vesterbacka and Mikael Hed, the two Finnish creators of one of the App Store’s most popular titles. They’re actually mobile app veterans — while Angry Birds is their biggest hit as a company, they’ve also developed for lots of other groups, including Real Networks and Electronic Arts.

The game was created to be casual, open to anyone to play, and use some really memorable characters that would resonate with anyone who picked it up. They accomplished those goals — the game has found a surprising following around the world, and almost everyone who owns an iPhone recognizes the birds and pigs characters. A US$4.99 iPad version has also taken off, and Rovio plans to bring the app to lots of other mobile devices as well. The growth has been entirely organic, too — they haven’t spent a single cent on advertising the game, instead relying completely on word-of-mouth and Apple’s own promotional tools.

And while their success is already quite widespread, the two say their goals are even bigger than what they’ve accomplished so far: they hope to eventually see 100 million paid downloads. Definitely possible — it’s interesting to see how iPhone-created brands are growing so quickly.

TUAWRovio sells 6.5M copies of Angry Birds without advertising once originally appeared on The Unofficial Apple Weblog (TUAW) on Tue, 17 Aug 2010 10:00:00 EST. Please see our terms for use of feeds.

Read | Permalink | Email this | Comments

Shopkick, Best Buy team up to use location-based app for loyalty program

I’ve been a member of Best Buy’s rewards program for a little while now — as long as I’m spending way too much of my hard-earned money at the big box retailer, I figure I might as well try to get some of it back. And I was pretty impressed with what they’ve done on their website with the program — you can track your status and check out whatever deals are available to you whenever you sign in.

And now, Best Buy has partnered up with an iPhone app called Shopkick, set to go live later this week. Shopkick is an app designed to automatically “check-in” with partnered retailers, so you can earn rewards bucks or other loyalty currencies whenever you stop by a specific retail location. Instead of using GPS, the app uses the smartphone’s speaker to pick up a certain audio signal being played in-store, so “checking-in” at a Best Buy with the signal running will apparently grant rewards or discounts to customers.

I don’t know if the process actually appeals to me, even as a loyal Best Buy customer — I haven’t been interested in the whole “check-in” fad, and Shopkick sounds more like adware than anything else. But we’ve heard already that Apple themselves are interested in location-based networking, and this seems like exactly the kind of system that retailers and app creators alike are trying to build, enticing customers to visit and interact with brands and products in their stores. Shopkick goes live later this week and has already partnered with 25 malls in cities across the US, so we’ll see how customers react to it.

TUAWShopkick, Best Buy team up to use location-based app for loyalty program originally appeared on The Unofficial Apple Weblog (TUAW) on Tue, 17 Aug 2010 11:00:00 EST. Please see our terms for use of feeds.

Read | Permalink | Email this | Comments

Adobe on Flash in iOS: ‘We’ve moved on’

The Telegraph has published a lengthy and fascinating interview with Adobe CEO Shantanu Narayen. Most of the interview focuses on Adobe’s deteriorated relationship with Apple, particularly Apple’s refusal to allow Adobe’s Flash Player to run on the iPhone, iPad, or iPod touch. Narayen had many things to say during the interview, but here’s the bottom line: “They’ve made their choice. We’ve made ours and we’ve moved on.”

Narayen continues to characterize Apple’s shunning of Flash as a business decision rather than one based on technical considerations: “There are companies that are choosing to provide a complete end-to-end experience and control every aspect of it and want all the business model gains from it,” he says. “There are other companies that have chosen to say that the open eco-system is the way to go and that’s how you would contrast Apple and Google’s business models. We’re on the side of the open.”

It’s interesting that Adobe, purveyor of some of the most ubiquitous proprietary software out there, keeps using that word, “open,” without any sense of irony. But regardless of whether Flash can rightly be characterized as “open” or not, this latest word from Adobe’s top executive proves one thing for certain: Flash is not coming to iOS devices. Not now, not in the near future, and probably not ever.

Adobe is working with “19 out of 20” handset companies to get Flash working on their devices, with Apple as the lone holdout. Will Apple’s continued anti-Flash stance hurt its iOS device sales in the long run? Probably not. Many pundits predicted the iPad would be a market failure because it lacked support for Flash video, and yet its sales have taken even Apple by surprise. The iPhone 4 continues to sell out worldwide nearly two months after its debut, and it doesn’t run Flash, either. Following an expected refresh of the iPod touch’s hardware next month, Apple will sell millions of them over the holiday quarter, and not one of them will support Flash. Adobe needs Flash to run in iOS far more than Apple does, and if sales are anything to go by, more than most iOS users do, too.

Narayen says Adobe’s “doors are open” if Apple decides to change its stance on Flash. However, it’s highly unlikely that Apple will ever open its doors to Flash, so as far as this debate goes, it really is time to move on.

[Via Mac Rumors]

TUAWAdobe on Flash in iOS: ‘We’ve moved on’ originally appeared on The Unofficial Apple Weblog (TUAW) on Tue, 17 Aug 2010 11:30:00 EST. Please see our terms for use of feeds.

Read | Permalink | Email this | Comments

App Review: Tafl brings Norse asymmetry to your game table

Mancala. Chess. Backgammon. The number of ancient board games available in the App Store is long and somewhat predictable. A fresh new entry that deserves notice is Tafl, a pretty and interesting abstract strategy game that has existed in Northern Europe since at least 400 C.E. Exactly how the game was played has been lost to history, but the general idea was to have one player move a king pawn from the center of the board to the exits, which maybe have been simply off the side or maybe into the corners. Given the wide variety of boards and locations where the game was played – and knowing what we know about how ancient games traveled – it’s entirely likely that the games in the tafl family were all played differently. Well, now you can play it on a touch screen on your iPad or iPhone (or iPod touch). There is a great history of the board game(s) here; keep reading for the rest of our review.

Gallery: Tafl

TUAWApp Review: Tafl brings Norse asymmetry to your game table originally appeared on The Unofficial Apple Weblog (TUAW) on Tue, 17 Aug 2010 12:00:00 EST. Please see our terms for use of feeds.

Read | Permalink | Email this | Comments

You Can’t Always Get What You Want: Great book, lousy app

You Can’t Always Get What You Want (US$4.99 until the end of August, to celebrate Jerry Garcia’s birthday), is one of the best Rock and Roll books I’ve ever read. It is written and read by Sam Cutler, the tour manager of the Rolling Stones and later the Grateful Dead in the late 60’s and early 70’s. The centerpiece of the book is the free concert at the Altamont Speedway in Northern California that took place on December 6, 1969, which was made into a gripping documentary film titled Gimme Shelter by Albert and David Maysles.

The line up included: Santana, the Jefferson Airplane, the Flying Burrito Brothers, Crosby Stills Nash and Young, the Rolling Stones and the Grateful Dead, who later decided not to play since it was too dangerous. What most people remember about the concert is that during the Stones performance, quite near the stage, Alan Passaro, a Hells Angels member, stabbed and killed Meredith Hunter after Hunter pulled out a gun. Although horrible and headline grabbing the full story is much more gripping and is only one part of the book.

Sam Cutler, is a gregarious guy who was smack in the middle of the rock scene at the time. He’s a great story teller, and has the perfect voice to tell his story. He reads his book in a grizzled and sometimes tired English accent that gives instant credibility to his words. He knew everyone and remembers everything in amazing detail. Naming the cast of characters would go on for pages, but Sam was there at the start of arguably every English rock and roll band at the time and later knew just about everyone in the San Francisco music scene.

TUAWYou Can’t Always Get What You Want: Great book, lousy app originally appeared on The Unofficial Apple Weblog (TUAW) on Tue, 17 Aug 2010 07:00:00 EST. Please see our terms for use of feeds.

Read | Permalink | Email this | Comments

Time Warner Cable entering the iPhone app game

TWC appI’ve been a Verizon FiOS subscriber since the day it rolled out in my neighborhood, and I couldn’t be happier (my bank account’s demeanor is another story). Actually, I take that back, because I got a tad bit happier when the cable company released an official iPhone app that allows for DVR scheduling and management. Joy!

If you’re a Comcast subscriber, there’s a similar app available. And, coming soon, Time Warner Cable will be rolling out their own answer to the iOS app scheduling game. Just as with the Verizon and Comcast apps, you’ll reportedly be able to manage your DVR recordings, view TV schedules and setup recordings from afar.

What the Verizon and Comcast apps do not have is the ability to view your recordings on your device, which, reportedly, could be a possibility with the TWC app. Imagine watching part of a recorded program on your iPad, then pick up later where you left off at home.

Check out the YouTube video after the jump, which shows off a glimpse of a prototype of the app.

TUAWTime Warner Cable entering the iPhone app game originally appeared on The Unofficial Apple Weblog (TUAW) on Tue, 17 Aug 2010 08:15:00 EST. Please see our terms for use of feeds.

Read | Permalink | Email this | Comments

TUAW’s Daily App: Soundrop

Soundrop isn’t really a game — it’s more of a musical instrument, although you can play with it for quite a while. The app presents a small hole that constantly drops balls out at a certain rate, while you draw lines on the screen with your finger. Where the balls hit the lines, a tone is sounded, and by positioning the lines in the right places, you can make an interesting sort of music. The app itself calls it “musical geometry,” and it is surprisingly fun, even if you aren’t a musician. With headphones, you can actually hear the whole thing in stereo, which makes for another fun factor of the experience.

The app is a free download, although you only get a demo for free, with the ability to just draw white lines anywhere. Paying US $1.99 opens up the full functionality, and you can change physics, add more spouts, or change the colors of the lines that are drawn, creating different musical noises with each color.

It’s a good time — play with the free version to see if it hits you right, and then if you’re interested, you can buy in for the two bucks and have the whole app.

TUAWTUAW’s Daily App: Soundrop originally appeared on The Unofficial Apple Weblog (TUAW) on Tue, 17 Aug 2010 09:00:00 EST. Please see our terms for use of feeds.

Read | Permalink | Email this | Comments

Download The New Cube Dance Custom Effect – AE Premium

In its simplest form Cube Dance creates cubes without you having to manually align 3D layers. This of course can be pretty useful, however, by animating a few properties, such as offset and rotation, you can choreograph very intricate movements and even create unique geometric shapes. This tutorial acts an introduction and we’ll look at installing the effect, how each of the effect properties work, and how you might set-up an animation. I hope you enjoy it!


This is a Premium Tutorial. To view and get the Custom Effect you must Join Premium.

Once you’ve joined, log-in to the Premium Dashboard with your username and password to immediately access your Premium Content. Navigate to AE Premium via ‘Premium Categories’ in the sidebar. You’ll be able to grab the tutorial videos, project files and assets in the members’ area.


Design a Coffee Shop Menu Layout from Scratch with Photoshop and InDesign – Part 2


This is the second part of this tutorial series about creating a ready to print booklet menu for an imaginary coffee shop named "Violet Coffee." In this final part of the two part series, you’ll learn to create a ready to print booklet on InDesign, work with master pages, text, tabs, paragraph and character styles, import external files and actually print the booklet. Let’s move on!

Continue reading “Design a Coffee Shop Menu Layout from Scratch with Photoshop and InDesign – Part 2”

Intro To Fusion For The After Effects User – AE Basix

It may be true that After Effects is the more popular software for creating eye candies and blending CGI and reality. But it’s also true that different studios use other softwares for creating their works. This time we will take a look at node based software called Eyeon Fusion. In this first tutorial I’ll present Fusion’s workflow and some of its basic tools. You will learn how to import footage, connect nodes, set up their parameters and create some simple animations.


Tutorial

Download Tutorial .flv

File size 94.5MB

Additional Resources


A Sneak Peak at Premium for Non-members

Week by week you’ve seen our Premium tut announcements. Perhaps you’ve wondered what it’s all about. Perhaps you’ve asked yourself why you would pay for content when we offer so much for free. Read on and find out! In this post we introduce you to our Premium program, and give you a sneak peak behind the scenes.

A Premium membership gives you access to material that can’t be accessed for free – content from seven different Tuts+ sites, including Audiotuts+. The content is twice as detailed as normal tutorials, and is generally written by industry professionals. Each Premium post is either a bonus tutorial, or source material like a loop or sample pack.

How much content are we talking about? Quite a lot, and it grows every week:

  • Total Premium tutorial: 374

  • Total Premium source files: 841
  • Total Premium material (combined): 1,215

Membership costs $9 a month, and comes with a money-back guarantee within the first month. Considering how much you get, that’s a bargain!

So what are you waiting for? Join now.

Still thinking? Here are some great reasons to subscribe to Premium:


1. Support Audiotuts+

Audiotuts+ is committed to bringing you excellent audio training virtually every day of the week – most of it for free. In doing so, we spend a lot of money – we pay our authors for every tutorial and every quick tip. Where does that money come from? Most of it comes from our Premium program.

The best way to support Audiotuts+ is with a $9 a month Premium subscription. We don’t expect everyone to subscribe, but if you love Audiotuts+ and want to contribute to its ongoing success, subscribing to Premium is the best way to do that.

And to all of our current subscribers – we appreciate your support!


2. Invest in Your Education

If you’re serious about mastering audio, investing in a Premium membership is a great idea. There are few industries where the techniques and methods of the professionals are so guarded in secrecy. We’ve lined up some of those professionals who are happy to break that unspoken oath of silence and teach you how things are done in some of the famous studios around the world.

If you don’t feel you can afford a Premium subscription on a long-term basis, why not subscribe for a few months. Six months or a year down the track you can resubscribe when you’re ready. And if Premium doesn’t measure up to your expectations, we’ll buy back your first month. That’s a no-questions-asked money-back guarantee.

Interested yet? Join now.


3. Accessing Premium Content

At the bottom of each Premium announcement post you’ll find a section where you can log in. Type your Premium username and password, and click “Sign In”.

You’ll be directed to the Premium site. View the Premium content for each Tuts+ site by clicking the site names and logos on the left. When in the Audiotuts+ area, you can switch between viewing bonus tutorials and audio packs by clicking the buttons near the top of the screen.

Premium content is currently read locally on your own machine. You can download a zip file containing the tutorial or audio pack by clicking the post’s title.


4. What Do You Get?

So far, Audiotuts+ Premium content is made up of 12 loop and sample packs, and 54 bonus tutorials. That 66 posts in total. Browse through them below – we’ve listed every one! If you have any suggestions of how we can improve Premium, let us know in the comments.

You’ll find lots of reasons to subscribe, from building up your loop and sample library, to sampling material from Bobby Owsinski’s renowned books. Most techniques work in any DAW, and are designed to give you the big picture, as well as some more intimate hints on the important details of producing music.

12 Premium Loop and Sample Packs

Most months we release a sample or loop package for Premium subscribers. You can use these samples and loops in as many projects as you like, commercial or personal, without having to pay for royalties or anything like that. Subscribing to Audio Premium will not only help you develop audio skills, it’ll help you grow your sample library — something that’s important for every producer worth their salt. So far we offer 405 source files in total!

  • 65 Drum & Bass Loops and Samples

    1. 65 Drum & Bass Loops and Samples

    Our inaugural Audiotuts+ Plus program content is here: 65 high quality drum & bass loops and samples in both WAV and MP3 format, by Scott Wills. If you’re in search of samples to help add depth to your drum and bass compositions, this is the sample pack for you!

    Visit Article

  • 50 Funky Guitar Loops Sample Pack

    2. 50 Funky Guitar Loops Sample Pack

    This week in Audio Plus we have 50 funk guitar loops from Audiotuts+ author Toby Pitman, available in both WAV and REX formats. Everything you need to add a bit of funk to your productions.

    Visit Article

  • Dark Space Ambient Sound FX

    3. Dark Space Ambient Sound FX

    Scott Wills‘ Dark Space Ambient Sound FX contains 50 WAV files in a pack of atmospheric and textured sound effects for ambient productions.

    Visit Article

  • 25 Abstract Textures and Drones

    4. 25 Abstract Textures and Drones

    This Premium Pack download contains 25 Abstract Textures and Drones from Audiotuts+ author Toby Pitman. They are ideal for all sorts of applications including Motion Graphics, Flash websites, game development and TV/Film scores. They are made entirely from scratch using a range of audio processing techniques.

    Visit Article

  • 47 Junk Percussion Samples

    5. 47 Junk Percussion Samples

    This week in Audio Premium we have 47 ‘junk percussion’ samples from Audiotuts+ author West Latta. The pack includes simple EXS24 and Kontakt banks for easy playability.

    Visit Article

  • 12 Ambient Field Sounds Pack 1

    6. 12 Ambient Field Sounds Pack 1

    This week in Audio Premium we have 12 ambient samples from Audiotuts+ author West Latta. The pack comes to a huge 300 MB of uncompressed audio – some of the samples are over a minute long.

    Visit Article

  • 42 Glitch and FX Samples

    7. 42 Glitch and FX Samples

    To make up for last month’s lack of sample packs, we bring you a great pack of 42 glitch and FX samples from Audiotuts+ author Toby Pitman.

    Visit Article

  • Graimbient Loops and Textures Pack

    8. Graimbient Loops and Textures Pack

    This week in Audio Premium we have a pack of 18 samples from Audiotuts+ author West Latta. The pack has great variety, and contains some weird but useful sounds.

    Visit Article

  • 14 Ethnic Loops From the East

    9. 14 Ethnic Loops From the East

    This week in Audio Premium we have a pack of 14 exotic loops from Audiotuts+ author West Latta. The pack features great percussion, and the sound of the East.

    Visit Article

  • 12 Action-Packed Score Drums Sample Pack

    10. 12 Action-Packed Score Drums Sample Pack

    This week in Audio Premium we have a pack of 12 long action-packed drum samples from Audiotuts+ author Toby Pitman. You’ll find something suitable for any score – from supercharged chase scene to thirsty marches across the dessert to climbing mountains in the Himalayas.

    Visit Article

  • Guelzo SFX Bundle

    11. Guelzo SFX Bundle

    When it comes to royalty free sound effects, you can never have enough. With over 60 royalty free sound effects ranging from various Ambiances to Hard Effects, the Guelzo SFX Bundle will help give you just a few more options ready at your disposal when the next project comes knocking at your door. (No pun intended.)

    Visit Article

  • The Poignant Piano Pack

    12. The Poignant Piano Pack

    This week in Audio Premium we have The Poignant Piano Pack from AudioJungle.net site manager and author Scott Wills, a collection of ten original compositions that can be used for film, video or Web. Ideal for end credits of a film, a reflective ambience in a slideshow, or just thoughtful and delicate background music for your project, these mostly loopable pieces will help add a delicate and retrospective moment to your next piece of work.

    Visit Article

17 Premium Tutorials by Bobby Owsinski

A long-time veteran of the music industry, Bobby Owsinski has produced and composed for records, motion pictures and television shows along the way. Bobby has served as the longtime producer of the annual Surround Music Awards, and is one of the executive producers for the “Guitar Universe” and “Desert Island Music” television programs. He’s just completed producing the latest SNEW album.

You’ve seen Bobby’s books being offered as prizes in our competitions, and many of you have expressed your appreciation for his work. Much of the material from Bobby’s Premium tuts comes from his audio books.

  • Working With the Intangibles of a Mix

    1. Working With the Intangibles of a Mix

    In this week’s Audio Plus content, Bobby Owsinski teaches us how to set about creating a mix that works beyond the basic techniques of getting levels right. This tutorial is about planning the mix and creating the balance that makes everything come together. Bobby is the author of many best-selling audio books including The Mixing Engineer’s Handbook — this is a tutorial of expert advice that’s not to be missed!

    Visit Article

  • Mastering: You Can Do It Yourself (With a Little Caution)

    2. Mastering: You Can Do It Yourself (With a Little Caution)

    In this week’s Audio Premium content, Bobby Owsinski brings us the first of two tutorials on do-it-yourself mixing — the common pitfalls and techniques you can use to make your own mastering efforts sound that much better than the average mixing engineer’s attempts. Bobby is the author of many best-selling audio books including The Mixing Engineer’s Handbook.

    Visit Article

  •  Mastering: You Can Do It Yourself (Part Two)

    3. Mastering: You Can Do It Yourself (Part Two)

    In this week’s Audio Premium content, Bobby Owsinski brings us the second of two tutorials on do-it-yourself mixing — this time looking at such topics as editing, fades, spreads, exporting and encoding. Bobby is the author of many best-selling audio books including The Mixing Engineer’s Handbook.

    Visit Article

  • Things You Don’t Think About During Mixing (But Should)

    4. Things You Don’t Think About During Mixing (But Should)

    In this week’s Audio Premium content, Bobby Owsinski brings us a tutorial that covers considerations to make during the mixing phase of your recording project that go beyond simply giving your track depth and contrast. Bobby is the author of many best-selling audio books including The Mixing Engineer’s Handbook.

    Visit Article

  • Build an Effective Room Treatment on the Cheap

    5. Build an Effective Room Treatment on the Cheap

    In this special Birthday Bonus tutorial, Bobby Owsinski teaches us how to treat a room acoustically without breaking the bank.

    Visit Article

  • Why Playing In The Studio Is Different From Playing Live

    6. Why Playing In The Studio Is Different From Playing Live

    In this week’s Audio Premium content, Bobby Owsinski explores the difference between playing music live and in a studio.

    Visit Article

  • Effects: The Subtle Side Of Mixing

    7. Effects: The Subtle Side Of Mixing

    In this week’s Audio Premium content, Bobby Owsinski explains when, why and how to effectively use effects while mixing.

    Visit Article

  • The Secret Of Recording Great Sounds

    8. The Secret Of Recording Great Sounds

    In this week’s Audio Premium content, Bobby Owsinski texplains how technique trumps equipment when it comes to capturing great sounds.

    Visit Article

  • Equalization Tricks That Everyone Should Know

    9. Equalization Tricks That Everyone Should Know

    In this week’s Audio Premium content, Bobby Owsinski covers some tricks, methods and principles that will help you EQ your tracks like a pro.

    Visit Article

  •  Getting The Best Out Of A Vocalist

    10. Getting The Best Out Of A Vocalist

    In this week’s Audio Premium content, Bobby Owsinski teaches you how to get the most out of a vocalist in a recording session.

    Visit Article

  •  Vocal Recording Techniques

    11. Vocal Recording Techniques

    In this week’s Audio Premium content, Bobby Owsinski takes us through some practical and insightful vocal recording techniques from his books.

    Visit Article

  • Recording The Drums – The Song’s Heartbeat

    12. Recording The Drums – The Song’s Heartbeat

    In this week’s Audio Premium content, Bobby Owsinski teaches you how to get more life out of the drums when you’re recording.

    Visit Article

  • Recording The Drums – The Song’s Heartbeat Part 2

    13. Recording The Drums – The Song’s Heartbeat Part 2

    In this week’s Audio Premium content, Bobby Owsinski continues his series on how to get more life out of the drums when you’re recording.

    Visit Article

  • Recording The Drums – The Song’s Heartbeat Part 3

    14. Recording The Drums – The Song’s Heartbeat Part 3

    In this week’s Audio Premium content, Bobby Owsinski continues his excellent series on how to get the best sound out of drums when recording.

    Visit Article

  • Recording the Drums – Part 4

    15. Recording the Drums – Part 4

    In this week’s Audio Premium content, Bobby Owsinski continues his series on how to record the drums.

    Visit Article

  • Recording the Drums – Part 5: It’s All In the Mix

    16. Recording the Drums – Part 5: It’s All In the Mix

    In this week’s Audio Premium content, Bobby Owsinski concludes his series on recording and mixing the drums. This final part is full of techniques, hints and tips from an industry professional.

    Visit Article

  • The Art Of Music Production – Part 1

    17. The Art Of Music Production – Part 1

    In this week’s Audio Premium content, Bobby Owsinski starts a new series on music production inspired by his new book “The Music Producer’s Handbook” and his decades of experience in the industry.

    Visit Article

12 Premium Tutorials by Ryan Leach

Ryan is a genius when it comes to explaining music theory, and has worked on some of the biggest television shows and movies in the business, including composing additional music for Cold Case, and offering technical assistance for The Dark Knight.

  • How to Set Up Your Workstation Template

    1. How to Set Up Your Workstation Template

    In this week’s Audio Plus content, Ryan Leach teaches us about creating workstation templates so you can get composing and recording quickly without getting bogged down in technical details. After an in-depth guide to planning your template, Ryan takes us through the process of setting the template up in Logic Pro (with instructions that can be easily adapted to other software).

    Visit Article

  • How to Create More Expressive MIDI Music

    2. How to Create More Expressive MIDI Music

    In this week’s Audio Plus content, Ryan Leach teaches you how to make those artificial sounding MIDI pieces come to life with a kit of effective techniques. While the screenshots for this tutorial are taken in Logic Pro, the content is not Logic-centric and is equally useful and valuable in any software that deals with sequenced music.

    Visit Article

  • How to Make Your Tracks More Interesting

    3. How to Make Your Tracks More Interesting

    In this week’s Audio Premium content, Ryan Leach teaches you how to create interest and variation in your tracks so that you can grab your listener’s attention and keep it.

    Visit Article

  • How to Write an Instrumental Underscore Track

    4. How to Write an Instrumental Underscore Track

    In this week’s Audio Premium content, Ryan Leach teaches you how to create an instrumental underscore for a film score.

    Visit Article

  • What’s New in Logic Pro 9 (and How to Use It)

    5. What’s New in Logic Pro 9 (and How to Use It)

    In this week’s Audio Premium content, Ryan Leach explores the new features of Logic Pro 9.

    Visit Article

  • An Introduction to Creating Beats

    6. An Introduction to Creating Beats

    In this week’s Audio Premium content, Ryan Leach teaches you how to put a good beat together by use of two examples—one using regular kit sounds, and the other with electronic sounds.

    Visit Article

  • How to Become a Better Musician in 2010

    7. How to Become a Better Musician in 2010

    In this week’s Audio Premium content, Ryan Leach inspires us to become better musicians in 2010.

    Visit Article

  • An Introduction to Modes

    8. An Introduction to Modes

    In this week’s Audio Premium content, Ryan Leach gives us an in-depth music theory tutorial, explaining what modes are and how to use them.

    Visit Article

  • The Contemporary Musician’s Guide to Counterpoint

    9. The Contemporary Musician’s Guide to Counterpoint

    In this week’s Audio Premium content, Ryan Leach takes us for a detailed tour through the world of counterpoint.

    Visit Article

  • Developing Motives (or How To Write A Symphony With Only Four Notes)

    10. Developing Motives (or How To Write A Symphony With Only Four Notes)

    In this week’s Audio Premium content, Ryan Leach takes us on a journey exploring motives – what they are, how to write them, and how to develop them. The tutorial is full of helpful examples, both notated and audio.

    Visit Article

  • Making the Most of Match EQ

    11. Making the Most of Match EQ

    In this week’s Audio Premium content, Ryan Leach teaches you how to quickly improve the sound of your tracks with Match EQ.

    Visit Article

  • An Introduction to Film Scoring

    12. An Introduction to Film Scoring

    In this week’s Audio Premium content, Ryan Leach gives us an overview of scoring for film. Check out Ryan’s experience in this area on IMDB.com.

    Visit Article

10 Premium Tutorials by Björgvin Benediktsson

Björgvin’s passion is for live music, and you’re more likely to see him twiddling knobs more than playing an instrument – though he plays guitar as well. An SAE graduate, he knows his way around most audio equipment.

  • How to Use Space Designer in Logic

    1. How to Use Space Designer in Logic

    In this week’s Audio Premium content, Björgvin Benediktsson teaches you how to use Space Designer in Logic.

    Visit Article

  • How to Use Loops for Soundtrack Post-production

    2. How to Use Loops for Soundtrack Post-production

    In this week’s Audio Premium content, Björgvin Benediktsson teaches you how to use loops for post-production of soundtracks. “Bear in mind that in the following examples I am using Logic, but you can use whatever DAW you want, if it has believable synths and you have enough loops.”

    Visit Article

  • Mixing for the ’80s

    3. Mixing for the ’80s

    In this week’s Audio Premium content, Björgvin Benediktsson teaches you how to take your music back to the ’80s. While the screenshots for this tutorial are taken in Logic Pro, the content is not Logic-centric and is equally useful and valuable in any software that deals with sequenced music.

    Visit Article

  • 5 Great Vocal Effect Tips

    4. 5 Great Vocal Effect Tips

    In this week’s Audio Premium content, Björgvin Benediktsson teaches you five techniques for enhancing vocals. While the screenshots for this tutorial are taken in Logic Pro, the content is not Logic-centric and is equally useful and valuable in any software that deals with sequenced music.

    Visit Article

  • 10 Things Everyone Should Know About Modulation Effects

    5. 10 Things Everyone Should Know About Modulation Effects

    In this week’s Audio Premium content, Björgvin Benediktsson takes us on a detailed tour through modulation effects.

    Visit Article

  • The Ultimate Guide to Stereo Microphone Techniques

    6. The Ultimate Guide to Stereo Microphone Techniques

    In this week’s Audio Premium content, Björgvin Benediktsson takes us on a tour of a dozen or so stereo microphone techniques.

    Visit Article

  • Everything You Ever Wanted to Know About Live Sound

    7. Everything You Ever Wanted to Know About Live Sound

    In this week’s Audio Premium content, Björgvin Benediktsson takes us through how to set up for a live concert from start to finish.

    Visit Article

  • An Awesome Guide to Guitar Mixing

    8. An Awesome Guide to Guitar Mixing

    In this week’s Audio Premium content, Björgvin Benediktsson teaches you the best techniques for mixing electric and acoustic guitar.

    Visit Article

  • Guitar Tones From the 1950s to the Millennium

    9. Guitar Tones From the 1950s to the Millennium

    In this week’s Audio Premium content, Björgvin Benediktsson teaches you how to recreate some of the best guitar tones from the last sixty years.

    Visit Article

  • The Mixing Magician: Adding Subtleties Without the Audience Noticing

    10. The Mixing Magician: Adding Subtleties Without the Audience Noticing

    In this week’s Audio Premium content, Björgvin Benediktsson teaches you how to use effects to enhance the music rather than obviously draw attention to themselves. If you’re aiming to be an audio wizard, this tut has a lot to teach you.

    Visit Article

7 Premium Tutorials by Joel Falconer

Joel was once the managing editor, and for some time continued contributing to Audiotuts+ as an author. His tutorials take an in-depth look of various DAWs, including Pro Tools, Logic Pro and Propellerhead Reason.

  • MIDI Editing in Pro Tools

    1. MIDI Editing in Pro Tools

    In this week’s Audio Premium content, Joel Falconer teaches you how to make the most of Pro Tools 8′s new MIDI editing features. While the tutorial is focused on Pro Tools, the concepts covered are relevant to those interested in using other DAWs for MIDI sequencing.

    Visit Article

  • The Recording Artist’s Workflow: From Writing to Mastering

    2. The Recording Artist’s Workflow: From Writing to Mastering

    In this week’s Audio Premium content, Joel Falconer teaches you how to optimize the process and flow of a recording project, enabling you to use your time in the studio more effectively.

    Visit Article

  • Understanding Your Mixer: The Channel Strip

    3. Understanding Your Mixer: The Channel Strip

    In this week’s Audio Premium content, Joel Falconer takes us through the workings of the channel strip of your mixer.

    Visit Article

  • In-Depth with Reason’s Sequencer Pt 1

    4. In-Depth with Reason’s Sequencer Pt 1

    In this week’s Audio Premium content, Joel Falconer begins an in-depth series on MIDI sequencers, using Reason as an example.

    Visit Article

  • In-Depth with Reason’s Sequencer Pt 2

    5. In-Depth with Reason’s Sequencer Pt 2

    In this week’s Audio Premium content, Joel Falconer In this week’s Audio Premium content, Joel Falconer concludes his in-depth series on MIDI sequencers, using Reason as an example.

    Visit Article

  • In-Depth with Reason’s Rack

    6. In-Depth with Reason’s Rack

    In this week’s Audio Plus content, Joel Falconer takes us on an in-depth tour around Reason’s rack.

    Visit Article

  • In-Depth with Reason 4's Matrix Pattern Sequencer

    7. In-Depth with Reason 4′s Matrix Pattern Sequencer

    In this week’s Audio Premium content, Joel Falconer takes us for a guided tour through Reason 4′s Matrix Pattern Sequencer.

    Visit Article

5 Premium Tutorials by Toby Pitman

Toby is a professional guitarist and drum programmer in the UK, and works for a major studio. His tutorials are always detailed and helpful, and often humorous. Toby also contributed some of the loop packs above.

  • Groove Templates and Quantizing in Logic Pro

    1. Groove Templates and Quantizing in Logic Pro

    In this week’s Audio Plus content, Toby Pitman teaches you how to use Logic’s quantize and groove templates features, so you can pull the music in time without sucking the life out of it. For non-Logic users, the tutorial covers the subject in a way that’s relevant for users of most audio software.

    Visit Article

  • How to Create a Live Performance Rig in Logic Pro – Part 1

    2. How to Create a Live Performance Rig in Logic Pro – Part 1

    In this week’s Audio Premium content, Toby Pitman teaches you how to make a live performance rig in Logic Pro similar to the Sonifi iPhone app.

    Visit Article

  •  Create A Live Performance Rig In Logic Pro – Part 2

    3. Create A Live Performance Rig In Logic Pro – Part 2

    In this week’s Audio Premium content, Toby Pitman continues his series on how to make a live performance rig in Logic Pro similar to the Sonifi iPhone app.

    Visit Article

  • How to Create a Live Performance Rig in Logic Pro – Part 3

    4. How to Create a Live Performance Rig in Logic Pro – Part 3

    In this week’s Audio Premium content, Toby Pitman concludes his very detailed and helpful series on creating a live performance rig in Logic Pro.

    Visit Article

  • The Art of Improvisation

    5. The Art of Improvisation

    In this week’s Audio Premium content, Toby Pitman waxes lyrical about the art of improvisation, and gives us some practical tips about how to develop our ability to improvise.

    Visit Article

3 More Premium Tutorials

  • How to Create the Elements of a Drum ‘n’ Bass Track

    1. How to Create the Elements of a Drum ‘n’ Bass Track

    In this week’s Audio Premium content, Andy Slatter shows you how to design a reese bass sound from scratch, how to make a custom drum kit and program a classic D’n’B drum pattern, and edit some vocals to produce a cool timestretched effect. While the screenshots of this tutorial are taken in Cubase 5, the techniques are transferable to other DAWs. The emphasis is more about the plugin synths and effects, which are all freeware.

    Visit Article

  • How to Edit for One-Shots In Edison/Slicex

    2. How to Edit for One-Shots In Edison/Slicex

    In this week’s Audio Premium content, Sean Duncan teaches you how to extract drum-type hits from a junk percussion recording session. Sean has also included a Junk Percussion Pack with 23 sounds.

    Visit Article

  • Making the Beat: Rock Drums

    3. Making the Beat: Rock Drums

    In this week’s Audio Premium content, Mike Elliott begins his in-depth series on creating drum beats, starting with Rock.

    Visit Article

So, how about it? Is Premium for you? Join now.


Workshop #108: Rain in the Canyon by Oakensong

At Audiotuts+ we regularly put up a reader track for workshopping and critique (find out how to submit a track). This is how it works: you upload your song, and every week or so we’ll publish one here and step away from the podium. The floor is yours to talk about the track and how the artist can fix problems in and improve upon the mix and the song.

This track has been submitted for your friendly, constructive criticism. They have put their track (and their heart and soul) in your hands to learn and get useful feedback.

  • Do you enjoy the song or track itself? Does it have potential?
  • Can the arrangement be improved?
  • How did you find the mix? What would you do differently?
  • What do you enjoy about the rhythm track? What can be done to improve it?
  • Is the choice of instruments relevant and effective for the style/song?
  • Are the lyrics (if any) effective? Does the style, arrangement and genre of the song suit them?
  • Can you suggest any specific techniques that might improve the track?
  • Do you have any other constructive feedback?

Rain in the Canyon by Oakensong

Artist’s website: oakensong.bandcamp.com/album/flutecore

Description of the track:

“Rain in the Canyon” is the first track on my CD Flutecore, which combines Native American flutes with lots of software synthesizers. The flute part to this track has no particular melody, and has probably half a dozen different delays on it.

Download audio file (01RainintheCanyon.mp3)

Terms of Use: Users can stream the track for the purposes of giving feedback but cannot download or redistribute it.

Have a listen to the track and offer your constructive criticism for this Workshop in the comments section.


Submit Your Tracks for Workshopping

Need constructive criticism on your own tracks? Submit them using this form.


Design a Coffee Shop Menu Layout from Scratch with Photoshop and InDesign – Part 1


Hi everyone, this time I’ve got for you a practical tutorial about creating a ready to print booklet menu for an imaginary coffee shop named "Violet Coffee." In this tutorial you’ll learn to mockup a ready to print background and a couple of additional objects, which will be imported later on in Adobe InDesign to finish the piece. Are you ready?


Before Getting Started

This tutorial aims to be a guide for those starting on print design, we will cover several important subjects, such as: document settings, dimensions, layout, bleed and margins, working with color, adding typography and even printing the piece.

I’ll divide it in two parts, this first one is about creating the background for the menu sheets and adding a couple of additional graphics using Adobe Photoshop, which will be imported later on into InDesign to finish the product. The second part is about adding the text elements in Adobe InDesign, mock-up a ready to print booklet style document and actually print it.

We will work within an imaginary scenario where a client "X" provide us a couple of pictures and a Word document with the coffee shop’s text and our job is to make it look nice for print.

Let’s get it started, the assets for this tutorial are:


Setting Up the Document

Remember, pen and paper first! Draft what you want to achieve and how you want to make it. Below there’s a quick draft that I did, which will be the starting point of the design. There will be two pages, front and back.

On the front page we will have the cover and back cover layout, and on the back page we will have the actual menu text. The design will be folded as a booklet. We will use violet and black colors for the background and mostly white text. The paper size may be variable, I’m thinking of a "double – letter" size, which means that each page will be an actual Letter size. It’s common to print the menus on big sizes, but depends on you. Once you have the idea of what you want to achieve, it’s time to move forward.


Step 1

We will create a single Photoshop document to mock up the backgrounds, create the image with the company name and add the cup of coffee.

Let’s start this adventure, open Photoshop and then go to File > New. First of all you need to decide which size of paper you want to use, this may vary depending on the client’s budget. This time we will start with a standard Letter Size of 8,5 x 11 inches. It’s very important to set up the resolution at this point, the minimal Print Resolution that works (in my experience) is 300 pixels/inch. And this time I’ll start working directly with CMYK Color Mode.

The cover and back cover of the booklet will be a unique piece of paper that will be folded after print. In order to make the background look nice and fluid (without undesired cutoffs), we will design it in a single document, which means duplicate the document width to convert it into a "Double Letter" piece of paper.

Duplicate the width size of the Letter paper to 17 inches (8,5 x 2). Once you double-check everything is correctly set up, hit OK.


Step 2

Now we’ve got the printable canvas, but we need to increase the design area a little bit with a security Bleed. Show the Ruler (Command + R) and add four Guides (click over the rule and drag) around the document borders, then go to Image > Canvas Size and increase the document size 1/8 inch at top, bottom, left and right. The quickest way of doing this is to add 1/4 inch (1/8 x 2) which means 0,25 inch to the canvas width and height as shown in the image below. Ensure the anchor point is located at the center and hit OK, you should have your canvas increased by 1/8 inch on all the borders.

Finally, add a Guide exactly to the horizontal center to divide the document into two columns. Use the rule to draw two more guides 1/8 inches to the left and right of the middle guide, to create something like a middle bleed area.


Designing the Background

Step 3

Let’s start with the actual graphic design. First of all we will create a Gradient Fill Layer, go to Layer > New Fill Layer > Gradient and set the following values to the gradient colors: Violet (C:80, M:100, Y:30, and K:25), and Black (C:70, M:70, Y:70, and K:95) which is a common version of rich black and works really good. If you want to know more about using black in print design, take a look at this link: The Ultimate Guide to Designing with Black. Be sure to set the Angle to 90 degrees.


Step 4

Now add some effects to the to the background. Create a new layer above the gradient background, set the Front color to: C:80 M:70 Y:60 K:80 and the Background color as White. Now go to Filter > Render > Clouds. Change the cloud layer’s Blending Mode to Overlay.

Then, go to Filter > Blur > Motion Blur, set the Angle to 90 degrees and Distance to 999 px. Finally adjust the Levels (Command + L) as shown at the bottom of the image below to finish the effect.


Step 5

Using the Pen Tool, draw a shape similar to the one shown in the image below. Fill the path with this color: C:10, M:15, Y:0, and K:0. To keep the layers organized I’m using Layer Groups, first create a folder named "Curves Right" and put all the curves of the right side of the canvas there.

After drawing the curve, go to Layer > Layer Mask > Hide All and fill it with a Horizontal Gradient (White to Black) making visible just a part of the left side of the curve. Finally change the curve Layer Opacity to 25% and set its Blending Mode to Color Dodge.


Step 6

Duplicate the Curve as many times as you want (hold the Alt key and Drag) and use the Transformation Tools to distort each duplicated curve in order to get something like the image below. You can add as many curves as you want. Try changing the opacity value on each one to obtain a nice effect.

Then select the "Curves Right" group and drag it to the right side of the canvas. Then duplicate the entire group (you can hold the Alt key and drag) and go to Edit > Transform > Flip Horizontal to reflect the curves, then select the new Group that you can name "Curves Left" and drag it to the left side of the canvas.

Step 7

Create a new layer above the "Curves." Use the Ellipse Tool (U) to draw a pink (C:5 M:55 Y:0 K:0) circle (hold the Shift key to make it perfect). Then go to Filter > Blur > Gaussian Blur you’ll be asked to Rasterize the Shape, do it; set the Radius to 50px and hit OK. Next, change the circle’s Blending Mode too and the Opacity to 25%, then place it somewhere over any of the curves.

Duplicate this layer as many times as you want, changing the Opacity value and resizing each copy a little bit. Try to get something like the bottom of the image below. Once you’ve finished, put all the layers into a folder named something like "Light Spheres."


Step 8

For this step you’ll need to open the Stars Brushes set. In a new layer paint some White (C:0, M:0, Y:0, and K:0 ) stars in random places, then add an Outer Glow Layer Style using the Screen Blend Mode, with a Size of 70px and this color: C:15, M:55, Y:0, K:0. Finally set the "Stars" layer Opacity to 70%.


Adding the Name

Step 9

The following step is adding the logo, of course this cannot be named logo, since an actual logotype is a more complicated graphic design piece, so I’ll call it just "company name." Use some guides to divide the left portion of the document in two, both vertical and horizontal. Then use the Type Tool (T) to type the word "VIOLET" in all caps and in White. I’m using the commercial font Avant Garde, but feel free to use any substitute (Futura, Century Gothic, etc). Use the Character values shown below. Then select the letter "O" and change its color to: C:10, M:85, Y:0, and K:0.

Finally, as an additional effect, add to the Text Layer a Gradient Overlay Layer Style (Gray to White) and set the Blend Mode to Linear Burn, Opacity to 75%, and Angle to 90 degrees.


Step 10

Now we will add a reflect effect to the text layer, for this duplicate the text layer, rasterize it (a quick way of doing it is creating a blank layer below it, then select both the copied layer and the blank layer and press Command + E to merge them) and then go to Edit > Transform > Flip Vertical. Place the copy just below the text. Finally, add a Layer Mask > Hide all to the copy and fill it with the Gradient Tool (Black to White).


Step 11

As a final touch, create a new Layer above the "Violet" text layer and use the Stars Brush set to paint some white stars on it. Change the Layer’s Opacity to 85%.


Step 12

Let’s type the word "coffee" in the lower right corner of the word "Violet." For this word you can use any script typeface (I’m using Edwardian Script). Now add a Gradient Overlay Layer Style using these colors: C:10, M:85, Y:0, K:0 and C:15, M:55, Y:5, K:0. Finally, put all the layers related to the company name in a Layers Group named "Logo."


Layer Comps

Step 13

Now we’ll set two Layer Comps in order to save two different versions of the design in two separate files using an Automated Script.

First show the Layer Comps panel, go to Windows > Layer Comps. Ensure the "Logo" folder is visible and on the Layer Comps panel click on the tiny New icon at the bottom, rename the new layer comp to "Cover." Then hide the "Logo" folder, and create a new Layer Comp naming it "Inner" this time. You can toggle the visibility of the layer comps to double-check everything is OK.


Step 14

Go to File > Scripts > Layer Comps to files. In the dialog, set the File Type as PSD, browse where you want to store the new files, name the resultant files with some descriptive prefix like "Violet," and leave all the other settings by default. When you hit on Run, Photoshop will automatically create a new file for each Layer Comp. The name of the new document will include the name of the Layer Comp.


Additional Graphic, a Cup of Coffee

Step 15

Open the cup of coffee image in Photoshop, double-click on the "Background" Layer to make it editable. Then use the Pen Tool in Paths mode, draw around the cup’s silhouette, once you’re finished with the path drawing, click on Exclude Overlapping Path Areas in the Options bar and draw a path inside the cup’s handler. Once you’ve got the paths drawn, go to Layer > Vector Mask > Current Path to convert the path to a vector layer mask extracting the cup from its background.


Step 16

You can drag and drop the coffee cup from its original document to our working document. Once you place it on the design, rasterize the layer if you want too, Option (Right) click on the Layer and select Rasterize Layer; name the resultant layer "coffee cup."

Then, using the same technique as in Step 10, add a reflection to the cup, but this time using a big, soft, black Brush (B) paint a little bit over the layer mask to soften the angular shades, as shown.


Step 17

As a little additional detail we will add a shadow to the cup. Use the Ellipse Tool to draw a rich black ellipse between the "coffee cup" and "coffee cup copy" layers. Then go to Filter > Blur > Gaussian Blur, set the Radius to 35 and hit OK.


Step 18

To keep the violet ambient add a Photo Filter Adjustment Layer above the cup, ensure the Clipping Mask option on the Adjustments Panel is selected and set this color to C:40, M:80, Y:0, K:0 and Density to 25%. Now put all the coffee cup related Layers into a Layer Group named "Coffee cup."


Step 19

Now we will add a little bit of Smoke to the coffee cup. Open the Smoke image from the assets and double-click on the "Background" Layer to make it editable. Hit Command + I to invert the colors of the image. On the Hue / Saturation adjustment window (Command + U) set the Hue value to -92 to make the smoke more violet.

Let’s extract the smoke from its background. In the Channels Panel (Window > Channels) duplicate the Red channel, hit Command + A and Command + C to save the copy to the clipboard, then delete the duplicated channel, click on the RGB channel again to leave the image with its default colors.

In the Layers Panel select the smoke layer and go to Layer > Layer Mask > Hide All, on the Layer Mask miniature, always on Layers Panel, Alt-click on the mask to show it, then Paste the clipboard on the visible Layer Mask. Then click on the actual layer miniature to see how it looks.


Step 20

Drag the smoke layer to our main document. Then rasterize it and name it "Smoke." Place it just above the cup of coffee. Add a Layer Mask to this layer and fill it with a White to Black gradient to hide the bottom of the smoke column. Use a soft black brush to paint over the layer mask to hide the top of the smoke column.

Finally, duplicate the "Smoke" layer, place the copy above the original layer and go to Filter > Blur > Gaussian Blur, then set the radius to 35%. This will add a nice glow to the smoke layer.


Step 21

Now, in order to increase the visual impact of the coffee cup, add some lights and stars, just like we did on the background at the steps 7 and 8. Finally, put all the layers related to the coffee cup, including the smoke, the lights and stars, into a new Layer Group named "Coffee."


Exporting the Additional Graphics

Step 22

Revising, we have two important layer groups for this step: "Coffee" and "Logo." Both will be additional graphics that we will import later on into the InDesign document, so we need to export each one as a different file. Let’s start with the "Logo" group, duplicate it (drag the group over to the New button at the bottom of the Layers Panel), select the "Logo copy" group and press Command + E to rasterize it. Do exactly the same with the "Coffee" Group.


Step 23

Select the "Logo copy" layer, then Option (Right) – Click on it and select Duplicate Layer, on the popup dialog, write a name for it and select Destination of New. This will create a copy of the logo layer in a document with the same width and height as the original. Use the Crop Tool to cut all the blank space on the copy, then save the document with some descriptive name like: "Logo.psd." Repeat the process with the "Coffee copy" layer.


Resultant Files

Step 24

That’s it with Photoshop, at this point you should have the following important elements to use them on the next part of this tutorial: two PSD files with the backgrounds, one for the cover and another for the internal pages. A PSD file including the Logo with a transparent background, and another document including the coffee cup with transparent background as well.

Now we are ready to create a printable document in InDesign and add the information provided by the client.


Conclusion

At this point we have a good looking background for our menu. Now jump to Part 2 of this tutorial over on Vectortuts+ where we’ll learn more about print design.

.

Beginner’s Guide to Augmented Reality

Augmented Reality has been cropping up a lot lately, especially Flash-based AR. I will guide you through how to create some simple yet neat effects that you can put on your own website.


Introduction: Augmented Reality

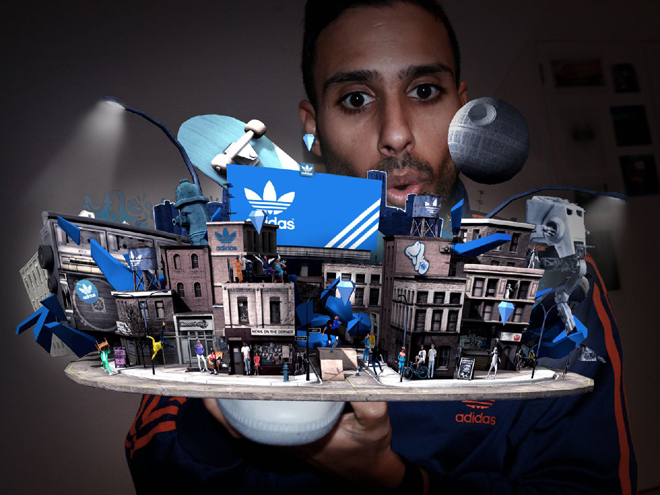
Augmented Reality has been judged as one of 2010’s hottest trends. The concept behind it is pretty simple, over lay the physical world with cool graphics that appear to occupy the same space as you.

Lots of companies have used it as a great promotional tool. Adidas have recently put them on their shoes and made a very cool looking game.

source: http://www.wired.com/gadgetlab/2009/12/adidas-sneaker-augmented-reality/

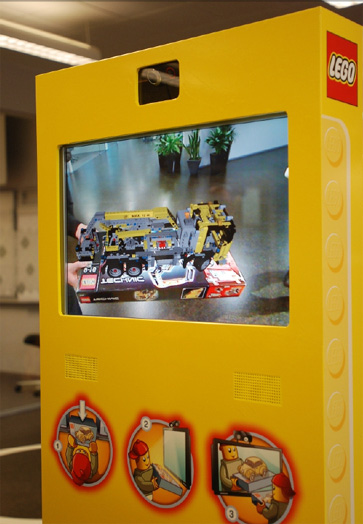
Lego use it as a way to visualize what their products will look like when you’ve finished building them.

source: http://www.virtualworldlets.net/Worlds/Listings/AugmentedReality/Lego.jpg

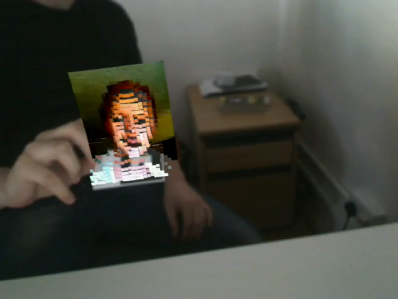
Some freelancers use it as a very cool business card and promotional tool. AR allows you to create a more impressive business card at no cost at all and you can fit way more info on it.

source: http://jamesalliban.wordpress.com/2009/06/03/ar-business-card/

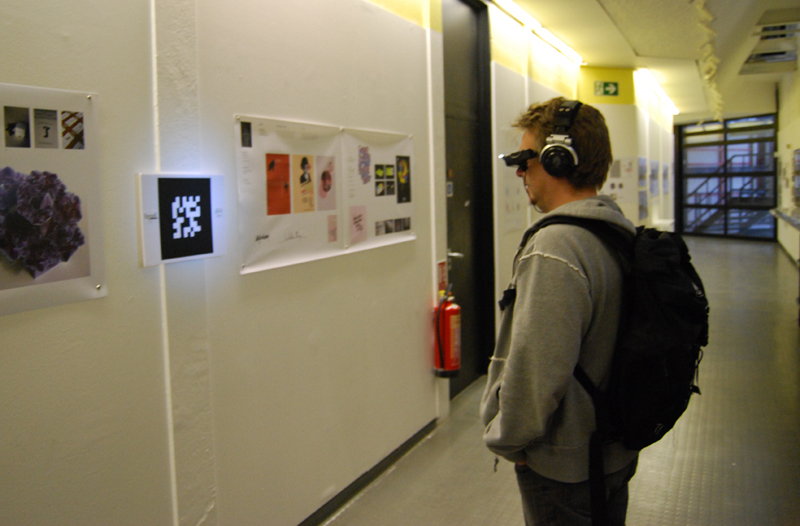
In January of this year, I completed a project for university where I created a wearable augmented reality system. It featured a virtual gallery which, as you walked around, told a very tragic story.

source: http://kablamo.co.uk

Check out the video on Youtube.

I approached creating AR from a design point of view, knowing very little about coding in AS3. I am here to share what I learned with you as I found it very difficult for beginners to learn anything about the subject. It was just a question of starting everything from scratch.

Now I’m sure you’re full of ideas of things to create, let’s create your first augmented reality project: adding depth to a flat piece of paper.


Introduction: flARToolkit

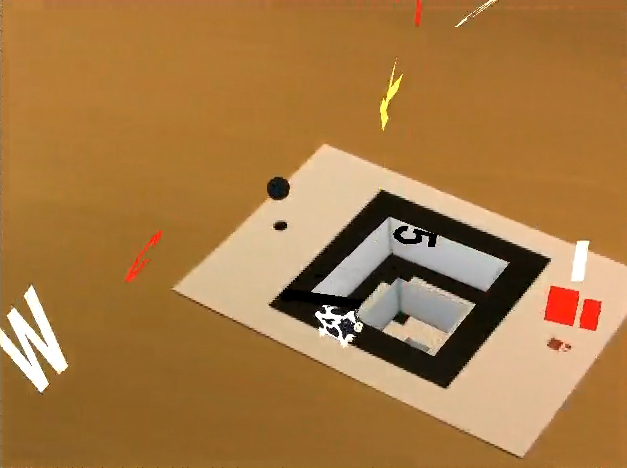
flARToolkit is the flash version of the C-coded augmented reality library known simply as ARToolkit. It was converted over by a very very skilled Japanese coder known as saqoosha. He does all kinds of crazy stuff with augmented reality and if you can read Japanese or are prepared to wade through lots of posts that barely make sense when translated, then you can learn a lot from him. He created the infamous ‘hole in the wall’ effect which is demonstrated in the New Years celebration project he created to welcome in 2009.

source: http://vimeo.com/2734815

More recently, he has demonstrated that you can link various markers together and other wonderful effects that I could only ever dream of creating.

source: http://vimeo.com/6262632

Step 1: Getting to the Source

Squidder.com modified an existing flARToolkit library, the flARManager class, to be able to handle events and multiple objects. Interestingly enough they post their source code and a so called ‘how to’ but never actually explain their own code. It took me some time to work out how to get multiple objects that could all be different. I should point out now that I am a designer first and coding resulted from wanting to make crazy things. I approached this wanting the end result to work rather than being concerned with best ways to code things.

Let’s download the code from their original post on the subject and give it a look over.

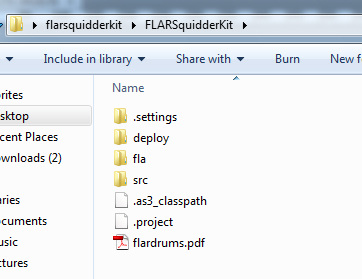
Download the file called “flarsquidderki.zip”, extract the .zip file and open up the main folder. Note, if you don’t extract the .zip folder, you won’t be able to open the .swf correctly or edit the files you need. So once you have done that, you’ll see 3 key folders: deploy, fla and src. You will also see a file called “flardrums.pdf”.

source: My hard drive

Step 2: Play Time

We have our markers for now, print them off so we can test it and see how the source currently works.

Open up the deploy folder and open the MultiFLARExample.swf. Accept the webcam and start playing with the markers.

source: My parents front room

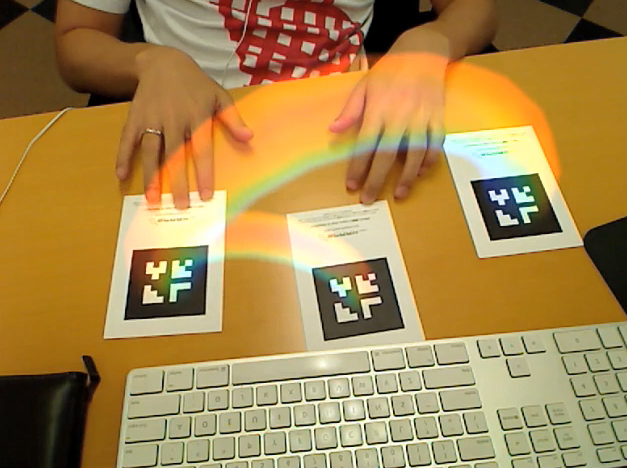
In a video demo that they created, you pass your hand over each marker individually and see how they make sounds when they disappear. This was written in by squidder. They added two events, MARKER_ADDED and MARKER_REMOVED. We will explore how to use these events later.

Now you know how it currently looks, let’s get down to modifying their source code to do some cool things of our own.


Step 3: There’s Coding to Do

For this tutorial, I assume you have basic knowledge of AS3 and class sheets.

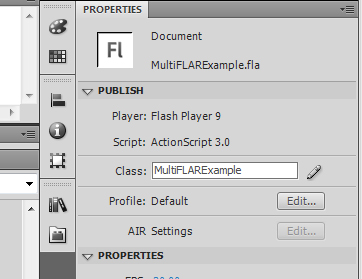
Open up the \fla\ folder and then double click on “multiFLARExample.fla”. In the properties panel you should see the class box filled in with MultiFLARExample. You’ll want to click the pencil icon next to the class box so that we can start looking at the code.

source: Flash

Step 4: MultiFLARExample

Straight away you’ll see the usual import code at the top and underneath that some basic variables for light sources.

Next is an interesting part, the code that loads in the markers. As you can see, the markers are loaded into an array so that they can easily be called later on. Pay attention to the order they loaded in here. The first marker in the array gets the id of 0, the next is 1 and so on. We will be using these id’s later on.

source: Flash

Also look at private functions _addCube and _getFlatMaterial as these are the other two sections that we will be focusing on editing today. They’re pretty self explanatory in what they do, but they are oddly set up. They have been coded for simplicity in getting the same object in multiple colors, rather than lots of different objects, so we have to make a few changes.


Step 5: Ch-Ch-Changes

Okay, let’s change some code. Let’s alter it to a more usable state but for now we’ll keep the visual look the same. When I was figuring all this out, it was an odd relief to find out that it all came down to if statements in the end. If statements are just so magical and useful when it comes to coding things.

In the _addCube function replace this code :

var cube : Cube = new Cube( new MaterialsList( {all: fmat} ) , 40 , 40 , 40 );
					cube.z = 20;
					dispObj.addChild( cube );

with the following code:

if (id==0){

	var cube : Cube = new Cube( new MaterialsList( {all: fmat} ) , 40 , 40 , 40 );
	cube.z = 60;
	dispObj.addChild( cube );

} else if(id==1){

	var cube2 : Cube = new Cube( new MaterialsList( {all: fmat} ) , 40 , 40 , 40 );
	cube2.z = 0;
	dispObj.addChild( cube2 );

} else if (id==2) {

	var cube3 : Cube = new Cube( new MaterialsList( {all: fmat} ) , 40 , 40 , 40 );
	cube3.z = 20;
	dispObj.addChild( cube3 );

} else if (id==3){

	var cube4 : Cube = new Cube( new MaterialsList( {all: fmat} ) , 40 , 40 , 40 );
	cube4.z = 40;
	dispObj.addChild( cube4 );

}

Step 6: Test the Movie

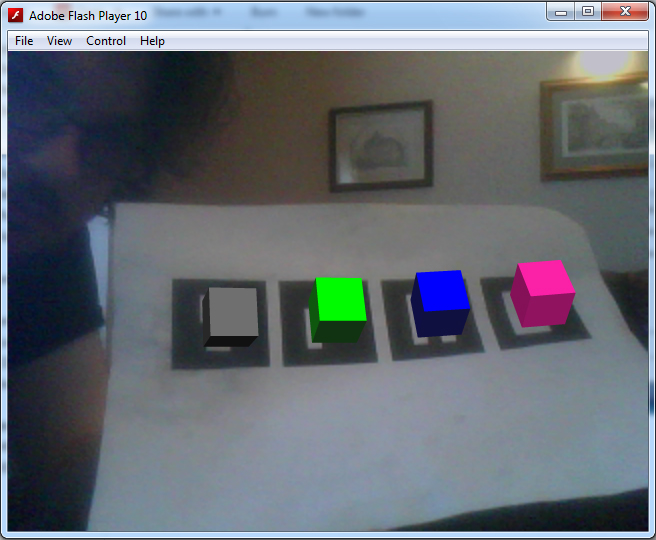
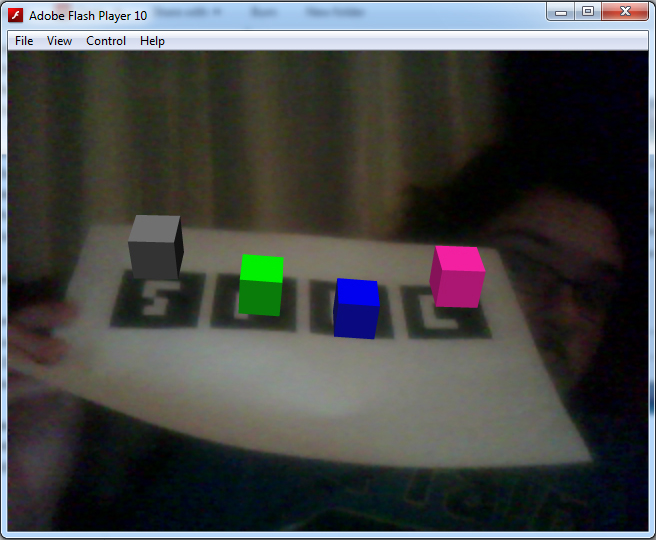
Now, this might seem like a convoluted way to deal with cubes, but it allows us to deal with each individual cube. For example, in the code above, I have altered the z axis of the cubes to demonstrate to you that the code is now handling each cube as its own object. Let’s try out the movie, you should have something to this effect:

source: My parents front room

Step 7: Explanations

Before we continue, let me explain the code you just put in. It’s pretty straight forward and if you have used papervision3D before you can skip this part.

var cube : Cube = new Cube( new MaterialsList( {all: fmat} ) , 40 , 40 , 40 );

Here we create a new variable, cube. This variable holds all the information needed to render a cube and determine how it looks. The MaterialsList part refers to the material used for the outside of the cube. As we want the same material on every side and that material is held in a variable created earlier in the code, we use {all: fmat}. I’ll talk more about the fmat variable later. Finally, the three 40’s, these are the dimensions of the cube, the width, height and depth. Of course they don’t have to all be the same even though this is a cube. You can use the cube method to create rectangular cuboid shapes if you so wish.

cube.z = 20;

This sets the z value of the cube. This is how high the cube sits above the marker. 0 is the center line of the cube and so setting it at half the shape’s height means that is sits exactly on top of the marker.

dispObj.addChild( cube );

dispObj refers to a display object that was created earlier in the code. A display object will render your object on the screen. You can load as many shapes as you want inside one display object, so we will load all our shapes into it for now.

Brilliant, now that you know how it works, let’s continue editing the code. You don’t really need the _getFlatShadeMaterial function so let’s edit it all together shall we. Doing it this way also allows us to give a different material to each object.


Step 8: Pulling it Together

You’ll want to find this line in your code:

source: Flash

We are now going to edit the fmat variable so that instead of calling a function, it will call a new flatShadeMaterial where we specify the colors. Later on I’ll deal with other materials including bitmap materials.

Replace _getFlatMaterial(id); with:

new FlatShadeMaterial( _lightPoint , 0xff22aa , 0x75104e );

The three parameters set the lightsource for the flatShadeMaterial, the flat color, and also the shade color. Doing this will give our object a more realistic effect as we turn and rotate it in physical space.

Now, underneath that line we’ll want to add:

var fmat2 : FlatShadeMaterial = new FlatShadeMaterial( _lightPoint , 0x00ff00 , 0x113311 );
var fmat3 : FlatShadeMaterial = new FlatShadeMaterial( _lightPoint , 0x0000ff , 0x111133 );
var fmat4 : FlatShadeMaterial = new FlatShadeMaterial( _lightPoint , 0x777777 , 0x111111 );

Now that we have created a variable for each of our objects, we’ll want to change up the cube code I gave you earlier. Instead of just having fmat as the material for all of our cubes, you’ll want to change it to fmat, fmat2, fmat3 and fmat4 so that our cubes will appear different.

After you have done that, you can now finally remove the _getFlatMaterial function.

Delete the following lines of code:

private function _getFlatMaterial( id:int ) : FlatShadeMaterial {

	if ( id == 0 ) {
		return new FlatShadeMaterial( _lightPoint , 0xff22aa , 0x75104e );
	} else if ( id == 1 ){
		return new FlatShadeMaterial( _lightPoint , 0x00ff00 , 0x113311 );
	} else if ( id == 2 ) {
		return new FlatShadeMaterial( _lightPoint , 0x0000ff , 0x111133 );
	} else {
		return new FlatShadeMaterial( _lightPoint , 0x777777 , 0x111111 );
	}
}

Step 9: Test the Movie Again

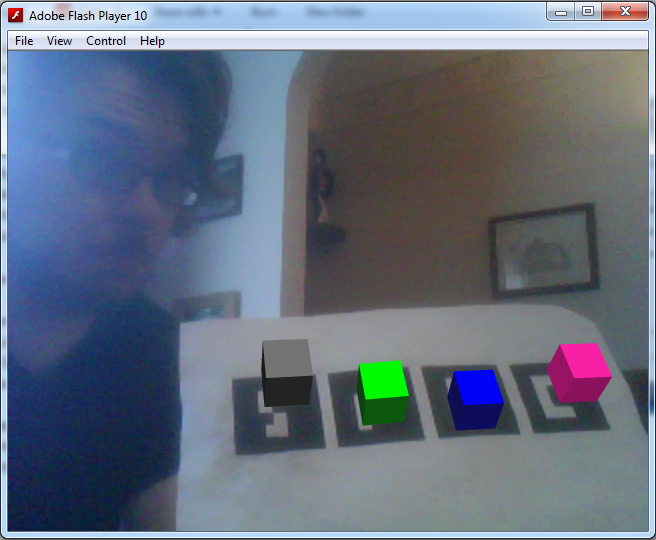
And now let’s test again. If everything is done correctly, it should look exactly the same. What an achievement, eh?

source: My parents front room

It may not look like much, but we have just set up the foundation for creating lots of different looking objects.

Step 10: Materials

Okay, let’s get on to something a bit more useful. The bitmap material. Most people would want to put their own images into AR as a cool way to present their work; this is achieved by using an image as a material.

It’s fantastically simple. I have created the following image for you to use, since I’ll show you how to use bitmap material through a web link.

source: Photoshop

Firstly, you need to import the BitmapFileMaterial class. At the top of your code sheet where all the other classes are imported, add the following line:

import org.papervision3d.materials.BitmapFileMaterial;

and change your fmat material to the following:

var fmat : BitmapFileMaterial = new BitmapFileMaterial("http://kablamo.co.uk/artutorial/kcube1.jpg");

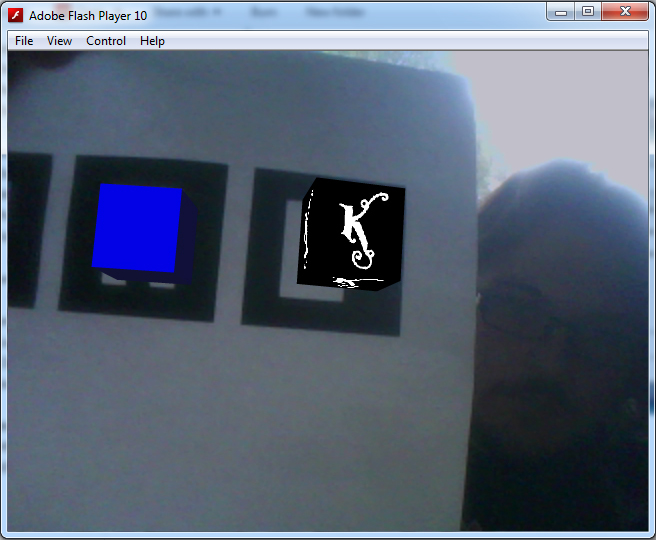
Now let’s test it, it should look just like this:

source: My parents front room

How simple was that?

Step 11: Making it Hole

Now that I’ve shown you how to make a cube that sits above the marker, let’s create a cube that sits below the marker to create the hole in the wall effect.

This effect was originally imagined and explained by saqoosha. Unfortunately, he explained it in Japanese and for papervision3d rather that for use with flARToolkit so a few changes were made.

You need to import these two classes:

import flash.geom.ColorTransform;
import flash.filters.*;

Add this line under _lightpoint with the other private variables:

private var _green:Cube;

and then under var dispObj : DisplayObject3D = new DisplayObject3D(); add the following:

this.viewport.filters = [
	new ColorMatrixFilter([
                    1, 0, 0, 0, 0,
					0, 1, 0, 0, 0,
                    0, 0, 1, 0, 0,
                    1, -1, 1, 1, 0
	])
];

Basically, what’s going on here is that you will have two cubes, one being green and the other forming the inside view. They will sit one inside the other. The viewport filter will mask out anything that is that particular color green, which is what we set the outside cube to, giving the effect that there is a hole in the marker.

Now we will create the two cubes.

Remove your existing cube code and replace it with this:

var hole:Cube = dispObj.addChild(new Cube(new MaterialsList(
		{all:new  BitmapFileMaterial( "assets/hole.jpg" ), bottom: new  BitmapFileMaterial( "assets/k.jpg" )}
	), 80, 80,80,1,1,1, Cube.ALL,Cube.TOP)) as Cube;

this._green = dispObj.addChild(new Cube(new MaterialsList({all: new ColorMaterial(0x00ff00)}), 80, 80,80, 1, 1, 1, Cube.TOP)) as Cube;
hole.rotationX = this._green.rotationX =90;
hole.z = this._green.z = -40;

Notice, for the materials we import in two .jpg files from the assets folder. This folder is located inside the main deploy folder, where the file MultiFLARExample.swf is found. You can either download the following images that I have created, or make your own.

source: Photoshop
source: Photoshop

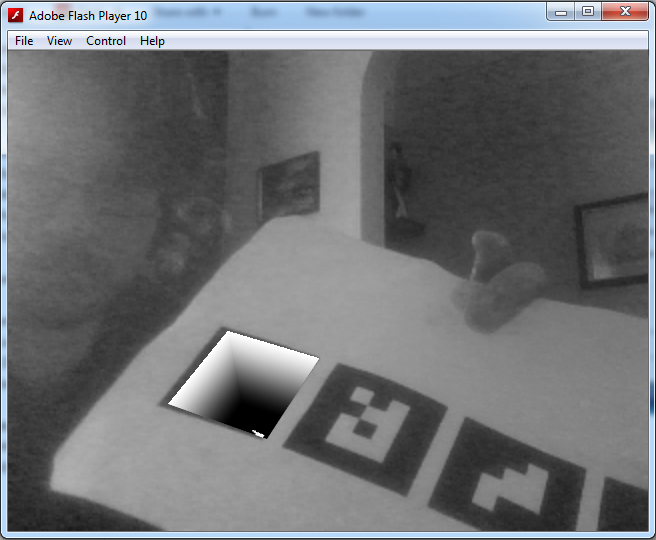
Step 12: Test the Hole

Give it a test and you should have something like this:

source: My parents front room

Step 13: Making Mark-ers.

By now, you are probably fed up of holding up a ratty piece of paper with four markers up to the camera. You want to have your very own marker, so let’s make it. With a few online tools and Photoshop, you can have your own marker up in minutes.

First, let’s make your marker. You don’t need to use a barcode-like design like on the markers you are currently using, but, if you are using a lot of markers then the barcode is the best way to go. If you are using one or two then go wild with the design. For my marker design, I used the K from my website’s logo.

source: My parents front room

If you are doing it for a business card or some promotional material, think about how the marker looks as you can make some very nice looking markers that blend into the design more.

You need to set up your Photoshop document ready for marker creation. For a basic marker, create an 800x800px file with a 150px border all the way around. Or download this image below:

source: Photoshop

Step 14: Online Marker Generator

The white square in the middle is where you can put your marker design. Print off the marker and then pay a visit to the Online Marker Generator.

They have an online marker creator that takes your marker and makes a .pat file that works with your code. It’s quite odd, they have an upload option but I have never gotten it to work (printing out works just fine). There is also an AIR app that does just the same job but this is fine for now.

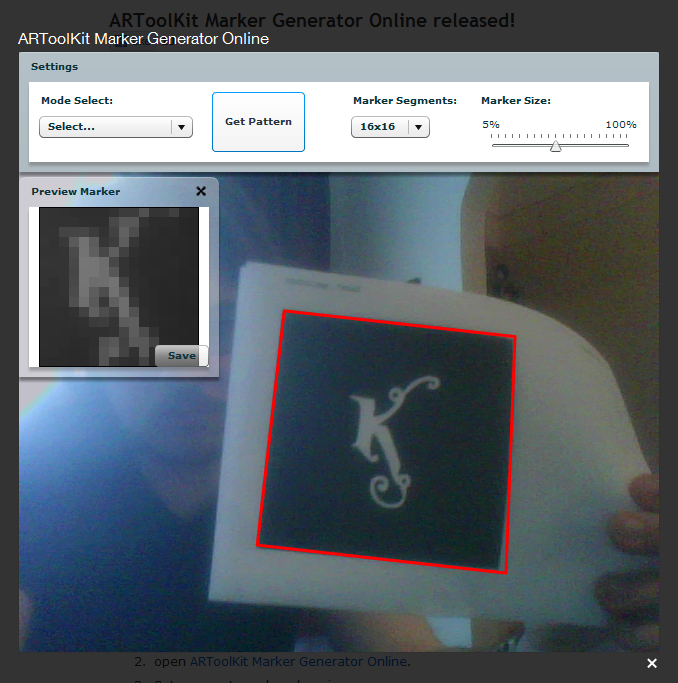
Set the marker segments to 16×16 and the marker size to 50%, show your marker to your webcam and when a red square surrounds your marker click on get pattern, if you are happy with how it looks in the preview window click save.

source: My parents front room

If your marker looks really odd in the preview or a red square doesn’t come up, you may need to re-design your marker. You also have to make sure that there is some white space around your marker as otherwise Flash won’t recognize it.

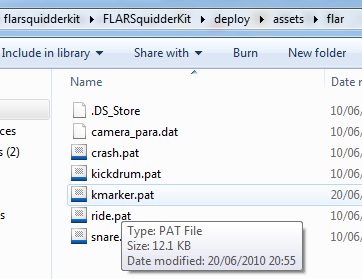
When the dialog box comes up, don’t just download this anywhere, you need to put the .pat file in a specific folder. Navigate to your flARToolkit folder > deploy > assets > flar and you should find four other .pat files there. Save your pattern there and remember what you called it. I called mine “kmarker.pat”

source: My hard drive

Step 15: Alter the Code

Back in flash, find this line:

source: Flash

And change crash.pat to whatever you named your marker as.

source: Flash

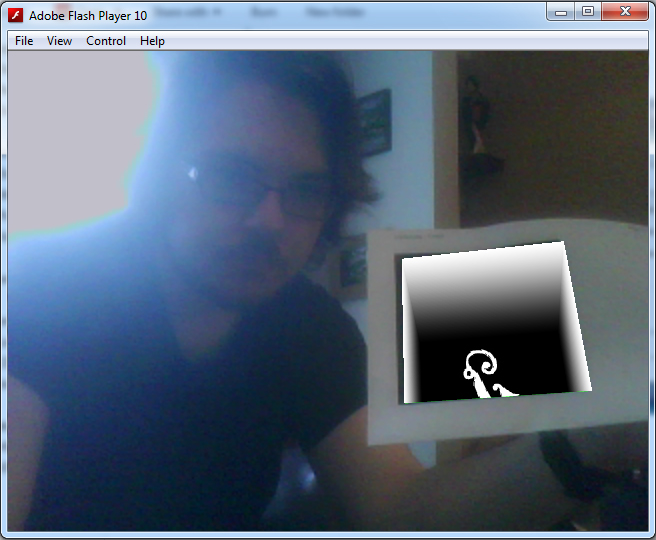
If you test your Flash file, you should find that your new marker picks everything up perfectly.

source: My parents front room

Conclusion

Thanks for reading this introduction to Augmented Reality. I hope you enjoyed it and that it’s made you curious about creating your own AR projects. In the next part of this tutorial, I will cover how to animate objects with TweenMax, making the markers a bit more play sound, importing 3D models and making everything prettier.