Workshop #109: Exploding Train by Ganesh Rao

At Audiotuts+ we regularly put up a reader track for workshopping and critique (find out how to submit a track). This is how it works: you upload your song, and every week or so we’ll publish one here and step away from the podium. The floor is yours to talk about the track and how the artist can fix problems in and improve upon the mix and the song.

This track has been submitted for your friendly, constructive criticism. They have put their track (and their heart and soul) in your hands to learn and get useful feedback.

  • Do you enjoy the song or track itself? Does it have potential?
  • Can the arrangement be improved?
  • How did you find the mix? What would you do differently?
  • What do you enjoy about the rhythm track? What can be done to improve it?
  • Is the choice of instruments relevant and effective for the style/song?
  • Are the lyrics (if any) effective? Does the style, arrangement and genre of the song suit them?
  • Can you suggest any specific techniques that might improve the track?
  • Do you have any other constructive feedback?

Exploding Train by Ganesh Rao

Artist’s website: ganeshnrao.com

Description of the track:

My latest progressive metal instrumental. Recorded and programmed in Garageband. I use Guitar Rig for the guitars, and Drumkit From Hell for the drums. Hope you enjoy this.

Download audio file (GaneshRaoExplodingTrain.mp3)

Terms of Use: People can download this for free.

Have a listen to the track and offer your constructive criticism for this Workshop in the comments section.


Submit Your Tracks for Workshopping

Need constructive criticism on your own tracks? Submit them using this form.


Mastering Elements Part 4: Stereo Enhancement

When it comes to mastering treatments stereo enhancement is a tricky one. Beginners often make the mistake of overusing it or using the wrong plug-ins for the job. The good news is, with the right technique in place, there is a place for stereo processing in your mastering chain.

In this tutorial I’ll go through a few examples of different stereo processing that can be used in mastering and highlight some of the pitfalls that you might come across. I’ve tried to cover processors from as many different DAWs and manufacturers as possible.


Step 1: What to Avoid

The main thing that presents a problem when it comes to stereo treatment in mastering is the use of the wrong processor. Many DAWs supply stereo enhancement tools that are perfectly usable in the mix but are not really suited to a mastering environment.

The majority of these ‘mix’ processors are single band in nature, meaning that they treat the entire frequency range indiscriminately. This leads to a situation where we are processing parts of our mix that should remain untouched.

In most cases it’s our low end that should remain intact and that is something our single band plug-ins just aren’t capable of. Below are a few examples of the sort of processors I’m referring to and our example track processed by them.

The untreated example clip.

Download audio file (1.mp3)

The untreated recording.

The Cubase stereo enhancer.

Download audio file (1b.mp3)

… and treated with the Cubase single band enhancer.

In this example the stereo widening is pretty impressive but the low end mix has been threatened and loses is clarity and focus.


Step 2: The Subtle Approach

If you are a firm part of the ‘less is more’ camp then you may want to take the subtle approach to stereo enhancement. A simple linear phase equaliser can be enough to make your masters sound a little wider.

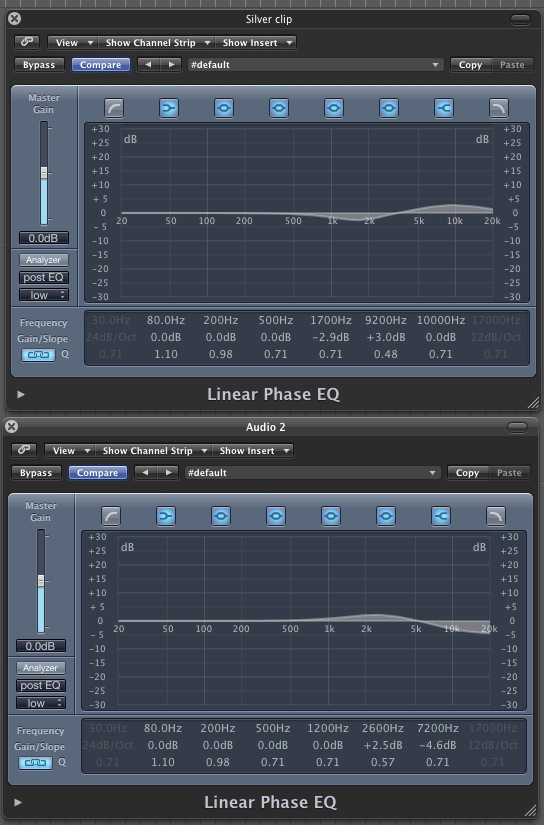
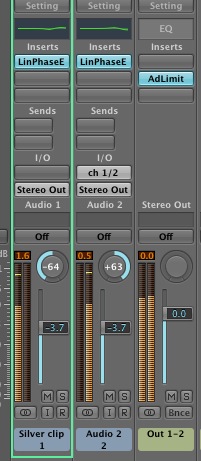
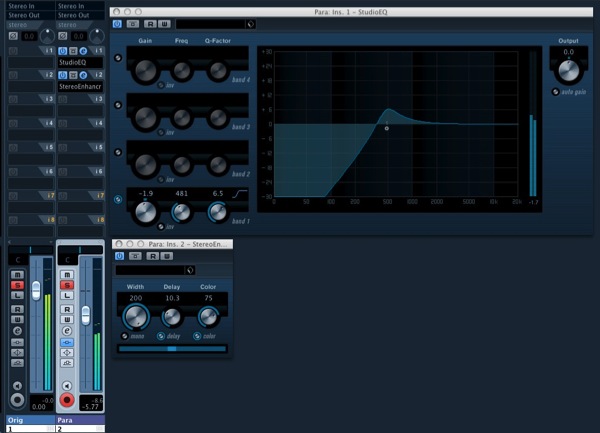
Before you apply any other mastering processors, duplicate your exported track and place it on two tracks in your chosen DAW. Pan one hard left and the other hard right. Now apply a mastering grade EQ to each channel. You can now apply different EQ settings to each side of your master.

Avoid working on lower frequencies here and concentrate on high mids and high frequency. Also keep Q values low to avoid coloration and hype. So for instance add a few db of high frequency in one side and remove a few db of the same frequency in the other.

Of course this will work better in some situation than in others. It can be a great way of adding some width to older recordings that perhaps lack a great stereo image. If you find the EQ adds too much coloration, you can also try the same technique using very slightly different compression values in each side.

Two linear phase EQs providing stereo enhancement.

Download audio file (2.mp3)

The audio with some subtle EQ based widening.

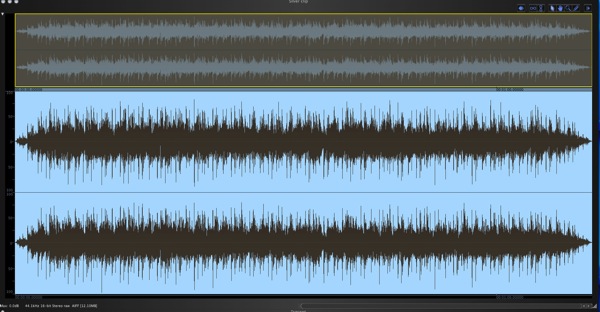
The duplicate channels panned hard.


Step 3: Dedicated Mastering Enhancement

Using a dedicated stereo mastering processor is probably the most popular route to achieving a wider image. There are many to choose from but the main thing to look out for is a frequency dependant interface.

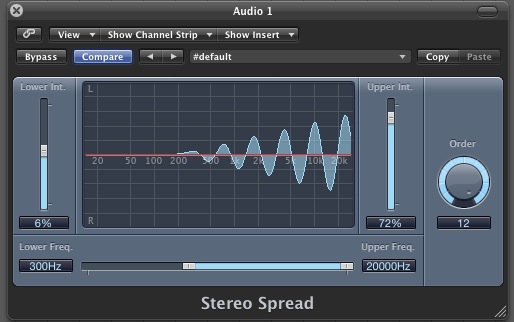
Logic provides a frequency specific enhancer

As does Reson / Record.

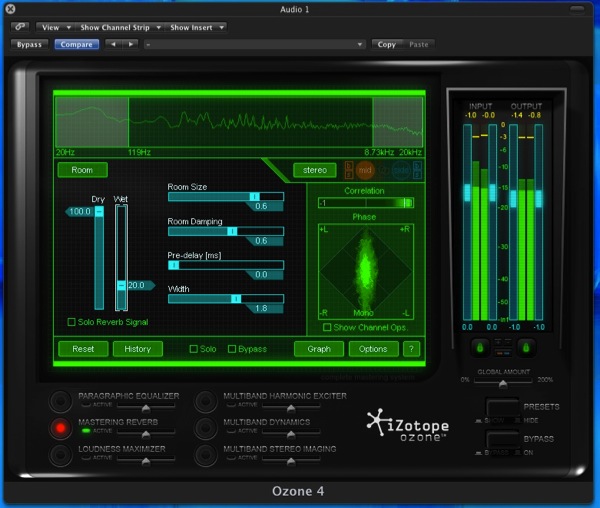
To give you an example of what I mean check out the stereo enhancer included in isotope’s Ozone processor. Many DAWs include stereo processors suitable for mastering as well. Logic Pro 9′s enhancer, for example, is capable of effecting only certain frequencies.

Izotope Ozone’s fully features stereo enhancement area

Download audio file (3.mp3)

The audio is treated by Ozone.


Step 4: Parallel Tricks

There are some situations where more intense stereo processes can be used in mastering but some know how is required here. Setting up a parallel buss in your mastering project will allow you to apply pretty much any process to your parallel mix, without adversely effecting your final master.

With a second version of you mix set up you can apply even single band enhancement and mix to taste. Even in this situation it’s a good idea to filter the low end from the secondary stream to ensure that you don’t create a confused and incoherent low end mix.

This technique can also be used to add extra compression an limiting during the mastering process. In general parallel processing during mastering will create a much denser, louder result with a vastly reduced dynamic range, so if this is not what your after you may want to look at other options.

A parallel mastering buss set up in Cubase 5

Download audio file (4.mp3)

The audio is given added stereo width in Cubase.


Step 5: M/S Technology

Using M/S based processors is a great way to enhance the stereo content in your mix and it’s also extremely transparent (and mono compatible!). If you are unsure what M/S processing is then you might want to have a quick read of my in depth tutorial on the subject… here.

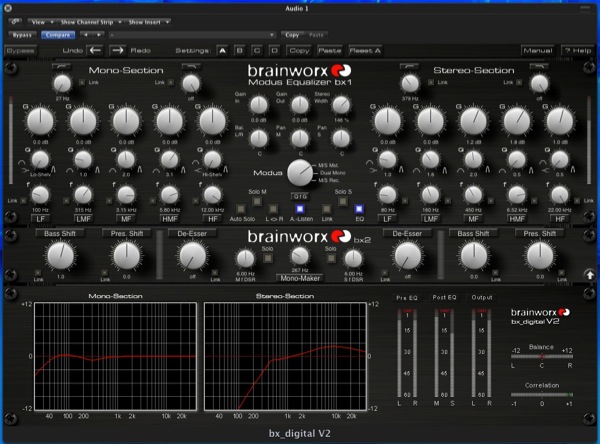
You can route your own M/S processing set ups or use a dedicated plug-in. The latter is certainly the easier route but you will have to invest in the right plug-in and they aren’t cheap. Brainworx do make some really excellent products in this area.

Using M/S processing you can manipulate the mono and stereo data in your mix separately and not only enhance the stereo width but also force the lower frequencies to become mono. Extremely useful stuff!

The fantastic Brainworx ‘bx_digital V2′

Download audio file (5.mp3)

The file is treated to some M/S processing.


Step 6: Reverb on Your Master Anyone?

Now this is a bit of a strange one but some mastering processors do supply a mastering reverb section. Izotope’s Ozone has one and it’s certainly something that will supply a wider stereo feel, saying that I’m not 100% convinced on this one and would probably only reserve it to old recordings that needed restoration or a new lease of life.

All this said, I would never write off a technique, as what I may find strange someone else might swear by! So I would certainly look into it and see if its for you.

The mastering reverb section of the Izotope Ozone suite

Download audio file (6.mp3)

Ozone’s reverb is added.


How to Save Money in Your Home Studio

Studio equipment is expensive! If things keep breaking, replacing them can rack up quite a cost. If you’re like me, you want to make every cent count. Here are a few tips about cutting costs.


1. Consider Second Hand Gear

It’s amazing how many people won’t buy second hand gear because they have to have the “best”. They want something brand new and shiny. This train of thought will cost you a lot more money in the long run – money you might not have to have spent.

Second hand gear can be just as great as new gear. Only it’s been used before and it’s a hell of a lot cheaper! Why do most people sell their gear? It’s usually because they’re upgrading, not because there is something wrong with it.

Think about it. If you upgrade your console are you really going to keep the one you never use, or sell it and make some of your money back on the ridiculously expensive piece of new equipment you bought?


2. Take Care of Your Cables

Cables just cost a couple of pounds or dollars here and there right? But are they costing you more than they should be?

Inside your cables are thin copper wires that are very delicate. Bending the cable one way and then the other will and can break cause breakages. These things are delicate and need to be looked after. If you have to replace them every other week you’re going to spend most your income replacing them.

There are proper coiling techniques that can be learnt that will save you a lot of money in the long run. Don’t wrap them around your elbow! You will also want to buy some cable ties so they don’t keep uncoiling.

But if you’re more of the DIY Person you could always bulk order the materials and make your own cables, I’ve known people to do this and they save a lot of money for that little extra work. If you’re interested, check out Glynn Davies’ article.


3. Make the Most of Your Space

Drums

We know drums are LOUD, and they take up a lot of space. If you’re struggling for space and can’t soundproof the room there is an alternative: drum samples.

Yeah, drum samples can do a great job on a track. Of course they’re not as flexible when trying to get the sound you want like you can with a real drum kit, and they will probably sound somewhat artificial. But if you’re on a budget I guarantee these will do you well!

And you can probably find some cheap or freeware samples around the Net.

Amps

Amps take up a lot of room as well, and if you really want a small cheap setup these are the way to go. You can pay out a lot of money for expensive amps, or get yourself a amp simulator/plug-in. For example, Amplitube 3 is a great piece of software.

Again, these can sound quite artificial at times, but not always. And again, it’s not as flexible when trying to get the sound you want compared to owning your own amps.


4. DIY Equipment

Do vocal booths and pop shields cost too much? Looking for an alternative? Do it yourself! I warn you these things are not pretty if you’re looking to make a professional studio. But they do the job pretty well.

Pop Shields – Tights

Yeah, that’s right. Go steal a pair of your girlfriend’s, wife’s or mother’s tights. You can make a pretty good pop shield by stretching them over a coat hanger. Be creative – they may do a good job.

Vocal Booths – Foam or Two Couches

Who would have thought? I have known people to lie two couches on their side and put them together with a microphone inside. If you manage to stuff your singer inside you can apparently get quite good results!

Or you could just put a large piece of foam behind the microphone. This does a good job if your low on cash.

Again, be creative and use anything that you can get your hands on that will absorb sound. Carpets not worth bothering with – I’ve known people who’ve tried.

Cables – Build from Parts

This solution isn’t so improvised: as I mentioned earlier, buying parts in bulk and putting together your own cables can save you a lot of money if you’re a DIY person.


5. Get the Most from Your Computer

Computers are an important part of any studio, and you need a good one to run all your programs and plug-ins. There are a few ways to cut costs here, but not many.

Make sure you know what software you want to run before you get your computer, as some software only runs on certain operating systems. I prefer Mac OSX for Logic Studio, but that’s just me. You might be perfectly happy running Cubase on your Windows computer.

Upgrade

Your computer will need a lot of processing power to run all these programs and plug-ins, but instead of buying a new computer when your old one starts to struggle, take off the case and upgrade some of the hardware.

A better processor and some more RAM should do the trick. And as we know WAV and AIFF files are large, so a bigger hard drive is important.

Converting your files to the smaller MP3 format is not recommended – it is a compressed file format that will ruin the quality of your audio files. I would recommend getting an external drive to put all your finished work onto, freeing space on your hard drive. And keep a backup in case your computer decides to break down on you (as they do).

Track Freezing

If your computer’s starting to struggle and you’re a little low on cash, you can freeze tracks on most digital audio workstations (DAWs). This will write your plug-in details as audio, and save you some of that much loved processing power. Read more in these tutorials by Björgvin and Sean.

Well, there are my tips on saving money in the studio. Feel free to add to them in the comments.


A Sneak Peek at Premium for Non-Members


During the last few years Psdtuts+ has grown considerably. We went from one tutorial site, to a family of them; each with their own unique focus. About two and a half years ago, Psdtuts+ was the first Tuts+ site to go Premium. Since then, we have had a total of 7 sites launch premium subscriptions, with more on the way! The growth of our Premium Membership Program over the last couple of years as been incredible. During that time, we have published a total of 371 premium tutorials and released 841 premium source files; and with every new site we launch, the numbers just keep growing and growing!

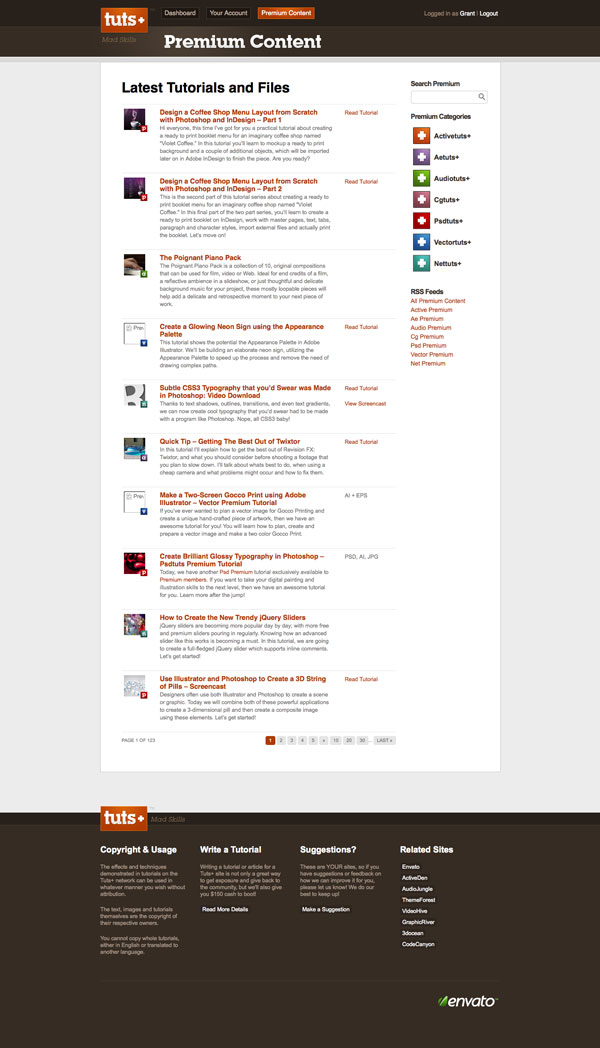
Occasionally we receive some questions regarding our Premium Membership Program. The most common questions we receive involve how much it costs, and what exactly do members get access to. Today, we would like to introduce you to our Premium Membership Program by showing you exactly what you will receive when you become a member.


How Much Does it Cost?

Our Premium Membership Program costs $9 a month (or $22 for 3 months). That’s about 30 cents per day!


What do You Get Access to?

Premium Membership gets you access to all the source files for tutorials that we publish on this site as well as a few periodic bonus tutorials and freebie sets that are exclusively available to our premium membership. In addition, Premium Members get access to all the other sites in our Premium Network including Psdtuts, Vectortuts, Activetuts, Nettuts, Aetuts, and more!


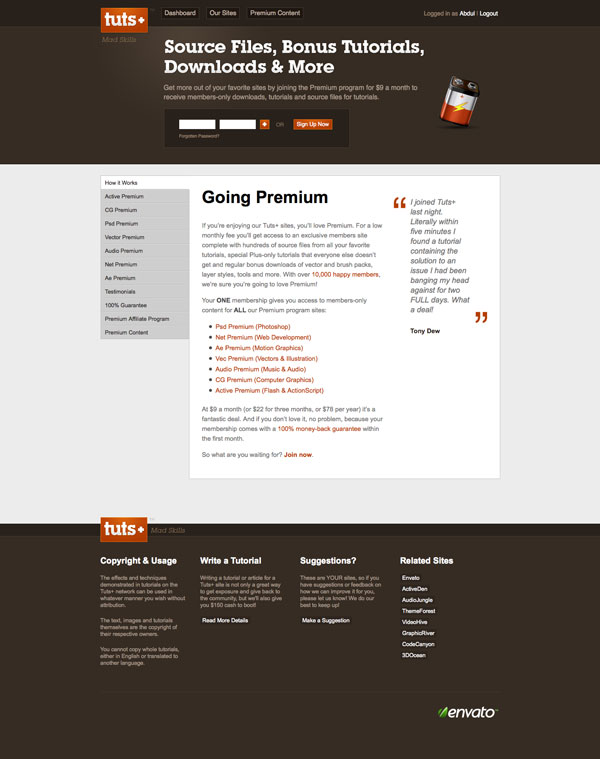
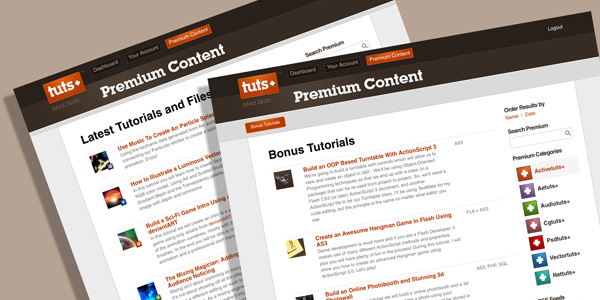
Sneak Peek

Take a look at what you will see when you become a Premium Member.


Why Join?

By joining our Premium Membership Program you will gain access to over 841 source files from tutorials throughout the Tuts+ Network. Source files will help you learn faster as you can dig though them and learn first hand how a tutorial was accomplished. You will also help support the Tuts+ family of websites. Our Premium Membership Program helps support our site, allowing us to pay more high quality authors to provide content back to you.


How to Join?

So what are you waiting for? Become a Premium Member today!

Psdtuts joins the Smashing Network


A quick bit of news today to let you know that Psdtuts+ has joined the Smashing Network which means you’ll now be able to see Psdtuts+ posts appear on Smashing’s awesome Web Design Post Network section! The quality of sites in the network is simply phenomenal, and I’m thrilled that Vitaly and the crew are letting our tutorials reach even more people through their network.

If you’ve not ever flicked through the Smashing Network, I highly recommend heading over. The only downside is you usually end up with way more awesome articles than you could possibly read! :-)

Create Gold Ornamental Text in Photoshop


Ornamental text can be created in several ways. Today we will demonstrate how to combine several stock images to create some nice gold ornamental typography. Let’s get started!


Resources Used

The following resources were used during the production of this tutorial:


Step 1

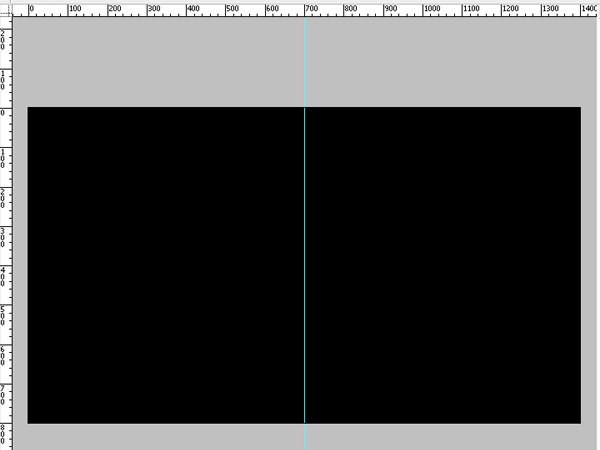
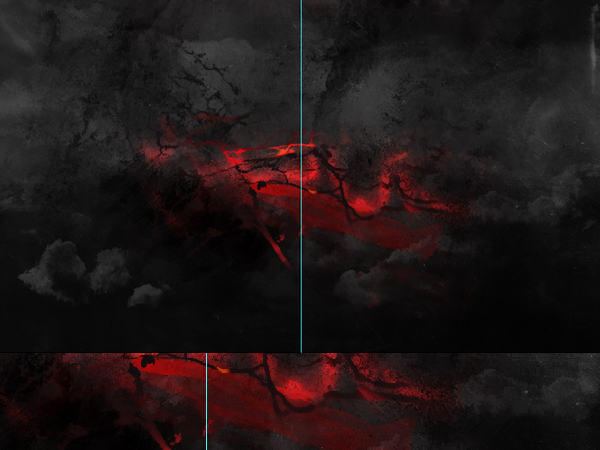
Create a new document 1400 x 800 px and fill it with black. Draw a vertical guide that cuts your document in half.


Step 2

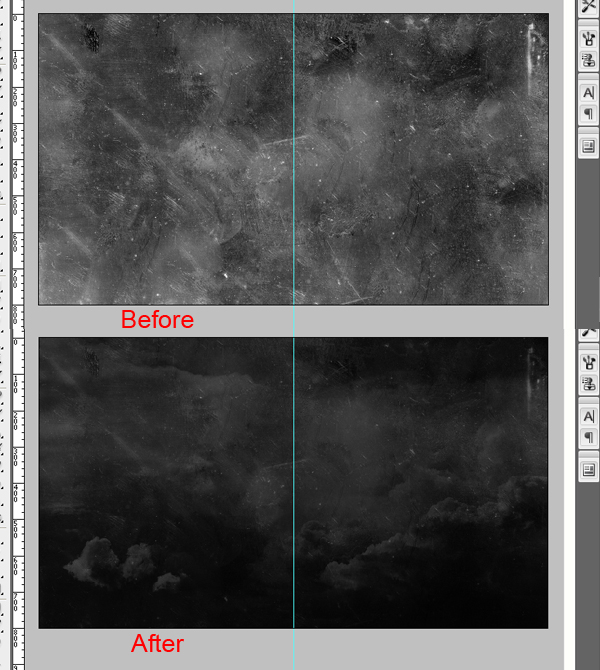
Place the clouds photo as shown. Now desaturate this image by going to Image > Adjustments > Hue/Saturation and apply the settings as shown.


Step 3

Now place the grunge texture as shown and change its layer blending mode to soft light.


Step 4

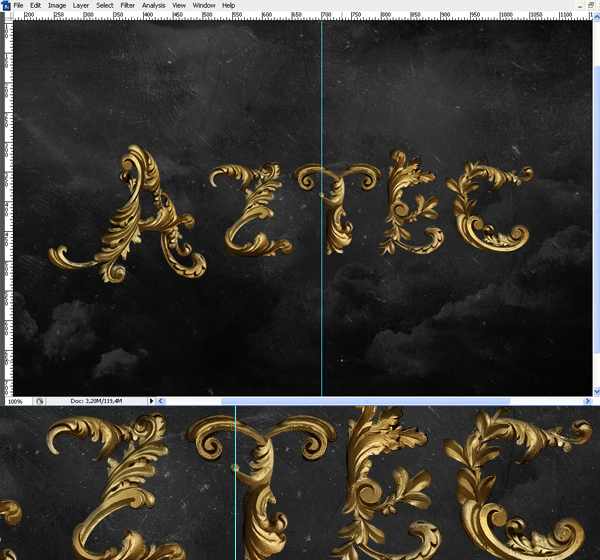
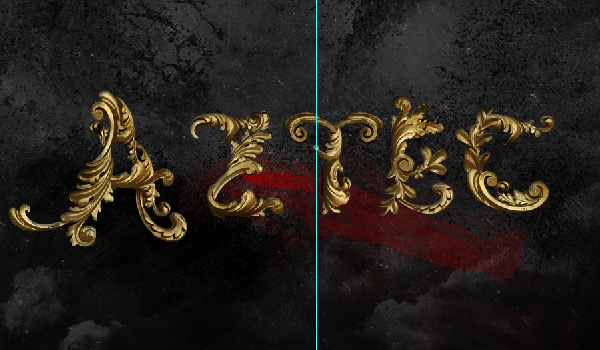
Now it’s time to start creating text. You can choose to create any word that you like but in this case we are going to create the word “Aztec.” For this step it is very important that you choose nice stock images to create the ornaments. I chose this package of images from CGTextures.com.


Step 5

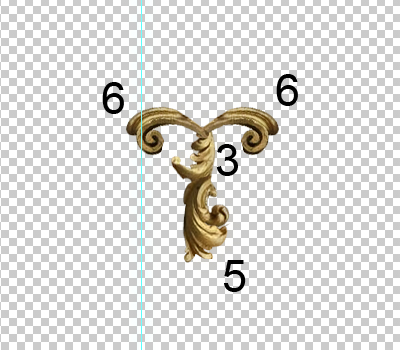
Extract ornaments using the Pen Tool as shown below. When you’re done you should have about 11 pieces.


Step 6

Now start combining these elements to create your letters. Feel free to warp, re-size, position, or erase areas as needed.


Step 7

Repeat Step 6 until you have created a “z”.


Step 8

Repeat Step 6 until you have created a “t”.


Step 9

Repeat Step 6 until you have created a “e”.


Step 10

Repeat Step 6 until you have created a “c”.


Step 11

Now we need to start blending our letters together. To do this, duplicate all your layers and merge them down to one. Make sure to save a copy of all your layers just in case. Now take your smudge tool and start blending the elements together to make everything look smooth. A nice soft brush about 4 – 9 px should work well.


Step 12

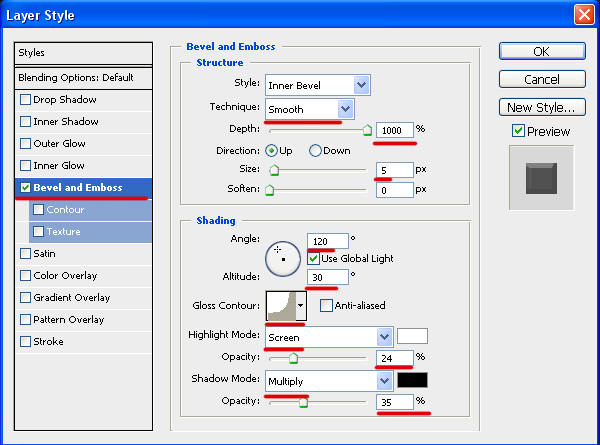
Now let’s add some shadows. Apply the following layer style to your text.


Step 13

Applying an inner shadow will increase the contrast of the piece.


Step 14

Now let’s add some additional elements to our background. Open the Splatter Brushes and apply them on a new layer as shown using black.


Step 15

Now open this brush pack and select a red #8d0000 color. Use the first brush in the pack and paint some red in as shown.


Step 16

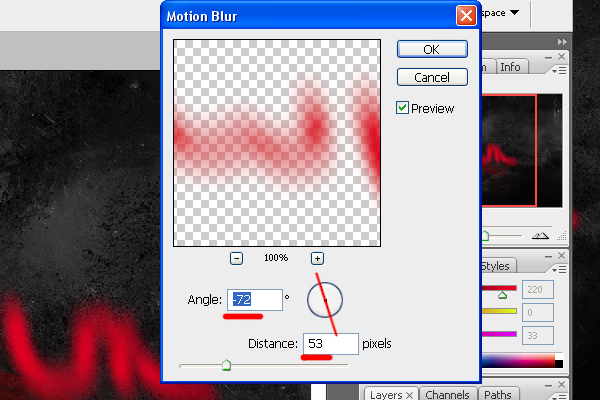
With a red # dc0021 color still selected keep painting in some bright red highlights with a 35 px brush as shown below on a new layer.

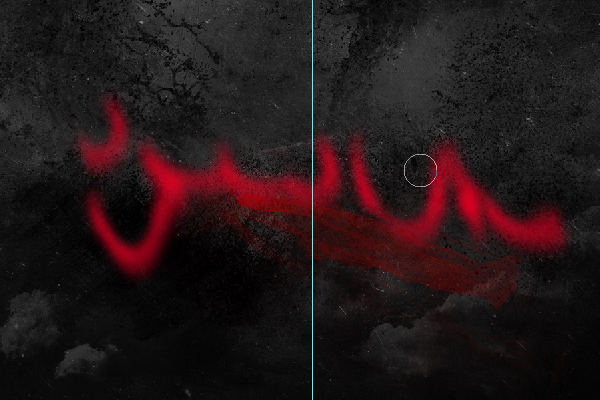
Temporarily turn off the visibility of the text layer and go to Filter > Blur > Motion Blur.

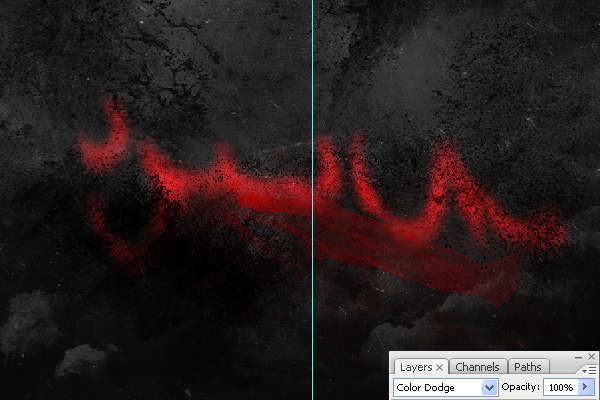
Now use a soft 65 px brush to erase areas as shown and set blending mode to color dodge.


Step 17

Use the second brush from this pack and apply it to the background as shown on a new layer.

Create a clipping mask (Cmd/Ctrl + Alt + G) for this brush. Create a new layer above the brush layer and draw something similar to what is shown below.

Here is how this layer looks without a mask.


Step 18

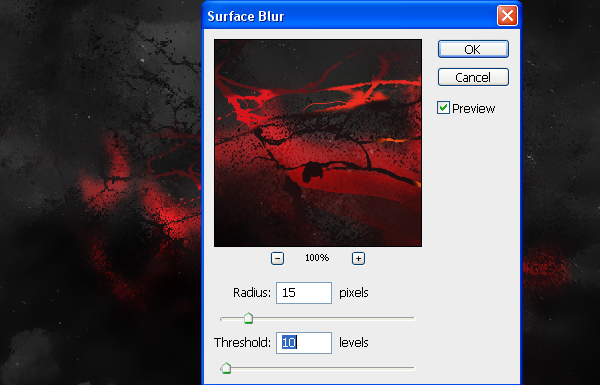
Merge all the background elements and go to Filter  > Blur > Surface Blur.

Use a soft eraser to remove areas you don’t like. Use the smudge tool to smooth out rough areas as well.


Step 19

Turn on your text layer’s visibility and draw in some highlights as shown with a 3 px #360a0b color.


Step 20

Select the type tool # cc982f and add the text “TREASURES OF THE” and place it as shown. Use the Blair Caps font and apply the layer styles as shown.


Step 21

To add something extra to your text use a 3D brush from this pack and apply it on a new layer with #ddaf00 selected.


Step 22

Add some sparks using this set of brushes.

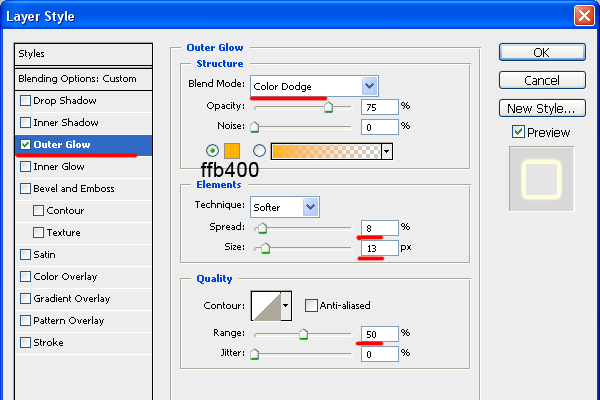
Apply the following layer style.


Step 23

Create a new layer above all others and take a large 300 px brush and paint in some black around the edges as shown. Now go to Blur > Gaussian Blur to smooth out the transition.


Step 24

Duplicate and merge your layers into one. Now add a radial blur as shown.

Set the blending mode of this layer to lighten and its transparency to 75%.


Step 25

Our artwork is almost complete! Add some backlights with a soft 100 px brush using #e96800 as shown.

Delete areas as needed with the eraser.

Set the blending mode to screen.


Step 26

We’re almost finished! Go to Filter > Sharpen > Smart Sharpen. Then go to Layer > New Adjustment Layer > Brightness/Contrast. Done!

Support Activetuts+ and Tuts+ Premium!

The Tuts+ Network publishes around 50 tutorials and articles every week and part of the reason we’re able do so lies with our Premium Membership service. If you haven’t yet heard, for $9 per month, you gain access to exclusive premium tutorials, screencasts, and freebies from Nettuts+, Psdtuts+, Activetuts+, Aetuts+, Audiotuts+, Vectortuts+ and CgTuts+ provided by some of the best minds in the business.

Read on to find out what Premium has to offer you and how you can support the Tuts+ Network!


What You Get

The Tuts+ Premium program is growing with every passing week, so what do you already get for your subscription? Sign up for just $9 per month and you get instant access to a massive 374 tutorials and 841 source files from the 7 Tuts+ Premium sites!

What do I get for my Premium subscription?

Active Premium

We kicked off Active Premium just a few months ago, but already have a stockpile of 12 awesome tuts for you to dive into. Here’s a quick look at some of the great Active Premium content on offer and a couple of cracking examples waiting in the pipeline..

Build an OOP Based Turntable With AS3

Read More

Packaging Silverlight Applications

Silverlight applications are simple in that there’s an HTML page that launches the plug-in and a packaging file format (XAP) for the code and resources themselves. Here, we take a quick look at how those applications are packaged and how we go from HTML page to running Silverlight code on the screen and also talk a little around how to include your own class libraries and resources such as images, videos, etc.


What’s Covered?

Here’s a quick breakdown of what’s covered in this screencast:

  • The XAP format
  • Running your app
  • Publishing your app to a web page / embedding the app in a web page (either ASPX or HTML)
  • Using multiple projects in one solution (separate projects for application proper and class library)
  • Using server-based images (external images) inside the app
  • Embedding images inside the XAP (two ways)

View Screencast

Don’t like ads? Download the screencast, or subscribe to Activetuts+ screencasts via iTunes!


Useful Links

Mike Taulty Microsoft (UK): http://mtaulty.com: [email protected]: twitter.com/mtaulty

Introduction to Smoke/Fire Simulation in Blender 2.5 – Day 4

In the next part of this invaluable in-depth series, Gottfried Hofmann, the man behind the official Blender smoke/fire documents, continues his look at smoke and fire simulation techniques within Blender 2.5. The 4th part of the series is all about working with optimized domains to improve your hi-res simulations. Prepare to be amazed at just what Blender can do for free!

Techniques covered in this forth video include :

  • How to expand your domain without changing the style of the sim
  • How to check out the style in a testbed-domain
  • How to perform test-bakes on crucial parts only

So let’s get going!


Video 1

Download

Note: click the ‘Monitor’ icon to view tutorial in full-screen HD.

The Screencast Key Status Tool used in this tutorial is available here.


This tutorial is Day 4 in a series – Go to Day 1, Day 2 and Day 3.


Don’t miss more CG tutorials and guides, published daily – subscribe to Cgtuts+ by RSS.

The Key to Forming a New Habit

Abandoning an old habit and forming a new one isn’t easy. Unless you really enjoy the new habit, it’d be very hard for you to form it. That’s what Leo Babauta of Zen Habits believes.

His article talks about why the most important thing in forming new habits is to simply enjoy them. He goes on to say that you should try to choose habits that you love. I found myself agreeing more with the second point where he mentions that even if the habit isn’t something you like, you should focus on its enjoyable aspects. That makes sense.

So, for example, if you don’t like waking up early, you could focus on things like a walk in the cool, fresh air, or an early morning game of badminton or tennis with friends. That could definitely help you get up early and form that habit.

The Importance of Enjoying the Habit

How to Stay Productive When the Internet Is Down

The Internet went down this morning at the home office. If I were in a deadline situation, I would have packed the laptop into the car and headed for the nearest caffeinated wifi hot spot. But I was under no pressure this morning and had hope the Internet downtime would be brief.

Under these circumstances, this is how I stay productive when the Internet is down:

Plan what to do when Internet is back up.

Sooner or later I can get back to work. So pull out the pen and paper (my task manager is in the cloud) and outline what I need to do later. This way I have a plan for what needs to be done when I’m ready.

Catch up on podcasts.

My iPod is packed with audio that I listen to when away from my computer. It includes everything from news shows to the official Toastmasters Podcast. Since I’m an optimist, I’m starting with the short ones. The internet shouldn’t be down too long.

Spend quality time with the family.

I get through one episode of Wall Street Journal on Small Business when I hear the family having fun downstairs. I know I’m supposed to show some discipline.

Screw it.

Time to come out of the freelancer cave and enjoy their company. This makes everyone happier when I have to get back to work.

Write offline.

After catching up with my loved ones, I’m still in the mood to write. So I keep the words flowing while the Internet can’t distract me. This blog entry is starting out as a list written long hand on a legal pad. This down time isn’t going to totally kill my productivity.

Make my phone calls.

Oh, yeah…this is what we did before e-mail was invented. I actually can use a cell phone to talk to people. These calls are on my schedule for later when I usually get sick of looking at a computer monitor. So let’s get them out of the way.

Read a book.

Now I’m really going retro.

I’m about to put down my pen and pick up a dead-tree version of Where Cool Waters Flow. I keep it handy for times when my cell phone or iPod is charging. You would think I would pick a business book about the Internet or changing the color of parachutes. But the subject is close to my heart and I actually am finding a way to relate it to business.

So when your Internet is down, what do you do to stay productive?

6 Ways to Get More From Your Commute Time

According to the United States Census Bureau survey, Americans spend more than 100 hours a year commuting to work. Australians don’t fare much better, as the average daily commute time ranges from 22 minutes up to 35 minutes. And if the infamous opening scene from Office Space is any indication, most workers don’t enjoy weaving in and out of traffic (or being crammed into a public transportation, as the case may be).

However, commuting doesn’t have to be a useless time suck, because there are plenty of productive uses for your commute time. Here are a few suggestions:

Read

One of the few things I actually miss about commuting is the amount of reading I used to get done sitting or standing on the subway. Depending on your preferences and tech accessories, you can catch up your RSS feeds on a smartphone, read the latest bestseller on your favorite e-reader, or go old school with a paperback or magazine. Choose something light-hearted if you need escapism or further your career with a business book. I’ve even seen people skimming legal briefs or reviewing notes for a presentation on the subway.

Listen

Maybe you’re someone who drives to work (please don’t try to juggle an e-reader and the steering wheel!) or perhaps you get motion sick trying to read on a moving vehicle. Listening to an audio book or a podcast may be an even smarter use of your time! Many libraries offer audio books to patrons, or you could sign up for an expensive membership like Audible. Many podcasts are available as free downloads. Alternatively, you could listen to some nice, soothing music to drown out the sounds of honking horns or chattering commuters and start your day off right.

Exercise

If you’re lucky enough to live within walking or biking distance from work, this is a great way to squeeze in a workout on nice days. Some companies even offer incentives to employees who bike to work, because it’s more eco-friendly than driving and means they don’t have to provide parking. Just make sure you bring a clean shirt or a towel so you won’t be hot and sweaty during that morning meeting! If your workplace has shower facilities, that’s even better. For those who can’t walk or bike to work, consider parking a few blocks from your office or getting off the subway or bus a few stops early so you can walk the rest of the way and explore the area around your office. You might discover a great new lunch spot or treat yourself to a cup of gourmet coffee.

Socialize

If you can’t walk, bike, or ride public transportation to work, then car-pooling is your next most eco-friendly option. It also gives you a chance to catch up with coworkers, neighbors, or friends and save on gas money. Whether you’re brainstorming for your next client presentation or merely comparing notes about the previous night’s episode of The Bachelorette, car-pooling let you connect with people outside the office and feel like part of a community. Plus, you may not need to spend as much time chatting during happy hour if you’ve already spent time before work chewing the fat.

Daydream

Sometimes you just need a few minutes to let your mind wander (but don’t let it wander off the road if you’re driving!). Daydreaming can help you find a fresh approach to a creative challenge or clear your head for the beginning of the day. Some find that people-watching (especially on public transportation) can keep the creative juices flowing and keep them entertained. Others prefer meditation or even the calming, repetition motions of knitting (just keep those needles to yourself).

Your turn! How do you spend your commute? Is there anything you would add to this list? Leave a comment, and let us know!

Olympus E-PL1: An Affordable Micro Four Thirds Camera

Touted as the most affordable addition to the Olympus Micro Four Thirds camera range, today we’re going to be taking a look at the Olympus E-PL1. It’s an attractive piece of kit with a feature set to match, but let’s see how it stacks up in our in-depth review!


Background

The Olympus E-P1 and E-P2 were Olympus’s first Micro Four Thirds cameras. They drew heavily on Olympus’s film camera heritage and, in particular, the half-frame ‘Pen’ camera. A combination of retro styling and high-quality materials pushes up the price and makes these cameras attractive to well-heeled connoisseurs but probably outside the price range of ordinary enthusiasts.

But the E-PL1 offers pretty well all the features found on the other two cameras, adds a built-in flash and costs a whole lot less. This is the camera that cost-conscious photographers are going to be interested in because it competes head-on with entry-level digital SLRs and mirrorless hybrid cameras from other makers.


Design and Handling

The E-PL1′s cheaper build quality is obvious straight away. It has a lighter, more plasticky feel than the metal-bodied E-P1 and E-P2. It’s slightly less wide, but slightly taller, and the extra height accomodates a pop-up flash unit at the left end of the top-plate.

On a compact digital camera, this might be irritating because this is right where you want to put your left index finger as you hold the camera. On the E-PL1, though, it’s less of a problem because your left hand is more likely to be cradling the lens.

The main mode dial has a pretty basic, functional look to it, but it has firm click-stops for the program AE, aperture-priority, shutter-priority and manual exposure modes, plus the movie mode, scene modes, art filter and iAuto settings.

The controls on the back look very plain and do have a somewhat cheap feel. Perhaps this is deliberate, in order to distance the E-PL1 from the more prestigious E-P1 and E-P2 models.

Actually, though, they do a very good job. There’s no control dial on this camera, so all adjustments are carried out with the four directional buttons and the central ‘OK’ button. Does this slow things down at all? Not really. The buttons are clearly labelled and have a positive action, and the advantage of this simple control system is that the E-PL1 is very straightforward and logical to use.

The four directional buttons act as short-cuts to the exposure compensation, flash mode, drive mode and autofocus settings and, if you press the central ‘OK’ button instead, the camera displays an on-screen menu overlay which lets you change the ISO, white balance, metering pattern and other common camera settings very quickly.

The more expensive E-P1 and E-P2 models have a more elaborate twin-dial control layout, but the E-PL1′s directness and simplicity is actually a lot more effective.

There’s a button on the back for shooting movies directly, whichever mode the camera’s in, though you’ll need to switch to continuous AF mode first if you want the camera to keep focussing while you’re filming. For more control over your movies, you turn the mode dial to the movie setting, where you can select a range of options including art filters and manual exposure control.

Again, all these adjustments are made using the four-way navigation buttons, and it’s so straightforward that you could start wondering whether cameras need control dials at all.


The Lens

The 14-42mm kit lens is less impressive, though. Optically, it’s fine, but it’s a ‘folding’ design which has to be unlocked before you can use it and then locked again when you put it away – note the ‘Unlock’ switch on the side of the lens in the picture above.

Presumably, Olympus has done this to make the camera more compact, but it does mean extra hassle when you want to use it. When the lens is locked, the camera is certainly much more compact, but when the lens is extended, it’s actually rather longer than most other kit lenses, and the folding mechanism itself does give it a distinctly loose feel. It doesn’t affect the performance, it just feels a bit weak.

This is not a cheaper version of Olympus’s 14-42mm Micro Four Thirds kit lens, by the way. It’s the same lens as the one supplied with the E-P1 and E-P2, though theirs may have a silver finish rather than black. Both are plastic, though.


Viewing and Focussing

The 2.7-inch LCD display is large enough, but it’s a shame Olympus doesn’t use one of the newer, high-resolution displays used by some of its rivals. 230,000 dots is adequate, but that’s all. The menus and icons look pretty crude too, especially when you compare the E-PL1′s interface to those on the latest D-SLRs from Nikon and Canon, for example.

There’s no viewfinder on this camera, but you can get a clip-on external viewfinder. This attaches to the camera’s accessory port on the back.

The autofocus isn’t that impressive either, at least not compared to Panasonic’s Micro Four Thirds cameras. There’s a lot of to-ing and fro-in as it zeroes in on the right focus point, even if the focus distance has hardly changed since the last shot you took.

Interestingly, one of the E-PL1 bundles includes an Olympus 40-150mm Four Thirds lens originally designed for Olympus’s digital SLRs. It fits on to the camera using an adaptor supplied with the kit, and this adaptor blends in so well wit the finish of the lens and the camera that you’ll quickly forget it’s there.

The 40-150mm lens’s autofocus is quite fast and smooth for a lens with this kind of range (equivalent to 80-300mm) and it’s light and easy to handle, though ours had a slight roughness in the zoom action which didn’t affect the performance. It does demonstrate how readily you can use Four Thirds lenses on these Micro Four Thirds bodies, though it doesn’t work the other way round – you can’t use a Micro Four Thirds lens on a Four Thirds SLR.

The E-PL1 has in-camera image stabilisation which should help cut camera shake with longer lenses like this one, though it doesn’t have the visual stabilising effect of lens-based systems. What this means is that the image still jitters about on the LCD as you take the shot, and this can make it harder to frame long-range subjects accurately.

Manual focussing is a bit of a weak point with Micro Four Thirds cameras too. These lenses don’t have distance scales, and it’s much harder to judge sharp focus on an LCD display than it is with the optical viewfinder of an SLR.


Picture Quality

The E-PL1 uses the same sensor and lenses as the E-P1 and E-P2 models, and there’s really no visible difference in the image quality. The Four Thirds/Micro Four Thirds sensor is smaller than the APS-C format sensors in most digital SLRs, but this doesn’t seem to make any difference to the definition, and the E-PL1 is suprisingly good at high ISOs, too.

The 334-zone ESP multi-pattern metering system seems to do a good job in a wide variety of conditions, including this scene with a bright, overcast sky and and deep shadows. The E-PL1′s i-Enhance feature helped it along by brightening the shadowed areas. There is some purple fringing around the leaves and the treetrunk, but considering the degree and strength of the backlighting, it’s not that much.

This i-Enhance feature adjusts the colours as well as the exposure, and it’s really heightened the depth and saturation of this commemorative plaque. The 14-42mm kit lens focusses right down to 0.25m, which is constant across the focal range, so it’s pretty good for close-ups like the one above.

But while this lens is sharp at shorter focal lengths, it does seem to lose definition at full zoom. The shot above was taken at 42mm, and the definition’s not that good. The slightly softness is unlikely to be down to camera shake since the shutter speed was 1/160sec.

The Art filters are effective, though, and the Grainy Film, Pop Art and Pin Hole effects are the strongest. It’s odd, though, that these are applied using a separate exposure mode. Wouldn’t it make more sense to be able to apply the filters whichever mode you were shooting in?

The Grainy Film filter used here is particularly striking. The grain effect is quite ‘digital’ and pixellated when you look at it up close, but from normal distances it looks fine. The huge contrast increase applied by this filter makes it a bit of a handful in contrasty lighting, and you have to accept that you’re likely to lose highlight detail, shadow detail or both, but if you pick your subjects carefully the graphic effect is powerful, and reminiscent of push-processed black and white film.

The Pop Art filter eally does make colours ‘pop’. It doesn’t work so well on natural subjects, which just come out looking overintensified and artificial, but for man-made subjects it can be really effective.

Some might find the Pin Hole filter (above) a little strong, but this too is very good at evoking a specific type of camera and mood. The heavy corner vignetting is only part of the effect – the filter also seems to increase the contrast and add a subtle warm/sepia tone to the image.

The E-PL1 offers all the manual controls of a digital SLR and pretty much the same level of image quality too. The 14-42mm kit lens might not be the best, but it’s pretty good as kit lenses go, and thanks to Olympus’s Four Thirds adaptor it’s possible to use not only the Micro Four Thirds lenses designed for this camera but Olympus’s back-catalog of digital SLR lenses too, and many of these are very good indeed.


Shooting Movies

Not every photographer wants to shoot movies, but it’s worth mentioning the E-PL1′s movie mode anyway because it does a lot more than you might expect. The Olympus shoots at standard HD 1280 x 720 resolution, but then cameras which can shoot full HD at 1920 x 1080 pixels aren’t that common anyway, full HD footage takes up a lot of space and requires more processing power to edit and, for most of us, the extra quality isn’t really necessary.

But anyway, the point about the E-PL1 is that it can shoot movies in fully-automated program AE mode or with full manual control over shutter speed, lens aperture and ISO. Throw in the fact that you can use manual focus and any number of interchangeable lenses, and it becomes apparent that the E-PL1 is also a real enthusiasts video camera too.


The E-PL1 Versus the Rest

The E-PL1 is affordable, takes good pictures and offers plenty of potential for keen photographers, but this section of the market is expanding rapidly, and it has plenty of competition.

It stacks up well against the Olympus E-PL1 and E-PL2 models because it does more or less everything that they do, adds a built-in flash and costs a whole lot less. But compared to the Panasonic GF1, it does feel a bit crude. The finish isn’t as good, the autofocus is slower and its expanding/collapsing lens is just a nuisance.

You can’t really count Panasonic’s other Micro Four Thirds model or the Samsung NX10 because although they are mirrorless hybrid cameras too, they’re styled like digital SLRs rather than compacts.

But the E-PL1 is also up against the new Sony NEX-3 and NEX-5. These are interesting because they use a larger APS-C sized sensor but the bodies are even smaller than the Olympus’s. The chief drawback with these cameras, though, is that the control layout is designed very much with novices and compact camera users in mind. Anyone hoping for the hands-on manual control of a digital SLR is going to be disappointed. The picture quality from these Sonys is great, but the E-PL1 is a better camera for enthusiasts.


Verdict

The Olympus E-PL1 is substantially cheaper than the more prestigious E-P1 and E-P2 models, and it really does feel it. At the same time, though, a more basic, simplified approach is very effective.

It does everything that its more expensive stablemates do, but in a more straightforward manner – and it has that built-in flash, which they don’t. If you’re looking for SLR-style control in a compact camera form, and you want value for money rather than prestige and style, it’s an excellent choice.

Pros

  1. Value for money
  2. Straightforward controls
  3. Lens choice (with Four Thirds adaptor)
  4. HD video and manual control

Cons

  1. Low-cost build quality
  2. Fiddly expanding/collapsing 14-42mm kit lens
  3. Sluggish autofocus
How to Create a Slider to Zoom Photos: New Premium Tutorial


If you’ve ever used a piece of software, like Picasa or iPhoto before, you’ll be aware of the fact that there is a slider at the bottom, which allows you to specify how large each photo should be. Move the slider up a few ticks, and all the photos will zoom in a bit. Thanks to the HTML5 and the new range input, we can mimic this effect rather easily. Along the way, we’ll also learn about a variety of awesome new CSS3 features, including transition, nth-child, rotations, scaling, and more.

Help give back to Nettuts+, and learn the latest techniques at the same time!


60 Second Preview of the Tutorial

Get the Flash Player to see this player.


You’ll Learn About:

  • The new HTML5 range input type.
  • The “change” and “mouseup” events
  • CSS3 rotation
  • CSS3 scaling
  • Local storage
  • CSS3 box shadows
  • CSS3 transitions
  • Writing clean object-oriented JavaScript
  • How to listen for a click event with only CSS.
  • And plenty more fun stuff!

Join Net Premium

NETTUTS+ Screencasts and Bonus Tutorials
For those unfamiliar, the family of TUTS sites runs a premium membership service. For $9 per month, you gain access to exclusive premium tutorials, screencasts, and freebies from Nettuts+, Psdtuts+, Aetuts+, Audiotuts+, and Vectortuts+! For the price of a pizza, you’ll learn from some of the best minds in the business. Gain access to this tutorial, as well as hundreds of others!

Nettuts joins the Smashing Network


A quick bit of news today to let you know that Nettuts+ has joined the Smashing Network which means you’ll now be able to see Nettuts+ posts appear on Smashing’s awesome Web Design Post Network section! The quality of sites in the network is simply phenomenal, and I’m thrilled that Vitaly and the crew are letting our tutorials reach even more people through their network.

If you’ve not ever flicked through the Smashing Network, I highly recommend heading over. The only downside is you usually end up with way more awesome articles than you could possibly read! :-)