During this tutorial, we will learn how to implement the SharedObject class. We’ll store all the essential data of a MovieClip locally, then reload it next time the application is opened!
We found this awesome author thanks to FlashGameLicense.com, the place to buy and sell Flash games.
Thanks to manicho for the hard disk icon.
Final Result Preview
Let’s take a look at the final result we will be working towards:
Doodle an image in the box with your mouse, and hit the Save button. Refresh this page in your browser, and click Load. You’ll see your doodle reappear, having been loaded from your hard drive; the background animation will even be on the same frame as it was before!
Step 1: Setting Up Our Document Class
Let’s begin by creating a new .fla. Save it and open up the properties panel in Flash. I am using Flash CS5, but this tutorial should work with every Flash CS version. In the properties panel, push the Edit button and make sure that your settings are identical to the image below:
Step 2: Document Class Setup
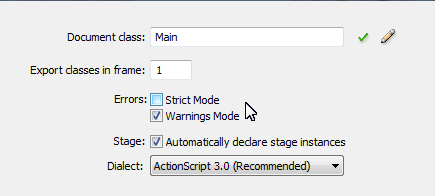
Now that we’ve setup our .fla, let’s begin our Document Class. To begin, open up your favorite ActionScript code editor and save an .as file called “Main.as” in the same directory as your .fla. Next go into the “Publish” panel of Flash. Set the “Class” textfield to “Main”. Now open Main.as and copy and paste the following code to create our Main document class.
package {

	import flash.display.Bitmap;
	import flash.display.BitmapData;
	import flash.display.Graphics;
	import flash.display.Shape;
	import flash.display.Sprite;
	import fl.controls.ComboBox
	import flash.events.Event;
	import flash.events.MouseEvent;
	import flash.geom.Matrix;
	import flash.geom.Rectangle;
	import flash.net.SharedObject;

	public class Main extends Sprite {

		public function Main():void  {

		}

	}

}
Step 3: Our Main Object
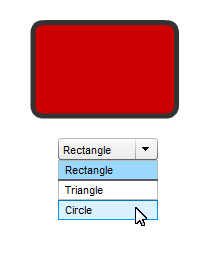
Now we are going to create our main MovieClip. It will contain 3 frames. Each one with a colored shape. Draw a red rectangle, turn it into a MovieClip with F8 and set the name of the MovieClip to “myObject”. Make sure that the registration point is the top left corner. Then create two new empty frames inside the MovieClip. Fill one up with a green triangle and the other with a blue circle.
The final result should look a bit like this:
Step 4: Using a ComboBox
Now we are going to use a ComboBox, which is basically a Drop-down list. Make sure that the instance of myObject on the stage is also labeled myObject. Then open: Window > Components and drag the “ComboBox” item onto the library. If you aren’t using the Flash IDE, you need to Right Click > Export to SWC the ComboBox in the library.
Now we can create the “myComboBox” variable, placed above the constructor function.
private var myComboBox:ComboBox = new ComboBox()
Next add the following code to your Main() constructor:
//Stops the myObject MovieClip on the first frame
myObject.gotoAndStop(1)

//Adds the following Objects to the ComboBox
and gives them each unique labels
myComboBox.addItem({label:"Rectangle"})
myComboBox.addItem({label:"Circle"})
myComboBox.addItem({label:"Triangle"})
//Adds the ComboBox
addChild(myComboBox)
//Moves it to the correct coordinates
myComboBox.move(280,150)
Here is a snapshot of what your application should look like when run:
Step 5: Changing myObject Frames
We want our MovieClip to change frames when we select a different item!
Let’s begin by adding an EventListener to our constructor – the Event.CHANGE event listener – which checks to see when the selected object in the ComboBox changes. This is exactly when the user chooses a new ComboBox item.
myComboBox.addEventListener(Event.CHANGE,changeObjectFrame)
Next we shall create the changeObjectFrame() function. This function checks to see what the current label on the ComboBox is, which is the name of the object the user has selected. It will then go to the correct frame of myObject to display the selected object type.
private function changeObjectFrame(e:Event):void
{
	//myComboBox.selectedLabel is the name of
	the current object selected that we defined
	earlier...

	if (myComboBox.selectedLabel == "Rectangle") {
		myObject.gotoAndStop(1)
	}
	if (myComboBox.selectedLabel == "Triangle") {
		myObject.gotoAndStop(2)
	}
	if (myComboBox.selectedLabel == "Circle") {
		myObject.gotoAndStop(3)
	}
}
You can now go ahead and compile the application. You should be able to switch to a different object by selecting it from the drop-down menu.
Step 6: Adding Animation
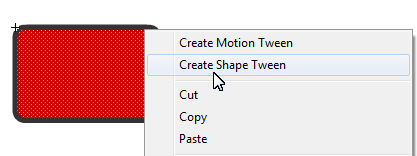
Next, let’s add some animation to our program. Go into the myObject MovieClip on the first frame. Select all of the red rectangle and push F8 to turn it into a MovieClip. Make sure that the registration point is at the top left corner. Do this with every shape inside the myObject MovieClip
Next we will have to give each MovieClip an animation. Go into the rectangle shape MovieClip and Right Click > Create Shape Tween on the red shape filling.
Then select the 60th frame of the MovieClip on the timeline and push F6 to create a new keyframe. Do this with the 30th frame as well. Now you can just go to the 30th frame and change the color of the shape fill. I have chosen to change the color to a golden orange. Now if you play the animation, the color should change from Red > Orange > Red.
Go ahead and do this for each shape in the myObject MovieClip. Now you can go ahead and compile the application; each selected shape will change colors.
The current application should act like this:
Step 7: Doodle Canvas
Now, let’s allow the user to draw a little custom doodle on the MovieClip. This is similar to my last tutorial in which we allowed the user to draw a custom design on the player. However, we will take it one step further in this tutorial by allowing the user to SAVE his message. But let’s save that for later!
Let’s get started by setting up an instance of the Shape class. Add this code above your constructor:
private var myCanvas:Shape = new Shape()
Next we are going to add the myCanvas variable to the stage… Add this code to the bottom of our constructor.
addChild(myCanvas))
Step 8: Doodles
We’ll do this very quickly. If you want more explanation on how to use the Shape class for drawing, please check my other tutorial.
Start by creating a mouseIsDown variable…
//Checks to see if the mouse is down
private var mouseIsDown:Boolean = false
Now go ahead and add the following event listeners:
stage.addEventListener(MouseEvent.MOUSE_MOVE, drawDoodle)
stage.addEventListener(MouseEvent.MOUSE_DOWN, mouseDown)
stage.addEventListener(MouseEvent.MOUSE_UP, mouseUp)
And here are the 3 functions which are attached to the EventListeners:
private function mouseUp(e:MouseEvent):void
{
	mouseIsDown = false
}

private function mouseDown(e:MouseEvent):void
{
	mouseIsDown = true

	//Moves mouse pointer to mouse
	myCanvas.graphics.moveTo(myCanvas.mouseX, myCanvas.mouseY);
}

private function drawDoodle(e:MouseEvent):void
{
	//If the mouse is clicked
	if (mouseIsDown) {
		//Makes drawing settings right
		myCanvas.graphics.lineStyle(5, 0, 1)
		//Draws the doodle line
		myCanvas.graphics.lineTo(myCanvas.mouseX, myCanvas.mouseY);

	}
}
Now you can test out the program and it should be drawing fine. However, we still haven’t limited the drawing space of our canvas, so drawings outside of the myObject boundaries still show. In the next step, we will solve all of this!
Step 9: Masking
In my previous tutorial, the process of masking was very easy because each masked object remained the same throughout all of the application. This time, we need to have a mask that adjusts to each MovieClip.
Let’s go ahead and Right Click > Copy our myObject on the stage. Now we need to Right Click > Paste in Place the object so it is exactly where our myObject was. Now change the instance name to “myObjectAsMask.” Switch to the Main Class and add the following lines to the constructor:
//This should all be self-explanatory!
myCanvas.mask = myObjectAsMask
myObjectAsMask.gotoAndStop(1)
So far, the mask should only work for the first object. We need to adjust the changeObjectFrame function to change our mask to meet the new shape of myObject. Add the highlighted code to the changeObjectFrame function:
private function changeObjectFrame(e:Event):void
{
	if (myComboBox.selectedLabel == "Rectangle") {
		myObject.gotoAndStop(1)
	}
	if (myComboBox.selectedLabel == "Triangle") {
		myObject.gotoAndStop(2)
	}
	if (myComboBox.selectedLabel == "Circle") {
		myObject.gotoAndStop(3)
	}

	//Clears doodle
	myCanvas.graphics.clear()
	//Syncs myObject and myObjectAsMask frames
	myObjectAsMask.gotoAndStop(myObject.currentFrame)
}
Step 10: The Save Button
Next up: we’ll add a save button to our application. Later on this will save all our myObject’s data into a SharedObject. Create a new Button and design it however you want. I have included my own button but showing you how to draw one is not important.
Drag an instance of the button onto the stage and give it the instance name of “saveStuff”. Then add the following event listener to the constructor:
saveStuff.addEventListener(MouseEvent.CLICK, saveObjectData)
Next, add this empty function that we will use to add our code that saves the object.
private function saveObjectData(e:MouseEvent):void
{

}
Step 11: Creating and Accessing a New SharedObject
To start using the SharedObject class, we will need to create a new instance of the SharedObject class. If you haven’t ever used the SharedObject class before, then this would be a good time to check out this tutorial on Working with SharedObjects to get a basic idea of how they work. Use this code to create a SharedObject:
private var mySaveData:SharedObject = SharedObject.getLocal("saveData")
Go inside the saveObjectData function and add the following code to begin our save operation:
// Creates a new array inside the program
var myDataArrayInProgram:Array = new Array()

// Adds some random data to our Array
myDataArrayInProgram.push("WhateverDataYouWant")

// Creates a variable inside the SharedObject
// and sets it's value to the value of our local
// array
mySaveData.data.myDataArray = myDataArrayInProgram

// "Flushes" the data away to be saved in the
// computer (although the name suggests otherwise,
// this actually stores the data!)
mySaveData.flush()
If you want to check to see if this code is effective, just add this snippet of code to the bottom of your function:
trace(mySaveData.data.myDataArray)
Step 12: Saving our Main MovieClip Data
So far, all is good. We’ve managed to create a SharedObject and have successfully stored a few bytes of data in it. The next step is to start preparing our program for reconstructing our MovieClip. In this step, we will add all of the necessary data to our SharedObject for our application to reconstruct the MovieClip from scratch.
To do this, we will need to push all of our data into the myDataArrayInProgram Array so it will be attached to our SharedObject. I’ve modified the saveObjectData function to do all of this. You can view it below:
private function saveObjectData(e:MouseEvent):void
{
	var myDataArrayInProgram:Array = new Array()

	//Adds the object's X location
	myDataArrayInProgram.push(myObject.x)

	//Adds the object's Y location
	myDataArrayInProgram.push(myObject.y)

	//Adds the object's currentFrame
	//(The current object chosen)
	myDataArrayInProgram.push(myObject.currentFrame)

	//Adds the current frame of the
	//current object's animation
	myDataArrayInProgram.push(myObject.getChildAt(0).currentFrame)

	mySaveData.data.myDataArray = myDataArrayInProgram
	mySaveData.flush()
	trace(mySaveData.data.myDataArray)
}
IMPORTANT: getChildAt() accesses the children of the object based on their index. When there is only one object in a MovieClip, you can be sure that getChildAt(0) will get you to it!
MORE IMPORTANTLY: Don’t worry if you get the following error:
1119: Access of possibly undefined property currentFrame through a reference with static type flash.display:DisplayObject.
If so, you probably have Strict Mode enabled in your flash settings. The problem is that getChildAt() returns a DisplayObject, and to flash, that could be a Bitmap, Sprite, MovieClip, etc. The issue with DisplayObject.currentFrame is that only the MovieClip Class has the currentFrame property, because no other class has any animation.
To solve this, go to: File > Publish Settings > Actionscript Settings and uncheck “Errors: Strict Mode”
Editor: Alternatively, you could
cast the object returned by getChildAt() as a MovieClip, like so:
myDataArrayInProgram.push((myObject.getChildAt(0) as MovieClip).currentFrame)
This tells Flash, “treat this object as a MovieClip“.
Step 13: Creating a Load Button
We aren’t at the stage yet where we can use our save data, but it is still good to create the UI option to load the SharedObject ahead of time. Just like the save button, you can design this button to be however you want; I’m not going to walk you through drawing it.
Create a new button and drag an instance onto the stage. Then set the instance name to “loadStuff”.
And now just add the following Event Listener:
loadStuff.addEventListener(MouseEvent.CLICK, loadObjectData)
And create the loadObjectData function like so:
private function loadObjectData(e:MouseEvent):void
{

}
Step 14: Clear Everything Button
Now let’s add a new button to our UI. This button will delete everything in our SharedObject and also wipe out the current doodle on myCanvas.
Just like the other buttons, I will choose my own graphic; you can choose your own or use mine.
This time you can set the instance name of the button to “clearStuff”.
Now add this Event Listener:
clearStuff.addEventListener(MouseEvent.CLICK, clearObjectData)
And create the clearObjectData function like so:
private function clearObjectData(e:MouseEvent):void
{
	//Clear SharedObject
	mySaveData.clear()
	//Clears myCanvas graphics
	myCanvas.graphics.clear()
}
Step 15: BitmapData Snapshots
Now you are beginning to ask: “Why can’t I save the user’s doodle like any other property?” Unfortunately, Flash doesn’t allow you to directly save MovieClips, Bitmaps, or even Shapes inside of a SharedObject, but you can do this by saving the pixel by pixel value OF the image.
You must be asking: “But the doodle isn’t a bitmap, it’s a user drawn vector image contained in shape?!” That’s right, but we can convert it to Bitmap based data by taking a snapshot of it with the BitmapData class!
Go ahead and create the following variable above the constructor of our Main application:
private var bitmapDataSnapshot:BitmapData
This variable will be the “camera” that takes a snapshot of the doodle.
Now add the following highlighted lines to the saveObjectData function in the location shown below:
private function saveObjectData(e:MouseEvent):void
{
	var myDataArrayInProgram:Array = new Array()
	myDataArrayInProgram.push(myObject.x)
	myDataArrayInProgram.push(myObject.currentFrame)
	myDataArrayInProgram.push(myObject.getChildAt(0).currentFrame)

	//Creates a new instance of the BitmapData class,
	//makes it the size of the stage, enables transparency,
	//and sets the fill to a transparent white
	bitmapDataSnapshot = new BitmapData(640, 480,true,0)

	//Tells the camera to take a snapshot
	//of myCanvas, skips the next 3 parameters,
	//and tells the snapshot area to only include
	//the stuff covered by the myObject MovieClip
	bitmapDataSnapshot.draw(myCanvas, null, null, null, new Rectangle(250, 30, 150, 100))

	mySaveData.data.myDataArray = myDataArrayInProgram
	mySaveData.flush()
	trace(mySaveData.data.myDataArray)
}
Step 16: Saving BitmapData in a SharedObject
Let’s wrap up the saving process of our program. Now that we have created a BitmapData instance with all of our myCanvas data, we need to store it inside a ByteArray to be sent into our SharedObject. To do this, we can use a very handy function inside of the BitmapData Class. It’s name is getPixels().
getPixels() returns a ByteArray of all of the pixel data of a BitmapData. Unlike the BitmapData Class, ByteArrays can be stored inside SharedObjects so they are the right tool for saving our Doodle.
All you need to do is add this line of code in your saveObjectData function right after you finish doing your BitmapData work:
//Pushes the value of the returned
//ByteArray of the getPixels() function
//into myDataArrayInProgram

//getPixels() requires a Rectangle that
//shows what part of the object's  pixels
//we actually want!

//NOTE: The current rectangle is only
//an approximation of where the doodle
//should show!
mySaveData.data.myDataArray.push(bitmapDataSnapshot.getPixels(new Rectangle(250, 30, 150, 100)))
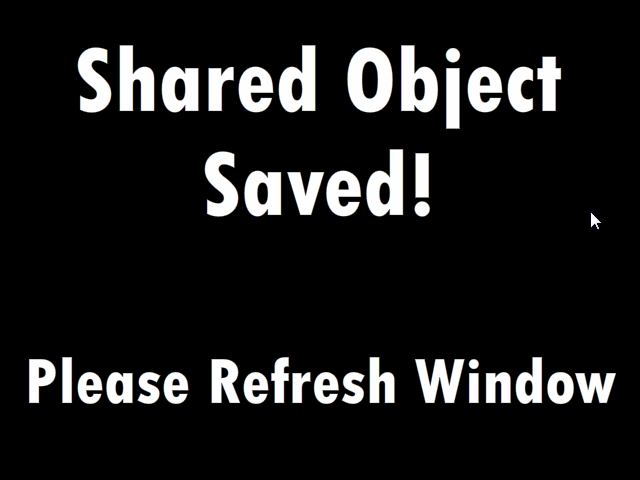
On to the last step. Once the data is saved, we need to have the user refresh the page, to prove that their doodle has been saved to their hard drive, and not just stored in temporary memory. Draw a black box around the stage and add some text to it that asks the player to refresh. Then select the whole object and push F8. Make sure to check the “Export For Actionscript” box and set the “Class” to “refreshScreen”. You can now delete the object on the stage…
Below is the refreshScreen that I have drawn:
Now add this code to the bottom of your saveObjectData function:
addChild(new refreshScreen())
Your finished saveObjectData function should look like this:
private function saveObjectData(e:MouseEvent):void
{
	var myDataArrayInProgram:Array = new Array()
	myDataArrayInProgram.push(myObject.x)
	myDataArrayInProgram.push(myObject.currentFrame)
	myDataArrayInProgram.push(myObject.getChildAt(0).currentFrame)
	bitmapDataSnapshot = new BitmapData(640, 480,true,0)
	bitmapDataSnapshot.draw(myCanvas, null, null, null, new Rectangle(250, 30, 150, 100))
	myDataArrayInProgram.push(bitmapDataSnapshot.getPixels(new Rectangle(250, 30, 150, 100)))

	mySaveData.data.myDataArray = myDataArrayInProgram
	mySaveData.flush()
	trace(mySaveData.data.myDataArray)

	addChild(new refreshScreen())
}
Step 17: Reconstructing Our Doodle
It’s time to reconstruct our entire Doodle from the ByteArray that we saved earlier!
You must be thinking: “What the heck do I do with a ByteArray, its just a bunch of garbled mumbo-jumbo!” And you are right, it is! Thankfully, Adobe has also given us a great function called setPixels() which you gives the same Rectangle and ByteArray, to recreate the same BitmapData you had!
Before we reconstruct our entire MovieClip, we should go ahead and run a test to see if we can reconstruct the BitmapData itself. Modify your loadObjectData function so it looks like this:
private function loadObjectData(e:MouseEvent):void
{
	//Creates a BitmapData and makes
	//it the size of the stage, and
	//applys all of the old settings
	var loadBitmapData:BitmapData = new BitmapData(640, 480, true, 1)

	//Sets the pixels of loadBitmap
	//using our old rectangle, and
	//by accessing our SaveData ByteArray
	//(4th item in myDataArray (myDataArray[3]))
	loadBitmapData.setPixels(new Rectangle(250, 30, 150, 100), mySaveData.data.myDataArray[3])

	//Creates a new Bitmap and tells it to
	//load its image from loadBitmapData
	var display:Bitmap = new Bitmap(loadBitmapData)

	//Moves the object mask
	//playhead to the right frame
	myObjectAsMask.gotoAndStop(mySaveData.data.myDataArray[2])

	//Masks the image with the mask
	display.mask = myObjectAsMask

	//Adds the Bitmap to the stage
	addChild(display)

}
Step 18: Fully Reconstructing myObject
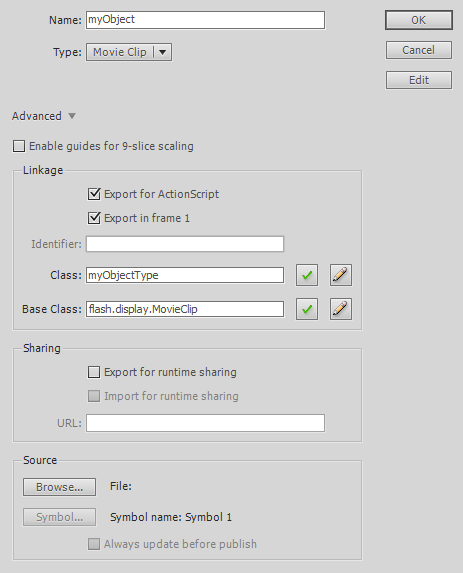
Now it’s time to put this all together! First, right-click on myObject (in library) > Properties. Now check the “Export For Actionscript” box and set the “Class” to “myObjectType”. Compare your properties to the ones in the image:
If it’s all the same, then we are ready to go! Add this above our constructor:
private var myNewObject:myObjectType;
And add all of this to the top of loadObjectData().
//Creates a new instance of myObjectType (myObject)
myNewObject = new myObjectType()

//Sets the X to the old position
myNewObject.x = mySaveData.data.myDataArray[0]
//Sets the Y to the old postion
myNewObject.y = mySaveData.data.myDataArray[1]
//Selects the old object
myNewObject.gotoAndStop(mySaveData.data.myDataArray[2])
//Moves the playhead to the right animation frame
myNewObject.getChildAt(0).gotoAndStop(mySaveData.data.myDataArray[3])
//Adds the object to the stage
addChild(myNewObject)

//Removes comboBox event listener
myComboBox.removeEventListener(Event.CHANGE, changeObjectFrame)

//Removes the "doStuff" event listeners for buttons
saveStuff.removeEventListener(MouseEvent.CLICK, saveObjectData)
loadStuff.removeEventListener(MouseEvent.CLICK, loadObjectData)
clearStuff.removeEventListener(MouseEvent.CLICK,clearObjectData)

//Removes drawing event listeners
stage.removeEventListener(MouseEvent.MOUSE_MOVE, drawDoodle)
stage.removeEventListener(MouseEvent.MOUSE_DOWN, mouseDown)
stage.removeEventListener(MouseEvent.MOUSE_UP, mouseUp)

//Removes unneeded UI
removeChild(myObject)
removeChild(saveStuff)
removeChild(loadStuff)
removeChild(clearStuff)
removeChild(myComboBox)
removeChild(myCanvas)
Test the app out, it should work perfectly.
Congratulations! You’ve officially reconstructed a MovieClip using the SharedObject class!
Step 19: Adding a Play Animation Button
If the application above works, it should present a paused image of where you saved myObject. To get the animation to play again, let’s create a “Play” button. Here is the one that I’ve chosen:
Drag it just underneath myObject on the stage and set its instance name to “playAnimation”.
Now add this to the bottom of our constructor:
//Hides button
playAnimation.visible = false

//Adds buttons Event Listener
playAnimation.addEventListener(MouseEvent.CLICK, playObjectAnimation)
Then put this at the bottom of loadObjectData().
//Shows button
playAnimation.visible = true
Lastly, add this function to your program:
private function playObjectAnimation(e:MouseEvent):void {
	myNewObject.play()
}
Step 20: Final Source
Here is our Final Application Source Code. If there is any difference between your code and this, go back and see where you took a different path.
package {

	import flash.display.Bitmap;
	import flash.display.BitmapData;
	import flash.display.Graphics;
	import flash.display.Shape;
	import flash.display.Sprite;
	import fl.controls.ComboBox
	import flash.events.Event;
	import flash.events.MouseEvent;
	import flash.geom.Matrix;
	import flash.geom.Rectangle;
	import flash.net.SharedObject;

	public class Main extends Sprite {

		private var myComboBox:ComboBox = new ComboBox()
		private var myCanvas:Shape = new Shape()
		private var mouseIsDown:Boolean = false
		private var mySaveData:SharedObject = SharedObject.getLocal("saveData")
		private var bitmapDataSnapshot:BitmapData
		private var myNewObject:myObjectType

		public function Main():void  {
			myObject.gotoAndStop(1)

			myComboBox.addItem( { label:"Rectangle" } )
			myComboBox.addItem({label:"Triangle"})
			myComboBox.addItem({label:"Circle"})
			addChild(myComboBox)
			myComboBox.move(280, 150)

			myComboBox.addEventListener(Event.CHANGE, changeObjectFrame)

			addChild(myCanvas)

			stage.addEventListener(MouseEvent.MOUSE_MOVE, drawDoodle)
			stage.addEventListener(MouseEvent.MOUSE_DOWN, mouseDown)
			stage.addEventListener(MouseEvent.MOUSE_UP, mouseUp)

			myCanvas.mask = myObjectAsMask
			myObjectAsMask.gotoAndStop(1)

			saveStuff.addEventListener(MouseEvent.CLICK, saveObjectData)
			loadStuff.addEventListener(MouseEvent.CLICK, loadObjectData)
			clearStuff.addEventListener(MouseEvent.CLICK, clearObjectData)

			playAnimation.visible = false
			playAnimation.addEventListener(MouseEvent.CLICK, playObjectAnimation)
		}

		private function clearObjectData(e:MouseEvent):void
		{
			mySaveData.clear()
			myCanvas.graphics.clear()
		}

		private function loadObjectData(e:MouseEvent):void
		{
			myNewObject = new myObjectType()
			myNewObject.x = mySaveData.data.myDataArray[0]
			myNewObject.y = mySaveData.data.myDataArray[1]
			myNewObject.gotoAndStop(mySaveData.data.myDataArray[2])
			myNewObject.getChildAt(0).gotoAndStop(mySaveData.data.myDataArray[3])
			addChild(myNewObject)

			myComboBox.removeEventListener(Event.CHANGE, changeObjectFrame)

			saveStuff.removeEventListener(MouseEvent.CLICK, saveObjectData)
			loadStuff.removeEventListener(MouseEvent.CLICK, loadObjectData)
			clearStuff.removeEventListener(MouseEvent.CLICK,clearObjectData)

			stage.removeEventListener(MouseEvent.MOUSE_MOVE, drawDoodle)
			stage.removeEventListener(MouseEvent.MOUSE_DOWN, mouseDown)
			stage.removeEventListener(MouseEvent.MOUSE_UP, mouseUp)

			removeChild(myObject)
			removeChild(saveStuff)
			removeChild(loadStuff)
			removeChild(clearStuff)
			removeChild(myComboBox)
			removeChild(myCanvas)

			var loadBitmapData:BitmapData = new BitmapData(640, 480, true, 1)
			loadBitmapData.setPixels(new Rectangle(250, 30, 150, 100), mySaveData.data.myDataArray[4])
			var display:Bitmap = new Bitmap(loadBitmapData)
			myObjectAsMask.gotoAndStop(mySaveData.data.myDataArray[2])
			display.mask = myObjectAsMask
			addChild(display)

			playAnimation.visible = true

		}

		private function playObjectAnimation(e:MouseEvent):void
		{
			myNewObject.getChildAt(0).play()
			playAnimation.visible = false
		}

		private function saveObjectData(e:MouseEvent):void
		{
			var myDataArrayInProgram:Array = new Array()
			myDataArrayInProgram.push(myObject.x)
			myDataArrayInProgram.push(myObject.y)
			myDataArrayInProgram.push(myObject.currentFrame)
			myDataArrayInProgram.push(myObject.getChildAt(0).currentFrame)
			bitmapDataSnapshot = new BitmapData(640, 480,true,0)
			bitmapDataSnapshot.draw(myCanvas, null, null, null, new Rectangle(250, 30, 150, 100))
			myDataArrayInProgram.push(bitmapDataSnapshot.getPixels(new Rectangle(250, 30, 150, 100)))

			mySaveData.data.myDataArray = myDataArrayInProgram
			mySaveData.flush()
			trace(mySaveData.data.myDataArray)
		}

		private function mouseUp(e:MouseEvent):void
		{
			mouseIsDown = false
		}

		private function mouseDown(e:MouseEvent):void
		{
			mouseIsDown = true
			myCanvas.graphics.moveTo(myCanvas.mouseX, myCanvas.mouseY);
		}

		private function drawDoodle(e:MouseEvent):void
		{
			if (mouseIsDown) {
				myCanvas.graphics.lineStyle(5, 0, 1)
				myCanvas.graphics.lineTo(myCanvas.mouseX, myCanvas.mouseY);

			}
		}

		private function changeObjectFrame(e:Event):void
		{
			if (myComboBox.selectedLabel == "Rectangle") {
				myObject.gotoAndStop(1)
			}
			if (myComboBox.selectedLabel == "Triangle") {
				myObject.gotoAndStop(2)
			}
			if (myComboBox.selectedLabel == "Circle") {
				myObject.gotoAndStop(3)
			}

			myCanvas.graphics.clear()
			myObjectAsMask.gotoAndStop(myObject.currentFrame)
		}

	}

}
Conclusion
As you can see, with a little bit of tweaking, it is absolutely possible to save all MovieClip data into SharedObjects for loading later on. This means that if you are writing a game, you can easily create save states instead of having small checkpoints…
Good luck on using this method of saving data on your games and applications, to help make your programs better than ever!
Thanks for reading!

 Although your car has a fully-capable AM radio, and you’re an