How to Create Your Own Tilt-Shift Photograph in Photoshop

Miniature faking is a great way to spice up an otherwise dull shot. This effect is sometimes referred to as a “tilt-shift effect” because of how the finished product resembles a photograph taken with a tilt-shift lens. In this tutorial we will examine this interesting effect and outline how to achieve it without spending money on a new lens.
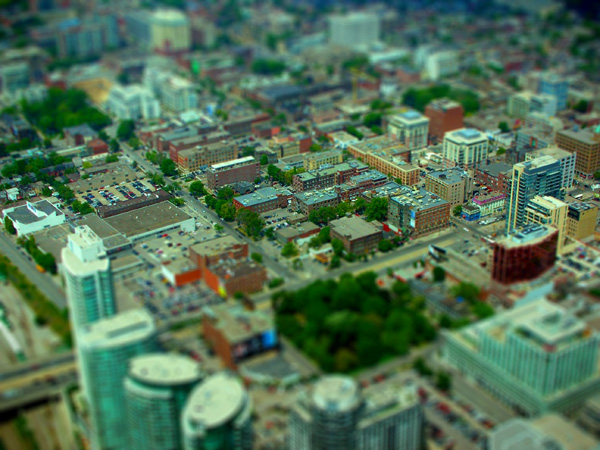

Final Image Preview


Step 1. How Does It Work?

Miniature faking tricks the eye into perceiving a life-size image as a miniature model. The miniature feeling of the photo is present because of the illusion of a shallow depth of field. This shallow depth of field is normally encountered in macro (close-up) photography, giving the photo’s subject the feeling of being much smaller than it actually is.


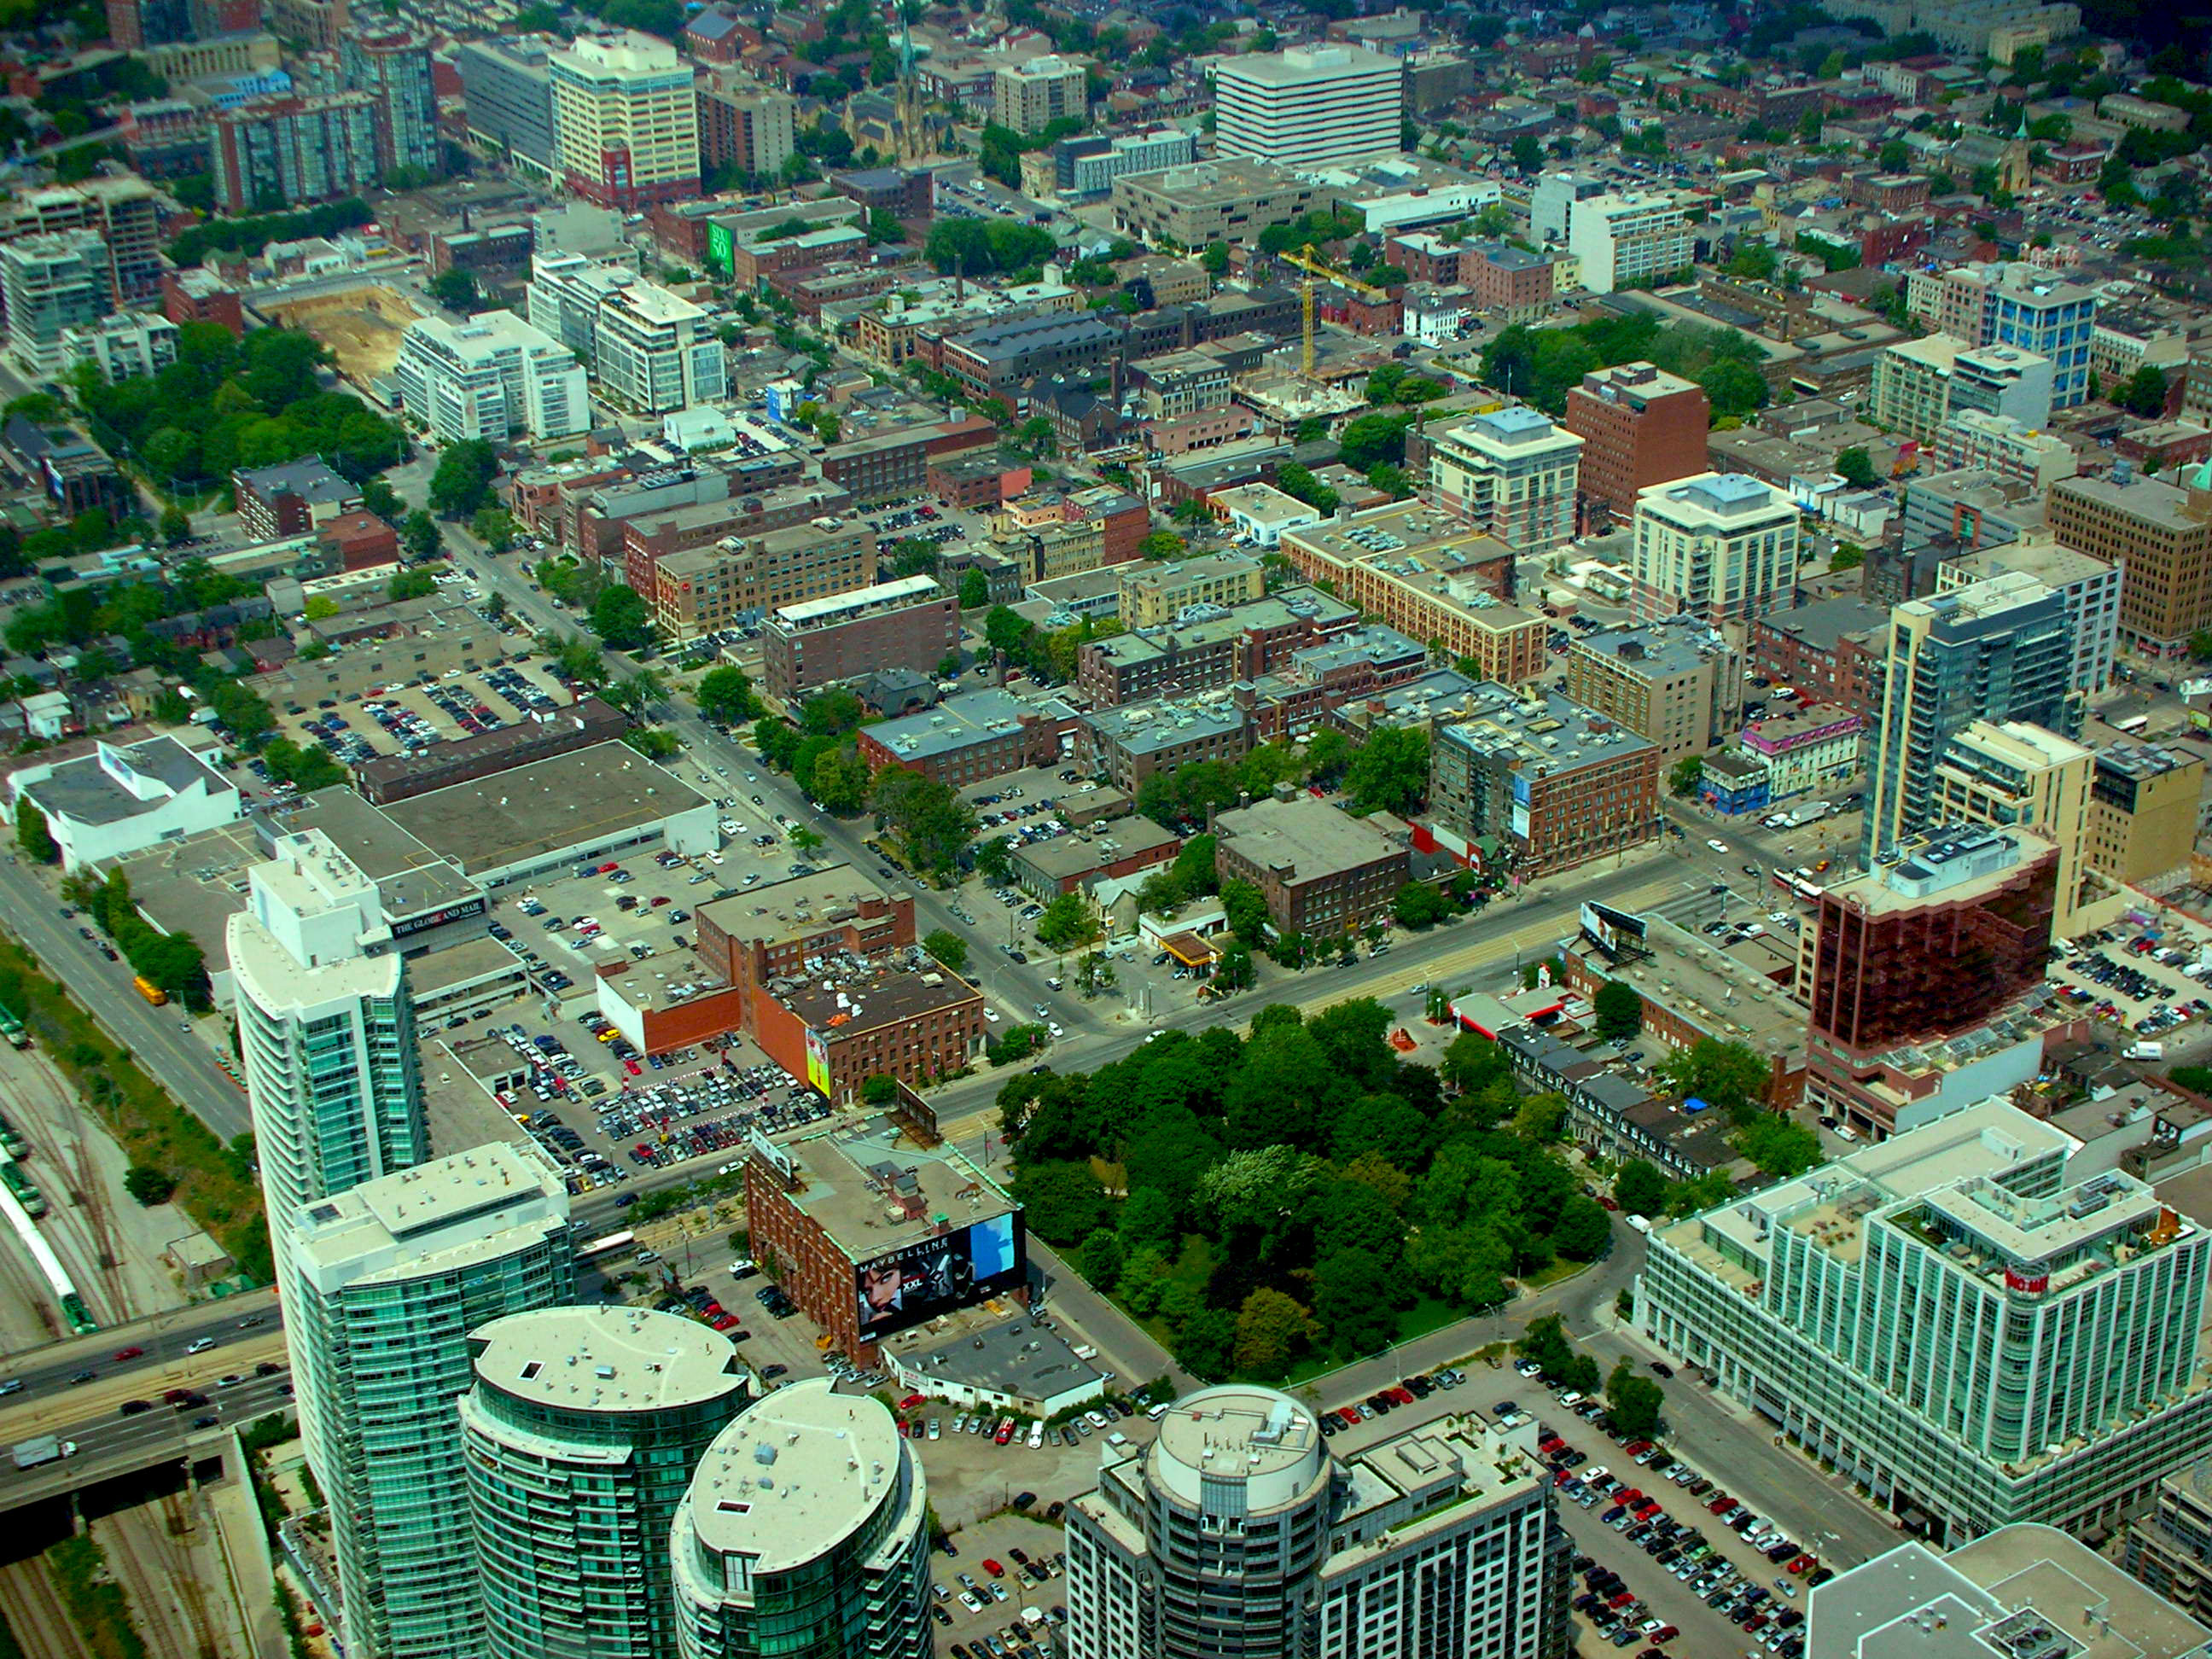
Step 2. Taking the Right Shot

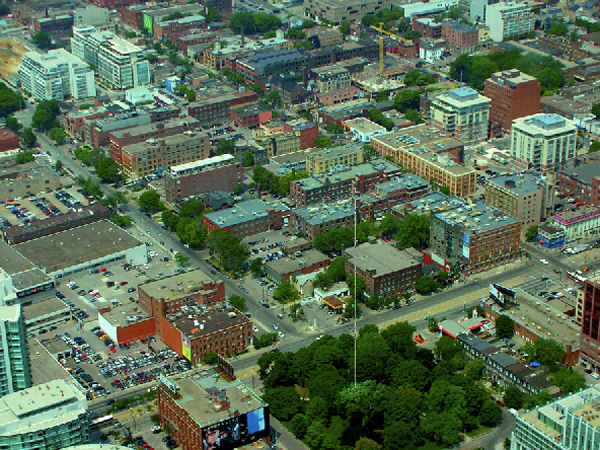
The best shots for miniature faking are ones taken at a high vantage point. Usually, the larger the angle between you and the ground, the better. Lower angle shots are not useless, but the higher angled shots have the best results. This is because the higher angled shots emulate a shot looking down at a miniature model.

Take your time deciding the best location to get the effect you want. If available, venture into a city near you and go to an observation deck. This high vantage point makes for extremely interesting miniature photographs. In more rural locations, higher ground such as hills should do just fine in capturing a shot high enough to display the miniature effect well. Another key to taking a good shot for miniaturization is shooting in the daytime. Unless your night shot is extremely well lit, the effect of the shallow depth of field won’t be as obvious as it would in a day shot.


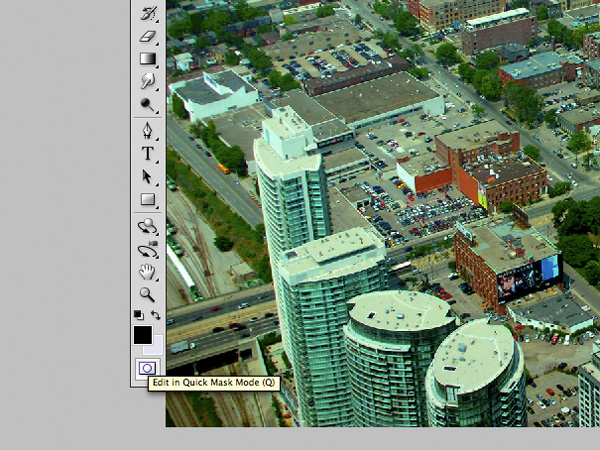
Step 3. Getting Started in Photoshop

The first step in miniaturizing your photo is by switching into Quick Mask Mode in Photoshop by pressing “Q” or selecting the icon on your tool palette. Quick Mask Mode can also be found by going to Select -> Edit in Quick Mask Mode. The mask will enable us to lay the groundwork for which areas of the image will be in or out of focus.


Step 4. Choosing the Gradient Tool

The next step is to choose the Gradient Tool by either pressing the icon on the tool palette, or by pressing “G” on your keyboard.

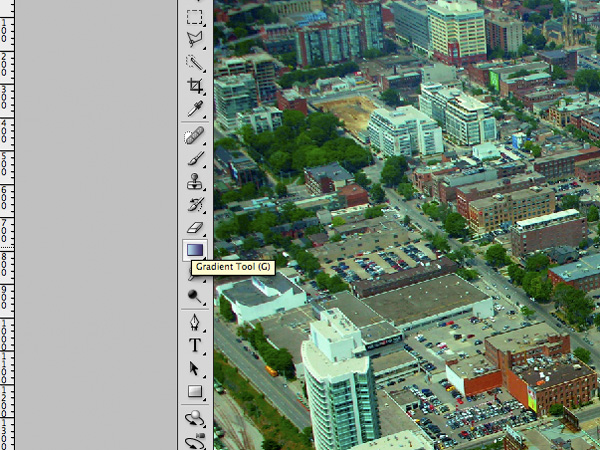
Make sure that the reflected gradient (icon fourth from the left) is selected and the gradient is moving from black to white.


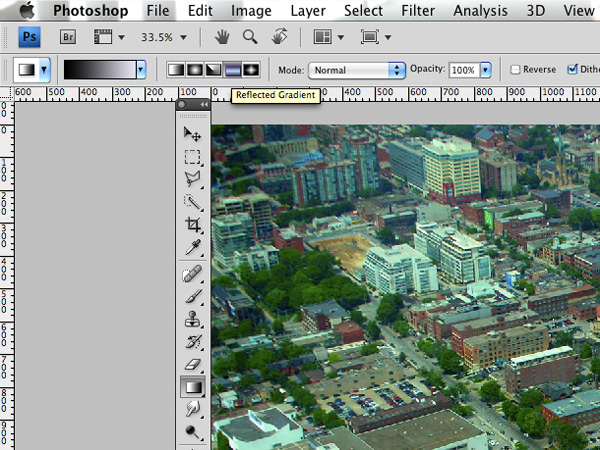
Step 5. Drawing your Focus Line

This step will probably take the most time in the process and requires a lot of trial and error to get it perfect. When drawing the line, position the anchor point where you want the sharpest focus to be. The gradient will fill different depending on whether you drag the line up or down from the anchor point. Try either way to figure out which works best for you.

It is essential that you don’t make this long too long, as it will eventually decide the depth of field in your image. Don’t be concerned that your gradient turns out red even though we selected black to white as our gradient fill; it is totally normal!

Take heed not to make your gradient too thin, or else the blurred portion of the image will obscure the little part that is in focus. Also, making the gradient too thick will cause the depth of field to be too large, therefore taking away from the effect we’re trying to accomplish.

A perfect gradient should have a nice band of solid color where the sharpest focus will be, but also enough fade away that the lens blur will look believable when it is applied.


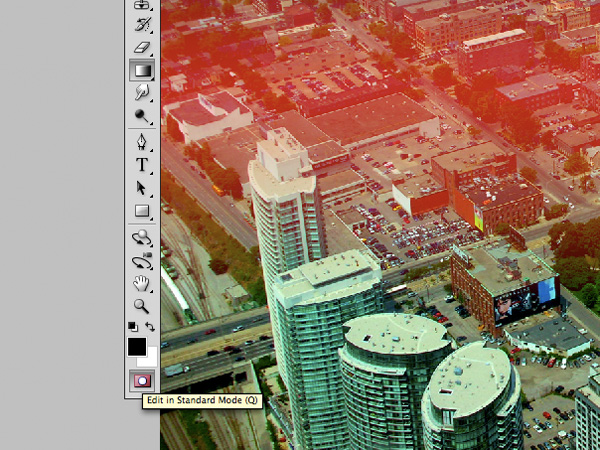
Step 6. Return to Standard Mode

When you are happy with your red masking area, return to Standard Editing Mode by pressing “Q” or by clicking the icon shown in Step 3. After returning to Standard Mode, you will see a rectangular marquee representing the gradient that you drew in the last step.


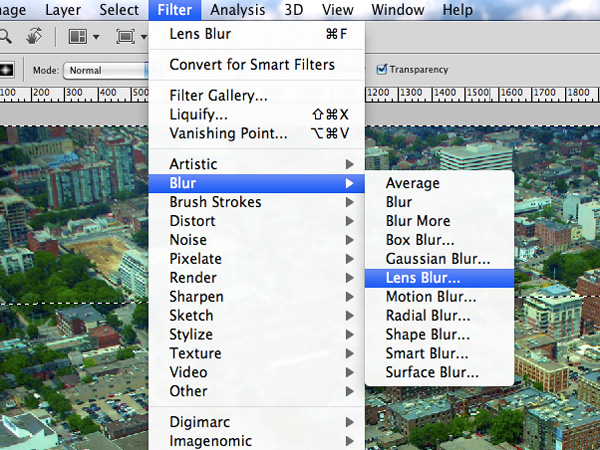
Step 7. Add the Lens Blur Effect

The next step is add the lens blur effect that will make the depth of field shallow. Go to Filter -> Blur -> Lens Blur.


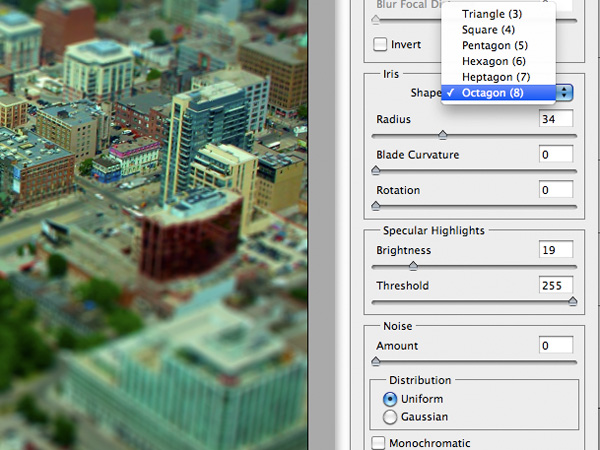
Step 8. Adjusting the Lens Blur

In the Lens Blur editing screen, you will see the preview of what your image will look like, as well as options on the right side. Many of the default settings are sufficient for the effect we are going for.

I like to change the Iris shape from Hexagon to Octagon, but the decision is yours. Fool around with the options to get the effect you desire. When you are satisfied, hit OK at the top right of the screen.


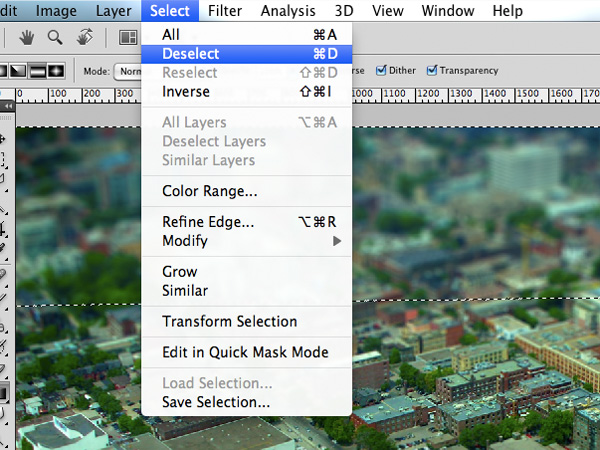
Step 9. Remove the Selection Marquee

After applying the Lens Blur, press Control+D (Command+D on Mac) to deselect the marquee. Or go to Select -> Deselect.


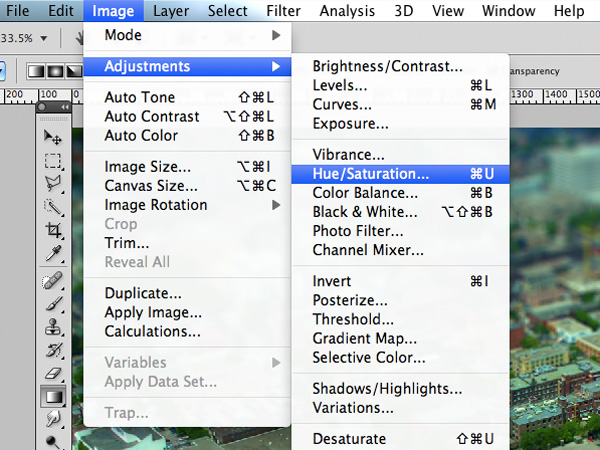
Step 10. Boost Saturation

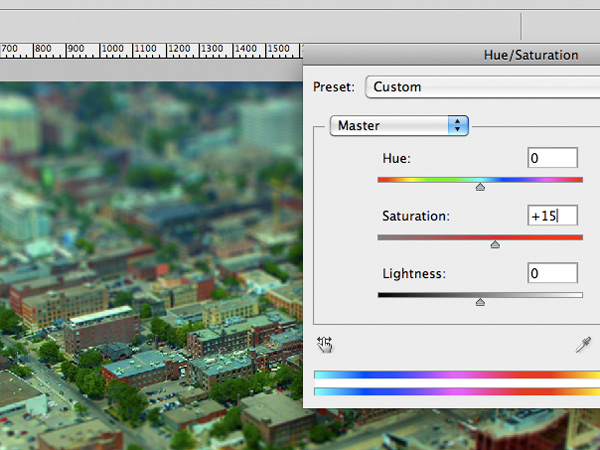
To get the feel of a small model, we will boost the saturation a bit to give the photo more of a “toy” feel. Open up the Saturation Adjustment Panel either by pressing Control+U (Command+U on Mac) or by going to Image -> Adjustments -> Hue & Saturation.

With the window open, move the saturation slider to the right to increase it. Don’t go overboard with the saturation, but just add enough to give the image the feel of a toy model. Finished!


Final Result


Conclusion

Miniature faking is a great technique that you can employ on many landscape photos. This process is most easily done the way you have just learned using Photoshop. This tutorial just touches the basics of miniature faking, but there is so much more that can be done using this technique! More advanced techniques can use selective focus and separate layers to create an even more realistic effect.

Miniature faking is a interesting topic to explore should you have the free time. I hope you learned a thing or two about depth of field and miniature faking and I can’t wait to see some of your results!


Further Reading and Inspiration

Miniature faking has really found it’s stride in photography, and many artists are using it to create captivating effects that catch the viewer’s attention. Here’s some more information on the techniques employed in this tutorial as well as some inspiration for your own miniature fakes.

Some more info on Wikipedia:

Inspiration:

Have fun experimenting, and feel free to share a link to your finished image in the comments below!

The Official Guide to HTML5 Boilerplate


When we helped to promote the recently released HTML5 Boilerplate in early August, multiple comments were made, which expressed a desire for a full video overview of the template. Thankfully, Paul Irish, the co-creator, recorded a full video walk-through, exclusively for Nettuts+. In this screencast, he meticulously reviews each page, and then further goes on to explain why and when you would use each snippet in your projects.

The product of years of learning, this video is not to be missed! Even if you have no intention of using this template, you’ll still learn an array of helpful techniques.

You also might like Paul’s “10 Things I Learned from the jQuery Source” screencast. It’s equally educational and funny.

Why Net Premium Rocks


You’re likely aware of the fact that Tuts+ offers a Premium membership for $9 a month. With this membership, in addition to smaller benefits, like the removal of all ads on our sites, you’ll gain access to the premium content for not only Nettuts+, but all of our tutorials sites which publish premium content – that’s 400 exclusively awesome tutorials, screencasts, and freebies, and 800 source file downloads — with more coming each week!

And, better than that, becoming a member really helps us out. This then allows us to continue providing you wish the best tutorials available around the web.

Our Premium site

A Brief Sampling of our Amazing Content

  • CSS Noob to Ninja

    CSS: Noob to Ninja (12-Part Screencast Series)

    This exclusive premium video series will take you from a state of absolute CSS “noobness,” all the way up to ninja-status, capable of taking advantage of the latest CSS3 techniques. The series begins with the basics: the syntax, properties, etc. However, each new video expands upon the previous, as you work your way up and improve your skills. In this final week, you’ll complete the series, as you gain access to Parts 8-12: five new episodes.

    Sign Up to View


  • The Beginner's Guide to Web Design

    The Beginner’s Guide to Web Design

    Throughout this three-part series, you will learn how to create a website using the latest in web design techniques (HTML5 & CSS3). This series is aimed at those with minimal knowledge of web design.

    Sign Up to View


  • Build an Awesome Status Board

    Build an Awesome Status Board

    When Panic unveiled their status panel to the world, I was both impressed and inspired. In today’s in depth Premium tutorial and screencast, I’ll show you how to built a similar status board!

    Sign Up to View


  • Tumblr Theme Design: Start to Finish (Screencast Series)

    Tumblr Theme Design: Start to Finish (Screencast Series)

    Tumblr’s popularity over the last year has increased exponentially. The reason why is quite simple: Tumblr is flexible, powerful, and, most importantly, a pleasure to work with. Unfortunately, there aren’t many training resources available for the platform yet. In this video series, we’ll go through the process of taking a Tumblr theme, designed in Photoshop, and converting it into a fully working theme – in just a few hours.

    Sign Up to View


  • An In Depth Overview of File Operations in PHP

    An In Depth Overview of File Operations in PHP

    We will learn how to work with file operations using PHP. This is one of the most fundamental subjects of server side programming in general. Files are used in web applications of all sizes. So let’s learn how to read, write, create, move, copy, delete files and more.

    Sign Up to View


  • How to Code a Gorgeous Watercolor Website

    How to Code a Gorgeous Watercolor Website

    This tutorial is a useful guide for both expert and noob designers/developers who wants to learn more about how to convert complex designs to standards-compliant websites. We’ll learn the basics of slicing a PSD design, how to convert it into a 100% functional HTML+CSS+JavaScript mockup, and more.

    Sign Up to View


  • Learn How to be a TextMate Champion

    Learn How to be a TextMate Champion

    TextMate is, by far, the preferred text-editor for most web developers on the Mac. In this Premium screencast, we’ll be taking a look at some of the features most developers simply don’t use; ones which can massively increase your productivity by allowing you to type less and code more.

    Sign Up to View


  • Firebug - White to Black Belt

    Firebug – White to Black Belt

    Firebug is a Firefox extension that will streamline your developing process: it offers a plethora of tools for working with HTML, CSS, Javascript, and more. In this tutorial, I’m going to take you to a black belt level of Firebug usage that will karate chop your website woes!

    Sign Up to View


  • Create a Jobs Board with with CodeIgniter

    Create a Jobs Board with with CodeIgniter

    In this two-part download, we’ll be creating a basic ‘Jobs Board’, similar to “FreelanceSwitch Jobs” and “Smashing Jobs”, using the CodeIgniter PHP framework.

    Sign Up to View


  • How to Build a Newspaper Website with a Grid

    How to Build a Newspaper Website with a Grid

    You’ll learn how to utilize a grid to create a simple newspaper-like website. Along the way, you’ll learn helpful techniques, such as easy ways to target IE7 and IE6 with only a single character, using the 960 grid system, and even using CSS3 to create columns! It’s an hour long; ready to dig in?

    Sign Up to View


  • Combining Modern CSS3 and HTML5 Techniques

    Combining Modern CSS3 and HTML5 Techniques

    Just because some techniques don’t work in decade old browsers doesn’t mean that you shouldn’t be learning everything you can! Stay on the cutting edge, as we use everything from CSS shadows and animations, to HTML 5 mark-up and local storage, to utilizing jQuery to query the Picasa API. We’ll also take advantage of the excellent jQuery library, and review some best practices when coding.

    Sign Up to View


  • Generating a Particle System with JavaScript

    Generating a Particle System with JavaScript

    If you’ve ever seen a fireworks effect, created in Flash, I’ll show you how to reproduce the effect using pure JavaScript! Why let the Flash developers have all the fun?

    Sign Up to View


  • How to Create the New Trendy jQuery Sliders

    How to Create the New Trendy jQuery Sliders

    Query sliders are becoming more popular day by day; with more free and premium sliders pouring in regularly. Knowing how an advanced slider like this works is becoming a must. In this tutorial, we are going to create a full-fledged jQuery slider which supports inline comments. Let’s get started!

    Sign Up to View


  • Working with Advanced 3D CSS

    Working with Advanced 3D CSS

    CSS is capable of so much more than browsers can currently handle, namely when it comes to working in 3D spaces. In this week’s premium video tutorial, I’m going to teach you how to work with CSS transitions, animations, and specifically how to work with Webkit’s CSS 3D capabilities.

    Sign Up to View


  • A Deeper Look at Advanced Select Queries

    A Deeper Look at Advanced Select Queries

    o the SQL novice, joins can be intimidating and somewhat frustrating. Even when you think you have the query nailed, along comes an unexpected result which make you throw up your arms in surrender to the SQL gods. In this tutorial, we are going to build upon the excellent quick tip of working with MySQL and INNER JOIN recently posted and crack open the real power of a SELECT statement.

    Sign Up to View


Give it a Shot

100% Guarantee
If you’re already a member, thank you so much! We appreciate your support. If you’re not one just yet, but are considering it, why not give it a shot? You can pay monthly or yearly. So, if you’re on the edge, purchase a single month’s plan, take a look around, and then decide! And, of course, we’re confident enough to offer everyone a 100% guarantee.

Sign up for a Premium membership

Quick Tip: Dissecting jQuery – Filters


Sporadically, over the course of each month, we’ll post a “Dissecting jQuery” video quick tip. The idea behind these is that we’ll take a single chunk of the jQuery source at a time, break it down, and determine exactly what’s going on under the hood, so to speak. Then, with that knowledge, we’ll learn how to better utilize the library in our coding. Today, we’ll review filters.


Video Tut


jQuery’s Source for the :hidden Filter

jQuery.expr.filters.hidden = function( elem ) {
		var width = elem.offsetWidth, height = elem.offsetHeight,
			skip = elem.nodeName.toLowerCase() === "tr";

		return width === 0 && height === 0 && !skip ?
			true :
			width > 0 && height > 0 && !skip ?
				false :
				jQuery.curCSS(elem, "display") === "none";
	};

The :visible Filter

Quite cleverly, the :visible filter only needs to call the hidden method, and return the reciprocal.

jQuery.expr.filters.visible = function( elem ) {
	return !jQuery.expr.filters.hidden( elem );
};

Hint: Search for filters: and setFilters: within the jQuery source code to view a listing of other helpful filters that are available to you.


Harnessing this Knowledge to Extend jQuery

<script>
	$('p:first').data('info', 'value'); // populates $'s data object to have something to work with

	$.extend(
		jQuery.expr[":"], {
			block: function(elem) {
				return $(elem).css("display") === "block";
			},

			hasData : function(elem) {
				return !$.isEmptyObject( $(elem).data() );
			}
		}
	);

	$("p:hasData").text("has data"); // grabs paras that have data attached
	$("p:block").text("are block level"); // grabs only paragraphs that have a display of "block"
</script>

Note: jQuery.expr[':'] is simply an alias for jQuery.expr.filters.


Stay tuned. In future episodes, we’ll continue to slice out more chunks of the jQuery source, and dissect them!

Google app gets updated with push notification for Gmail

Google for iPhone with pushAfter many months of users having to resort to third-party or jailbroken apps to get push notifications from Gmail, Google has finally released an updated version of its iPhone app that now handily does that all for you.

The update — which is now freely available in the App Store — allows you to sign into one or several Google accounts and set up Gmail and Google Calendar push events, which work just as you’d expect. It’s not yet clear how consistently quick the app is at alerting you of new mail, though it seems to have a significant delay upon initial testing. So far connectivity to my Gmail account using the Mail app responds much quicker.

As you can see from the screengrab of the update, you can specify quiet times for notifications, which could be handy if you tend to get a deluge of mail in the wee hours of the night. Google customers rejoice: push notifications are finally here!

TUAWGoogle app gets updated with push notification for Gmail originally appeared on The Unofficial Apple Weblog (TUAW) on Mon, 23 Aug 2010 18:00:00 EST. Please see our terms for use of feeds.

Read | Permalink | Email this | Comments

Naturespace gets a welcome update for iOS 4

We looked at Naturespace Holographic Audio back in May of 2009. I liked it then, and I like it more now. Naturespace is a free iPhone app that plays back carefully recorded natural environments designed for listening on headphones.

The recordings are created using the binaural technique, where two closely spaced microphones approximate the distance between your ears. When you put headphones on, the results can be dramatic and hyper-realistic.

The free app has no ads, and comes with six audio environments which are very relaxing and can simply transport you to another place. With good headphones (I use the B&W P5) you get a 3D illusion, at times even hearing things that appear to be above or behind you.

TUAWNaturespace gets a welcome update for iOS 4 originally appeared on The Unofficial Apple Weblog (TUAW) on Mon, 23 Aug 2010 19:00:00 EST. Please see our terms for use of feeds.

Read | Permalink | Email this | Comments

John Mellencamp is not an iPod fan

If you happen to believe John Mellencamp, the Internet is the equivalent of the A-Bomb.

“I think the Internet is the most dangerous thing invented since the atomic bomb,” he said last week at the Grammy Museum, as reported by Canada’s The Globe and Mail. “It’s destroyed the music business. It’s going to destroy the movie business.”

Oh, and that little doo-hickey called the iPod that happens to be all the rage? He listened to one of the remastered Beatles CDs, then to the same song on an iPod.

“You could barely even recognize it as the same song. You could tell it was those guys singing, but the warmth and quality of what the artist intended for us to hear was so vastly different,” he lamented.

And, Mellencamp is quite sure that rock and roll will go the way of the dodo since no one will listen to it any longer. It’s not like there’s a store where people could easily buy his entire music catalog, along with other rock and roll gems.

[Via Edible Apple]

TUAWJohn Mellencamp is not an iPod fan originally appeared on The Unofficial Apple Weblog (TUAW) on Mon, 23 Aug 2010 16:00:00 EST. Please see our terms for use of feeds.

Read | Permalink | Email this | Comments

TUAW review and giveaway: EasyStand for iPad

We’ve had a few iPad stands that we’ve talked about on TUAW, and all of them do the same thing to one extent or another — they prop up the iPad so that you can view the screen without holding the device in your hand or lay it down on a desk.

EasyStand for iPad is a $19.99 device that is simple, well-made, and does exactly what it is supposed to do. The device comes in two colors, Metallic Black and Metallic Silver, and features two slots that are at slightly different angles. If the angle at which your iPad is being held seems too steep, just turn the EasyStand around and pop the iPad in the other slot. Both slots are felt-lined to protect your iPad, and there’s a tiny “finger notch” that makes pressing the Home button possible without moving the iPad from the stand.

I was initially concerned that the hard material of the EasyStand would make it susceptible to sliding on hard surfaces like desks and countertops, but found that there are four non-skid bumper feet included that can be installed on the bottom of the stand. With the feet installed, the stand is not going to move. The bumper feet also keep the stand from scratching wood desks if you happen to get something sharp trapped underneath.

TUAWTUAW review and giveaway: EasyStand for iPad originally appeared on The Unofficial Apple Weblog (TUAW) on Mon, 23 Aug 2010 17:00:00 EST. Please see our terms for use of feeds.

Read | Permalink | Email this | Comments

At last, Steve Jobs may demolish old home

1984 wasn’t just a landmark year for Apple, but it was also the year that Steve Jobs bought an aging mansion. Jobs lived in the house, originally built in the 1920s, for 10 years then rented it out. Since 2001, he’s tried to get the mansion torn down to build a new home, saying that it was ”
one of the biggest abominations of a house I’ve ever seen,” but preservationists stopped him. He even tried to give it away in 2005, but that didn’t succeed.

AppleInsider reports that Uphold Our Heritage has dropped its appeal of a demolition permit issued to Jobs in 2009. The group wanted two residents to dismantle and move the house two miles away, then open it to the public once a year, which actually falls in line with the original demolition terms from December 2004. However, the couple who wanted to do this had a number of stipulations for both Jobs and the town, the Menlo Park Almanac reported, and they later dropped their bid. Other attempts to salvage the home were blocked due to Uphold challenging Jobs in court. Historically significant parts of the home will be removed and preserved, per the 2009 permit.

AppleInsider produced a photo gallery of the house last year after a photographer noticed that the house’s gates, doors and windows were entirely open.

TUAWAt last, Steve Jobs may demolish old home originally appeared on The Unofficial Apple Weblog (TUAW) on Mon, 23 Aug 2010 14:00:00 EST. Please see our terms for use of feeds.

Read | Permalink | Email this | Comments

Apple rumor roundup: iTV, next-generation iPod touch

It’s a new week, and with that comes a new batch of Apple rumors. This time we’ve got more hints about the forthcoming Apple TV (or is it “iTV”) and what could be a new iPod touch screen.

First, Digg co-founder Kevin Rose has been chatting up the new Apple TV. According to Rose, it will be launched in September and “change everything.” He says that we can expect iOS apps, a la carte offerings from the major networks (goodbye, cable bill) and MobileMe picture and video sharing.

The whole thing will interact with a remote control app on other iOS devices. He’s pretty much in keeping with Engadget’s report. We’re starting to feel quite secure that the future Apple TV will run iOS apps.

In other news, M.I.C Gadget has posted pictures of what it claims to be the front LCD and bezel for the 4th generation iPod touch. Labeled “Apple (c) 2010”, the part bears a small hole near the top bezel that could conceivably allow a front-facing camera to peek through. It looks like the real deal to us. A front-facing camera on the iPod touch wouldn’t be a surprise at this point.

There’s your Apple rumor round up for Monday. More to come.

TUAWApple rumor roundup: iTV, next-generation iPod touch originally appeared on The Unofficial Apple Weblog (TUAW) on Mon, 23 Aug 2010 15:00:00 EST. Please see our terms for use of feeds.

Read | Permalink | Email this | Comments

Government, enterprise Mac sales surge

Apple continues to show tremendous growth in the enterprise and government markets, as Mac sales spiked sharply over the last three months.

AppleInsider cites a report from Charlie Wolf of Needham & Company this week that Apple saw a 200.8% year-over-year growth in government sales for the month of July. That’s a huge number, and significantly higher than the 12.1% of growth that PC sales showed over the same period.

Likewise, sales grew 49.8% in the business market during the same time period. Large companies out-purchased small businesses, picking up 98.3 more Macs than they did in the previous year.

Wolf hesitates to call the figures a pattern, saying “Whether the June blip was a one-quarter phenomenon or something more enduring should be revealed in future quarters.”

As for education, traditionally a stronghold for Apple, sales grew 14.7% during the same period. Recent reports show that college and university students in the US are buying MacBooks in huge numbers.

TUAWGovernment, enterprise Mac sales surge originally appeared on The Unofficial Apple Weblog (TUAW) on Mon, 23 Aug 2010 15:30:00 EST. Please see our terms for use of feeds.

Read | Permalink | Email this | Comments

TUAW review and giveaway: Twelve South BookBook for iPad

When fellow TUAW blogger Dave Caolo teased you with the news of Twelve South releasing the US$69.99 BookBook cover for iPad, you knew that a review and giveaway couldn’t be far behind. We’re happy to say that you’ll have a chance to win one of these beautiful iPad covers. But first, let’s give the BookBook for iPad a test flight.

It’s rather ironic that the sleek glass and aluminum iPad is inspiring a lot of old-school cases. The first out the door was the Dodo Case, a leather-bound tome that resembles a Moleskine in more ways than one. It has a hand-carved bamboo interior shell to hold the iPad in place, and an elastic band holds the cover closed when the iPad is not in use. These $59.95 cases have resulted in a resurgence in the book binding trade in San Francisco, and there’s a long waiting list for them. Minneapolis-based Pad&Quill also has a similar case called “The Case, Vol. 1” with a hand-carved birch interior lining.

The Dodo Case has spawned a host of imitators, including a number of blog posts from people who are creating their own Moleskine-type iPad cases by hand. A lot of iPad owners, however, were waiting to see what Twelve South would do for the iPad. This, after all, is the company that started the whole retro case market with the BookBook for MacBook Pro. Well, the wait is over, and now Twelve South is shipping their beautiful distressed leather book binding case for the iPad.

TUAWTUAW review and giveaway: Twelve South BookBook for iPad originally appeared on The Unofficial Apple Weblog (TUAW) on Mon, 23 Aug 2010 13:00:00 EST. Please see our terms for use of feeds.

Read | Permalink | Email this | Comments

Found Footage: DIY iPhone 4 guitar cam

How we love the ingenuity of Apple fans. This enterprising musician took some scissors and a roll of oh-so-useful duct tape to an iPhone 4 box to create the awesome guitar cam you see above.

Inside the iPhone 4 box is a section of plastic that separates the phone from the accessories. There’s a hole in the center that allows a small tab to peek through. Gleeful new owners pull that tab to remove the booklet and get at the headphones, USB cable and wall adapter.

Our musician friend took that piece and cut it flat on the bottom and removed the top to make room for the iPhone’s display. He then duct tape’d the daylights out of it to mount it to his guitar’s head. The result can be seen above: a rock-steady guitar cam that stares down the neck.

Well done! We love it.

Thanks, Dylan!

TUAWFound Footage: DIY iPhone 4 guitar cam originally appeared on The Unofficial Apple Weblog (TUAW) on Mon, 23 Aug 2010 11:00:00 EST. Please see our terms for use of feeds.

Read | Permalink | Email this | Comments

Moleskine case hides your iPhone, prison-style


I really do love the look of moleskine books. When you’ve got a well-worn leather moleskine book, bursting with notes and bookmarks, you sort of feel like you’re holding onto the long lost notes of Dr. Henry Jones Sr. on the whereabouts of the Holy Grail. No? Just me?

If you’re completely nuts about all things moleskine, there’s a new iPhone case that should be right up your alley. As seen pictured, the case looks like a hollowed-out moleskine book that fits your iPhone, complete with traditional elastic band. In essence, the iPhone replaces what would be oh-so-passe paper. Finally, a classy way to hide your cell in your cell during prison guard shakedowns.

[via The Daily What]

TUAWMoleskine case hides your iPhone, prison-style originally appeared on The Unofficial Apple Weblog (TUAW) on Mon, 23 Aug 2010 12:00:00 EST. Please see our terms for use of feeds.

Read | Permalink | Email this | Comments

Expose on jailbroken iPhones with Multiflow

This app requires a jailbroken iPhone, but it’s pretty neat. Multiflow brings Expose-like functionality to iOS 4.0.1. Installation should be familiar to anyone with a jailbroken iPhone. Enter Cydia and search for “Multiflow.” It is a paid app, so bring your US$4.99.

Once installed, you’ll want to select an activation method. There are several options, like a double press or press-and-hold of the home button, singe or short press of the headset button or sleep button or shake. Once you’re set, try it out. Four windows will be displayed at a time representing running apps. Tap anyone to bring it up front, or hit the “X” to quit it entirely.

It’s a nifty alternative to Apple’s fast app switching. If you’ve got a jailbroken iPhone and 5 bucks you’d like to part with, check it out.

TUAWExpose on jailbroken iPhones with Multiflow originally appeared on The Unofficial Apple Weblog (TUAW) on Mon, 23 Aug 2010 10:00:00 EST. Please see our terms for use of feeds.

Read | Permalink | Email this | Comments