Netflix app hits the iPhone and iPod touch

Here’s some great news for Netflix subscribers. The free Netflix app has finally made it to the iPhone and iPod touch. Netflix members on plans as low as US$8.99 a month can instantly watch movies and TV shows streamed from the Netflix servers.

This has been an eagerly-awaited app (the iPad version was available at launch), and I downloaded it this morning to give it a test. It works fine on both 3G and WiFi, and the 3G feature is a bit of a surprise given AT&T’s position of holding back on some streaming apps. Slingbox, for example, found dealing with AT&T tough sledding, but the company finally did get the app approved for 3G.

My TUAW colleague Richard Gaywood points out that with many AT&T users no longer on unlimited data plans, the company may see apps like this as a profit center. The new Hulu Plus app also works over 3G.

The new iPhone version has excellent image quality, supports fast forwarding and rewinding of the video stream, and like other incarnations of Netflix, allows you to pick up where you left off if you stop a movie and restart it. As Netflix members will appreciate, you can pause a movie you are watching on a Netflix device at home, and start the movie on the iPhone app and it will resume at the same place.

TUAWNetflix app hits the iPhone and iPod touch originally appeared on The Unofficial Apple Weblog (TUAW) on Thu, 26 Aug 2010 10:00:00 EST. Please see our terms for use of feeds.

Read | Permalink | Email this | Comments

(i)Pawn is an iPhone game with screen-reactive pieces

This is one of the cooler things I’ve seen done with the iPhone’s capacitive touchscreen. (i)Pawn is a game of sorts that works with a series of little figures on tokens that actually interact with the touchscreen itself. Most of the time, you need actual flesh to interact with the iPhone’s screen, but these figures are also capacitive, so the app running on the device not only knows when and where you’ve placed these figures down but also which figures are touching, and so on.

Unfortunately, it’s all in French, so I’m not completely sure what the “game” is. It appears to be a relationship game that has something to do with various personalities passing messages and interacting. And it could just be a demo of some kind, with a video running underneath those figures rather than actually interacting with the pieces themselves.

But it’s not hard to think of other applications of a system like this (D&D on a touchscreen, anyone?), and a bigger screen like the iPad would come in handy, too. (i)Pawn is scheduled to be for sale in November of this year, so we’ll keep an eye out for it and try to find out more about what it is and exactly how it works. Meanwhile, you can watch the videos of the figures in action and dream of all the various ways to use accessories like this.

[via TDW]

TUAW(i)Pawn is an iPhone game with screen-reactive pieces originally appeared on The Unofficial Apple Weblog (TUAW) on Thu, 26 Aug 2010 11:00:00 EST. Please see our terms for use of feeds.

Read | Permalink | Email this | Comments

MobileMe to go down for scheduled maintenance

MobileMe customers who use the web apps will experience some down time later today as Apple performs some scheduled maintenance.

Expect the web services to be offline between 10:00 PM and 12:30 AM Pacific Time. Apple doesn’t mention if other services will be affected, so we assume you’ll still be able to send and receive email via Mail for the Mac and iOS, as well as manage events with iCal. If you’re restricted to using the web apps, get your work done early and enjoy a little forced down time later tonight.

For the latest MobileMe news and status updates, you can look here (the closest Apple has come to maintaining a blog). You’ll find a history of recent status updates here.

TUAWMobileMe to go down for scheduled maintenance originally appeared on The Unofficial Apple Weblog (TUAW) on Thu, 26 Aug 2010 11:30:00 EST. Please see our terms for use of feeds.

Read | Permalink | Email this | Comments

Rolling shutter effect can make stunning iPhone photos

The image above was shot by Jason Mullins with his iPhone 4 on a flight from London to Guernsey. The weird black lines you can see are actually distorted, disconnected copies of the propeller blades, but this isn’t a Photoshop hack; this was how the image came out of the phone.

Virtually all consumer grade digital cameras, including cell phones, do not take the picture instantly when you push the shutter button. Instead, they quickly scan over the CCD CMOS sensor from the top left to the bottom right, like the electron beam in an old CRT television. This is called rolling shutter capture. This scanning process is fast, but sometimes it’s not fast enough. If you angle the device just right and take pictures of fast moving or rotating objects, you can create all sorts of weird and funky distortion effects. You can see more like this in the rolling shutter Flickr group.

(Thanks to Jason for letting us reproduce his shot; he’s put a few more pictures on Flickr from the same flight.)

[Post updated to correct CCD vs. CMOS sensor used in the iPhone.]

TUAWRolling shutter effect can make stunning iPhone photos originally appeared on The Unofficial Apple Weblog (TUAW) on Thu, 26 Aug 2010 12:00:00 EST. Please see our terms for use of feeds.

Read | Permalink | Email this | Comments

TUAW’s Daily App: Chapters

Chapters (US$3.99 on the iPad) looks like a terrific app for your various notetaking enterprises. I haven’t yet been completely sold on the iPad as a blogging or writing device; so far, I’ve stuck with my MacBook rather than an iPad when I need to be out remotely somewhere keeping notes or writing things down. But Chapters is exactly the kind of app that could change that. With a simple and powerful interface and a set of features that steps aside and lets you write in whatever fashion you want, it could easily help your iPad replace a more powerful notebook computer.

The ability to add photos, edit text formatting, and quickly find and export text you’ve written into the app is all icing on the cake. Whatever your implementation would be (the reviews in iTunes have a teacher keeping notes, a photographer tracking trips, and a journal writer just documenting random thoughts), Chapters seems like a great app to keep notes, large or small, on the iPad. And that introductory price of $3.99 makes it pretty easy to check out, too.

TUAWTUAW’s Daily App: Chapters originally appeared on The Unofficial Apple Weblog (TUAW) on Thu, 26 Aug 2010 08:00:00 EST. Please see our terms for use of feeds.

Read | Permalink | Email this | Comments

Mac 101: Adding screenshots to Stickies

More Mac 101, our series of tips and tricks for novice Mac users.

Here’s a great tip from Mac OS X Hints about an old, old Mac utility. Stickies has been around since the System 7 days, and it provides a super-simple way to store quick bits of information. Did you know that, with Snow Leopard, you can also use it to store screenshots? Well, you can, and it’s simple to do.

With a sticky note open, right-click or control-click on the note to bring up the contextual menu. You’ll see “Capture Selection from Screen.” Select it to bring up the screen capture tool, drag the cursor around the area you want to snap, and you’re done! The screenshot will be inserted into that note. This only works with the Stickies app, not the Dashboard widget.

We love finding little tips like this, and we hope you find it useful.

TUAWMac 101: Adding screenshots to Stickies originally appeared on The Unofficial Apple Weblog (TUAW) on Thu, 26 Aug 2010 09:00:00 EST. Please see our terms for use of feeds.

Read | Permalink | Email this | Comments

Mac indie dev asks The Pirate Bay to keep a torrent of his software

As a software developer myself, I know how hard it is to see your product being ripped off. We have recently reported on how even $2 iPhone games (like Stardunk) or iPad games (like Aqua Globs HD) are not immune despite their low cost and closed platforms. Their developers have reported piracy rates as high as 38% and 50%, respectively.

Mac developer Dmitry Chestnykh of Coding Robots recently came across a crack on The Pirate Bay for his journal keeping application Mémoires and decided to use different tactics. Out of curiosity, he downloaded the crack to see how it worked, and he did not like what he found one bit, … but it’s not for the reasons you might think.

Reproduced below is a portion of the official complaint he has filed with the Pirate Bay, under the heading of “Notice of Ridiculous Activity” (keep in mind English isn’t Dmitry’s first language).

It has come to my attention that the torrent located at [URL] is ridiculous.

Not only it requires installing APE plugin, and generating keyfiles using some scary tool, it contains an [expletive] *WINDOWS* program to verify the validity of this release. The “How-to” section in the description is just incomprehensible, and won’t be understood by anyone other than the writer of this description.

Clearly, the “cracker” Minamoto did a lazy job and don’t know how to crack software. It’s an [expletive] SINGLE BOOLEAN SWITCH that validates the licence, it doesn’t require any Application Enhancer tricks or whatever.

I demand that you don’t remove this torrent, so that people can laugh at Minamoto and CORE skills. However, I also demand the better crack to be made, so that it doesn’t cripple the user experience of my beautiful program.

Dmitry: for your vigorous defense of Quality, TUAW salutes you.

[via torrentfreak.com]

TUAWMac indie dev asks The Pirate Bay to keep a torrent of his software originally appeared on The Unofficial Apple Weblog (TUAW) on Wed, 25 Aug 2010 22:00:00 EST. Please see our terms for use of feeds.

Read | Permalink | Email this | Comments

Vapor iPhone case review and giveaway

First of all, we’re giving away four Vapor cases in your choice of colors to four lucky readers. Second, the Vapor case is awesome. The Vapor bolts onto the edge of your iPhone 4 and cradles it in aircraft aluminum, complete with little rubbery grips on the inside to isolate the antenna and provide some shock absorption. It adds just enough width to the phone on the edges to make it a little easier to grip, especially if your hands are larger. The indentation allows for added grip, plus the larger edge makes it slightly more stable if you want to sit your iPhone on its edge.

True, at $79.95 the Vapor is not for everyone. It is a premium case. If you like finely-crafted accessories, you will love it. Apple’s case provides similar protection, so if you’re on a budget, you can afford to buy a cheaper case. Still, the machined power button and the cutouts for volume, SIM, cable connector and headphones are meticulously cut. There’s clearly a lot of thought in the design of this case. If you appreciate great design and want a case that stands out from the rest, the Vapor is for you. You can even get custom engraving and several colors. The downside is that ElementCase, makers of the Vapor, are busy taking pre-orders and aren’t currently shipping.**

(**Note: Since this writing, TUAW has learned that ElementCase is, in fact, shipping both current and back orders. Expected order processing time is currently less than two weeks.)

To put your iPhone in the Vapor, you’ll need a little hex wrench that comes with the case. There’s an optional carbon fiber back plate you can add, but I didn’t feel it was necessary. Once the four screws are in place, the case cannot easily be removed. That could be a minus if you tend to use a dock, because you’ll have to keep the wrench with you and unscrew those screws every time you want to dock the phone. Still, in my road testing I never felt I needed to remove the case. It made the iPhone feel sturdier, fit better in my hand and provided insulation from my antenna woes.

Details on the giveaway on the next page.

TUAWVapor iPhone case review and giveaway originally appeared on The Unofficial Apple Weblog (TUAW) on Wed, 25 Aug 2010 23:00:00 EST. Please see our terms for use of feeds.

Read | Permalink | Email this | Comments

Steam releases Mac stats, share drops to 5%

Steam has released its latest hardware survey results, and there’s both good and bad news for us Mac gamers. The bad news first: Mac usage of the gaming service has apparently leveled off since the big debut a few months ago, and while the Mac share was originally around 8%, it appears the novelty has worn off a bit, and Mac usage has fallen down to about 5% of the total Steam audience. That’s not too surprising (don’t forget that the service kicked off with a free Portal game and a good amount of publicity), and it’s important to remember that 5% of Steam’s 25 million users is still a significant audience. It’ll be interesting to see if Apple ever takes advantage of that — we haven’t heard a single official word from them yet about Steam coming to our platform, although the Snow Leopard Graphics Update was tuned to clear up issues that Valve reported.

The good news, however, is that Valve has separated out Windows and Mac stats in the hardware survey, so even though there are a few less percentage points of people to look at, we have a lot of interesting information about those Mac users. As you can see in the graphic above, the majority of them are actually playing on a MacBook Pro — iMacs are the next biggest model on the list, but represent 25% of Mac users as opposed to the MBP’s 49%.

Steam is also promising a list of most commonly installed Mac applications, but as of this writing, that information isn’t posted quite yet. Unfortunately, while Steam is installed on a wide variety of Windows computers, I’ll bet that it hasn’t quite reached widespread adoption on the Mac side, so these stats will be specifically for Mac gamers rather than the Mac audience as a whole. But it’s always interesting to see what stats come out of the Steam Hardware Survey, as a snapshot of just what our technology profile looks like.

[via Joystiq]

TUAWSteam releases Mac stats, share drops to 5% originally appeared on The Unofficial Apple Weblog (TUAW) on Wed, 25 Aug 2010 20:30:00 EST. Please see our terms for use of feeds.

Read | Permalink | Email this | Comments

New Higher Envato Marketplace Rates!

For four years the Envato Marketplaces have helped authors around the world earn an income selling their digital wares. Along the way we’ve grown from one marketplace to seven, with more on the way. We’ve gone from hundreds of members to hundreds of thousands. Items from our marketplaces have appeared in projects for companies big and small, all around the world. And most importantly of all, we’ve had thousands of authors cash out earnings, ranging from a bit of money for a big weekend to sums in the tens of thousands of dollars a month!

It’s been an amazing ride, and here at Envato along with our commitment to growing Tuts+, we are completely committed to making our marketplaces the best around. That’s why I’m very excited today to announce that as of the end of September we are rolling out some dramatically improved rates for all our exclusive authors!

As the sites have grown, so has our revenue. As we increase in volume and size we’re able to push back more and more to the authors. This is in fact our third rates increase now, and it’s always a really happy day when we get to make the changeover and start putting more money in author’s hands.

50-70% with a $75k scale

The new rates, which go into effect at the very end of September, will see new exclusive authors get 50% of every sale out of the gate, with their commission rising up to 70% as they sell more. The volume of sales needed to get to 70% has been dramatically reduced from the old $300,000 mark, down to just $75,000. While that’s still a lot of money, it will mean dozens of our existing authors will suddenly catapult up to the highest rate and every author will see a big increase to their earnings.

If you’re wondering just how much people sell on our marketplaces, perhaps a stat will help. Our top seller across the marketplaces has sold just shy of a whoppingly huge half a million dollars in gross sales! That’s an enormous amount of money, most of which happened in under a year.

Lest you think that’s just for the biggest marketplaces, in fact on every single one of the seven marketplaces, we have authors whose take home earnings are in the four figures each month! So that’s authors selling not just on ThemeForest, our marketplace for websites, but also the marketplaces for graphics, video, audio, 3D, Flash and code and scripts.

How much could you make selling your work?

Envato Notes – new Community Blog!

You can get the full details of the big Envato Rate Increase on our brand new Envato Community blog – Envato Notes.

Notes, which launched just last week, is going to be the hub of the entire Envato / Tuts+ community with news about our sites, interviews of people who work on our sites, tips, giveaways, competitions and much more.

If you haven’t seen it already, I highly recommend heading over to Envato Notes and subscribing to the feed!

Happy Birthday Authors!

So on the fourth anniversary since our first marketplace FlashDen first hit the web, I’d like to take a moment and say Happy 4th Birthday to all our authors. Thank you so much for choosing to sell with us. Thank you so much for being a part of our amazing community. Thank you for helping us make the Envato Marketplaces what they are.

One More Thing …

With the Birthday Bundle now finished, our massive rates change announced, well … to borrow a line from Mr Jobs, there’s just one more thing. Next week, I’ll be back with a very exciting announcement – a whole new Envato Marketplace! Yep it’s one heck of an August for us here at Envato, so stay tuned for even more big news!

Woohoo!!!


The Projector – Old School Movie Intro Walkthrough

In this tutorial we’ll combine basic shapes to make a camera silloutte in Photoshop before bringing it over to After Effects. We’ll learn how to directly select font layers in combination w/ the paths tool to create unique shadows and pick up on some short cuts here and there. We’ll also be, please don’t hate me, making a small sacrifice doing some folder organizing to better help control our creative chaos. But hey, I don’t think anyone truly enjoys losing track of files so lets try and put an end to most of that… This way we can get back to the more important things in life…. Have fun!


Tutorial

Download Tutorial .flv

File size 263MB

Additional Resources


How to Use the Perspective Grid to Create a Modern TV


In this tutorial you will learn how to create your own modern TV on a stand. Using the Perspective Grid in Illustrator CS5 as the basis of your work you will learn how to quickly create a product illustration with perfect perspective.

Continue reading “How to Use the Perspective Grid to Create a Modern TV”

New Higher Envato Marketplace Rates!


For four years the Envato Marketplaces have helped authors around the world earn an income selling their digital wares. Along the way we’ve grown from one marketplace to seven, with more on the way. We’ve gone from hundreds of members to hundreds of thousands. Items from our marketplaces have appeared in projects for companies big and small, all around the world. And most importantly of all, we’ve had thousands of authors cash out earnings, ranging from a bit of money for a big weekend to sums in the tens of thousands of dollars a month!

It’s been an amazing ride, and here at Envato along with our commitment to growing Tuts+, we are completely committed to making our marketplaces the best around. That’s why I’m very excited today to announce that as of the end of September we are rolling out some dramatically improved rates for all our exclusive authors! Continue reading “New Higher Envato Marketplace Rates!”

Additive Synthesis in Reason – Part 1

This tutorial will show you how you can create an additive synthesizer using a combinator in Reason. Additive synthesis is one of the less common forms of synthesis in use today, but it can be used to create some great sounds. Furthermore, following this tutorial is a great way to improve your understanding of some of the fundamental principals of sound and synthesis in general.


Step 1

The first step is to understand what we are trying to achieve in this exercise. If this seems overly complicated or confusing don’t be put off, the actual exercise is relatively simple, and should make things clear as you follow it through.

Additive synthesis is a method for building up complex tones from simple ones. Most sounds we hear in the real world, for example a piano or a guitar are not just simple, linear wave shapes like a sawtooth or a square. They are in fact made up of many complex overtones, all at different frequencies and layered up over a ‘base’ or ‘fundamental frequency.

A sine wave is a wave shape that has very few harmonics or overtones, and is essentially only the fundamental frequency of whatever note or frequency it is pitched to play. By layering up many sine waves we can artificially create the effect of a complex harmonic tone, with complete control over each individual overtone or harmonic in the sound.


Step 2

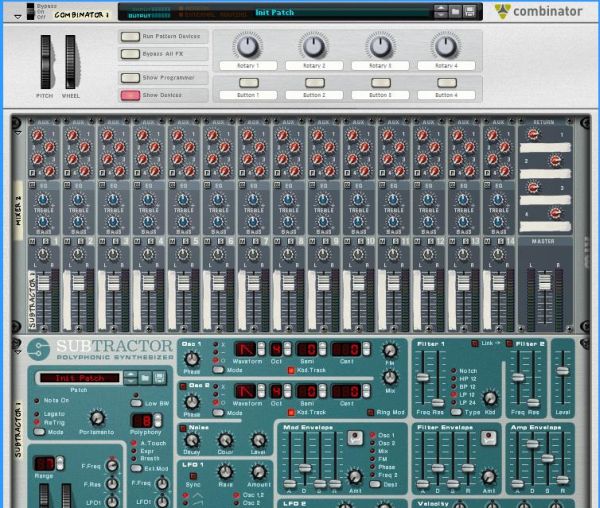
Now we are ready to begin. The first thing we need to do is to build a combinator patch which will allow us to generate a large number of sine waves at once, from a single key press or MIDI note trigger. For this we will need a combinator. After creating a combinator in your Reason file, create a full size (14:2) mixer inside the combinator, and then create a subtractor synthesizer.


Step 3

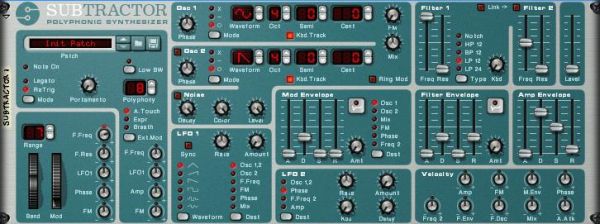
We now need to program the Subtractor to generate a simple sine wave. Firstly initialize the patch on the Subtractor. Once this is done change the wave shape on Oscillator 1 to a sine wave shape. Open the filter all the way and turn the volume all the way down. Turn the velocity>filter freq knob to the neutral position. Your patch should now look like this:


Step 4

We will need a lot more than one sine wave generator to create a complex tone, so now create an additional seven subtractors inside the combinator. Once you have done this right click on the top one (the one where we edited the patch to generate a sine wave) and select ‘copy patch’. Now paste this patch onto each of the other Subtractors by right clicking on each in turn and choosing ‘paste patch’. You will now have a combinator with 8 Subtractors inside it, each with the same simple sine wave patch.


Step 5

Our basic template is now complete. You should now save the combinator patch at this point so that you can easily return to this stage and start experimenting with different additive synthesis sounds. We can now et into the meat of the exercise and begin generating our tones. For the first tone I am going to create a soft organ/keyboard type tone.


Step 6

Find the Subtractor that is at the very top of the pile. On this subtractor turn up the volume all the way. Play a note on your MIDI keyboard. You should hear a very simple sine wave tone.

If you do not have a MIDI keyboard you will find it useful at this stage to create a simple loop in the sequencer window, so that one note repeats itself – you will be able to use this to hear the changes you make to the sound without having to click on the on screen keyboard.

This simple sine tone is going to be the base note for our sound, or the fundamental frequency.

Download audio file (Audio Example 1.mp3)


Step 7

On the next Subtractor down turn the octave for Oscillator 1 up from 4 to 5. Now increase the volume up to about 85. You should now hear a higher tone joining your original tone when a note is played.

Download audio file (Audio Example 2.mp3)


Step 8

On the third Subtractor down turn the octave control for Oscillators 1 up to 5, and the semitone control up to 7. Now turn the volume up all the way.

This will sound like an extra note has been added to the sound, at an interval of a 7th. This is not what we want as we are trying to create the impression of one tone, rather than two or more. Lower the volume back down. When you get down to about 55 you should hear that the sound generated by this Subtractor starts to sound like a part of the overall tone rather than a note in its own right.

Download audio file (Audio Example 3.mp3)


Step 9

On the fourth subtractor turn the octave up to 6, but leave the semitone control at zero. Again, turn up the volume so that you can hear this new layer to the tone but not so much that it stands out as a separate tone in it’s own right. Somewhere between 50 and 60 should be about right.

Download audio file (Audio Example 4.mp3)


Step 10

On the fifth Subtractor in the pile turn the octave to 6 and the semitone to 7 – now bring the volume up like you have with the other devices. As we go further up the frequency spectrum and the overtone we add become higher and higher you will find that you don’t need to turn them up as loud as the lower pitched tones. This time leave the volume at about 40.

Download audio file (Audio Example 5.mp3)


Step 11

For the sixth Subtractor we are going to put the octave up to 7 and leave the semitone alone. Remember that when we only change the octave control the tone we are adding is effectively the same note as our fundamental frequency, so you can sometimes get away with having these overtones louder than other, more discordant overtones.

We are starting to get into the really high frequencies now, and the overtones we are adding at this stage will add some real brightness to the tone. I have decided to have quite a bright sounding organ tone, so I have left the volume for this Subtractor at 50, but you may wish to choose your own setting.

Download audio file (Audio Example 6.mp3)


Step 12

This time we are going to push the octave up to 7 and the semitone to 7 again. This is another very bright overtone, so you can adjust the volume of it according to your taste. I have left it at 38.

Download audio file (Audio Example 7.mp3)


Step 13

So far all of our overtones have been either the same note as our fundamental frequency, at different octaves or at an interval of a 7th, at different octaves. These intervals are nice and musical, and make for a pleasant sound, using other, more unusual intervals as our overtones can create more interesting and unusual sounds, but can sound out of key unless you are careful.

As you get higher and higher up the frequency spectrum our ears find it harder to distinguish between different notes, and we can get more adventurous with our choice of interval without worrying so much about sounding out of key. As an example we are going to tune this last Subtractor to a more unusual interval.

Turn the Oscillator 1 octave on the last Subtractor up to 9. Now turn the semitone control up to 1. We are now adding an overtone which is effectively just 1 semitone apart from our fundamental, only at a much higher octave. In many cases playing 2 notes next to each other sounds wrong, but as we are playing so high up this final overtone just adds more brightness, as long as it is not too loud. In this example I have chosen to set the volume at 38.

Download audio file (Audio Example 8.mp3)

You should now have a basic organ type tone, which you can play like any other instrument or combinator patch in Reason.

This concludes Part 1 of the tutorial. In the next part we will look at how some modulation can make our patch sound more realistic, and how further modulation of the individual overtones can create different sounds, with almost limitless possibilities.