Apple adds demo video to MobileMe mail

The MobileMe web app went down for scheduled maintenance last night, and returned this morning with an overview video. In about three minutes, it points out the features of the recently-redesigned Mail web app. Those who have been using it for a while won’t find anything new in the video, but it’s still a nice review.

It starts by describing the different view options and how to enable each. Next the friendly Apple voice demonstrates how to create and apply rules, and finally moves on to several formatting options (another recently-introduced feature).

Again, anyone who’s been using the web app for the last few weeks won’t find anything new, but it’s still a well-done overview.

Thanks to everyone who sent this in.

TUAWApple adds demo video to MobileMe mail originally appeared on The Unofficial Apple Weblog (TUAW) on Fri, 27 Aug 2010 11:30:00 EST. Please see our terms for use of feeds.

Read | Permalink | Email this | Comments

Brabus’s iBusiness is a Mercedes-Benz S600 tricked out Apple style

We’ve seen the iPad implemented both at school and at work, but in your car? That’s the idea behind the iBusiness, a Mercedes-Benz S600 that’s been tricked out with Apple gear aplenty by Brabus. Get this — you can see the two iPads and keyboards in the back seats, but there’s also a Mac mini in the back and a 64gb iPod touch as well. The display above is a 15.2″ TFT display, and all of the gear connects to the Internet via a high speed 3G system. The iPads can also control the car’s multimedia system, navigation systems, and the built-in telephone system.

And it’s all built into a car that goes from 0 to 62 in 4.0 seconds, with a top speed of 211 miles per hour. Brabus has tricked out those interiors, too — there’s leather everywhere, power-operated curtains, wood trim, color-changing interior lighting, LED running lights outside, and anodized aluminum pedals under the sport steering wheel. Yowza.

Brabus doesn’t give a price for this made-to-order monster, but the car itself (without any options) starts around $150k, so the entire package runs into the “if you have to ask, you can’t afford it” range. What a set of wheels, though.

[via Electronista]

TUAWBrabus’s iBusiness is a Mercedes-Benz S600 tricked out Apple style originally appeared on The Unofficial Apple Weblog (TUAW) on Thu, 26 Aug 2010 23:00:00 EST. Please see our terms for use of feeds.

Read | Permalink | Email this | Comments

XNA Touch: Microsoft XNA Games Running On The iOS Platform

Microsoft’s XNA has persevered and become popular with hobbyist game developers on the Windows and Xbox 360 platforms.   While I haven’t really fooled around with it much, I’ve always felt it would be nice to be able to develop XNA games that ran on the iPhone.

Apple has spoken out against cross-platform development, but it appears that the MonoTouch project bringing C# to iOS development has persevered, and a new project known as XNATouch has been created for MonoTouch developers.  This has brought the ability to program 2D games using C# and XNA to the iPhone with 3D apparently in the works.  There is also a similar project for Android, so theoretically games would run on the iPhone, Android (through another open source project), and Microsoft platforms including the upcoming Windows Phone 7 platform.

You can find the project here: XNATouch at Codeplex

The project is still in active development, and if you’re a hardcore XNA fan you will want to check it out.

Thanks for reading, please share this using the buttons below!

©2010 iPhone iOS 4 iTV iPad SDK Development Tutorials, Programming Tips, News. All Rights Reserved.

.

Share and Enjoy:

RSS
Twitter
Facebook
DZone
HackerNews
del.icio.us
FriendFeed

Packt launches fifth annual Open Source Awards

The 2010 Open Source Awards was launched today by Packt, inviting people to visit www.PacktPub.com and submit nominations for their favorite Open Source project. Now in its fifth year, the Award has been adapted from the established Open Source CMS Award with the wider aim of encouraging, supporting, recognizing and rewarding all Open Source projects.

WordPress won the 2009 Open Source Content Management System (CMS) Award in what was a very close contest with MODx and SilverStripe. While MODx was the first runner up, SilverStripe, a Most Promising CMS Award winner in 2008, made its way to the second runner up position in its first year in the Open Source CMS Award final.

The 2010 Award will feature a prize fund of $24,000 with several new categories introduced. While the Open Source CMS Award category will continue to recognize the best content management system, Packt is introducing categories for the Most Promising Open Source Project, Open Source E-Commerce Applications, Open Source JavaScript Libraries and Open Source Graphics Software. CMSes that won the Overall CMS Award in previous years will continue to compete against one another in the Hall of Fame CMS category.

These new categories will ensure that the Open Source Awards is the ultimate platform to recognise excellence within the community while supporting projects both new and old. “We believe that the adaption of the Award and the new categories will provide a new level of accessibility, with the Award recognizing a wider range of Open Source projects; both previous winners while at the same time, encouraging new projects” said Julian Copes, organizer of this year’s Awards.

Packt has opened up nominations for people to submit their favorite Open Source projects for each category at www.PacktPub.com/open-source-awards-home. The top five in each category will go through to the final, which begins in the last week of September. For more information on the categories, please visit Packt’s website www.PacktPub.com/blog/packt’s-2010-open-source-awards-announcement

Contacts
Julian Copes
PR Executive, Packt Publishing
[email protected] | www.PacktPub.com


How to Automatically Sort and Sift Files with Hazel

Today we’re going to look at Hazel, an app that can help keep your Mac nice and tidy with everything in its place.

Below we’ll go over exactly what Hazel is and how to install it. Then walk you through a handy little workflow that you can setup to cleanup your Mac a little right away.

What Is Hazel?

Hazel provides an easy way to automate tasks on the contents of any folder on your hard drive. By setting up rules you determine specific actions that are to be taken on files that meet a certain criteria.

For instance, say you want to apply a certain color label to .jpgs, move files older than a week, or automatically backup any newly inserted files to another folder, all of these actions are fairly simple with Hazel.

Download and Installation

To try it out, visit the Hazel website and download the 14 day trial. It’s not limited in any other way but time so you’ll get to play with all the features unhindered.

screenshot

The Hazel Website

The file you download is actually not an application but a preference pane. To install a preference pane, all you have to do is double click (right click on the preference pane to remove it).

You should now see a Hazel icon in the lowest portion of your System Preferences window.

screenshot

System Preferences

The Basics

The window below shows the primary Hazel interface. Basically what you do is add in a folder to watch (far left), then add rules that perform certain actions on the contents of that folder.

screenshot

The Main Hazel Interface

To add a folder, you simply click the little plus button on the left. To add a new rule, click the plus button on the right.

Below is the window that pops up when you add a rule. As you can see, the interface here is almost exactly like setting up Smart Folders in Apple Mail.

First, you choose a condition such as when the file was added, what color label is applied or what extension the file has. Then you choose the action to take on the files that meet that criteria. The actions available are shown below.

screenshot

Adding a Rule

That’s it! Now Hazel will continually watch that folder and make the indicated changes when necessary.

A Practical Example

For me one of the most interesting ideas for how to use Hazel is to create droplets to process files. We all have lots of clutter in our downloads folder and/or scattered across our Macs and creating a droplet can be a great way to quickly archive specific files.

To set up this test, create a series of empty folders somewhere on your hard drive. Label one of them “PDFs,” another one “Archives,” and continue to add any for the specific file types you want to keep together.

Also create a folder that you can use as a droplet. Place this folder anywhere you like on your hard drive but be sure to drag it to either your dock or your Finder’s sidebar as seen below.

screenshot

Add the Droplet Folder to Your Dock or Sidebar

Now go into Hazel and add this folder. Then create a series of rules that match the folders you just setup. For instance, create rule for PDF’s, a rule for archives, and a rule for Music (point this one at your iTunes folder).

For each rule, designate the desired type of file and the folder you want to move it to. Make sure to apply all of these rules to your Droplet folder and set the destination of the move to the folder where you want to send the files as seen in the screenshot below.

screenshot

Setting Up a PDF Rule

When you’ve setup all the folders and rules you want, you’re ready to use the droplet. Any time you find a file in your hard drive that’s out of place, simply drag it to the droplet folder and Hazel will automatically determine what type of file it is and then move it to its proper location! This makes the mundane and meticulous task of file sorting a breeze.

Other ideas include automatically emptying out your Downloads folder once per week, putting files that you’ve never opened all in one place and adding color labels to certain types of files that you use often.

Why It’s Better Than Saved Searches and Folder Actions

OS X currently has a number of features for sorting through your files quickly built right in. One of the easiest and handiest is Saved Searches. Any Spotlight search can be saved as a quickly accessible Saved Search in your Finder’s sidebar.

For instance, you can run a search for files with the extension “pdf,” save the search and easily find all your PDFs by clicking on the shortcut in your sidebar.

However, unlike Hazel, this is not an organization solution. Saved Searches do not move your files or affect them in any way, they simply provide an easy access solution.

A more powerful option is Folder Actions. This allows you to setup specific scripts that watch folders and react automatically when files are added to that folder. This solution provides much of the same functionality you’ll find in Hazel at no charge to the user.

Unfortunately, Folder Actions are reserved for only those users already familiar with automation techniques such as AppleScript and Automator. AppleScript has a high learning curve but scripts are easy to attach to folder actions. Automator has a much lower learning curve but it’s a bit trickier to apply an Automator workflow to Folder Actions. I plan on doing an in-depth Folder Actions tutorial some time in the future so if you’re interested in this feature stay tuned.

Ultimately, there’s nothing in OS X that does what Hazel does as easy as Hazel does it. It’s an excellent app that can really save you tons of time if implemented properly.

Conclusion

Hazel is a great little app that can save any messy Mac user from the clutches of digital clutter. For the most part, the app ran just fine for me without a complaint. I did however encounter one or two glitches as I used it.

For instance, when I applied rules to my Mac’s default downloads folder, they all seemed to act weird and unpredictably (sometimes having the exact opposite effect that I intended). I fully understand how to use the app and implemented rules successfully on other folders, it just doesn’t like my downloads folder for reason (this is likely an isolated incident).

Otherwise Hazel is an awesome app and I recommend it to anyone in need of some automated organizational aid. Download the trial version, give it a shot and leave a comment telling us what you think. There are tons of potential uses for Hazel so also be sure to tell us any clever workflows you dream up!


New Higher Envato Marketplace Rates!

For four years the Envato Marketplaces have helped authors around the world earn an income selling their digital wares. Along the way we’ve grown from one marketplace to seven, with more on the way. We’ve gone from hundreds of members to hundreds of thousands. Items from our marketplaces have appeared in projects for companies big and small, all around the world. And most importantly of all, we’ve had thousands of authors cash out earnings, ranging from a bit of money for a big weekend to sums in the tens of thousands of dollars a month!

It’s been an amazing ride, and here at Envato along with our commitment to growing AppStorm, we are completely committed to making our marketplaces the best around. That’s why I’m very excited today to announce that as of the end of September we are rolling out some dramatically improved rates for all our exclusive authors!

As the sites have grown, so has our revenue. As we increase in volume and size we’re able to push back more and more to the authors. This is in fact our third rates increase now, and it’s always a really happy day when we get to make the changeover and start putting more money in author’s hands.

New Author Rates on Envato Marketplaces

50-70% with a $75k scale

The new rates, which go into effect at the very end of September, will see new exclusive authors get 50% of every sale out of the gate, with their commission rising up to 70% as they sell more. The volume of sales needed to get to 70% has been dramatically reduced from the old $300,000 mark, down to just $75,000. While that’s still a lot of money, it will mean dozens of our existing authors will suddenly catapult up to the highest rate and every author will see a big increase to their earnings.

If you’re wondering just how much people sell on our marketplaces, perhaps a stat will help. Our top seller across the marketplaces has sold just shy of a whoppingly huge half a million dollars in gross sales! That’s an enormous amount of money, most of which happened in under a year.

Lest you think that’s just for the biggest marketplaces, in fact on every single one of the seven marketplaces, we have authors whose take home earnings are in the four figures each month! So that’s authors selling not just on ThemeForest, our marketplace for websites, but also the marketplaces for graphics, video, audio, 3D, Flash and code and scripts.

How much could you make selling your work?

Envato Notes – new Community Blog!

Envato Notes!

You can get the full details of the big Envato Rate Increase on our brand new Envato Community blog – Envato Notes.

Notes, which launched just last week, is going to be the hub of the entire Envato / AppStorm community with news about our sites, interviews of people who work on our sites, tips, giveaways, competitions and much more.

If you haven’t seen it already, I highly recommend heading over to Envato Notes and subscribing to the feed!

Happy Birthday Authors!

So on the fourth anniversary since our first marketplace FlashDen first hit the web, I’d like to take a moment and say Happy 4th Birthday to all our authors. Thank you so much for choosing to sell with us. Thank you so much for being a part of our amazing community. Thank you for helping us make the Envato Marketplaces what they are.

One More Thing …

With the Birthday Bundle now finished, our massive rates change announced, well … to borrow a line from Mr Jobs, there’s just one more thing. Next week, I’ll be back with a very exciting announcement – a whole new Envato Marketplace! Yep it’s one heck of an August for us here at Envato, so stay tuned for even more big news!

Woohoo!!!


Play An Intense Game Of Human Pong

If you’re good at playing sport games on your computer but suck at sports in real life, this tutorial is just for you. You’ll learn how to combine 3D animation with live footage through 2d and 3d tracking. It’s time to bring back some life to the all time classic tennis game…. “PONG”!


Tutorial

Download Tutorial .flv

File size 280MB

Additional Aetuts+ Resources


Create a Monochrome Portrait in Illustrator – Vector Premium Tutorial


We have another great Vector Premium tutorial available exclusively for Premium members today. If you want to learn how to modify a stock image in Adobe Photoshop and how to use various blends and techniques within Adobe Illustrator to create a soft monochrome portrait, then we have an awesome tutorial for you.

Continue reading “Create a Monochrome Portrait in Illustrator – Vector Premium Tutorial”

Quick Tip: Realistic Panning

If you are a film composer most of your early work will be with MIDI and sample libraries. This is great for saving money and is essential for low budget films.

For this to work, you need your music to sound as realistic as possible. Many sample libraries employ some of these techniques we are going to discuss, but it is still important to place your instruments properly in the stereo field. Panning will get you one step closer to that realistic sound.


Panning for Orchestra

First, what is panning? Panning is the placement of sound in the stereo field. With the advancement of surround sound that also includes the near and far field or front to back positioning of sound.

So, if our goal is to sound like a realistic orchestra we must think like a real orchestra. A typical symphony orchestra will have a string section, a woodwind section, a brass section and a percussion section. Each section is then divided into individual instruments and placed into a standard seating position. The image below shows the typical placement of instruments in the live orchestra.

As we can see in the picture the string section sits at the front of the room and consists of violins, violas, cellos and basses. The woodwinds are a little further back with the brass and percussion sections at the back of the room.

Now lets take the string section and make it as real as possible by panning each individual instrument into its proper place. In this example, we will need to pan our violins to the left of center, the cellos to the right of center and the basses we will need to place in the center. The reason we are placing the basses in the center is because in real life the bass frequencies tend to envelope an entire room so by placing that section in the middle we can create that feeling.


Other Panning Tricks

Another benefit of panning is the separation of the instruments. Separation is a mixing concept that tries to give each instrument its own space in the final mix. By simply panning each instrument to a different spot in the mix you can achieve this. This is important, as it will help each instrument stand on its own and make your tracks sound clearer.

For those who have cool convolution reverb plug-ins like Altiverb you can try and experiment with the placement of the sound on the stage.

Convolution reverbs use Impulse Responses (a recording of an acoustic space) and some fancy math to make any audio sound like it was played in the room you have selected. In addition to making your audio sound like it is in a real room, you can place your sound in different positions around the "room". This can be useful when trying to create the ideal virtual orchestra because we can place the strings at the front of the "room" and the woodwinds, brasses and percussion behind the strings.

Here is a picture of AltiVerb. The speakers represent what part of the virtual room your audio is coming from.


Conclusion

Panning is a really simple way to improve your overall sound. If you use some of these suggestions you will be on your way to a more realistic digital orchestra. The big key to all these suggestions is to think how the group you are trying to imitate would sound in a live environment.


10 Guitar-envying Keytar Solos

Lots of keyboard players feel trapped behind their instrument when performing on stage, and look with envy at their free guitar-playing band mates. They dream about dropping anchors and sailing out from behind that big barrier. Well, here are ten people brave enough to give it a try. How do you think they went?

You’ll see lots of Roland keyboards, a Casio, a toy from the 80s, and… I give up – what is that thing Jordan Rudess is playing? Combining the right sounds and effects, practicing lots of scales and having a great pitch bend technique seem to be what it takes.

What do you think about keytars – ah, portable keyboards? Do you play one yourself? Do you think they’re for show offs? Do you think they look big and funny? Do they inspire you? And what do you think about these performances? Which one takes the cake? All opinions gladly accepted in the comments!


1. Rick and Adam Wakeman on Keytar playing “Tudorock”

“From Rick Wakeman’s Six Wives of Henry VIII concert on May 2, 2009 at Hampton Court Palace. This is an excerpt from one of Rick’s new songs, called Tudorock, played as an encore.”


2. Best Keytar Player Ever!

This guys got it all – the chops, the moves… and the sunglasses!


3. Belinda Bedekovic

“Only the best keytarist in the world. Not to mention her sweet dance moves! Belinda now has a Fan Club so you can join and keep up with her latest awesomeness!”


4. Muse – Keytar Solo @ Barcelona

“Matt Bellamy plays keyboard guitar in the interlude leading up to Undisclosed Desires. Palau Sant Jordi, Barcelona.”


5. Keytar Shredding To Metallica

“Having some fun shredding to “My Apocalypse” by Metallica on the keytar. I’m sure Metallica would hate this.”


6. Casio CZ-101 with AZ-1 Controller Keytar

“Short vid of my Casio CZ-101 controlled by a custom painted AZ-1 remote. Background sequence on a Sequential Circuits Pro~1.”


7. Keytar Solo

“Another clip of the ever-popular Elena Shemankova playing keytar for Red Elvises ‘Closet Disco Dancer’.”


8. Stratovarius – Stratosphere DUAL (Guitar & Keytar)

“Another Tribute to Timo Tolkki: Dual Cover (Guitar & Keytar) of Stratosphere, an amazing Stratovarius song. Guitar: Paco Aranda. Keytar: Jose Aranda.”


9. Brett Domino Trio – Beat It – Keytar

“This is my band, The Brett Domino Trio, performing Michael Jacksonses ‘Beat It’ entirely on keyboards.”

Search for their UK’s Got Talent video too.


10. Jordan Rudess VS John Petrucci

“Jordan going at it with his keytar. Possibly the best Keytar solo I have ever seen. Taken from “Chaos in motion” DVD.”

So there we have it. Feel free to share your thoughts and favorites in the comments!


Create a Biomechanical Floating Ecosystem – Psd Premium Tutorial


Today, we have another Psd Premium tutorial exclusively available to Premium members. If you want to take your design skills to the next level, then we have an awesome tutorial for you. Learn more after the jump!


This Premium Tutorial is Filled with Creative Tips

We’re all aware that an ecosystem is a living community of plants and animals that share the same environment, but what happens when the natural world and man-made technology amalgamate to form a harmonious coexistence? In this tutorial I’ll walk you through the process of creating such a world by combining stock images and 3D renders.

Mark is a talented designer and illustrator from the UK. He has worked as a designer and creative director for several design/advertising agencies and specializes in print, branding, packaging, and exhibition graphics. Mark began his career when the tools of the trade were markers, layout pads, and most importantly, the ability to draw, but he embraced the digital revolution in the early 90′s and swapped his drawing board for a Mac. Today, Mark freelances from his studio in Cornwall for such clients as American Express, BMW, Future Publishing, IDG Communications and Imagine Publishing. Log in or Join Now to get started!


Professional and Detailed Instructions Inside

Premium members can Log in and Download! Otherwise, Join Now! Below are some sample images from this tutorial.


Psd Premium Membership

As you know, we run a premium membership system here that costs $9 a month (or $22 for 3 months!) which gives members access to the Source files for tutorials as well as periodic extra tutorials, like this one! You’ll also get access to Net Premium and Vector Premium, too. If you’re a Premium member, you can log in and download the tutorial. If you’re not a member, you can of course join today!

Aetuts+ Tutorial : Play An Intense Game Of Human Pong

Our sister site Aetuts+ today put up an excellent tutorial by Itay Kaplan, showing you how to track and composite together a Human Pong scene using footage from a tennis match. It uses PFHoe, C4D and of course After Effects to get the job done and we thought you all might like it too! Preview video and tutorial links are after the jump…

If you like what you see, why not head over to the Aetuts+ site to watch the full tutorial!


Don’t miss more CG tutorials and guides, published daily – subscribe to Cgtuts+ by RSS.

Create an Epic War Game in Flash: Part 1 – Active Premium

In this two-part Active Premium tutorial we’ll be building a top-down war game from scratch. Creating a game is definitely one of the most involved tasks in the world of programming and my mission here is to help Premium members make this process a little bit easier.

We run a Premium membership system for $9 a month (or $22 for 3 months!) which gives members access to extra tutorials, like this one! You’ll also get access to all other Premium content (Psd Premium, Net Premium etc.) and whilst logged in, your favorite Tuts+ sites are all completely ad-free!


This Premium Tutorial is Filled with Creative Tips

Our war game will implement many different concepts from building a background based on xml data to breaking colors into separate channels using bitwise operators. The game itself will not be like some MMORPG (it would probably take several volumes of a book to describe the process of complicated game creation).

This game will have a couple of types of player and enemy vehicles to check the movements, collisions and weapons, and two missions just to make sure everything works properly (you’ll be able to create more missions anytime you want using the unified engine that we’ll make in this tutorial).


Professional and Detailed Instructions Inside

Premium members can Log in and Download! Otherwise, Join Now! Below are some sample images from this tutorial.


Active Premium Membership

We run a Premium membership system which costs $9 a month (or $22 for 3 months!) which gives members access to extra tutorials, like this one! You’ll also get access to Psd Premium, Vector Premium, Audio Premium, Net Premium, Ae Premium and Cg Premium too. If you’re a Premium member, you can log in and download the tutorial. If you’re not a member, you can of course join today!

Also, don’t forget to follow @activetuts on twitter and grab the Activetuts+ RSS Feed to stay up to date with the latest tutorials and articles.

Rendering Wireframes in Maya for Compositing with After Effects

In today’s tutorial, Crystal Leal walks us through how to render out a wireframe version of a model using either Mental Ray or Maya’s own Vector Renderer. Once rendered, the sequences are then composited together in After Effects and rendered out to video. This technique is perfect to use when putting together turntable animations for your portfolio!


Step 1

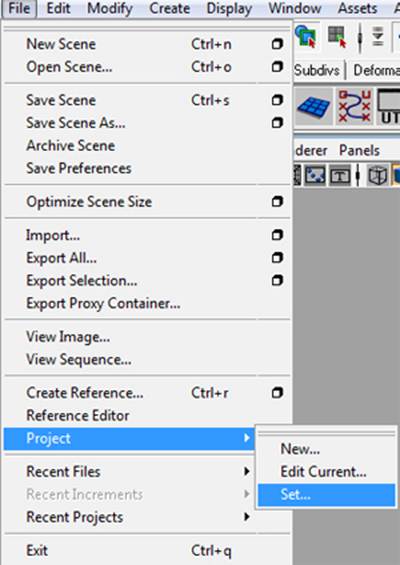
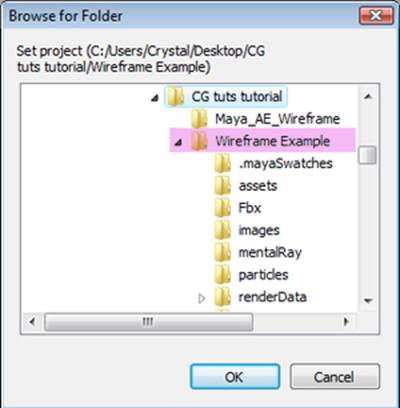
Open up your Maya file with your model. You will first set your project. Go to File > Project > Set. In the Browse for Folder window find the location of the project file you have created. The example project folder is named “Wireframe Example.”

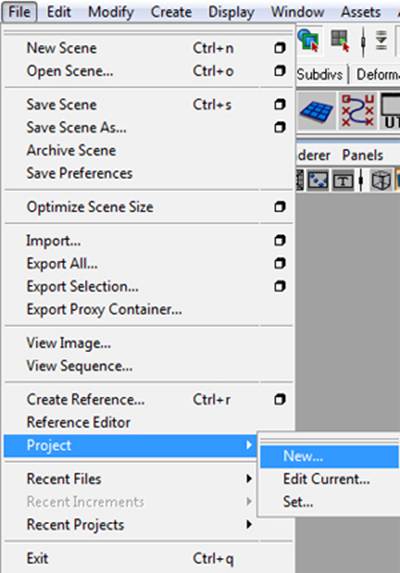
If you do not yet have a project set go to File > Project > New.

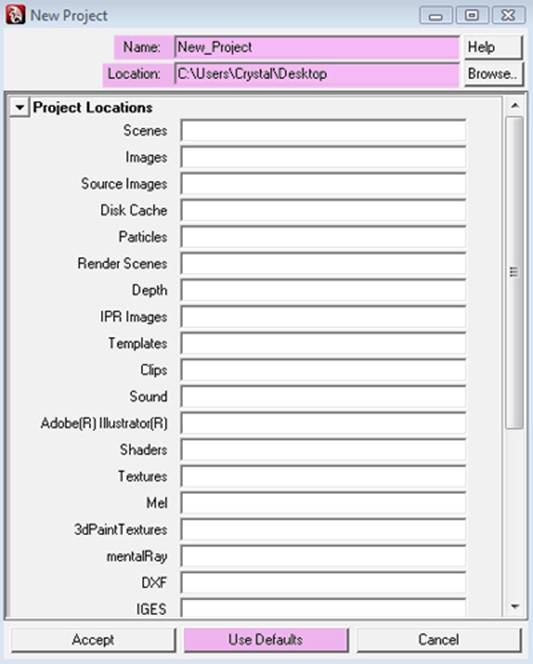
Name the project. Under location choose where the project will be saved. Press the Use Defaults button so that it will create the default file structure for the project. Save your Maya files in the scenes folder, texture files in the source images folder, and rendered sequences will be saved into the images folder.


Step 2

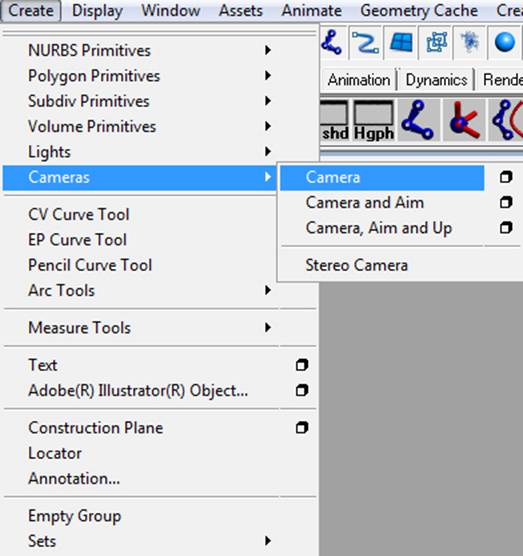
Set up a camera to render from if you do not have one already. Go to Create > Camera > Camera. Creating and setting up a camera will allow you to render your wireframe and any other render passes at the same position.


Step 3

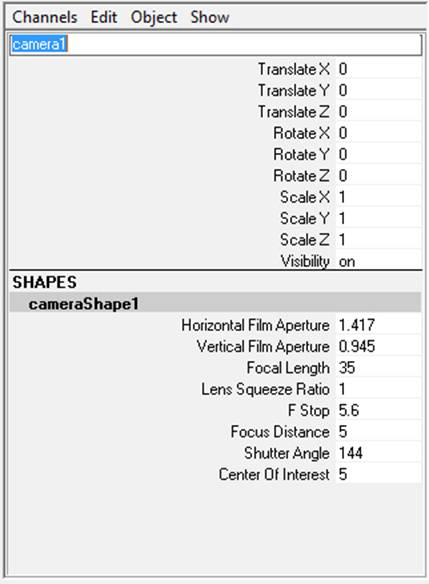
Rename the camera. Where it says “camera1” replace it with the new name. For example “RenderCam.”


Step 4

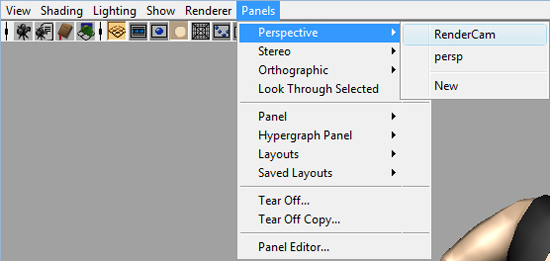
Set the viewport to the new camera. In the panel menu to go Panel > Perspective > New camera name (RenderCam).


Step 5

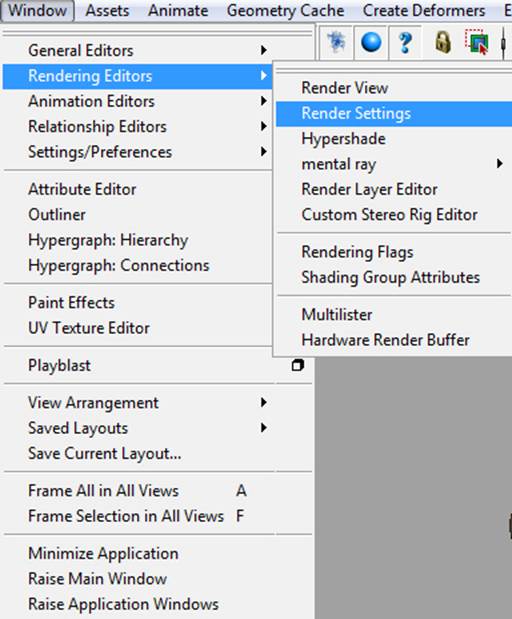
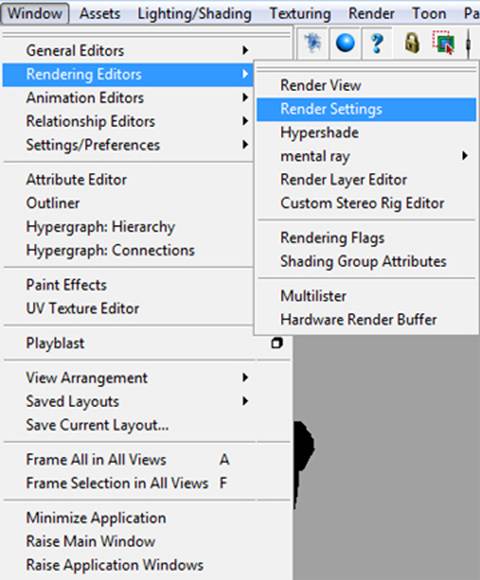
Set up the render settings before adjusting the camera. Go to Window > Rendering Editors > Render Settings.


Step 6

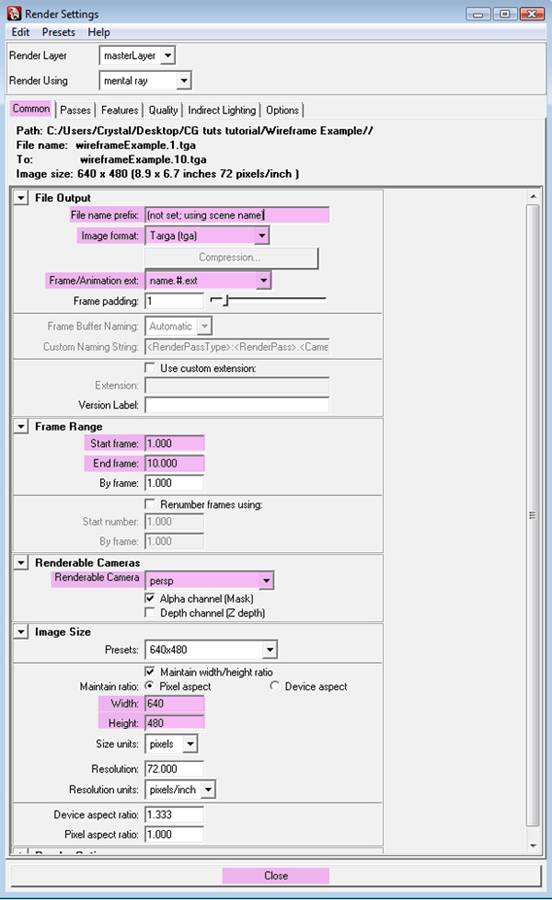
In the Render Settings window you want to be in the Common Tab. The main setting you want to set up before setting up your camera placement is the Image size and what you are rendering with.

The rest of the settings will need to be set if you are rendering a whole sequence. Under width and height you want to set the size of the image. Under file name create a name the file. For example “wireframe” if that is what is being rendered. Image format can be changed to several formats. In this case use Targa which will keep the alpha information. Under Frame/Animation ext. you will set it to name.#.ext. The files will then be named “wireframe.(frame number).tga. Frame range will be how long your animated sequence will be. If you are rendering a second worth of animation at 30fps you will be rendering from frame 1 to 30. Under Renderable Camera change this to the camera you want to render from. In this case change it to “RenderCam.”

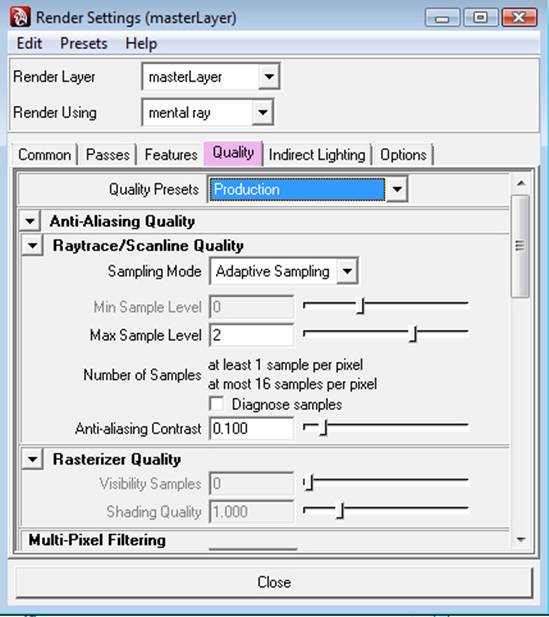
Under the Quality tab you set the quality to production when rendering your final images. Quality can be set to a lower quality when doing test renders.


Step 7

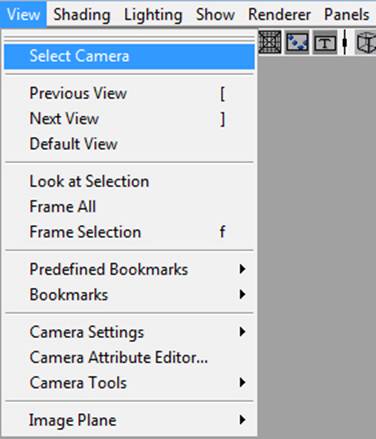
Select your camera through the panel menu by selecting the panel with the RenderCam set from earlier. In that panel menu to go View > Select Camera. On the right Channel menu you should see that you have your camera selected.


Step 8

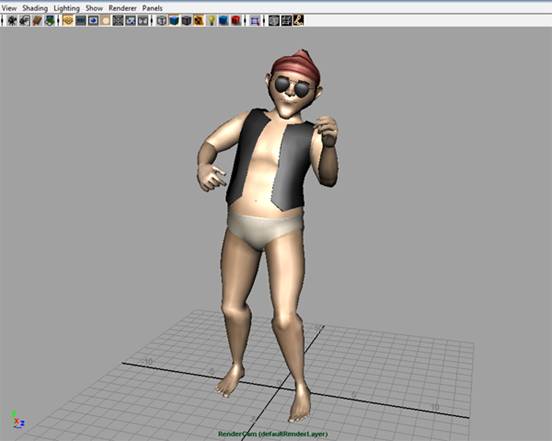
Position your camera to frame up you model.


Step 9

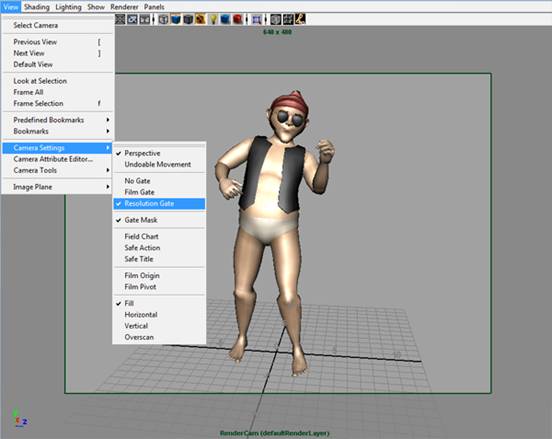
To make sure your model does not go outside the renderable area you can turn on the resolution gate by going to the panel menu > View > Camera Settings > Resolution Gate. You will now have a outline in your viewport which will show the area that will be rendered.


Step 10

Setting up Mental Ray Wireframes

(You do not have to set up both renderers. Choose which one you prefer. Skip to step 20 to set up Vector wire frames.)

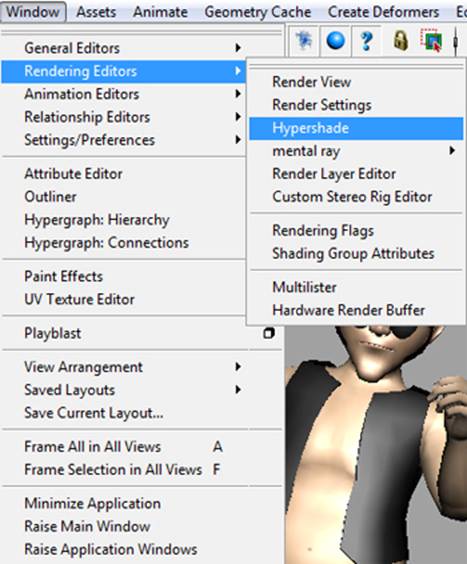
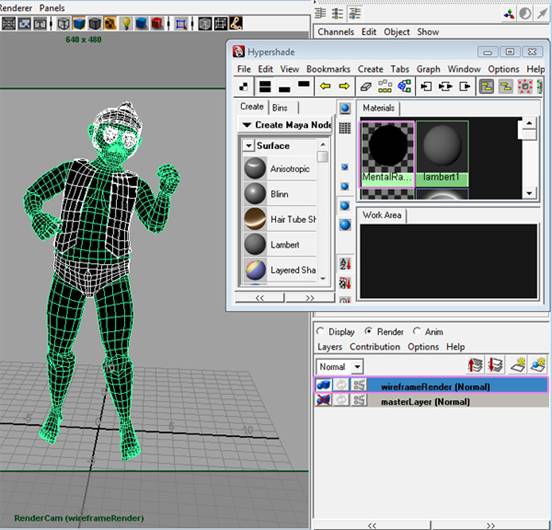
Open up the Hypershade window by going to Window > Rendering Editors > Hypershade.


Step 11

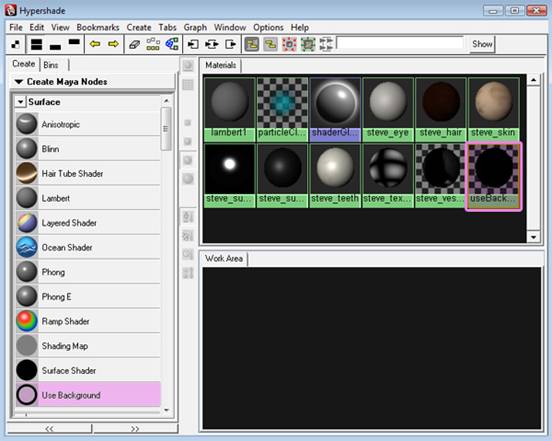
In the Hypershade window create a Use Background shader located on the bottom of the surfaces menu on the left. It will create a new shader node which will appear in the Materials tab. Select the new shader and double click or prese Ctrl + A to open its Attributes.


Step 12

Change the name of the shader in the useBackground input to “MentalRayWireframe.” Set the following attributes and then close the window :

  • Specular: black
  • Reflectivity: 0
  • Reflection Limit: 0
  • Shadow Mask: 0.

Step 13

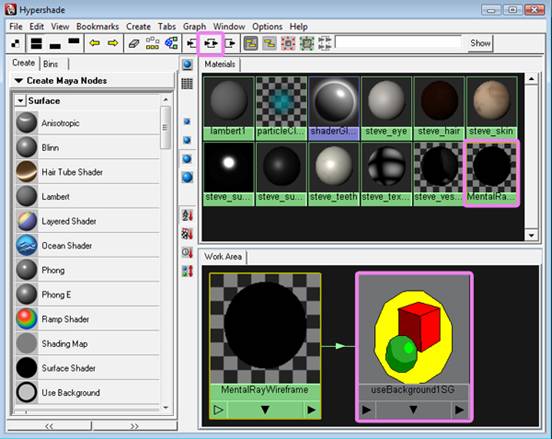
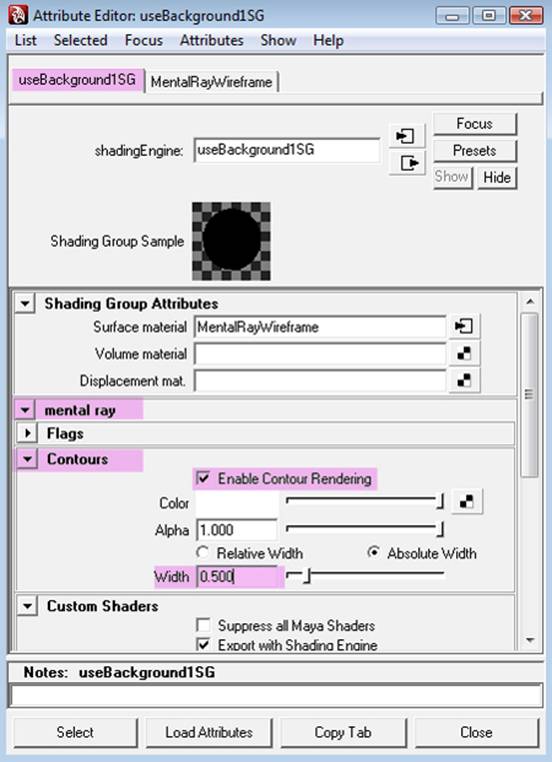
Open up the Hypershade again. Go to window > Rendering editors > Hypershade. Select the MentalrayWireframe shader. At the top of the Hypershade press the input and output button. In the Work area tab below the Materials you will see the shader connected to a node named “useBackground1SG.” Select the useBackground1SG node. Double click of press Ctrl + A to open up its attribute window.


Step 14

In the Attribute Editor switch to the useBackground1SG tab at the top. Open the mental ray menu. In the Contours menu check on Enable Contour Rendering. Under width you can change the value depending on the desired thickness of the wire frame. A smaller value will be a thinner wireframe. A value of .5 is good. Close the window.


Step 15

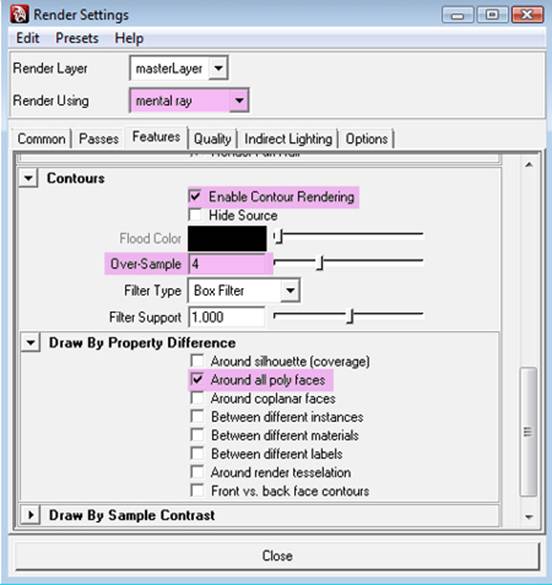
Open up the Render Settings. Go to Window > Rendering Editors > Render Settings. In the Render Setting window Set Render using to Mental Ray. Open the Features tab. In the Contours menu check on Enable Contour Rendering. Raise the Oversample to 3 or 4 which will give a cleaner wireframe render. Open the Draw by properties menu set and check on Around all poly faces.

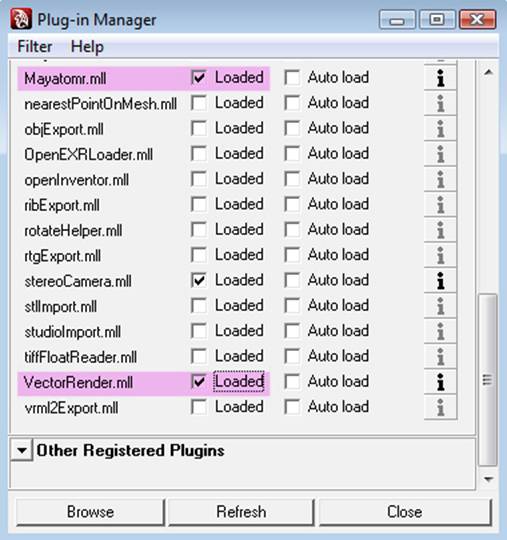
If the Mental Ray option does not appear in the drop down menu in the Set render option go to Window > Settings/Preferences > Plug-in Manger. In the Plug-in Manager window scroll down till you find the Mayatomr.mll and check loaded. The same can be done for the Vector render seen as VectorRender.mll.


Step 16

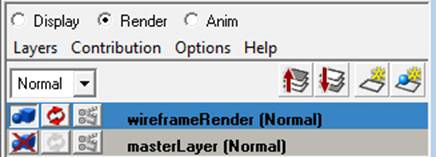
You can set up a new render layer to keep the original shaders applied to the model. Switch the display option to the Render option. Select all of the objects you are going to render wireframes for and press the button on the far right with the blue sphere. There will be a new layer created. You can double click on the name of the layer and rename it to describe what is going to be rendered with that layer. For example “wireframe” or “wireframeRender.”


Step 17

Select the wireframe layer. It should then be highlighted. Open the Hypershade window. Window > Rendering Editors > Hypershade. Select all the objects in the layer through the view port or right click on the layer itself and choose select objects in layer. Once they are selected locate the Mental Ray Wireframe shader created earlier and MMB drag over the objects or right click and choose assign material to selection.


Step 18

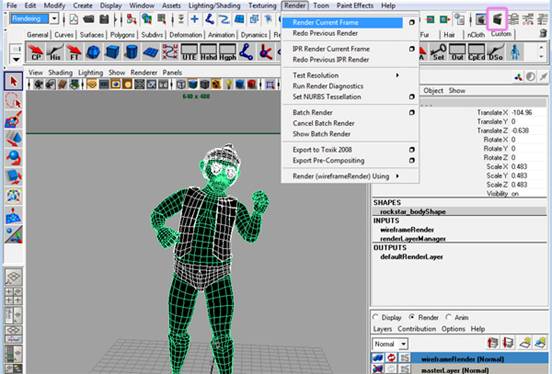
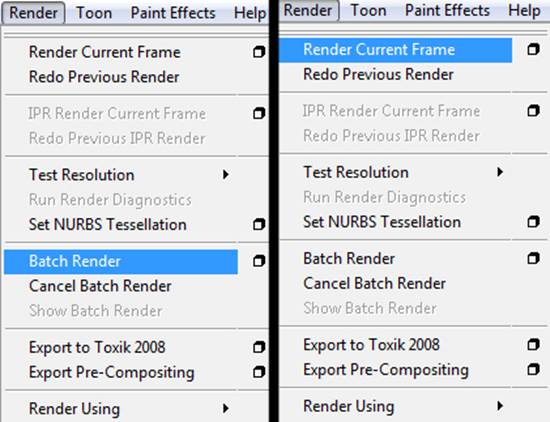
With the wireframe render layer still highlighted render the image by going to to Render menu set > Render > Render Current Frame or press the render button highlighted in the menu bar.

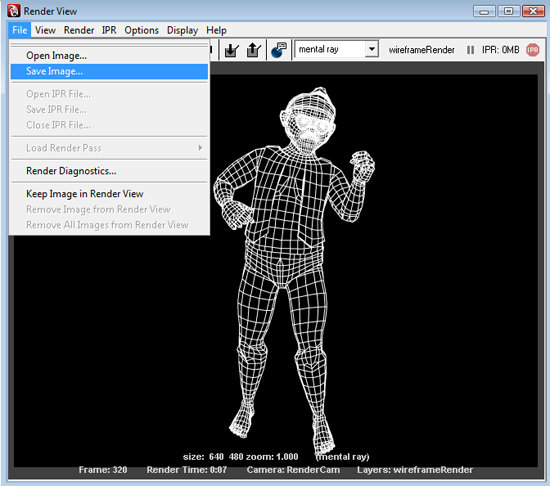
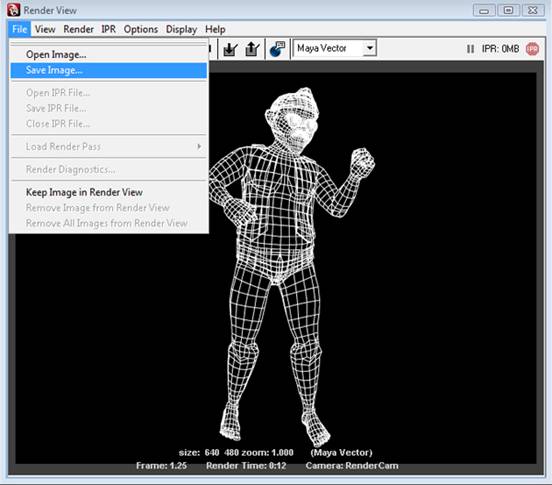
You should get a wireframe that looks like the following. Make sure you do not have any subdivision smoothing on your objects.


Step 19

Save your image. To save a single image in the Render View window go to File > Save image.

Name your file and change the file type to .tga (Targa) to keep the alpha information.

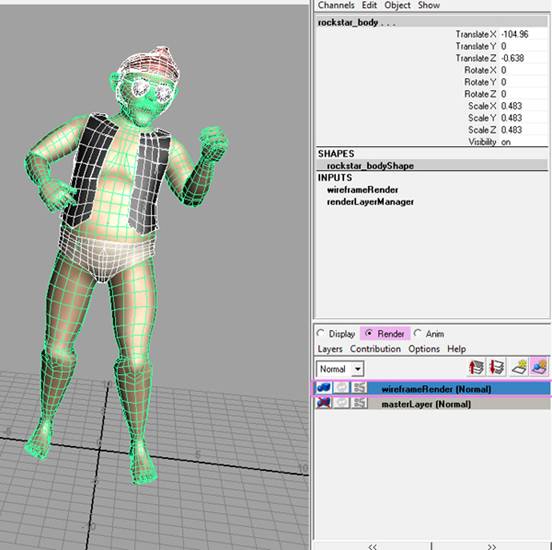
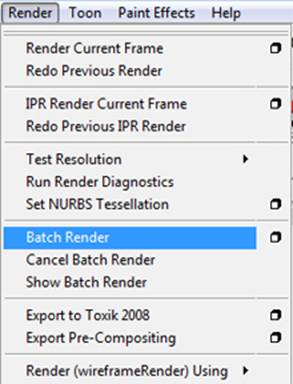
To render and save an animated sequence such as a turn table make sure you have set up your render settings as I went over in step 6. Set your frame range to the desired frames. Go to Render > Batch Render.

Make sure you have your render layer turned on to render. Here the wireframe layer is going to render in the batch render and the masterLayer is turned off and will not render which can be seen by the red x. To turn layers on and off press the button with the blue cube and sphere.


Step 20

Vector Wireframe Set up

(Skip to step 25 if using Mental Ray wireframe set up to move onto After Effects.)

To set up the Vector wireframe set up your scene the same as was done in steps 1 through 9. Open up the Render settings. Go to Window > Rendering Editors > Render Settings.


Step 21

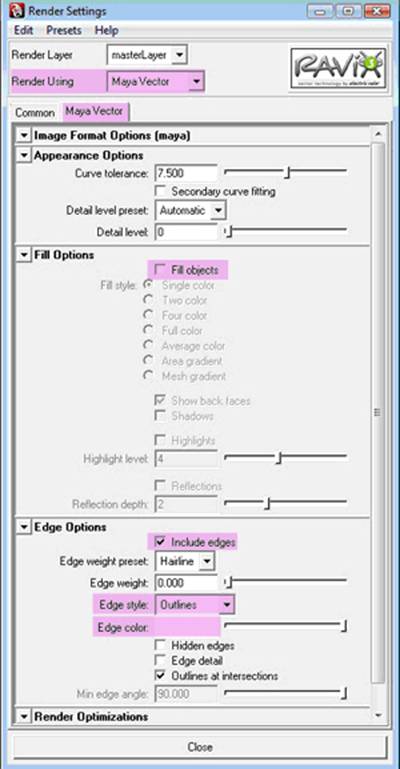
In the Render Settings Window change Render using to Maya Vector. If it does not show up in the pull down menu load the plug-in as shown in step 15. Set the following attributes :

  • Uncheck Fill Objects.
  • Check Include Edges.</li
  • Edge style: Outlines.</li
  • Edge color: white.</li

Step 22

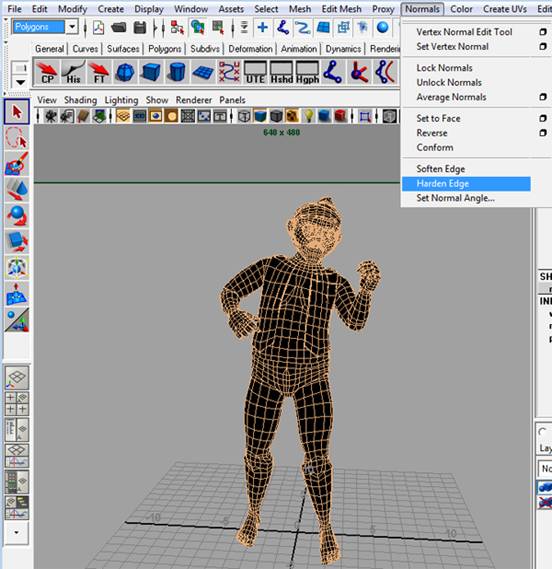
Before you render harden the edges of your model. Select all of your objects > go to the Polygons Menu set > Normals > Harden Edge.


Step 23

To render a single frame go to the render menu set > Render > Render Current Frame. To render a sequence go to the Render > Batch render and make sure you have set up your render settings shown in step 6.

Step 24

In the Render View if you are saving a single image go to File > Save image. Name the file, choose the location, and change the file format to .tga to save the alpha information.


Step 25

Bringing images into After Effects

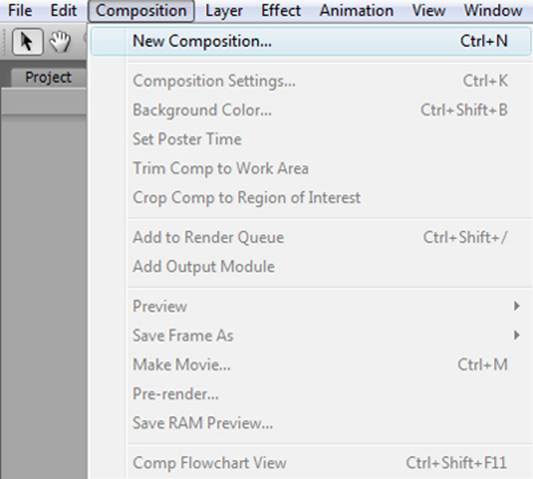
Open After Effects. Create a composition. Composition > New Composition.


Step 26

Set the properties for your composition. Composition name will be the name of the composition project. Set the width and height to the size you want for you final product. There are a list of preset sizes in the Preset pull down menu. Here the width and height are set to match the image size rendered from Maya. Frame rate is set to the same frame rate rendered out of Maya. Duration will be the time you have in the composition time line. In the example I have a sequence of 30 images which is only a second worth of time so 5 seconds is enough to work with. If you have several clips you want to adjust the duration accordingly. Press the OK button to close the window.

<img
src=”http://cgtuts.s3.amazonaws.com/206_Maya_Wireframes/image035.jpg”>

Step 27

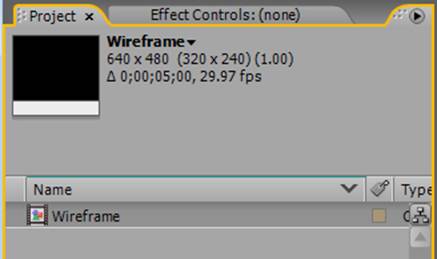
In the top right corner in the project tab you should now see the new composition.


Step 28

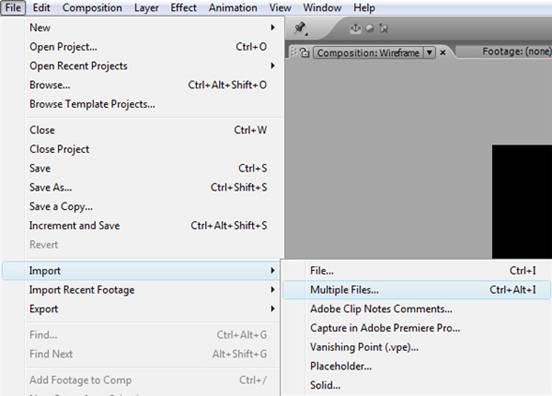
Import image(s) or image sequences. Go to File > Import > Multiple File or File. If you have multiple rendered sequences use Multiple file for a quicker import.


Step 29

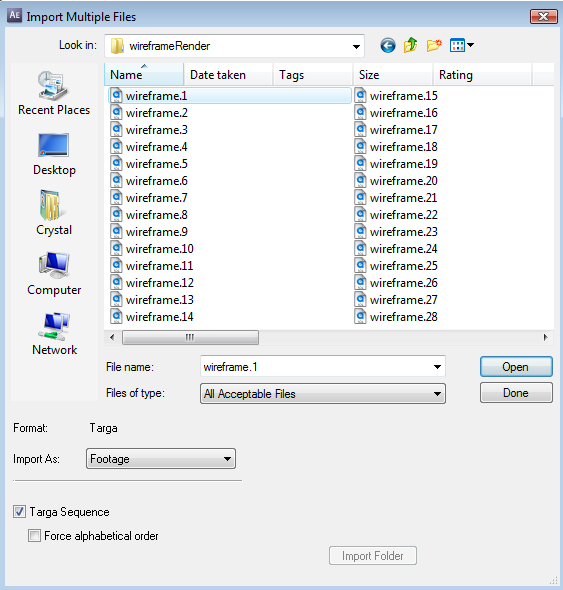
Find the location of your images or image sequence. To import an image sequence select just the first image of the sequence and make sure the Targa sequence option is checked at the bottom of the window. Press the open button.

?

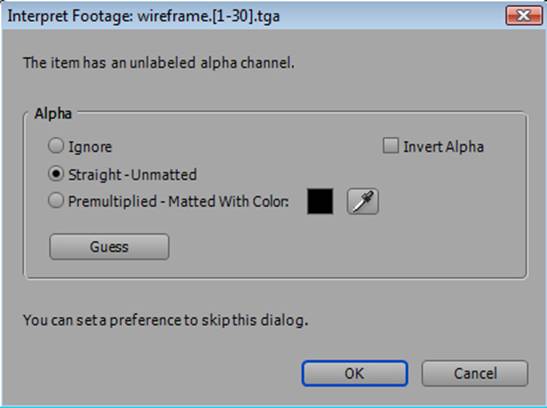
A pop up window like the following will appear. Press the Okay button. If you are importing multiple sequences it will take you back to the Import files window. Once you are done importing files press the Done button.

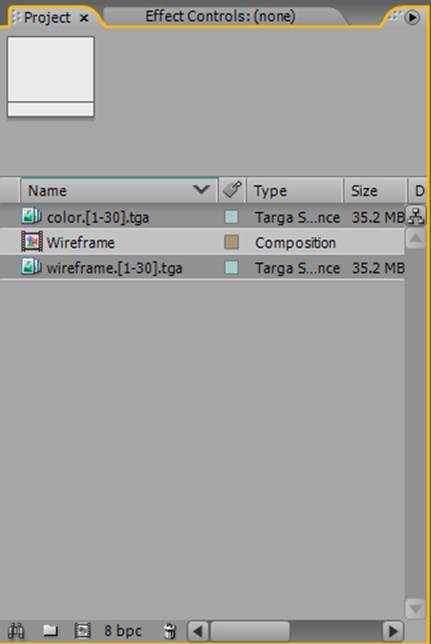
In the upper left corner under the project tab you should now see the imported images or image sequences


Step 30

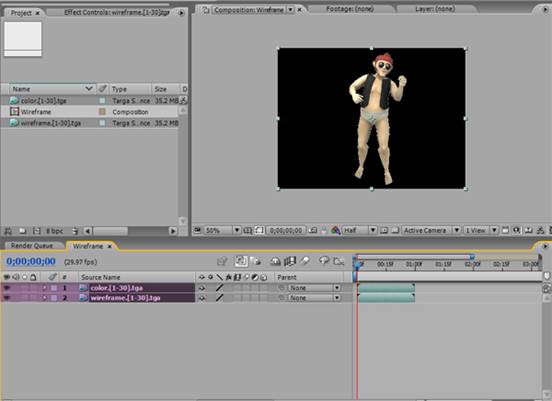
Pull the sequences into you composition. In the project tab in the upper left corner select the image sequences. Ctrl click to select multiple images or sequences. Left mouse button drag the imported files onto the composition. You should then see the sequences appear inside the composition at the bottom of the screen and in the viewport.


Step 31

Reorganize the layers. Pull the wireframe sequence on top of the color sequence by selecting the layer and dragging it above the top of the color layer.


Step 32

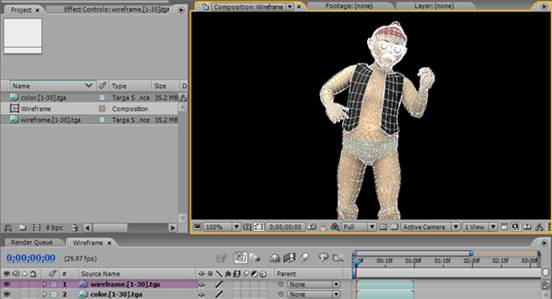
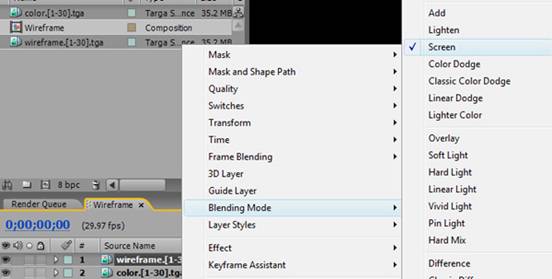
Change the blending mode of the wireframe layer to Screen. Select the wireframe layer > Right mouse button click > Blending Mode > Screen.

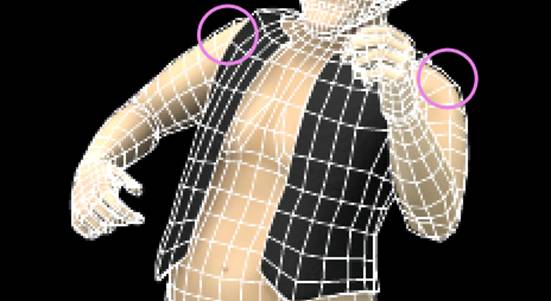
Since the color geometry is rendered out smooth and the wireframes are rendered unsmoothed you will start to see where some of the wireframes will protrude further out.


Step 33

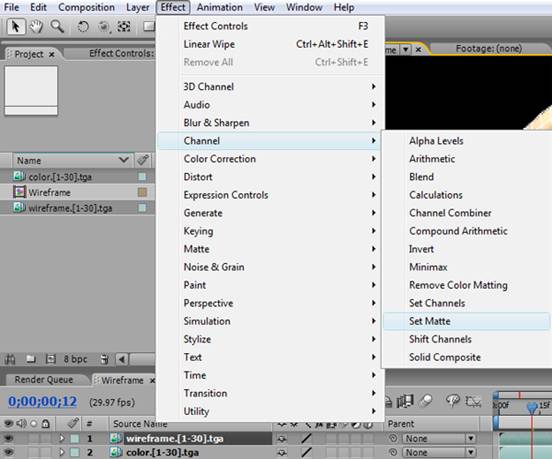
To fix this you can use the alpha channel of the color renders (targa images) as the alpha for the wireframe renders. Select the wireframe layer > Effect > Channel > Set Matte.


Step 34

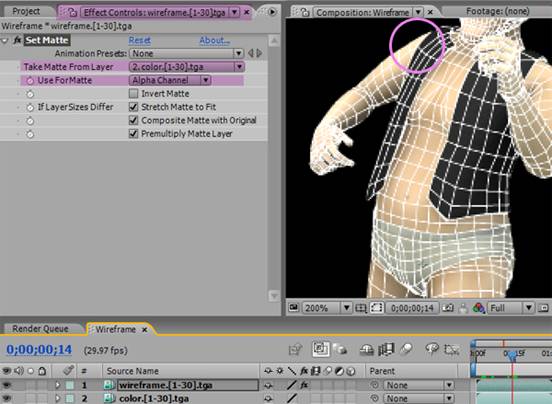
The Effects Control tab will open which is next to the project tab. Set Take Matte From Layer to the color sequence layer. Use For Matte should be set to Alpha Channel. The excess wireframe will then be cleaned up to match the color render.


Step 35

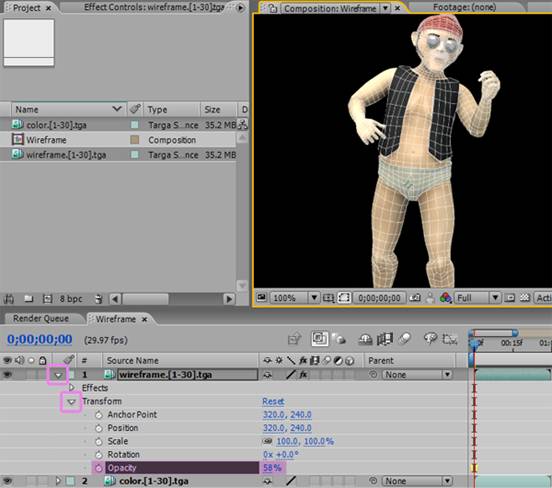
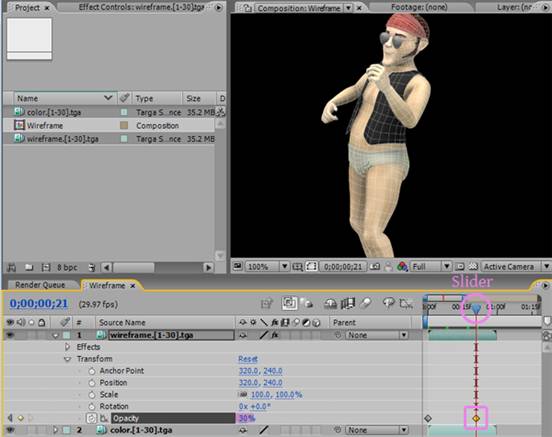
Adjust the opacity. Open the wireframe attributes by pressing the triangle > open the transform attributes > opacity. You can change the value by typing in the number or left mouse button dragging over the number left or right.


Step 36

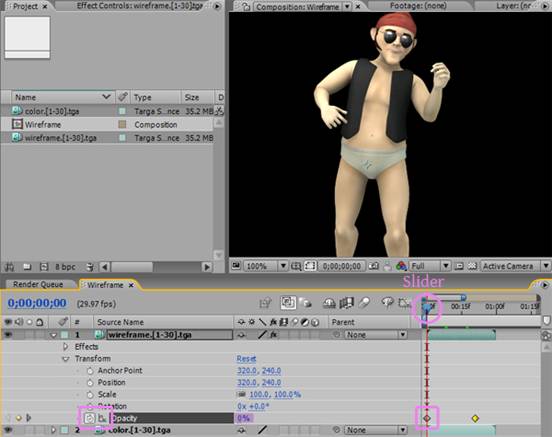
Animate the opacity over time. If you have an animation where you only want the wireframe to show up at a certain time you can set key frame on the opacity or any other attribute by pressing the stop watch button icon next to the attribute.

Choose the point in which you want the key frame by placing the slider at a certain point in the time line and set the value of the attribute. Press the stop watch icon. Once you do so you will get a dimond shaped key frame visible in the time line. You can also move the keyframes by selecting and dragging the dimond icons to the desired position. Each change in the value of the opacity and position of the slider will create a new keyframe. To delete a keyframe select the diamond node and press delete. If the stop watch icon is pressed again it will delete all keyframes for that attribute.


Step 37

Check the animation of the opacity by moving the slider along the timeline.


Step 38

Once you have set up all of your sequences, attributes, and animation you can set the sequence to render a movie file. Scale the render area bar to include the image sequences by left mouse dragging the right end of the bar to match with the end of the image sequence(s). If there are no images for the rest of the four seconds it will render a blank video so make sure to adjust the rendered section. This bar can be moved to different areas and cover as much or as little of the sequence as desired. If you are doing a test of a specific area you can adjust it to cover a specific section to render.


Step 39

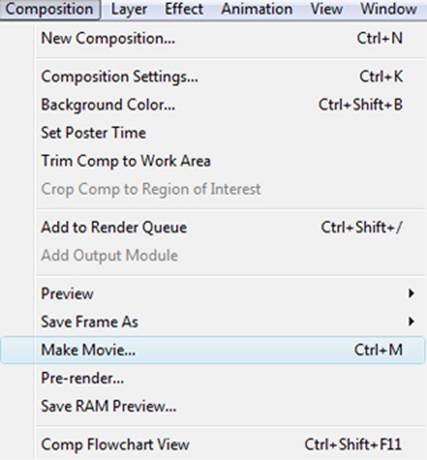
Set up a video file render. Go to composition > Make Movie.

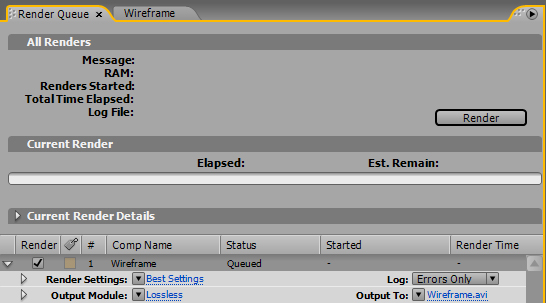
The Render Queue tab will open at the bottom of the screen. Here there are several options you can set: Render Settings, Output Module, and Output to. To open the menus click on the blue text.


Step 40

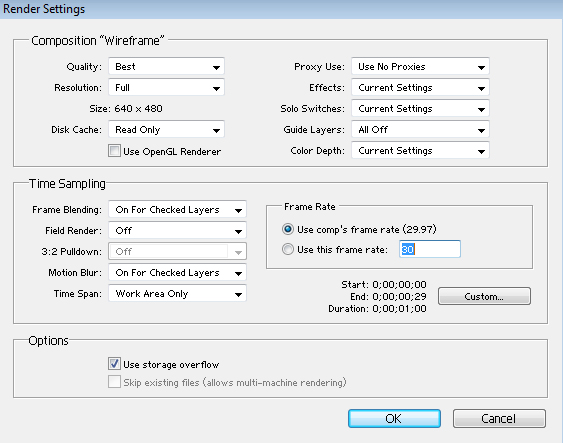
Set the render settings. Quality should be set to best and resolution to full when doing a final render. If you are doing test renders you can set these to a lower quality and size.


Step 41

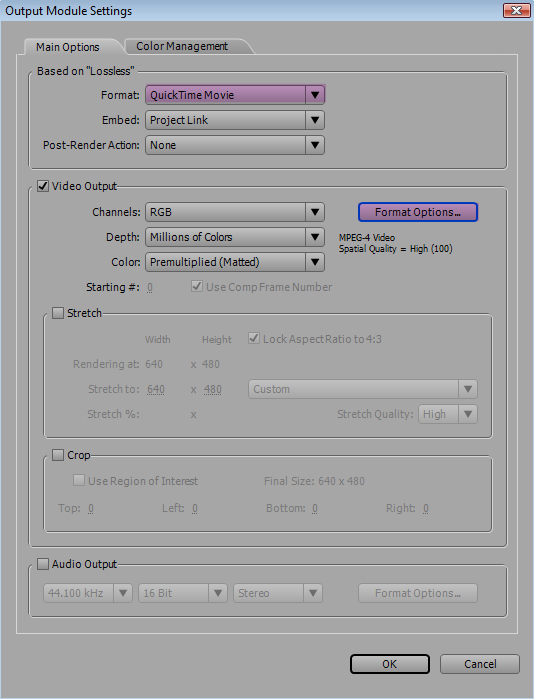
Open output model settings. Format menu is where you choose the file type. Here Quicktime Movie is the chosen file type. Once the file type is chosen you will have format options according to the file type where you can set the compression.


Step 42

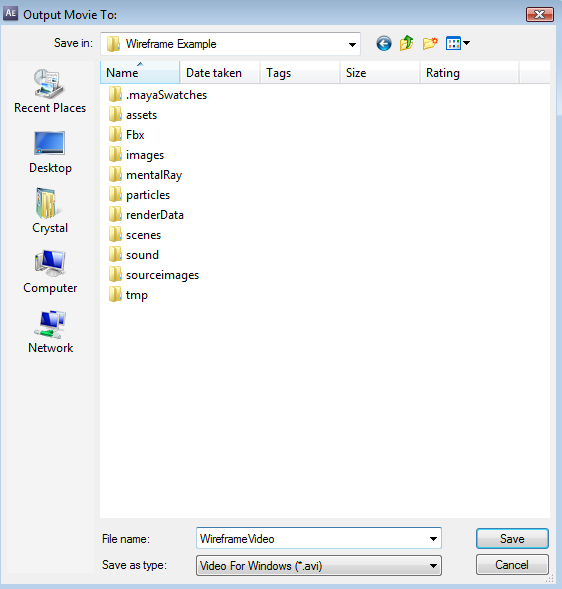
Open output to settings. In the output to window you will choose where you want to save your file.


Step 43

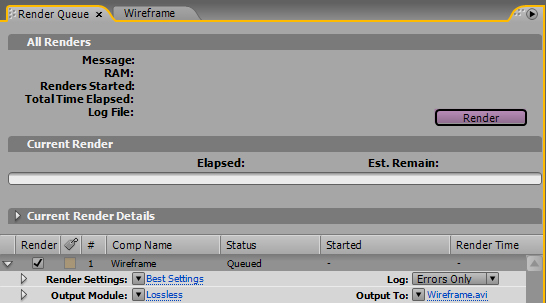
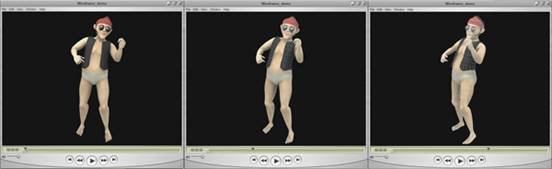
Press the render button. It will then show you a progress bar which will disappear when the rendering of the file is complete. You can now open it up and take a look at what we’ve created!


Don’t miss more CG tutorials and guides, published daily – subscribe to Cgtuts+ by RSS.

Data Backup and Sync Strategies #2: Top Backup and Sync Tools

In my first article in this series, I discussed the importance of data backup and sync, and what data you should consider backing up. It ranged from files to browser preferences, credit cards to business data, and emails to your tweets.

So, now that you know the things you need to address, let’s check out some  backup and sync tools that’ll get the job done. Data backup is an industry in itself and there is no dearth of software to get it done. But we don’t need to worry about all of them. I’ve chosen certain tools which should be more than enough for the average computer user or a small business owner.

The tools are categorized into different sections depending upon what they are used for primarily.

Files, Folders and General Data Backup

1. Dropbox

Probably the hottest tool in the backup and sync scene at the moment, Dropbox boasts of some incredible features. It can backup, sync, works online and offline, is easy to use, and does much much more.

2. Mozy

While Dropbox is limited to 100GB of backup per account, Mozy goes beyond that and has options for both individual users and businesses. Mozy has been one of the foremost online backup services for a pretty long time.

3. Carbonite

Carbonite is head-to-head with Mozy in terms of features and premium offerings. It is another trusted brand when it comes data backup on the cloud.

4. Windows Backup and Restore

Windows backup and restore is a comprehensive backup and sync utility for Windows Vista and 7 users that helps them effortlessly backup their hard drive data on an external location.

5. TimeMachine in Mac

TimeMachine is Windows backup and restore center’s Mac counterpart. It facilitates data backup and sync with an external drive for Mac users.

Bookmarks, Password and Other Browser Stuff

1. Xmarks

If you want to keep your browser bookmarks backed up and synchronized, Xmarks is a must-have tool. Here’s a guide that gives a step by step explanation of bookmarks backup and sync using Xmarks.

2. Lastpass

Lastpass is a brilliant tool for creating and storing your passwords securely on the cloud. It also helps you fill forms, save secure notes and generate a one-time password to use on public computers.

3. FEBE for Firefox

Firefox users are likely to find the FEBE (Firefox Environment Backup Extension) quite useful. It can backup your complete Firefox data: passwords, profile, bookmarks, history–everything. You can schedule the backup to run every day. If you happen to do a clean reinstall of Firefox, you can quickly restore your original settings using FEBE.

Social Accounts Data

1. ArchiveFB

If you’re heard of the stories of Facebook accounts getting locked up and users losing data overnight (it does happen), and want to create a personal backup of the stuff you share on Facebook, then ArchiveFB or ArchiveFacebook for Firefox can help you do that.

2. Backupify

Backupify provides a complete social media data backup solution that includes your Facebook, Twitter and WordPress.com accounts as well as Google apps like Gmail, Picasa, Docs and all. It offers both basic and premium features.

Emails, Credit Cards and Business Data

1. Gmail Backup Techniques

Gmail has become the defacto email solution for professionals all around the world. It is important that you keep a backup of your Gmail, which you can access in the nightmarish scenario of your Gmail account getting compromised. The CybernetNews blog has a detailed article on various methods you could try out to backup your Gmail account. You could also use Backupify mentioned above as your Gmail backup solution.

2. Outlook Backup

If Outlook is your preferred email application then you can use the Microsoft Outlook Personal Folders Backup tool to backup Outlook data like inbox, contacts, calendar, etc. I am not sure though if the tool works on the latest version of Outlook. See this article by Microsoft and Outlook 2010 backup guide for more on this.

3. Website Backup Tools

If you own a blog or a website, make sure you back it up regularly. Whether it is by downloading the server files on your computer or backing them up to a cloud service like Amazon S3, you should have a backup of the most recent files which you can use in case of an emergency.

Tip for WordPress users: You can use plugins like WordPress database backup and automatic wordpress backup on Amazon S3 to automate the process.

4. Credit Cards and all

It’s good to keep a backup of personal data like credit and debit card numbers, bank account information etc. You can save it in Lastpass (mentioned above) or store it on an encrypted note on your computer. Another way would be to have them printed out on a plain sheet of paper and keep it in a safe location. You never know when you might need it.

That was about the various data backup and sync tools. Next article would focus on Dropbox, the best personal data backup and sync solution in my opinion.