Animating Text Along A Path In After Effects – AE Basix

Have you seen those animated adverts, where the text seamlessly moves along path? In this tutorial we are going to learn how to create a sequence that involves text animating along a custom path using the first margin text property. A custom path is a vector path that is drawn freehand using the pen tool in After Effects.


Tutorial

Step 1

Create a new composition

The first thing we are going to do is create a composition; this is the canvas you will create your animation on. To manually create a composition, you need to do the following.

Choose New Composition.

New composition window.

This will open the composition dialog box. The options on the basic tab will allow you to set up the preset,
width, height, aspect ratio, frames per second, start code and duration for your animated sequence.

With the dialog box open apply the following settings:

Preset: PAL D1 / DV

Width and height: 720 X 576

Aspect Ratio: D1/ DV PAL 1.09

Resolution: Full

Start Timecode: 0.00.00.00

Duration: 0.00.030.00

Depending on your output, you may want to set up the first 4 settings at other standard settings, for example for Northern American broadcast media or for the Web.

So now our sequence will run for 30 seconds.

Step 2

Changing background color of the composition.

To change the background color you need to do the following:

Choose Background color.

This will open the color picker dialog box.

The color picker dialog box.

Click OK to choose a color for your background. With your cursor move around within the color space to pick a color, when you have chosen your color click ok to accept this.


Step 3

Creating text for the animation.

Using the text tool type out a word on the stage.

Choose the font and size using the character palette.

The character palette.

Step 4

Creating the path for the animation

With the text layer selected, select the pen tool draw a path for the text to follow.


Make sure that
Rotobezier check box in the tool palette, is selected, this allows you to draw a smooth path.


Twirl down the text option to reveal the path options.

Select Mask 1 for the path, this is the path you have just created. Now the text is automatically
linked to that path.

Step 5

Animating text the path

With the play back at the start of the time line, create a keyframe for the first margin property.

For this property set the stopwatch and drag the word to the beginning of the path by dragging the slider value for the first margin property.

Drag the play back head further down the timeline set a keyframe for the last margin property, drag the slider value for the for the first margin property so that the so the text moves to the end
of the path.


Move the play back head to the start of the animation and scrub through the timeline. You should now
see your animated text animating along a path.

I’ve added some extra graphics and text in addition to the animated text.

Hope you have found this tutorial useful.

Additional Resources


Creating Psychedelic Character Art Using Adobe Illustrator – Vector Premium Tutorial


We have another great Vector Premium tutorial available exclusively for Premium members today. If you want to learn how to make a psychedelic comic style character and background with Adobe Illustrator, then we have an awesome tutorial for you.

Continue reading “Creating Psychedelic Character Art Using Adobe Illustrator – Vector Premium Tutorial”

Imitate Guitar Techniques With MIDI Part 3 – Glissando (1 Octave)

In this tutorial Oleg Berg concludes his series on achieving realistic guitar sliding sounds with a MIDI keyboard. Like the previous two parts, this tut is very detailed, and gets technical in places, but is a very worthwhile read if you’re aiming to get the ultimate realism out of your MIDI setup.

Achieving a realistic whole-octave guitar slide requires different techniques to shorter slides. This tutorial will explain how step by step.


If you missed the earlier parts of the series, you can find them here:


Step 1

The most interesting fact about this glissando range is that, unlike the shorter ranges we discussed in Parts 1 and 2, there is no initial music fragment needed here. We only have to play one single note. However, the listener will hear 13 notes – 12 semitones plus initial note. This job will be done by our good old friend, the pitch bend controller.


Step 2

In this case pitch wheel range of 2 is not enough. In Step 4 of Part 1 of this tutorial I described how to set a needed value to pitch wheel range (in this case 12). Keep in mind that any changes to this parameter will change the scale interval of the pitchbend graph (the difference between two pitch values).

It is not hard to calculate the value corresponding one semitone changing. The entire pitchbend range from the bottom (minimum) to middle (zero value) always equals 8192. This number corresponds 2 semitones when the pitch wheel range is 2. One semitone is 4096. When pitch wheel is set to 12, then the whole range (8192) will represent 12 semitones. Therefore, one semitone will be 8192/12 ? 682.7.

As you see, the number we get for one semitone is not exact, and we’ll have to round it, but this can lead to accumulation of round-off error as a result. To avoid it, we can first draw the points where there are integer numbers. For example, we can obtain some integer values by calculating:

  • 3 semitones: 8192 / 12 * 3 = 8192 / 4 = 2048
  • 6 semitones: 8192 / 12 * 6 = 8192 / 2 = 4096
  • 9 semitones: 8192 / 12 * 9 = 8192 / 4 * 3 = 6144

Therefore, we can set several points first (3, 6, 9, and 12 semitones) and then proceed with other in between points considering the interval we found (? 682,7).


Step 3

Drawing all the precise values manually is difficult. So we’ll use one of methods we discussed before (in Step 9 of Part 1). One way is editing the values of selected event parameters in the MIDI Inspector window. The other method is selecting the note we need in the Piano Roll window and open List Editor – here in the next “Pitchbend” line enter the correct value.

To set the actual time intervals between the points of changing pitch, we should imagine how the guitarist finger moves during a long slide. It gradually accelerates, speeding up at the end. So the time intervals between the points must gradually decrease.

A similar principle is used to play sliding down.


Step 4

You may have noticed in the example images above that the main note is the last one. We first altered the Pitchbend value, changing the pitch up or down for an octave. Then using small semitone portions we adjusted the Pitchbend to zero.

We can conversely choose the first note to be the main one. In this case, take a note with Pitchbend value = 0, and then using the methods described here move down or up an octave with semitone portions.

It’s up to you what option to choose between these two. Here’s a third option.


Step 5

Instead of choosing the first or last note as the main one, I advise you to pick a note from the middle of range instead. Changing a sample’s pitch up or down an entire octave will sound less realistic than playing it at the original pitch. We can minimize this problem by choosing a note in the middle of the range, that will be changed up or down by only half an octave.

For example, sliding down an octave from G3-G2. Make D-flat (C#3) the main note, and the Pitchbend parameter will range from +4096 to -4096, with a scale interval ? 682.7.

Another example – sliding up an octave from F2 to F3. Here the best main note will be B2. The range of changing the Pitchbend parameter here will be from -4096 to +4096, with scale interval ? 682.7.


Step 6

This technique will be less effective if the sound you are using has a limited pitch range. For example, if the manufacturer supplied a set of samples with G4 at the top of the range, then you will not be able to slide from E4-E5 using a note in the middle as a main one.

For instance, A#4 – the middle note in this range – will simply not sound in this case, as it is outside the instrument’s range. It is better to choose a main note closest to maximum possible one – G4.

Download audio file (3-1.mp3)

Download audio file (3-2.mp3)

Interestingly, the value of Pitch Wheel range = 12 is rather universal number, as using this value it is possible to imitate both long and short sliding. Keep in mind that when sliding for two semitones with PW = 12, the numbers we set for Pitchbend (unlike ±8192 and ±4096 we used in Part 1) should be accordingly ±682 (683) and ±1365 (1366).

I hope you understand where we got these numbers: the entire range is divided to number of semitones to get the needed value. For a 3-4 semitone glissando you can also use this pitch wheel range, and calculate Pitchbend values relatively.

If in your music you like to combine both long, short, and medium glissando, it is up to you which pitch wheel range to use. You can leave PW = 12 for all ranges, or you may want to use PW = 2 for short glissando for more flexible manual work. In this case for long glissando you could simply change the pitch wheel range from 2 to 12 either in List Editor window, or working with automation (if you find the needed parameter on your instrument and if it is possible technically).


Conclusion

You’ve made it to the end of the series! You learned how to imitate a realistic guitar sliding technique with a MIDI keyboard in any MIDI editor. We dissused several glissando ranges: from 2 semitones, to 3-4 semitones, to entire octave (12 semitones). The tutorial was long and detailed with many graphs and calculations, but I hope it gave you some useful tips and you’ve enjoyed it. Use it to create your own live guitar tracks with MIDI editor.

Using these techniques allows you to achieve unbelievably realistic guitar tracks – with slides, bends and whammy bar. Let’s finish by listening to our example tracks one last time.

Download audio file (example-1.mp3)

Download audio file (example-2.mp3)


Workshop #115: Blueberry Haze by Sound Scientists

At Audiotuts+ we regularly put up a reader track for workshopping and critique (find out how to submit a track). This is how it works: you upload your song, and every week or so we’ll publish one here and step away from the podium. The floor is yours to talk about the track and how the artist can fix problems in and improve upon the mix and the song.

This track has been submitted for your friendly, constructive criticism. They have put their track (and their heart and soul) in your hands to learn and get useful feedback.

  • Do you enjoy the song or track itself? Does it have potential?
  • Can the arrangement be improved?
  • How did you find the mix? What would you do differently?
  • What do you enjoy about the rhythm track? What can be done to improve it?
  • Is the choice of instruments relevant and effective for the style/song?
  • Are the lyrics (if any) effective? Does the style, arrangement and genre of the song suit them?
  • Can you suggest any specific techniques that might improve the track?
  • Do you have any other constructive feedback?

Blueberry Haze by Sound Scientists

Artist’s website: HipHopProduction.com

Description of the track:

This track is entitled “Blueberry Haze,” and was created using Cubase SX3 for tracking/mixing, NI Battery/Trigger Finger for playing drums/samples, Basic64 (highly recommended freeware VST) for chiptune leads, and Spectrasonics Trilogy for bassline.

Download audio file (02BlueberryHaze.mp3)

Terms of Use: Users may download track, and may even redistribute it, so long as original credit is given to Sound Scientists.

Have a listen to the track and offer your constructive criticism for this Workshop in the comments section.


Submit Your Tracks for Workshopping

Need constructive criticism on your own tracks? Submit them using this form.


Dried Ink Stains: 20 High Resolution Brushes – Premium Psdpack


Today, we have a new set of Premium Brushes available for Psd Premium Members. This set was crafted by Grant Friedman of Colorburned and includes 20 High Resolution Photoshop Ink Stain Brushes. If your next project calls for a grungy, stained look, then this set is perfect for you. Learn more at the jump!


High Resolution Ink Stain Brushes

This new Premium Psdpack Pack is available for Psd Premium Members today and includes 20 high resolution brushes ranging somewhere in the neighborhood of 2500 by 2500 pixels. Each brush was created using varied mixtures of ink and water. This mixture was applied in layers which allowed the stains to dry and mix together in a wide range of opacities. Members can Log in and Download! Otherwise, Join Now! A preview of the brushes is below.

sample

This new Premium Psdpack Pack was created by Grant Friedman of Colorburned and is available for Psd Premium Members to download today. Grant is also the Editor of Psdtuts+ and creates loads of professional quality Photoshop brushes on a regular basis. We’re excited to partner up with him on this release.

pack

Psd Premium Membership

As you know, we run a Premium membership system that costs $9 a month (or $22 for 3 months!), which gives members access to the Source files for tutorials as well as periodic extra tutorials, and Premium Packs like this one! If you’re a Premium member you can log in and download this set. If you’re not a member, you can of course join today!

Quick Tip: Create a Realistic Credit Card in Photoshop


In today’s quick tip tutorial we will demonstrate how to create a realistic-looking credit card using Photoshop and Illustrator in just a few short steps. Let’s get started!


Step 1

To speed up the process, we will begin by putting together some basic graphics in Illustrator. Make a 3.5in by 1.9in rounded rectangle, then fill the object with a color or gradient of your choice.

Draw some curvy lines as shown using the Pen Tool. Then go to Object > Blend > Blend > Blend Options > Specific Steps, enter 30 and click OK. Make two different lines with different colors.

Select the line art that you just created and apply a clipping mask using the shape of the credit card. Make sure that the credit card shape is placed on top of your line art and that you’ve duplicated your credit card background as well.

Note: if you are using Illustrator CS5, select the credit card and click the Draw Inside option to Paste (Cmd/Ctrl + V) inside the objects.

Use the Pen Tool to draw the ribbon as shown.


Step 2

We are now finished with Illustrator. Let’s get started by opening Photoshop, creating a new canvas that’s a bit larger than your Illustrator document and then by copying and pasting each element that you created in Illustrator individually. At this stage, you should already have some logos and graphics that you would like to place on the card. If not, go ahead and create some. Add your graphics to the card, as shown. Feel free to use the following fonts in your card as well. Download them here and here.


Step 3

Now it’s time to add your text. Choose the Oval Typeface using #f1efed. Type out some random numbers and a name. Then apply the following layer styles.


Step 4

Now it’s starting to look more like a credit card, let’s add some shadows to make it look more realistic. Duplicate each layer, change the font’s color to black and turn off the Layer Styles, this will give us the base shadow. Now move the shadow numbers about 3-5 pixels to the right and 3 pixels down (do the same with the name as well), now go to Filter > Blur > Motion Blur, then type in Angle: -34 and Distance: 10px; set the Layer Blend to Multiply and 50% Opacity. For final touches of the front side, go ahead and look at your reference credit card and add an expiration date wherever you want it placed and you will be done with the front side, make a new folder and drop all the layers inside and name it FRONT.


Step 5

Now, let’s work on the backside of the credit card. Duplicate the credit card base, move the layer to the FRONT folder, then Right Click on the layer and rasterize, make a selection of it and fill it up with a color you used on the front side (I used the bright red on the top left of the credit card’s front side). Note: don’t use gradients for the back.

Go to the FRONT folder, duplicate the text layers that you used Layer Styles (credit card numbers, name and expiration date in my case) on and drag them to the BACK folder, then flip them Horizontally and change the color of the text to the same as the credit card’s back.

Now we need to change the Layer Styles of the text layers to make them look as if they were stamped and look as the reference credit card, Double Click on the layer and change the values as shown below, do the same for the other layers.


Step 6

Now the credit card looks like your reference, go ahead and arrange the rest of the elements you made for the back side of the credit card.

Some elements like the signature rectangle can be done in Photoshop, if you have a logo of your own you can rotate it 45 degrees and duplicate several times and make a pattern, then select each one and change the color of it with Hue and Saturation (Cmd/Ctrl + U), then Merge them all together, in another layer make a rectangle the size you want for the signature and fill it with white, make a selection of rectangle > select the pattern layer and click (Cmd/Ctrl + Shift + I) to inverse the selection and Erase, then merge both layers.

To make the signature make another layer, select a hard black brush and make a random signature. Finally, add the security codes.


Step 7

If you like, you could end the tutorial here but now we are going to add some perspective to the card. Duplicate each folder, then Right Click on the group folder and select Merge Group, do the same for each folder. Now we have 2 layers, one of the front and one for the back of the credit card, select both layers and Click Cmd/Ctrl + T to transform and make them smaller, then rotate a little and Right Click to select Perspective and transform as desired.


Step 8

Select a layer of the credit card (no matter if it’s front or back) and duplicate, make a selection of it and fill it with a light grey, then move it about 2px to the right. To make the shadow of the card, Duplicate the credit card and make a selection of it and fill it with black, then Click Cmd/Ctrl + T to transform > Right click and select Distort and transform as desired; Go to Filter > Blur > Gaussian Blur > 10 px radius; set the Layer Blend to Multiply at 30% Opacity.

To make the Reflection, Duplicate both credit card layers, select both layers and flip them vertically (Cmd + T > Right Click > Flip Vertical) and arrange them on the tip of the credit card; select a Soft Eraser Brush with 30% Opacity and erase each layer to make the reflection.


Step 9

Let’s make some lights and shadows, make a selection of the credit card, then make a new layer, select a white soft brush, Normal Mode at 20% Opacity and on the top left corner add some light, then change color to black and add some shadows on the lower right corner.


Final Image

Make a background and you are done! To make images of each side of the credit card just turn off the front side layer, remember to turn on or off the corresponding reflection layer as well; you can use this tutorial to make a credit card icon; remember that you can make different color credit cards by playing with Hue and Saturation.

Design and Develop a Fantastic Flash Shooting Gallery Game – Active Premium

Plenty has been happening in the world of Tuts+ Premium lately, so let’s keep the ball rolling with another cracking tutorial exclusively available to Premium members. Here’s a brilliantly entertaining AS3 game tut, courtesy of Carlos Yanez.


Take a look at (and play around with) the final result we will be working towards:


This Premium Tutorial is Packed with Design and Development Tips

Using the Flash Tools we’ll create good looking graphics that will be powered by several ActionScript 3 classes like MouseCursor, Tween Nano, Sprite, Timers and other Events.

The user will be able to input a player’s name and destroy a predefined number of dartboards before the game ends.


Professional and Detailed Instructions Inside

Premium members can Log in and Download! Otherwise, Join Now! Below are some sample images from this tutorial.


Active Premium Membership

We run a Premium membership system which costs $9 a month (or $22 for 3 months!) which periodically gives members access to extra tutorials, like this one! You’ll also get access to Psd Premium, Vector Premium, Audio Premium, Net Premium, Ae Premium and Cg Premium too. If you’re a Premium member, you can log in and download the tutorial. If you’re not a member, you can of course join today!

Also, don’t forget to follow @activetuts on twitter and grab the Activetuts+ RSS Feed to stay up to date with the latest tutorials and articles.

An Introduction to Xpresso in Cinema 4D

In today’s tutorial, rigging artist Aleksey Voznesenski takes us through the basics of Cinema 4D’s Xpresso scripting system. If utilised correctly, Xpresso can be an incredibly powerful system allowing you an amazing level of control over your rigs, animations – even the UI itself. If you want to speed up your workflow in C4d and you’re not using Xpresso, this tutorial is for you!

Aleksey previously recorded our ‘Cinema 4D 101′ tutorial, which can be found here : A Quick-Start Guide to Cinema 4D


Video 1

Download

Note: click the ‘Monitor’ icon to view tutorial in full-screen HD.


Don’t miss more CG tutorials and guides, published daily – subscribe to Cgtuts+ by RSS.

11 Tips for Training People at Work

If you’ve ever had to train people at work you will certainly learn, over time, the right way to do so. Winging it is not part of my vernacular when it comes to training others. Here are some tips that I have picked up during my career that have helped me immensely when training people at work.

Before the Training Session

1. Put together detailed documentation with screenshots.

Providing documentation at the start of the training session is very important. People learn more easily when they have hardcopy material to follow during the class. You should also provide a section called Notes at the bottom of each page so that the students can add additional information.

2. Reserve the room, as a separate meeting, ½ hour before the training session.

I’ve seen people try to set up the projector and hand out the training material with the students already in the class. If you reserve the room, for yourself, ½ hour before the class, this will give you plenty of time to hit the ground running when the students arrive.

3. Ask them what they expect.

Send an email to all participants a few days before the training class. Ask them what they expect to get out of the training session. This could help you prepare the curriculum and gear it more toward that particular group. It should also ensure that the participants aren’t expecting something you’re not prepared to deliver.

4. Test drive.

Find a co-worker and give them a test drive of the training session. It may be an abbreviated version but ask that person to take notes and ask questions as you are presenting. This should help you work out the kinks and will give you practice presenting the material.

During the Training Session

5. Lose the phones and PDAs.

Paying attention is all you can really expect from your students. The last thing you want someone to be doing while you are presenting is texting, answering a phone, or checking email. Bring a small cardboard box and ask each student to turn off and place their phone or PDA in the box while the class is in session. During breaks they can use them.

6. Give ‘em breaks.

Along the lines of paying attention, it is very difficult to expect your students to keep their attention span for more than one hour straight. I have a hard-and-fast rule to give the class a 15 minute break for each hour of class time. This break will certainly refresh the students and allow them to get coffee, use the bathroom, or check their phones and email.

7. Be comfy.

It is much easier to present your training material if you are wearing comfortable clothes. Wearing comfortable shoes will also help if you’re on your feet the whole day. Being comfy will help you relax and, as a result, will help your audience relax.

8. Stay hydrated.

Nothing will give you dry-mouth faster than having to speak a lot. You may find that five minutes into the training session your mouth is dry as the Sahara. Bring a full water bottle with you that is easy to dispense. You may also want to have a couple of pitchers of ice water in the back of the class with plastic cups for the students as well.

9. Make it interactive.

Always allow your audience to ask questions at any time during the training session. People want answers at the time that the material is being covered. Asking a class to wait until the end of a particular section to ask questions doesn’t really help. If you don’t allow a question to be cleared up as soon as it comes up, you could lose the class.

After the Training Session

10. Evaluate.

Hand out a set of evaluation questions at the end of the training session. It doesn’t have to be a lengthy list but you want to hear how the training was received by the students. This should help you refine the material based on their input.

11. Provide an electronic copy of the material.

Even though you handed out hardcopy training material at the beginning of the class, always provide an electronic copy at the end. These days everyone wants to have an electronic file. Gather the email addresses of the participants and send it out via email after the class.

Conclusion

Training others is not an easy task. If you heed these simple steps, you just may make the experience more enjoyable for your class and for yourself.

Boomerang for Gmail: Beta Invites!

Yesterday we gave Baydin’s Boomerang for Gmail a pretty decent once over.  I have been using the service for the past week or so and I’m happy with the results I’m getting.  As editor of this site – and living in North America as opposed to where Envato HQ is based – it’s handy to schedule emails and move on to other things that aren’t, well, email. Alas, the service is still in beta, so you’ll need an invite to use it.

Luckily, WorkAwesome has just been given 1000 invites to give away (thank you, Baydin)! Use the promo code b4gbeta on the link below and you’re good to go…

Boomerang for Gmail: Get Started Today!

A Beginner’s Introduction to Wide Angle Photography

Today we’re going to take a step back and view the art of photography through a much wider perspective, which is a terribly pun-filled way to say that this article will examine the basic concept of wide angle photography. We’ll take a look at what wide angle photography is, why you should try it, some considerations to keep in mind and finally a few lenses to get you started.


What Is a Wide Angle Lens?

Just to make sure this article is understandable to absolute beginners, a brief definition of our terms is necessary.

For the purposes of this article, a “wide angle” lens will simply be one with a fairly short focal length. If you have a 14mm lens and an 85mm lens, the 85mm will possess a greater magnification than the 17mm.

Because of its zoomed out nature, a wide angle lens is capable of capturing more in the frame than a zoom lens and is therefore considered to have a “wider” field of view.


Why Not a Zoom Lens?

When new photographers purchase their first digital SLR and eventually set off in search of a few good lenses to buy, they tend to have only one thing in mind: zoom.

A “good lens” is one that allows you to take a close-up shot of a fly on a horse’s ear from thirty yards. All that other stuff is just second rate, right?

Obviously, the answer is a resounding “no!” Don’t get me wrong, zoom lenses are absolutely fantastic and every photographer should have at least one good one. They’re just not the only thing you should consider in your quest to expand your lens arsenal.

In a recent article I raved about the wonders of using my 50mm 1.4, a lens that is by no means ideal for capturing your kid’s little league game from the top of the bleachers. However, there are in fact several situations where it is hard to beat for both convenience and quality.

This same logic applies to a good wide angle lens. While it definitely won’t be appropriate for all shooting scenarios, it is an incredibly essential piece of equipment that can produce uniquely stunning photographs.


More Than Landscapes

Shooting with a zoom lens or even something like a 50mm prime tends to limit what you can take in. If you’ve ever walked around with one of these you know that there are tons of shooting scenarios when you simply can’t get the shot you want.

Often, the first type of shot that comes to mind when you think about a wide angle lens is a landscape. After all, what wider subject could you possibly hope for than a mountain range or a vast windswept field?

There’s definitely a reason for considering these shots first: wide angle lenses are unrivaled in capturing the beauty of an immense landscape. Your eyes are capable of taking in nearly 180 degrees of a scene at once and when you’ve got a beautiful view, you typically want a lens that can capture as much or more than what you’re seeing.

However, taking in the sites isn’t the only thing that wide angle lenses are good at. For instance, when you’re indoors, walls tend to prevent you from backing up far enough to get everything you want in the frame. Anything zoomed in too far can leave you frustrated at your inability to capture anything but close details of the room you occupy. A wide angle lens will enable you to really take in the full room and capture the essence of the scene before you.


Distortion

One of the most important things to keep in mind when shooting with a wide angle lens is that you’ll quite often come up with a result that surprises you in its awkwardness.

Because wide angle lenses take in such a wide field of view, they tend to distort the apparent physical relationships between objects. This results in notable distortion, most noticeable when you look at lines that should be relatively straight but are instead bent.

For this reason, you have to monitor your results closely, especially when you’re taking pictures of people. Keep in mind though that the distortion doesn’t have to be an unwanted side affect. Countless photographers use wide angle distortion as an important element of the image. As long as you’re aware of the distortion and how it affects a given lens, you can use it to stylistically create images that you simply couldn’t capture by any other means.


Depth of Field

Understanding depth of field is key to mastering wide angle photography. A cursory Google search will reveal many sources claiming that wide angle lenses provide a much stronger depth of field than telephoto zoom lenses. This is nice because it means that most of your wide angle image appears in focus.

However, according to Alex Don, this effect is mostly an illusion and that “if you enlarge a portion of it [the zoomed out image] this apparent depth of field will disappear.”

Similarly, Cambridge In Colour points out that what’s really changing drastically with the focal length is the distribution of the depth of field. Put simply, “a wide angle lens provides a more gradually fading DoF behind the focal plane than in front.” Because longer focal lengths flatten your perspective, they appear to have a greater depth of field. Keep in mind that in photography appearances are just as important as the literal truth (and occasionally more so).

The best step you can take toward understanding the technical side of wide angle depth of field is to experiment. Take the same photo with multiple lenses at multiple aperture settings and compare so you can get a feel for how to produce the effect that you want. All the technical articles in the world can’t compare to actually getting your hands on a camera and picking up some experiential knowledge.


Wide Angle Lens Prices

As with all types of lenses, wide angle lenses are all over the map in price. A Canon 14mm f/2.8L II USM will run you upwards of $2,000 and a Nikkor 14mm will typically be at least $1,500. Alternatively, you can grab a Sigma 14mm for only $700 and a similar Tamron for $800.

Contrast this with the lower end lenses which are obviously much more affordable. A Canon 35mm f/2 is pretty easy to find under $300 and a Nikkor equivalent at f/1.8 is widely available for under $200.

These are all primes but you can definitely pick up some affordable multi-purpose zoom lenses that start at around 17mm and go up to anywhere from 85-200mm.


Conclusion

To sum up, big fancy zoom lenses are both wildly impressive and highly practical in certain situations, but as a photographer you should always be ready and able to capture the bigger picture, and you’ll need a wide angle lens to do it.

Though wide angle lenses are most often thought of in relation to landscapes, they actually have a wide variety of applications in all kinds of settings.

Finally, always be aware of the level of distortion as well as both the apparent and literal range of the depth of field in your wide angle photos. With practice you’ll be able to use these variables positively to create the shot you want.

Leave a comment below and show us your favorite wide angle shots. Be sure to include the type of lens you used and whether or not you would recommend it to others.

Creating a Web Poll with PHP


Polls are nearly ubiquitous on the web today, and there are plenty of services that will provide a drop-in poll for you. But what if you want to write one yourself? This tutorial will take you through the steps to create a simple PHP-based poll, including database setup, vote processing, and displaying the poll.


Step 1: Plan & Create the Database

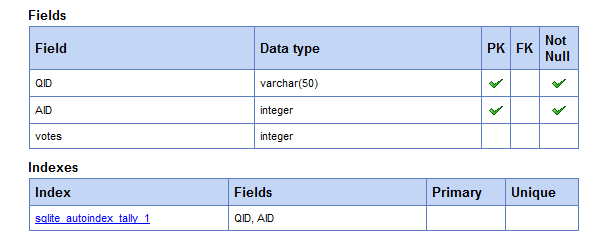
In order to store poll results, we’re going to store three pieces of information:

  • A question identifier
  • An answer identifier
  • The number of votes a question/answer pair has gotten

For this tutorial, we’ll be using PDO and SQLite. If you’re working with SQLite3, you can create a new database via the command line tool; if you’re using an older version, a quick PHP script will do the trick. Here’s the one used for this tutorial:

<?php
echo "creating database\n";
try {
    $dbh = new PDO('sqlite:voting.db');
    $dbh->setAttribute( PDO::ATTR_ERRMODE, PDO::ERRMODE_EXCEPTION );
    $dbh->exec('
        CREATE TABLE tally (
        QID varchar(32) NOT NULL,
        AID integer NOT NULL,
        votes integer NOT NULL,
        PRIMARY KEY (QID,AID))
    ');
}
catch(PDOException $e) {
    echo "ERROR!!: $e";
    exit;
}
echo "db created successfully.";
?>
Voting Database Structure

This simple script will create a SQLite database in the directory you run it. Unlike mySQL, the database here is a flat file. If you’re familiar with SQL, the create should make sense to you, although the last line may be new to some people:

PRIMARY KEY (QID,AID)

This creates a composite key for the database. Entries in either column do not have to be unique to that column, but the combination of the two must be unique.


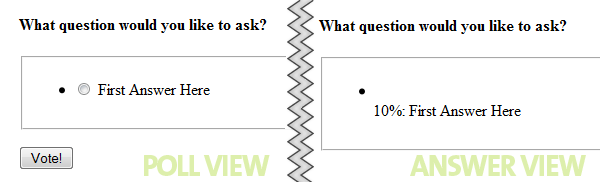
Step 2: Design Your Poll’s HTML

Before you start writing any PHP, you need to decide how to create your poll in terms of markup. We’re going to try to keep the markup as semantic and simple as possible. Your poll will have two looks:

  • Question waiting to be answered
  • Current Results of the poll

In writing this HTML, some classes will be included to help with the CSS later.

Poll View

Because a poll is primarily a list of answers, we’re going to incorporate an unordered list to contain those answers. For the question itself, we’re going to use a heading tag.

<form class="webPoll" method="post" action="test.php">
    <h4>What question would you like to ask?</h4>
    <ul>
        <li>Answer Here</li>
        <li>Another Answer Here</li>
    </ul>
</form>

That’s pretty basic, but doesn’t include any form elements. Radio buttons are the most appropriate since we’re only allowing one answer per poll. Also, we’re going to use the label tag to associate answers with the proper radio button. Now our form HTML looks more like this:

<form class="webPoll" method="post" action="test.php">
    <h4>What question would you like to ask?</h4>
    <ul>
        <li>
            <label class='poll_active'>
            <input type='radio' name='AID' value='0'>
            First Answer Here
            </label>
        </li>
    </ul>
</form>

That’s a little more complex, but not too bad. Still a bit more to add. We’re going to include a fieldset tag to open up some styling options, and of course we need a submit button!

<form class="webPoll" method="post" action="/poll/test.php">
    <h4>What question would you like to ask?</h4>
    <fieldset>
    <ul>
        <li>
            <label class='poll_active'>
            <input type='radio' name='AID' value='0'>
            First Answer Here
            </label>
        </li>
    </ul>
    </fieldset>
    <p class="buttons">
        <button type="submit" class="vote">Vote!</button>
    </p>
</form>

For each answer, a new LI tag is added and the value of the radio button incremented. That will eventually be done by our PHP. The extra HTML is the fieldset tag, and the paragraph wrapped around the button – both of which will be used by our CSS.

Answer View

The HTML is going to be nearly identical for the answer view. The line-item tags won’t contain a form element and we’ll be adding a div which can be used to show the percentage of votes that answer received. Here’s how that will look:

<li>
    <div class='result' style='width:20px;'>&nbsp;</div>
    <label class='poll_results'>
        10%: First Answer Here
    </label>
</li>

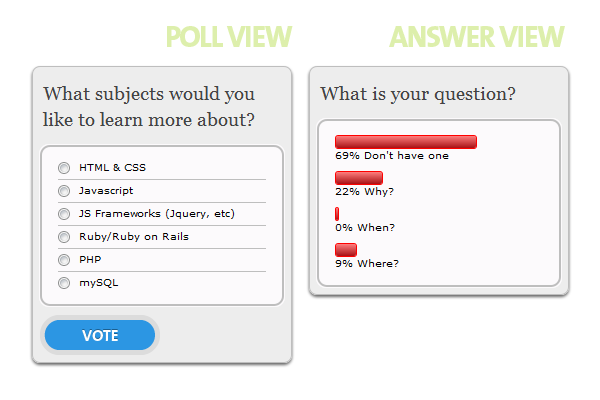
Yes, that’s an inline style you see there. That style will be generated by our PHP based on the current percentage of each individual answer. Here’s what we have so far:

Unstyled Poll

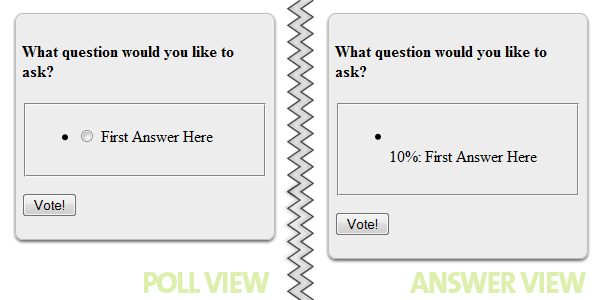
Step 3: Style the Form

The HTML we created in the last step was not very attractive. Let’s see if we can fix that up a bit. We’re going to use the wonderful CSS3 PIE (progressive Internet Explorer) library so we can obtain a similar look across all browsers. To make this library work properly, there are numerous cases where you must apply a relative position to elements. You can read all the details on the library website.

Style the Form Tag

We’re going to use the form tag as our container. It’s going to have nice, rounded corners, and a bit of a drop shadow. The styles below also specify a width, and padding.

form.webPoll {
    background:#ededed;
    behavior:url(PIE.php);
    border:1px solid #bebebe;
    -moz-border-radius:8px;
    -webkit-border-radius:8px;
    border-radius:8px;
    -moz-box-shadow:#666 0 2px 3px;
    -webkit-box-shadow:#666 0 2px 3px;
    box-shadow:#666 0 2px 3px;
    margin:10px 0 10px 8px;
    padding:6px;
    position:relative;
    width:246px;
}

The key line here is the behavior attribute. This will be ignored by non-IE browsers and will add the CSS3 functionality to IE6-8.

Basic styling

Still ugly, but a noticeable improvement.
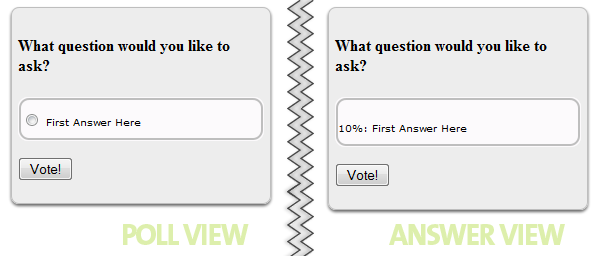
Box the Answers

Next, we’re going to create a nice box around the answers and use a bit of illusion to make the border look inset by a pixel. This is done by coloring the outer-most border (the fieldset) the same color as the interior, and then using the unordered-list tag as our real border. Here’s the CSS:

form.webPoll fieldset {
    background:#FCFAFC;
    behavior:url(PIE.php);
    border:1px solid #FCFAFC;
    -moz-border-radius:10px;
    -webkit-border-radius:10px;
    border-radius:10px;
    margin:0;
    padding:0;
    position:relative;
}
form.webPoll ul {
    behavior:url(PIE.php);
    border:2px #bebebe solid;
    -moz-border-radius:10px;
    -webkit-border-radius:10px;
    border-radius:10px;
    font-family:verdana;
    font-size:10px;
    list-style-type:none;
    margin:0;
    padding:10px 0;
    position:relative;
}
Basic styling

Style the Answers

Next we need to add a little CSS to make our options look better.

form.webPoll li {
    margin:0 16px;
    overflow:auto;
    padding:4px 0 6px;
    position: relative;
}
form.webPoll input {
    position: absolute;
    top: 4px;
    *top: 0;
    left: 0;
    margin: 0;
    padding:0;
}
label.poll_active {
    float:right;
    width:90%;
}

You might ask why we’re using absolute positioning on the inputs and floating the label. The reason is simple: multi-line answers. If an answer to your poll question is long, you want the radio button to look like a bullet on an unordered list – hanging. This will keep the text from wrapping around it if it’s multiple lines.

There’s also a style targeting IE specifically with the * hack to cause the buttons to line up properly in IE6-8.

We also need to style the bar used to show results. We’ll add that now:

form.webPoll .result {
    background: #d81b21;
    background: -webkit-gradient(linear, left top, left bottom, from(#ff8080), to(#aa1317));
    background: -moz-linear-gradient(top,  #ff8080,  #aa1317);
    -pie-background: linear-gradient(#ff8080, #aa1317);
    border:1px red solid;
    -moz-border-radius:3px;
    -webkit-border-radius:3px;
    border-radius:3px;
    clear:both;
    color:#EFEFEF;
    padding-left:2px;
    behavior: url('PIE.php');
}

There’s another new attribute here: -pie-background, which allows us to, in conjunction with the PIE library, use gradient backgrounds in IE. There’s still a few touches to add.

Question and Button

A default H4 may not be what you’re looking for, so let’s add some styling to that.

form.webPoll h4 {
    color:#444;
    font-family:Georgia, serif;
    font-size:19px;
    font-weight:400;
    line-height:1.4em;
    margin:6px 4px 12px;
    padding:0;
}

And I’m not a big fan of default buttons, so we’re going to use a CSS sprite to liven it up a bit.

.buttons {
    margin:8px 0 1px;
    padding:0;
    text-align:right;
    width:122px;
}
.vote {
    background:url(res/vote.png) repeat scroll 0 0 transparent;
    border:medium none;
    height:40px;
    text-indent:-9999em;
    width:122px;
}
.vote:hover {
    background-position:0 -41px;
    cursor:pointer;
}

What about IE6? It doesn’t support the hover psudo-class! We can either leave those users out in the cold (they’ll still see the button default state) or we can use another lovely little GPL licensed library, Whatever:hover.

Final Poll CSS

Last Bits

In order to accommodate some IE6 quirks, certain elements need to have something called “HasLayout” triggered. The easiest way to do this is to set a property of zoom for these elements. The property is ignored by non-IE browsers.

form.webPoll ul,li { /*// Make IE6 happy //*/
    zoom:1;
}

You’ll also notice there are borders between each question. This was done with an additional class on the LI tags specifying a border. The class will be assigned to all but the last item by the PHP script.

The completed CSS file is contained in the download.


Step 4: Create a PHP Class — Decide on the Interface

Now it’s time to create the PHP to generate polls, show results, and handle votes. I’d like to keep using the script as simple as possible, so I’m planning the usage ahead of time. To create a poll in a particular place in a page, you’ll just use the following PHP:

$a = new webPoll(array(
        'What subjects would you like to learn more about?',
        'HTML & CSS',
        'JavaScript',
        'JS Frameworks (jQuery, etc)',
        'Ruby/Ruby on Rails',
        'PHP',
        'mySQL'));

That’s it. You’ll pass an array to the constructor which contains the question followed by the answers. In order to track the questions in the database, we’ll create an MD5 hash of the question to use as an identifier.


Step 5: Decide on the Class Properties

There’s certain data that’s going to be needed by each poll; we’re going to store some of this in class properties. We’ll need to store the question and the answers, the basic HTML, the question identifier, and some information on how to draw the results bars. Here’s the start:

class webPoll {

    # makes some things more readable later
    const POLL = true;
    const VOTES = false;

    # number of pixels for 1% on display bars
    public $scale = 2;

    # the poll itself
    public $question = '';
    public $answers = array();

    # the HTML
    private $header = '<form class="webPoll" method="post" action="%src%">
                       <input type="hidden" name="QID" value="%qid%" />
                       <h4>%question%</h4>
                       <fieldset><ul>';
    private $center = '';
    private $footer = "\n</ul></fieldset>%button%\n</form>\n";
    private $button = '<p class="buttons"><button type="submit" class="vote">Vote!</button></p>';

    # question identifier
    private $md5 = '';

The initial constants will be used in one of the methods to make it more readable so it’s easier to know whats going on.

Take note of the hidden input that’s been added here. This is the question identifier used to store information in the database. All the values in the HTML surrounded by percent signs will be replaced.


Step 6: Create the HTML Poll or Answers

Since it’s already been decided the poll will be made by creating an object, let’s examine the __construct method.

public function __construct($params) {
    $this->question = array_shift($params);
    $this->answers = $params;
    $this->md5 = md5($this->question);  

    $this->header = str_replace('%src%', $_SERVER['SCRIPT_NAME'], $this->header);
    $this->header = str_replace('%qid%', $this->md5, $this->header);
    $this->header = str_replace('%question%', $this->question, $this->header);

    # has the user voted yet?
    isset($_COOKIE[$this->md5]) ? $this->poll(self::VOTES) : $this->poll(self::POLL);
}

In the first line, we peel the question off the array stack with array_shift, and store it in a property. We also store the questions, leaving them as an array. We also create the question identifier here, by making an md5 hash of the question itself.

The next three lines perform some replacements on the HTML. The first sets our form action to point at the page the poll is one. The second puts our question identifier in a hidden form field. The third puts our question into the HTML.

In the final line of the constructor we check if the user has voted on this particular poll, and if he has, we show the votes. If he hasn’t, we show the poll.


Step 7: Generate the Poll

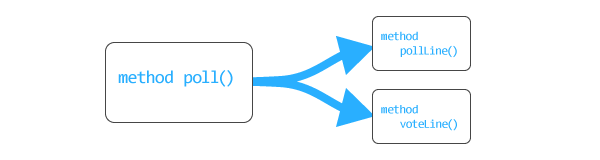
Both generating the poll and generating the results are very similar operations. In order to keep our code DRY we break the creation into three methods. The main one is “poll”.

DRY: Don't Repeat Yourself
private function poll($show_poll) {
    $replace = $show_poll ? $this->button : '';
    $this->footer = str_replace('%button%', $replace, $this->footer);

    # static function doesn't have access to instance variable
    if(!$show_poll) {
        $results = webPoll::getData($this->md5);
        $votes = array_sum($results);
    }

    for( $x=0; $x<count($this->answers); $x++ ) {
        $this->center .= $show_poll ? $this->pollLine($x) : $this->voteLine($this->answers[$x],$results[$x],$votes);
    }

    echo $this->header, $this->center, $this->footer;
}

Here’s the breakdown of what’s going on in this function:

lines 2 & 3: We only need a vote button if the user hasn’t voted. Here we determine if we’re going to use the button HTML or not, and then either insert the HTML, or replace the %button% placeholder with an empty string.

lines 6 – 8: If we’re not showing the poll, we obviously need the results, so here we go fetch them. We also calculate the total votes cast for use later in determining percentages.

lines 11 – 12: This generates the LI tags in our HTML. Depending on if we’re showing the poll or the results, we generate different HTML. This HTML generation is handed off to two functions:

  • pollLine
  • voteLine

line 15: Simply dumps out the data to the page.


Step 8: The pollLine() Method

This is a very simple method, which takes the current index of the answer as an argument.

private function pollLine($x) {
    isset($this->answers[$x+1]) ? $class = 'bordered' : $class = '';
    return "
    <li class='$class'>
            <label class='poll_active'>
            <input type='radio' name='AID' value='$x' />
                {$this->answers[$x]}
            </label>
    </li>
";
}

It checks if there’s an answer after the current one on its first line, and if there is, applies a class of bordered to that LI tag. The very last answer won’t get this class, allowing us to achieve the visual effect intended.


Step 9: The voteLine() Method

This method is getting 3 parameters passed into it:

  • $answer : The question answer for this line
  • $result : The number of votes this option has gotten
  • $votes : The total number of votes cast in this poll

With that information, the LI tags for the voting results can be produced.

private function voteLine($answer,$result,$votes) {
    $result = isset($result) ? $result : 0;
    $percent = round(($result/$votes)*100);
    $width = $percent * $this->scale;
    return "
    <li>
            <div class='result' style='width:{$width}px;'>&nbsp;</div>{$percent}%
            <label class='poll_results'>
                $answer
            </label>
    </li>
";
}

Since it’s possible for there to be no votes for an option, it will effectively leave $result unset. If we detect this we’ll give it a default value of 0 votes.

Next, we determine what percent of the votes the option got and finally use the scale property to determine the width, in pixels, that the results bar should be. Then we finally return the HTML containing all that information.


Step 10: Write the getData() Method

If you look back up a bit, you’ll see we call the getData() method which is defined as a static method in the class. Why static? Because if we decide to enhance this poll later by making it AJAX based, we’ll want access to that method without object creation. Here’s the method:

static function getData($question_id) {
    try {
        $dbh = new PDO('sqlite:voting.db');
        $dbh->setAttribute( PDO::ATTR_ERRMODE, PDO::ERRMODE_EXCEPTION );

        $STH = $dbh->prepare('SELECT AID, votes FROM tally WHERE QID = ?');
        $STH->execute(array($question_id));
    }
    catch(PDOException $e) {
        # Error getting data, just send empty data set
        return array(0);
    }

    while($row = $STH->fetch()) {
        $results[$row['AID']] = $row['votes'];
    }

    return $results;
}

The question ID is passed into the method and it will return an array containing the answer ID’s and the number of votes that answer has. If an answer has no votes, it won’t have an entry in the array, which we’ve already dealt with in the voteLine() method.

Since database errors in web polls are particularly tragic, we’re simply going to return an empty array if one occurs. The user will get 0 votes for each result. In a production environment you might want to log this error to a file, or send the admin an email.


Step 11: Handling a Vote

We’re going to add a second static method to the class, and this one will handle incoming votes. Votes will only be counted if the user hasn’t voted before (as determined by a cookie) and once the user has voted we’ll set a cookie indicating this.

In this type of web application, it’s nearly impossible to stop multiple votes without excluding some legitimate users. Setting a cookie is just a basic precaution.

This is one of the more complex methods in our webPoll class, and we’re going to look at it in three parts.

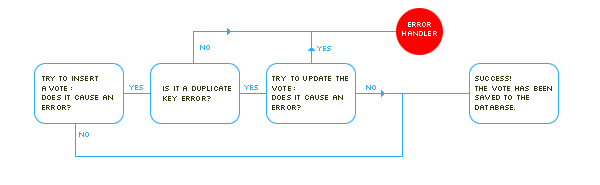
static function vote() {
    if(!isset($_POST['QID']) ||
       !isset($_POST['AID']) ||
       isset($_COOKIE[$_POST['QID']])) {
        return;
    }

A call to the vote() method will be at the top of our PHP page, so the first thing we want to do is decide if there’s a vote to process or not. The above statement is how we determine this. Here’s what it says:

  • If there’s no Question Identifier in our POST data (OR!!)
  • If there’s no Answer Identifier in our POST data (OR!!)
  • If a cookie has been set already matching the Question Identifier

If any of those are true, we don’t have to process a vote, and we leave the method.

$dbh = new PDO('sqlite:voting.db');
$dbh->setAttribute( PDO::ATTR_ERRMODE, PDO::ERRMODE_EXCEPTION );

try {
    $sth = $dbh->prepare( "INSERT INTO tally (QID,AID,votes) values (:QID, :AID, 1)" );
    $sth->execute(array($_POST['QID'],$_POST['AID']));
}
catch(PDOException $e) {
    # 23000 error code means the key already exists, so UPDATE!
    if($e->getCode() == 23000) {
        try {
            $sth = $dbh->prepare( "UPDATE tally SET votes = votes+1 WHERE QID=:QID AND AID=:AID");
            $sth->execute(array($_POST['QID'],$_POST['AID']));
        }
        catch(PDOException $e) {
            $this->db_error($e->getMessage());
        }
    }
    else {
        $this->db_error($e->getMessage());
    }
}

This looks a lot more complicated then it really is. What happens here is we check if a particular answer has gotten a vote before. If it hasn’t we create a new record for that answer, and give it one vote. If it has, we update the existing record. So how’s it decide which to do?

PDO exception magic.

Remember at the very beginning we created our multi-column primary key? When we try to insert a record into the table which matches an existing QID/AID pair, an exception is thrown, and in particular the exception code is 23000 (duplicate key).

If the insert throws an exception, we’re going to check the exception code, and if it matches 23000, we’ll try to update the record instead. Of course if the insert fails for a different reason, or the update fails as well, we’re going to just issue a call to a method called db_error() which just echos a generic error message. Like before, a production environment would log this error and/or notify the admin.

Using PDO Exceptions

Finally, the end of the method:

    # entry in $_COOKIE to signify the user has voted, if he has
    if($sth->rowCount() == 1) {
        setcookie($_POST['QID'], 1, time()+60*60*24*365);
        $_COOKIE[$_POST['QID']] = 1;
    }
}

By using rowCount() we can verify that we’ve either updated or inserted a vote. If a vote has been successfully registered we set a cookie indicating as much, using the question identifier as the cookie name.

In addition to setting the cookie, we populate the super-global $_COOKIE, so when the poll displays, it shows answers rather then presenting the poll again.


Step 12: Put It All Into Action

We’ve written the PHP, set up the CSS and HTML, now it’s time to put it all into use. In this example, we’re just going to drop everything into a page that’s otherwise blank. At the very top of the page, insert the following:

<?php
    include('webPoll.class.php');
    webPoll::vote();
?>

It’s important that this be the very top of the page, before any HTML. Why? Because if there’s a vote to process, a cookie may be written, and you can’t write cookies after anything else has been sent. The call to the static method vote() returns if there’s not the proper POST data to process.

Next, we’ll include all the styles we wrote as a seperate stylesheet. Also, we’re going to include a particular style just for IE that was mentioned earlier to enable the :hover psudo-class.

<link rel="stylesheet" href="poll.css" type="text/css" />
<!--[if IE]>
<style> body { behavior: url("res/hover.htc"); } </style>
<![endif]-->

In the BODY of your HTML page, you’ll drop in the following PHP to insert the polls:

$a = new webPoll(array(
        'What subjects would you like to learn more about?',
        'HTML & CSS',
        'JavaScript',
        'JS Frameworks (jQuery, etc)',
        'Ruby/Ruby on Rails',
        'PHP',
        'mySQL'));

$b = new webPoll(array(
        'What is your question?',
        'Don\'t have one',
        'Why?',
        'When?',
        'Where?'));

That’s it! Thanks for reading. Any thoughts, questions, or suggestions?

Quick Tip: What you May Not Know About JavaScript’s Logical AND Operator


In today’s video quick tip, we’ll be reviewing JavaScript’ logical AND operator. Those of you who are just beginning to get into JavaScript, or even a library like jQuery, might not realize that they can even be used as micro if statements!


Example 1: General Usage

// EXAMPLE 1
var a = 5,
	b = 10;

if ( (a === 5) && (b === 10) ) {
	alert('yay');
}

The AND operator’s use in the code above is what the huge majority of us are most familiar with. If a equals 5, and b equals 10, then do something awesome, like display an alert box that says, “Yay!”

The right side of the && operator will only run if the left side is equal to true. With that in mind, we can use this to our advantage!


Example 2: Checking if an Element Exists

In most of my AJAX-based applications, there will be a point where I must first determine whether an element with a particular id exists within the DOM. If it does not, I’ll create it. Otherwise, I’ll work with the element that already exists. Generally, we can use an if statement for this sort of task.

if ( !document.getElementById('contents') ) {
  // then call a function that inserts the element into the DOM.
}

Alternatively, we can use the && operator to accomplish this task.

!document.getElementById('contents') && createElem('div', 'contents', 'hello world');

Remember, that fake createElem function will, again, only run if the left side is equal to true. Think of it this way: is it true that we could not find an element with an id of contents on the page? If so, then move on to the right side. Now if it’s equal to false, the right side will never run.


Example 3: Loading jQuery Locally

When reviewing the HTML5 Boilerplate, I noticed that Paul uses a clever one-liner that potentially loads a local version of jQuery, if, for some reason, there was an error downloading the file from your CDN of choice.

!window.jQuery && document.write('<script src="localjQuery.js"><\/script>');

Is it true that jQuery does not exist? If so, move on to the right side, and insert a script element, which references jQuery locally. Nifty, eh?


Conclusion

Before you go crazy with this technique, be careful. It certainly makes for slightly less readable code, and that should be an important factor in your decision — especially when return to six month old projects!

Five dislikes plus five likes equals iTunes 10

Before I get rolling here, let me warn you — I’m not a frequent user of iTunes. I don’t spend all of my time purchasing new music, videos, and movies, nor do I obsess over creating playlists to share with my friends.

However, I do use it often enough that after firing up iTunes 10 last night, I immediately found some things I wasn’t fond of and some other items I quickly loved. Am I going to lose sleep over the things I don’t like? Nope. But I hope that it gets TUAW readers thinking about what they like and dislike about the new iteration of iTunes.

Dislikes:

  1. What’s with the close / minimize / maximize buttons being vertical in the top “toolbar” of iTunes 10 (see example at right)? As I stated to my cohorts here at TUAW this morning, doesn’t that fly in the face of 10 years of experience with OS X and even violate Apple’s Human Interface Guidlines? Fortunately, there’s relief. A tweet from @rudyrichter showed how to fix this — pop into Terminal and type or paste in “defaults write com.apple.iTunes full-window -1”, press Return, relaunch iTunes and life is back to normal.
  2. I miss the colorful icons in the sidebar. There used to be color in the icons for Library, Store, and Shared Items. What happened to the color? It looks so … drab over there now. If anyone can come up with a defaults command to bring the colors back, I’ll give ’em a nickel. Hey, they also removed color icons in the preferences. I want my color back! Everything is so grey and boring. Perhaps that’s Apple’s way of saying “focus on the content we’re trying to sell you, not the application.”

TUAWFive dislikes plus five likes equals iTunes 10 originally appeared on The Unofficial Apple Weblog (TUAW) on Thu, 02 Sep 2010 13:00:00 EST. Please see our terms for use of feeds.

Read | Permalink | Email this | Comments

Set up your own Priority Inbox with Apple’s Mail

Last month, Google released Priority Inbox, a system that learns which messages are the most important to you and highlights them automatically over time. It’s in beta right now and Google is slowly turning it on for its users. If you’re tired of waiting, or if you use Apple’s Mail and not Gmail, you’ll appreciate this setup from Ben Brooks.

Ben explains how a combination of rules acts as his “priority inbox” for Mail. He’s got some basic rules in place, like one that identifies messages from Apple and one that files backups away. Others are more clever.

For instance, he’s written one that first notices if his work address is in the CC field, and then checks if his name appears in the message body. If not, it’s highlighted red and stored away. That way, it’s marked “less important” in Priority Inbox terms.

Conversely, another rule searches for messages from people on a pre-defined “Important” list and flags them. Taken individually the rules are clever but not amazing. Combined, however, they make for an effective system. Go and read the whole post.

[Via Shawn Blanc]

TUAWSet up your own Priority Inbox with Apple’s Mail originally appeared on The Unofficial Apple Weblog (TUAW) on Thu, 02 Sep 2010 14:00:00 EST. Please see our terms for use of feeds.

Read | Permalink | Email this | Comments