CodeIgniter from Scratch: Displaying & Sorting Tabular Data


In today’s video tutorial, we are going to use CodeIgniter to pull information from a database and display it in a sortable table structure. This is a quite common task, especially inside admin areas, for displaying database records. We’ll be utilizing a few different utilities, such as the active records library and pagination.


Catch Up


Day 16: Displaying & Sorting Tabular Data

Day 16: Displaying & Sorting Tabular Data

Thanks for watching! Any questions/thoughts?

10 Terminal Commands That Will Boost Your Productivity


Back in May, Nettuts+ ran a great article entitled ”7 Simple and Useful Command-Line Tips”; this was a great article for getting started with using the command line. But there’s a lot more you can learn about using a shell, and I’ll take you to the next level in this tutorial!


Getting Started

If you’re running Mac OS X, or your favourite flavour Linux, you’re all set. Just fire up the terminal, and keep going. If you’re on Windows, well, the default command set isn’t quite what a bash shell is. If you want some power, check out Microsoft PowerShell; however, the commands below won’t necessarily work there. You can get a bash shell on Windows, though:

  • Install Cygwim, a Linux-like environment for Windows.
  • Install msysgit; depending on the options you choose when installing, you’ll get a Git Bash that should work will all these commands.
  • Try Windows’ subsystem for Unix-based applications. Although I haven’t tried it myself, I understand you can get a Unix shell with it.

All right, let’s hop in!


1. Touch

touch

As a developer, one of your most common tasks is creating files. If you’re working from the command line, most of the time you’ll just pass the name of the file you want to create to your editor:

$ mate index.html
$ mvim default.css

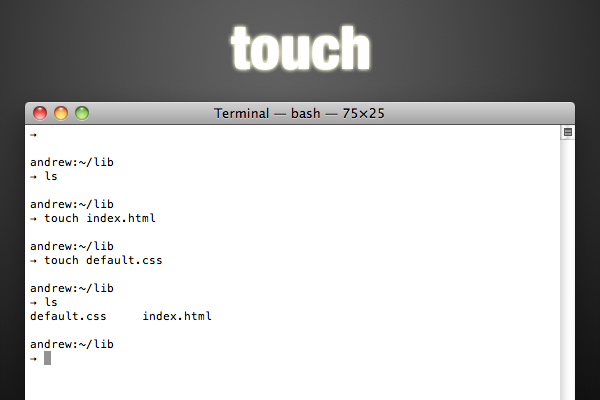
However, occasionally you’ll just want to create one or more files, without editing it. In this case, you’ll use the touch command:

$ touch index.html
$ touch one.txt two.txt three.txt

It’s that easy. Actually, the touch command is for updating the access / modified date of a file; it’s just a nice side-effect that if the file doesn’t exist, it will create it.


2. Cat and Less

cat and less

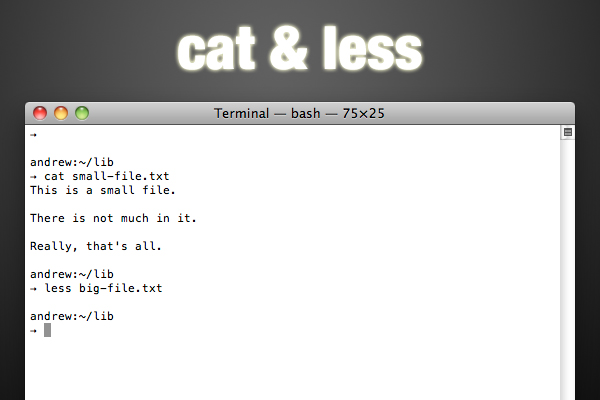
Well, since it’s all about files, there’s a good change you’ll want to see the contents of a file from the terminal sooner or later. There’s a few commands that will do this for you. First is cat; cat is short for “concatenate”, and this command does more than output file contents; however, that’s what we’ll look at here. It’s as simple as passing the command a file:

$ cat shoppingList.txt

However, if the file is large, the contents will all scroll past you and you’ll be left at the bottom. Granted, you can scroll back up, but that’s lame. How about using less?

$ less shoppingList.txt

Less is a much better way to inspect large files on the command line. You’ll get a screen-full of text at a time, but no more. You can move a line up or a line down with the k and j respectively, and move a window up or down with b and f. You can search for a pattern by typing /pattern. When you’re done, hit q to exit the less viewer.


3. Curl

curl

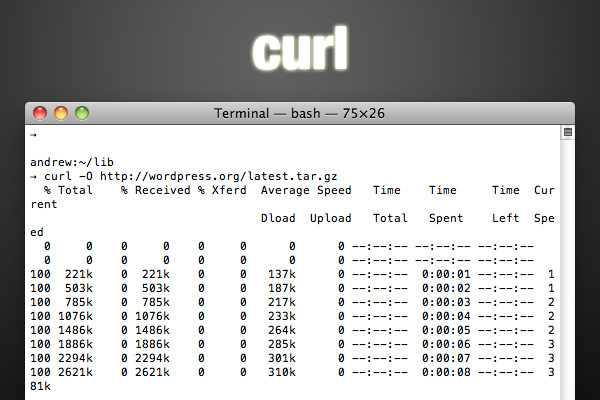
Since you probably work with your fair share of frameworks libraries, you’ll often find yourself downloading these files as you work. Oh, I know: you can just download it from the web, navigate to the folder, uncompress it, and copy the pieces to your project, but doesn’t that sound like so much work? It’s much simpler to use the command line. To download files, you can use curl; proceed as follows:

$ curl -O http://www.domain.com/path/to/download.tar.gz

The -O flag tells curl to write the downloaded content to a file with the same name as the remote file. If you don’t supply this parameter, curl will probably just display the file in the commmand line (assuming it’s text).

Curl is a pretty extensive tool, so check out the man page (see below) if you think you’ll be using it a lot. Here’s a neat tip that uses the shell’s bracket expansion:

$ curl -0 http://www.domain.com/{one,two,three}.txt

Yeah, it’s that easy to download multiple files from one place at once. (Note that this isn’t curl functionality; it’s part of the shell, so you can use this notation in other commands; check this link out for more)


4. Tar and Gzip

tar and gzip

So, now you’re rocking command line downloads; however, there’s a really good chance that most of the things you download will be archived and gzipped, having an extension of .tar.gz (or, alternately, .tgz). So, what do you do with that? Let’s take a step back for a second and understand what exactly “archived and gzipped” means. You’re probably familiar with archives. You’ve seen .zip files; they’re one incarnation of archives. Basically, an archive is just a single file that wraps more than one file together. Often archives compress the files, so that the final file is smaller than the original ones together. However, you can still get a bit smaller by compressing the archive … and that’s where gzipping comes in. Gzipping is a form of compression.

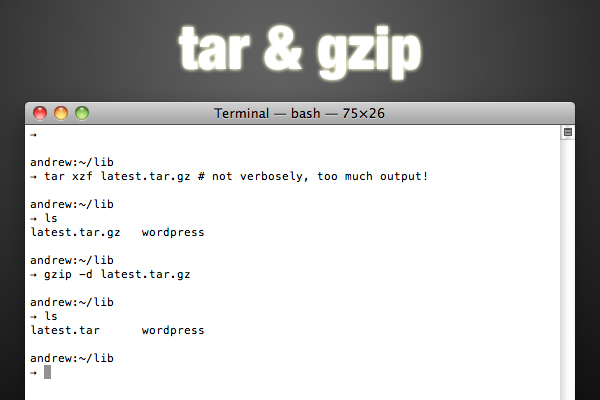
So, back to that download. It’s been tarred (archived) and gzipped. You could unzip it and then un-tar it, but we’re all about fewer keystrokes here, right? Here’s what you’d do:

$ tar xvzf download.tar.gz

Wait, what? Here’s the breakdown: tar is the command we’re running; xvzf are the flags we’re using (usually, you’d have a dash in front, but that’s optional here). The flags are as follows:

  • x let’s tar know we’re extracting, not archiving.
  • v let’s tar know we want it to be verbose (give us some output about the action it’s performing).
  • z let’s tar know that the file we’re working with has been gzipped (so it unzips the file).
  • f let’s tar know we’re going to pass it the name of the archive file.

If you want to create one of these gzipped archives, it’s as simple as replacing the x flag with a c (to create an archive). The v and z flags are options: do you want output? how about gzipping? Of course, leave f; you’ll have to give the file name for the new archive (otherwise, it will all be output to the command line). After that, you’ll pass the command all the files you want to put in the archive:

$ tar cvzf archive.tar.gz index.html css js auth.php
$ tar cvzf archive.tar.gx *.txt

Just for completeness, I’ll mention that you can gzip archives (or other files) individually; when you do so, gzip replaces the original file with the gzipped version. To un-gzip, add the -d flag (think decompress.

$ gzip something.txt
$ gzip -d something.txt.gz

5. Chmod

chmod

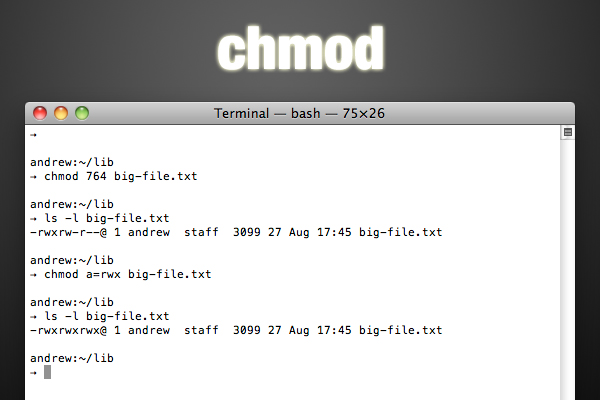
Another thing you’ll do often as a web developer is change file permissions. There are three permissions you can set, and there are three classes that can receive those permissions. The permissions are read, write, and execute; the classes are user, group, and others. The user usually the owner of the file, the user that created the file. It’s possible to have groups of users, and the group class determines the permissions for the users in the group that can access the file. Predictably, the others class includes everyone else. Only the user (owner of the file) and the super user can change file permissions. Oh, and everything you’ve just read goes for directories as well.

So, how can we set these permissions? The command here chmod (change mode). There are two ways to do it. First, you can do it with octal notation; this is a bit cryptic, but once you figure it out, it’s faster. Basically, execute gets 1 ‘point’, write gets 2, and read gets 4. You can add these up to give multiple permissions: read+write = 6, read+write+execute = 7, etc. So for each class, you’ll get this number, and line them up to get a three digit number for User, Group, and Others. For example, 764 will give user all permissions, give group read and write ability, and give others permission to read. For a better explanation, check out the Wikipedia article.

If you have a hard time remembering the octal notation, you might find symbolic notation easier (although it takes a few more keystrokes). In this case, you’ll use the initial ‘u’, ‘g’, and ‘o’ for user, group, and others respectively (and ‘a’ for all classes). Then, you’ll use ‘r’, ‘w’, and ‘x’ for read, write, and execute. Finally, you’ll use the operators ’+’, ‘-‘, and ’=’ to add, subtract, and absolutely set permissions. Here’s how you’ll use these symbols: class, operator, permissions. For example, u+rwx adds all permissions to the user class; go-x removes executable permission from group and others; a=rw sets all classes to read and write only.

To use all this theory on the command line, you’ll start with the command (chmod), followed by the permissions, followed by the files or directories:

$ chmod 760 someScript.sh
$ chmod u=rwx g+r o-x dataFolder

6. Diff and Patch

diff and patch

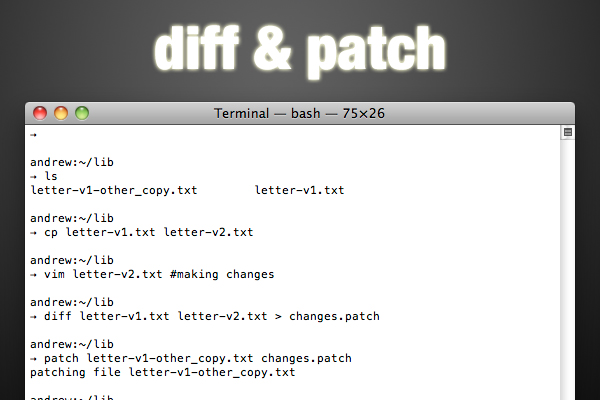
If you’ve used version control like Git or Subversion, you know how helpful such a system is when you want to share a project with other developers, or just keep track of versions. But what if you want to send a friend some updates to a single file? Or what if another developer has emailed you the new version of a file that you’ve edited since you received the last copy? Sometimes, full-blown version control is too much, but you still need something small. Well, the command line has you covered. You’ll want to use the diff command. Before you make changes to a file, copy the file so you have the original. After you update, run diff; if you don’t send the output to a file, it will just be output to the command line, so include a > with the name for your patch file:

$ cp originalFile newFile
$ vim newFile #edit newFile
$ diff originalFile newFile
1c1
< This is a sentence.
---
> This is a short sentence.
$ diff originalFile newFile > changes.patch

As you can see, the diff is just a simple text file that uses a syntax the diff and patch command will understand. Patch? Well, that’s the command that goes hand in hand with diff. If you’ve received a patch file, you’ll update the original as follows:

patch originalFile2 changes.patch

And now you’re all updated.


7. Sudo

sudo

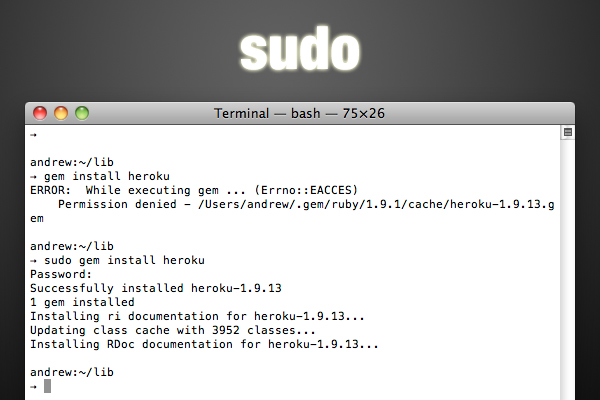
Sudo isn’t really a command like the others, but it’s one you’ll find a need for as you venture deeper into the command line world. Here’s the scenario: there are some things that regular users just shouldn’t be able to do on the command line; it’s not hard to do irrevocable damage. The only user who has the right to do anything he or she wants is the super user, or root user. However, it’s not really safe to be logged in as the super user, because of all that power. Instead, you can use the sudo (super user do) command to give you root permissions for a single command. You’ll be asked for you user account password, and when you’re provided that, the system will execute the command.

For example, installing a ruby gem requires super user permissions:

$ gem install heroku
ERROR:  While executing gem ... (Errno::EACCES)
    Permission denied - /Users/andrew/.gem/ruby/1.9.1/cache/heroku-1.9.13.gem
$ sudo gem install heroku
Password:
Successfully installed heroku-1.9.13

8. Man

man

Most of the commands you’ll use in a bash shell are pretty flexible, and have a lot of hidden talents. If you suspect a command might do what you want, or you just want to see some general instruction on using a command, it’s time to hit the manuals, or man pages, as they’re called. Just type man followed by the command you’re curious about.

$ man ln

You’ll notice that the man pages are opened in less.


9. Shutdown

shutdown

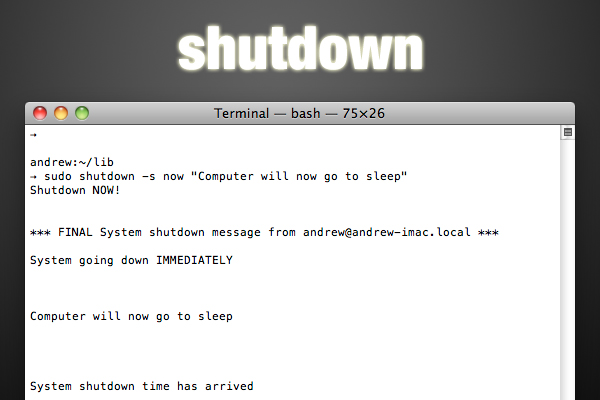
When you’re done for the day, you can even turn your computer off from the command line. The command in the spotlight is shutdown, and you’ll need to use sudo to execute it. You’ll have to give the command a flag or two; the most common ones are -h to halt the system (shut it down), -r to reboot, and -s to put it to sleep. Next, you’ll pass the time it should happen, either as now, +numberOfminutes, or yymmddhhmm. Finally, you can pass a message to be shown to users when the deed is about to be done. If I wanted to put my computer to sleep in half-an-hour, I’d run this:

$ sudo shutdown -s +30

10. History, !!, and !$

history

Since the command line is all about efficiency, it’s supposed to be easy to repeat commands. There are a few ways to do this. First, you can use the history command to get a numbered list of many of your recent commands. Then, to execute one of them, just type an exclamation mark and the history number.

$ history
...
563  chmod 777 one.txt
564  ls -l
565  ls
566  cat one.txt
...
$ !565

Granted, this is a terrible example, because I’m typing more characters to use the history than it would take to re-type the command. But once you’re combining commands to create long strings, this will be faster.

It’s even quicker to access the last command and last argument you used. For the latest command, use !!; the usual use case given for this is adding sudo to the front of a command. For the latest argument, use !$; with this, moving into a new folder is probably the common example. In both these cases, the shell will print out the full command so you can see what you’re really executing.

$ gem install datamapper
ERROR:  While executing gem ... (Errno::EACCES)
    Permission denied - /Users/andrew/.gem/ruby/1.9.1/cache/datamapper-1.0.0.gem
$ sudo !!
sudo gem install datamapper
Password:
Successfully installed datamapper-1.0.0

$ mkdir lib
$ cd !$
cd lib

Conclusion

If you’re as passionate about productivity as I am, the idea of using the command line as much as possible should resonate with you. What I’ve shown you here is just a sampling of the built in commands … then, there are many more than you can install yourself (look at something like the homebrew package manager, for example). But maybe you’re already proficient on the command line; if so, can you share another great command with the rest of us? Hit the comments!

Build a Custom HTML5 Video Player: Free Premium Tutorial


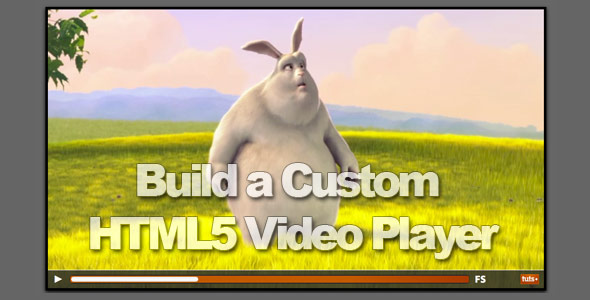
Much like the other various Envato marketplaces, our newly launched Tuts+ marketplace will offer a free file each month. For September, that free file/tutorial just so happens to mine! I’ll show you how to build a custom HTML5 video player with Flash fallback support.

Be sure to grab this one for free for the entire month of September. Next month, it’ll return to its original price.

Build a Custom HTML5 Video Player

Though the idea of a video-specific HTML element was suggested well over a decade ago, we’re only just beginning to see this come to fruition! Forget all of that “HTML5 2012” mumbo-jumbo; the truth is that you can use the video element in your projects right now! The only problem is that the video players are inconsistent from browser to browser, and full-screen support is, at the time of this writing, only available in certain browsers, via a right-click. Further, what if we want to brand our video player? Unfortunately, there isn’t an easy way to do so by default. The solution is to create a custom player that remedies all of these issues.

While we’re using a great deal of our Premium catalog to populate the new marketplace, it will quickly become dominated by unique tutorials, screencasts, and eBooks! Be sure to check it out if you haven’t already.

An Analysis of Typography on the Web


Typography is one of the most—if not the most—important aspects of web design. Some would argue that it takes up to 95% of web design, so why do we often neglect its importance? The readers who come to your site will often decide whether or not to stay according to your typographic choices. After all, they came here to read in the first place. Think about it for a second: if content really is king, logically typography should be treated as the queen.

In fact, even some font names suggest that classification; Futura, Optima, Times New Roman (OK, that’s probably a dude), Verdana, Lucida, Georgia, Helvetica… There’s no question about it, Typography is the queen. Therefore, she also needs to be dressed up properly before going out: she should put on some kerning and tracking, maybe a different font-variant, and already she’s looking like a real lady.

Not sure what I’m talking about? Well, read on.


Knowing Your (sans) Serifs

Before proceeding with this article, and especially if you don’t have much contact with typography, I suggest you fill the gaps of your Typographic knowledge from Typedia, taking special note of Typeface classifications and the anatomy of a typeface, which will serve you well when making your own font-stacks and pairing fonts.

After you finish reading the two articles on Typedia, come back here so we can tighten your newly-founded Typographic knowledge and prepare it for the next few chapters of this article.

Tightening Wisdom #1: Typefaces Relate

Typefaces have dynamic relationships and can look good or bad together, depending on who they’re mixed with and their differences. If we’d like to get technical, there are in fact three ways in which typefaces can relate:

  1. Concord

    A concordant relationship is the one with no thrills, where two typefaces are very similar in characteristics. It can also be a single typeface in multiple styles and/or sizes.

  2. Contrast

    When typefaces are fairly different from each other, contrast appears. It’s usually good to aim for contrast, for instance, between a serif and sans-serif typeface.

  3. Conflict

    Two (or more) typefaces who have different characteristics that are still similar enough to create distress on a page are in conflict. You should usually avoid this type of relationship.

Contrasting, conflicting and concording relationship between fonts.

Tightening Wisdom #2: Typefaces Differ

Typefaces can vary. Whether it is weight, height, width, or anything else, every single typeface has some characteristic that makes it stand out. You should learn to spot these subtleties and adapt to their influence. And don’t think it doesn’t matter, since even various iterations of the same typefaces can be significantly unequal at times.

This specifically relates to the Web, where the art of creating and applying font stacks is very important. You do not have to pick exactly the same-looking typefaces for a fallback, but it’s only fair to say that an oldstyle font like Garamond should be backed up by another oldstyle typeface with sensibly similar characteristics (Caslon, Baskerville, Times, for instance).

Adobe Garamond Pro, Garamond Premier Pro and Georgia side-by-side

Although they’re all serifs, Georgia, Garamond and Adobe Garamond Pro (200 point size in example above) look very different.

Tightening Wisdom #3: Not Every Typeface is Suitable For All Situations

A modern font, such as Bodoni Condensed or Bodoni Bold is an excellent choice for headlines, whereas it would likely be a bad typeface for extensive lines of body copy, where it would only distract the reader from the content. An oldstyle like Garamond (I ♥ Garamond) is a much better choice for these situations.

Non-designers often make poor decisions when choosing typefaces for different occasions, and—although I’m going to skip the Comic Sans lecture—you should be aware of the fact that it’s not always suitable to use, say, Georgia for body copy. It’s also not always bad to use Arial as your preferred typeface; but do consider what message you are trying to convey, via your typography.


Learning From The Best

This article is not primarily a showcase, yet it’s always interesting to observe what other talented designers have done to make their (client’s) websites a delight to look at. We’re going to see what can be done with careful consideration for font decoration, as well as solid font-stacks and smart typographic choices.

(P.S. If you’d like to see other examples of nice Typography on line, browse through Typesites’ archives. There’s not too much content there, but they’ve covered some very good sites.)

Websafe Fonts: A List Apart

A List Apart, careful consideration to Webfonts
A List Apart shows how Websafe fonts can look good indeed when given enough thought.

Is Verdana the most boring typeface you can use? Not if you ask Jason Santa Maria. He was smart in using Verdana’s strength (X-height) to make body copy rather small in size for a dignified, elegant look that A List Apart deserves. The small size also makes it pleasant to read in the long run.

Georgia is mostly used for emphasis on certain page elements, and as a display typeface. From other noticeable design decisions, uppercase letters are small in size and positive letter-spaced for easier readability and better looks.

Font Stacks: Jon Tan

JonTangerine.com, typographic excellence
Jon Tan, attention to detail brings Typographic perfection.

Jon Tan, like Khoi Vin and Daniel Mall, also follows the cult of black & white minimalist design with carefully placed splashes of orange. Although there’s a lack of excitement in color choice, you could say that Jon makes up for it by taking extra care of his typographic choices. The CSS file of Jontangerine.com contains more than 250 different declarations for all micro-typography!

The main body copy is set in lovely Georgia, while centered headings appear in a Times-based font stack with Baskerville and Palatino:

font-family: baskerville, 'palatino linotype', 'times new roman', serif;

In other areas, typographic “color” is achieved using different font-variants, various shades of black and excellent font styling. Definitely one of the best typography-centered sites out there!

@font-face Embedding: Information Highwayman

Information Highwayman
Information Highwayman is embedding Justus, a free font.

You have probably heard a lot about @font-face embedding with CSS during the past few months. Although Internet Explorer has had a similar technique ever since its fourth iteration (we’re ashamed to admit this), only in 2009—when all of the five big browsers implemented @font-face (the right way)—did we start talking intensively about using non-core webfonts online.

There are, as you might know, a few considerable drawbacks to this technique (primarily copyright issues), but if you find a suitable font for your needs, you have every chance of improving the way readers experience your site. D. Bnonn Tennant (Information Highwayman) decided to use Justus for body copy, which contrasts quite well against the sans-serif background element (the “compelling magnum”) and helps in achieving the “worn-out” effect on the site.

Typekit: Elliot Jay Stocks

FF Tisa Web Pro on ElliotJayStocks.com
The slabby FF Tisa goes perfect with Elliot’s website.

Elliot likes to use Slab-Serif typefaces, which is exemplified in both his excellent 8 faces magazine on Typography (highly recommend it), with FF Unit Slab, and his own Website, where FF Tisa Web Pro is embedded using Typekit’s font embedding service.

There isn’t as much typographic styling on the site as, for instance, Jon Tan has; however, he’s done a great job with alignment and color, which also never should be overlooked and are important ingredients in good typography.

Image Replacement and sIFR: Squared Eye

Squared Eye, sIFR typography
Squared Eye uses sIFR Flash text replacement.

Although they’re rapidly becoming “old” replacement techniques, Flash and image-replaced text (both Cufón and manually inserted images) instead of ordinary text are important for cross-browser compatibility in sites whose visitors aren’t predominantly using modern browsers, as well as in cases where the particular font isn’t available due to one or the other reason (e.g., copyright issues).

Squared Eye places emphasis on different levels of headings with sIFR, as well as with manually inserted images. He’s using a beautiful slab-serif Archer in harmony with a Lucida-based font stack for a modern, yet still elegant look.


Putting Our Knowledge to Good Use

Although I’m going to provide a few font-stacks you can use in your designs, consider the following more as a “training” for making your own font stacks. There are already plenty of other sites out there which offer a lot of readymade solutions for both display and body copy text.

As the saying goes, “Give a man a fish and you feed him for a day. Teach a man to fish and you feed him for a lifetime.”

Gripping the Bases: Your Readers

Before beginning to build font stacks, you should become acquainted with your primary audience and determine what software and Operating Systems they use. That way, you can predict which fonts they might have installed, and how much typographic flexibility that provides you.

For instance; Matthew Smith (Squared Eye) probably (rightfully) predicted that most of his audience will not have a font like Archer installed on their computers and decided to embed it using Flash font replacement (comparing to Archer, ~97% of users have Flash installed).

Always design with core Webfonts first, and then gradually improve with font stacks)

For more information on fonts shipped with different software, browse through 24 Ways’ Font Matrix, Fluid Web Type and Apaddedcell. You might also find Microsoft’s extensive documentation on fonts that come with their products, as well as insight into their Typographic department, a useful read.

Notice The Small Things

When it comes to building font stacks, you’ll need to consider a few variables, when determining what make fonts different from one other (remember the Georgia-Garamond-Garamond comparison above?). This, again, comes down to your experience and familiarity with different font categories. You’ll need to learn to notice not only the way serifs are presented (are they slanted, or straight? Or do they not exist?), but also the small(er) differences between two similar typefaces.

Consider how they communicate with each other, their x-heights and readability on small sizes, as well as their form and direction. Even if this sounds, perhaps, intimidating right now, remember how practice makes perfect.

Example: Ibis Display and Archer, although both slab-serifs by category, probably wouldn’t make a good pair due to the significant difference in the way their serifs are presented and the noticeable thick/thin transitions on Ibis versus a monoweight Archer.

Writing a Sample Font Stack

I’ve already mentioned I like Garamond. So I’m going to base a font stack off of Times New Roman, which is the Web-safe font closest in appearance to the aforementioned oldstyle typeface.

I would like to mention that Garamond, due to its low X-height, likely isn’t the best choice when designing for excellent readability on screen (after all, it wasn’t made for screen presentation primarily), but it is fine if used on high enough font sizes (in my opinion, 16-17 pixel/1em Garamond is optimal).

In optical scaling, as it is called, smaller text sizes typically have larger x-heights, wider stem widths, and less typographic stem contrast and larger display sizes have smaller x-heights with more variation in stem widths.
MSDN Blogs

Font degrading in our font-stack
How our font family will degrade in case Garamond isn’t available (Garamond colored blue in examples).

According to 24 Ways’ Font Matrix, Garamond is shipped with Office Word 2007 for Windows, and Word 2004 for Mac, which means that it’s available to a huge percentage of visitors. For those who don’t have it installed, I’ve provided a backup in the form of Adobe’s Caslon, Garamond and Minion Pro typefaces which come shipped with the Creative Suite (notice, however, that all of these fonts are also available for individual download; I’m mentioning the programs they ship with because I suppose a lot of you bought them with Adobe’s software).

I’ve also decided to use Crimson text from Google’s Webfont repository to provide a decent fallback before Times. The final font stack looks like this:

font-family: Garamond, Adobe Garamond Pro, Minion Pro, Adobe Caslon Pro, Crimson Text, Times, serif;

This font stack should be used exclusively on higher font sizes, especially because Windows is notorious for poor font rendering.

Font rendering in Safari vs. Chrome

Chrome with default settings (left) and Safari with font smoothing set to Medium (right). May look subtle at first, but it makes a big impact on readability in smaller sizes.

If you were looking for extremely good on-screen readability, the high-x-height-blessed Georgia and Verdana (both fonts are from the nineties, made specifically for screen rendering) will provide more pleasing results in font-stacks.

For instance, we could take advantage of the similarity between the Lucida serifs (Fax and Bright, which also come with MS Word) and Droid serif from the Google Webfont repository to make a highly readable font-stack with a large x-height:

font-family: Lucida Bright, Lucida Fax, Droid serif, Georgia, Serif;

Once again Google’s webfonts come to action before a generic solution, mostly because Droid serif is much closer in appearance to Lucida than Georgia and Times, respectively.

A very similar Verdana-based stack would also contain the three almost equal Lucida sans-serifs (Grande – ships with Mac, Sans, Sans Unicode):

font-family: Lucida Sans, Lucida Sans Unicode, Lucida Grande, Verdana, Sans-serif;

Notice how the replacement fonts have similar characteristics, particularly how the g letter is virtually the same across typefaces, and how the o resembles a circle rather than an ellipse. As with most sans-serifs, they’re monoweight and don’t have any thick/thin transitions (Optima, for instance, isn’t monoweight —that’s what makes it more difficult to pair with other fonts).

Lucida-based Sans-serif font stack

Being Picky

While creating sensible font stacks is important, in order to provide excellent typography, you’re going to have to do the “extra ten percent” and provide typographical contrast using different font variants, weights, direction and nurturing care to all micro typographic methods.

Jon Tan, attention to micro typography

Jon Tan tackles micro typography with extra care.

Jon Tan, for instance, uses some CSS3 selectors to create great visual impact.

.entry-content p:first-line,
.entry-content img + p:first-line {
	font-variant: small-caps;
	font-weight: 900;
	text-indent: 0px;
}

He’s using centered and italicized headings within a blog post in a Times-based font stack. This, when combined with justified text and his minimalistic design, makes for a very pleasant reading experience. Remember: small things do matter.

Absolutely astonishing headings on jontangerine.com

Mixing things up with a bold typeface, uppercase titles and positive letter spacing for smaller headings will many times provide a far better experience and contrast, as well as clearer separation to the body copy, than just a different typeface. Samantha Warren has covered Typographic hierarchy very well, and I suggest you read her article for a broader understanding of the topic.

Lucida and Garamond, contrasting and conflicting
Contrast improves separation. Can you even notice the second heading?

A seventeen pixel Garamond for body copy and 15px Lucida Sans for subheading level 4 (h4) do look quite different in the upper two situations, only due to a few small changes in our CSS:

body {
	font: 17px/1.4 Garamond, Adobe Garamond Pro, /* ... (look at the Garamond-based stack above) */ serif;
	color: #333;
	text-align: justify;
} 

h4#uppercase {
	text-transform: uppercase;
	font: bold 14px/1 Lucida Grande, Lucida Sans, Verdana, sans-serif;
	margin-top: 15px; letter-spacing: 1px;
}

h4#normalcase {
	text-transform: none;
	font-weight: normal;
	letter-spacing:0;
}

The italicized ampersands are another one of those techniques that prove how “small things matter” (notice, however, that not all fonts have “special” ampersands):

.amp {
	font-family:Adobe Caslon Pro,Garamond, Palatino Linotype, Bell MT, Minion Pro, Garamond, Constantia, Goudy Old Style, High Tower text, serif;

	/* The font-stack above contains some font-families that
	have nice ampersands. You should pick a couple that suit your
	needs on a particular website, rather than use all.
	For instance, Caslon, Palatino and Baskerville do a nice job
		most of the time. */

	font-style: italic;
	line-height: 0;
}

If you would like to automate the use of fancy ampersands (enclosing them to proper classes, as well as having some advanced typographic help), I suggest looking up the WP-Typography plugin for WordPress.


Additional JavaScript Enhancement

We could further improve our user’s experience by enhancing the site with some simple JavaScript to test whether she has a particular font installed on her system. Then, it’s simply a matter of picking a suitable fallback font, if the font isn’t available (i.e., increase font size to make another font more readable, use image replacement, load additional fonts, etc.).

Note that you should still consider the fact that a small percentage of users browse the web with JavaScript turned off.

You could, perhaps, add a noscript class to the body if JavaScript is disabled and prepare some sensible typography for it, accordingly.

That said, there are a few, essentially equal, techniques for discovering if a particular font is installed on the user’s system. I’m going to use a slightly modified version of Lucas Smith’s code:

function testFont(name) {
    name = name.replace(/['"]/g,'');

    var	body  = document.body,
		test  = document.createElement('div'),
		installed = false,
		template =
			'<b style="display:inline !important; width:auto !important; font:normal 80px/1 \'X\',sans-serif !important">mmmmmwwwww</b>'+
			'<b style="display:inline !important; width:auto !important; font:normal 80px/1 \'X\',monospace !important">mmmmmwwwww</b>',
		ab;

    if (name) {
        test.innerHTML = template.replace(/X/g, name);

        test.style.cssText = 'position: absolute; visibility: hidden; display: block !important';

        body.insertBefore(test, body.firstChild);

        ab = test.getElementsByTagName('b');

        installed = ab[0].offsetWidth === ab[1].offsetWidth;

        body.removeChild(test);
    }

    return installed;
}

Upon pasting the code into your JavaScript file, you can simply test whether a particular font is installed on the users’ computer by using conditional statements:

if (testFont("FontName"))
	// Do stuff if the font is installed
else
	// Do stuff if the font isn't installed, i.e. load Cufón replacement

One of the more interesting uses of this technique would possibly be linking to a font-loading file (@font-face, Google Webfonts…), in the case our preferred fonts aren’t available on the user’s system. That way, we improve performance, and don’t force the user to download extra ~30kb for no reason:

if (!testFont("Lucida Fax") && !testFont("Lucida Bright") && !testFont("Droid serif")) {

  var head = document.getElementsByTagName("head")[0];
  var webfontLink = document.createElement('link');
  webfontLink.rel = 'stylesheet';
  webfontLink.href = 'http://fonts.googleapis.com/css?family=Droid+serif';
	// now we have <link rel="stylesheet" href="http://fonts.googleapis.com/css?family=Droid+serif">
  head.appendChild(webfontLink);

}

Further Reading and Resources

♣ ♠ ♣ ♠ ♣ ♣ ♠ ♣

I hope that you now have a better understanding of typography on the web. There’s definitely more to the matter, and I’ll enjoy hearing what you have to say about it in the comments!

How to Create a Web-Based Drawing Application Using Canvas: New Premium Tutorial


Combining HTML with the all new <canvas> feature, you can make some pretty awesome web apps! In this Premium exclusive tutorial, we will create a neat interactive drawing application using HTML and JavaScript. Along the way, we’ll also learn the basic concepts of the all new <canvas> feature. Become a Premium member to access this, as well as many other amazing tutorials and screencasts.

Preview
Preview
Preview
Preview

Quick Tip: Getting Offline Access with HTML5 Application Cache


Just when you thought you’d seen all the cool features of HTML5, I’m here to bring you yet another one. The internet is no longer about just websites; it’s about web applications. Often, our users are on portable or mobile devices, and they won’t always have access to a network. With HTML5’s Application Cache, you can provide them with all or some of the functionality they would have online, no matter where they go.


Step 1: Make the Cache Manifest

The trick here is using a cache manifest file. In its most basic form, it’s incredibly simple:

CACHE MANIFEST

# version 0.1

index.html
style.css
script.js
preview.jpg

Step 2: Serve the Manifest Correctly

This file needs to be served with a content-type header of text/cache-manifest; it’s really simple to do this with a .htaccess file:

AddType text/cache-manifest manifest

This will serve all files with an extention of “manifest” with the appropriate content-type header.


Step 3: Hook the Manifest In

To use the cache manifest file, you simply add a property to the html element:

<!DOCTYPE html>
<html lang="en" manifest="site.manifest">
	<meta charset='utf-8'>

Now, the next time a user visits your site / app, their browser will cache the required files. It’s that easy. If they browse to your URL when they’re offline, they’ll get the cached content.


Caveat: Refreshing the Cache

It’s important to note that even when the user is online, the browser will only go to the server to get new content in three cases:

  1. The user clears their cache (obviously removing your content).
  2. The manifest file changes.
  3. The cache is updated via JavaScript

So, to force all your users to reload their cache, you can change something in the manifest file (not the files linked to, the actual content of the manifest file). Most of the time, you’ll probably just want to change a comment, and that will be enough.

If you want, build cache updating into your app via the JavaScript API; that’s beyond the scope of this quick tip, but if you want to learn more, check out this article at html5rocks.com.


Browser Support

Like a lot of other HTML5 features, the Application Cache is supported by all the modern browsers.


Chart from www.findmebyip.com

And that’s HTML5′s Application Cache; it’s pretty cool, and I’m sure it will be used by developers, of almost any site, to provide a gracefully degrading experience that keeps their users happy wherever they are. Thanks for reading!

Creating a Web Poll with PHP


Polls are nearly ubiquitous on the web today, and there are plenty of services that will provide a drop-in poll for you. But what if you want to write one yourself? This tutorial will take you through the steps to create a simple PHP-based poll, including database setup, vote processing, and displaying the poll.


Step 1: Plan & Create the Database

In order to store poll results, we’re going to store three pieces of information:

  • A question identifier
  • An answer identifier
  • The number of votes a question/answer pair has gotten

For this tutorial, we’ll be using PDO and SQLite. If you’re working with SQLite3, you can create a new database via the command line tool; if you’re using an older version, a quick PHP script will do the trick. Here’s the one used for this tutorial:

<?php
echo "creating database\n";
try {
    $dbh = new PDO('sqlite:voting.db');
    $dbh->setAttribute( PDO::ATTR_ERRMODE, PDO::ERRMODE_EXCEPTION );
    $dbh->exec('
        CREATE TABLE tally (
        QID varchar(32) NOT NULL,
        AID integer NOT NULL,
        votes integer NOT NULL,
        PRIMARY KEY (QID,AID))
    ');
}
catch(PDOException $e) {
    echo "ERROR!!: $e";
    exit;
}
echo "db created successfully.";
?>
Voting Database Structure

This simple script will create a SQLite database in the directory you run it. Unlike mySQL, the database here is a flat file. If you’re familiar with SQL, the create should make sense to you, although the last line may be new to some people:

PRIMARY KEY (QID,AID)

This creates a composite key for the database. Entries in either column do not have to be unique to that column, but the combination of the two must be unique.


Step 2: Design Your Poll’s HTML

Before you start writing any PHP, you need to decide how to create your poll in terms of markup. We’re going to try to keep the markup as semantic and simple as possible. Your poll will have two looks:

  • Question waiting to be answered
  • Current Results of the poll

In writing this HTML, some classes will be included to help with the CSS later.

Poll View

Because a poll is primarily a list of answers, we’re going to incorporate an unordered list to contain those answers. For the question itself, we’re going to use a heading tag.

<form class="webPoll" method="post" action="test.php">
    <h4>What question would you like to ask?</h4>
    <ul>
        <li>Answer Here</li>
        <li>Another Answer Here</li>
    </ul>
</form>

That’s pretty basic, but doesn’t include any form elements. Radio buttons are the most appropriate since we’re only allowing one answer per poll. Also, we’re going to use the label tag to associate answers with the proper radio button. Now our form HTML looks more like this:

<form class="webPoll" method="post" action="test.php">
    <h4>What question would you like to ask?</h4>
    <ul>
        <li>
            <label class='poll_active'>
            <input type='radio' name='AID' value='0'>
            First Answer Here
            </label>
        </li>
    </ul>
</form>

That’s a little more complex, but not too bad. Still a bit more to add. We’re going to include a fieldset tag to open up some styling options, and of course we need a submit button!

<form class="webPoll" method="post" action="/poll/test.php">
    <h4>What question would you like to ask?</h4>
    <fieldset>
    <ul>
        <li>
            <label class='poll_active'>
            <input type='radio' name='AID' value='0'>
            First Answer Here
            </label>
        </li>
    </ul>
    </fieldset>
    <p class="buttons">
        <button type="submit" class="vote">Vote!</button>
    </p>
</form>

For each answer, a new LI tag is added and the value of the radio button incremented. That will eventually be done by our PHP. The extra HTML is the fieldset tag, and the paragraph wrapped around the button – both of which will be used by our CSS.

Answer View

The HTML is going to be nearly identical for the answer view. The line-item tags won’t contain a form element and we’ll be adding a div which can be used to show the percentage of votes that answer received. Here’s how that will look:

<li>
    <div class='result' style='width:20px;'>&nbsp;</div>
    <label class='poll_results'>
        10%: First Answer Here
    </label>
</li>

Yes, that’s an inline style you see there. That style will be generated by our PHP based on the current percentage of each individual answer. Here’s what we have so far:

Unstyled Poll

Step 3: Style the Form

The HTML we created in the last step was not very attractive. Let’s see if we can fix that up a bit. We’re going to use the wonderful CSS3 PIE (progressive Internet Explorer) library so we can obtain a similar look across all browsers. To make this library work properly, there are numerous cases where you must apply a relative position to elements. You can read all the details on the library website.

Style the Form Tag

We’re going to use the form tag as our container. It’s going to have nice, rounded corners, and a bit of a drop shadow. The styles below also specify a width, and padding.

form.webPoll {
    background:#ededed;
    behavior:url(PIE.php);
    border:1px solid #bebebe;
    -moz-border-radius:8px;
    -webkit-border-radius:8px;
    border-radius:8px;
    -moz-box-shadow:#666 0 2px 3px;
    -webkit-box-shadow:#666 0 2px 3px;
    box-shadow:#666 0 2px 3px;
    margin:10px 0 10px 8px;
    padding:6px;
    position:relative;
    width:246px;
}

The key line here is the behavior attribute. This will be ignored by non-IE browsers and will add the CSS3 functionality to IE6-8.

Basic styling

Still ugly, but a noticeable improvement.

Box the Answers

Next, we’re going to create a nice box around the answers and use a bit of illusion to make the border look inset by a pixel. This is done by coloring the outer-most border (the fieldset) the same color as the interior, and then using the unordered-list tag as our real border. Here’s the CSS:

form.webPoll fieldset {
    background:#FCFAFC;
    behavior:url(PIE.php);
    border:1px solid #FCFAFC;
    -moz-border-radius:10px;
    -webkit-border-radius:10px;
    border-radius:10px;
    margin:0;
    padding:0;
    position:relative;
}
form.webPoll ul {
    behavior:url(PIE.php);
    border:2px #bebebe solid;
    -moz-border-radius:10px;
    -webkit-border-radius:10px;
    border-radius:10px;
    font-family:verdana;
    font-size:10px;
    list-style-type:none;
    margin:0;
    padding:10px 0;
    position:relative;
}
Basic styling

Style the Answers

Next we need to add a little CSS to make our options look better.

form.webPoll li {
    margin:0 16px;
    overflow:auto;
    padding:4px 0 6px;
    position: relative;
}
form.webPoll input {
    position: absolute;
    top: 4px;
    *top: 0;
    left: 0;
    margin: 0;
    padding:0;
}
label.poll_active {
    float:right;
    width:90%;
}

You might ask why we’re using absolute positioning on the inputs and floating the label. The reason is simple: multi-line answers. If an answer to your poll question is long, you want the radio button to look like a bullet on an unordered list – hanging. This will keep the text from wrapping around it if it’s multiple lines.

There’s also a style targeting IE specifically with the * hack to cause the buttons to line up properly in IE6-8.

We also need to style the bar used to show results. We’ll add that now:

form.webPoll .result {
    background: #d81b21;
    background: -webkit-gradient(linear, left top, left bottom, from(#ff8080), to(#aa1317));
    background: -moz-linear-gradient(top,  #ff8080,  #aa1317);
    -pie-background: linear-gradient(#ff8080, #aa1317);
    border:1px red solid;
    -moz-border-radius:3px;
    -webkit-border-radius:3px;
    border-radius:3px;
    clear:both;
    color:#EFEFEF;
    padding-left:2px;
    behavior: url('PIE.php');
}

There’s another new attribute here: -pie-background, which allows us to, in conjunction with the PIE library, use gradient backgrounds in IE. There’s still a few touches to add.

Question and Button

A default H4 may not be what you’re looking for, so let’s add some styling to that.

form.webPoll h4 {
    color:#444;
    font-family:Georgia, serif;
    font-size:19px;
    font-weight:400;
    line-height:1.4em;
    margin:6px 4px 12px;
    padding:0;
}

And I’m not a big fan of default buttons, so we’re going to use a CSS sprite to liven it up a bit.

.buttons {
    margin:8px 0 1px;
    padding:0;
    text-align:right;
    width:122px;
}
.vote {
    background:url(res/vote.png) repeat scroll 0 0 transparent;
    border:medium none;
    height:40px;
    text-indent:-9999em;
    width:122px;
}
.vote:hover {
    background-position:0 -41px;
    cursor:pointer;
}

What about IE6? It doesn’t support the hover psudo-class! We can either leave those users out in the cold (they’ll still see the button default state) or we can use another lovely little GPL licensed library, Whatever:hover.

Final Poll CSS

Last Bits

In order to accommodate some IE6 quirks, certain elements need to have something called “HasLayout” triggered. The easiest way to do this is to set a property of zoom for these elements. The property is ignored by non-IE browsers.

form.webPoll ul,li { /*// Make IE6 happy //*/
    zoom:1;
}

You’ll also notice there are borders between each question. This was done with an additional class on the LI tags specifying a border. The class will be assigned to all but the last item by the PHP script.

The completed CSS file is contained in the download.


Step 4: Create a PHP Class — Decide on the Interface

Now it’s time to create the PHP to generate polls, show results, and handle votes. I’d like to keep using the script as simple as possible, so I’m planning the usage ahead of time. To create a poll in a particular place in a page, you’ll just use the following PHP:

$a = new webPoll(array(
        'What subjects would you like to learn more about?',
        'HTML & CSS',
        'JavaScript',
        'JS Frameworks (jQuery, etc)',
        'Ruby/Ruby on Rails',
        'PHP',
        'mySQL'));

That’s it. You’ll pass an array to the constructor which contains the question followed by the answers. In order to track the questions in the database, we’ll create an MD5 hash of the question to use as an identifier.


Step 5: Decide on the Class Properties

There’s certain data that’s going to be needed by each poll; we’re going to store some of this in class properties. We’ll need to store the question and the answers, the basic HTML, the question identifier, and some information on how to draw the results bars. Here’s the start:

class webPoll {

    # makes some things more readable later
    const POLL = true;
    const VOTES = false;

    # number of pixels for 1% on display bars
    public $scale = 2;

    # the poll itself
    public $question = '';
    public $answers = array();

    # the HTML
    private $header = '<form class="webPoll" method="post" action="%src%">
                       <input type="hidden" name="QID" value="%qid%" />
                       <h4>%question%</h4>
                       <fieldset><ul>';
    private $center = '';
    private $footer = "\n</ul></fieldset>%button%\n</form>\n";
    private $button = '<p class="buttons"><button type="submit" class="vote">Vote!</button></p>';

    # question identifier
    private $md5 = '';

The initial constants will be used in one of the methods to make it more readable so it’s easier to know whats going on.

Take note of the hidden input that’s been added here. This is the question identifier used to store information in the database. All the values in the HTML surrounded by percent signs will be replaced.


Step 6: Create the HTML Poll or Answers

Since it’s already been decided the poll will be made by creating an object, let’s examine the __construct method.

public function __construct($params) {
    $this->question = array_shift($params);
    $this->answers = $params;
    $this->md5 = md5($this->question);  

    $this->header = str_replace('%src%', $_SERVER['SCRIPT_NAME'], $this->header);
    $this->header = str_replace('%qid%', $this->md5, $this->header);
    $this->header = str_replace('%question%', $this->question, $this->header);

    # has the user voted yet?
    isset($_COOKIE[$this->md5]) ? $this->poll(self::VOTES) : $this->poll(self::POLL);
}

In the first line, we peel the question off the array stack with array_shift, and store it in a property. We also store the questions, leaving them as an array. We also create the question identifier here, by making an md5 hash of the question itself.

The next three lines perform some replacements on the HTML. The first sets our form action to point at the page the poll is one. The second puts our question identifier in a hidden form field. The third puts our question into the HTML.

In the final line of the constructor we check if the user has voted on this particular poll, and if he has, we show the votes. If he hasn’t, we show the poll.


Step 7: Generate the Poll

Both generating the poll and generating the results are very similar operations. In order to keep our code DRY we break the creation into three methods. The main one is “poll”.

DRY: Don't Repeat Yourself
private function poll($show_poll) {
    $replace = $show_poll ? $this->button : '';
    $this->footer = str_replace('%button%', $replace, $this->footer);

    # static function doesn't have access to instance variable
    if(!$show_poll) {
        $results = webPoll::getData($this->md5);
        $votes = array_sum($results);
    }

    for( $x=0; $x<count($this->answers); $x++ ) {
        $this->center .= $show_poll ? $this->pollLine($x) : $this->voteLine($this->answers[$x],$results[$x],$votes);
    }

    echo $this->header, $this->center, $this->footer;
}

Here’s the breakdown of what’s going on in this function:

lines 2 & 3: We only need a vote button if the user hasn’t voted. Here we determine if we’re going to use the button HTML or not, and then either insert the HTML, or replace the %button% placeholder with an empty string.

lines 6 – 8: If we’re not showing the poll, we obviously need the results, so here we go fetch them. We also calculate the total votes cast for use later in determining percentages.

lines 11 – 12: This generates the LI tags in our HTML. Depending on if we’re showing the poll or the results, we generate different HTML. This HTML generation is handed off to two functions:

  • pollLine
  • voteLine

line 15: Simply dumps out the data to the page.


Step 8: The pollLine() Method

This is a very simple method, which takes the current index of the answer as an argument.

private function pollLine($x) {
    isset($this->answers[$x+1]) ? $class = 'bordered' : $class = '';
    return "
    <li class='$class'>
            <label class='poll_active'>
            <input type='radio' name='AID' value='$x' />
                {$this->answers[$x]}
            </label>
    </li>
";
}

It checks if there’s an answer after the current one on its first line, and if there is, applies a class of bordered to that LI tag. The very last answer won’t get this class, allowing us to achieve the visual effect intended.


Step 9: The voteLine() Method

This method is getting 3 parameters passed into it:

  • $answer : The question answer for this line
  • $result : The number of votes this option has gotten
  • $votes : The total number of votes cast in this poll

With that information, the LI tags for the voting results can be produced.

private function voteLine($answer,$result,$votes) {
    $result = isset($result) ? $result : 0;
    $percent = round(($result/$votes)*100);
    $width = $percent * $this->scale;
    return "
    <li>
            <div class='result' style='width:{$width}px;'>&nbsp;</div>{$percent}%
            <label class='poll_results'>
                $answer
            </label>
    </li>
";
}

Since it’s possible for there to be no votes for an option, it will effectively leave $result unset. If we detect this we’ll give it a default value of 0 votes.

Next, we determine what percent of the votes the option got and finally use the scale property to determine the width, in pixels, that the results bar should be. Then we finally return the HTML containing all that information.


Step 10: Write the getData() Method

If you look back up a bit, you’ll see we call the getData() method which is defined as a static method in the class. Why static? Because if we decide to enhance this poll later by making it AJAX based, we’ll want access to that method without object creation. Here’s the method:

static function getData($question_id) {
    try {
        $dbh = new PDO('sqlite:voting.db');
        $dbh->setAttribute( PDO::ATTR_ERRMODE, PDO::ERRMODE_EXCEPTION );

        $STH = $dbh->prepare('SELECT AID, votes FROM tally WHERE QID = ?');
        $STH->execute(array($question_id));
    }
    catch(PDOException $e) {
        # Error getting data, just send empty data set
        return array(0);
    }

    while($row = $STH->fetch()) {
        $results[$row['AID']] = $row['votes'];
    }

    return $results;
}

The question ID is passed into the method and it will return an array containing the answer ID’s and the number of votes that answer has. If an answer has no votes, it won’t have an entry in the array, which we’ve already dealt with in the voteLine() method.

Since database errors in web polls are particularly tragic, we’re simply going to return an empty array if one occurs. The user will get 0 votes for each result. In a production environment you might want to log this error to a file, or send the admin an email.


Step 11: Handling a Vote

We’re going to add a second static method to the class, and this one will handle incoming votes. Votes will only be counted if the user hasn’t voted before (as determined by a cookie) and once the user has voted we’ll set a cookie indicating this.

In this type of web application, it’s nearly impossible to stop multiple votes without excluding some legitimate users. Setting a cookie is just a basic precaution.

This is one of the more complex methods in our webPoll class, and we’re going to look at it in three parts.

static function vote() {
    if(!isset($_POST['QID']) ||
       !isset($_POST['AID']) ||
       isset($_COOKIE[$_POST['QID']])) {
        return;
    }

A call to the vote() method will be at the top of our PHP page, so the first thing we want to do is decide if there’s a vote to process or not. The above statement is how we determine this. Here’s what it says:

  • If there’s no Question Identifier in our POST data (OR!!)
  • If there’s no Answer Identifier in our POST data (OR!!)
  • If a cookie has been set already matching the Question Identifier

If any of those are true, we don’t have to process a vote, and we leave the method.

$dbh = new PDO('sqlite:voting.db');
$dbh->setAttribute( PDO::ATTR_ERRMODE, PDO::ERRMODE_EXCEPTION );

try {
    $sth = $dbh->prepare( "INSERT INTO tally (QID,AID,votes) values (:QID, :AID, 1)" );
    $sth->execute(array($_POST['QID'],$_POST['AID']));
}
catch(PDOException $e) {
    # 23000 error code means the key already exists, so UPDATE!
    if($e->getCode() == 23000) {
        try {
            $sth = $dbh->prepare( "UPDATE tally SET votes = votes+1 WHERE QID=:QID AND AID=:AID");
            $sth->execute(array($_POST['QID'],$_POST['AID']));
        }
        catch(PDOException $e) {
            $this->db_error($e->getMessage());
        }
    }
    else {
        $this->db_error($e->getMessage());
    }
}

This looks a lot more complicated then it really is. What happens here is we check if a particular answer has gotten a vote before. If it hasn’t we create a new record for that answer, and give it one vote. If it has, we update the existing record. So how’s it decide which to do?

PDO exception magic.

Remember at the very beginning we created our multi-column primary key? When we try to insert a record into the table which matches an existing QID/AID pair, an exception is thrown, and in particular the exception code is 23000 (duplicate key).

If the insert throws an exception, we’re going to check the exception code, and if it matches 23000, we’ll try to update the record instead. Of course if the insert fails for a different reason, or the update fails as well, we’re going to just issue a call to a method called db_error() which just echos a generic error message. Like before, a production environment would log this error and/or notify the admin.

Using PDO Exceptions

Finally, the end of the method:

    # entry in $_COOKIE to signify the user has voted, if he has
    if($sth->rowCount() == 1) {
        setcookie($_POST['QID'], 1, time()+60*60*24*365);
        $_COOKIE[$_POST['QID']] = 1;
    }
}

By using rowCount() we can verify that we’ve either updated or inserted a vote. If a vote has been successfully registered we set a cookie indicating as much, using the question identifier as the cookie name.

In addition to setting the cookie, we populate the super-global $_COOKIE, so when the poll displays, it shows answers rather then presenting the poll again.


Step 12: Put It All Into Action

We’ve written the PHP, set up the CSS and HTML, now it’s time to put it all into use. In this example, we’re just going to drop everything into a page that’s otherwise blank. At the very top of the page, insert the following:

<?php
    include('webPoll.class.php');
    webPoll::vote();
?>

It’s important that this be the very top of the page, before any HTML. Why? Because if there’s a vote to process, a cookie may be written, and you can’t write cookies after anything else has been sent. The call to the static method vote() returns if there’s not the proper POST data to process.

Next, we’ll include all the styles we wrote as a seperate stylesheet. Also, we’re going to include a particular style just for IE that was mentioned earlier to enable the :hover psudo-class.

<link rel="stylesheet" href="poll.css" type="text/css" />
<!--[if IE]>
<style> body { behavior: url("res/hover.htc"); } </style>
<![endif]-->

In the BODY of your HTML page, you’ll drop in the following PHP to insert the polls:

$a = new webPoll(array(
        'What subjects would you like to learn more about?',
        'HTML & CSS',
        'JavaScript',
        'JS Frameworks (jQuery, etc)',
        'Ruby/Ruby on Rails',
        'PHP',
        'mySQL'));

$b = new webPoll(array(
        'What is your question?',
        'Don\'t have one',
        'Why?',
        'When?',
        'Where?'));

That’s it! Thanks for reading. Any thoughts, questions, or suggestions?

Quick Tip: What you May Not Know About JavaScript’s Logical AND Operator


In today’s video quick tip, we’ll be reviewing JavaScript’ logical AND operator. Those of you who are just beginning to get into JavaScript, or even a library like jQuery, might not realize that they can even be used as micro if statements!


Example 1: General Usage

// EXAMPLE 1
var a = 5,
	b = 10;

if ( (a === 5) && (b === 10) ) {
	alert('yay');
}

The AND operator’s use in the code above is what the huge majority of us are most familiar with. If a equals 5, and b equals 10, then do something awesome, like display an alert box that says, “Yay!”

The right side of the && operator will only run if the left side is equal to true. With that in mind, we can use this to our advantage!


Example 2: Checking if an Element Exists

In most of my AJAX-based applications, there will be a point where I must first determine whether an element with a particular id exists within the DOM. If it does not, I’ll create it. Otherwise, I’ll work with the element that already exists. Generally, we can use an if statement for this sort of task.

if ( !document.getElementById('contents') ) {
  // then call a function that inserts the element into the DOM.
}

Alternatively, we can use the && operator to accomplish this task.

!document.getElementById('contents') && createElem('div', 'contents', 'hello world');

Remember, that fake createElem function will, again, only run if the left side is equal to true. Think of it this way: is it true that we could not find an element with an id of contents on the page? If so, then move on to the right side. Now if it’s equal to false, the right side will never run.


Example 3: Loading jQuery Locally

When reviewing the HTML5 Boilerplate, I noticed that Paul uses a clever one-liner that potentially loads a local version of jQuery, if, for some reason, there was an error downloading the file from your CDN of choice.

!window.jQuery && document.write('<script src="localjQuery.js"><\/script>');

Is it true that jQuery does not exist? If so, move on to the right side, and insert a script element, which references jQuery locally. Nifty, eh?


Conclusion

Before you go crazy with this technique, be careful. It certainly makes for slightly less readable code, and that should be an important factor in your decision — especially when return to six month old projects!

Psystar is dead. Long live Quo Computer

While we all know the story of Psystar, the company that crashed and burned by loudly selling non-Apple Macintosh computers with OS X installed, a much quieter and more polite company named Quo Computer seems to be doing just fine. Their mission is to get computers that can run the Macintosh OS into as many hands as possible, and they go about it in a much more reasonable way.

Although their PR waxes eloquently about the virtues of using a Mac, Quo creates computers that can run any operating system, be it Linux, Windows, Mac OS X, or any combination of the three. In June of last year, they opened up a store located at 2401 West Main Street, Alhambra, California as a small mom and pop operation in a section of town that is going through revitalization. At the store, they offer classes including one on how to switch from a PC to a Mac. Their site speaks of getting free computers to low-income neighborhoods and offers to train teachers and work with them in order to get computers into more classrooms. They seem like nice people and not as litigious as some other company we know.

TUAWPsystar is dead. Long live Quo Computer originally appeared on The Unofficial Apple Weblog (TUAW) on Fri, 10 Sep 2010 09:00:00 EST. Please see our terms for use of feeds.

Read | Permalink | Email this | Comments

PopCap making 25% of business in mobile space, sees future in social gaming

PopCap’s Dave Roberts spoke with TechFlash recently, and revealed that about 25% of the company’s profits are coming from the mobile division. You’d think that the iPhone would be a huge part of that (and it is), but it turns out the iPhone isn’t alone — Java/BREW versions of the games are also very popular for older wireless phones. In that sense, PopCap is a different iPhone game company — rather than depending on Apple and the App Store for profits, it’s a true cross-platform developer.

Roberts says the company is aiming for social gaming next — Zuma Blitz is going to be the next big push, and PopCap is very tuned in to the relationship between the iPhone and Facebook. “Our customers love it,” Roberts says about combining iPhone games with Facebook stats. “It is really sticky. It gets people excited about playing.” It’ll be interesting to see what PopCap does with Apple’s Game Center — presumably, they’ll include the functionality in their games sooner rather than later.

Finally, Roberts says that a lot of casual game companies have come and gone in mobile gaming, but PopCap has endured, mostly because they simply work hard on making great games, and selling those in as many places as possible. “We’ve made more money on mobile gaming than probably any other company except for EA, just by doing our thing,” he says. And as anyone who’s enjoyed a Plants vs. Zombies marathon will tell you, we’re glad they did.

TUAWPopCap making 25% of business in mobile space, sees future in social gaming originally appeared on The Unofficial Apple Weblog (TUAW) on Thu, 09 Sep 2010 19:00:00 EST. Please see our terms for use of feeds.

Read | Permalink | Email this | Comments

Steve Young Football for iPad ads spoof 90s commercials

Apparently there is an iPad game behind these crazy commercials, but we posted them mainly because they’re hilarious. The spot above will be familiar to anyone who grew up in the ’90s as a spoof of the old Crossfire commercials that took a mechanical board game way too seriously. You’d probably be forgiven for noticing that the game, Steve Young Football, which is an over the top wacky version of the sport itself, actually has a feature where you can network two iPads together for multiplayer. Pretty cool.

The second spot, after the break, is just as hilarious, this time spoofing the old My Buddy commercials (oh man, the memories). Steve Young Football is available for $4.99 on the iPad, and just 99 cents on the iPhone, and no matter what the game is like, it’s pretty much worth giving them the buck for the entertainment you’ll get from these videos.

[via Joystiq]

TUAWSteve Young Football for iPad ads spoof 90s commercials originally appeared on The Unofficial Apple Weblog (TUAW) on Thu, 09 Sep 2010 18:30:00 EST. Please see our terms for use of feeds.

Read | Permalink | Email this | Comments

GetGlue goes iPad

GetGlue users who have iPads have a reason to get happy today — there’s an official GetGlue iPad app available in the App Store. We talked about the Glue social network and iPhone app when it debuted a few months ago, and Glue is now quite popular. It’s great to see the GetGlue app on the big screen now, and you can even get a special “iPader” sticker (one of the common bonuses for achievements in GetGlue) for using your iPad to check in.

The free app does an outstanding job of utilizing the extra real estate on the iPad display, and makes it much easier to follow what your friends are watching, reading, or thinking about. As noted in a phone call about GetGlue that I participated in yesterday, the new app allows for a more immersive conversation with friends.

In other GetGlue news, the company has reward partnerships in place with FOX, HBO, Showtime, PBS and Universal Pictures. The FOX deal is brand new, and there will be special rewards for fans of the popular Glee and Bones series. Later in the month, GetGlue and FOX will be providing incentives for fans to watch two new series premieres for Raising Hope and Lone Star.

HBO has placed a lot of special GetGlue posts on their website, and fans can get exclusive stickers for influencing friends or dropping comments. The network is planning on special incentives for the new Boardwalk Empire and Eastbound and Down series, encouraging users to get stickers for watching the trailers and checking in during each episode. PBS is planning on joining in on the fun when they provide special rewards to viewers of new mini-series this year who check in while watching the shows live.

It should be a fun fall TV season, and GetGlue is there to add to your enjoyment.

TUAWGetGlue goes iPad originally appeared on The Unofficial Apple Weblog (TUAW) on Thu, 09 Sep 2010 17:30:00 EST. Please see our terms for use of feeds.

Read | Permalink | Email this | Comments

Tearing apart an old Apple TV just for the heck of it

My “love” for the original Apple TV is well-documented. I purchased a 40 GB model not long after the device hit the market, and found it not to my liking. I hated how I had to slowly sync everything to the device, it had little space to begin with (yeah, I know I should have just swapped out the HD for a bigger model), it ran hot, and the UI was never up to Apple standards in my humble opinion.

So, with a new Apple TV on order for arrival later this month, I decided to take a look at the innards of the old device while also trying to recover a bunch of media that I had stored on the ATA drive in the old Apple TV. My idea was that I’d pop the unit open, take some pictures for posterity, disconnect the old drive, hook it up to my iMac with a cable that I use for recovering data from older machines, and then create a disk image of the content I had stored on this Apple TV. Follow along as I take this little geek journey — you might want to do this with your old Apple TV as well.

TUAWTearing apart an old Apple TV just for the heck of it originally appeared on The Unofficial Apple Weblog (TUAW) on Thu, 09 Sep 2010 18:00:00 EST. Please see our terms for use of feeds.

Read | Permalink | Email this | Comments

Apple HDR head to head with two top competitors

I recently expressed surprise that Apple has dipped into the world of HDR (high dynamic range) photography. It’s a great upgrade for the camera, and will help users get better pictures if they use the feature wisely and at the right time.

Megan Lavey has just done a nice summary of what the Apple HDR feature can do, and it’s worth a look. So what about the HDR apps that were already available for the iPhone? How does the Apple version stack up to what are probably the two best paid HDR apps? Has Apple made the paid apps irrelevant?

To test them all I took some pictures in challenging sunset lighting giving me bright skies and deep shadows. It’s the kind of mix of light and dark that HDR is designed to help with. I also captured some images in bright morning sunlight with moderate shadows.

TUAWApple HDR head to head with two top competitors originally appeared on The Unofficial Apple Weblog (TUAW) on Thu, 09 Sep 2010 16:30:00 EST. Please see our terms for use of feeds.

Permalink | Email this | Comments

TUAW review: EpicWin for iPhone

As a gamer and productivity fetishist, I’ve been anticipating EpicWin for iPhone since we first saw the app’s trailer. It aims to enhance the drudgery of a to-do list with elements of a fantasy role-playing game like World of Warcraft, thereby adding a bit of fun to your daily tasks. I’ve been using it for a couple of weeks now and, while it’s fun in a I’m-gaming-while-I-should-be-working way, EpicWin feels unfinished. The developers have promised (and delivered) new features via updates, but EpicWin still feels like an internal beta. Here’s what I found.

Choose your character

Like many fantasy role-playing games, the first thing you’ve got to do when launching EpicWin is create your character. There are five to choose from, all familiar to the genre: a dwarf, a warrior priestess, an “undead” skeleton warrior, a male warrior and, oddly enough, a living tree. Think of a happy-go-lucky Ent and you’ll get the idea. The first three are free; the others can be purchased in-game.

TUAWTUAW review: EpicWin for iPhone originally appeared on The Unofficial Apple Weblog (TUAW) on Thu, 09 Sep 2010 17:00:00 EST. Please see our terms for use of feeds.

Read | Permalink | Email this | Comments