Tutorial: Getting Gravatars – MD5 Encryption And Simple Data Retrieval

In the past I’ve posted about how to extra data from web services, particularly parsing XML and JSON.  Some web services are much simpler than this, and don’t require that level of overhead.  An example of this service is the Gravatar service (for those who don’t know those little images you see beside comments are typically from users registered on Gravatar.com).

In order to get a gravatar all you need to do is encrypt the user’s e-mail into an MD5 hash, add that information to a URL associated with the gravatar api, and in return gravatar.com will send you the URL of the image.

Mugunth Kumar has created a tutorial illustrating this process here:
Add Gravatar Support To Your App

Here’s the blood and guts of it:

1. The “CommonCrypto/CommonDigest.h” includes a function known as CC_MD5 which allows you to convert the user’s e-mail into a MD5 hash tag.

2.From there it’s simply a matter of accessing the URL on gravatar at “http://www.gravatar.com/avatar/HASH” and that will give you the URL of the user’s avatar.

Mugunth has also added a sample project on Github:
http://github.com/MugunthKumar/Gravatar

There probably aren’t many situations when you’ll specifically need Gravatars in your app, but it’s especially good to know how to perform the MD5 encryption, as it is commonly required by web api’s.

Thanks for reading, please share this using the buttons below!

[Via: Under The Bridge]

©2010 iPhone, iOS 4, iPad SDK Development Tutorial and Programming Tips. All Rights Reserved.

.

Share and Enjoy:

RSS
Twitter
Facebook
DZone
HackerNews
del.icio.us
FriendFeed

Submitting iPhone Apps To The Apple App Store – A Step by Step Guide

Here’s a quick step by step guideline that you can print and keep hand, to use when your app is ready for submission. I am assuming that the reader of this article has an iPhone Developer License.

====== Step 1 ======

Certificate is an essential element to submit or test an application on iphone. It comes with code sign(Signatures) which would verified when an application is submitted on apple store or when tested on iphone.

One can bypass these if an application is installed on jail-break iphone or  when submitted on Cydia but this is not possible when one wants submit it to Appstore.

One has to through 2 step procedure to create a certificate from developer portal. I simply copied those two from “iphone developer portal”

[1] Generating Certificate Signing Request

[2] Submitting a Certificate Signing Request for Approval

Generating a Certificate Signing Request:

[3] Open the Utilities folder and launch Keychain Access from the Applications folder.

[4] Set the value of Online Certificate Status Protocol (OCSP) and Certificate Revocation List (CRL) to “off” in the Preferences Menu.

[5] Select Keychain Access -> Certificate Assistant -> Request a Certificate from a Certificate Authority.

[6] Fill in your email address in User Email Address Field. Confirm that this email address is same as provided at the time of registering as iPhone developer.

[7] Fill in your name in the Common Name field. Confirm that this name is same as provided at the time of registering as iPhone developer.

[8] It is not necessary to have an Certificate Authority (CA). The ‘Required’ message would be eliminated after finishing the following step.

[9] Click the ‘save to disk’ radio button if prompted, choose ‘Let me specify key pair information’ and proceed.

[10] If  you choose ‘Let me specify key pair’ option then one has provide a file name and click ‘Save’. Select ‘2048 bits’ for Key Size and ‘RSA’ for the algorithm in next screen and proceed.

[11] CSR file would created on the desktop by Certificate Authority.

Submitting a Certificate Signing Request for Approval:

[1] Once CSR file is created log in to the iPhone developer program portal and go to ‘Certificates’> ‘Development’ and select ‘Add Certificate’.

[2] Click the ‘Choose file’ button, select your CSR and click ‘Submit’. The portal will reject the CSR if Key Size is not set to 2048 bit at the time of CSR creation.

[3] This will followed by notification to Team Admins by email of the certificate request.

[4] The change in the certificate status would informed by email on approval or rejection of the CSR by Team Admin.

Download/Installing Certificate on your machine

[5] Once the CSR is approved the Team Members and Team Admins can download their certificates via the ‘Certification’ section of the Program Portal.  Choose ‘Download’ next to the certificate name to download your iPhone development certificate to your local machine.

[6] Once this is done double-click the .cer file to launch Keychain Access and install your certificate.

On installation of certificate on your MAC the next step is to create an App ID.

Note: You have to follow this step only once and late you don’t have to make certificates for your other applications.

====== Step 2 ======

Follow the following steps to create an App ID:

[1] Go to ‘App IDs’ and click ‘App ID’ after logging in to iPhone developer program portal.

[2] Populate the ‘App Id Name’ field with your application name (that is – iPhone app) and in ‘App Id’ enter something like com.yourdomain.applicationname (i.e com.edumobile.iphoneapp) and click submit.

[3] Please do note down the “App Id” as this would be utilized in Info.plist, bundle identifier tag.

====== Step 3 ======

Next step would be to create a Provisioning file for our Xcode and is the last step for creating binary which would submit it to Appstore.

[1] After you navigate to ‘Provisioning’> ‘Distribution’ click ‘Add Profile’ in iphone developer program portal.

[2] Choose “App Store” in “Distribution Method”.

[3] In “Profile Name” enter your application name (i.e iphoneapp) which will be your provisioning profile name as well.

[4] In “App ID” select the app name(i.e. iphoneapp) which you created in Step 2.

[5] After downloading the Provisioning profile copy it to your/YourUserName/Library/MobileDevice/Provisioning Profile.

====== Step 4 ======

Now everything is step up, open your project in Xcode

[1] Click “i” Info button after selecting your project from “Group & File” in left side bar.

[2] Navigate to “Configuration” tab and select “Release”. Click the “Duplicate” button from bottom, name is “iphoneDistribution”.

[3] Click on “Build” tab and choose “iphoneDistribution” and enter in “Search in Build Settings” filed ‘Base SDK’ and select the current selected Device and  change to what gadget your application is targeting (I prefer “Device-iPhone OS 2.0)

[4] Now in “Search in build setting” field enter “code signing identity” and choose the provisioning profile created earlier in Step 3. Apply the same to the child property “Any iPhone OS Device”.

[5] Once this done close the Info screen and select the “Target”> “Your App” from “Group & File” in left side bar and click on “Info” button again from Xcode.

[6] To be on the safer side repeat step 3 and 4.

[7] With the Info screen still open click on “Properties” tab and enter “App Id”(i.e. com.edumobile.iphoneapp) in Identifier field.

[8] Now that all is done, click on “Build” (cmd+B) from Xcode>Build.

[9] You will find your binary file created on right clicking on “Product”> “YourApp” and selecting “Reveal in Finder”. Zip this file.

====== Step 5 ======

The next step is to submit the binary file created to itunesconnect.

[1] In your browser type https://itunesconnect.apple.com/ (this website is very slow over https) and login using your iPhone developer account.

[2] Click on “Manage Your Account” > “Add Application”

[3] On replying to a simple question from apple you can sumbit your application to app store. You also need few things in your system before you submit your application.

a) Application Name (must be unique)

b) Application description

c) Application Category

d) URL for your application feedback.

e) Icon of your application in 512 x 512 size.

f) Main picture of your application in 320 x 480 or 320 x 460 size. (You have option to submit up to 4  more pictures of your application).

Thats it… you’re done now! Don’t forget to bookmark and save this page for later!

Enhance your web forms with new HTML5 features

Please note that HTML5 is an emerging technique. These examples are not intended for use on a production site. Results may vary according to browser implementation. Please use Chrome or Safari for best results.

Required fields

Whose ever tried to submit a form and gotten an error message saying that you “forgot” to enter your email address? Probably not a lot of us: In fact, 99 percent of all web forms have at least one field marked as required.

In good ol’ HTML, we had to manually display that a specific field is required, most of the time by using a red asterisk. But with HTML5, you can set up a input field to be required:

<input type="text"  name="client_name" required>

And on the CSS side, something like

input:required {
    border: 1px red solid;
}

will save you a lot of time.

Two similar attributes are also available: optional and invalid. They work exactly as the required attribute explained above.

Placeholders

In a form, an input field always has a label explaining what kind of information is required. While you can currently use the label tag to display a label for a specific text field, HTML5 introduces the placeholder attribute. As shown below, using it is pretty simple:

<input name="firstname" placeholder="Please enter your first name">

The HTML5 placeholder attribute works exactly as the value attribute, except that when the user click on the text field, the placeholder text is automatically removed so the user can easily enter his information.

The placeholder attribute currently works only in safari/webkit. Don’t worry about other browsers though, it is pretty easy to simulate placeholders using javascript:

Autofocus

A new HTML5 attribute is named autofocus. If applied to an element, the element will automatically receive the focus once the page is loaded. This can be seen on some sites and most search engines.

Nothing complicated, just use the syntax below, and remember that in HTML5, there’s no more need for attributes to have a value like in XHTML 1.0.

<input name="search" autofocus>

Email fields

Asking someone’s email on a web form is extremely common because email is still the easiest way to contact someone over the internet. HTML5 introduces a new type for the input element, named email.

<input name="email" type="email">

Pattern attribute

When validating a web form, we have to validate the data entered by the visitor. The new pattern HTML5 attribute allows you to define a regular expression pattern. Only the data that matches the defined pattern will be validated. If the data doesn’t match the pattern, then the form will not be submitted.

This is, in my opinion, an extremely good thing, which will save lots of time to developers when coding forms. Though, remember that you should always validate data on the server side as well.

<input type="text" name="Phone" pattern="^0[1-689][0-9]{8}$" placeholder="Phone" required>

Url fields

Nowadays, many people have a website, blog, or at least a Twitter profile. This is why many web forms offer the possibility to enter an url.

HTML5 introduces a new type for the input element, designed specifically for entering urls:

<input name="url" type="url">

Although I didn’t test it myself, I heard that the W3C validator will raise an error if the value of a url field doesn’t match a proper url structure.

Date pickers

Many businesses are offering an appointment request through their website. In that case, the visitor has to specify the day they would like an appointment. HTML5 introduces the date type for the input element:

<input name="day" type="url">

When clicked, the date attribute will display a date picker so visitors will simply have to choose a date instead of entering it manually. Unfortunately, except in Opera, most browsers don’t have it implemented yet.

Note that a date picker can be implemented on your forms using the following types:

<input type="date">
<input type="datetime">
<input type="month">
<input type="week">
<input type="time">

Isn’t that user friendly? Personally, I can’t wait to implement this in my forms but as I said earlier this isn’t very well implemented in browsers at the time of writing this post. Of course, Javascript is always here to help. On this site I found a simple fallback implementation for the input type=date HTML5 attribute:

var i = document.createElement("input");
i.setAttribute("type", "date");
if (i.type == "text") {
    // No HTML5 native date picker support, use jQuery or your favorite framework to create one.
}

Search boxes

To enhance ease of retrieving information, many websites have implemented their own search engine. HTML5 has created a new type for search fields.

<input name="q" type="search">

For now, the only difference with regular text inputs is that, if you use Safari, the search box will have rounded corners. But maybe interesting functionalities will be implemented in the future. Let’s hope, because right now I have to admit that I don’t really see why we should use this type.

Sliders type and step attribute

HTML5 is also introducing sliders: A new type for the input element, which allows visitors to easily select a number instead of entering it manually.

<input name="number" type="range" min="0" max="10">

The example above allows the visitor to choose a number between 0 and 10. If you want the slider to be incremented/decremented 2 by 2, you’ll have to use one more new attribute: step. Here is an example:

<input name="number" type="range" min="0" max="10" step="2" >

That way, visitors will only be able to select numbers like 0, 2, 4, and so on.

Like CatsWhoCode? If yes, don’t hesitate to check my other blog CatsWhoBlog: It’s all about blogging!

Enhance your web forms with new HTML5 features

Mac Freeware All-Stars: Our 10 Best in Category Picks

Recently we posted an enormous roundup of 100 free Mac applications. These types of articles are awesome for a quick overview of everything that’s available, but sometimes you just want to know what the best free app is in a given genre.

Today we’ll answer this question by presenting our top picks for free applications across various categories. Below we’ll take a look at the best of the best in free software and then give you the chance to join the discussion and cast your vote.

Best Free Task Manager: SimpleTask

Our first award goes to the best free task manager. There are plenty of premium GTD apps out there such as Things, Firetask and The Hit List but they all require you to drop at least $50.

Though you won’t currently find the premium level of functionality in a free app, there is much to be said about a simple todo list application that allows you to track your daily tasks without piling on fifty-seven features that you’ll never actually use.

Among the apps that fit this description, SimpleTask definitely stands out as a clear winner. This simple todo list has all the basic features you need in addition to a few great advanced features such as a global keyboard shortcut, a menu bar option, integrated search, and syncing with the iPhone version.

mac screenshot

SimpleTask Main Interface

SimpleTask makes it super easy to quickly add a task and back to work. You can set as many or as few of the options as you like and sort your list by pending and complete tasks.

mac screenshot

Adding a Task

Though I’d like to see a due date feature added here, it’s easy enough to use the description field for this and other information.


Best Free Clipboard Manager: ClipMenu

If you read AppStorm frequently, this pick will come as no surprise. ClipMenu is hands down the best free clipboard manager available (check out our full review).

mac screenshot

ClipMenu

Global keyboard access, a floating menu that pops up where your mouse is, menu bar access, snippets management, complex string actions and more.

mac screenshot

ClipMenu Snippets

Trust me, no matter what your free clipboard manager does, ClipMenu does more.


Best Free Launcher: Alfred

Once upon a time this award would’ve gone to Quicksilver without a second thought. However, despite still being more fully featured than any other free launcher, Quicksilver development has become stagnant (perhaps in favor of Google’s GQSB).

The current rockstar in the app launcher world is Alfred. The big user friendly interface makes it easy for even complete Mac novices to instantly launch any application from the keyboard.

mac screenshot

Alfred

Alfred is also great at finding files on your Mac, making calculations, and searching the web. One of my favorite features is the ability to search a number of popular sites and even set up your own custom searches for any site not included by default.

mac screenshot

Alfred IMDB Search

Sometime soon we’ll be taking an in-depth look at the Alfred Powerpack, a new bundle of advanced features available for £12.


Best Free Quick File Sharing App: Droplr

This genre is occupied primarily by two applications: CloudApp and Droplr. Both of these apps allow you to rapidly share files by uploading them online and automatically placing the URL in your clipboard.

It’s definitely a tough call, but I’m declaring Droplr the winner here. Though Cloud provides you with ad-free uploads and integration with a few other apps via “Raindrops,” Droplr has code sharing with syntax highlighting, better text sharing, a better web interface, and better Twitter integration (the place you’re most likely to be sharing to).

mac screenshot

Droplr

Above you can see the little pop-out menu that shows up when you drag something to Droplr. Clicking the little Twitter button will tweet the link with your app of choice.

Below is the online Droplr interface. The primary reason it stands out from that of Cloud is the thumbnail view for your recent images. Cloud’s simple list view has no previews and can therefore take quite a few clicks to find the image you’re looking for.

mac screenshot

Droplr Web Interface


Best Free Twitter Client: TweetDeck

I really wanted to give this one to Tweetie. While it’s definitely my client of choice, it has fallen far behind in development and supports none of Twitter’s newest features (Officials ReTweets, lists, etc.).

Moving on, Kiwi, a very similar client to Tweetie, is another one of my favorites, but it’s not a truly free app (it costs $9.95) and doesn’t support Twitter lists. Next I tried Nambu. It’s completely free, supports lists and ReTweets, and has a great interface complete with inline picture viewing. I thought I had found a winner but the fact that you can’t view user profiles or timelines in the app (clicking a user name opens your browser) makes it just about unusable for me.

It turns out if you’re comparing raw functionality you simply can’t beat good old TweetDeck. The features available in TweetDeck don’t just rival that of just about every other client, they blow them out of the water.

mac screenshot

TweetDeck

TweetDeck supports Twitter lists, official RTs, a bunch of other networks (Facebook, LinkedIn, Foursquare, MySpace, etc), in-app profile viewing, multiple columns, iPhone column syncing, column filtering, notifications, tweet translation and a whole bunch of other great stuff that we’ll be taking a look at in an upcoming article.

TweetDeck may not be a native Mac app (AIR), nor is it as pretty as Tweetie or Kiwi, but it’s definitely the ultimate free Twitter application.


Best Free Mail Alternative: Postbox Express

Apple’s default Mail application is certainly a powerful application but it leaves many users wanting more. I’ve been experimenting with free alternatives like Thunderbird lately and have had significant trouble finding a single app that really worked the way I wanted.

Enter Postbox Express, a new free version of the popular Postbox application. Postbox Express is enough like Mail that you’ll feel right at home and contains enough enhancements to make it worth the switch.

mac screenshot

Postbox Express

One of the coolest features that you’ll notice right away is tabbed email browsing. The tab implementation is exactly like Safari and is extremely useful to have for your inbox. Other awesome features include lighting quick email setup (username, password, done), message tagging (a huge missing feature in Mail), third party extensions and even social network integration (post to Facebook and Twitter).

mac screenshot

Postbox Express Message Tagging


Best Free Dashboard Widget: iStat Pro

Though iStat Menus has turned into a paid app, the old iStat Pro Dashboard widget is still free. I’ve nearly abandoned Dashboard completely, but I still keep this one widget open because it’s so incredibly useful.

mac screenshot

iStat Pro

If you’re a data junkie, feast your eyes on all of the information available with iStat Pro. The widget is fully customizable and allows you to track any or all of a number of system variables including memory, connected drives, active processes, network activity, internal temperatures, fan speeds and more!

Best Free RSS Reader: NetNewsWire

NetNewsWire looks and feels very similar to Mail.app and has a ton of awesome features that help you stay on top of the news from your favorite sites.

mac screenshot

NetNewsWire

NetNewsWire syncs with Google Reader, is packed with keyboard shortcuts, integrates with Instapaper, allows you to repost articles via MarsEdit, lets you create multiple tabs, and has an integrated web browser.

I’ve tried a few other news readers but the concept never really stuck with me until I downloaded NNW. The integrated tabbed browser makes this application an awesome place to track not only your RSS feeds but keep on eye on Facebook and Twitter as well.


Best Free Text Editor: TextWrangler

There are definitely quite a few great fully featured IDEs on the market such as Netbeans and Aptana, but these applications tend to feel a little bloated if all you want is a simple code editor.

In these cases, your best bet is going to be TextWrangler, an awesome and free editor from the creators of BBEdit. TextWrangler supports all the simple stuff like syntax highlighting and has a lot of advanced features as well like sorting, version comparing, multiple clipboards, and custom document markers.

mac screenshot

TextWrangler


Best Free Maintenance Utility: IceClean

Recently we took a look at MainMenu, an awesome Mac maintenance utility that cost just under $20. If you’re looking for the same kind of functionality in a free app, check out IceClean, an app I only recently came across that rivals the feature set of even paid apps in its category.

mac screenshot

IceClean

IceClean’s features are far too numerous to list here while doing the application justice. A few notable commands include repairing disk permissions, verifying preferences, updating prebindings, routine maintenance scripts, clearing caches, removing log files, and force empty all trash.

mac screenshot

IceClean

If you’re an advanced Mac user and know your way around system maintenance jargon, IceClean is definitely a must-have utility whether you’ve already purchased MainMenu or not.

Your Turn!

Our top picks are sure to be controversial and are fully meant to start a few comment wars. Join the discussion by casting your votes for the best free app in each category above. This is a highly subjective topic so feel free to completely disagree with any and all of our choices!

Also be sure to post a link to and must-have free application that we didn’t mention above.


Quick Look: TrackRecord

Quick Look posts are paid submissions offering only a brief overview of an app. Vote in the polls below if you think this app is worth an in-depth AppStorm review!

In this Quick Look, we’re highlighting TrackRecord. The developer describes TrackRecord as a new time monitoring application for Mac OS X that integrates with 37Signal’s Basecamp. TrackRecord lets you track and manage the time you’re spending, filter your Basecamp account to see as much or as little as you like, and even edit and delete the time you’ve already posted to Basecamp. All within the app.

Read on for more information and screenshots!

Screenshots

TrackRecord

TrackRecord

TrackRecord

TrackRecord

About the App

Here are the top five features you can expect to see in the latest version:

  • The ability to edit and remove time posted to Basecamp within the app.
  • Full drag-and-drop support for rearranging tasks.
  • Collapsable filtering for projects, to-do lists and to-dos.
  • Quick access menu bar for managing time quickly and efficiently.
  • Idle time tracking.

Requirements: Mac OS X 10.5+ and a Basecamp account with time tracking enabled

Price: $49

Developer: Something Interesting

Vote for a Review

Would you like to see us write a full review of TrackRecord? Have your say in our poll:

Would you like to see TrackRecord reviewed in-depth on AppStorm?customer surveys

Quick Look posts are paid submissions offering only a brief overview of an app. Vote in the poll if you think this app is worth an in-depth AppStorm review! If you’re a developer and would like to have your app profiled, you can submit it here.


Create a Smooth Satin Background Using Blends


Upon first seeing this shiny fabric background, you might think "Gradient Mesh." And if Gradient Mesh intimidates you, you might just click to the next tutorial. In fact, achieving a rich, satin background is deceptively easy. Illustrator’s Blends are the key. Let’s get started!

Continue reading “Create a Smooth Satin Background Using Blends”

Mastering Elements Part 5: Mastering Limiters

As we have learnt in the last four sections of this series, there can be many parts to a mastering chain. When I am mastering a track for a client or teaching the subject on a one to one basis, limiting and volume are often the first things I’m asked about.

Many people still seem to want ‘super hot’, ear bleedingly loud masters. Limiting is often how this effect is achieved, so let’s take a look at how these processor produce these levels and what the side effects of excessive volume are.

This is a very in depth subject and I’ve tried to keep things succinct but it is a little longer than usual, so try to stay awake!!


1: Perceived Volume

The first thing to understand about the all important limiting phase of our mastering chain is that even small amounts of the process will increase the perceived level of a track. Simply put this means it may not actually read as louder on your meter but it will sound louder to the human ear.

This effect is created by a reduced dynamic response and relies on the fact we as humans judge volume using average levels. So cutting a very long story, very short… compress and limit your track more, reduce it’s dynamics and ultimately you will create a signal that sounds louder.

Below is the same file peaking at the same level, the first untreated and the second limited. Which is louder? Technically they are the same level but of course the second appears louder due to it’s reduced dynamic range.

The Sonnox limiter used to treat the clips.

Download audio file (1.mp3)

An normalised audio clip peaking at 0db.

Download audio file (1b.mp3)

The same clip limited to 0db appears louder

All seems pretty straight forward and innocent right? Wrong. Reducing the dynamics in our music does increase perceived volume but it also introduces distortion, moves us closer to the dynamic signature of noise and at the end of the day, it goes someway to removing the original soul and movement from our music.

Saying this, not all limiting is bad and don’t let me make you think you shouldn’t increase the levels of your masters. There is a halfway house here and you can create loud masters that still contain dynamics and don’t leave you feeling like your ears have lost a fight with a rhino.

The trick here is to understand what you mastering limiter is doing and how it achieving it’s volume. As ever, understand the process and you’ll start to think about how much of it you are applying. Let’s look the different areas of limiting and listen to a few examples.


2: The Brick Wall

Most limiters that are intended to be used in the mix use a compression ratio of over 1:10. Anything above this is considered to be limiting of some form and this will often get the job done when applied to individual instruments.

These limiters may often have a pretty soft output limit and may not be 100% strict in there final levels. Mastering limiters however have to be exact and will often feature higher ratios and a totally strict control on the final level. These task specific processors are often know as ‘brick wall’ limiters.

It maybe that you are already using a brick wall type limiter already. When using plug-ins in your mastering chain it’s always a good to idea to opt for something that is designed for the purpose. Check the manufacturer’s website and the manual for you plug-in to see if it’s specification is up to the task of mastering.

Of course some plug-ins are quite obviously mastering tools and in some cases even there name gives this away. Reason’s MClass processors are obviously intended for mastering and Izotope’s Ozone is also an excellent suite of tools to get you started. For something a little pricier you might want to try Flux plug-ins, Universal Audio’s precision mastering range and IK Multimedia’s excellent T-Racks collection.

Izotope Ozone contains an excellent brick wall limiter.

The UAD precision limiter is a slightly more upmarket option.

All these examples contain some form of brick wall limiter but there are literally countless other plug-ins to choose from on the market. You may even have one lurking in your DAWs bundled plug-in list. It’s worth mentioning that sometimes a mastering limiter maybe called a maximiser. This is often a cut down, easy to use mastering limiter for simply increasing the inherent volume of your audio.

The Cubase maximiser.

Download audio file (2.mp3)

An audio clip with no limiting.

Download audio file (2b.mp3)

And with some Steinberg Maximiser applied.


3: Setting Your Levels

Most mastering limiters achieve their effect by the in/out level being driven into the unit against a literal brick wall on the output section. The output can be fine tuned to a level it never goes over. Gain reduction then occurs when the signal is pushed against this virtual output barrier. In reality the input of these processors can be driven to a point where the gain reduction is so high that absolutely no dynamics are present, so it’s worth taking care here.

The first thing to do when you start to use these limiters is to set your output level. By default they will generally be set to 0dB. In most cases this is fine, although some mastering engineers do prefer to go very slightly below this, so maybe -0.01dB. This ensures that absolutely no playback devices are clipped by the material.

With your output set you can start to drive the limiter using the input. As you do this your overall level will increase massively and once you hit 0dB and move beyond this point, you will get gain reduction, limiting and even more volume. This is where you need to go easy.

Generally speaking, 3-4dB of reduction in most situations is plenty. More than this and some material will start to suffer from lack of dynamic range and will become fatiguing to listen to and generally noisy. It’s also questionable how much more volume you will juice after this point.

A good test here is to check if you have any dynamic movement. Keep a close eye on your metering and ensure that there is dynamic movement in your material. I you are in doubt get hold of a meter that includes dynamic range information, this will give you your actual perceived loudness in real time.

Setting the levels on Logic’s adaptive mastering limiter


4: Attack and Release

Other controls you are likely to find on a typical mastering limiter are attack and release. Some will only feature release and some will feature neither, it really depends on the manufacturer or designer. When you come across these parameters it’s best to use longer times than you would during mixing.

I cant remember exactly where I heard it but someone once said (in connection with mastering dynamics) “…give me a compressor and limiter with attack and release times of forever and I’ll be happy”. This stuck with me and I started experimenting with long times and they really do work.

Longer times here generally result in more transparent, organic compression and limiting at the mastering stage and work well for me in most cases. Obviously every body is different and so are their projects, so you may want to try different settings and see what works for you.

Some nice long attack and release times on the T-Racks brick wall limiter


5: Soft saturation and extra settings.

Some mastering limiters will offer extra features, usually at the end of their signal path, and these can include soft saturation and soft clip algorithms. This really means as you approach zero db and start induce gain reduction, or ‘clipping’, a tape like soft limiting will occur. This often adds extra harmonics and a warmth associated with analog tape machines.

Not all limiters have these features and they are seen by some as gimmicks but it’s worth knowing what they are when you see them. As rule approach any enhancement process in your mastering chain with caution and do plenty of A/B’ing to check if what your adding is an improvement.

The soft clip function on Reason 5′s MClass maximizer’

Download audio file (5.mp3)

Some audio treated by Reason’s maximizer.


Quick Tip: How to Sync Two Instances of Ableton Live

In this quick tip, I am going to show you a great way to sync two Ableton Live instances on the same computer by using external MIDI software. This way we can have one instance acting as a Master that will be controlling the playback of both instances.

This technique can be useful if a users requires two instances of the program to be open simultaneously with each instance playing a different live set instead of having all sets loaded in one instance.


Setting up

First of all we need to open up the Preferences in Ableton Live. Go to the Look Feel tab and activate the Allow Multiple Instances switch. This allows us to have multiple instances of Live loaded up.

Another prerequisite is that our sound card needs to have more than one stereo virtual output activated so that audio from the second instance of Live can be routed to it. My Echo Audio Indigo DJx sound card has four stereo virtual outputs so theoretically, I can have another three instances loaded up at the same time!

The extra software we are going to be using is a free software called MIDI YOKE. MIDI YOKE is a MIDI Patch Cable driver. It’s a Windows multimedia driver that allows you to connect the MIDI output from one program to the MIDI input of a different program. Mac users already have this functionality in the form of the IAC driver.

Once downloaded and installed head over to Live’s preferences in the MIDI Sync tab. Under MIDI Ports activate Sync for the Output: Out to MIDI Yoke: 1 port.

Exit Preferences and fire up another instance of Live. A notification icon will inform us that we won’t be able to use another rewire slave application until we quite the current Rewire master application and restart Live. You can safely ignore that warning and hit OK.

Once the second instance of Live is loaded go to Preferences for that instance and in the MIDI Sync table under MIDI Ports activate Sync for the Input: In From MIDI Yoke: 1 port. Close the Preferences.

We can, now, see the External Sync Switch appearing at the top left of the second instance. When activated, Live will follow the sync source that has been selected in the MIDI/Sync Preferences. Go ahead and activate it.

In Action

Now, we can drop any audio or MIDI files onto both instances. By playing a clip on the Session or Arrangement view on the first instance or just hit the Play button, we can see that the Sync Out indicator of the first instance on the top left starts flashing. This means that Live sends MIDI sync messages to all output ports which have been enabled for sync in the MIDI/Sync Preferences.

Now, have a look at the second instance at the same area near the External Sync Switch. The Sync In indicator starts flashing at the same time meaning that Live receives usable MIDI sync messages.

Now the first instance acts as the master application. Pressing Stop on the master application will stop both instances which can then be started again only by the master application’s Play button or by playing any of it’s clips. Not only that but as you can see the second instance’s tempo starts following the tempo of the first instance. You might experience a slight delay for a second when you restart the playback since Live needs this time to resync both instances. If after all you notice a delay between your two instances, you can go back to the Preferences of the second instances on the MIDI/Sync tab and adjust the MIDI Clock Sync Delay value for the Input: In From MIDI Yoke: 1 port, by expanding its arrow on the left and adjusting accordingly.

Theoretically, you could have as many Ableton Live slave applications as your virtual stereo outputs. On top of that you can still rewire other applications like Propellerheads Reason, as slave applications to the first master instance of Live.

Thanks for your time and have fun!


Create a Blackberry Torch Using Photoshop and Illustrator

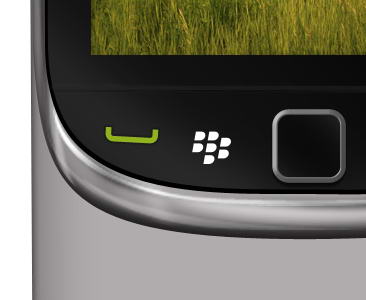
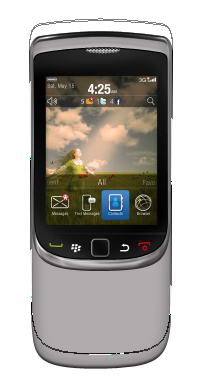
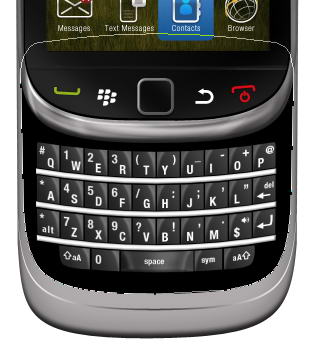
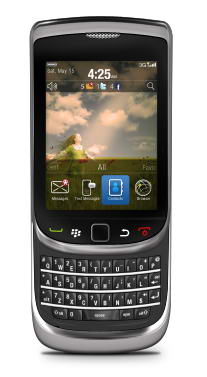
In this tutorial, we will draw a highly realistic blackberry torch using Photoshop and Illustrator. We’ll use Photoshop for basic shapes and shading and Illustrator for more complex shapes. Let’s get started!


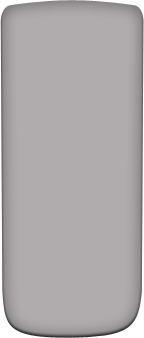
Step 1: Draw Basic Shape

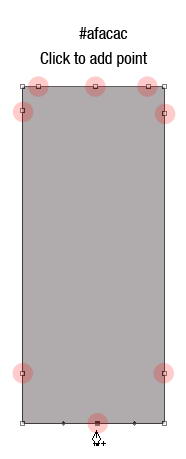
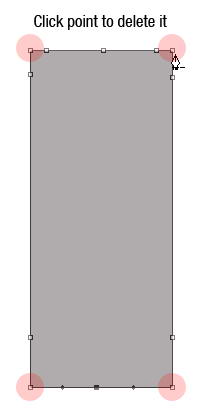
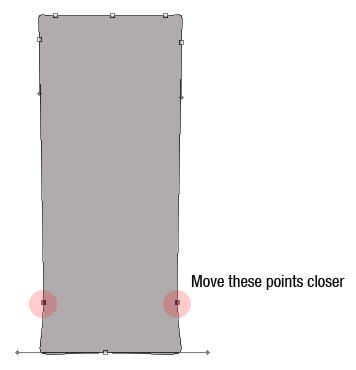
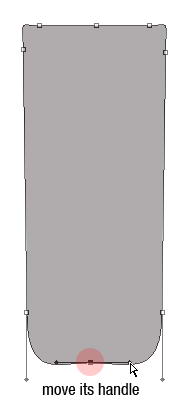
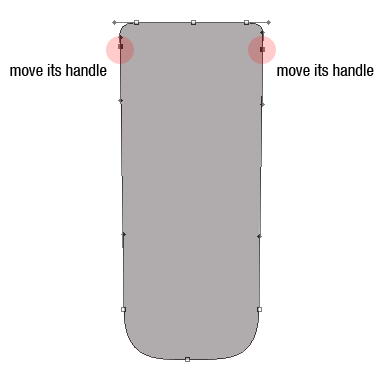
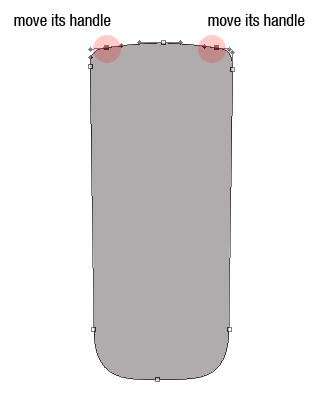
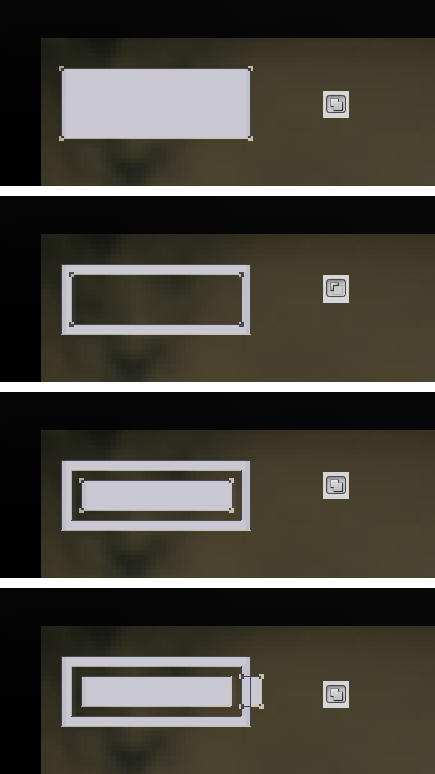
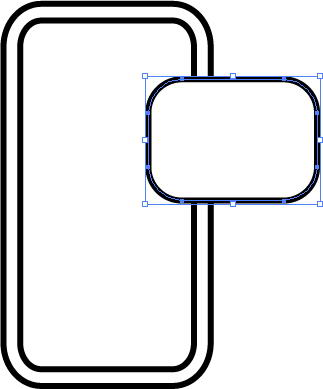
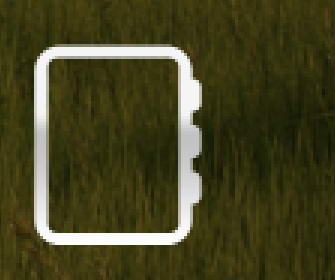
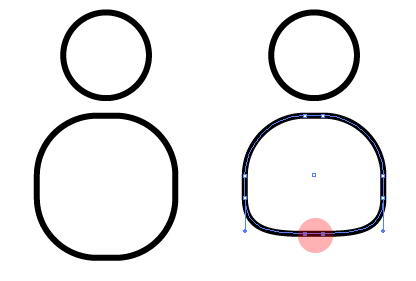
Let’s start by creating the basic shape of the phone. There are many methods to do this. I always find it easier to use a basic shape and modify it. In this case, I start by creating a rectangular shape with color #afacac then add some points, remove unneeded points, and modify its handle. See image below to see how I did it.
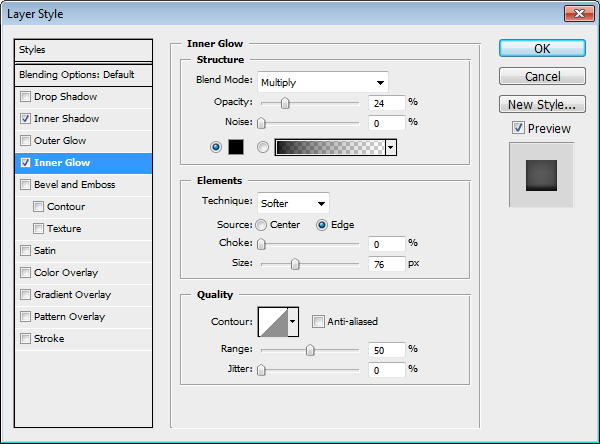
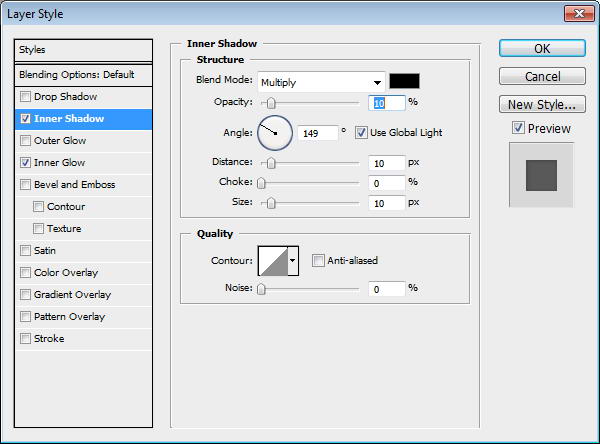

Step 2

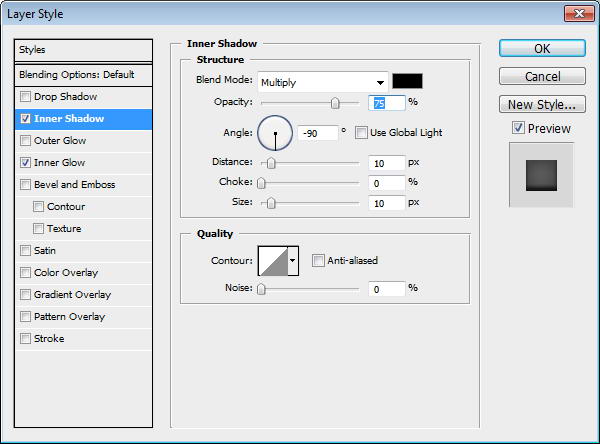
Add layer styles Inner Shadow and Inner Glow.
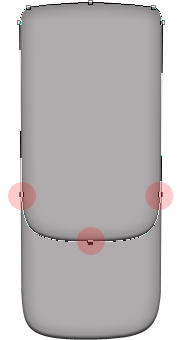

Step 3

Duplicate shape by pressing Cmd/Ctrl + J. Use direct selection tool to select three points indicated below and move them upward. This is going to be phone’s front face.
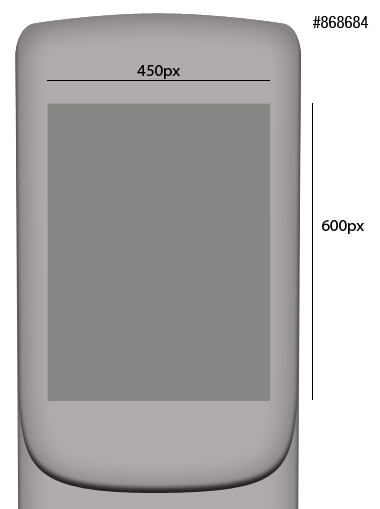
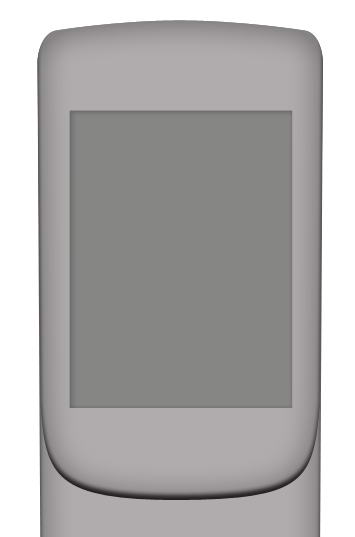

Step 4: Screen

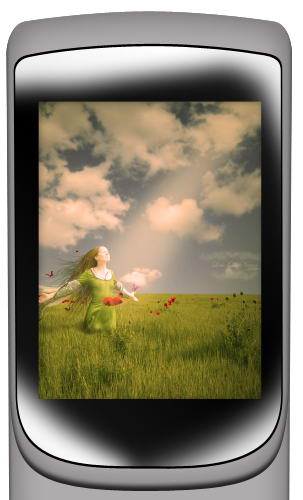
Create a 450×600 px rectangle on top of the shape. This will be screen area. Add Inner Shadow and Inner Glow to add depth into the screen.
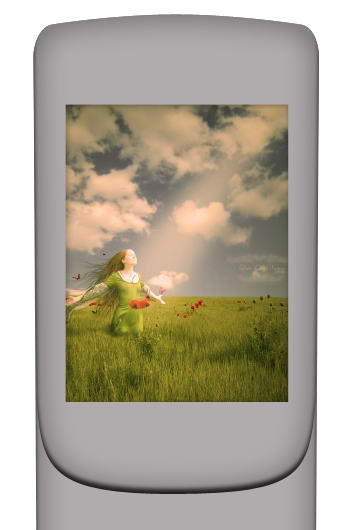
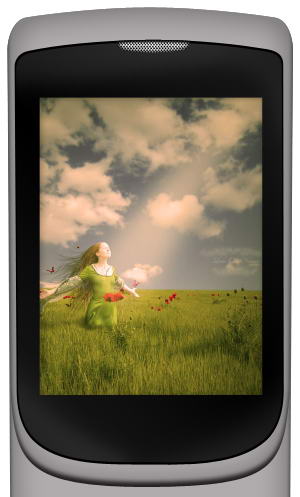

Step 5

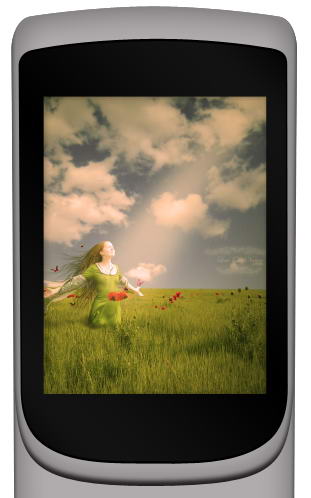
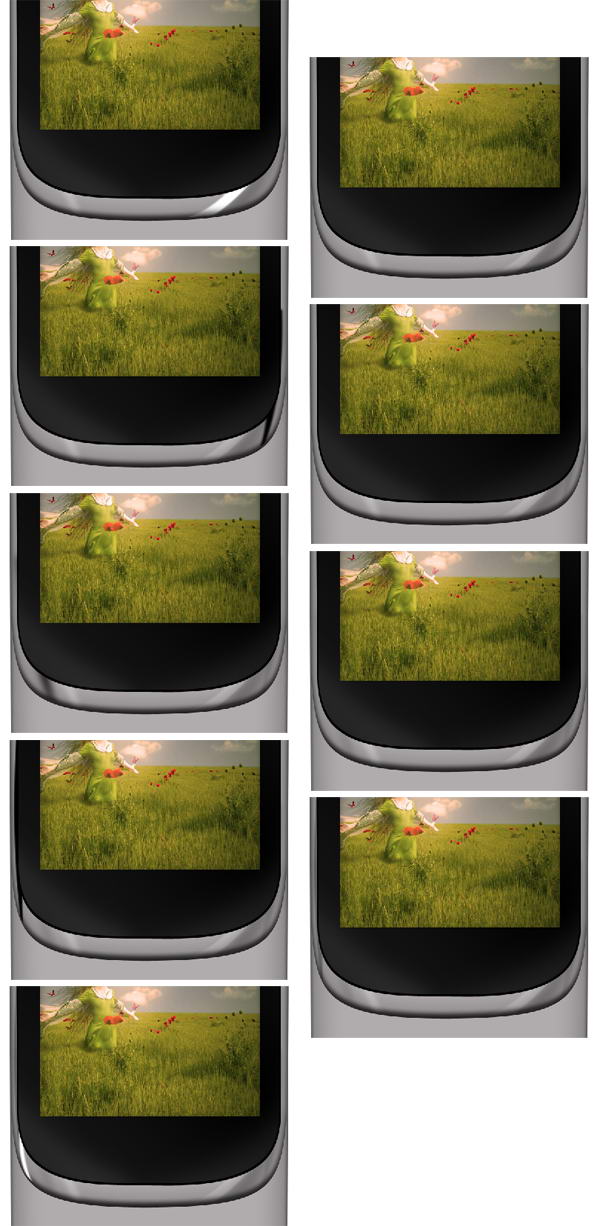
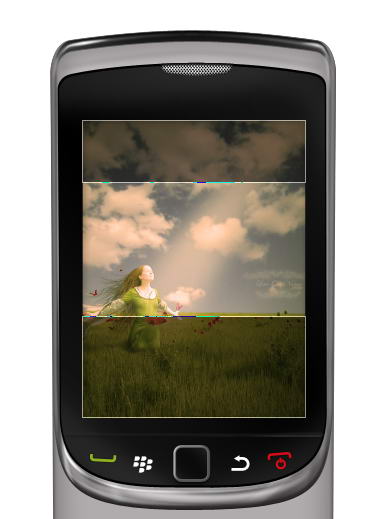
Add a picture and place it on top of the screen. Hit Cmd/Ctrl + Alt + G to convert it into clipping mask. The picture will automatically be placed inside the screen. You still can move or resize it if needed.


Step 6

Draw this black shape behind the screen.
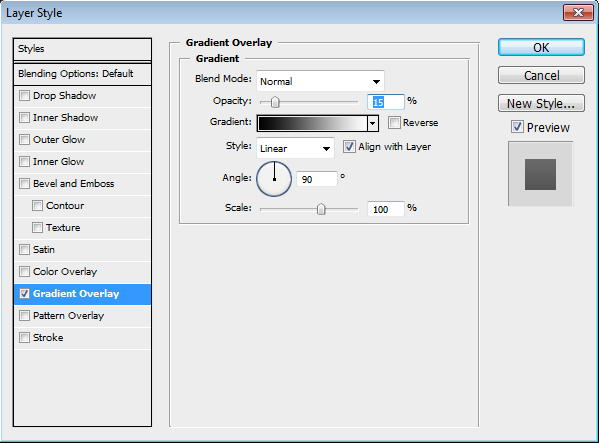
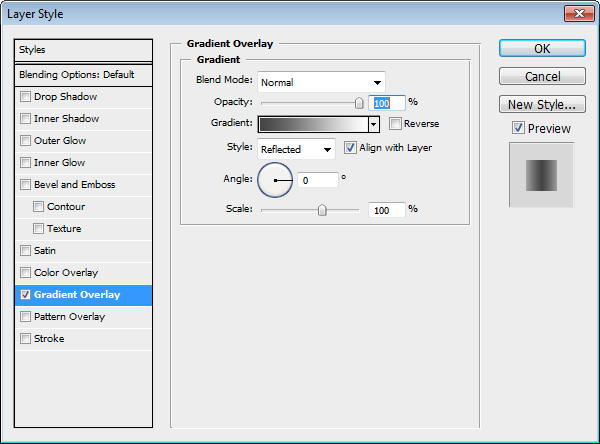
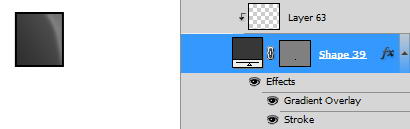

Step 7

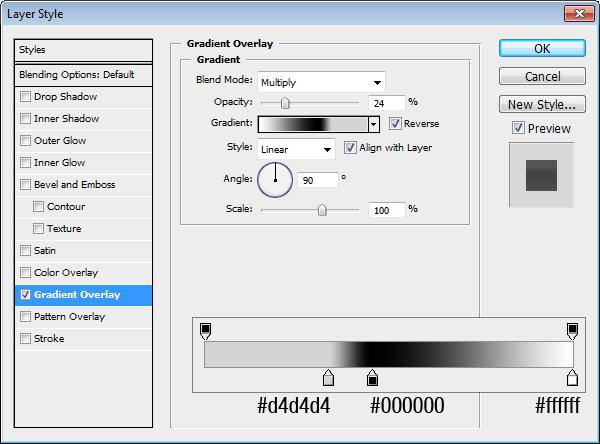
Duplicate shape and resize it to 99%. Add a subtle Gradient Overlay to the shape. I always add subtle gradients to add a natural look, since there is no perfect solid color in the real world.
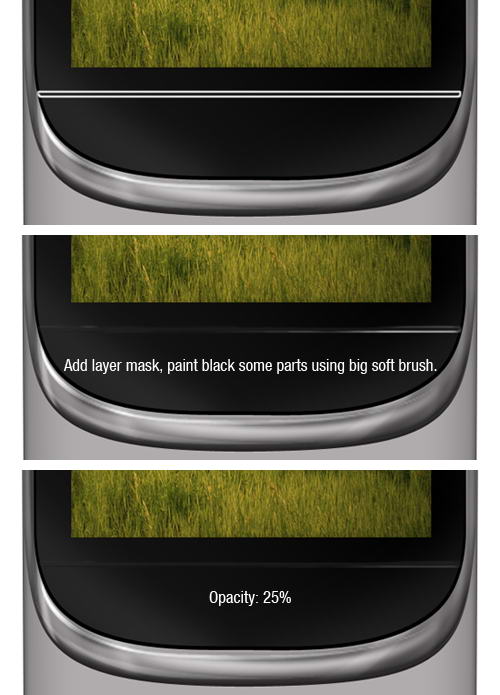

Step 8

Create a new layer on top of the screen and convert it to Clipping Mask by pressing Cmd/Ctrl + ALt + G. Paint white using soft brush and reduce layer opacity to 10%.
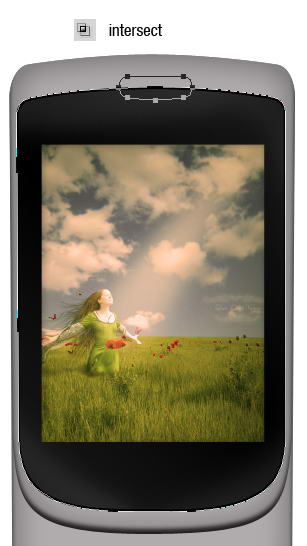

Step 9: Speaker

Duplicate screen shape, add rounded rectangle path on top of it and select intersect. Set Fill layer to 0%. This is going to be its speaker.
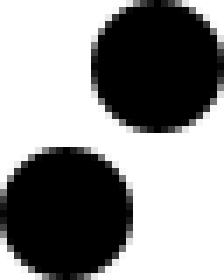

Step 10

Create a new file with size 32×40 px. Draw two circles, place them on opposite corners. Fill it with black.


Step 11

Select all (Cmd/Ctrl + A) and save it as a pattern by clicking Edit > Define Pattern. You may close the file, we won’t need it anymore.
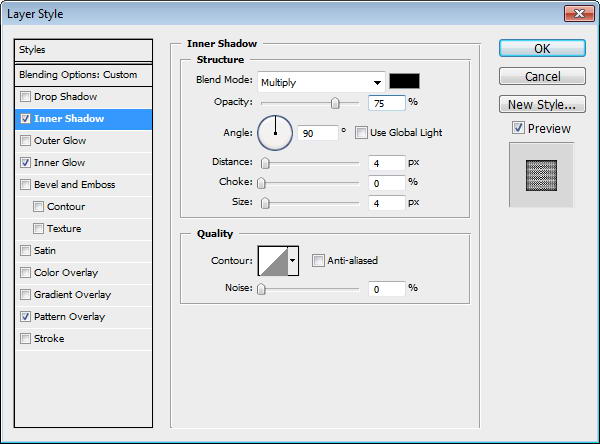
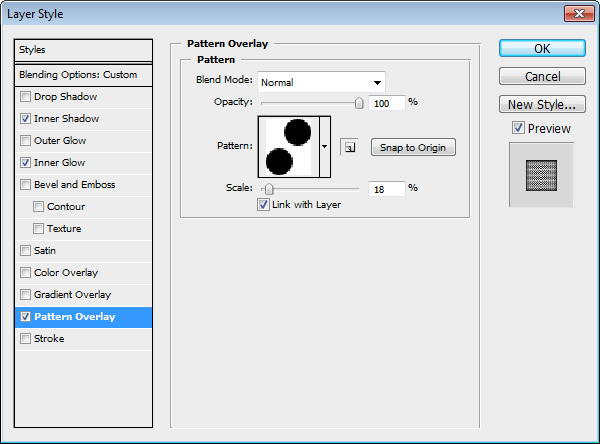

Step 12

Return to speaker shape. Add Inner Shadow, Inner Glow, and Pattern Overlay. In Pattern Overlay, make sure to select previously created pattern.


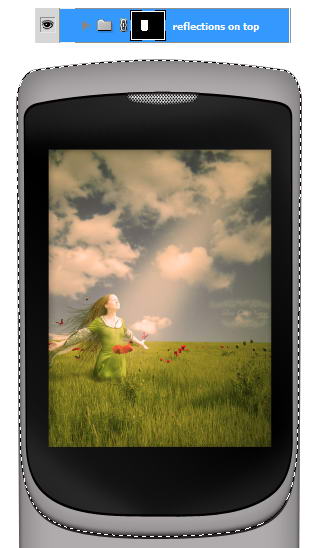
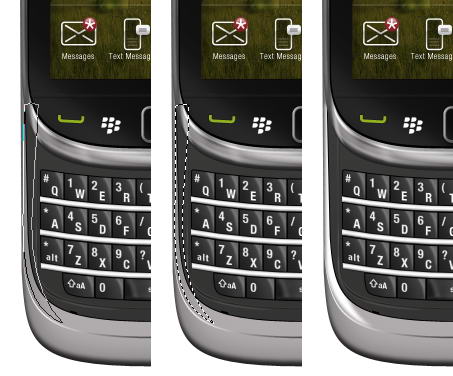
Step 13: Draw Highlight and Shadow

Cmd/Ctrl-Click phone’s front face shape. Create a new group layer and click Add Layer Mask icon. We are going to draw metallic reflections in this group.
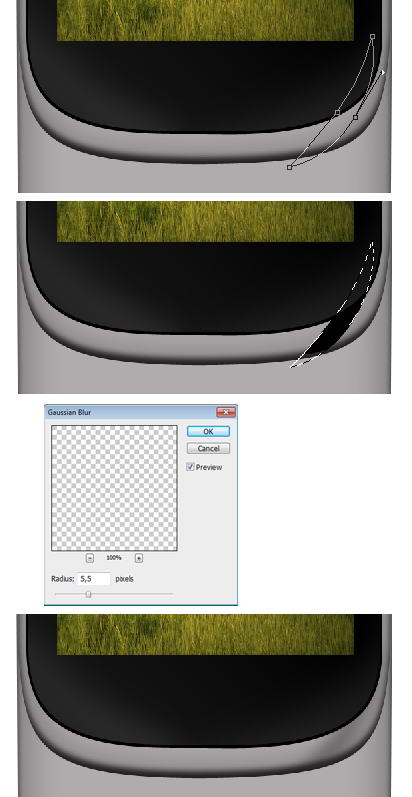

Step 14

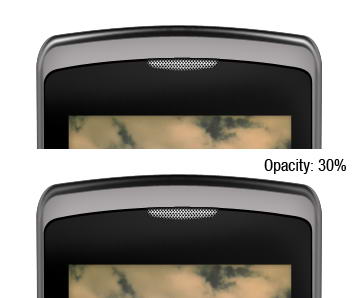
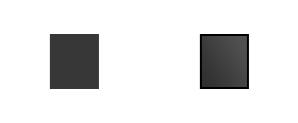
The idea is simple. We just need to add lots of subtle shadows and highlights on the phone surface. Draw a path using pen tool, convert it to selection by pressing Cmd/Ctrl + Enter. Create new layer. Let’s start drawing shadow. Fill it with black. Add Gaussian Blur to soften the shape then reduce layer opacity to 30%.


Step 15

Use the same technique to draw highlights. Draw path, convert it to selection, fill it with white, add Gaussian Blur, reduce layer’s Opacity.


Step 16

Keep drawing highlights and shadows using technique I described above. Place all your drawings on different layers, this will help if you want to modify it. Make sure to use different opacities to give it random reflections.
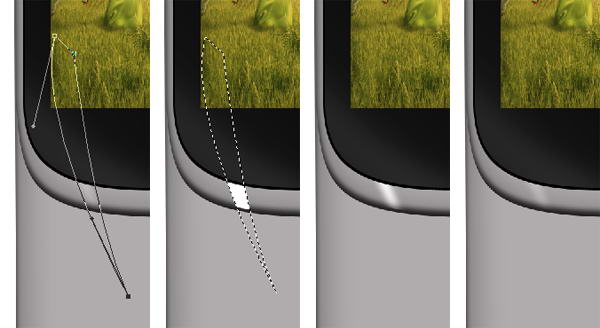

Step 17

Let’s draw a coarse highlight. Draw a thin path under the screen, convert it to selection, then fill it with white. No need to add Gaussian Blur or reduce its opacity.
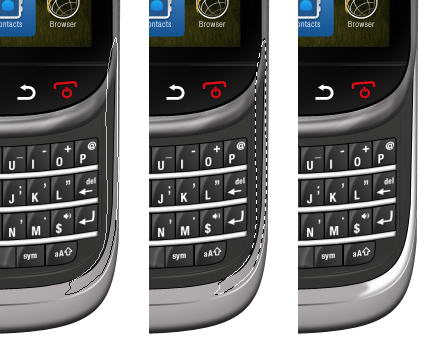

Step 18

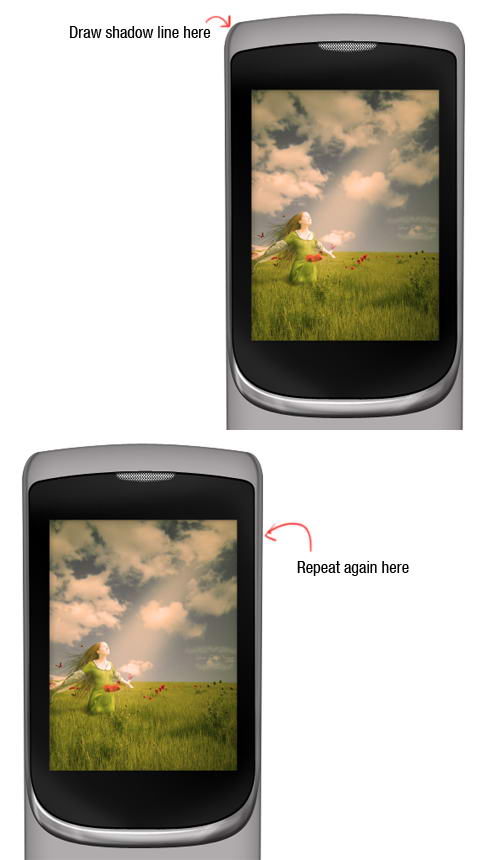
Now let’s add another shadow on the side of the phone. See picture below for reference.


Step 19

It’s important to add some coarser highlights and shadows on one side of the phone to keep it realistic. Draw a shape on top of the phone, convert it to selection, and fill it with gradient from black to darker gray.


Step 20

Inside the shadow, draw a soft highlight. Reduce its opacity to 30%.
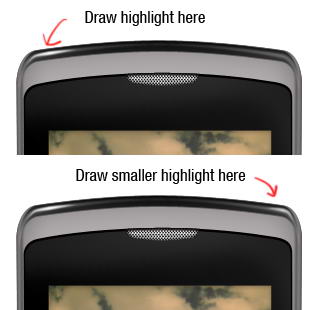

Step 21

On top of previous highlight, draw smaller highlight but with higher intensity. Don’t just copy paste the highlight. It’s not natural to have perfectly similar highlight on both sides.


Step 22

As I said, it’s not natural to have same highlight on both side. I decided to add another highlight on right side of the phone. This creates imperfection and adds more realism to the phone.
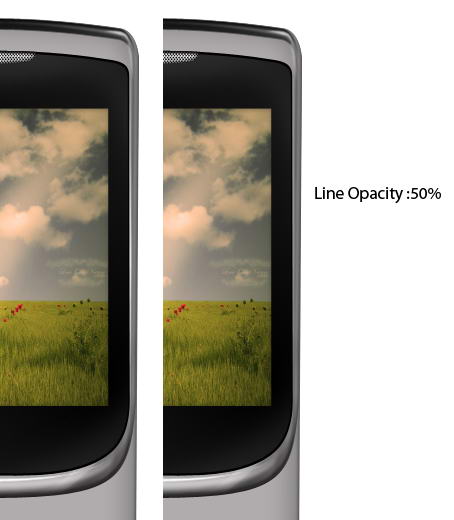

Step 23

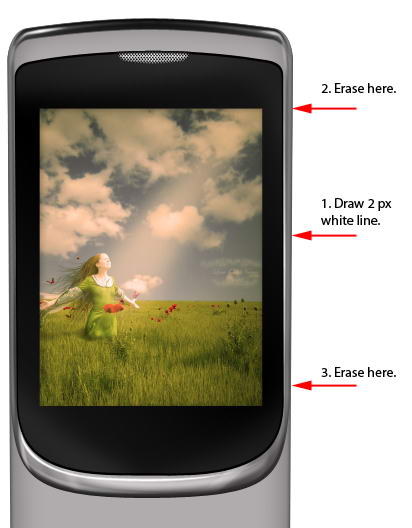
Let’s draw another detail. Draw a 2px white line. To draw a straight line, hold shift while dragging. Erase top and bottom of the line using a big soft eraser.


Step 24

Reduce its opacity to 50%.
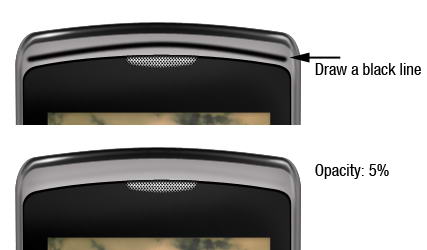
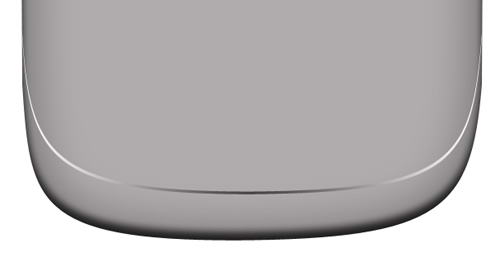

Step 25

Draw a black line on top of the phone and reduce its opacity to 5%. This subtle shadow adds a sense of depth to the phone.


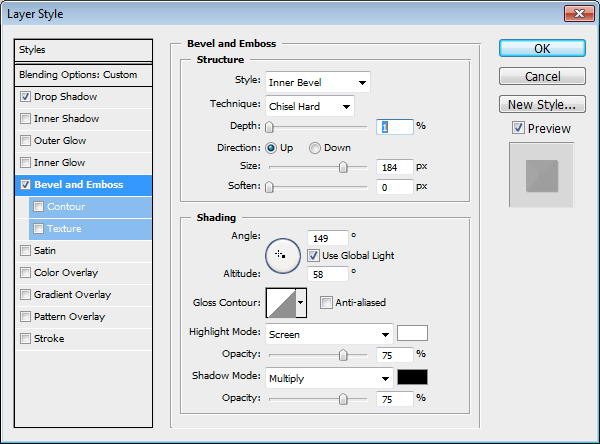
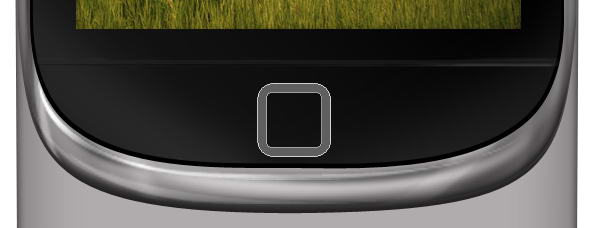
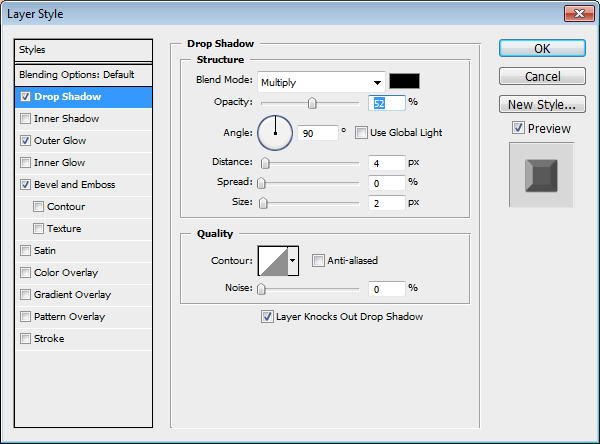
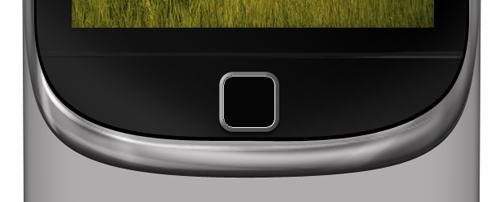
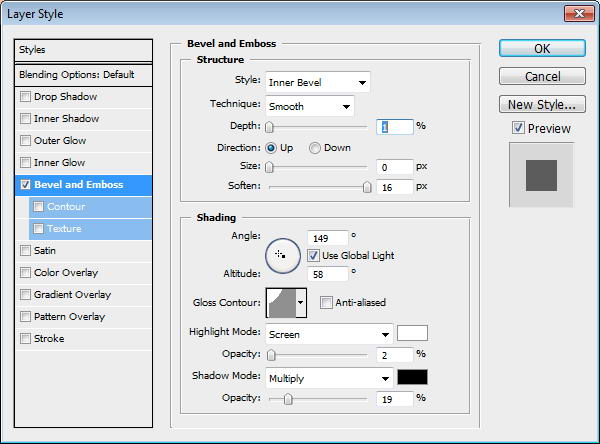
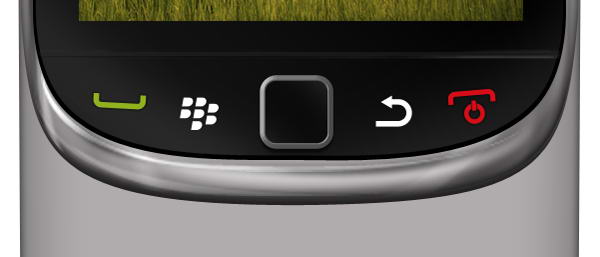
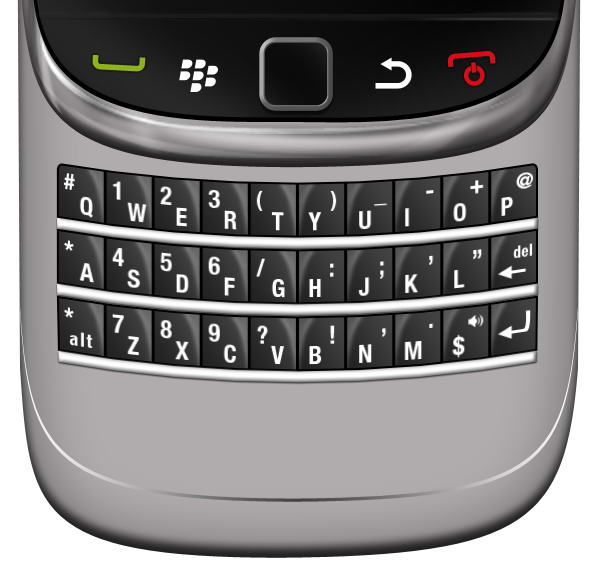
Step 26: Main Button

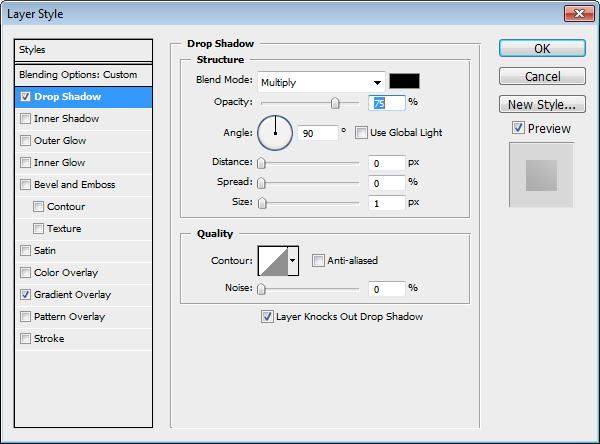
Draw a path to separate screen area and menu button. Change its Fill layer to 0%. Add layer styles drop shadow and Bevel and Emboss.
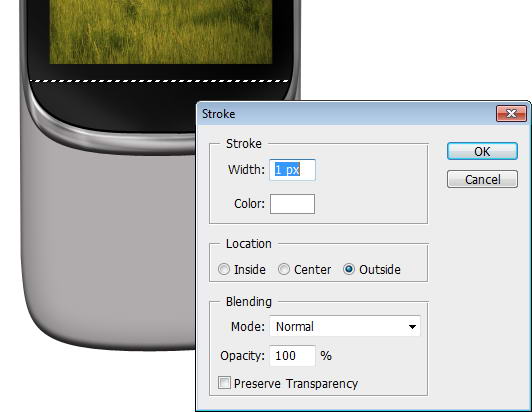

Step 27

Cmd/Ctrl-Click shape to convert it to selection. Create new layer. Click Edit > Stroke with 1px width and Color: White.


Step 28

Add a layer mask and paint some of the line. Reduce its opacity to 25%. This will add a subtle highlight on the separator.


Step 29

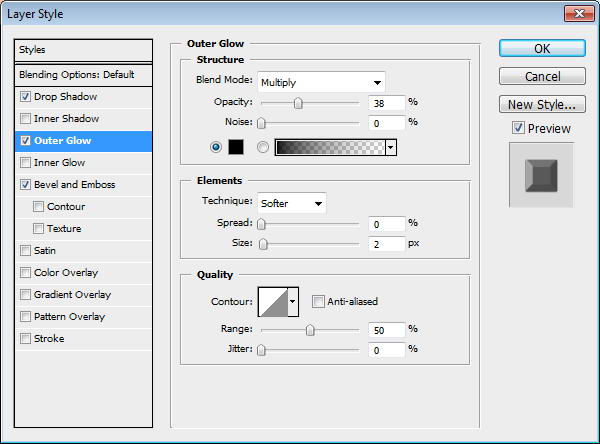
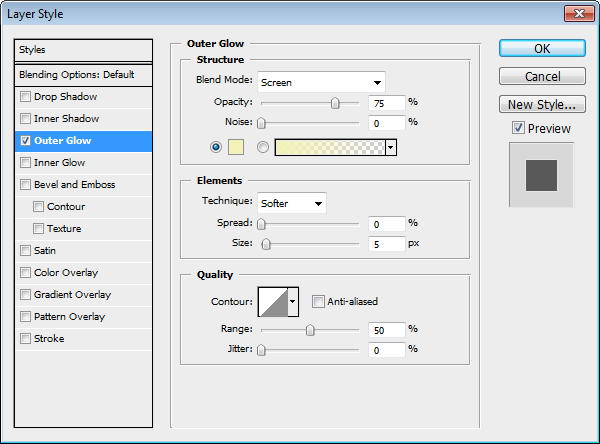
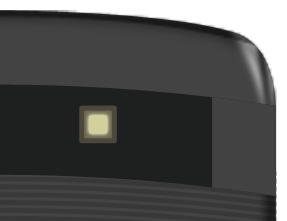
Create a rounded rectangle and inside it draw smaller rounded rectangle. Select subtract to create hole. Add Drop Shadow, Outer Glow, and Bevel and Emboss.


Step 30

On top of the shape draw a black rounded rectangle. Add a small Bevel and Emboss to add depth.
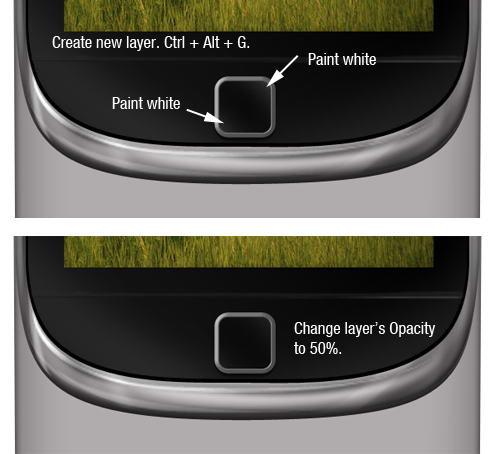
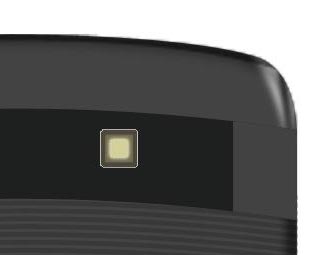

Step 31

Create a new layer and convert it to Clipping Mask by pressing Cmd/Ctrl + Alt + G. Paint white on its corner and reduce its opacity to 50%.


Step 32

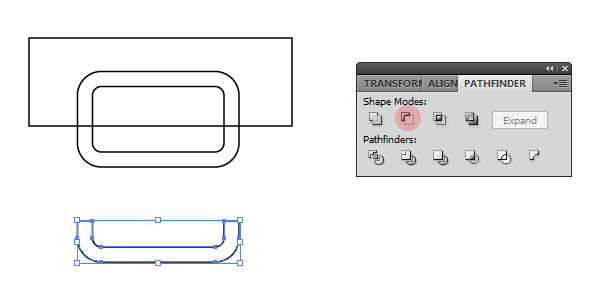
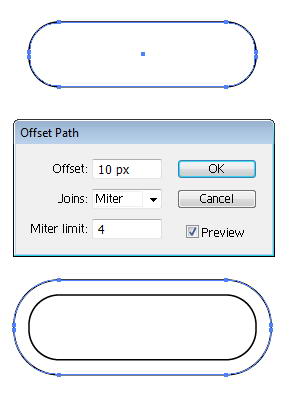
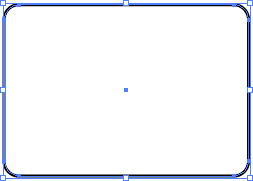
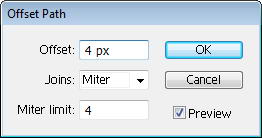
Now, open up Illustrator. Draw a rounded rectangle and click Object > Path > Offset Path. This command will convert path to a ring shape.


Step 33

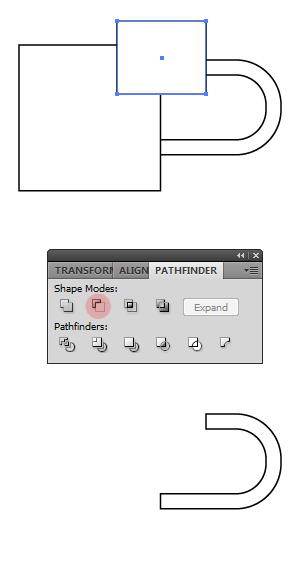
Create a rectangle on top of it. Select both shapes and from the Pathfinder panel select Minus Front.
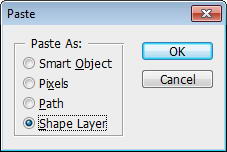
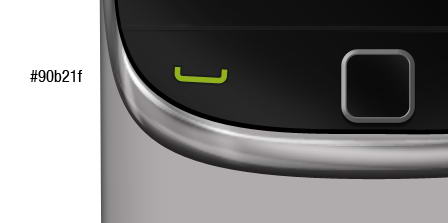
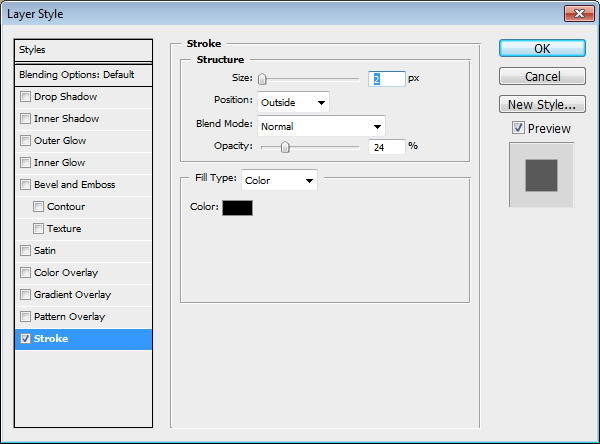

Step 34

Copy shape from Illustrator and paste it to Photoshop. In Paste option choose Shape Layer. Set its color to green and rotate it a bit. Add thin stroke to add depth on to the shape.


Step 35

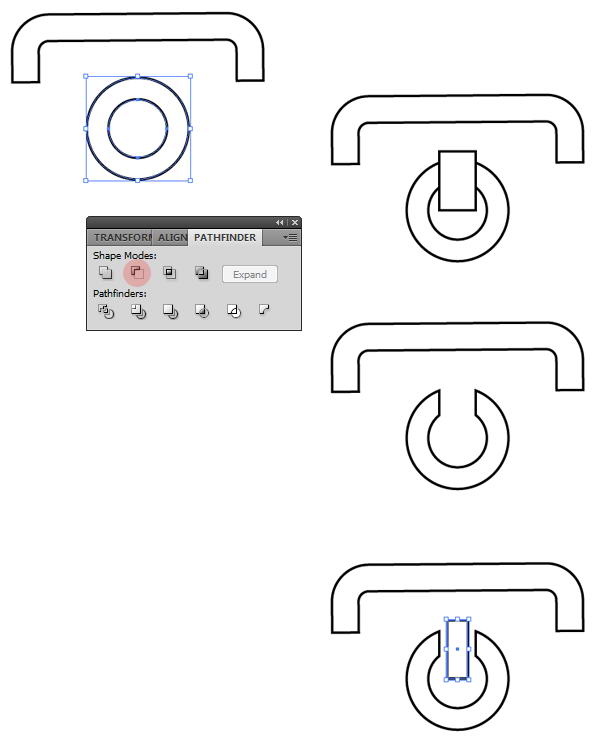
Repeat previous shape to create a semi rounded rectangle ring. Under it, add a circle. Inside that circle create another smaller circle. Select both circles and choose Minus Front to create a donut shape.

On top of the donut, draw a rectangle, then Minus Front both of them. Finally, draw a small rectangle on the hole.


Step 36

Paste the shape to Photoshop as a layer shape and use red color. Rotate it a bit. Just like previous button, add a small stroke.


Step 37

For Blackberry logo, draw a rounded rectangle. On top of it draw a rectangle. Select both shapes and choose Minus Front.


Step 38

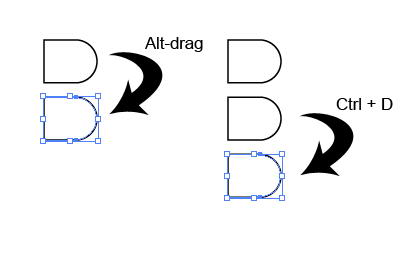
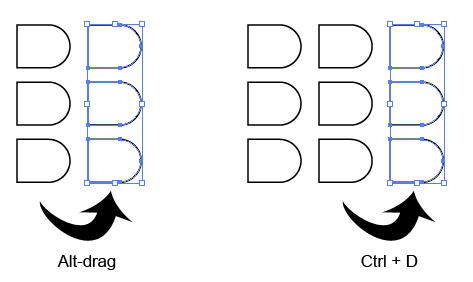
Using move tool Alt-drag to duplicate the shape. Repeat the duplication process by pressing Cmd/Ctrl + D.
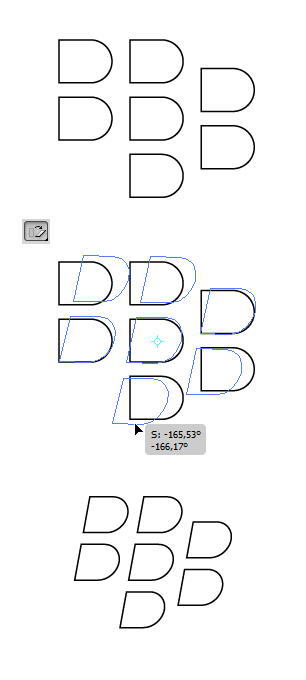

Step 39

Select all shapes. Use shear tool to transform them.


Step 40

Paste the logo into Photoshop. Use white for its color.


Step 41

Return to Illustrator, draw a rounded rectangle. Click Object > Path > Offset Path.


Step 42

Cover some of the shape with two rectangles. Select all shapes and hit Minus Front.


Step 43

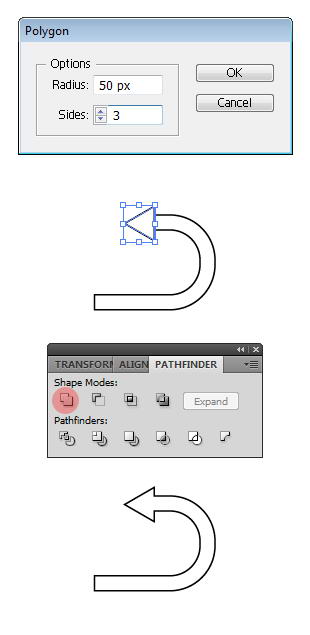
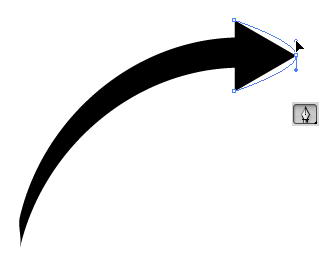
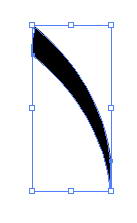
Draw a triangle using polygon tool. To change its side, you need to click once to open polygon dialog box and use 3 for the sides. Place the triangle on end of the ring and select Unite to combine both shapes into an arrow.


Step 44

Paste it onto Photoshop with white color.


Step 45

Draw two black rectangles on top and bottom of the screen. Set its opacity to 50%.


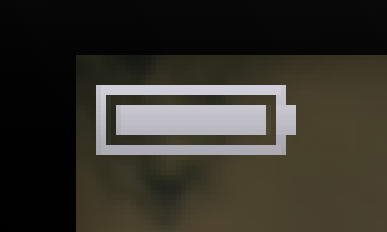
Step 46: Draw Battery Icon

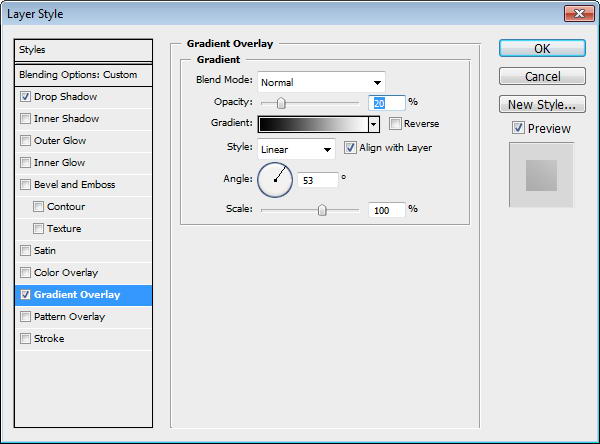
In Photoshop, draw a simple battery made from some rectangles. Add Gradient Overlay to make it shiny.
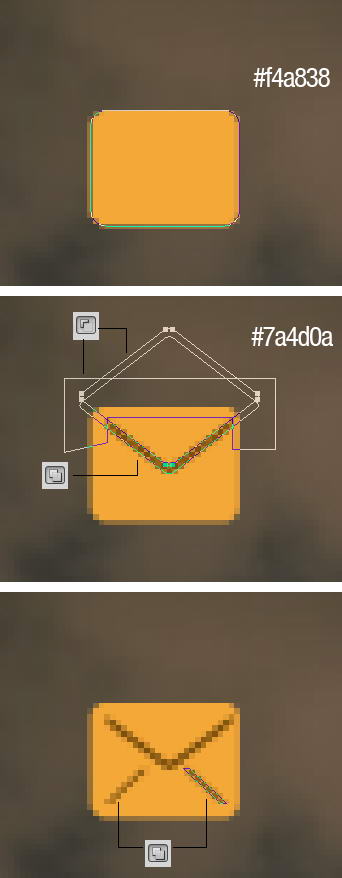
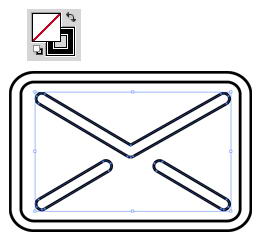

Step 47: Mail Icon

Draw a rounded rectangle. On top of it draw two overlapping rounded rectangles. Cut them using shape drawn with pen tool. Draw another line using rectangle tool.


Step 48

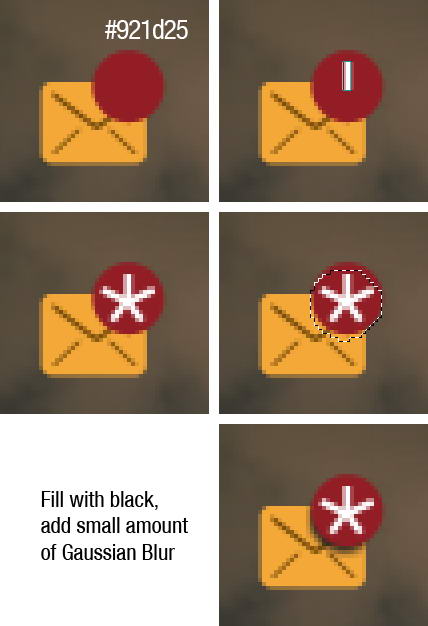
On top right corner, draw some white rectangles. Create new layer under red circle shape. Cmd/Ctrl-click red shape to create selection based on its shape. Move the selection a few pixels down and fill it with black. Delete unneeded shadow outside the mail.


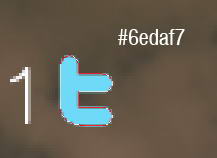
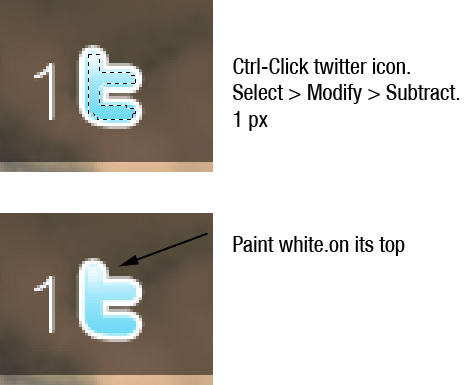
Step 49: Twitter Icon

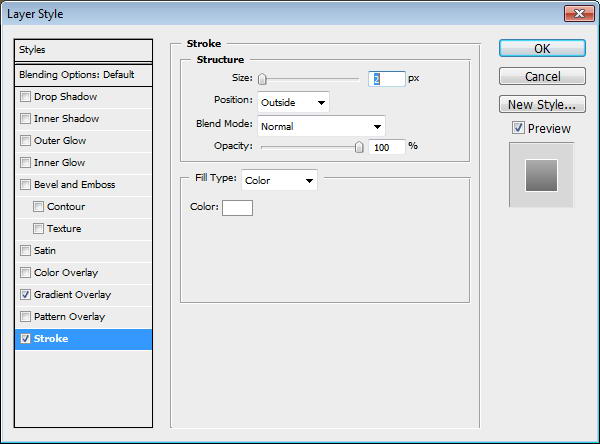
Copy Twitter logo, then trace its shape manually using pen tool. Paste the twitter shape as a layer shape and use light blue for its color. Add Gradient Overlay and white Stroke.


Step 50

Cmd/Ctrl-click twitter icon to create selection based on its shape. Click Select > Modify > Subtract, 1px. Paint white on top of the logo.


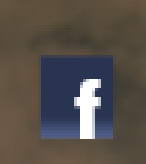
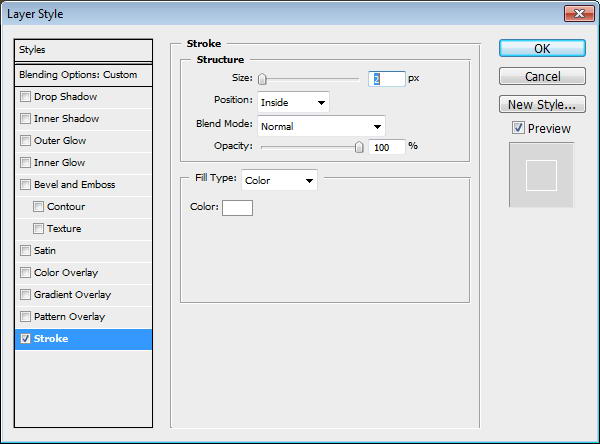
Step 51: Facebook Icon

Create a rectangle shape and this Gradient Overlay. Inside the rectangle add an f.


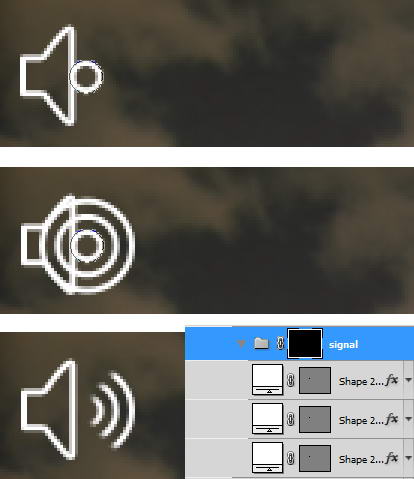
Step 52: Speaker Icon

Draw a rounded rectangle. On top of it, add another rounded rectangle them transform it. See picture below for reference. Set fill layer to 0% and add layer style Stroke.


Step 53

Next to the speaker, draw some circle shapes. Each in different layers with layer style stroke. Put them into a folder group, add layer mask, and paint some part of it with black.


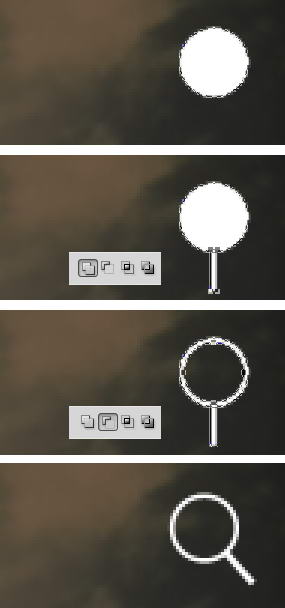
Step 54: Magnify Icon

Draw a circle. Inside it draw smaller circle and select subtract. Add a rectangle for its handle then rotate the layer.


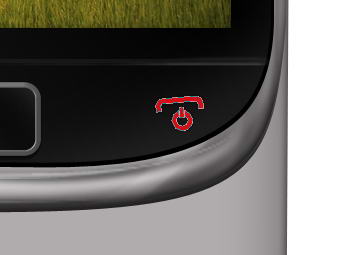
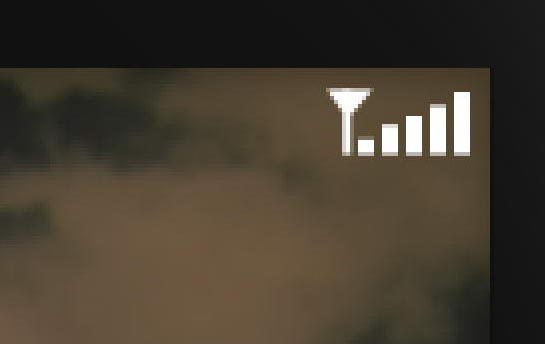
Step 55: Signal Icon

To draw a signal icon you just need some rectangles and a triangle.
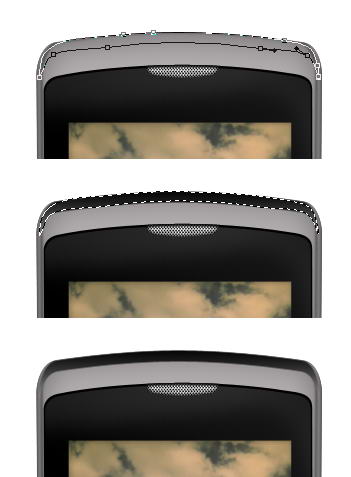
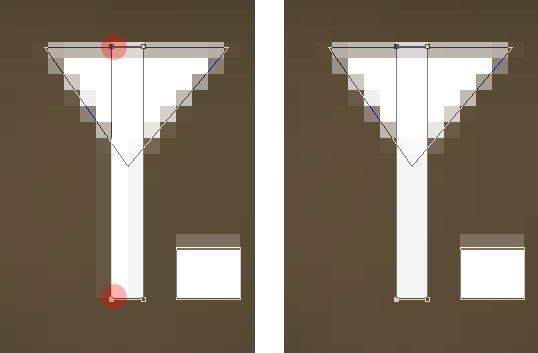
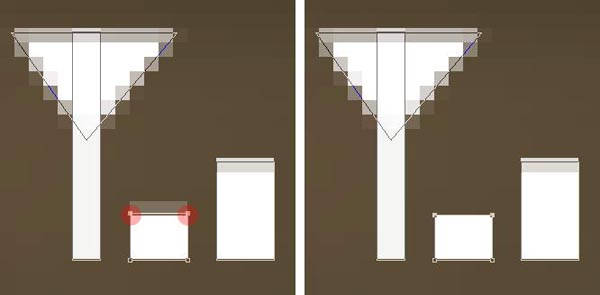

Step 56

When we zoom in, you can see that there is some unneeded anti-aliasing going on. We will need to fix this.


Step 57

To fix this, we need to select the points with direct selection tool and nudge them by pressing the arrow keys. Do this until the transparent pixels disappear.


Step 58

You can see the result below, much sharper now!


Step 59

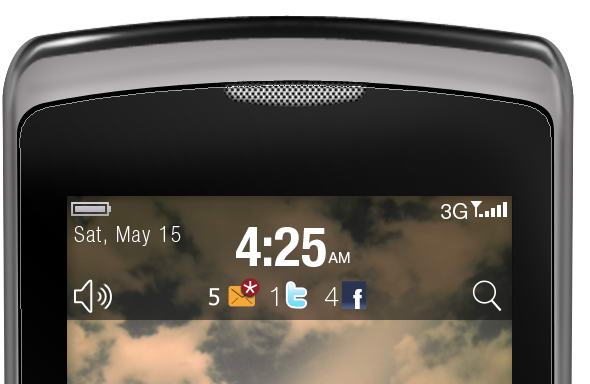
Add text for date, time, and other info.


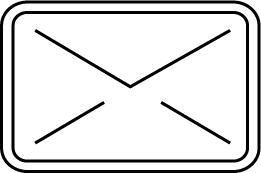
Step 60: Message Icon

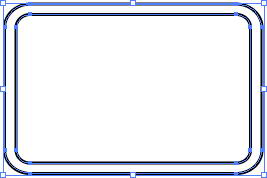
Let’s return to Illustrator again. Draw a rounded rectangle. Click Object > Path > Offset Path.


Step 61

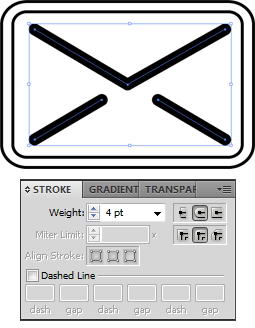
Using pen tool draw some lines until we have basic mail shape. Set its fill to none and stroke to black. From Stroke panel choose bigger weight and select round cap and round join.
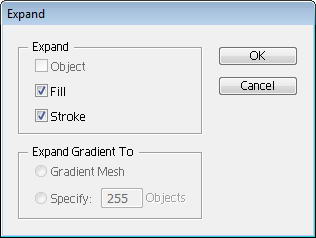

Step 62

Select lines and click Object > Expand. This will convert lines into shapes. Set its fill to none and stroke to black.


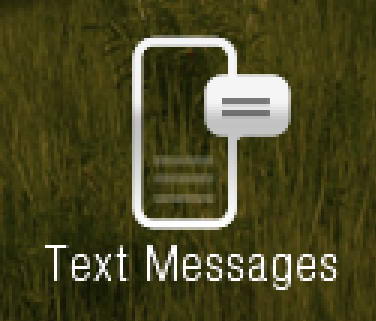
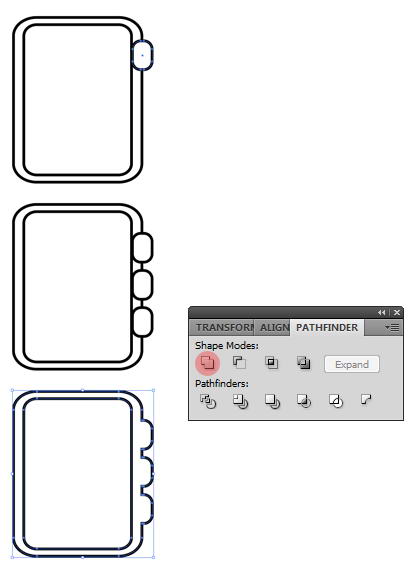
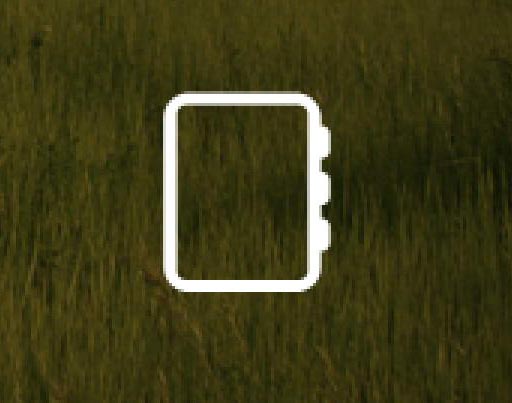
Step 63: Text Messages Icon

Create a ring rounded rectangle shape, just like previous shape. On top of it draw another rounded rectangle.
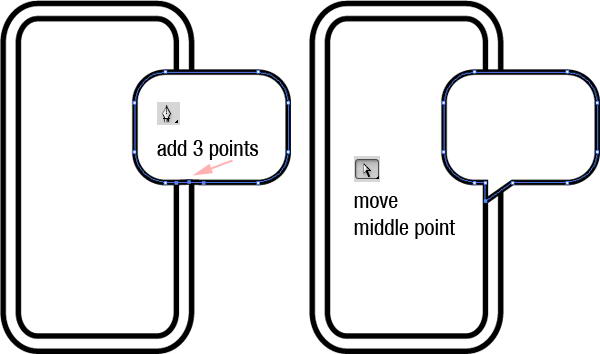

Step 64

Add 3 points on lower side of the rounded rectangle. See picture below for its position. Move middle point until we have a speech bubble.
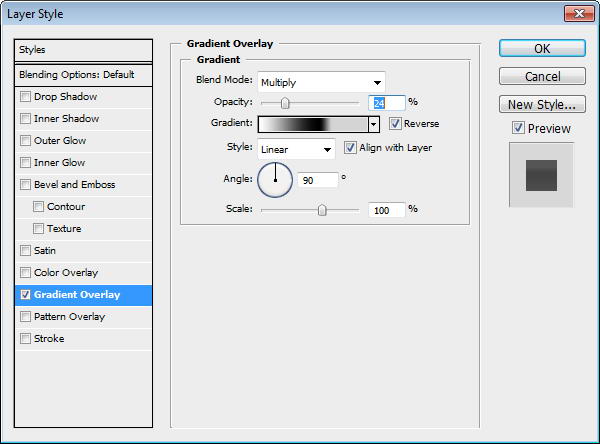

Step 65

Paste both shapes into Photoshop. Add this Gradient Overlay.


Step 66

On the top right corner of the mail icon, add a red circle. Give it a Gradient Overlay.


Step 67

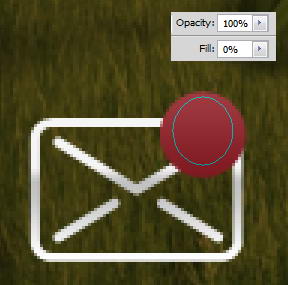
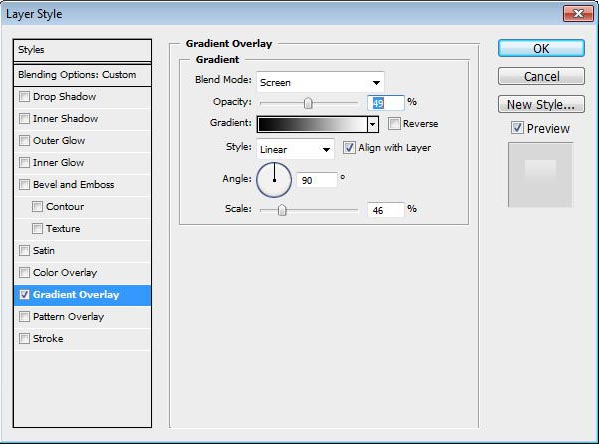
On top of it, draw an ellipse shape with fill 0%. Add a Gradient Overlay from black to white with blend mode Screen.
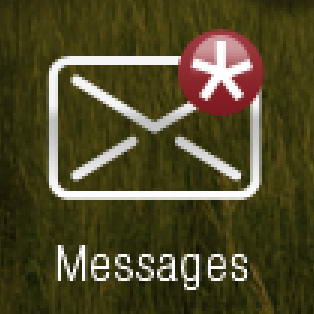

Step 68

Add a star made of five thin rectangles. Under it, add text "Messages".


Step 69

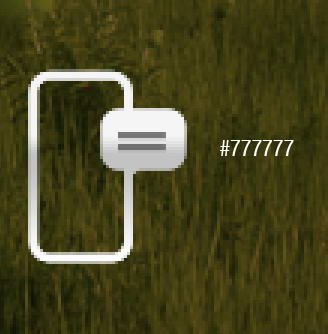
On top of speech bubble, draw two rectangular shapes with color #777777.


Step 70

Inside it, draw a low opacity gray rectangle shape. Add text under the icon.


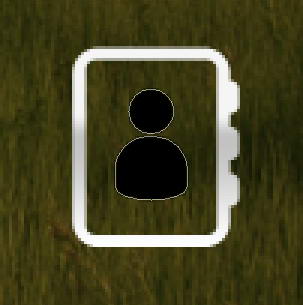
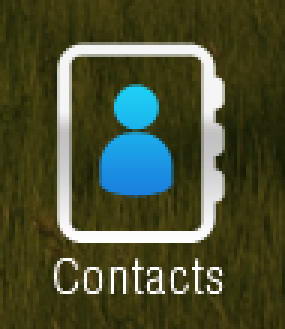
Step 71: Contacts Icon

Again, return to Illustrator. Draw a ring shape rounded rectangle.


Step 72

On its right side, draw three smaller rounded rectangles. Select all shapes and click Unite.


Step 73

Paste the shape into Photoshop. Add Gradient Overlay.


Step 74

In Illustrator, draw a circle and a rounded rectangle. Modify lower points on rounded rectangle to get a person shape.


Step 75

Paste the shape to Photoshop and put inside our previous shape. Add Gradient Overlay with setting seen below and add text Contact under it.
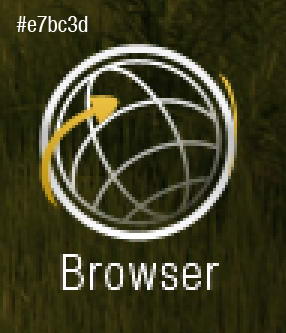

Step 76: Globe Icon

Draw a donut shape in Illustrator. Paste it to Photoshop. Add Gradient Overlay.
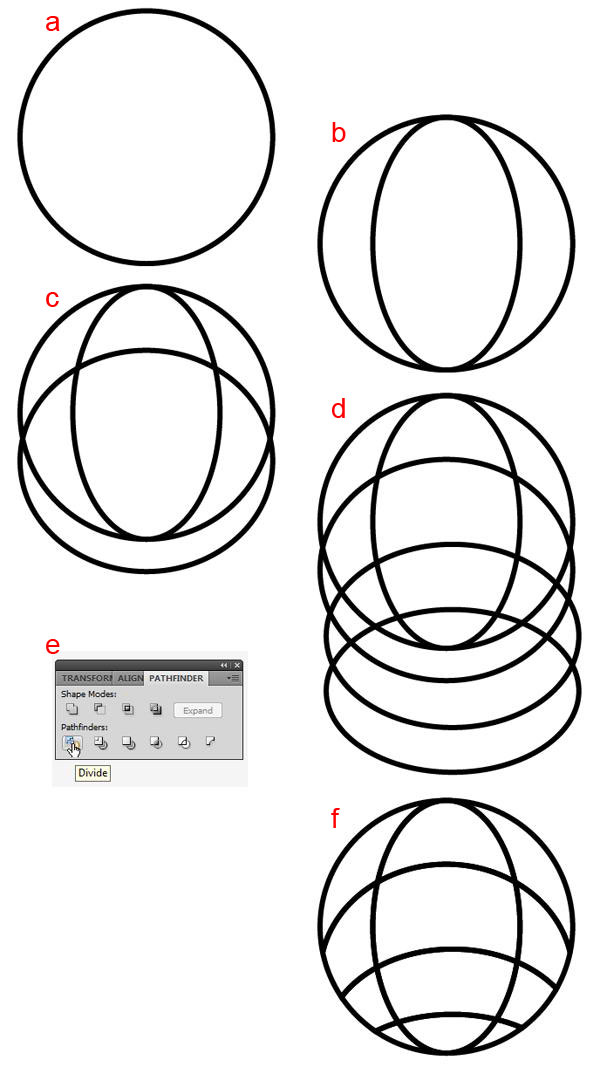

Step 77

Return to Illustrator. A) Draw a circle B) Inside it draw another circle and transform it. C) Draw circle across it. D) Draw more circles. E) Select all shapes and click Divide. F) Select and delete unwanted shapes.
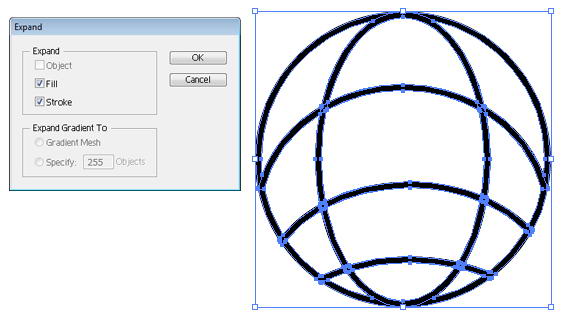

Step 78

Select all shapes and click Object > Expand.


Step 79

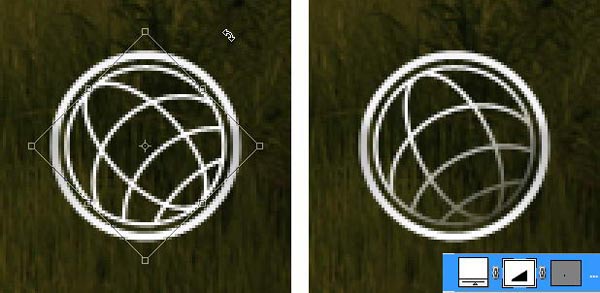
Paste the globe into Photoshop and place it inside the previous circle shape. Slightly rotate the globe. Add layer mask and add gradient to hide lower right part of the globe.
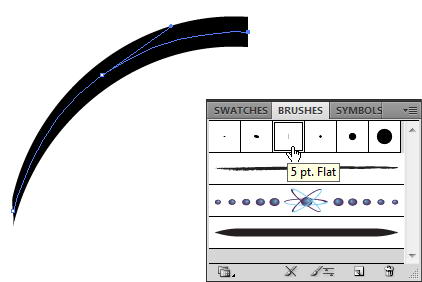

Step 80

Return to Illustrator. Create a short curved line. From brushes panel select brush type that add weight onto the lines. Click Object > Expand to covert line into shape.
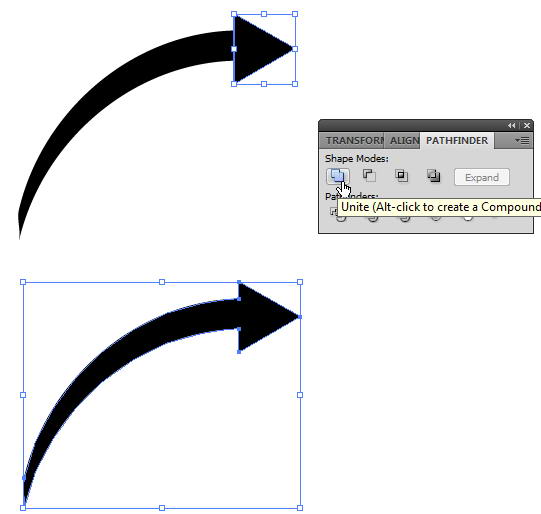

Step 81

Add a triangle on its end. Select both shape and click Unite to combine into one shape.


Step 82

Use pen tool and drag arrow’s end to make it curvy.


Step 83

Draw one more line.


Step 84

Paste both shapes into Photoshop. Use #e7bc3d as its color.


Step 85: Add Glossy and Depth

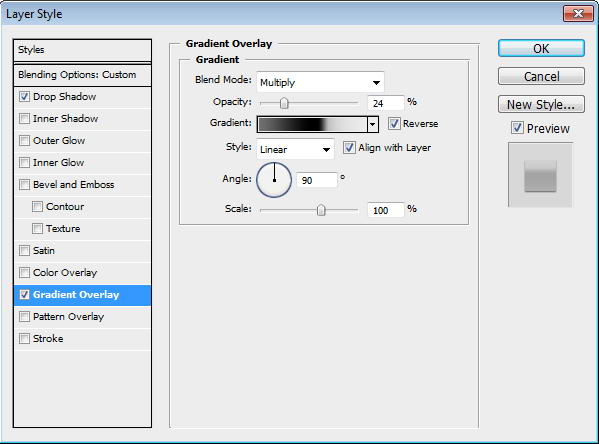
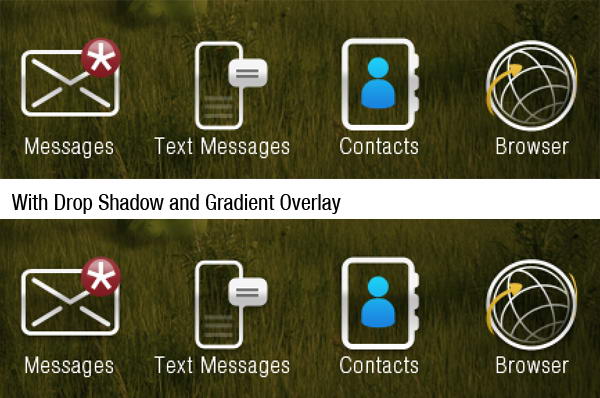
Copy all icons’ base path and paste it onto new shape layer. Place it under al layers. Set fill layer to 0%, add Drop Shadow and Gradient Overlay.


Step 86

Our last step is just a subtle change. You may not notice it, but if you compared them, you’ll see that we have one nice glossy effect with depth.


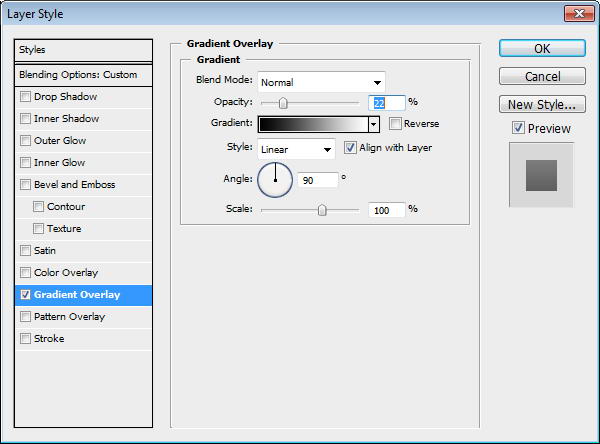
Step 87: Active Icon Background

Create a blue rounded rectangle and put it behind one of the icon. Add Gradient Overlay.


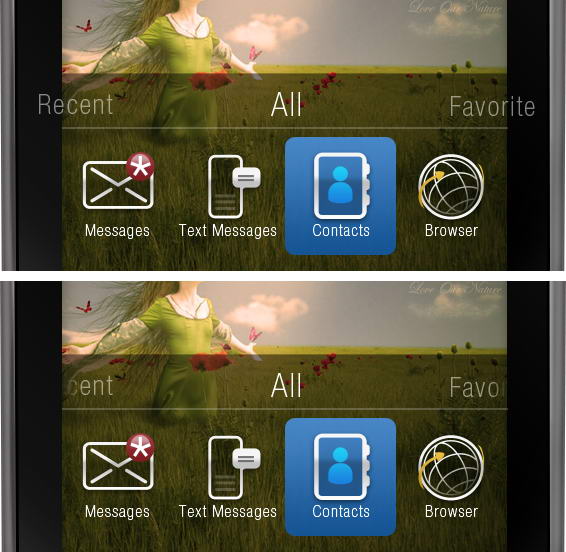
Step 88: Add Menu Text

Above all the icons, write Recent, All, and Favorite. Add layer mask and paint part of the text that is outside the screen.


Step 89: Add 3D Effect on Keyboard Area

Select base path created earlier in first step, duplicate it twice. Move one of the pathes three pixels up and set it to subtract. Add Gradient Overlay, dark gray to white.
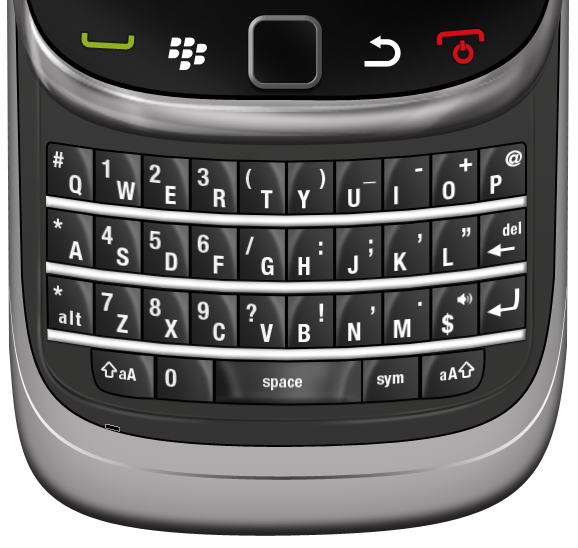

Step 90: Keypad

Draw a dark gray rectangle. Add Gradient Overlay and Stroke.


Step 91

Create a new layer above the keypad and convert it to Clipping Mask. Use soft brush to paint some highlights.


Step 92

Image below shows the layer I used on a black canvas.


Step 93

Add character to the keypad.


Step 94

Duplicate the keypad five times and change its characters.


Step 95

Duplicate all five keypads and flip it horizontally. Change its characters.


Step 96

Create a rectangle under the keypads. Add Drop Shadow, Inner Glow, and Bevel and Emboss.


Step 97

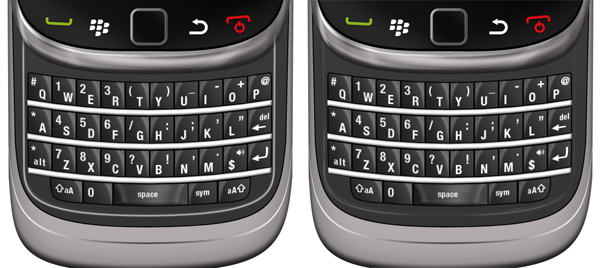
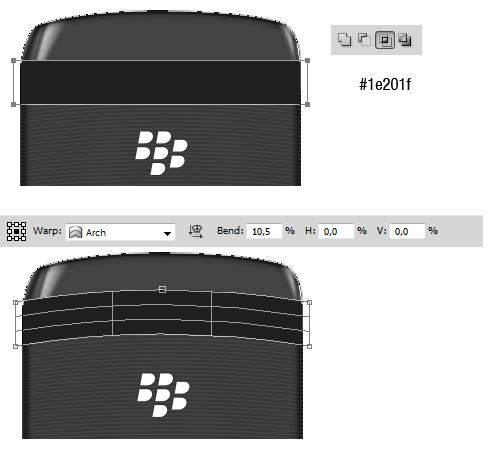
Select all keypad layers and hit Cmd/Ctrl + G to put it in a group. Right click group and choose Convert to Smart Object. Hit Cmd/Ctrl + T, right click and choose Warp. In option bar select Arch and change Bend size, see picture below for reference.


Step 98

Duplicate previous keypad by right clicking it and choose New Smart Object via Copy. Don not use Cmd/Ctrl + J or Layer > New > Layer via Copy. We want a new smart object not its child. If you use Cmd/Ctrl + J, the duplicated smart object is basically the same object to the one you copy. If you edit it, all of its instances will also change.

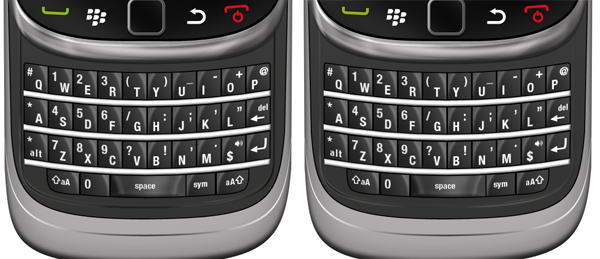
Move the duplicated smart objects until we have a full set of keyboards. Then, double click all the smart objects to change each character.
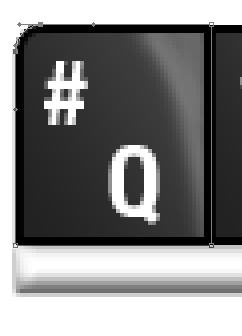
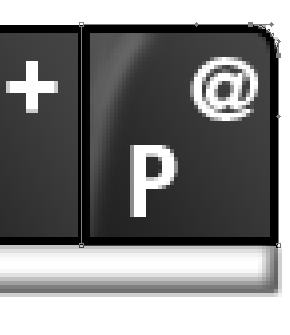

Step 99

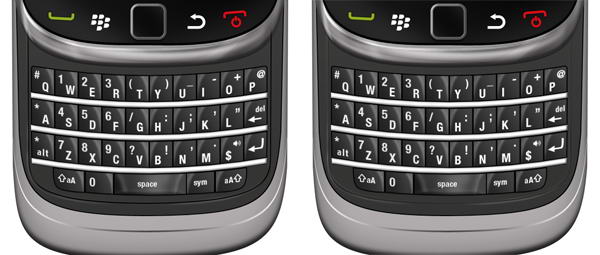
We need special treatment to keypad on top corner, Q and P. Modify its corner until it’s rounded.


Step 100

Repeat step 89 to create the remaining keypad.
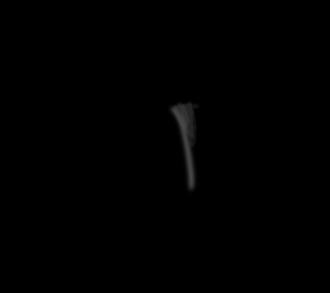

Step 101

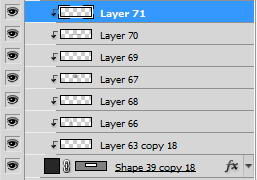
To draw a space, we need to use more complex steps. You can see steps I did in picture below. As usual, every stroke of brush in made in different layer.


Step 102

Here you can see set of layers I used to draw highlight on space key.
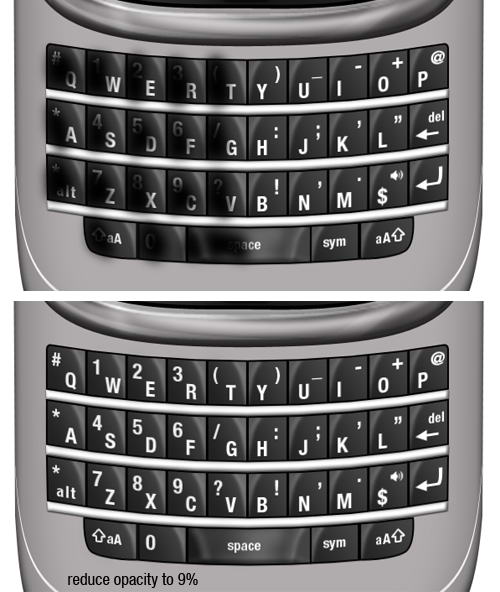
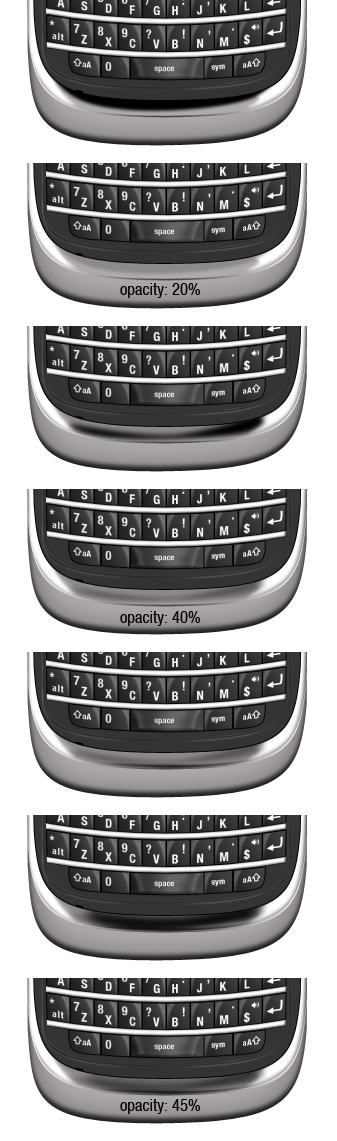

Step 103

Our keypad here is too similar, they have same highlight, same shadow, same lighting. To add realism, let’s paint black on half of the keypads so they are darker than the rest. Set its opacity to 9%. Just a subtle effect but add a bit more realism.


Step 104: Keyboard Base

Draw this shape manually using pen tool. Use black for its color.


Step 105

Duplicate shape and change its color to dark gray. Hit Cmd/Ctrl T and resize it to 99%. A black shape behind it added more depth to its appearance.


Step 106: Inset Lines

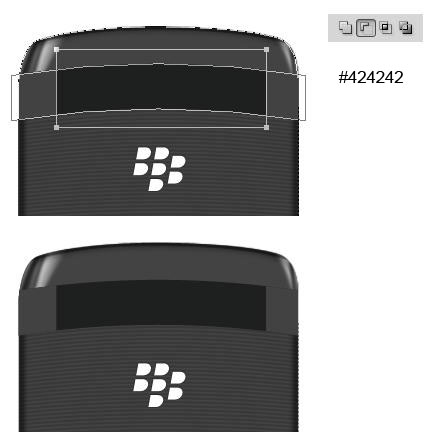
Create a rounded rectangle path covering keypads. Convert it to selection by pressing Cmd/Ctrl + Enter. Click Edit > Stroke, use 2px with white color. Add layer mask and paint some parts of the line to hide it.


Step 107

Repeat previous step, this time use slightly bigger rounded rectangle and add Gaussian Blur to make the lines softer.


Step 108

Just as previous step, create a line. This time use black.


Step 109

Again, repeat the same process.


Step 110

What we did in step 104-107 is adding an inset lines. We use lots of black and white lines because in real life shadow and highlight is always bouncing. This process replicate that effect.


Step 111: Add reflection

Select inner part of the phone. We are going to add some reflections inside it. Create group layer and click Add Layer Mask icon.


Step 112

The process is similar to what we have already done in Step 13. Draw a shape using pen tool, covert it to selection, fill with white for highlight, black for shadow, add Gaussian Blur, reduce its opacity.


Step 113

Draw some shadows on lower part of the phone.


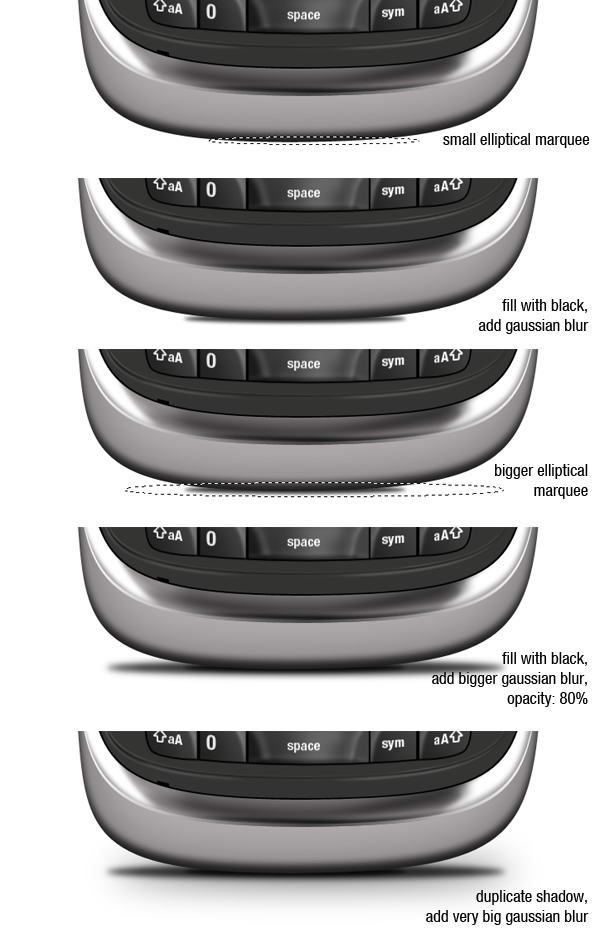
Step 114: Add Shadow

Create new layer and place it beneath all layers. Create a small elliptical marquee and fill it with black. Add Gaussian Blur to soften it. Next create new layer, add bigger selection, fill it with black, add Gaussian Blur, and reduce its opacity to 80%. Finally, duplicate previous shadow and add a very Gaussian Blur to get a very soft cast shadow on the floor.


Step 115

We’re done with this one.


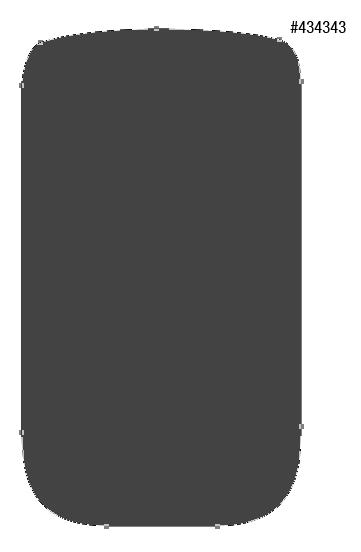
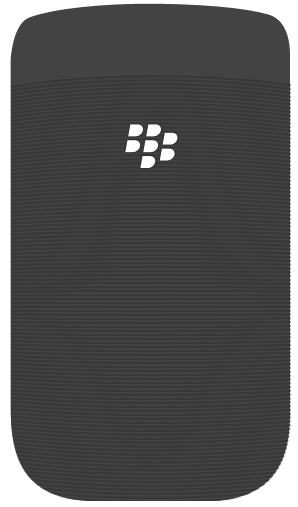
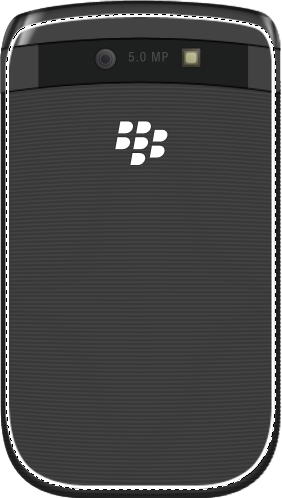
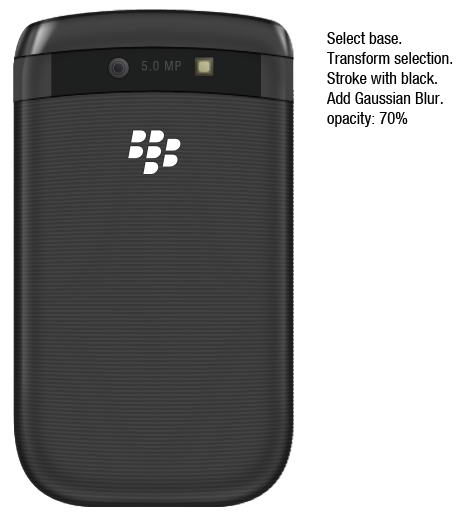
Step 116: Blackberry Viewed From Back

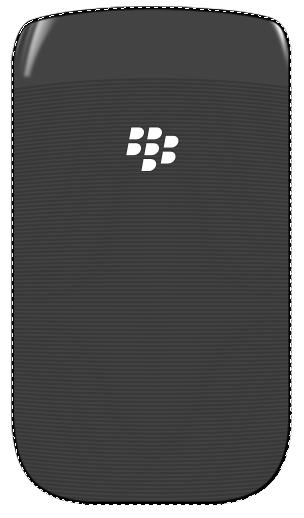
I hope you’re still with me. This time we’ll draw back side of the phone. Create this shape with color #434343.


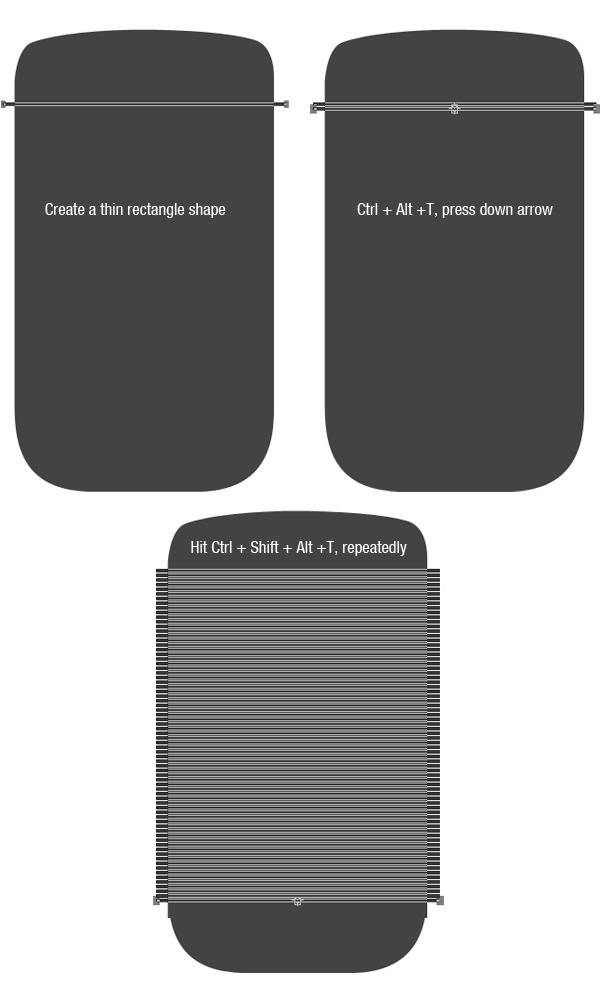
Step 117: Add Rectangle Shapes

Create a long thin rectangle shape. Hit Cmd/Ctrl + Alt + T to transform and duplicate the shape. Hit down arrow few times to move it. Repeat this transformation process by pressing Cmd/Ctrl + Shift + Alt + T repeatedly.


Step 118

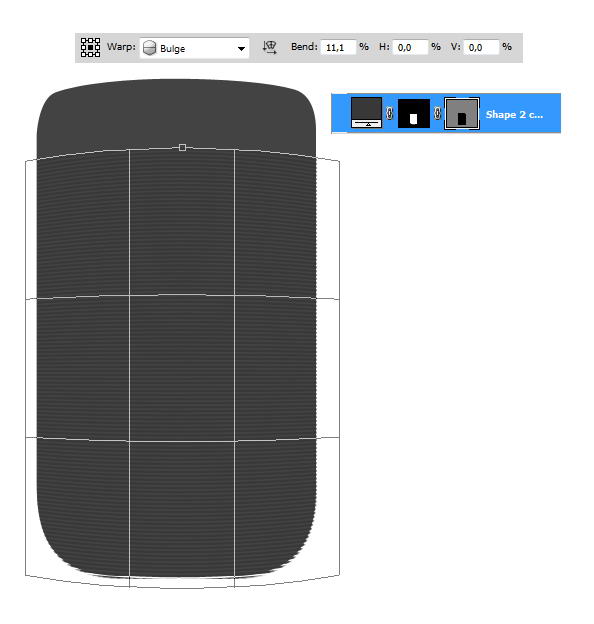
Cmd/Ctrl-click body shape and click Add layer Mask icon to isolate all shapes inside the phone’s body.

Make sure you have selected the vector mask. Hit Cmd/Ctrl + T, right click and choose Warp. Select Bulge in option bar and change its blend setting.
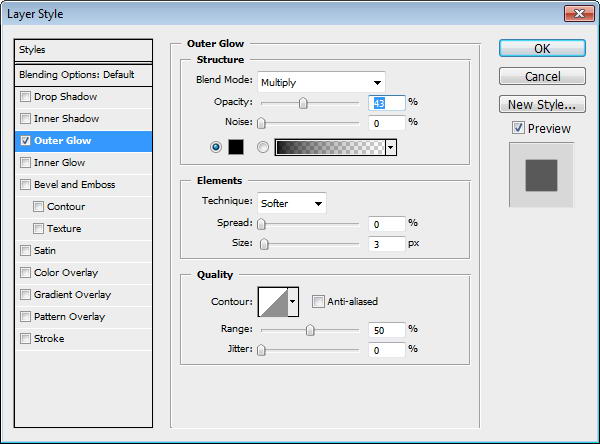

Step 119: Add Logo

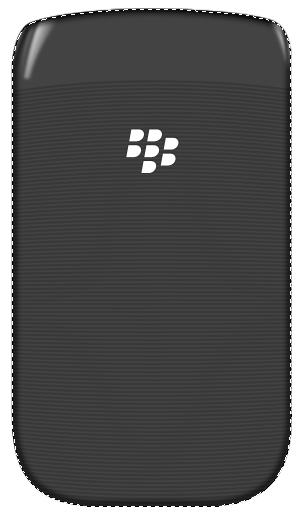
Place Blackberry logo on back of the phone. Add black Outer Glow.


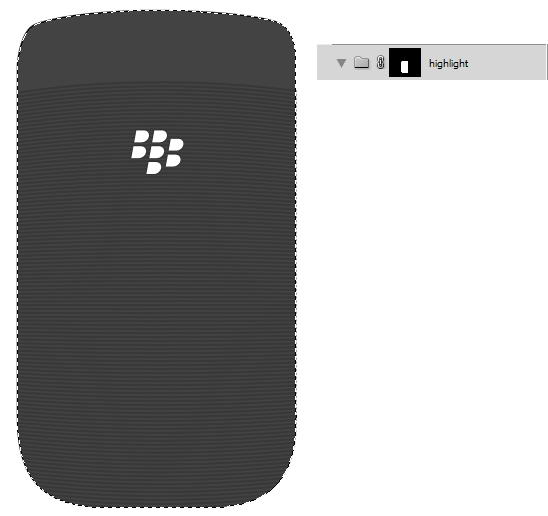
Step 120: Highlight and Shadow

Cmd/Ctrl-click phone’s basic shape. Create a new group layer, click Add Layer Mask icon.
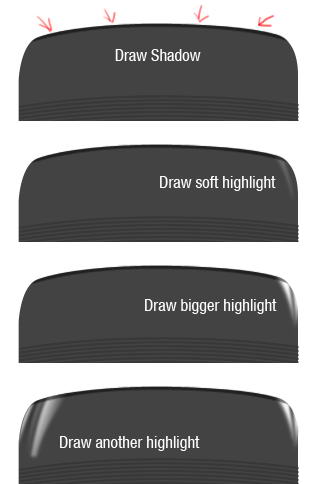

Step 121

Paint some shadows and highlights. You can see what I did in picture below. Each painting is made in separate layers.


Step 122

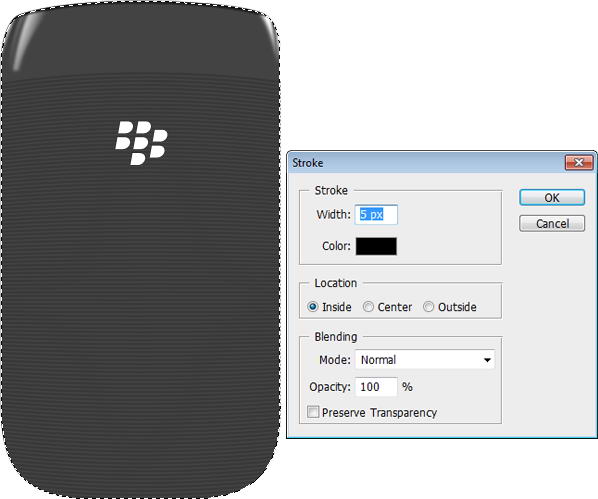
Create a new layer. Cmd/Ctrl-click phone’s basic shape. Click Edit > Stroke. Add Gaussian Blur.
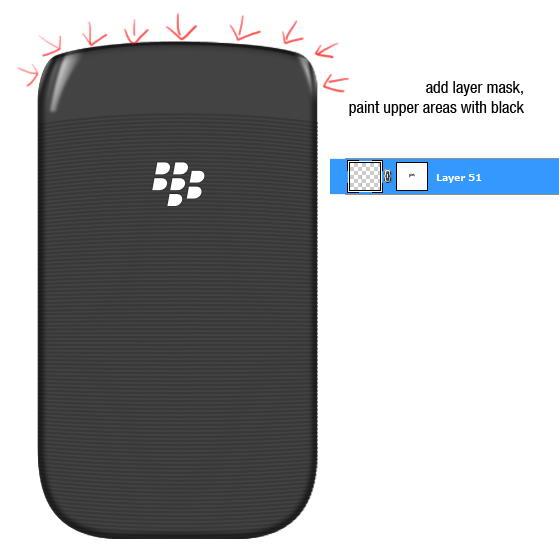

Step 123

Add layer mask. Paint upper part of the stroke with black to hide it.


Step 124

Duplicate path from phone’s basic shape. Add rectangle and set to intersect. Hit Cmd/Ctrl + T, right click and select Warp.


Step 125

Duplicate the shape. In its middle add a rectangle and choose subtract.
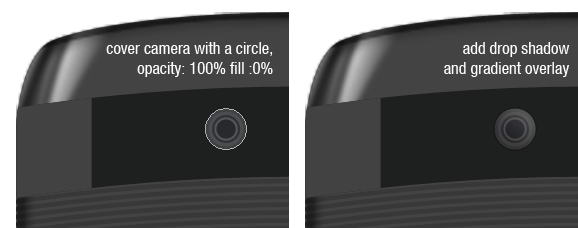
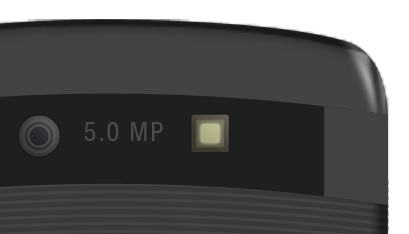

Step 126: Camera

Draw a circle shape and add a slight Drop Shadow.
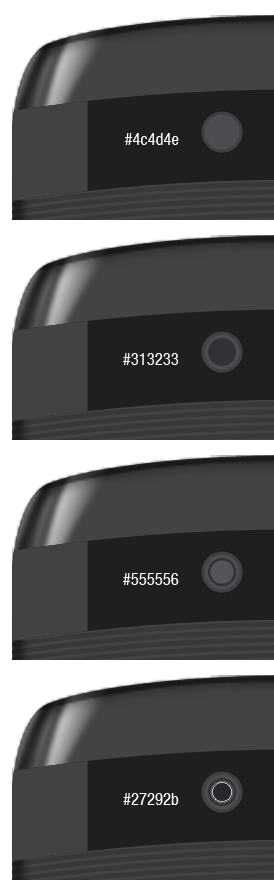

Step 127

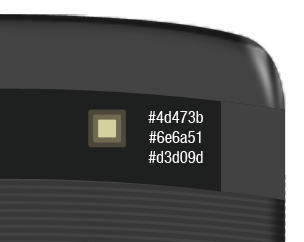
Camera is actually made from some small circles shape in different size. See the color of each circle in picture below.
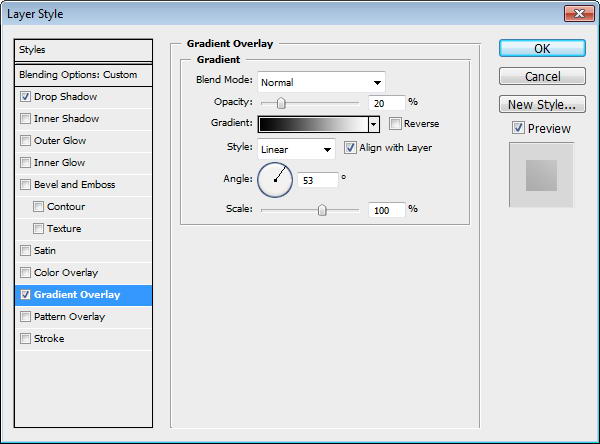

Step 128

Duplicate the biggest circle and move onto top of other circles. Set Fill to 0%, add Drop Shadow and Gradient Overlay.


Step 129: Flash

The same process goes while creating flashlight. It’s made from some rounded rectangles.


Step 130

Add Outer Glow to the smallest rounded rectangle.


Step 131

Duplicate biggest rounded rectangle and place on top. Add Drop Shadow and Gradient Overlay.


Step 132

Add some text for information on its Mega Pixel size.


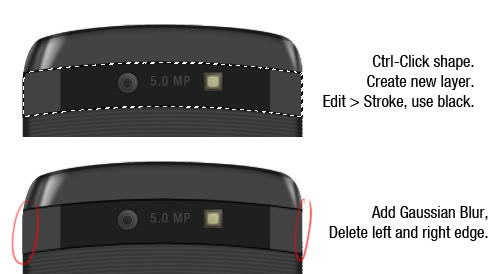
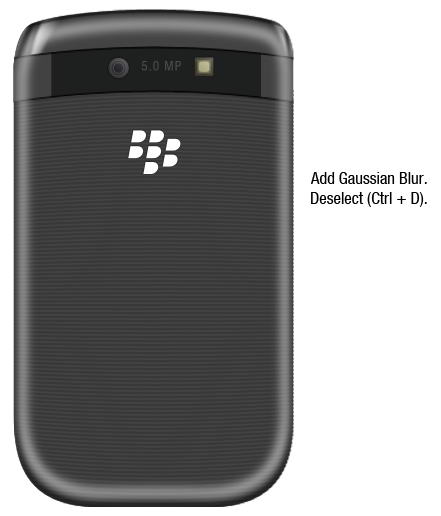
Step 133: Draw Highlights and Shadows

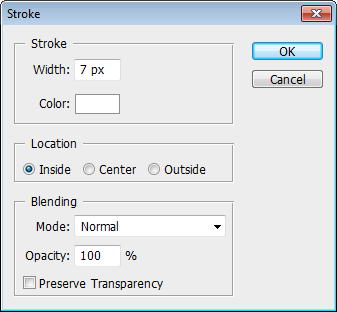
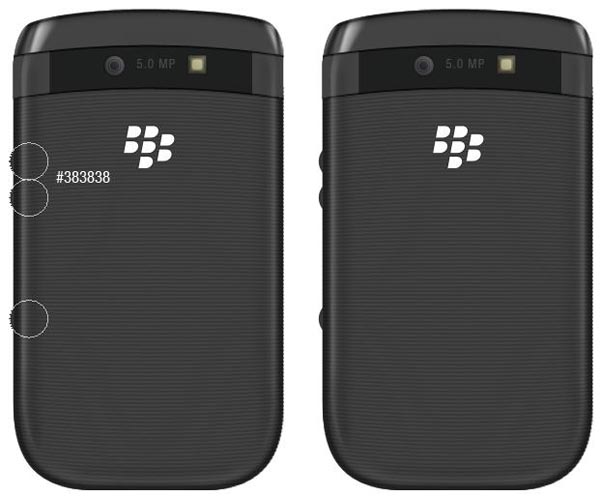
Cmd/Ctrl-click shape. Create new layer. Edit > Stroke, use black for the color. Add Gaussian Blur and erase left and right edge using soft eraser tool.


Step 134

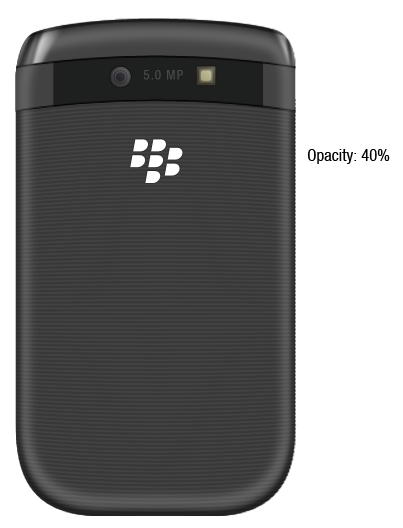
Cmd/Ctrl-click phone’s basic shape. Right click and choose transform selection. Make it smaller. Click Edit > Stroke, use white for its color. Add Gaussian Blur, deselect, then reduce layer’s opacity to 40%.


Step 135

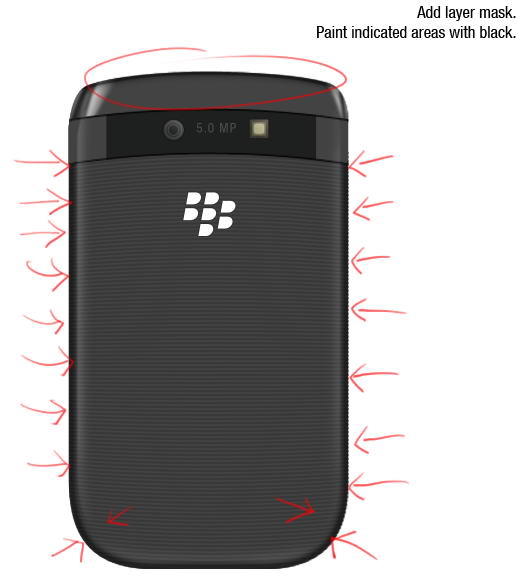
Add layer mask Paint indicated areas with black, we don’t want any highlight there.


Step 136

Repeat previous process, but this time use black for its color and resize it more.


Step 137

Add layer mask and paint areas on top and bottom corner with black.


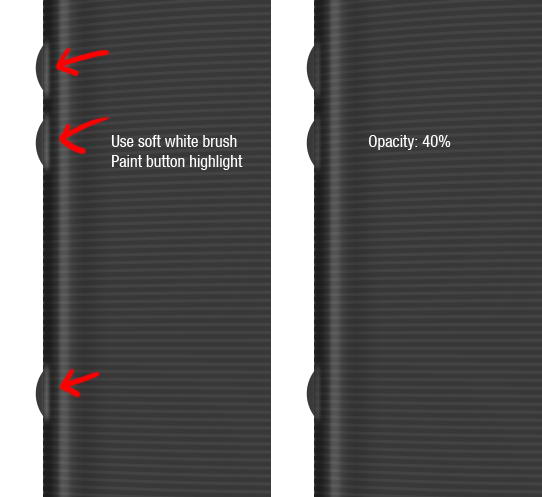
Step 138: Side Buttons

Draw three circles and place them behind all layers.


Step 139

Use soft brush and paint white to add button’s highlight on the phone.


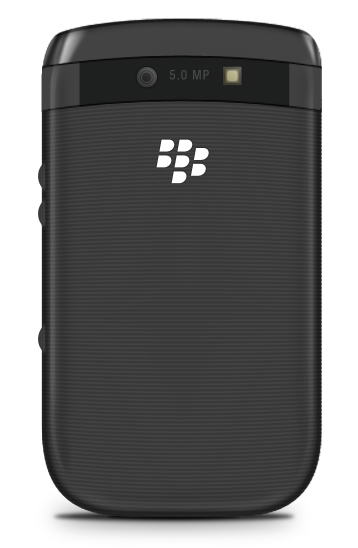
Step 140: Draw Phone’s Shadow

Create small elliptical selection right under the phone. Fill it with black and Add Gaussian Blur. Create slightly bigger selection, fill it with black, add Gaussian Blur, reduce its opacity. Create cast shadow by duplicating previous Shadow and give it a very big Gaussian Blur.


Step 141

Finally, we’re done with backside of the phone.


Step 142

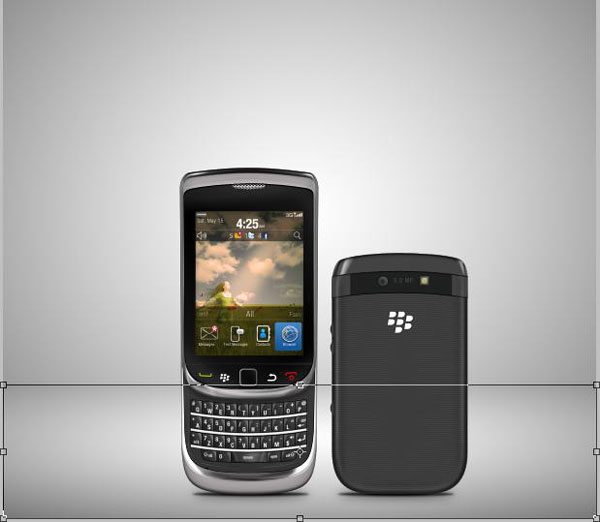
Let’s put both phones in one place. Create new layer above Background layer. Draw a radial gradient from black to white. Duplicate layer, hit Cmd/Ctrl + T then pull the new layer down.


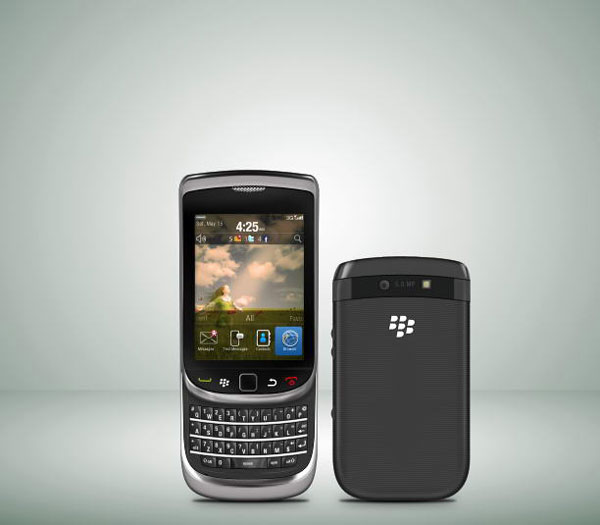
Step 143: Add Background

To add some color, click Add Adjustment Layer icon and select Hue/Saturation. Activate Colorize and change its settings.
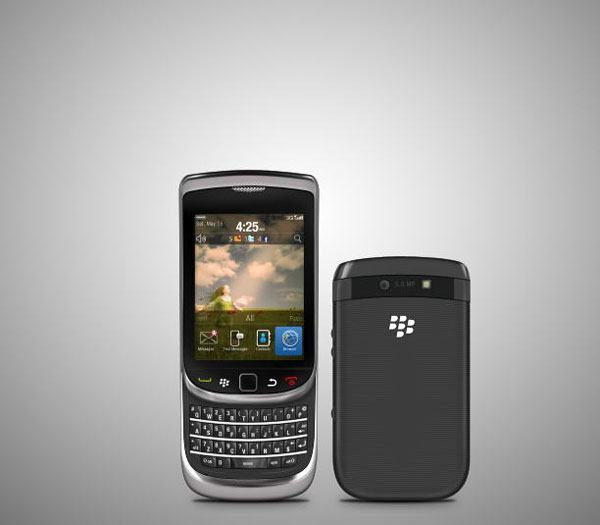

Final Image

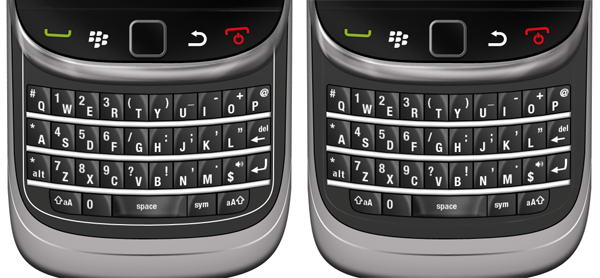
That’s it. I hope you like the final result and learned one or two new techniques from this long tutorial. In picture below I also added the phone with its keyboard closed.

Porting an Application to iPhone Using Flash CS5

Last week saw a very significant development in the relationship between Apple and Adobe. Flash is back in the iPhone picture. In this tutorial, I will show you how to convert an exisiting Flash movie to an iPhone application using Flash Professional CS5.


Step 1: Choose a Flash App

The first thing you need to do is select the application that you want to port. In this example we’ll be working with the Digital Clock app we created in another ActiveTuts+ tutorial.


Step 2: Create a new iPhone OS File

Launch Flash CS5 and create a new iPhone OS Document.


Step 3: Landscape

As you can see, the default stage size is 320×480 px, which is the iPhone full screen resolution in portrait mode (this is holding the iPhone vertically).

However, this application is has a Landscape format and it won’t look good if we adapt the interface to Portrait. Your first instinct is probably to rotate the interface 90° and build the app that way. It will work, but it will be very difficult and you will probably end up with neck pain. For this reason Flash CS5 includes a Publish option to make the iPhone application in landscape mode.

Set the stage size to 480×320 px and continue with the next step, we’ll see how to set the app to Landscape mode in step 10.


Step 4: Interface

To port the interface, a simple copy and paste will be enough. Yes, it’s that simple!

However, in most cases you will need to optimize the graphics, which involves size, alignment and the balance between vectors and bitmaps. Since we are using simple graphics, we’ll focus on the alignment and the size of the elements.


Step 5: iPhone Adjustments

The original application size doesn’t match the iPhone size, so the first thing to do is change the background size to fit the stage.

The current size of the clock text will look too small in the iPhone, select it and change the size to 120px.


Step 6: Class File

Copy and paste the class file to the source folder, no changes need to be made to this file.


Step 7: Document Class

Remember to add the class name to the Class field in the Publish section of the Properties panel.


Step 8: Test for Errors

You can now test your movie to see if everything works as intended.


Step 9: iPhone OS Settings

Here comes the part you’re interested in; the iPhone part.

Now you have a perfectly working Flash movie, it’s time to convert it to an iPhone application. Go to the Properties panel, Publish section and press the iPhone OS Settings button.


Step 10: General

You will now enter a window full of settings. These settings are:

  • Output File: The name of the ipa file that will be created, this can be whatever you want.
  • App Name: The name that will be shown in your iPhone below the icon.
  • Version: The current version of the application; you need to edit this on every test for iTunes to update the app succesfully.
  • Aspect Ratio: The view mode of your app.
  • Full Screen: Hides the top info bar (signal, bluetooth, wifi, battery, etc).
  • Auto Orientation: Uses the accelerometer to change the orientation without writing code.
  • Rendering: A very important option, using the gpu for rendering in complex graphics applications will highly increase the performance.
  • Included Files: The files to be included with your app. If you are loading content from an XML, TXT or any other source you should add those files here.

Step 11: Launch Image

Every iPhone application displays an image at launch while loading the essentials to show the app. This image is the Default.png file we included in step 10. It’s recommended to show the same screen that the app will show when fully loaded, but you can use it to show your company logo, loading screen, title screen, or any other useful info.

The image must be 320×480 it doesn’t matter if you’re working in landscape mode.


Step 12: Deployment

For the Deployment tab, you will need to be a member of the iPhone Developer Program and follow the instructions in the Provisioning Portal to get the necesary files to compile your application.


Step 13: Certificates

There are three different kinds of certificates. The first is the Apple Worldwide Developer Certificate (WWDC). This certificate is compiled alongside one of the other two certificates: either a Developer certificate or a Distribution certificate. These are used for testing applications and deploying to the Apple Store, respectively.


Step 14: Provisioning Profile

The Provisioning Profile is basically a file that states which application we’re testing and on which devices can we test it.


Step 15: App ID

An Identifier of your application, each application ID is required to have its own unique namespace that looks something like com.yourcompany.YourApp. This is also generated in the developer program site and included in your provisionig profile.


Step 16: Deployment Type

Select an option depending on the kind of certificate and provisioning profile you’re working with. A Developer Certificate can be used for Quick Publishing and a Distribution Certificate is needed for deployment, using this kind of certificate will create an app ready to be submitted to the app store.


Step 17: Icons

Next is a simple one, the Icons tab.

Three sizes of icons must be used 29x29px, 57x57px (this is the icon shown in the device) and 512x512px. Don’t worry about the round corners, iTunes will automatically generate them.


Step 18: Publish

When you’re done filling the settings press the Publish button, a progress bar will appear showing the remaining time. The time it takes depends on your application and the files included. Also, more time is needed when publishing for deployment.


Step 19: Device Testing

An .ipa file will be created in your source folder, drag it or double-click it to open in iTunes. You will see the icon of your app with the other applications.

Sync your iPhone and get ready to run your new app!


Step 20: Submit App

If you’re done porting your prefered application to iPhone and want to share it with the rest of the world, you can submit it to the App Store. Login at iTunes Connect and follow the guided instructions.


Conclusion

Now you know how easy it is to develop iPhone applications using Flash Pro CS5, start making your own!

I hope you liked this tutorial, thank you for reading!

Create a High Rez Clank Model in Cinema 4D – Day 1

In this tutorial Clinton Jones will demonstrate how to model his version of Clank, from the hit PlayStation game Ratchet and Clank, using Cinema 4D. You will learn many different techniques, from the basic steps needed to model the head and body, to the more complicated functions needed to add some pretty serious detail to stay true to the character.

Video 1

Download

Note: click the ‘Monitor’ icon to view tutorial in full-screen HD.

Video 2

Download

Note: click the ‘Monitor’ icon to view tutorial in full-screen HD.

Video 3

Download

Note: click the ‘Monitor’ icon to view tutorial in full-screen HD.

Video 4

Download

Note: click the ‘Monitor’ icon to view tutorial in full-screen HD.

Video 5

Download

Note: click the ‘Monitor’ icon to view tutorial in full-screen HD.

Video 6

Download

Note: click the ‘Monitor’ icon to view tutorial in full-screen HD.

Video 7

Download

Note: click the ‘Monitor’ icon to view tutorial in full-screen HD.

Video 8

Download

Note: click the ‘Monitor’ icon to view tutorial in full-screen HD.


Don’t miss more CG tutorials and guides, published daily – subscribe to Cgtuts+ by RSS.

How to Smash Your To Do List When You’re Your Own Boss

An insidious curse haunts all business owners and it doesn’t matter what business model they use or how large or small their company might be. The curse is freedom.

You’d think freedom was a blessing, and it is. It’s the ultimate goal of the successful entrepreneur. They want to enjoy freedom from someone else’s schedule, from corporate bureaucracy and from some lame manager’s to do list. They have the freedom to do work that counts, to blow off on a Tuesday afternoon to spend time with family, or to play by day and work at night.

All entrepreneurs chase freedom. We have our personal reasons to want it, but we share the same goal.

But freedom comes at a price. The curse kicks in and the universe demands payback for the gift we’ve created for ourselves.

Freedom is a curse precisely because it’s freedom. Freedom runs away from structure and hides in the bushes while discipline marches by. Freedom rejects fixed schedules and doesn’t answer when your inner deadline bailiff calls.

Yet if you’re an entrepreneur, you need structure, schedules and organization. It takes discipline to build the kind of business that allows you to blow off afternoons or take month-long holidays without the house of cards tumbling down.

You won’t stay your own boss for long if you don’t harness discipline in your life and business.

How to harness discipline and ride it hard

Trust me, I’m the last person to suggest you adopt discipline as a permanent state of mind. Discipline and I have a tenacious relationship at best. I hold on because she’s valuable to me; she barely concedes to put up with me. (Yes, discipline is a she. I have no idea why. Freud might).

Discipline isn’t some unseen cosmic force. Months of meditation aren’t required. No one is disciplined all the time, but being able to switch it on at the times we need it is the skill the forges business empires. It’s just a state of mind we enter and leave at will, just like any other state: feeling happy, being sad, and so forth. Here are three techniques that focus on cultivating a state of discipline that I’ve road-tested often with clients, with fantastic results.

Set micro goals

You need to set micro goals. Most entrepreneurs figure out that a long-term game plan, a vision board and clear goals are crucial to big-time business success. Yay for The Secret!

But many business owners don’t have itty-bitty sized goals that keep them on the straight-and-narrow of productivity performance. This habit is crucial. Long-term goals are great since they get us fired up and inspired. Actually doing stuff on a daily basis, however, comes down to how you tick off tasks.

The whole point of discipline, for entrepreneurs at least, is to move your business goals forward, bit by bit, each day. It ‘s about incrementally building your business, spooling up your momentum and eventually charging down the freeway of big profits, impact and perhaps fame.

The key is in the daily “micro-push”.  You must learn the discipline to add to that momentum on a daily basis, or you very quickly lose any acceleration you have.

Setting micro goals is about translating your long term vision for success into a weekly or, better yet, daily game-plan for winning big in business.

The best productivity system I’ve ever used revolves around the simple concept of writing a maximum of three goals on a single Post-It note. You’re allowed a single Post-It per day. You make it your day’s focus to, above all else, absolutely nail those three goals. If the goals are too big to achieve in a single day, you’re forced to split them into mini goals that can be achieved.

Realistic expectations

The reason the itty-bitty goal system works so well is simple. Setting a maximum of three tasks per day manages expectations. Achieving three tasks is easy. You could probably nail five, if you really tried, but that isn’t the point.

When you set realistic expectations and achieve them, you build a habit of success. You also build a habit of discipline. You’re conditioning yourself to, if all else fails, nail three important tasks per day. That builds crucial momentum.

A lot of entrepreneurs have unrealistic expectations. As a group, entrepreneurs tend to be a fairly cocky bunch. They do have reason for being this way: entrepreneurs are awesome. They achieve huge things. Nevertheless, most entrepreneurs have an unfortunate habit of setting stupid-big expectations for their own productivity.

If you have a to do list with hundreds of items on it, you ‘ll never tick them all off in a day, week or even a month. Even if you were nailing twenty tasks a day, to do lists have a habit of spawning more and more items.

The other sucky thing about unrealistic expectations is that you never meet them. You fail to achieve your performance target, which means most entrepreneurs end up feeling shitty about themselves and their performance.

Realistic expectations, like the “three tasks a day” strategy, give you the chance to win some personal success and, crucially, to pat yourself on the back for doing a good job. Success breeds success. Ticking off your three tasks on Monday (and celebrating) is far more likely to lead to the same level of discipline on Tuesday!

Discipline also applies to breaks

Celebrating your discipline, and the success it creates, is key. To adopt a habit of discipline, you need to convince your unconscious mind that it’s worth it  – that there’s something positive to be gained from it all. This means rewarding yourself for a (three task) job well done, rather than beating yourself up over your endless to do list.

Build a habit of small, incremental successes and simultaneously build a habit of celebrating that success. Be disciplined about patting yourself on the back for ticking off your tasks. Be disciplined about taking breaks too.

In most western countries, a minimum of a half-hour break per eight hours work is a mandatory, legislated requirement. For once the government got it right! What is it about entrepreneurs that makes them think they ‘re above taking breaks?

It comes back to cockiness and the belief that you can do anything. Get real. You can’t. You are not Superman.

Working for ten hours straight dramatically affects the quality of your work. If you think you ‘re capable of producing game-changing business ideas and insights while burning the midnight oil, you’re dreaming.

While you are conditioning yourself to be disciplined with work habits, create the same discipline around your breaks and down time. This is the best way — trust me. The alternative means burning out and falling to pieces or, more likely, having your unconscious mind self sabotage your efforts at discipline from the get-go.

Putting it into action

The key to mastering discipline, of course, is to actually do something. Don’t convince yourself that this needs to be some kind of cathartic, transformational, life changing experience where you cry, sweat and bleed. Don ‘t start on a milestone, like next Monday or on New Year’s Day.

Start now. Start gradually, without ceremony or worry. It ‘s as easy as writing three tasks on a Post-It. Discipline can be yours.

So, what do you want to achieve today?

Awesome Links #14: Twitter Links, Priority Inbox, Windows Context Menu

How to Extract Links From the Tweets In Your Twitter Timeline

If you love the information people share on Twitter via links, but don’t want to spend time visiting the site frequently to check for them then this tutorial on Guiding Tech will show you how you could pull out all the links from your Twitter stream in your RSS reader.

5 Tips for Using Priority Inbox

The Gmail team talks about five tips you could use with their new Priority Inbox feature to further enhance your productivity.

Keyboard Shortcuts That’ll Make Your Google Instant Searching Even Faster

If you’ve started using Google Instant Search then this article by Lifehacker could make your googling a bit easier.

From Freelancer to Thought Leader in 5 Easy Steps

An excellent article on our sister site Freelance Switch teaching freelancers to become thought leaders.

FilerFrog: Add a Productivity Boost to Your Context Menu

A nice find by Web Worker Daily that lets you do more with your Windows right click context menu.

Talkcast reminder: live at 10pm ET

It’s Sunday night in the USA, and that means two things: football, and we’re live tonight on Talkshoe. The big news of the week is the remarkable spirit of glasnost that seems to have taken over the iOS development world, as the formerly restrictive rules about third-party tools have been lifted. Never fear, though — we’ll find plenty of time for crackpot theories along with your comments and questions.

To participate on TalkShoe, you can use the browser-only client, the embedded Facebook app, or the classic TalkShoe Pro Java client; however, for maximum fun, you should call in. For the web UI, just click the “TalkShoe Web” button on our profile page at 10 pm Sunday. To call in on regular phone or VoIP lines (take advantage of your free cellphone weekend minutes if you like): dial (724) 444-7444 and enter our talkcast ID, 45077 — during the call, you can request to talk by keying in *8.

If you’ve got a headset or microphone handy on your Mac or your PC, you can connect via the free Gizmo or X-Lite SIP clients or using the Talkshoe client’s ShoePhone tool; basic instructions are here.

We’ll kick things off at 10pm ET/ 7pm PT. See you there!

TUAWTalkcast reminder: live at 10pm ET originally appeared on The Unofficial Apple Weblog (TUAW) on Sun, 12 Sep 2010 17:00:00 EST. Please see our terms for use of feeds.

Read | Permalink | Email this | Comments

The Best Resources In iOS Development (For Week Sept.4-Sept.10)

It was another eventful week in the world of iOS development (seriously, how often does developer news for anything or than the iPhone hit the major tech sites?!) with the big news being that Apple has taken a complete turn on their policy regarding third party development tools.

This has resulted in the continuation of development on the Flash CS5 iPhone packager, but even more importantly this means that any devs who were worried their apps could be pulled at any time because they used a tool such as Unity 3D no longer have anything to worry about.  In addition to this Apple clarified many of their reasons for rejecting apps, and has improved the overall process of getting an app into the app store for developers.

There were also many great development resources released during the week, and here are the most popular posts from the week Sept.4 to Sept. 10:

The Cost Of Hiring An iOS Developer – This article explores the true hourly costs of hiring a developer to create your apps, along with the total costs for developing apps.  Some very accurate approximations here.

Tapku An Amazing Open Source iOS Interface Library – This article uncovers a great library that adds many nifty interfacing effects on the iPhone and iPad such as coverflow.

Simple Tips To Avoid Memory Leaks in objective-C – This article illustrates some simple tips to help beginners prevent memory leaks from occurring in their obj-C programs, and points to some great resources from the past that explain memory management in objective.c

Creating A Custom Transition With Core Animation – This tutorial shows explains how to create a custom shutter animation, and points to a resource illustrating how to perform various other effects with core animation.

Large iAds Profit Growth After Open Sourcing App – This article uncovers how one developer’s iAds profits experienced great growth after open sourcing an app, and explores the marketing possibilities that could arise when an app is open sourced.

4 New Open Source Games Added To iOS Open Source Apps List – Thanks to Alex Curylo, this article shows off some open source games that have been ported to the iPhone platform.

New Open Source Game Released Using Cocos2D And OpenFeint – This article shows a beautiful open source Cocos2D game, with one of the best trailers ever for an indie game.

Thanks for reading, please share this using the buttons below!

©2010 iPhone, iOS 4, iPad SDK Development Tutorial and Programming Tips. All Rights Reserved.

.

Share and Enjoy:

RSS
Twitter
Facebook
DZone
HackerNews
del.icio.us
FriendFeed