The Making of Rapture – Psd Premium Tutorial

Today, we have another Psd Premium tutorial exclusively available to Premium members. If you want to take your photo manipulation skills to the next level, then we have an awesome tutorial for you. Learn more after the jump!


This Premium Tutorial is Filled with Creative Tips

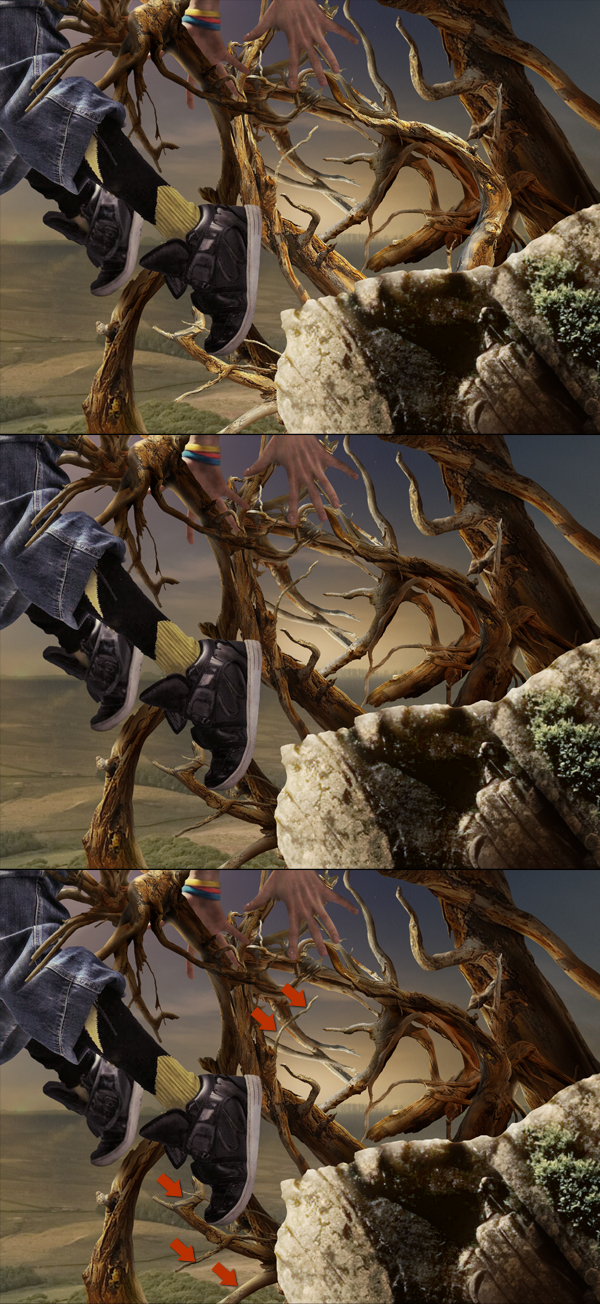
In today’s premium tutorial, we will demonstrate how to successfully create this epic scene in Photoshop. This piece involved the use of several stock images and is loaded with useful tips and tricks. It took several days to complete, so let’s stop fooling around and get started!


Professional and Detailed Instructions Inside

Premium members can Log in and Download! Otherwise, Join Now! Below are some sample images from this tutorial.


Psd Premium Membership

As you know, we run a premium membership system here that costs $9 a month (or $22 for 3 months!) which gives members access to the Source files for tutorials as well as periodic extra tutorials, like this one! You’ll also get access to Net Premium and Vector Premium, too. If you’re a Premium member, you can log in and download the tutorial. If you’re not a member, you can of course join today!

Envato Meetup Live Video Stream Tonight!

Tonight at 7pm CST we will be streaming a live video feed from our Envato Community Night here in Chicago. This will give you a chance to “hang out” with the Envato staff as we have an informal meet and greet with those who use the sites. Each site editor/manager, including myself, will make a point to come over and say hello. For those who can’t make it, we’ll record the stream for you to go back and watch later.


Update: Recordings Added

For those of you who couldn’t watch the video live, feel free to watch the recordings below.


Introduction: Part 1


Q & A Time: Part 2

Create an Eerie Underwater Composition in Photoshop

Sometimes certain scenes are too expensive, dangerous, or even impossible to photograph. This is when people often turn to Photoshop. In only a little bit of time, you can create a very realistic looking image. Today we will be learning how to create an eerie underwater scene. So, get your scuba gear on and let’s get started!


Tutorial Assets

The following assets were used during the production of this tutorial.


Step 1

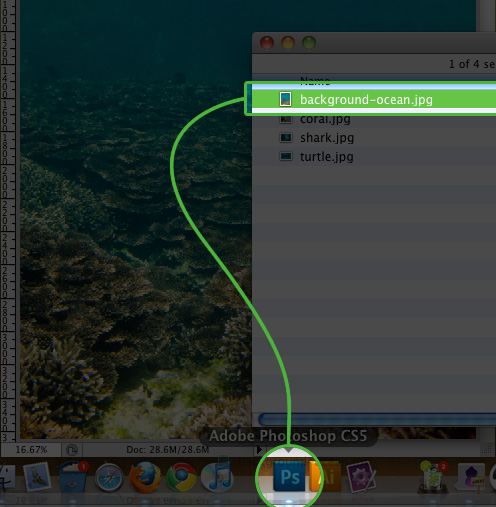
We are going to first open up the background ocean image, as this will dictate how large our canvas is going to be. You can do this by either dragging and dropping the image icon onto your Photoshop icon, or go to File > Open.

Step01

Step 2

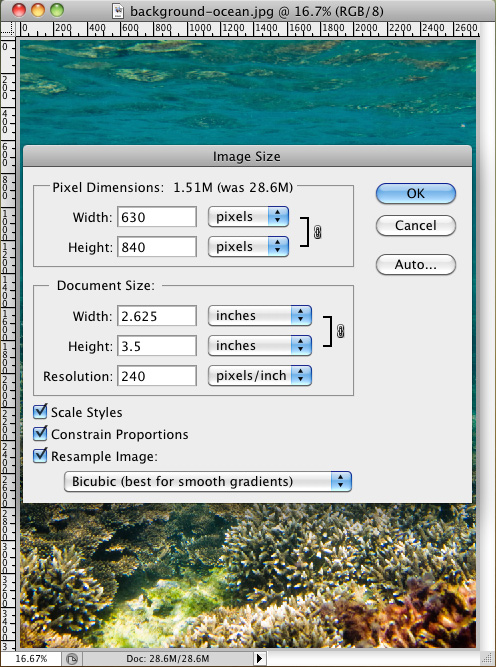
Once the background is opened in Photoshop, go to: Image > Image Size. In the popup box, we are only going to modify the Width. Set the width to: 630px.

Step02

Step 3

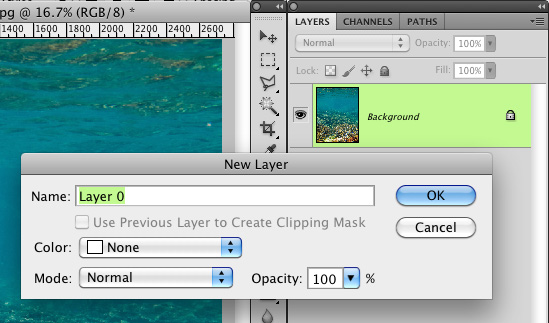
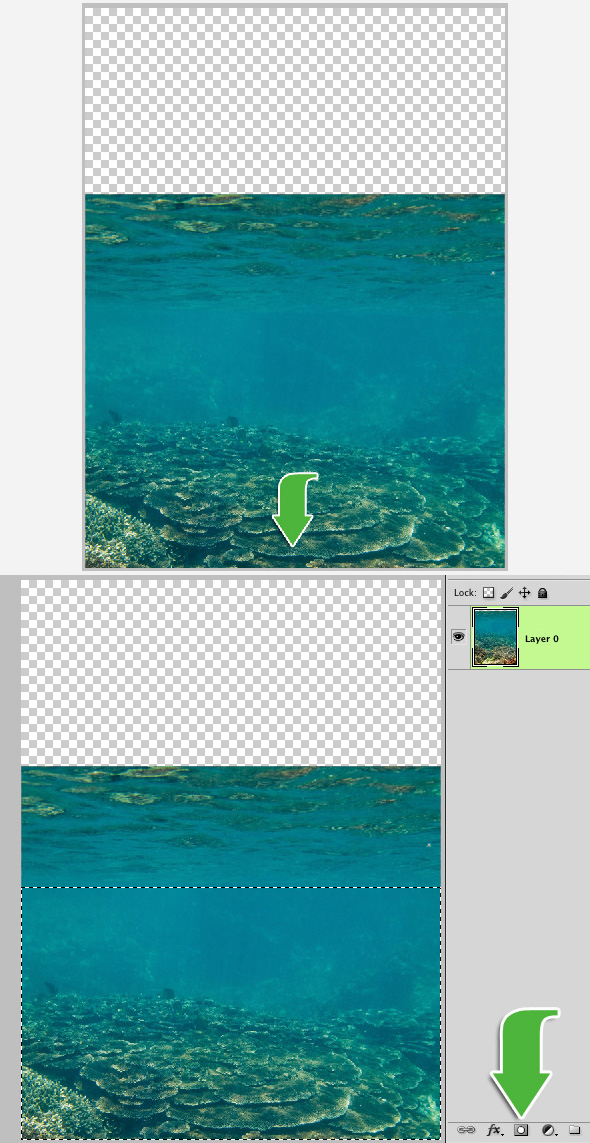
Before you can modify the background image, you are going to need to unlock it. We can do this by double clicking on the layer in the layer panel and by clicking "OK" on the "New Layer" popup.

Step03

Step 4

Once the background is unlocked, you can go ahead and drag it down, just until the bright rocks on the bottom are no longer visible. This will allow us to add more water to the top portion of the image. Grab your marquee selection tool and select the bottom portion of the image up to below the waves in the water, and then click the "mask" button in your layers panel.

Step04

Step 5

Select the top portion of the water and click "Cmd/Ctrl + J" on your keyboard to duplicate the selection to a new layer. Move the layer up just slightly and scale it upwards just so it covers about half of the transparent portion of the canvas.

Click "Cmd/Ctrl + J" one more time, to duplicate that layer. Take this layer, and move it upwards until it reaches the top of the canvas. Don’t worry about the water looking a little stretched. That won’t be noticeable once we are finished.

Step05

Step 6

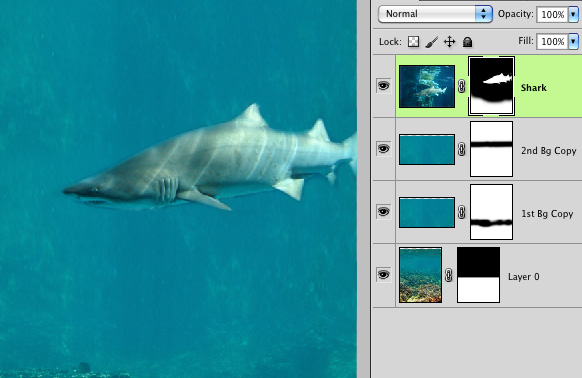
Now that we have the background filled in, we have to work on the bottom edges of the new layers that we created in the last step. We can do this very simply by using layer masks once again. We do this by clicking on the layer in the layers panel and then click the "mask" button. A new thumbnail image of a white box will appear next to the layer thumbnail.

You will now need to select a midsize brush with a hardness of 0%. We are going to use this brush to gently paint the bottom portion of the selected layer. By doing this, it will make the layer blend in. You will have to repeat this step for both of the water layers.

Step06

Step 7

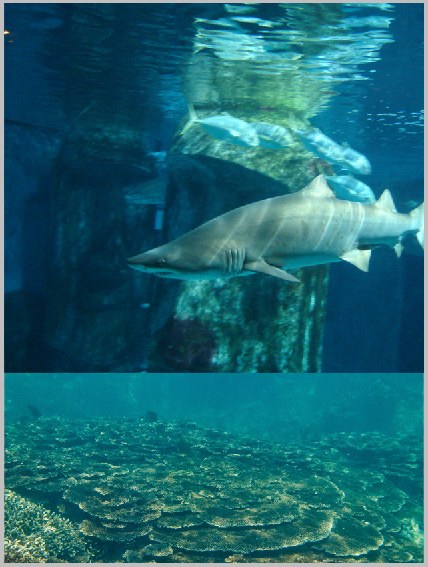
Import the Shark image. You can do this by going to File > Place and navigating to the shark image. Or you can just simply drag and drop the image from your folder directly onto your Photoshop document. Once it is imported, scale the shark to size, and then place it on the right side of the image about halfway up the image.

Step07

Step 8

Now it’s time to remove the background from the shark image. We are going to do this exactly like we did in step 6, with the mask tool. Click on the shark layer and then click the "mask" button in your layer’s panel. With a small brush slowly erase around the entire shark, removing the background. The closer you get to the shark, the better the final image will look.

Step08

Step 9

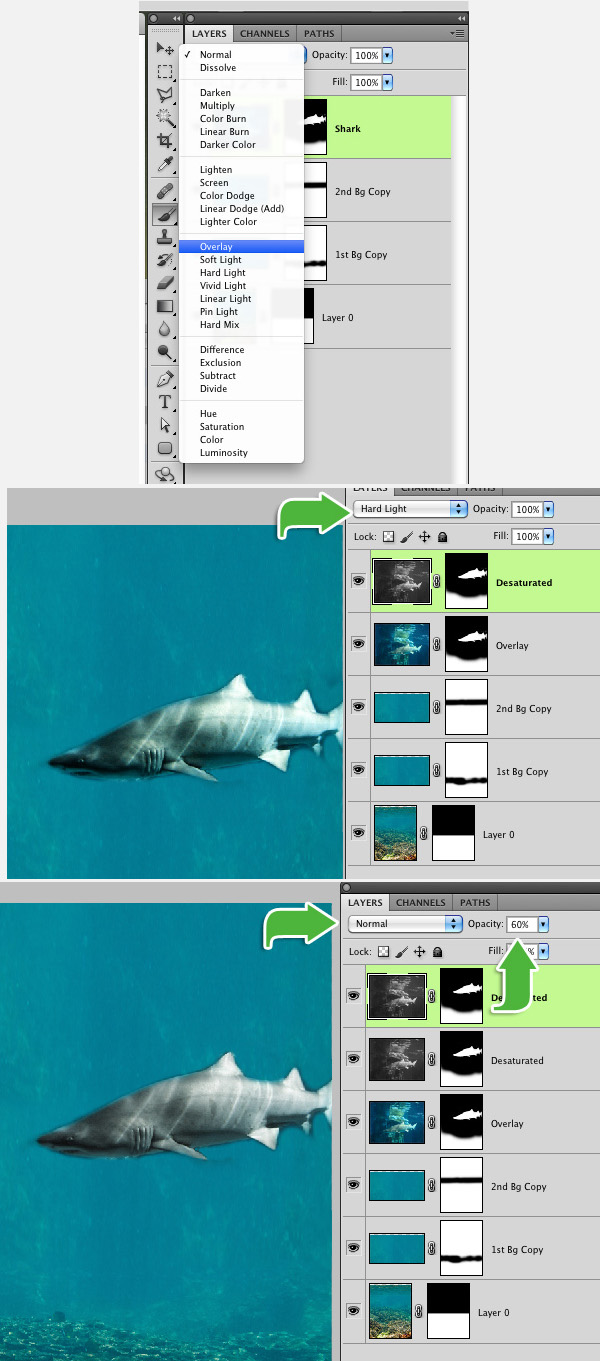
You can leave the shark as-is, but I prefer to give the shark more of a gray look. We are going to accomplish this by creating 2 duplicates of the shark and modifying them slightly. First step is to select your current shark layer and changing the Blending Mode to "overlay". You can do this by clicking the box with the word "Normal". This box is located at the top of your layers panel.

Duplicate that current layer (Cmd/Ctrl + J), change the Blending Mode to "Hard Light". We are going to want to "Desaturate" this layer. You can do this simply by clicking "Cmd/Ctrl + Shift + U", or you can do it the hard way by going to Image > Adjustments > Desaturate. This will turn the image black and white. Duplicate the desaturated layer (Cmd/Ctrl + J) and change the layer mode back to "Normal", but this time change the "Opacity" to 60%.

Step09

Step 10

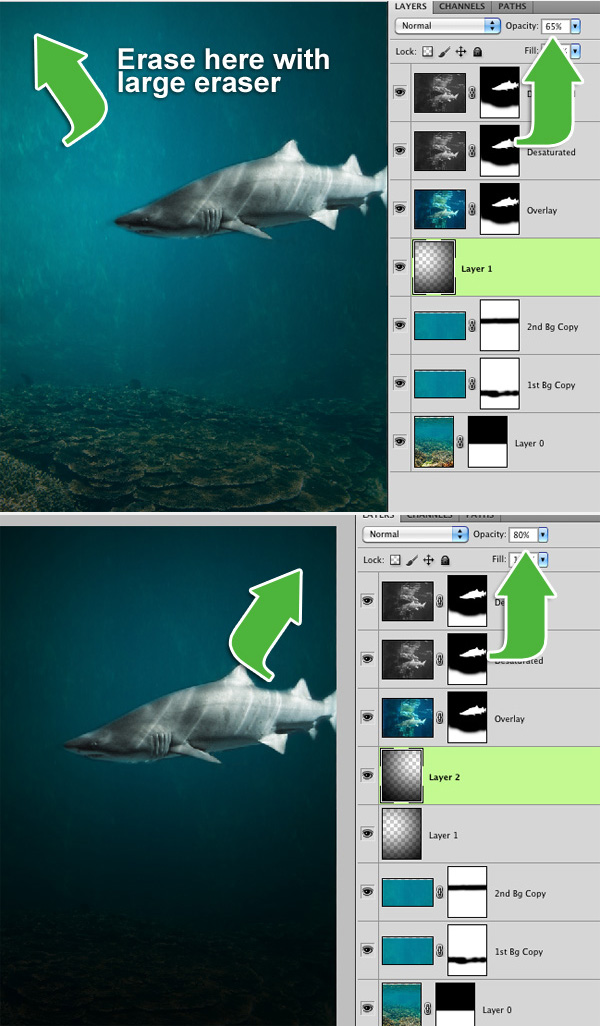
Now it’s time to give the background a dark eerie look. Create a new layer above the water background layers and fill it with black. Then grab a very large eraser brush (about 1000 px) and erase the top left portion of the black background. Lower the opacity of this layer to about 65%. Create one more layer and fill it with black. Using the same size eraser brush, erase the top right portion of the layer. This time lower the opacity to 80%.

Step10

Step 11

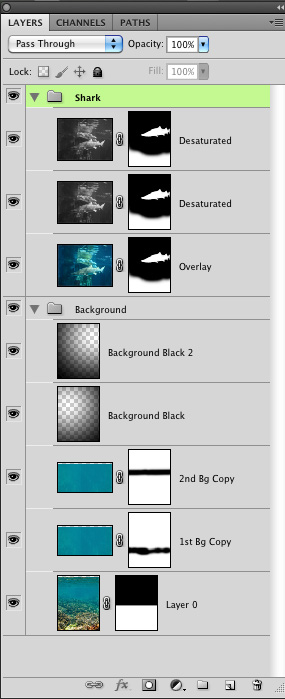
We now have 8 layers in our layers palette and it is looking a little sloppy. We can quickly organize it by selecting the 3 shark layers and clicking "Cmd/Ctrl + G". This will create a new folder with those layers in it. Lets do the same for the 5 background layers (2 black layers and 3 background image layers).

Step11

Step 12

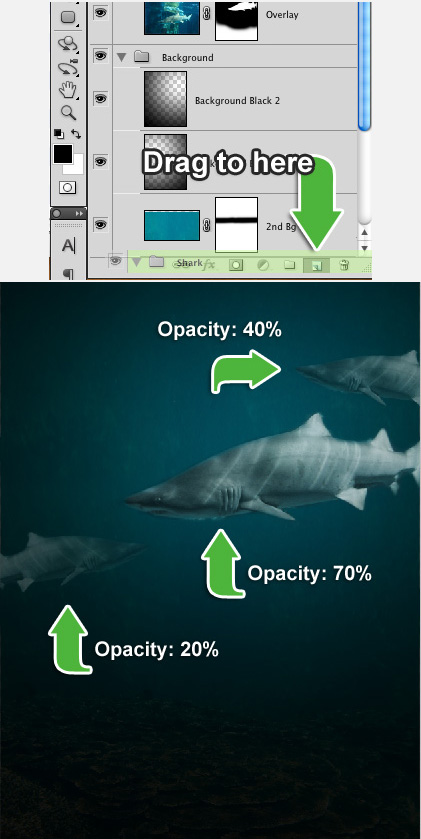
At this point, our scene is looking pretty empty. Lets fix this by duplicating the shark and giving him 2 friends. Select the "Shark" folder and drag it down to the "New layer" icon on the bottom of the layers palette. Go ahead and add one just above the current shark and then another on the left side of the canvas. Mess with the opacity and scaling of the shark to give the sharks more "depth".

Step12

Step 13

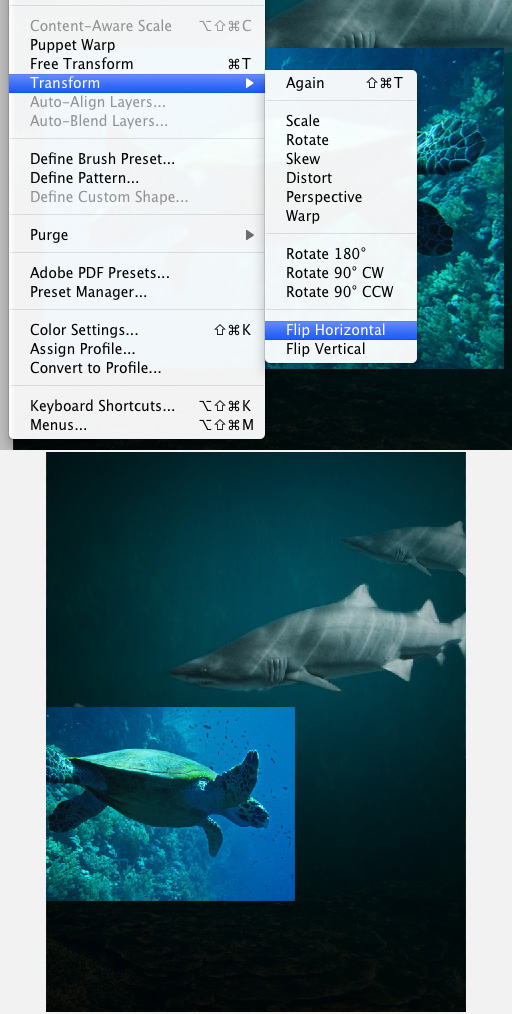
Now that the sharks are all placed, we need to give them a couple of friends, turtles. Go ahead and load the turtle image into Photoshop, exactly like you did with the shark image. At the moment, the turtle is swimming towards the left. We are going to flip the image horizontal so the turtle is swimming towards the right. We can rotate the image horizontal by going to Edit > Transform > Flip Horizontal.

Step13

Step 14

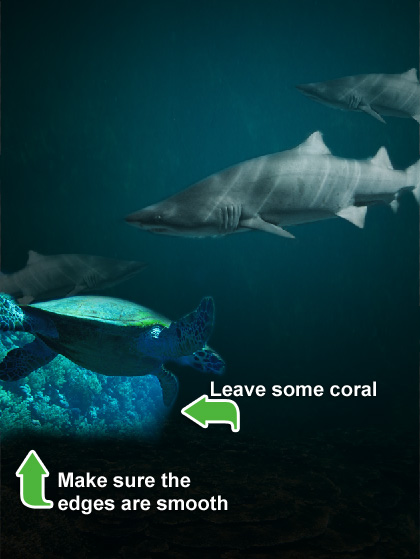
We need to now remove the background from the turtle image. We do this the exact same way as we did with the shark. Create a layer mask and then just paint around the turtle. This time, we want to leave a little bit of the coral that is under the turtle. You also want to mask a small amount of the background on the edges of coral. This way there are no hard edges.

Step14

Step 15

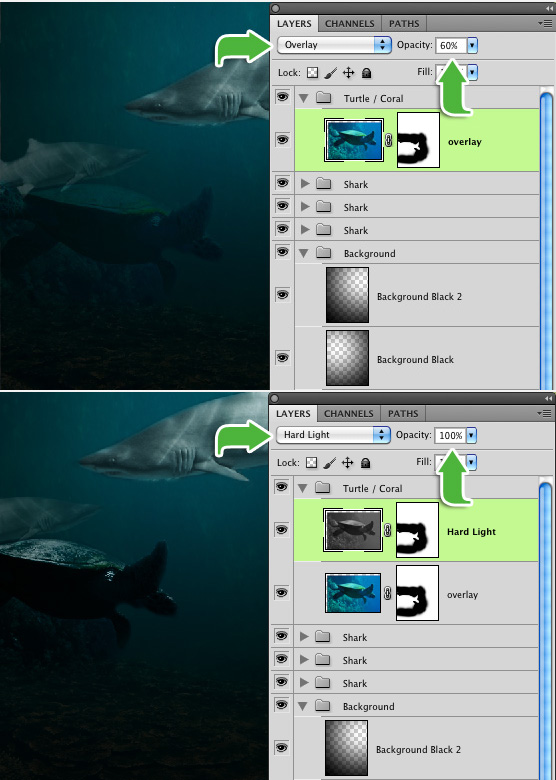
As you can see, the turtle stands out pretty badly. We need to do pretty much exactly like we did with the shark. Set the turtle layer’s blending mode to "Overlay" and set the opacity to 60%. Duplicate the turtle layer by clicking Cmd/Ctrl + J. Then set that layer to "Hard Light" with an opacity of 100%. As you can see, the turtle is standing out still, we need desaturate that layer. You can do this by clicking "Cmd/Ctrl + Shift + U", or going to Image > Adjustments > Desaturate.

Step15

Step 16

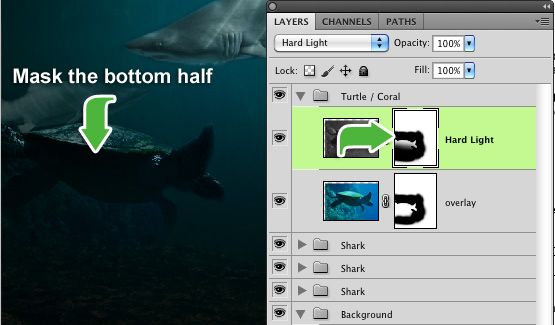
One final step for the "Hard Light" layer, is to slightly mask the bottom portion of it. We can do this by clicking on the "mask" thumbnail on the layer. Then with a black brush with the size of about 300px and a hardness of 0%, gently paint the bottom half of the turtle and coral. This will help make the turtle and coral blend in with the background Now, take both of those layers and put them into their own folder called "Turtle / Coral". You can do this by selecting both layers and clicking "Cmd/Ctrl + G".

Step16

Step 17

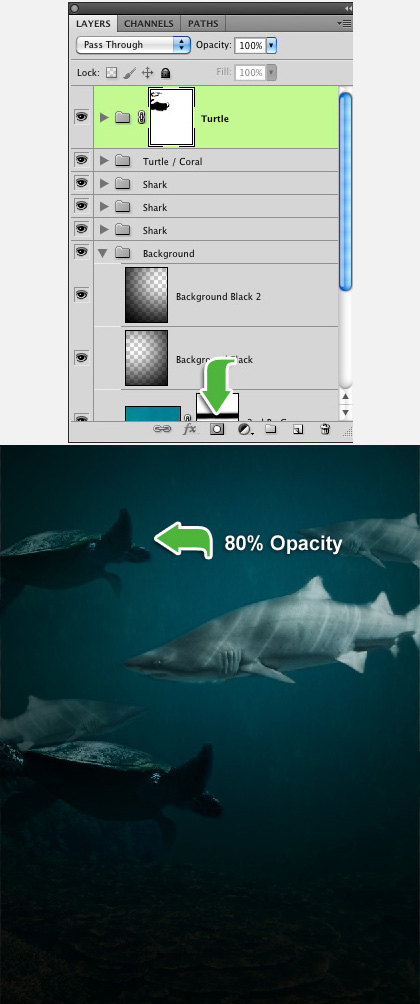
The turtle feels a bit out-numbered because there are so many sharks, so lets give him a friend. You can make a copy of the turtle, just like we did with the shark, by dragging it to the "new layer" button at the bottom of the layers pallet.

The problem with just cloning the turtle is that it has the little bit of coral at the bottom of the image, so we are going to have to remove that. Rather than redoing all of the previous steps, we are going to just add a layer mask to the folder. You can do this by clicking the folder, and just like with a layer, you click the "mask" button at the bottom of the layers pallet. With the mask created, paint away the rest of the coral with a small brush. Now, you can place the turtle at the upper left corner of the canvas. I recommend scaling, rotating and lowering the opacity to give it some depth.

Step17

Step 18

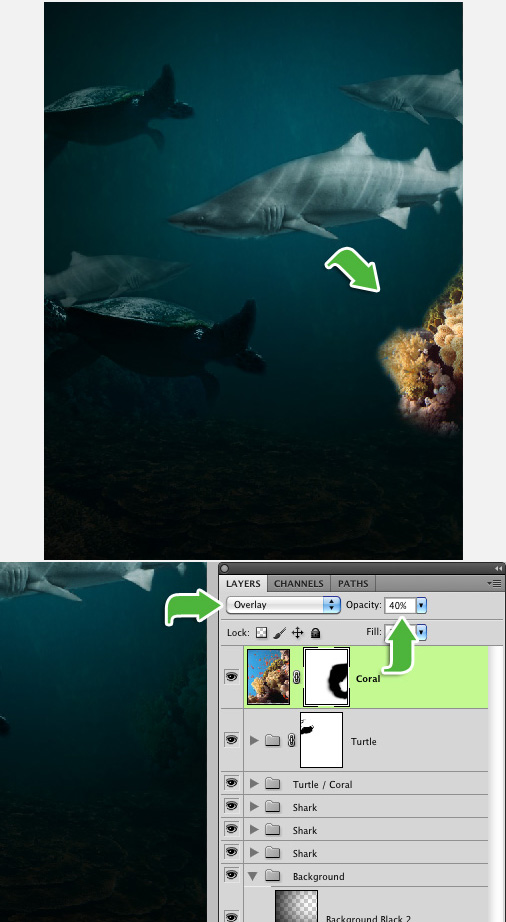
There is one more image for us to work with. This will just be repeating the exact same steps as the turtle. Go ahead and load up the Coral image and place it on the lower right corner of the canvas. Mask out the background, just like we did with the other images. With this image, all we have to do is change the layer Blending Mode to "Overlay" with an Opacity of 40%.

Step18

Step 19

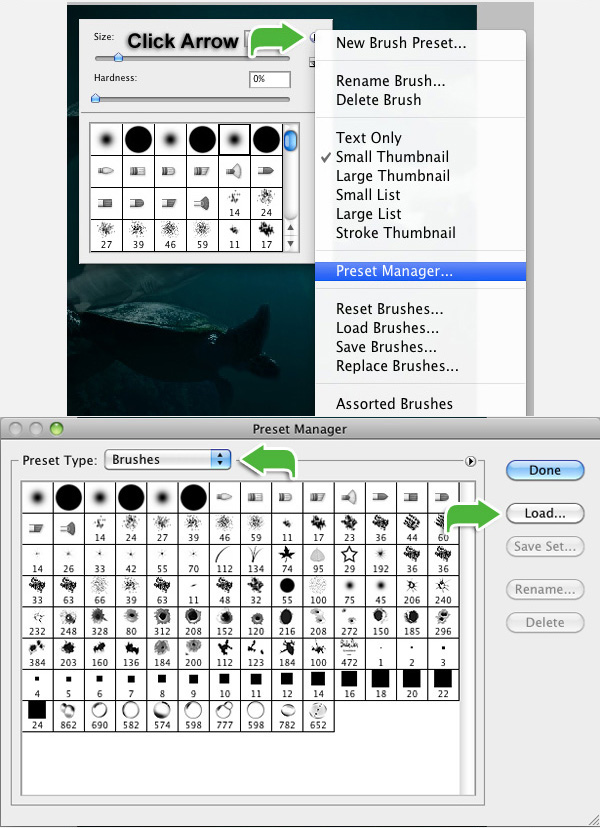
Now that we are done with the images, we can begin adding a little detail. We are going to add bubbles to the water, to give some character to the fish. First, we will have to load the bubble brushes. You do this by right clicking the canvas. In the brush selection pop-up, click the arrow on the top right, go down to "Preset Manager." In the "Preset Manager" window, make sure your Preset Type is on "Brushes", then click on the "Load" button and load the brush file.

Step19

Step 20

Your brushes are now loaded, but painting 1 bubble at a time would take way too much time. We can save time by simply modifying the brush. Click "F5" to open your brush menu, or go to Window > Brush. Select the bubble brush with the number "690." In this window we are going to do the following: Size: 6px – Spacing: 210%. On the left, click "Shape Dynamics." Size Jitter: 30% – Minimum Diameter: 10% – Angle Jitter: 10% – Roundness Jitter: 20% – Minimum Roundness: 25%. On the left, click "Scattering." Scatter: 1000% – Count: 1 – Count Jitter: 18%. You don’t have to worry about any other settings.

Step20

Step 21

Now that your brush is set, create a new layer and make sure your brush color is white. Then paint the bubbles. I like to give 1 to 2 rows of bubbles (vertical rows) by each mouth and gills. You can also add a few in the background. Pretty much anywhere you feel bubbles should be placed. Feel free to play with the brush size. Once your bubbles are brushed, lower the bubble layer’s Opacity to about 20% to 30%.

Step21

Step 22

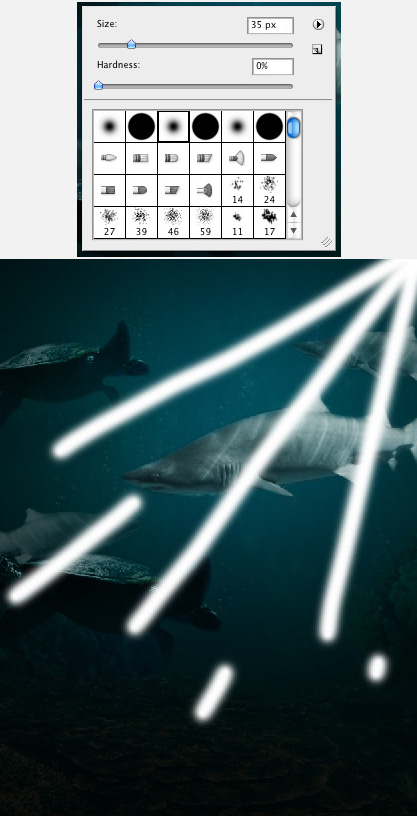
We need to go back to a "default" paintbrush. You can do this by right clicking the canvas and in the brush selection menu, just select one of the round brushes at the top. Set the size to about: 35px and make sure the hardness is 0%. Create a new layer and make sure your brush color is white. Now, we are going to paint "rays" coming from the top right of the canvas.

Step22

Step 23

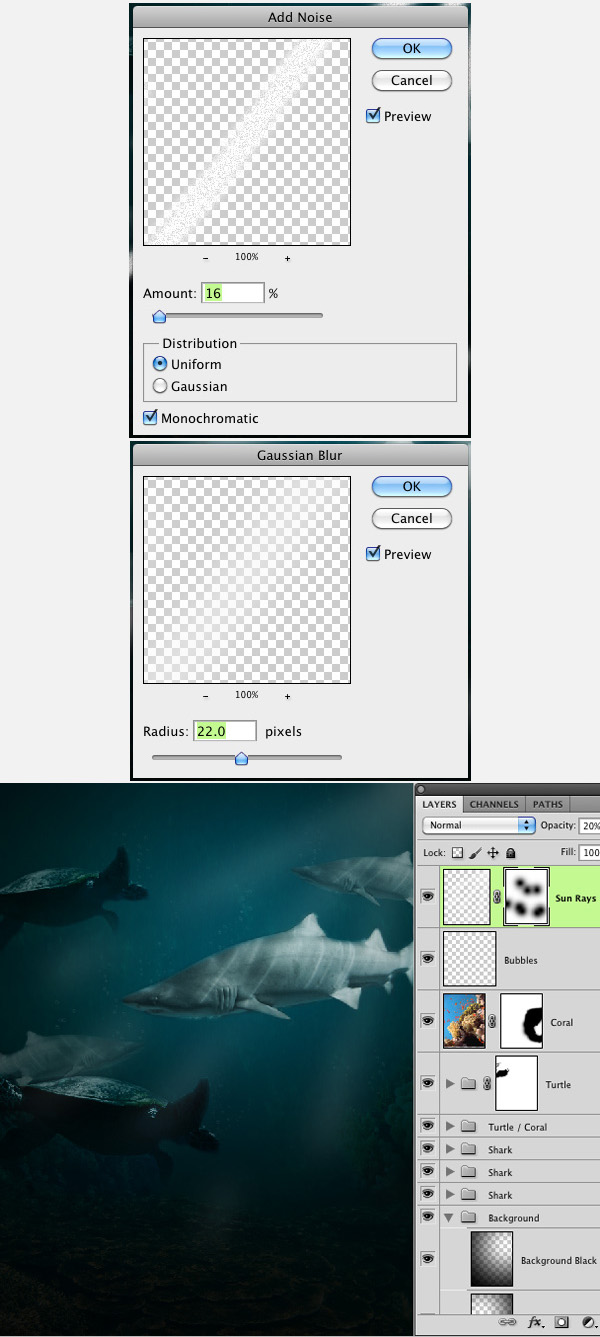
We need to now make the sunrays blend in quite a bit better. First step is to add noise to them. You can do this by going to Filter > Noise > Add Noise. Make the amount 16%. Then add Gaussian Blur. Filter > Blur > Gaussian Blur. Make the Radius 22.0 pixels. Lower the layer Opacity to about: 20%. If you feel that the light rays are a little too "heavy", you can create a layer mask, and gently mask out certain portions of the rays. For example: the bottom edges, and parts that intersect with the fish.

Step23

Final Image

Congratulations, you have successfully created an eerie underwater scene.

FinalUnderwater

Databinding with Silverlight

Databinding is key, key, key in Silverlight. Additionally, it’s key. No, really. The basic idea is that we don’t want to write code that transfers data between the objects representing data in your program and the UI controls presenting that data to the user. If you’re not using Databinding, keeping UI controls and the data separate in your Silverlight applications, then the chances are you’re doing it wrong ;-)

Silverlight has simple but powerful mechanisms that allow a great degree of separation between the UI controls and the data that is bound to them.

Here we take a look at the basics of data binding in Silverlight, how we set up bindings, how bindings are resolved via DataContexts and how tools like Visual Studio and Expression Blend represent data binding.


What’s Covered?

Here’s a quick look at some of the subjects discussed in this screencast:

  • The Visual Studio Data Source window
  • Binding properties to data
  • DataContexts
  • Data changes and notification
  • Setting binding properties
  • Data collections
  • Moving to Expression Blend

View Screencast

Don’t like ads? Download the screencast, or subscribe to Activetuts+ screencasts via iTunes!


Useful Links

Mike Taulty Microsoft (UK): http://mtaulty.com: [email protected]: twitter.com/mtaulty

A Comprehensive Beginners Guide to UDK – Day 2

In this new tutorial series, Ivan Krushkov will be walking us through the very basics of the Unreal Development Kit (UDK). In this first part Ivan covered the actual interface itself, whilst in today’s tutorial he goes over how to use BSP brushes, how to place static meshes to populate your level and how to add in the lighting! If you want to get started creating your own content in UDK, this tutorial is for you.

This tutorial is Day 2 in a series – Go to Day 1.


Video 1

Download

Note: click the ‘Monitor’ icon to view tutorial in full-screen HD.


Video 2

Download

Note: click the ‘Monitor’ icon to view tutorial in full-screen HD.


Video 3

Download

Note: click the ‘Monitor’ icon to view tutorial in full-screen HD.


Video 4

Download

Note: click the ‘Monitor’ icon to view tutorial in full-screen HD.


Video 5

Download

Note: click the ‘Monitor’ icon to view tutorial in full-screen HD.

This tutorial is Day 2 in a series – Go to Day 1.


Don’t miss more CG tutorials and guides, published daily – subscribe to Cgtuts+ by RSS.

Poll: Would You Like to Attend an Envato Meetup?

Last week, in Chicago, we held our first ever Envato meetup with our Australian, American, Canadian, and European staff. During the week, we held a community meetup with a group of Envato authors and readers at a local pub. We really enjoyed getting to meet our community and would like to judge your interest for more meetups. Would you like to attend a meetup if we held one in your area?

Right now, we are considering holding an initial meetup in New York City and possibly additional events in other major metropolitan areas. Please feel free to cast your vote and let us know what you think in the comments.


Would you like to attend an Envato meet up?survey software

How to Build a Killer Online Resume for Free

One of the emerging ways to put together a great resume is to use an online resume generator. Not only do you save time, but your productivity increases. This allows you to spend more time searching for work and less time putting together a resume that is attractive. While  some of these services do charge a nominal fee, others are available to use free of charge. While it’s a good idea to keep your resume updated in terms of skills and experience, it’s also not a bad idea to freshen it up every once in a while. Below we’ve listed 6 services that allows you to build a killer online resume that gets you noticed – without you having to dip into your pocketbook.

CeeVee

CeeVee allows you to use a customizable and interchangeable theme for your resume (or résumé, as they call it) and then post it online to the public.  You can then save it as a PDF to use offline, or share it via Facebook and Twitter as well.  As with any service, you need to sign up to use it – but it conveniently allows you to login using your Facebook account to speed up the process – if you’re one of those who are comfortable with using that option.

JobSpice

Claiming that it can have your resume up and running in 15 minutes, JobSpice boasts a user base of over 100,000 people. With mentions in mainstream news and testimonials emblazoned on the home page, this services considers its ease of use and ability to serve as a better option than MicroSoft Word. JobSpice does have a pricing structure for those that want to get more from the service – and its “trial mode” does not allow for PDF creation or posting online…unlike the aforementioned CeeVee.  Still, it is simple to use and you can save your work as part of the trail mode, so it is worth a look.

Krop: Creative Database

Krop is not only a place where people can find work (and employers can find people to do their work), but also has a Creative Database feature that allows creative professionals to host resumes and their portfolios. As with most of these types of services, you must sign up – but they tout that there will “joining is free forever and will never have advertisements”, which is a bonus for those who aren’t fond of seeing ads clutter their workspace. The service was designed with creatives in mind, and Krop consulted with both clients and creatives to ensure the design was liked by both. If you’re a creative professional and you’re looking for a place to show of your talents, this service might just do the trick.

DoYouBuzz

Referring to itself as “The NextGen Resume”, DoYouBuzz has a features set that includes importing from several sources, including your LinkedIn profile, which can really speed up your productivity. You can also export your resume to Facebook. They also claim that their site ranks pretty much at the top of Google rankings when it comes to online resume generators – 92% of searches for online resumes result in a DoYouBuzz resume appearing in the top three. Not too shabby if you’re looking for work and are hoping someone will find your resume in the giant “online” pile. You can even check out your traffic using their Statistics feature.  A premium version allows for custom URLs and more. A pretty robust feature set for free users makes this service one that you may want to give a test drive.

Jobrary

Jobrary takes the resume and portfolio game and allows you to blend them into one powerful web presence. Sure, you can also download the PDF, forward your credentials off to prospective employers and the like, but Jobrary also gives you the ability to create a custom URL (or landing page) where you can show off your work and your experience. You can also upload videos and hide your resume if you’re not currently looking for work. Then when you’re on the job hunt again you can simply bring it back to the public eye for all to see.

VisualCV

VisualCV allows you to build dynamic and stylish resumes online, really letting you put as much (or as little) of what you’re created or developed out there for potential employers to see. There’s a sharing option, a multitude of attachment types that you can augment your resume with and VisualCV even has a job search function built right in. With varying levels of privacy, the ability to embed a video resume as part of your profile and countless other features, VisualCV is a solid player in the online resume game.

Conclusion

Online job hunting (and employee hunting) is growing in leaps and bounds. While the traditional resume may be around for a while, there are plenty of creative templates out there to ensure that you have an advantage when looking for employment. Some people are even going further than that and abandoning resumes altogether, sticking with just an online presence or other alternatives. With online resume generators becoming increasingly popular (and increasingly easy to  use), creating a killer online resume and having an online presence is something everyone can – and should – do.

Gmail’s Priority Inbox: An Email Review

It’s been one week since I started using Gmail’s Priority Inbox, so I though I’d summarize my experience with an email review. For those of you who haven’t heard about this handy little tool yet, the idea is that Gmail sets up “priority inbox” for important messages and sends the rest to your regular mailbox. Although I’ve been marking tons of emails as important (or not), Priority Inbox is still getting a sense of my email priorities and yes, still marking some of my daily emails as important despite my marking them as not important.

However, as I recently discovered, you can fast track this process by creating filters. So, for each of my regular clients, I can set up a filter and instruct Gmail to make all of their emails as important (since client emails rank a whole lot higher than, say, newsletters or press releases). It’s a bit more work than simply marking something as important or not important, but it ensures that all of those emails make it to my priority inbox.

In case you need a quick tutorial, here’s how to set up a filter:

1. Click the “create a filter” link in the upper right corner.

2. Fill in the email address of the sender whose messages you’d like to be marked as important (or you choose other criteria like subject line or keywords).

3. Check the box for “always mark it as important” (or choose another action like starring it, forwarding it, deleting it, etc.)

4. Hit “create filter” and you’re done!

Another neat little trick I discovered (courtesy of Gmail’s blog) is that instead of clicking the buttons for important or not important, you can select a message (or multiple messages) and hit “+” or “-” to indicate importance.

Unlike other email tools I’ve tested, Priority Inbox really relies on you putting in the time to train it properly and customize it for your needs. Services like Boomerang serve a much different function but don’t require as much of a learning curve before you start seeing results. Although I find Priority Inbox to be useful, it hasn’t drastically changed how I manage emails.

What about you? Any thoughts on Priority Inbox?

100 Ultimate Examples Of Architecture Photography

Architectural photography is a stunning way to express the beauty of man-made creation. Although the natural world has a huge amount to offer photographers, the angular lines, shapes and patterns of architecture allow you to experiment in a completely unique way. Today we’re taking a look at 100 stunning examples of just this – architecture that provokes amazement!

Under arches

symmetrical tower

Spirals

nothing straight

Transformers

Oceanographic (Valencia, Spain)

Tales From The Distant Earth

Close to freedom

It’s History Now.

Centro de Convenciones

Architecture

a e r i a l

Cities of the future I

Phare des Baleines

curves

Bridge in fog

water cube

the Road to Fenghuang

Infinity

Roppongi Architecture

rise up to the sky

silent glory

Right – Left – Sideways

Tunnel Vision

P-Machinery

na rogu sw Ducha i Kopernika

Alone

Emisferic

Beach Huts

wings of rise

At The British Museum

well

photographing green chairs

Stairs

U-Bahn Marienplatz

Vatican City Stair

Imploding Glass

Pacman II

Up or Down

Once upon a time…

Hundertwasser

Webb Bridge

Sydney Opera House

The Wrath of the Norse Gods

Stairway to Nowhere

spine.

Docklands Underground

Kaiku

Java

With drive

EWHA

Cool Blue – Sydney Opera House

orange and green

Budapest Parliament

The Norwegian Opera & Ballet

Architecture :10

Curvy

Moscow

Luckenwalde Town Library

Pabellón de Aragón

Light at the end of bridge

Metro Station

PUrc 233 Green roofs

Mumuth

Round and Round

Architecture

BRICKS

shoe box on top

DoWnToWn WaVeS

Architectural Photography

Nightlines

Architecture

Torres

imEDGEs

The Playhouse

Titan

Horten

Bispebjerg Bakke

Mountain Dwellings, BIG Architects, Copenhagen

Low Light Photography

Work

door to the dream world

Convergence

The Inspector

structured thinking

Cyclists

Athens Olympic complex

Paris 09/01

Jewel inside a Dream

Taj Mahal

The Bastion

Framing the Sky

Architecture

Watertower


More Architecture Photography Inspiration

We recently took a look at abstract architecture photography, which is another great article to check out for this type of inspiration. We also included a handful of tips and techniques for shooting your own compelling architecture photography.


Share Your Own Examples!

Have you shot an architecture photograph that you’re particularly proud of? Feel free to share it in the comments below – we’d love to see it!

Introduction to the Smarty Templating Framework


Smarty is a PHP-based templating engine/framework. It allows you to further separate your business logic from its visualization, by removing as much PHP code as possible away from your views. Some developers and frameworks prefer not to use a templating engine, others do prefer them to using plain PHP in your views. Both points of view can be argued, and in the end, it’s mostly a matter of taste. Anyway, it’s never a bad idea to try it out before deciding not to use it, and that’s what this tutorial is about: trying out the Smarty Templating Framework.


Step 0: What To Expect

At the end of this tutorial, you’ll have a basic idea of how Smarty works. You’ll be able to load template files, pass variables to them, use a “layout” in which your other views are inserted, and write your own modifiers. This will all be accomplished using an additional wrapper class, which you can easily integrate in your existing projects.


Step 1: Setting Up The Project

The project for this tutorial will have a very easy setup, since we’re not developing a real application. Just create a project folder (mine is named “smarty_example”) with an index.php file in it, and a directory called “lib” inside of it. Also, create a file named smtemplate.php in the “lib” folder. Next, create a “views” folder inside “smarty_example”. This folder will contain our smarty template files.

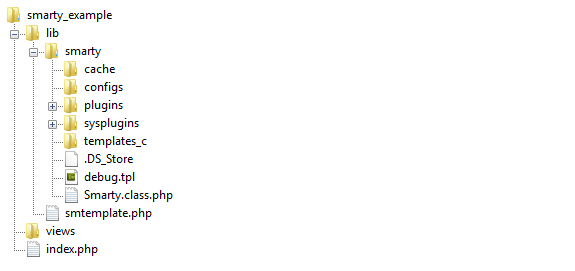
Before you’re able to use something, you have to install it. Thankfully, installing Smarty is extremely easy and requires almost no configuration. First of all, download Smarty and extract the archive. You can check out everything inside the archive, but we’ll only need the “libs” folder for our application. Rename it to “smarty” and paste it inside the “lib” folder of our application. Smarty uses some additional folders, so create the “templates_c”, “cache” and “configs” folders inside our “lib/smarty” folder. If you’re not using Windows, you’ll have to give 775 permissions on these folders to your webserver. Your directory tree should now look like this:


Step 2: Creating The SMTemplate Class

Every programmer has his own idea about the ideal API. In order to adjust Smarty’s API slightly, and allow us to add some additional functionality, we’ll create a wrapper class called SMTemplate, which will take care of the smarty details for us. This approach has another advantage: if, at one moment in time, you should choose to use another template engine, you can create a wrapper for that engine, while retaining the SMTemplate interface, and thus without breaking the code that uses our SMTemplate class.

Storing Your Configuration

Before coding the SMTemplate class functionality, we’ll need a place to store some configuration details. You can do this in multiple ways, i.e. by defining config options as class constants, by defining them as constants in the smtemplate.php file, or by keeping them in a separate config file. I prefer the last option, so I’ll create an smtemplate_config.php file. Smarty needs configuration for the template, compiled template, cache, and config directories. Later, we might also add SMTemplate specific options to our config file, but for now, this will do:

/**
 * @file
 * Configuration file for the SMTemplate class
 */

$smtemplate_config =
	array(
		'template_dir' => 'views/',
		'compile_dir' => 'lib/smarty/templates_c/',
		'cache_dir' => 'lib/smarty/cache/',
		'configs_dir' => 'lib/smarty/configs/',
		);

Building the SMTemplate Class

The SMTemplate class will load this config file, and pass the options to Smarty. Before we can pass the options, we’ll need an object of class Smarty. Our SMTemplate class could extend the Smarty class, but I prefer to use a private instance variable to contain the Smarty object. So far, we have the following for our SMTemplate class:

/**
 * @file
 * Wrapper for Smarty Template Engine
 */

require_once('smarty/Smarty.class.php');
require_once('smtemplate_config.php');

class SMTemplate{

	private $_smarty;

	function __construct(){
		$this->_smarty = new Smarty();

		global $smtemplate_config;
		$this->_smarty->template_dir = $smtemplate_config['template_dir'];
		$this->_smarty->compile_dir = $smtemplate_config['compile_dir'];
		$this->_smarty->cache_dir = $smtemplate_config['cache_dir'];
		$this->_smarty->configs_dir = $smtemplate_config['configs_dir'];
	}
}

Rendering templates

As you can see, our class is still pretty pathetic, as it can’t render anything. We’ll solve this issue by adding a render function, which loads a template and displays it.

	function render($template){
		$this->_smarty->display($template . '.tpl');
	}

In order to render anything, we’ll need to create a template file, and then call the render function from our index.php file. The template file will be pretty basic, containing a simple html page. Name it “home.tpl”, and place it inside our “views” directory.

<html>
	<head>
		<meta http-equiv="Content-type" content="text/html; charset=utf-8" />
		<title>Home</title>
		<link rel="stylesheet" href="/css/master.css" type="text/css" media="screen" title="no title" charset="utf-8" />
	</head>
	<body>
		<p>Hello, World!</p>
	</body>
</html>

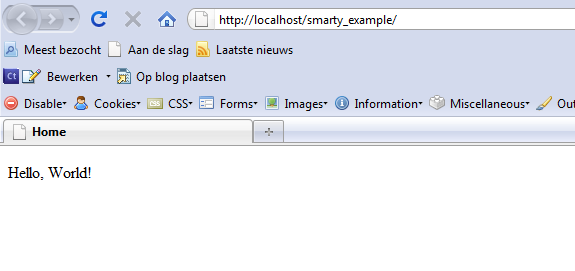
Now, all that is left is to create an SMTemplate object and render ‘home’. Open up index.php, add the following lines of code, and navigate there in your browser.

require_once('lib/smtemplate.php');

$tpl = new SMTemplate();
$tpl->render('home');

Step 3: Assigning and Formatting Variables

If we couldn’t render anything dynamically, Smarty would be pretty useless. Luckily, we can assign variables to our smarty class, and display those in our template. We can also use some Smarty functions (well, modifiers actually) to format them the right way.

Passing an Array of Variables

Though Smarty supports the assignment of variables, our SMTemplate doesn’t (yet). We’ll provide the CodeIgniter-style of assignment, where you pass an array to the render function. You can adapt SMTemplate to support other methods as well; for example, assigning them to the object and then using __set to store them in an array is also a clean way. For this tutorial though, passing an array will do. Before assigning the variables, we’ll edit our template to something a little more dynamic. Saying hello to the world is customary for programmers, but not very useful, so let’s use a variable to determine who we’re hello-ing. Secondly, we’ll add today’s date to the message. Variables can be displayed by wrapping them in curly brackets.

<body>
	<p>Hello, {$receiver}! It's {$date} today!</p>
</body>

If you refresh the page, you’ll see that the variables haven’t been filled in, since we didn’t set them. Setting variables can be done using smarty->assign, so let’s assign them. The render function will now take an optional data array as a second argument.

function render($template, $data = array()){
	foreach($data as $key => $value){
		$this->_smarty->assign($key, $value);
	}
	$this->_smarty->display($template . '.tpl');
}

It still won’t work, because we don’t pass in an array when calling our render function. We can easily do this, by altering a few lines in our index.php file.

$data = array(
	'receiver' => 'JR',
	'date' => time(),
	);

$tpl = new SMTemplate();
$tpl->render('home', $data);

If you refresh now, the page will say something like “Hello, JR! It’s 1282810169 today!”. Of course, this date isn’t really what we had in mind. It needs to be formatted, which brings us to the next section.

Using Modifiers to Format Variables

Smarty isn’t just a template engine that searches and replaces variables. It’s also a powerful framework, that allows you to save time by using things like modifiers, functions, and blocks. If we wish to format our date, for example, we can use the date_format modifier. To apply a modifier to a variable, simply put a pipe character and the modifier name behind it, followed by the optional arguments which are separated by colons. The date_format modifier takes a string argument, which represents the format the date will take, and an optional default date, which we won’t need. The following code will display the date as “day (in decimals) Month”.

<body>
	<p>Hello, {$receiver}! It's {$date|date_format:"%d %B"} today!</p>
</body>

This should now give something of the form “Hello, JR! It’s 26 August today!” Now, maybe we want to make sure our receiver is uppercased. We can achieve that by using the upper modifier.

<body>
	<p>Hello, {$receiver|upper}! It's {$date|date_format:"%d %B"} today!</p>
</body>

Now, if I alter index.php to pass ‘jr’ instead of ‘JR’, the template will still show ‘JR’. Easy, isn’t it? Next, we’ll include our templates in a default “layout”.


Step 4: Working With a Layout

Before we alter our SMTemplate class to enable layouts, we’ll create a layout first. Create a new directory named “layouts” inside our “smarty_example” folder and move home.tpl there. Rename it to ‘page.tpl’. We’ll remove our previous ‘hello world’ content, and put two horizontal lines in. Our content will be placed in between these lines.

<html>
	<head>
		<meta http-equiv="Content-type" content="text/html; charset=utf-8" />
		<title>Home</title>
		<link rel="stylesheet" href="/css/master.css" type="text/css" media="screen" title="no title" charset="utf-8" />
	</head>
	<body>
		<hr />
		<hr />
	</body>
</html>

Of course, this won’t cut it, since Smarty won’t know where to insert our content. There is more than one way to get content from another template inside of our layout, and I’ll use Smarty’s fetch function. This function returns our template as text, instead of displaying it. This means we can fetch the template, and then assign it to a variable for use within our template! This variable’s name is yours to choose. I prefix my special variables with __, to distinguish them from the other variables I use. I’ll call this one ‘content’, since we’re assigning our page content to it.

<body>
	<hr />
		{$__content}
	<hr />
</body>

This concludes our layout, so let’s create some templates to use as content. I’ll create a ‘hello’ template, which will contain a standard ‘hello world’ line, and a ‘lipsum’ template, which holds some Lorem Ipsum text. Don’t forget to give these templates a .tpl extension.

<p>Hello, World!</p>
<p>Lorem ipsum dolor sit amet, consectetur adipiscing elit. Aenean aliquet dignissim diam at vulputate. Aenean nec ligula ac dolor fringilla pharetra. Cras in augue ac tellus dictum pellentesque. Integer elementum tempus lectus, non rutrum sem viverra a. Sed tincidunt sollicitudin dolor, ut blandit magna auctor non. Maecenas sed nibh felis. Donec dictum porta ante at faucibus. Morbi massa tellus, pulvinar id porta id, imperdiet vel nibh. Donec lectus nulla, porttitor a tempor id, cursus vitae leo. Nulla eget nunc eu lorem posuere hendrerit ut ac urna. Aenean sodales lobortis egestas. Integer faucibus hendrerit tempor. </p>

Adapting our SMTemplate class to use a layout is also extremely easy. We’ll first set up a configuration option for the layouts directory, like we did for our views.

/**
 * @file
 * Configuration file for the SMTemplate class
 */

$smtemplate_config =
	array(
		'layouts_dir' => 'layouts/',
		'template_dir' => 'views/',
		'compile_dir' => 'lib/smarty/templates_c/',
		'cache_dir' => 'lib/smarty/cache/',
		'configs_dir' => 'lib/smarty/configs/',
		);

Next, we’ll change our render function. We’ll supply the layout as an optional third parameter, and let it default to ‘page’. Then, we’ll fetch the requested template, assign it to the $__content variable, and display our layout.

function render($template, $data = array(), $layout = 'page'){
	foreach($data as $key => $value){
		$this->_smarty->assign($key, $value);
	}
	$content = $this->_smarty->fetch($template . '.tpl');
	$this->_smarty->assign('__content', $content);
	$this->_smarty->display($layout . '.tpl');
}

There are a couple of things to consider, regarding this code. First of all, we haven’t told Smarty where to find our layouts yet. We can do that by adding a template dir, but this approach means we can’t give our layouts the same name as our templates – Smarty wouldn’t know which one to pick. We could solve this by giving our layouts a different extension, or by setting and resetting our template directory inside our render function, or by using more advanced Smarty functions. For now, we’ll just settle with the constraint that layouts and views can’t have the same name. We can add our layouts directory using the addTemplateDir() function.

function __construct(){
	$this->_smarty = new Smarty();

	global $smtemplate_config;
	$this->_smarty->template_dir = $smtemplate_config['template_dir'];
	$this->_smarty->addTemplateDir($smtemplate_config['layouts_dir']);  // _smarty->compile_dir = $smtemplate_config['compile_dir'];
	$this->_smarty->cache_dir = $smtemplate_config['cache_dir'];
	$this->_smarty->configs_dir = $smtemplate_config['configs_dir'];
}

Let’s check it out by changing our index.php file again.

require_once('lib/smtemplate.php');

$tpl = new SMTemplate();
$tpl->render('hello');

It works!

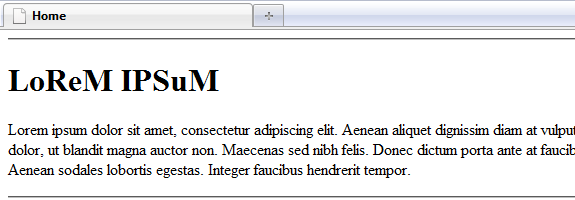
And if we change it to render ‘lipsum’, it works as well:


Step 5: Creating Your Own Modifiers

As the final part of this tutorial, I’ll introduce one of Smarty’s more advanced features, that make it more than a simple templating engine. Smarty contains a number of standard functions and modifiers, but it’s also extremely easy to create your own. Let’s have a look at the modifier we used to format our date:

{$date|date_format:"%d %B"}

If you want a custom modifier, all you need to do is write a PHP function.

This will actually result in a call to the function smarty_modifier_date_format(), with $date and our format string as arguments. This function will return a string, and this string will be displayed. So if you want a custom modifier, all you need to do is write a PHP function. As an example, we’ll write a modifier called ‘weirdcase’, which will uppercase all consonants and lowercase all vowels, i.e. ‘Lorem Ipsum’ becomes ‘LoReM IPSuM’. To do this, create a file called ‘modifier.weirdcase.php’ in the ‘lib/smarty/plugins’ folder. Our modifier will take only one argument, the string that needs to be altered.

/**
 * Smarty weirdcase modifier plugin
 *
 * Type:     modifier
 * Name:     weirdcase
 * Purpose:  turn consonants into uppercase and vowels into lowercase
 * @param string
 * @return string
 */

function smarty_modifier_weirdcase($string){

}

We can get our result by defining an array ‘vowels’, turning our string into an array and then traversing it, and checking whether each character is in our vowels array. If it is, we lowercase it, otherwise, we uppercase it. The modified characters are then appended to a result variable.

function smarty_modifier_weirdcase($string){
	$str_array = str_split($string);
	$result = '';
	$vowels = array('a', 'e', 'i', 'o', 'u');

	foreach ($str_array as $char){
		if (in_array($vowels, $char)) $result .= strtolower($char);
		else $result .= strtoupper($char);
	}

	return $result;
}

This should do the trick, so let’s check it out. Edit the ‘lipsum.tpl’ template and add an h1 containing our weirdcased ‘Lorem Ipsum’ to it.

<h1>{'Lorem Ipsum'|weirdcase}</h1>
<p>Lorem ipsum dolor sit amet, consectetur adipiscing elit. Aenean aliquet dignissim diam at vulputate. Aenean nec ligula ac dolor fringilla pharetra. Cras in augue ac tellus dictum pellentesque. Integer elementum tempus lectus, non rutrum sem viverra a. Sed tincidunt sollicitudin dolor, ut blandit magna auctor non. Maecenas sed nibh felis. Donec dictum porta ante at faucibus. Morbi massa tellus, pulvinar id porta id, imperdiet vel nibh. Donec lectus nulla, porttitor a tempor id, cursus vitae leo. Nulla eget nunc eu lorem posuere hendrerit ut ac urna. Aenean sodales lobortis egestas. Integer faucibus hendrerit tempor. </p>

Step 6: Conclusion

Although there is a lot more to Smarty than I could fit within this tutorial, hopefully this should provide you with a basic knowledge of how to work with it. You essentially already know everything you need to know. You should also be able to determine whether you like the idea of using this templating framework or not by now. The more advanced topics, such as filters and blocks, are useful, however, you’ll still do fine without them. You can find documentation on the more advanced features at the Smarty website. Thanks for reading!

Intel CEO: ‘Simplistic’ Apple TV is for ‘mom’

With the recent announcement of Apple’s new, improved Apple TV, there’s been a lot of talk as to whether it will meet consumers’ demands and expectations, not to mention how it will fare following the arrival of Google’s competing TV device.

According to Electronista, Intel CEO Paul Otellini said he felt Steve Jobs was taking a “step backward” by not making the Apple TV more of a computer-like device. He said Google TV would be the “full internet’ coupled with a traditional TV, featuring the complete Chrome browser as well as supporting Flash.

Otellini said he still thought Apple TV and Google TV could co-exist, though, because they appeal to two different audiences. Apple’s device will appeal to his “mom” because it’s “simplistic,” whereas Google’s device will appeal more to those wanting more, like his son. At the recent Apple event, Steve Jobs said that consumers didn’t want their TVs to do everything and that they wanted them to be simple: play Hollywood movies and TV shows.

MacDailyNews has a chuckle with the Intel CEO’s criticisms, pointing out that Apple TV will no longer use Intel’s Pentium M, but instead rely on an ARM-based processor.

Google TV is expected to start shipping in September, very close to when the new Apple TV will ship. It’s sure to be an exciting time seeing how these two devices fare. Let the race begin!

TUAWIntel CEO: ‘Simplistic’ Apple TV is for ‘mom’ originally appeared on The Unofficial Apple Weblog (TUAW) on Tue, 14 Sep 2010 23:00:00 EST. Please see our terms for use of feeds.

Read | Permalink | Email this | Comments

Cops hacking iPhones for information

I used to think that if I ever got hit by a car while out and about (God forbid, of course), the most useful place to find identifying information would be in my wallet. But that’s not really the case any more — as cops are learning these days, the best place in a person’s pockets to learn about them is their iPhone. Not only is the phone full of contact information (and indeed, I’ve included an “ICE” number on every phone I’ve ever had), but it’s got lots of other information about me, including where I’ve been lately, what kinds of things I’ve searched for, and even what apps I’ve used and how often.

Besides the obvious places (in the apps themselves), there’s a lot of information that you as a user don’t have access to — iOS apparently caches both screenshots and text used while multitasking and spellchecking, so even if you don’t actively save information on your iPhone, odds are it’s there anyway.

Before you panic and decide to ditch your iPhone for privacy’s sake, keep in mind that whoever’s trying to get this information needs to have direct access to the iPhone itself — at this point, hackers can’t dive into your phone over the air and steal your secrets (most of them, anyway). But this type of “iPhone forensics” is very useful for cops trying to figure out what anonymous victims have been up to lately.

Thanks, Colin!

TUAWCops hacking iPhones for information originally appeared on The Unofficial Apple Weblog (TUAW) on Tue, 14 Sep 2010 19:00:00 EST. Please see our terms for use of feeds.

Read | Permalink | Email this | Comments

Dear Aunt TUAW: dock my iPhone to my iPad

Dear Aunt TUAW,

I wish I could dock my iPhone right into the side or back of a large iPad screen. And then have the iPad run off my phone. That way I could have a large screen when I need it. But when I leave the house for a walk I could take the smaller device (the iPhone) out and carry it in my pocket.

Love and snuggles,

Your nephew Gary

TUAWDear Aunt TUAW: dock my iPhone to my iPad originally appeared on The Unofficial Apple Weblog (TUAW) on Tue, 14 Sep 2010 18:00:00 EST. Please see our terms for use of feeds.

Read | Permalink | Email this | Comments

Unity takes a bow on Apple’s third-party development stance

When Apple first passed out those development restrictions on using third-party platforms to create iOS apps, Unity was one of the third-party services that could have been frozen out (though Flash was obviously in everyone’s minds). The team behind the popular game development environment assured everyone Unity was safe, but according to the rules as stated, the rest of us weren’t so sure.

Now that Apple has officially relaxed that policy, however, Unity’s David Helgason is doing the equivalent of a victory dance on the company’s official blog, saying that Unity respects Apple for “coming to the right conclusion, and in our eyes it’s best to let bygones be bygones!” Yeah, he’s kind of excited.

Not that he’s admitting the rules were make or break for Unity — the company was apparently talking to Apple periodically, and even had a workaround ready to go if Apple ever did crack down on the platform. Helgason also points out that even while things were up in the air, Apple continued to approve and even feature lots of different Unity-created apps, so even while Apple preached against using anything but Xcode to create apps, the app review team allowed and even endorsed the products of third-party development tools.

At any rate, the issue is settled now. Consumers are the real winners here — an end user probably can’t tell the difference (if done correctly) between a third-party app and an Xcode app, so the more options for developers, the better.

TUAWUnity takes a bow on Apple’s third-party development stance originally appeared on The Unofficial Apple Weblog (TUAW) on Tue, 14 Sep 2010 17:00:00 EST. Please see our terms for use of feeds.

Read | Permalink | Email this | Comments