Create a Flash Login System Using PHP and MySQL – Part 1

This tutorial will demonstrate how to create simple but professional Flash login system using three different programming languages; AS3, PHP and MYSQL. Advanced sections like application logic, PHP and MYSQL integration with Flash will be our main talking points. Let’s get stuck in!


Final Result Preview

Let’s take a look at the final result, simply click the demo button at the top of this tutorial.

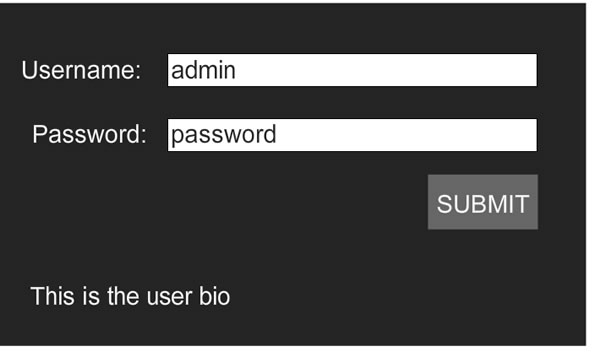
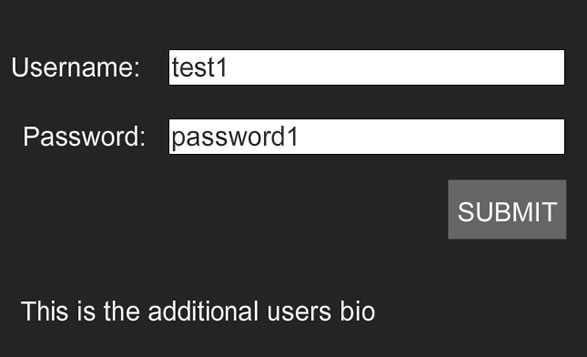
Try logging in with the username admin and password password, or username test1 and password password1. You’ll see a simple piece of text corresponding to that user.

In this Part we’ll get the actual login working, then in Part 2 we’ll let users register through a SWF.


Step 1: Get MAMP or Another Local Server

If you do not have web server that supports mysql databases and php, then download MAMP (for Mac), WAMP (for Windows), or another local server.

MAMP is an open source local server that allows you to run php and create and store data in mysql databases from your local hard drive. MAMP automatically creates a server when you download it therefore I recommend using it over other local servers.

You can alternatively use your web server if it supports mysql and php.

Install phpMyAdmin on the server, we will use it later.


Step 2: Imports

Here are the things you will need in order to create the end product.

  • A text or html editor (for example notepad or Dreamweaver).
  • Flash CS3+

Now we have everything we need it is time to set up our document class.


Step 3: AS3 Document Class Setup

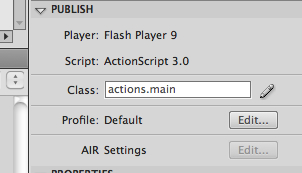
Create a brand spanking new .as file and an AS3 .fla file. Save the .as file as main.as in a new folder called actions.

Save the fla file in the root folder of our application. Now in our .fla file enter the main class name (and classpath) in the properties panel, as stated below:


Step 4: Creating the Base Class Code

Open your main.as file and add the following code:

package actions {

	/*
	always extend a class using movieclip instead of sprite when using flash.
	*/

	import flash.display.MovieClip;

	/*
	create our class
	*/

	public class main extends MovieClip {

		public function main ():void {

			trace("success");

		}

	}

}

This will be your document class. Press ctrl+enter to run the SWF.

If you get a message in the output you have successfully connected both documents and can move on.


Step 5: Creating our Database Connection – Part 1

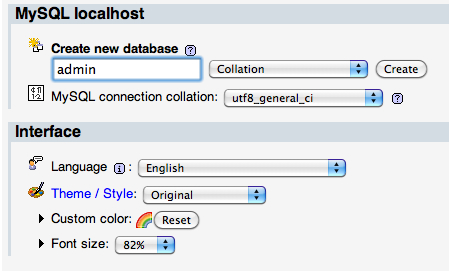
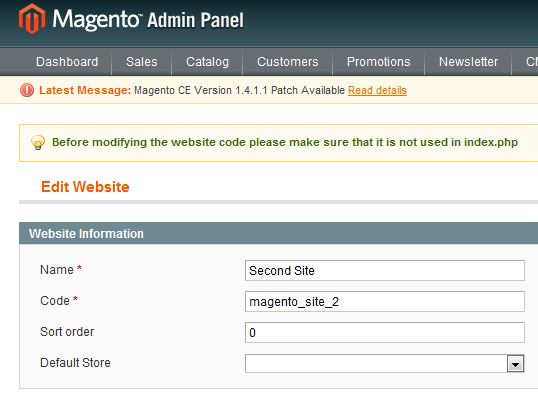
To create a connection to our database we need to use php. First you need to create a database on your server. Call it admin. You can create a database using phpMyAdmin on your server. The image below is first page you see when opening phpMyAdmin. This is the only time we will be using phpMyAdmin; we will be creating the table using php.


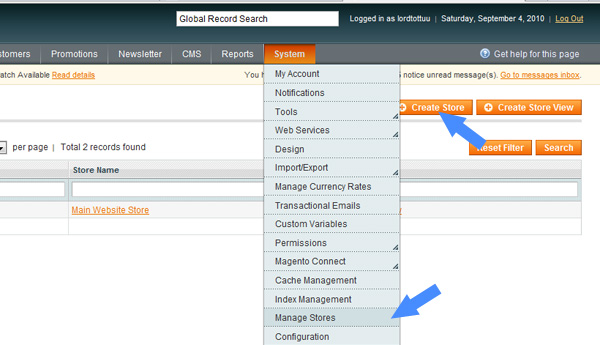
Step 6: Creating our Database Connection – Part 2

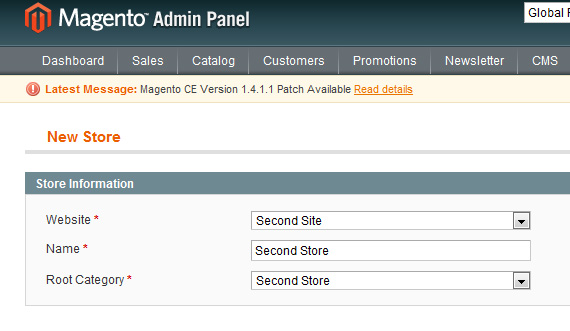
We need one file that will connect to our database. Create a new folder called php. Create a new document with the php extension and call it connect.php

Follow the code comments to see what’s going on.


/*
All code inside these tags will be recognized as php code.
*/

<?php

/*
Database vars that we use to connect to our mysql database. Change the values to your database settings.
*/

$db_name = "admin";

$db_username = "root";

$db_password = "root";

$db_host = "localhost";

/*
mysql_connect is a built in function that allows us to make an easy connection.
*/

mysql_connect($db_host, $db_username, $db_password, $db_name);

/*
mysql_select_db is a built in function that allows us to select the database. This is an essential function.

We use the 'die' function to check for errors.

*/ 

mysql_select_db($db_name) or die (mysql_error());

echo 'success';

?>

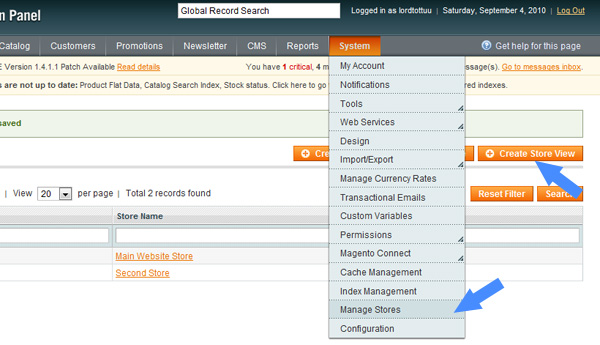
Then you need to upload your files to the testing server. If you are using MAMP copy your folder to the htdocs folder in the mamp application folder.

If there is a successful connection there will be a success message as below and you’ll have connected to your database.

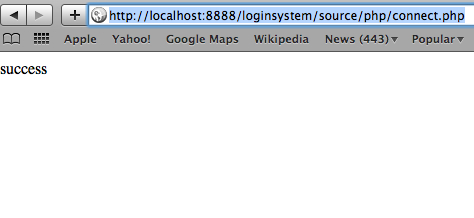
Note: It is important to delete echo 'success'; from your PHP afterwards.

Note: The directory will not be the same as in the image. Ignore the “source” path. For example http://localhost:8888/loginsystem/php/connect.php


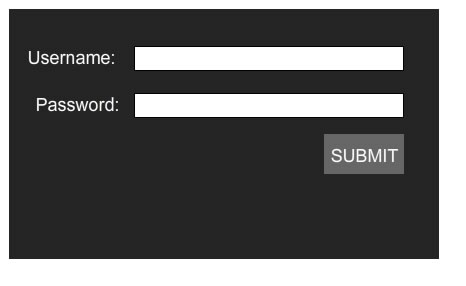
Step 7: Creating the Interface in Flash

First Create Two Text Boxes – Input Text – to allow the user to enter their name and password.

Then position them vertically. Give the top textbox the instance name of “username” and the bottom one “password”. Label the two any way you want.

Then draw a square and insert another text box writing in it “submit”. Convert these to a movie clip with an instance name of “submit_button”.

Distribute all different objects to layers (Modify > Timeline > Distribute to Layers).

Your interface should look something like this:


Step 8: Button Submission

Next we will create our submit button event handler, checkLogin(), to be run when the user clicks “submit”.

First we need to import flash.events.*; in our code. This way we can use Flash events. Follow the code comments.


package actions {

	/*
	always extend a class using movieclip instead of sprite when using flash.
	*/

	import flash.display.MovieClip;
	import flash.events.*;

	/*
	create our class
	*/

	public class main extends MovieClip {

		public function main ():void {

			/*
			buttonMode gives the submit button a rollover
			*/

			submit_button.buttonMode = true;

			/*
			what this says is that when our button is pressed, the checkLogin function will run
			*/

			submit_button.addEventListener(MouseEvent.MOUSE_DOWN, checkLogin);

			/*
			set the initial textfield values
			*/

			username.text = "";
			password.text = "";

		}

		/*
		the function to checkLogin
		*/

		public function checkLogin (e:MouseEvent):void {

			trace("submission success");

		}

	}

}

If the output displays “submission success” when you click the button, our button event has been created successfully.


Step 9: Field Validation

Now we are going to check whether our fields have data. Replace the current checkLogin function with the code below. It’s thoroghly commented for your convenience.


/*
the function to check login
*/

public function checkLogin (e:MouseEvent):void {

	/*
	check fields before sending request to php
	*/

	if (username.text == "" || password.text == "") {

		/*
		if username or password fields are empty set error messages
		*/

		if (username.text == "") {

		username.text = "Enter your username";

		} 

		if (password.text == "") {

		password.text = "Enter your password";

		}

	} else {

		/*
		init function to process login
		*/

		processLogin();

	}

}

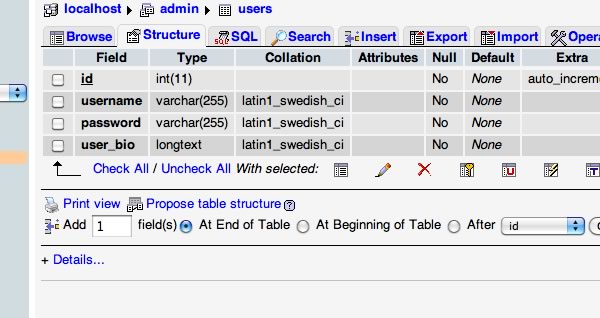
Step 10: Creating the Database Table

Data is stored in tables in databases. Therefore we will need to create a table and we’ll use php to do so. Create a new php document in the php folder and call it whatever you want (it won’t matter, this is just temporary to create the table, we won’t need to keep running it). Then fill it with the code below.


<?php

/*
connect to our database
*/

require_once "connect.php";

/*
create the mysql query
*/

$sql = "CREATE TABLE users (

		id int(11) NOT NULL auto_increment,
		username varchar(255) NOT NULL,
		password varchar(255) NOT NULL,
		user_bio longtext NOT NULL,
		PRIMARY KEY (id)

		)";

$query = mysql_query($sql);

if ($query === TRUE) {

echo 'You have successfully created your table';

}

mysql_close();

?>

After this, upload all your files to your server. Then enter the file path into the browser, if the table was created it will display a success message. If not, then please check your configuration. Note: Make sure you delete this file from the server after the success message is displayed.

Then go to phpMyAdmin or an alternative to check whether your table has been added. If it has been added this is what you will see below…


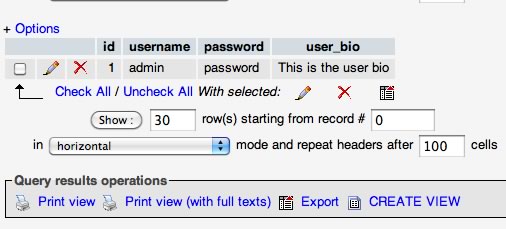
Step 11: Adding the First User

Now we have our table created let’s go ahead and add a user.

Create a new php document and call it whatever you like, then place it in the php folder.


<?php 

/*
connect to the database
*/

require_once "connect.php";

/*
create the mysql query

What this query means is php calls mysql to insert values into the table users. It then asks for the fields you want to add data too then the values for that certain field in ascending order.

*/

$sql = "INSERT INTO users (username, password, user_bio) VALUES ('admin', 'password', 'This is the user bio')";

$query = mysql_query($sql);

mysql_close();

?>

We have now added a user so therefore our table will look like this:

We should be all set to start creating our application logic, which will power the backend of our SWF.


Step 12: Sending a Request to PHP

There a few variables we need to process in order to get our database data.

Here is the completed processLogin() function, to go in our main.as file (it will be called when the user clicks the button). We need to import Flash’s net classes here. So, add this at the top: import flash.net.*;


/*
function to process our login
*/

public function processLogin ():void {

	/*
	variables that we send to the php file
	*/

	var phpVars:URLVariables = new URLVariables();

	/*
	we create a URLRequest  variable. This gets the php file path.
	*/

	var phpFileRequest:URLRequest = new URLRequest("php/controlpanel.php");

	/*
	this allows us to use the post function in php
	*/

	phpFileRequest.method = URLRequestMethod.POST;

	/*
	attach the php variables to the URLRequest
	*/

	phpFileRequest.data = phpVars;

	/*
	create a new loader to load and send our urlrequest
	*/

	var phpLoader:URLLoader = new URLLoader();
	phpLoader.dataFormat = URLLoaderDataFormat.VARIABLES;
	phpLoader.addEventListener(Event.COMPLETE, showResult);

	/*
	now lets create the variables to send to the php file
	*/

	phpVars.systemCall = "checkLogin";
	phpVars.username = username.text;
	phpVars.password = password.text;

	/*
	this will start the communication between flash and php
	*/

	phpLoader.load(phpFileRequest);

}

Step 13: PHP Vars Explained

The first line:


phpVars.systemCall = "checkLogin";

will be explained later when we create the main php control file.

The next two lines:


phpVars.username = username.text;
phpVars.password = password.text;

retrieve what the user inputted into the two text fields and convert them into php variables.


Step 14: Result Textfield

Create a dynamic text box and give it an instance name of “result_text”.

Place it under the login form and submit button. This will display information retrieved from the server.


Step 15: Main PHP Control File

This is the file that will communicate with php and return a value to flash. Create a new php file called “controlpanel.php” and place it in the \php\ folder.


<?php 

/*
connect to our database
*/

include_once "connect.php";

/*
we post the variables we recieve from flash
*/

$username = $_POST['username'];
$password = $_POST['password'];

/*
if flash called the login system the code below runs
*/

if ($_POST['systemCall'] == "checkLogin") {

/*
The * means the query initally selects all the records in the database.
Then the query filters out any records that are not the same as what the user entered.
*/

$sql = "SELECT * FROM users WHERE username='$username' AND password='$password'";

$query = mysql_query($sql);

/*
This counts how many records match our query
*/

$login_counter = mysql_num_rows($query);

/*
if $login_counter is greater we send a message back to flash and get the data from the database
*/

if ($login_counter > 0) {

/*
we use a while loop to get the user's bio. mysql_fetch_array gets all the field's data for the particular record.
*/

while ($data = mysql_fetch_array($query)) {

/*
gets the user_bio value from the selected record
*/

$userbio = $data["user_bio"];

/*
use the print function to send values back to flash
*/

print "systemResult=$userbio";

}

} else {

print "systemResult=The login details dont match our records.";

}

}

?>

Step 16: Show The Result – Part 1

Let’s go back to our process login function and add this:


phpLoader.addEventListener(Event.COMPLETE, showResult);

When the form has finished this listener calls the showResult() function. We will look at that now.


Step 17: Show The Result – Part 2

Here is the function. It displays the value we printed in the “controlpanel.php” file.


/*
function to show the result of the login
*/

public function showResult (event:Event):void {

	/*

	this autosizes the text field

	***** You will need to import flash's text classes. You can do this by adding: 

	import flash.text.*;

	...to your list of import statements 

	*/

	result_text.autoSize = TextFieldAutoSize.LEFT;

	/*
	this gets the output and displays it in the result text field
	*/

	result_text.text = "" + event.target.data.systemResult;

}

The SWF is getting the text that we print in the php and displaying it in the result_text textfield.


Step 18: A Successful Login Example

If you have created a successful login, this is what you will see:

Now we are going to add an additional user to test whether our system works for multiple users.


Step 19: Adding our Additional User

Open the “adduser.php” file in our php folder that we created earlier.

Simply change the VALUES in the mysql query.

$sql = “INSERT INTO users (username, password, user_bio) VALUES (‘test1′, ‘password1′, ‘This is the additional users bio’)”;

Then run the script on the server by simply entering the file path in a web browser.


Step 20: Test Our Additional User

Success! We have a successful flash login system that supports multiple users. Here is the result when we login the additional user.


Step 21: The Whole ActionScript Code with Comments


package actions {

	/*
	always extend a class using movieclip instead of sprite when using flash.
	*/

	import flash.display.MovieClip;
	import flash.events.*;
	import flash.net.*;
	import flash.text.*;

	/*
	create our class
	*/

	public class main extends MovieClip {

		public function main ():void {

			/*
			buttonMode gives the submit button a rollover
			*/

			submit_button.buttonMode = true;

			/*
			what this says is that when our button is pressed, the checkLogin function will run
			*/

			submit_button.addEventListener(MouseEvent.MOUSE_DOWN, checkLogin);

			/*
			set the initial textfield values
			*/

			username.text = "";
			password.text = "";

		}

		/*
		the function to check login
		*/

		public function checkLogin (e:MouseEvent):void {

			/*
			check fields before sending request to php
			*/

			if (username.text == "" || password.text == "") {

				/*
				if username or password fields are empty set error messages
				*/

				if (username.text == "") {

				username.text = "Enter your username";

				} 

				if (password.text == "") {

				password.text = "Enter your password";

				}

			} else {

				/*
				init function to process login
				*/

				processLogin();

			}

		}

		/*
		function to process our login
		*/

		public function processLogin ():void {

			/*
			variables that we send to the php file
			*/

			var phpVars:URLVariables = new URLVariables();

			/*
			we create a URLRequest  variable. This gets the php file path.
			*/

			var phpFileRequest:URLRequest = new URLRequest("php/controlpanel.php");

			/*
			this allows us to use the post function in php
			*/

			phpFileRequest.method = URLRequestMethod.POST;

			/*
			attach the php variables to the URLRequest
			*/

			phpFileRequest.data = phpVars;

			/*
			create a new loader to load and send our urlrequest
			*/

			var phpLoader:URLLoader = new URLLoader();
			phpLoader.dataFormat = URLLoaderDataFormat.VARIABLES;
			phpLoader.addEventListener(Event.COMPLETE, showResult);

			/*
			now lets create the variables to send to the php file
			*/

			phpVars.systemCall = "checkLogin";
			phpVars.username = username.text;
			phpVars.password = password.text;

			/*
			this will start the communication between flash and php
			*/

			phpLoader.load(phpFileRequest);

		}

		/*
		function to show the result of the login
		*/

		public function showResult (event:Event):void {

			/*

			this autosizes the text field

			***** You will need to import flash's text classes. You can do this by: 

			import flash.text.*;

			*/

			result_text.autoSize = TextFieldAutoSize.LEFT;

			/*
			this gets the output and displays it in the result text field
			*/

			result_text.text = "" + event.target.data.systemResult;

		}

	}

}

Conclusion

Well that concludes Part 1 of our Flash login system tutorial. In Part 2 we will be creating a registry form that will add users without the user entering it in the backend. Thanks for reading this tutorial. Enjoy it :)

20 High Rez Sky Textures – CG Premium Content Pack

Today we have 20 incredibly useful high resolution sky textures available exclusively to Premium members. These images are all based on original photos taken by CGTuts+ author Stefan Surmabojov, and can be used in multiple applications whether for LDR lighting, reflection maps, textures or during the final compositing stages. If you ever need realistic skydomes or backgrounds in your CG art, then this content pack is perfect for you! Learn more after the jump!

CG Tuts Content Pack 1

CG Premium Membership

The Tuts+ network runs a membership service called Premium. For $9 per month, you gain access to exclusive high quality screencast tutorials, extra project and source files, and awesome downloadable content packs like this one at CGtuts+, Psdtuts+, Vectortuts+, Audiotuts+, Nettuts+ and Aetuts+! For less than the price of a movie, you’ll learn from some of the best minds in the business all month long!!. Become a Premium member today!


Don’t miss more CG Premium tutorials and content packs, published weekly – subscribe to Cgtuts+ by RSS.

Do You Volunteer for an Organization or Cause?

I read this recent post, Making Your Passion a Higher Priority, and it hit close to home.

I have recently been asked to sit on the board of the young professionals chapter of my local chamber of commerce. I was flattered and immediately agreed. Not only do I believe in networking opportunities, I believe in my local business community.

Once a month I attend an hour-long meeting and help plan monthly, quarterly, and yearly activities. As the editor of a regional manager I feel it’s important for me to be involved in the community. But I was worried about how to fit my volunteer commitment into my work and personal life.

Luckily, my boss supports my appointment to the board as it helps promote our magazine to people who might be outside of our demographic. He’s been a local business owner for over 15 years and knows how important it is to get young people involved in the community. Plus I already attend chamber events anyway—now I get to have a say in how they’re organized and promoted.

I’ve also found that no only have I met a bunch of up and coming young business people that I’d only heard about, I’ve made some new friends and business contacts in the process. And since it’s a group made up of young professionals, most of the planning and events happen after the work day so no one has to ask for time off.

Do you volunteer for an organization or a cause? How do you manage your time?

Busting Your Performance Bottlenecks at Work

As a boss, I sometimes have to listen to a member of my team explain why something went horribly wrong. As as a business owner, I also have to ease the concerns of clients who have been burned by vendors in the past. And as a human being, I hate being on the hot seat myself. Worrying about things that could go wrong on a project can seize your brain. Just as Steven Covey counsels professionals to get task lists out of their heads and on paper, I’m finding my head has more room for creativity if I know that I’ve got a “Plan B” for any situation.

Project managers and engineers call this technique “eliminating single points of failure.” Simply put, if your routine or your process relies too heavily on one particular tool, technology, or person, something as simple as a rogue squirrel can ruin your week. (I’ll explain that in a bit.) Before you think I’m obsessed with failure, let me show you seven ways I’ve eliminated the single points of failure that become performance bottlenecks in my work routines, along with some strategies I coach my teams to use when we’re working together.

1. Break Down the Morning Commute

I dread getting phone calls before 8am. They’re never good, since they usually mean that someone from my team is going to be late or calling out sick. Accidents happen, but you can prevent missing the start of your work day by mapping multiple ways to get to the office. If you take the train to work, map out an alternate route by bus or figure out the nearest Zipcar location you can use in a pinch. If you drive to work, explore some of the side roads you might need to use if a pileup blocks your normal route. In a tight job market, few bosses will tolerate more than a couple of late starts.

2. Keep Yourself Healthy

If you work in an office, it’s no longer a badge of courage to be slogging through your work with a cold or flu. You’re just going to get a reputation for being “patient zero.” Most of the common bugs that knock us out of our routines are surprisingly easy to prevent if you prepare for flu season properly. You don’t even need to become a hand sanitizer junkie. Just stay aware of your surroundings, wash your hands with hot water before and after meals and after every trip to the bathroom, and boost your immune system by taking a multivitamin. Even if you have the luxury of being able to work from home, take your body’s hint and rest up on your sick day, so it doesn’t stretch out to a sick week.

3. Run Lines with Your Understudy

What happens to your business if you’re the single point of failure. Many of like to believe we’re indispensable, but no amount of Vitamin C is going to prevent every kind of event that could keep you home from work. Unless you’re a movie star, there’s probably someone you can rely on to cover for you when you’re down. Doctors often cover appointments for their peers, just like Broadway actors, news anchors, and sales professionals. The trick to making clients comfortable with a last minute switch is familiarity. If you take time to rehearse your expectations, your fill-in will get your customers’ needs met and you can return the favor. This technique works even better when you delegate tasks for a team member’s development.

4. Sync Your E-Mail

Many of us live in our inboxes, even though e-mail’s only been a major part of corporate life for about fifteen years now. I’m still amazed at the number of professionals I meet who rely on “POP” accounts, especially those offered for free by ISPs. Check with your IT team at work to learn whether your mail server supports IMAP or Exchange protocols instead. The systems manage your messages differently. IMAP e-mail usually stays on the server and syncs to your local devices. Checking e-mail with POP often moves your messages off the server onto your local hard drive, wrecking your archives if you check mail on multiple devices and completely destroying your work if one of your hard drives fails.

5. Back Up and Back Away

Some of the most painful conversations I’ve ever had involve lost data. As a writer and media producer, I’ve watched hours of my life vaporize with failed hard drives. Vowing never to let that happen again, I backup and sync my active projects in the cloud. I’ve got a local backup hard drive making nightly copies of my recent work, and I also subscribe to an emergency online backup service that I hope I’ll never need. If you want to save money by avoiding online backups, try keeping two portable hard drives. One stays at work, and the other comes home with you. Swap them out weekly, so if something bad happens in one location, you’re not affected at the other.

6. Treat Internet Access Like a Transit Agency

Whether you telecommute, work remotely, or handle a traditional 9-to-5, your connection to the Internet has become as important as the nearest interstate. And just like an interstate, you should know multiple ways to get around a traffic jam. Personal mobile hotspots have become affordable, usually between $40-60 per month depending on where you live. I thought it was silly to pay extra for a 3G hotspot until I was stuck in a remote hotel with no Wi-Fi for a week. That monthly fee saved me a deal worth thousands of dollars because I could get to the Internet quickly.

7. Break Glass in Case of Emergency

Let’s say the worst happens. You or a loved one ends up in a real emergency. Not a work-is-stressful emergency, but a someone-might-actually-die emergency. This happened to me, and not being prepared for it nearly cost me my business. To get ready for next time, I’ve got an “emergency kit” ready for retrieval by my assistant or my wife. It’s got my most important passwords, phone numbers to partners and vendors I’ll need on board if I have to check out for a while, and instructions on who to call if things get worse. Your clients may love you, but their world shouldn’t have to sit on hold if you take a leave of absence (temporary or permanent). Consider it the ultimate act of customer service.

What other strategies do you have in place to make sure you’re not the bottleneck in your own workday? Tell us in the comments.

Phototuts+ Reader Profile: Olivia Bell

Olivia Bell is a 19 year old photographer from England. She doesn’t take any particular style of photos, instead she takes a vast range, focusing on being able to capture a person’s emotion and beauty. To see more of her work, you can visit her website, follow her on Twitter or become a fan on Facebook.

Q What inspired you to take up photography?

My father had a Canon EOS 10D, which he let me play with from time to time. I gradually began to want to have a pretty profile picture on Facebook, but as I began to use the camera more, I started to see things I wanted to capture.

Moments between my sisters (my models), emotions I loved to see people express, like happiness, laughter, warmth – things like that. Eventually I started to take my camera (now the Canon EOS 5D) everywhere and it all just escalated from there.

Q What camera and editing software do you use?

I shoot with a Canon EOS 5D on a regular basis, however I often use the amazing Canon EOS 1D mark III. I tend to edit in Adobe Photoshop Lightroom, and occasionally Adobe Photoshop.

Q How would you describe your style?

I’m not entirely sure how to describe my style, but my goal is always to have a hint of light, happiness and emotion (mostly positive emotions). I find the beauty of focus incredibly powerful, and enjoy experimenting with it.

Q Who is your favourite photographer?

I have yet to pick a favourite, but I do adore Rosie Hardy’s photography.

Q What equipment do you use during a photo shoot?

I use either the 5D or 1D mark III, along with a couple of lenses – it always depends on the shoot and photographs I am looking to take, but I regularly use my favourite lens, 135mm f1/2.8 L.

QWhat websites and blogs do you keep up with?

I tend to follow most websites/people on Twitter and Facebook. For example I keep “up to date” on Rosie Hardy’s latest photographs via Twitter!

Q Is there anyone or anything you would like to take a photograph of?

I would love to photograph so many people! I don’t even know where to begin, the list is massive. My “top of the list” people would have to be Rosie Hardy, Miley Cyrus, Emma Watson, Rupert Grint, Daniel Radcliffe, Tom Felton.

Q How do you see yourself in 10 years?

I hope to see myself more skilled, with knowledge and a lot of experience under my belt – and a lot more photographs in my portfolio. As I often say, my ultimate goal is to bring out the very essences and being of a person I’m photographing. So when someone looks at a photograph of themselves, their instant reaction is “Wow, you captured me to a T!”

Q What do you think makes a good photograph?

Emotion and composition. You can have a picture perfect photograph, but if it doesn’t have any emotion, it’s just “pretty” – it has a lack of meaning, depth and emotion.

Composition is vital, you can’t have an emotional photograph without composition, you need the “security” of composition to draw the eye in to the photograph.

Q What five words would you use to describe yourself?

Dedicated, self-aware, honest, happy, ambitious.

Q What skills do you think someone needs to be a successful photographer?

Patience has to be first and foremost, followed by communication. When you’re behind the camera, you have to have patience when things don’t go how you want them to, and communication to help you get what you want in your shot.

Q What tips would you give to an aspiring photographer?

Try and take one photograph a day. Doing a 10/20 minute session is great, you get to practice, without getting too daunted by your goal, and if it doesn’t work out how you planned, you only spent 10/20 minutes doing it, so you can easily learn and go back the next day to try again.

On top of that, I personally spent hours looking at other photographs galleries on Flickr and DeviantArt. When I look at other photographs, the questions I ask myself are “What do I like about this?” “What about the composition?” – which once again, go back to emotion and composition.

Learning angles and generally getting your eye in-tune with what’s good, and what isn’t good will really help improve your skill.

Apart from that, learn the basics of your camera. The more you shoot on manual, the more you’ll learn about your camera. From a very early stage I shot on manual and it helped me hugely to focus on the technical side.

Q What skill do you wish you had?

I honestly wish my Photoshop skills were better. Although I’m not hugely into photo-manipulations, it would be wonderful to have the ability to do some if I wanted.

Q If you had one wish, what would it be?

I’d wish for the weather I wanted, when I wanted it!


Olivia’s Photography

Magento for Designers: Multi-Store Functionality


Magento is a stunningly powerful e-commerce platform. In this miniseries, we’ll learn how to get started with the platform, get to know the terminologies, set up a store and all related aspects of it and finally learn how to customize it to make it our very own.

In this seventh part, we’ll be learning how to set up the fabled Magento multi store functionality in simple, easy to follow steps. Excited? Let’s get started!


The Full Series


A Quick Recap

In the last few parts, we took a high level look at how Magento themes are put together, the components that drive it and how everything works together to create a working theme. We also looked at a number of API methods that Magento exposes so that we can painlessly acquire information about the product.


What Are We Learning Today?

Today, we’ll be taking a focused, step by step look at what Magento multi store is, how it can help you, and finally how to set it all up. I know it sounds interesting and you’re itching to get started, so let’s go!


What’s Magento Multi Store?

Magento ships with a number of very powerful features under the hood that go mostly unnoticed by the folks that install and use it on a daily basis. The feature we’re looking at today, the multi store functionality, happens to be one of those; and arguably, it’s one of the most advanced ones. There isn’t a general vernacular for this feature so I’ll be just calling it multi store from now on.

Using this multi store functionality, we can use a single Magento installation and use it to power any number [within technical limits, of course] of stores or websites. This is definitely a godsend for stores that would like to sell products on different domains but would like to have a unified administrative centre. If you need even more granular control, you can set up different, separate stores under the same domain to differentiate between items even better.


The Terminologies Involved

Magento’s documentation regarding this topic has a pretty decent explanation of the terminologies so I’ll make a concise introduction here:

Website: Container for stores and their related views

Store: Exactly what you’d expect but in the abstract sense. You can control your catalog through your store but nothing will be rendered on screen

Store View: These enable the actual rendering of your store. If you want to have a multi-lingual store, you’d be modifying the store view, not the store itself.

All these terminologies will start making more sense once you see them in action. For now, we’ll move on.


Today’s Goal

We’re just going to implement the system I talked about as an example above. We’re going to add a store front to a domain without installing Magento on it. Instead it’ll be using an already installed version of Magento to do all the heavy lifting. And that’s about it! I’m choosing to focus specifically on this scenario since I’ve been getting numerous messages through various channels asking how to set it up. So let’s get started!


Requirements

There are only 2 requirements/restrictions here.

  • Computing Power

    Choose your servers carefully. Running a single store on an installation often chokes most shared hosts and brings it down to its knees. Imagine running multiple store on one. If you decide to run everything off a single installation, please make sure your server will be able to handle it. If the total number of products is small, say less than 100, it shouldn’t be a concern but once you get past 500 or so, it will really begin to show.

  • Version of Magento You’re Running

    This method will require the 1.4.x.x branch or higher. Sure, you can get the functionality to work with previous versions but it is a convoluted, error prone, lengthy affair where you had to modify the core thus introducing even more work when you’ll need to upgrade in the future. Each new version is faster and brings more features to the table which means I’ll be focussing exclusively on the newer branch. If you’re still running an old branch, back everything up and upgrade. Please.


Step 1: Initial Preparations

First up, if you’re on your local server, you probably entered nothing for the URL during the installation and thus Magento has the default value stored. We’ll need to change to point it to a concrete location. We’ll do it quickly right now.

Go to System -> Configuration and under the Web category, change the base URL value to reflect your local set up. I have mine working under a predictably named Magento directory thus my URL. Please remember to add the trailing slash; otherwise, Magento will spaz out.

With that out of the way, we can get to the next step: creating a root category for the new store. You may ask why. My reasoning is that with the additional stores, the number of prospective categories will increase as well. With organizational structure in mind, it makes sense to keep each store’s categories in a separate root category. We’ll be creating one now.

Just give a name to the new category and make sure it’s set to active.

Finally, set the is anchor value to yes as well. This is important.

Step 2: Setting up the New Site

First, we’ll set up the new site in Magento’s back end.

In the resulting screen, key in a name for the site as well as a code for it. Neither is really important, other than that both need to be unique.


Step 3: Setting up the New Store

Now we’ll move on creating a new store.

This should be self-explanatory. We set the website and category to the ones we created a few steps back. The name of the store is just for human readability, so feel free to name it as you like. I know having the same name for the store and category is a little confusing here. Feel free to name it as you like in your installations. There’s no concrete naming scheme here for you to follow.


Step 4: Setting up the New Store View

Again, these steps should be fairly self-explanatory. We select the appropriate website and store for the view along with keying in a name and code for it. Additionally, remember to set its state to enabled. It may seem obvious, but we tend to forget it, so I thought a quick “heads up” was in order.

With these, most of the back end work in Magento comes to an end. We’ll need to revisit this later so for now we’ll focus on preparing the new domain.


Step 5: Prepping the New Domain

Ok, to be honest, this is the easiest step there is. Just FTP into the server with the working Magento installation and copy the index.php file as well as the htaccess file over to the new domain.

Open up index.php and look for the following code at around line 45,

$mageFilename = '$mageFilename = 'app/Mage.php';';

Change it to the following.

$mageFilename = '../magento/app/Mage.php';

Remember to point it to the Mage.php file of the working installation. Both my sites run under sub folders in my server so I just ask it to go a directory up, go into the magento folder, into the app folder and then access the required file. Depending on your server set up, this may vary, for example, your main installation may be in your account root while the other site may be under a parked domain. In that case, the following code will do.

$mageFilename = '../app/Mage.php';

As I said, just make sure you point Magento to the right location


Step 6: Making it all Work – the HTACCESS file

Now open up the copied htaccess file and append the following to it.

SetEnvIf Host .*base.* MAGE_RUN_CODE="base";
SetEnvIf Host .*magento_site_2.* MAGE_RUN_TYPE="magento_site_2";

Simple as that! Note that we’ve used the website code we keyed in earlier. If you don’t remember it, just go back in and copy it over. This is very important so make sure typos are avoided.


Step 7: Final Steps

We’re pretty much done now. Just the final few steps before we get everything working.

Go to System->Configuration and choose the web tab.

As shown in the picture above, please change the redirect to base URL to “no.”

If you’ve noticed that the select element on the left has extra options now, you get a cookie! Now that we have different stores, we can now change their settings and store policies on a per store basis.

Access our second store’s view and choose the web tab.

Uncheck the use website checkbox and change the base URL to the URL of your second domain. For this article, I did everything on my local server so I have a sub-folder imaginatively named magento-2 as a container for my second store front.

Click on save. And that’s about it. Go to your second domain and start browsing through your catalog!


What We’ll be Doing in the Next Part

All that’s left now is creating a custom module; then, and I think by then this series will have runs its course. I’m thinking of finishing off with a Magento tweaks and optimization how-to, if enough people show interest for such an article.

If you do feel that something else needs to be covered before this series comes to a close, don’t hesitate to leave a comment below to let me know!


The Last Word

And we are done! Today, we learnt what Magento’s multi store functionality is and how to set it up as quickly as possible. Hopefully this has been useful to you and you found it interesting. Since this is a rather new topic for a lot of readers I’ll be closely watching the comments section so chime in there if you’re having any doubts.

Questions? Nice things to say? Criticisms? Hit the comments section and leave me a comment. Happy coding!

Sexy Real-Time Analytics with Reinvigorate


To best serve your website’s audience, you need to understand them as best you can. The best way to do that? Analytics. There’s a few ways to track your website’s traffic, though Google Analytics is probably the most popular due to its price — free.

However, Google Analytics has several important features missing that other analytics providers offer; namely real-time stats and heatmaps. Reinvigorate is one of those providers, which we’ll take a look at today.


Read the Full Review on our Sister Site: Web.AppStorm

Reinvigorate

A web app review is a bit beyond the scope of what we cover on Nettuts+, however, it fits perfectly on the awesome Web AppStorm. Read the full review there, if this interests you!

Video demo of ABC’s My Generation synchronized app

As Dave reported earlier, ABC and Nielsen have teamed up to develop an iPad app that supports the new series My Generation. Users run the app while watching the show — either live or recorded — and it will stay synced with the section of the episode you’re watching by “listening” to the audio from your television, using the built-in microphone.

From there the app will present you with polls and quizzes related to what you’re watching, along with other interactive elements. You can get a sense of how this new form of interactivity will play out by watching the video above. [Yes, it’s Flash; sorry, but ABC’s hosting it and that’s the only way to get at it. -Ed.]

While you’re watching TV, the iPad is actually watching you, in a manner of speaking; the app serves as a tool for Nielsen to understand viewing habits, as they will use digital watermarking to track user behavior. With such a small percentage of viewers likely to be using the app during the show, it’s hard to tell just what kind of data they’ll get. But it is an interesting experiment.

My Generation doesn’t premiere until September 23. I tried it out on the screener (preview copies available to media and reviewers) of the pilot, and it wasn’t able to sync, so hopefully that just means the app’s just not ready to go live yet; either that, or the Nielsen audio encoding wasn’t embedded on the screener but has been added to the broadcast version.

TUAWVideo demo of ABC’s My Generation synchronized app originally appeared on The Unofficial Apple Weblog (TUAW) on Thu, 16 Sep 2010 20:30:00 EST. Please see our terms for use of feeds.

Read | Permalink | Email this | Comments

Android is taking the smartphone market, but don’t panic just yet

To read all the latest internet posts, the iPhone is all but dead, succumbing to the onslaught of Android phones being bought by customers in massive numbers. ComScore, who watches mobile use very carefully, pretty much says Android is rapidly eating away at the iPhone market share.

It’s enough to make an Apple stockholder or fan weep, or at least get a bit nervous. The problem is, it’s all a bit over-hyped. In a Fortune column today, the numbers get a bit of welcome perspective. While Android phones are doing very well, with market share up 5% in the three month period ending July 31 from the previous three months. Meanwhile Apple is down 1.3%, but the numbers don’t tell the whole story.

First, the iPhone sold out on the U.S. launch day on June 24, and has been in short supply ever since. Of course that means that the iPhone wasn’t even on sale for all of May and most of June. Further, since everyone and their cousin Clem knew a that a fresh iPhone model was coming out, it also likely suppressed sales.

Will Android eventually be the number one smartphone? Good chance. Suppliers and carriers get the OS for free, it’s a good phone with a vibrant app store and an increasing loyal user base. It’s not such good news for RIM and Microsoft, but who knows what the future might bring. It’s just that the shovels are getting deployed just a bit early to bury the iPhone, and Apple continues to be innovative and responsive to the competition, which is good for all smartphone users.

TUAWAndroid is taking the smartphone market, but don’t panic just yet originally appeared on The Unofficial Apple Weblog (TUAW) on Thu, 16 Sep 2010 17:00:00 EST. Please see our terms for use of feeds.

Read | Permalink | Email this | Comments

TUAW App Shootout: Comparing Quickoffice and Documents To Go

Although the iPad was never designed to be a laptop replacement, iWork for iPad was featured as one of the platform’s star programs. If you’re happy with the simplistic iWork format — and want to pay $9.99 each for Pages, Keynote and Numbers — then stick with it. However, for a few dollars more than the cost of just one iWork for iPad app, you can purchase either Documents To Go or Quickoffice and get all of the apps rolled into one.

TUAWTUAW App Shootout: Comparing Quickoffice and Documents To Go originally appeared on The Unofficial Apple Weblog (TUAW) on Thu, 16 Sep 2010 18:00:00 EST. Please see our terms for use of feeds.

Permalink | Email this | Comments

Dear Aunt TUAW: Burn baby burn

Dear Aunt TUAW,

Is iTunes slowly encouraging the death of CDs? The burn icon at the bottom of the interface has disappeared as you can see in this screen shot.

Concerned,

Your nephew Sean

TUAWDear Aunt TUAW: Burn baby burn originally appeared on The Unofficial Apple Weblog (TUAW) on Thu, 16 Sep 2010 15:00:00 EST. Please see our terms for use of feeds.

Read | Permalink | Email this | Comments

Found Footage: Windows 95, 3.1 running on jailbroken iPad

If you can get past the sight of Windows 3.11 (gack…) and Windows 95 (hurl!) running on an iPad, then hit the play button in the YouTube embed above and be prepared to be visually and audibly assaulted (by no less than Metallica).

YouTube user MSComputerVideos provides a complete tutorial on how to make your iPad look like a relic from the 1990s by using a jailbroken iPad and the open-source Bochs emulator (frequently used for such efforts).

A rip of the ‘Kill ‘Em All’ t-shirt to tipster MS.

TUAWFound Footage: Windows 95, 3.1 running on jailbroken iPad originally appeared on The Unofficial Apple Weblog (TUAW) on Thu, 16 Sep 2010 15:30:00 EST. Please see our terms for use of feeds.

Read | Permalink | Email this | Comments

Alarms helps out with ‘productive procrastination’

I started playing with a new app called Alarms yesterday, and it’s already become indispensable to me. It’s rare that something fits so perfectly into my workflow that I don’t think twice about the space it takes up in my (already frighteningly crowded) menubar. What is it, you ask? It’s an unobtrusive means of scheduling tasks on a timeline, seeing your upcoming tasks and taking care of things one at a time.

Alarms isn’t a replacement for a full-fledged task management system, but it’s perfect for remembering to reply to emails that you aren’t ready to tackle at the moment, honey-do items, turning the fish filter back on 10 minutes after feeding … anything that just needs a gentle reminder at a specific time. Read on for more details.

TUAWAlarms helps out with ‘productive procrastination’ originally appeared on The Unofficial Apple Weblog (TUAW) on Thu, 16 Sep 2010 16:00:00 EST. Please see our terms for use of feeds.

Read | Permalink | Email this | Comments

Release of Apple’s 27" LED Cinema Display appears to be imminent

If you’re holding out for Apple’s new 27″ LED Cinema Display, the wait might not be all that much longer. Back in July, the 27″ model was announced with a September release date. Being that it’s mid September, folks have been getting a little anxious with no sign of the new model, until now.

9to5Mac
is reporting that a few days ago, on the customization page for Mac Pro orders placed on Apple’s online store, the 27″ display was being advertised for purchase on an updated description, although the 24″ and 30″ models were only available for selection. As it stands now, that description has been removed, but with reports of 24″ and 30″ Cinema Display stock beginning to dwindle, it’s clear that some preparation for the release of the 27″ display is underway.

Apple’s official display page still lists the 27″ Cinema Display as “Coming September.” For all you 27″ Cinema Display loving people, you’ll have to hold on and place some faith in Apple’s word.

[Via MacRumors]

TUAWRelease of Apple’s 27″ LED Cinema Display appears to be imminent originally appeared on The Unofficial Apple Weblog (TUAW) on Thu, 16 Sep 2010 13:00:00 EST. Please see our terms for use of feeds.

Read | Permalink | Email this | Comments