After a recent unfortunate computer accident — word to the wise: never allow liquids near your laptop — I have been forced to go on a budget to recoup the costs of paying for repairs.
In the past, I have mostly lived paycheck-to-paycheck and spent most of the money I made, but now I have decided that it is time to get serious about saving money and paying off my recent debt.
In my search for the best way to document my purchases and keep a strict watch on my spending, I have discovered an iPhone app that has been tremendously helpful for managing my budget: MoneyBook ($2.99 in the App Store as of this writing).
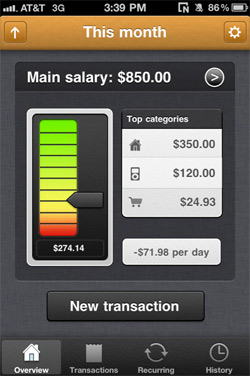
MoneyBook for iPhone
The MoneyBook iPhone app lets you input transactions (both income and expenses) and categorize them so that you can keep track of what kinds of things you are spending your money on.
The app’s main page (pictured above) displays your salary (in my case, my budget for the month), your remaining funds, and a list of your top three expense categories.
Inputting New Transaction History
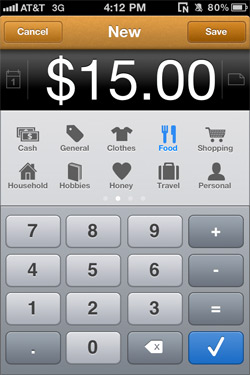
To input a transaction, simply touch “New Transaction” and enter the amount of your purchase. You may also select a category and write a note about your purchase. MoneyBook has a number of default categories, which you can modify in the settings.
Viewing Your Transactions
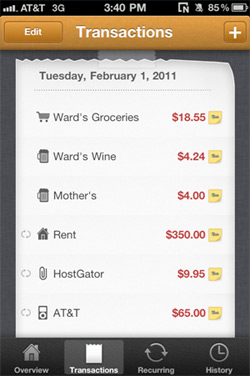
Moneybook lets you view your transaction history in several ways. You can view the current month’s transactions in the Transactions section, where your latest purchases are displayed by date, including the categories, notes and monetary amounts. These transaction items can also be edited.
The History section of the MoneyBook app displays your transactions in the same way, except that you can view your transaction history from past months.
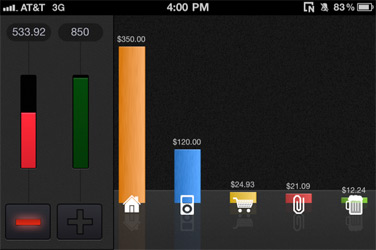
The third and most interesting way to view your transactions is in the bar graph, which you can pull up by reorienting your iPhone on its side (landscape) when in the Transactions section. The bar graph shows you how much money you have spent per category in the current month. This is useful for narrowing down what types of things you spend the most money on.
You might find, for example, that you have been spending more money eating out than on groceries, and then you can adjust your budget accordingly.
Recurring Transactions
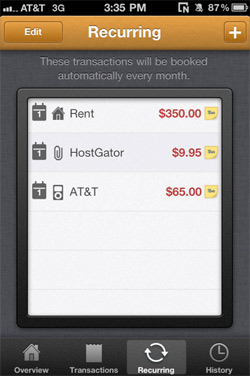
Another great feature of the MoneyBook iPhone app is the ability to set recurring transactions, for example rent, cell phone bill and other regular monthly transactions.
Conclusion
I have tried other budgeting apps in the past, but they were either too simple or too complicated to use. MoneyBook, on the other hand, includes the right set of helpful features (modifiable categories, good summaries of my transaction history, recurring transactions, etc.) in an easy-to-use interface that has served me well in my recent attempt to better manage my finances.
Going forward, I plan to make my financial security a top priority, and the $3 MoneyBook app will be an essential tool for helping me attain that goal.
Have you used MoneyBook? What iPhone app do you use to help you stay on budget?
MoneyBook: Awesome Budgeting App for iPhone is a post from Apple iPhone Review.
You Might Also Like…
- iFitness iPhone App: An Exercise Log for Your iPhone [Review]
- iGorilla App is Good Model for Donation-Based Non-Profits [App Review]
- 3 Ways the Nook iPhone App Will Beat the Kindle iPhone App