Interview with Sant Valentin


Today our guest is a true expert and person who will be interesting to talk to – Ukrainian designer Sant Valentin. “I believe that line should be alive, it does not have to have clearly defined directions, the more smooth and hasty lines, the more there is life in illustration style. I did not make up the name for my style, but to me it vaguely resembles watercolor,” says Valentin about vector graphics, and his style.

Continue reading “Interview with Sant Valentin”

Open Mic: Which Music Keyboard Do You Use Most Often?

Each week we open our mic to readers and lurkers alike to come out of the woodwork and tell us your thoughts and opinion, your experiences and mistakes, what you love and what you hate. We want to hear from you, and here’s your chance.

Which music keyboard do you use most often? Why? Is it weighted, unweighted, or onscreen?


Read More

6 Stereo Miking Techniques You Can Use Today

Twice a month we revisit some of our reader favorite posts from throughout the history of Audiotuts+. This tutorial was first published in August 2008.

Stereo miking is a great way to increase the sense of depth in your recording of an instrument. Here are six stereo miking techniques you can try out today. We’ll start with the basics and then move to some more exciting options.

Before You Get Started

One thing to be careful of in stereo recording is phase cancellation. When using a spaced pair this can be a concern. Phase cancellation occurs when two versions of the same sound, which occur at slightly different times, are mixed together. The result is that when one signal is going into positive amplitude and the other is going into negative amplitude they will cancel each other out and when they are both going the same way they will boost each other.

When two signals are out of phase you will notice a warble in your sound or, if the two signals are 180 degrees out of phase, you will get silence. You will not notice this when the two signals are panned hard left and right. So, to avoid any surprises always check in mono.

The way to minimize your chance of running into phase problems is to use coincident pairs (where the two mics are very close together) or to use the 3:1 rule (place the mics 3 times as far from each other as they are from the sound source).

Phase Cancellation

Spaced Pair

Spaced pair miking is exactly what the name implies. Two cardioid microphones are placed apart from each other to produce two different recordings of the same instrument. I suggest trying two places on the instrument that produce different tonalities. For example, on a guitar you may want to have one mic on the bridge and one on the nut.

Spaced Pair

X-Y

The X-Y configuration takes two cardioid microphones and places them with heads together at 90 degree angles. The result is that the mic on the left will pickup the right side of the room and the mic on the right will pickup the left side of the room.

X-Y

Blumlein Pair

The Blumlein Pair is much like the X-Y technique with one variation. Two bi-directional mics are used at 90 degree angles. The result of this technique is that one mic will pickup the front left and back right of the room while the other picks up the front right and back left of the room. This technique is best if you have a nice sounding room to record in.

Blumlein Pair

ORTF

The ORTF technique is named after the French television and radio commission who invented it (Office de Radiodiffusion-Télévision Française). This is a binaural mic technique which means it is meant to approximate the response of your two ears. In the ORTF technique two cardioid mics are placed at an angle of 110 degrees with the heads 17cm (7”) apart. The beauty of this technique is that mic placement can be as simple as moving around the room until it sounds good and then placing the mics where your head was.

ORTF

Mid-side

In this technique a cardioid mic is placed facing the sound source and a bi-directional mic is placed perpendicular to the cardioid mic (so it is picking up the sides of the room). They are each recorded onto one track. The track with the bidirectional microphone is then copied and the phase is inverted on the copy. The two bi-directional tracks are then panned hard left and right while the cardioid mic is panned center. By adjusting the relative volume of the cardioid mic we can control how close or far away the recorded instrument sounds.

Note: This technique only works in stereo. If this is played back in mono the two bi-directional tracks will cancel each other out.

Mid-side

Decca Tree

The Decca Tree is used mainly for recording orchestras and large ensembles. It was developed in the 1950s by engineers at Decca Records. The Decca Tree uses a special T-shaped mic stand suspended above the conductor’s head. On the T-shaped stand are 3 cardioid microphones facing left, right and centre which are then panned to match their configuration.

There are no fixed measurements for the distance between the microphones but the standard seems to be around 5-7 feet. The mics are usually placed closer together for smaller orchestras and further apart for larger ones.

Decca Tree

Download the Play Pack for this tutorial (250KB)

Contents

  • Printable PDF tutorial


Read More

$0.99 Premium Memberships!

Want to join Tuts+ Premium for just $0.99!?

Tuts+ is providing a discount code so you can sign up to Premium at an atomic fraction of the cost.

There are an extremely limited number of these available, first in best dressed.

Instructions

Go ahead and Join Now. When you see the coupon field, add in the coupon code below and it will automatically calculate the price of the membership for you!

Conditions of Sale

  • 1. Discount memberships are non-refundable.
  • 2. These Memberships are recurring, though you are able to cancel at anytime.
  • 3. Discounts are not available to current members.
  • 4. Only the $9 monthly subscription is available for this price.
  • 5. After the first month the subscription will default to the standard $9/Month

Coupon Code: 073C5AA830

Why Join Premium?

By joining Premium you get access to all Member’s Only tutorials, and all of the source files for the free tutorials we regularly provide you. You’ll be taught by experts how to make the some of the most photorealistic, beautiful images you will have ever seen. Such as those by Ed Lopez and Mark Mayers.


If you’re not looking to fine tune your Photoshop skills, but you do want to stay up to date with the latest and greatest web technologies, then Nettuts+ is for you.

Learn from Alex Moore to take advantage of the new canvas tag alongside JavaScript to make an entirely browser based Drawing App.


If you’d rather create the illustration rather than build the app behind it, check out Vectortuts+ bevy of Illustrator focused content, such as this illustration by Tuts+ Veteran Iaroslav Lazunov.


Find out what you need to know in the studio from Industry Professions like Bobby Owsinski

“Push up the faders, balance the mix, add some EQ, adjust the pans, add some effects and you’re finished. Those are usually the only things that many of us think about when we’re mixing, but there are a number of additional items to keep in mind during mixing besides the mixing process itself. ”


Have you ever watched a movie and wondered how certain shots were created behind the scenes? With Aetuts+ you can learn how its done and start making these for yourself! Dave Scotland takes you through a recreation of a scene from iRobot.


Consider yourself to be more of a gamer? Maybe you have always wanted to create one but never got around to it? Carlos Yanez will show you how to develop a shooting game in AS3!


Perhaps you dont want to make a game, but you would create the models that are in one? Cgtuts+ offers extremely in-depth training on software such as Maya and 3Ds Max. Check out this Fifteen Hour Long tutorial on how to model the Bugatti Veyron in Maya.

But, maybe you more enjoy getting out into the fields with your camera. You can learn the best Photography skills from people who do it for a living over at Phototuts+. It’s not every day that professions share their secrets with you.


Read More

Mascot Design In Real Time Order – the SOSFactory Way


Hello, this is Sergio Ordóñez from SOSFactory and this time I’m going to talk about my workflow used to design mascots for websites. This process in this article was described in real time as I created the designs. Let’s look at this more closely.

This article was originally published on Psdtuts in September of 2008.


Introduction

This time I wrote this post as the job was being developed. This way you’re going to see how the order is developed, from the first sketches to the final result, I hope I won’t miss anything… What stress!

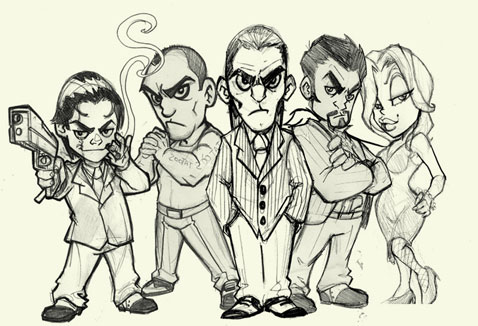
Also, notice this is not a Photoshop tutorial where I explain everything in depth (for that I already wrote a really detailed tutorial about mascot design in Photoshop). My goal here is to show the way I work. Below is the final design I did for Mafia Death.

Mafia Death character design

About the Client

I want to keep your attention, so to give it a mysterious touch, I’ll just drop some info:

  • Client: Mafia Death, an online game based on mafia stories.
  • Order: Design of five characters and design of logotype. The characters must work separately and jointly.

Descriptions:

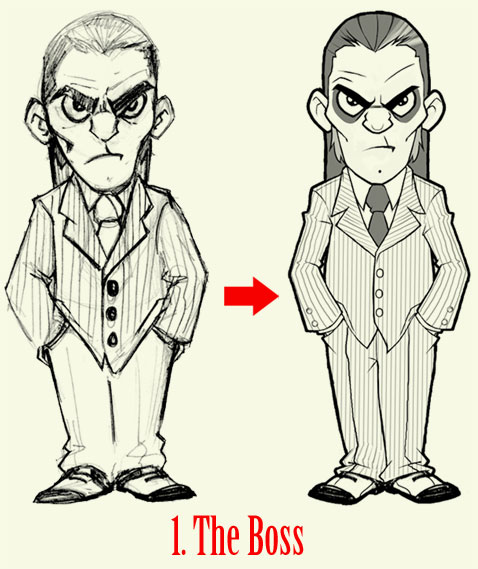
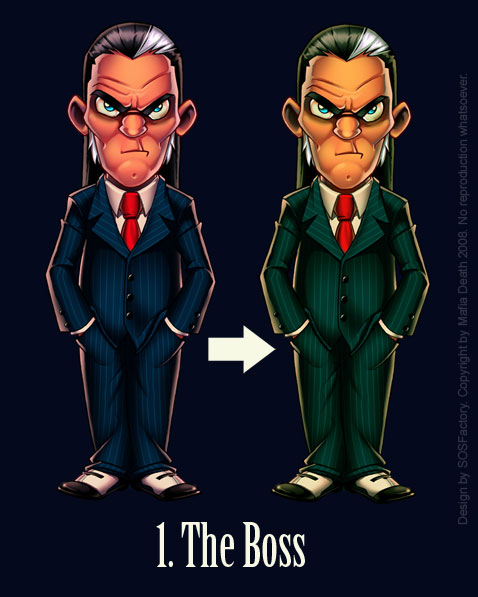
  1. The Boss: The family’s chief, he only has to raise his eyebrow and you are a dead man. He is not very talkative, not specially strong physically… His better weapon is his brain.
  2. The Bodyguard: He is the brawny of the team, the one who fixes the loose ends. His favorite sound? The crack of a breaking neck. If you notice him parking in front of your house, you have less than 10 minutes to make your last will.
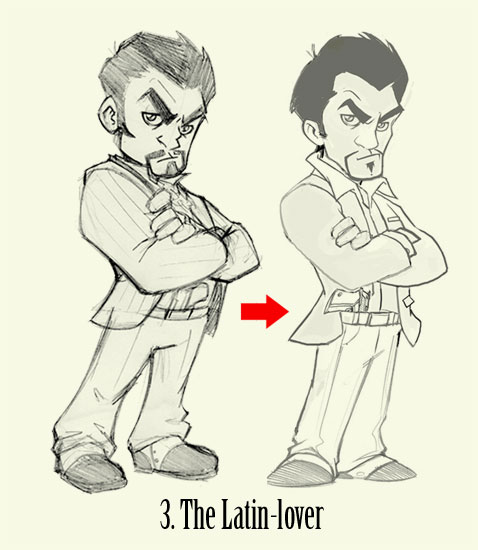
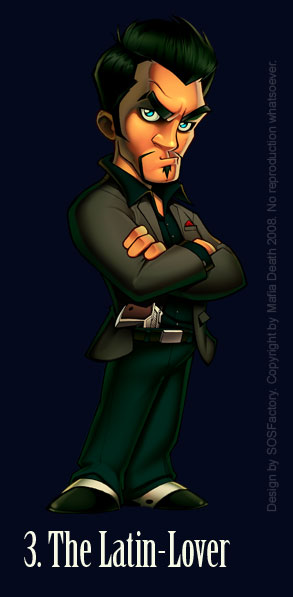
  3. The Latin-Lover: He is in charge to negotiate the important deals. A smart guy, attractive, athletic, with a fine taste for clothing and women, latin appearance and charm. He has a weakness for blondes and is quite independent. If you go out at night with him, tell your parents you won’t arrive home before noon.
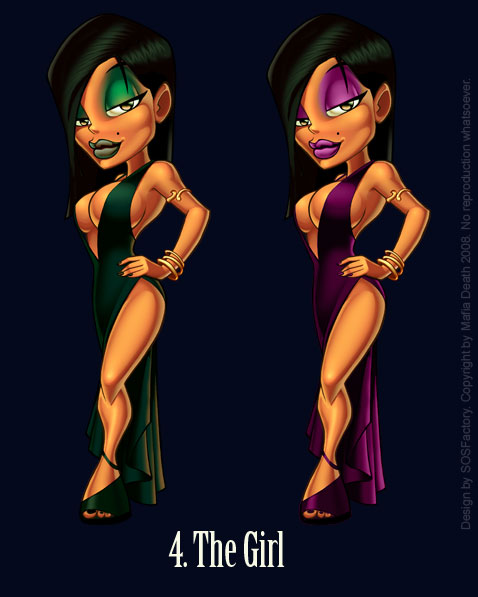
  4. The Girl: Only her sensuality matches her wickedness, she is cold and calculating. She is a precision weapon. She succeeds both between men and women. The last one who mentioned her affinity with Angelina Jolie is dead.
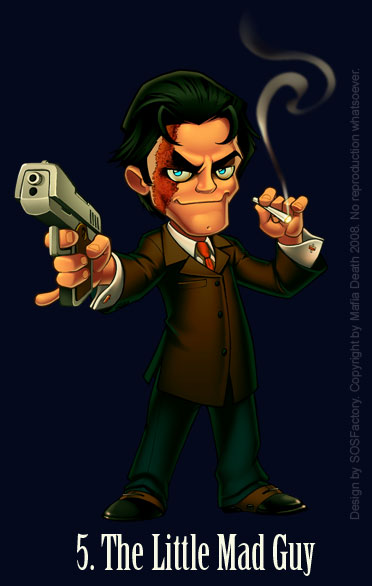
  5. The little mad guy: His slogan is: "Surviving is irrelevant, what really matters is how many ones you can annihilate". His mind is so insane that he is only useful in desperate missions. Joe Pesci fan. One more important thing: Don’t ask about his scar.

Summary

  1. Sketching the First Three Characters
  2. Sketches of the Rest of the Team
  3. Scene Composition
  4. Cleaning the Sketches
  5. Inking the Characters
  6. Coloring The Boss
  7. Coloring The Latin-Lover and The girl
  8. Coloring The Little Mad Guy and The Bodyguard
  9. Final Illustration
  10. Closing Words

Day 1: Sketching the First Three Characters

I love Mafia films, so I didn’t need to look for any references and we directly went for the sketches. Mi idea was to find a mid point between the elegance of “The Godfather” and the modernity and daily look of “The Sopranos”.

I asked my friend Miguel Ruiz to help me with the sketches, I sent him descriptions for each character and the image below is what he sent me back.

Bocetos

The first thing that hits you in the eye is the style, it is not the usual SOSFactory style. But don’t worry, because in the end everything will match. What really matters now is the character´s attitude, their pose, facial expression, the clothing… that each character transmits what it must transmit (have a look to the descriptions at the beginning of this post):

  1. The Boss: I think this one is great, it is exactly what we need. He has a relaxed pose but transmits a lot of strength by his look. His legs look a bit short to me and his waist is a bit wide, but it is an excellent starting point.
  2. The Bodyguard: I think this character is quite good too. I’d like to put all the characters on a horizontal line so I’ll have to modify a bit his right leg, which is a bit short. The hands pose doesn’t satisfy me, and I have to work a bit on the left arm musculature too. The face looks perfect to me.
  3. The Latin-Lover: This character is going to need quite a lot of work. I like the pose but it’s too lateral, there is very little space left for the chest, so it won’t look good. We don’t have place for the gun either, so we’ll put him in a ¾ pose, a little more frontal. I don’t like the feet pose at all, we’ll put them in a 90 degrees angle. The face has to be retouched too, I need him to be more attractive.

Summary of the day: I like the sketches, they have to be improved technically, but they transmit the proper attitudes, specially the first two ones. The third one has to be almost completely redone.

See you tomorrow!!!!!!!


Day 2: Sketches of the Rest of the Team

Mas bocetos
  1. The Girl: From this character I like the facial expression, but she looks too classical. I’d rather something more modern and sensual, I think we’ll have to make many changes.
  2. “The little Mad Guy”: I like his attitude, but technically it’s quite improvable. The hand of the gun is too short; the hand that holds the cigar is too close to the body, we’ll separate it to make the pose clearer; the waist is too wide, it has to be slimmed a bit. He looks too young, I need an older character.

Summary of the day: We already have 5 character´s sketched, the first 2 ones are good, for the rest I’ll make many changes. If I had time I would have made the sketches myself, but because of the circumstances (I’m really busy) the investment was worth the effort.

Tomorrow I’ll make the scene composition. Regards!!


Day 3: Scene Composition

Diseño de personaje

We already have all the team members, now we have to line them up looking for a good composition. I think the central character should be the Boss, the Bodyguard on his right (his right hand man), on his left the negotiator (completing the trio of important characters), by his side will be the girl (we add a bit of sexual tension) and the shortish guy on the opposite side to balance the composition.

Composición final

Summary of the day: We already have the scene composition, together they look very promising, much better than I expected. From now on I will retouch each character.

Let’s have fun!


Day 4: Cleaning the Sketches

In this step, I try to fix the stuff I commented on from Day 2, I use my Wacom Cintiq and Photoshop, from this point everything I do is digital. I use old sketches, references from other designs or photos, I draw once and again until everything is well defined. Under each drawing you can find the corrections we talked about in Day 2.

The boss

The Boss: I made his legs longer, I reduced the waist a bit, I added some details to his suit, I defined the volumes a bit and I retouched the face.

The Bodyguard

The Bodyguard: I mainly worked on the torso. Notice that I lowered his arms to make his face clearer. I retouched his left arm and I corrected a bit the tallness of his legs.

The Latin-lover

The Latin-Lover: This character is almost completely redone. I made a little more frontal pose and I lowered his arms to gain some space in the chest area. I drew his legs in a smarter pose, and I gave him a more attractive face.

The Girl

The Girl: From this character I only kept the facial expression. Luckily I had a sketch I hadn’t used before, and it fit quite well. Now she’s much more sensual and has a more modern look. I used Angelina Jolie as a reference.

The little mad guy

The Little Mad Guy: I also changed this character almost completely. The arm that holds the gun was too short so I separated it a bit from the body. I separated the gun with the cigar too, this way the silhouette is much clearer. I stylized the pose with a narrower waist and separating his legs (a much more active pose), I added a clearer scar and a more pronounced chin.

Summary of the day: The first two characters were easy to correct, from the third I re-drew them… Everything is going as I expected.

Let’s continue tomorrow :)


Day 5: Inking the Characters

We already have all the characters ready, now it’s time clean the lineart. I entrusted this to my buddy Carlos Gomez, he’s very clean at drawing. He draws everything with pencil and then I ink his lines and I retouch them until everything is perfect, you can see the progress below.

Click the image below to see a bigger "step by step" image.

Mafia Death evolucion personajes

I already explained a lot of things about digital drawing in other tutorials, so I wont repeat it again. As you can see in this video there is no secret tips, just practice.

Summary of the day: After a week of vacation in Berlin, I’m back to work. The drawings are ready for the coloring, this is gonna be really fun.

Regards!!!


Day 6: Coloring The Boss

As you surely know, the color is my speciality, it’s what I like best and the part I spend more time at. I usually color with a cartoon style, with very bright colors, but in this case I think that more moderated colors will fit better, funny but mysterious, with very contrasted dark tones.

I made a first version with cold colors, it looks OK, but I think that with warmer colors, and more “worn out” tones, it matches better with the theme. Don’t think I colored it all again from the beginning, I used the Photoshop correction tool (Command + B) and I added a bit of Cyan and Green. Easy, isn’t it?

Mafia Death: The Boss

I already did a tutorial about digital color, so I wont repeat everything again, instead you can see how I work in this video tutorial below.

Summary of the day: after many hours of testing, the color looks great, the challenge is now to compound the scene to make the 5 characters work as a whole.

Tomorrow, more!!


Day 7: Coloring the Latin-Lover and the Girl

Now that I have defined the color palette I can work faster. The characters still look good to me separately, but too laden when I put them together. That’s because I decided to soften a bit the colors, here goes the second character – ready!

The Latin-Lover

And here we have the girl. She looks great but we have a problem. The most eye-catching color range is the one on the right, but the more coherent with the rest of the characters is the one on the left. My choice would be to sacrifice the character for the sake of the illustration, but the client doesn’t agree… We’ll see what happens.

The Girl

Summary of the day: We have already finished the most difficult part, to choose the color ranges, so I’m going quite fast and I’m feeling comfortable. I expect that as I continue working the color will be improved.

Let’s continue tomorrow!!!


Day 8: Coloring the Little Mad Guy and the Bodyguard

Alright mates, I finally finished all the characters :)

The little mad guy

I’m specially proud of the last two ones, they are exactly as I imagined them at first. Unfortunately, I only achieved this from the third character (although the first ones are not bad at all). Notice that these characters look good separately, but because of the softer color and a less contrasted source of light, they are more harmonic and will look better when we compose the scene.

The Bodyguard

The worst part of this character was the musculature… Ufff!!! But it’s finally looking good. I also corrected the position of the hands.

Summary of the day: The last two characters were beautiful, quick and fun to make, I finally got it. After five characters with this color style, I think I can handle it, this will be very useful for me in the future.


Day 9: Final Illustration

At last, the great day, after many hours of work I can say the illustration is finished. I made some color corrections to unify each character. Click the image below to enlarge.

Mafia Death character design

Summary of the day: As I expected, I had to make some adjustments to join the characters. I’m quite happy with the result and the client too. So another good piece for the SOSFactory portfolio.


Closing Words

Well mates, I hope it was useful and fun to read, I did my best. If you like this stuff I’m sure Psdtuts+ will invest more to have me writing for you again, so push the comments hard. Of course, if you have any questions I will answer with pleasure!

Thanks to David from Mafia Death for giving me permission to share this info, please give him some love and sign up to play his game.

Sergio Ordóñez on the Web: SOSFactory is my portfolio, SOSNewbie is my blog, sergitosuanez is my username on Deviantart, and 00SOSNewbie00 is my username on YouTube.

Read More

$0.99 Premium Memberships!


Want to join Tuts+ Premium for just $0.99!?

Tuts+ is providing a discount code so you can sign up to Premium at a massive discount.

There are an extremely limited number of these available, first in best dressed.

Instructions

Go ahead and Join Now. When you see the coupon field, add in the coupon code below and it will automatically calculate the price of the membership for you!

Conditions of Sale

  • 1. Discount memberships are non-refundable.
  • 2. These Memberships are recurring, though you are able to cancel at anytime.
  • 3. Discounts are not available to current members.
  • 4. Only the $9 monthly subscription is available for this price.
  • 5. After the first month the subscription will default to the standard $9/Month

Coupon Code: 073C5AA830

Why Join Premium?

By joining Premium you get access to all Member’s Only tutorials, and all of the source files for the free tutorials we regularly provide you. You’ll be taught by experts how to make the some of the most photorealistic, beautiful images you will have ever seen. Such as those by Ed Lopez and Mark Mayers.


If you’re not looking to fine tune your Photoshop skills, but you do want to stay up to date with the latest and greatest web technologies, then Nettuts+ is for you.

Learn from Alex Moore to take advantage of the new canvas tag alongside JavaScript to make an entirely browser based Drawing App.


If you’d rather create the illustration rather than build the app behind it, check out Vectortuts+ bevy of Illustrator focused content, such as this illustration by Tuts+ Veteran Iaroslav Lazunov.


Find out what you need to know in the studio from Industry Professions like Bobby Owsinski

“Push up the faders, balance the mix, add some EQ, adjust the pans, add some effects and you’re finished. Those are usually the only things that many of us think about when we’re mixing, but there are a number of additional items to keep in mind during mixing besides the mixing process itself. ”


Have you ever watched a movie and wondered how certain shots were created behind the scenes? With Aetuts+ you can learn how its done and start making these for yourself! Dave Scotland takes you through a recreation of a scene from iRobot.


Consider yourself to be more of a gamer? Maybe you have always wanted to create one but never got around to it? Carlos Yanez will show you how to develop a shooting game in AS3!


Perhaps you dont want to make a game, but you would create the models that are in one? Cgtuts+ offers extremely in-depth training on software such as Maya and 3Ds Max. Check out this Fifteen Hour Long tutorial on how to model the Bugatti Veyron in Maya.

But, maybe you more enjoy getting out into the fields with your camera. You can learn the best Photography skills from people who do it for a living over at Phototuts+. It’s not every day that professions share their secrets with you.

Read More

Quick Look: FormLizard

Quick Look posts are paid submissions offering only a brief overview of an app. Vote in the polls below if you think this app is worth an in-depth AppStorm review!

In this Quick Look, we’re highlighting FormLizard. The developer describes FormLizard as an app that doesn’t just collect data, it produces completed documents from simple online interviews. Export forms in Word, Excel, or PDF. You can also e-submit to GoogleDocs, RightSignature and other integration partner accounts. Use FormLizard internally within an organization; open it up to selected persons, such as customers; or make your instance accessible to the public.

Read on for more information and screenshots!

Screenshots

FormLizard

FormLizard

FormLizard

FormLizard

About the App

Here are the top five features you can expect to see in the latest version:

  1. Complete forms, prepare contracts, update reports.
  2. Export in Word, Excel, PDF, E-Submit, Box.net, and more.
  3. Simple to get started; most users are up and going in 10 minutes or less.
  4. Very secure; each customer has their own 256 bit AES encrypted database housed in a world class datacenter.
  5. Use for internal forms, or make it open to the public.

Requirements: Current Internet Browser
Price: Free, $14.99+ per month
Developer: Blue Burro Software

Vote for a Review

Would you like to see us write a full review of this app? Have your say in our poll:

Quick Look posts are paid submissions offering only a brief overview of an app. Vote in the poll if you think this app is worth an in-depth AppStorm review! If you’re a developer and would like to have your app profiled, you can submit it here.

Create Facebook Pages in 3 Easy Steps With FaceItPages

A lot has been said already about the clout of Facebook. Businesses get better exposure and brand recognition at Facebook than at their corporate websites. Over time, Facebook has made it easy to create Facebook page for promoting your business. They have some excellent articles in their wiki to help you build a Facebook page for business.

There are tons of apps available, both free and paid, to enhance the functionality of the page and user engagement. Finding the apps that work and putting them all together to create a Facebook page that works, isn’t for everyone. FaceItPages is a web app that helps people with zero technical knowledge put together and publish a Facebook fan or business page.

FaceItPages

Overview

Overview

With FaceItPages‘ Facebook Page tools, you can easily create a great-looking, lead-generating, cost-effective Facebook Business Page, in just three easy steps. Sign up for the app is extremely quick and does not require email activation.

Pricing

Pricing

Pricing

FaceItPages has four different pricing plans starting from $8 per month. For the most part the plans differ from each other in the number of custom pages one can make and the number of tabs per page. For those looking to evaluate the app, there is a free plan.

Ease of Use

Straight after signing up, you’ll be taken to creating a Facebook business page. Placed prominently is a header indicating that this is to be the first of three step process as FaceItPages proclaims on the homepage.

Adding Content

Adding Content

In the first step all necessary information regarding the type of page you want are recorded. There is a stripped down WYSIWYG editor available for you to add your copy. The collection of modules available is quiet comprehensive and will sure make non-tech savvy users quite happy.

Modules

Modules

Modules

From a simple banner module to product listings, there’s almost everything one would need to create a comprehensive Facebook business page. Some interesting ones are the Twitter and WordPress blog feed modules which help you cross publish your tweets and blogs to your Facebook page.

Adding Images

Adding Images

To add content to the modules, you will have to click on them. You will not be prompted anywhere in this process to add respective content. So if you are using a free account and have the banner, photo gallery and main menu modules enabled by default, be sure to access them again to add content or make changes.

For those planning on setting up a Facebook fan page that offers exclusive content to registered fans, the Reveal Content module would be a welcome addition. Without the need for any coding knowledge, this module allows you to hide content from non-fans. So until a person likes your page, he or she wont have access to exclusive offers an deals. You can hide multiple tabs using this module.

Templates

After selecting the modules that you find fit for your Facebook page, fill out a few business and contact information details and off you to beautifying the page. As soon as you hit next, you will be taken to a screen that allows you to choose a style/theme.

Templates

Templates

When you make a Facebook fan page, the style should match your branding. Thanks to FaceItPages, you won’t have a lot of trouble finding the right theme. The selection of templates available is much higher than the number of modules available. A variety of designs, layouts and colors are available to choose from. Some template designs look more like a static page of a website and not that of a typical Facebook page. Choose a template that best matches your branding. You can change this later if you’d like.

Publishing the Page

After choosing the template that suits your taste, it’s now time to publish the page for all the world to see. A preview of the page is shown for you double the check the details. If need to make any changes, go back to step one, make the necessary changes and after your page is created, you simply click on an install button.

Installing a Facebook Page

Installing a Facebook Page

If there are key details missing, FaceItPages will notify you of the same. I forgot to name the tab, despite creating one and I was prompted to choose a name for it just before installing it on Facebook. Login to Facebook and approve FaceItPages access to your data. That’s all the work you will have to do to get your brand on Facebok.

Final Thoughts

Creating a Facebook page is such a chore. I’ve tried creating fan pages for my previous reviews and I can vouch that it is such a tedious task. A lot to grunt work has to be done before even getting a decent looking page up and running. You will have to search for the right apps, tips to create ads, make them invisible for fans, add and embed media, choose a theme and so on.

With FaceItPages, there’s no need to go through all these hassles. The app does the lion’s share of the work and all you have to do is point and click. The subscription charges are pretty reasonable too. Themes could have been designed a bit better though. While there are so many of them to choose from, some of them are downright unusable. FaceItPages is the right tool for those looking to go live on Facebook within minutes .

Share Your Thoughts!

In your opinion, how cumbersome it is to create a Facebook page? Are services like FaceItPages a better alternative?

Away on business

Hi all Quick note to let readers know that I am away this week in San Francisco. I’m starting at the new company I have joined www.vindicia.com which I’m really looking forward too. As I’m away and going to be busy I may not be able to respond to support emails as quickly as usual. […]

Five iPhone 5 Features That I’d Like to See

iPhone 5 Features

In my iPhone 4 review, I claimed that the iPhone had finally come of age. While I once touted an expansive list of things wrong with the iPhone, now that Apple’s device has matured, I am satisfied with it overall, despite my decision to jailbreak and add certain features here and there.

Nevertheless, there are still some features left to be desired. So here is a list of the top five features that I would like to see in iPhone 5:

iPhone 5 Features I Want

  1. iTunes Streaming. I would like to be able to listen to music without having to use up many of my precious gigabytes for iPod media storage. That’s why I love my Grooveshark app (which was unfortunately removed from the App Store 5 days after it was approved). There have been rumors that Apple will introduce a cloud-based iTunes music streaming service, but nothing has become of those rumors yet. Hopefully iPhone 5 will bring this much-awaited music streaming feature.
  2. Touch-Sensitive Bezel. About a year ago, it was discovered that Apple filed a patent for a touch-sensitive bezel. Possibilities include a bezel that senses when you remove the iPhone from your pocket and automatically unlocks, or a bezel that lets you increase or decrease the display brightness with a swipe.
  3. FaceTime on 3G. FaceTime is virtually useless to me if I can’t use it on the go. I hope to see Apple enable FaceTime video chatting over 3G, instead of keeping it limited to Wi-Fi.
  4. Thinner Hardware. Who wouldn’t want a thinner iPhone? It would look cool and be easier to handle.
  5. Dual Core Processor. As fast as the iPhone is already, a dual-core processor like the A5 chip in the iPad 2 could make the iPhone twice as fast.

Do you agree with my most-wanted features for iPhone 5? What would you add to the list of desirable iPhone 5 features?

Five iPhone 5 Features That I’d Like to See is a post from Apple iPhone Review.