Quick Tip: How to Enable the Mod Wheel in FL Studio

This tutorial will tackle one of the most frequently asked questions about FL Studio and show you how to enable the Mod Wheel for all virtual instruments, once and for all.


Step 1

Load a new, blank project in FL Studio.


Step 2

Load any third-party (not made by Image-Line) virtual instrument.


Step 3

In the Browser (F8), Open the folder Current Project > Generators > Fruity Wrapper (ThirdPartyVST). This will reveal a list of all automatable parameters in the instrument.


Step 4

Scroll way, way down until you see MIDI CC #1 (Modulation Wheel), right-click on it and select Link to Controller.


Step 5

The Remote control settings window should appear. Be sure to enable Omni so that the control will be automatically enabled for whatever particular instrument you happen to have selected in the future.

When you play notes on your keyboard, it doesnít send notes to all of the instruments at once, just to the one instrument you happen to have selected at the time, this is “Omni” behavior. The Pitch Bend wheel has “Omni” behavior.

We definitely want to the Mod Wheel to act like this! Enable Autodetect and move the physical Mod Wheel on your MIDI controller. The window will disappear and your Mod Wheel will be connected.


Step 6

Delete the third-party virtual instrument and save this project as a template (see how in the second step of this article (link here).

Close and reopen FL Studio, and then navigate to File > New From Template and select your template. FL Studio always loads with the template you last selected, so from now on the Mod Wheel will be enabled. Enjoy! Note that some Virtual Instruments automatically use the ModWheel for Vibrato, but some have it as a linkable control, and other plugins might not really use it all.


Why You Might Ignore This Tutorial

There is at least one really good reason to leave the Mod Wheel unassigned, and that is if you want to use the Mod Wheel as a re-assignable controller. This may be what you want to do if your MIDI controller doesnít have any knobs, because then you can use your Mod Wheel as a knob.

Even the most basic MIDI keyboard controllers will have a mod wheel, so by leaving the mod wheel to its default behavior, you can link, perform and record knob tweaks without shelling out a lot of cash for a feature-rich MIDI controller. Most studio musicians probably only need one or two knobs per recording take anyway.


Read More

Create a Surreal Out of Bounds Photo Manipulation in Photoshop

Advertise here

In this tutorial we will combine several images of water, animals, and people to create a surreal out of bounds photo manipulation in Photoshop. Let’s get started!


Tutorial Assets

The following assets were used during the production of this tutorial.


Step 1

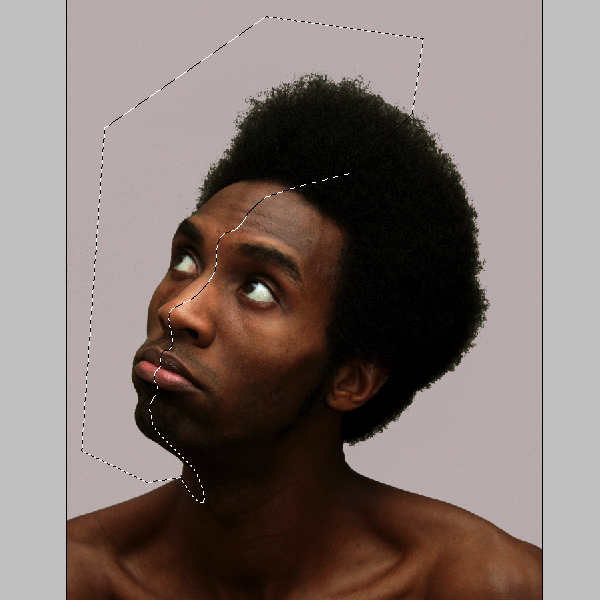
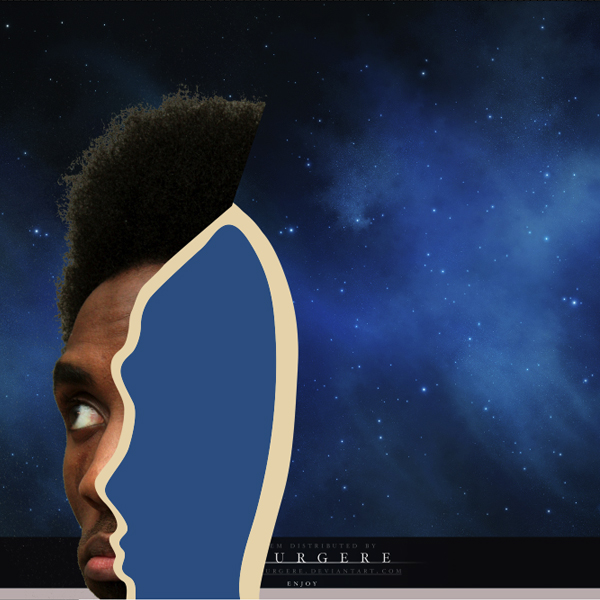
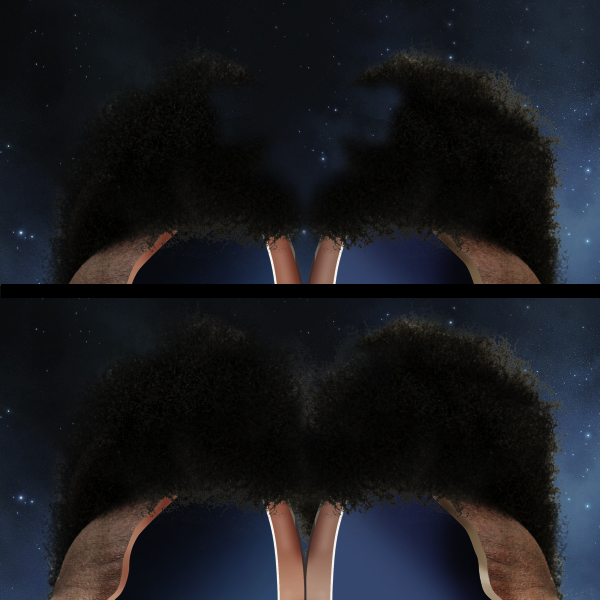
The first Step is to open the picture with the human head. Select the pen tool and cut out the left part as I did in the picture below. This is going to be the right part also, because we are going to flip it in the next steps.

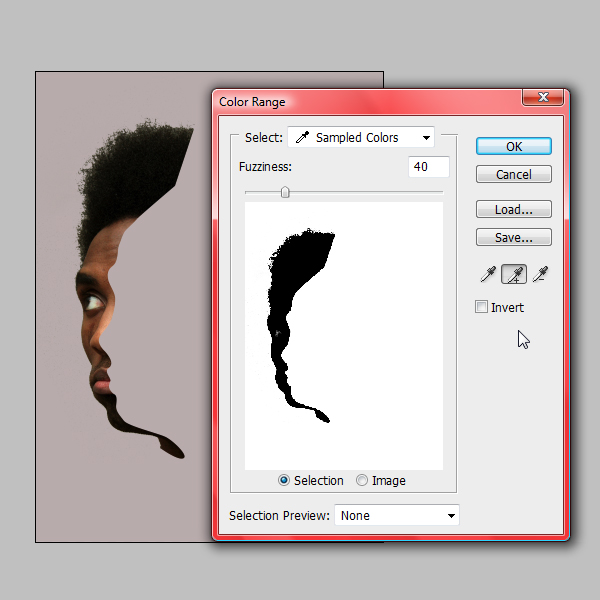
Next I have extracted the head from the initial background, for this go to Select-Color range.
The extraction will be very easy because of the contrasts of the picture. Use the eye picker to select the head and extract it. This is a good method to extract hair since the pen tool is not so precise.


Step 2

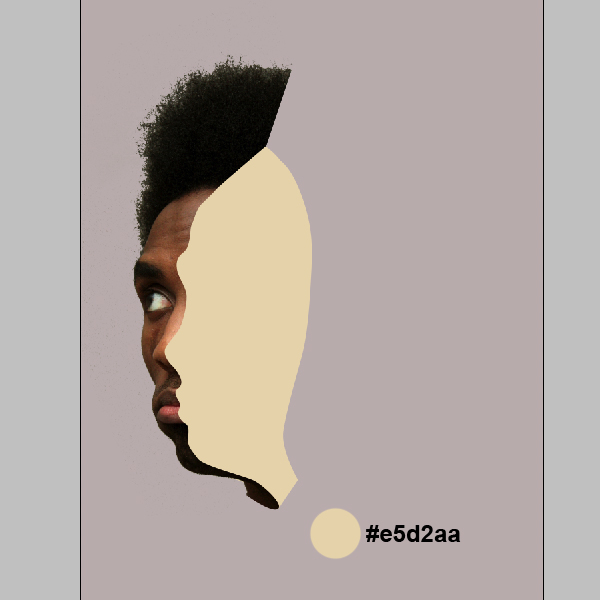
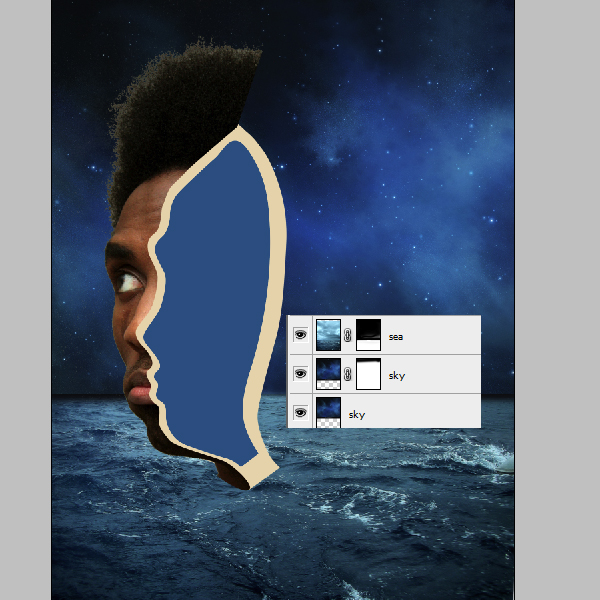
Now that we have the head lets create the missing part. We are going to work on the left part only and then flip it to create the right part of the head. Create a new layer under the head’s layer. Using the pen tool make a shape as I did in the picture. Use the color code shown below.

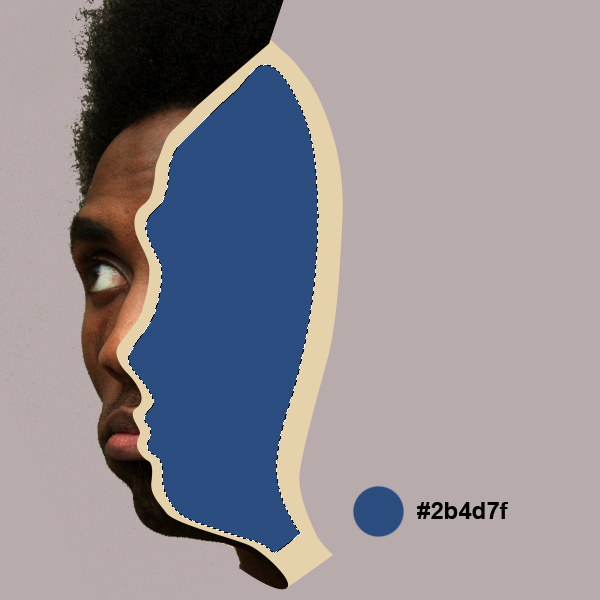
Using the pen tool, create a new shape smaller then the last one and fill it with blue.


Step 3

We are going to leave the head pending for a few layers and open the sky picture.

Since the sky picture is a bit too small I’ve duplicated the layer and filled the missing parts. Use the clone stamp tool for this. Open the sea picture and, on the layer’s mask, erase the top part to blend it with the sky.


Step 4

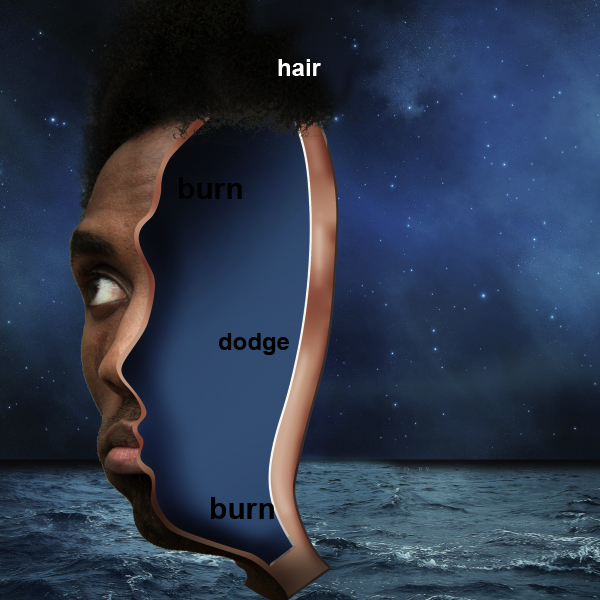
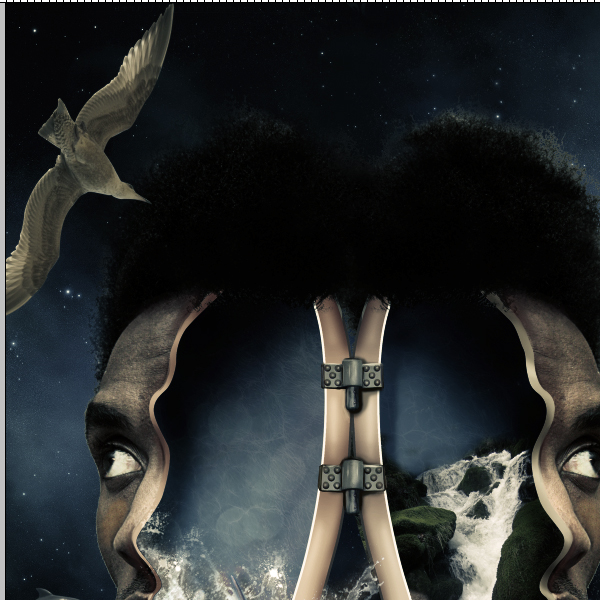
Now that we have the background let’s go back to the head. In this Step we will add some shadows and lights to the head using the burn and dodge tools. Use the picture below as a reference. Also add some hair, with the clone stamp tool, as you see below.

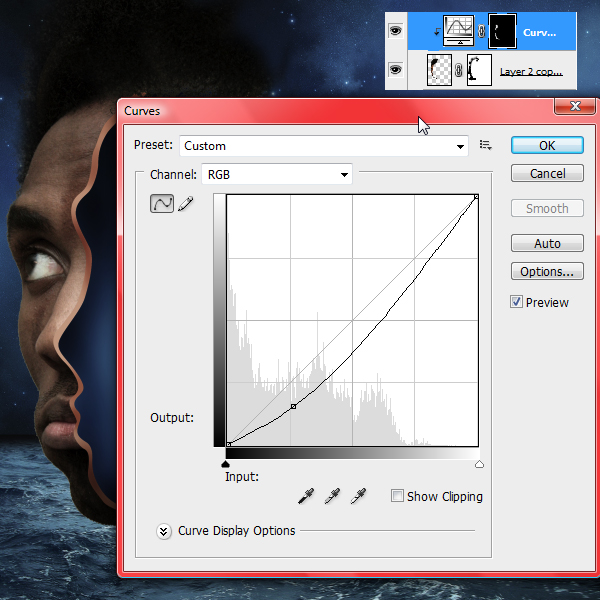
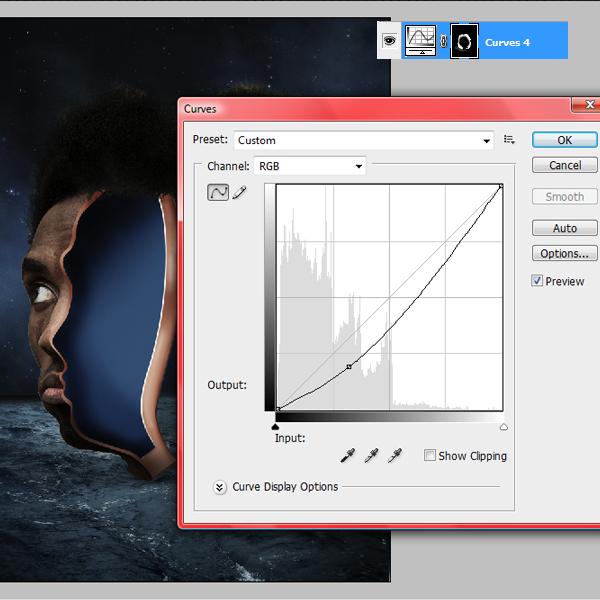
Use some curves on a clipping mask attached to the head’s layer.

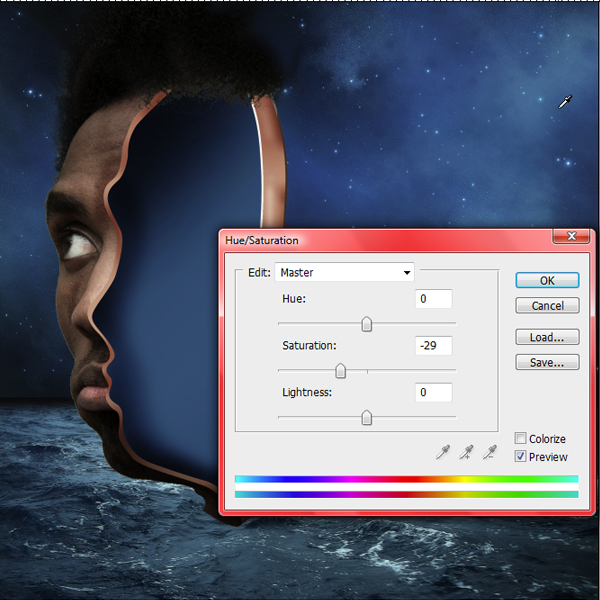
Let’s desaturate the picture. Choose Hue/Saturation and use the settings shown below.

Duplicate the layer with the head. Go to Filters > Other > High Pass. Set it to 2 – 3px and put the layer’s blending mode to overlay.


Step 5

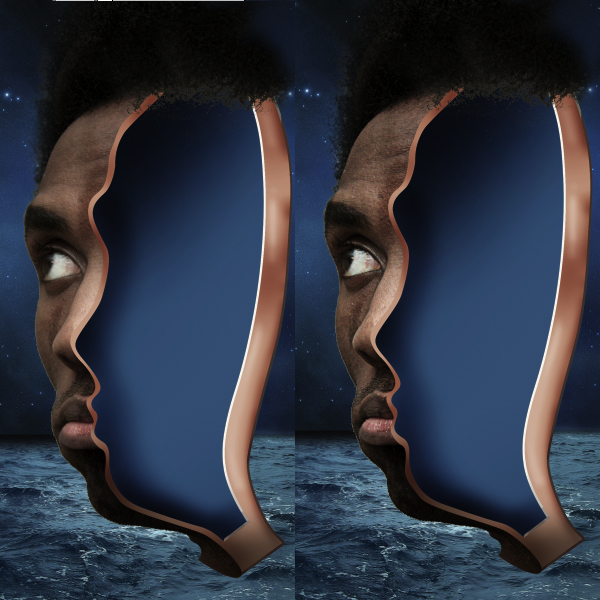
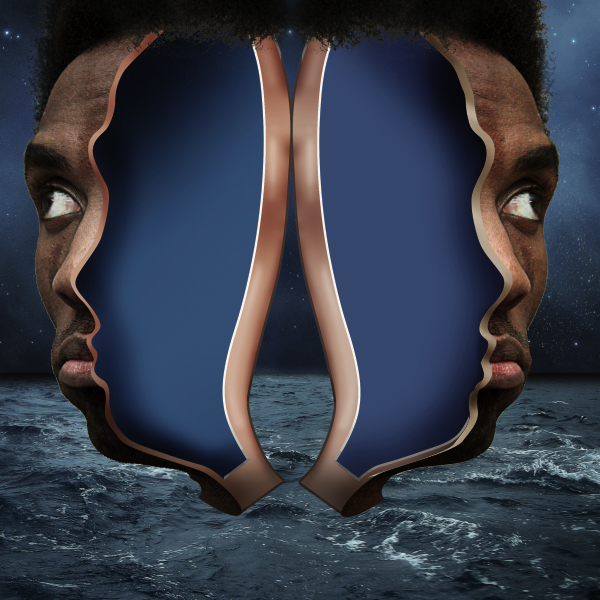
Now that the right part is done create a new folder and place all the head’s layers in. Name it “left”. Duplicate the folder and name it “right”. Flip it horizontally. Now we have the other part of the head.
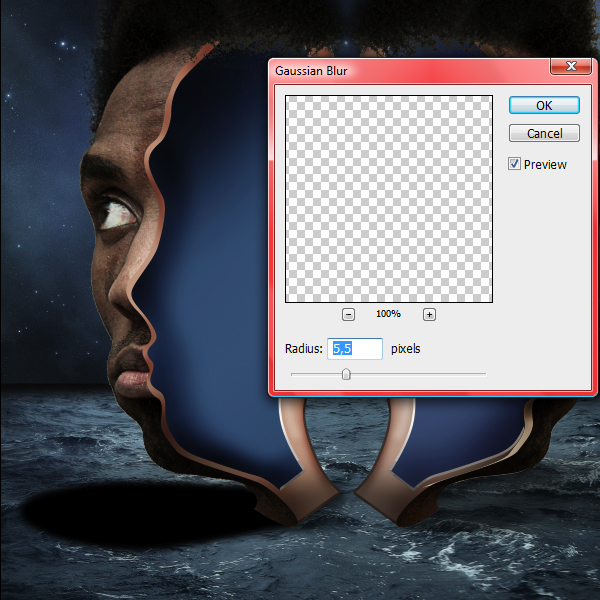

Step 6

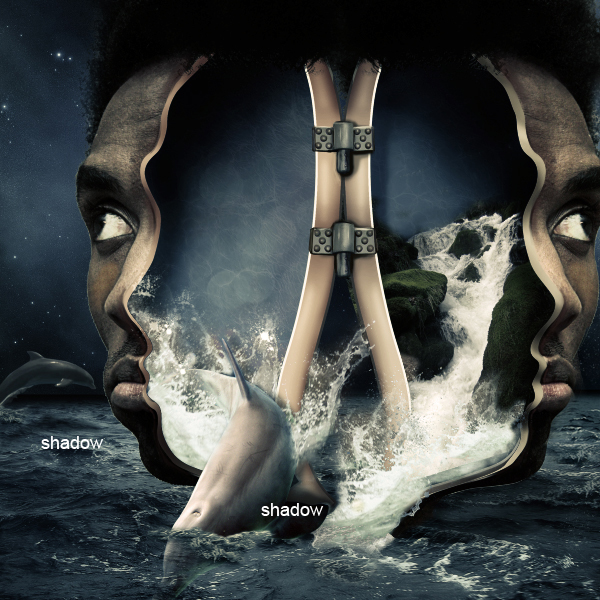
Create a new layer. With the pen tool create a shape as you see below. Fill it with black. Go to Filter > Blur > Gaussian Blur (5.5 pix). Set the layer’s opacity to 10-12%. This is going to be the shadow cast by the head on the water.

Duplicate the layer (Command/Ctrl+J) and flip it horizontally. Use it on the right part of the head also.


Step 7

Select the clone stamp tool and place some hair. You have to cover the whole area of the head with hair.


Step 8

Use some curves to darken the face so it will blend in with the night atmosphere.


Step 9

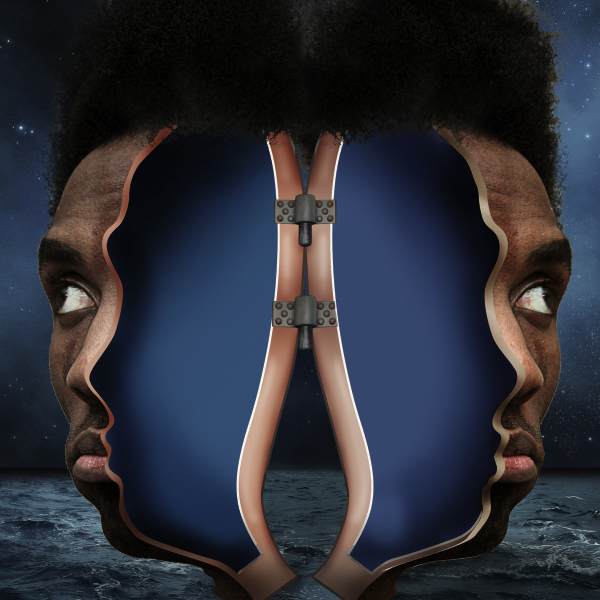
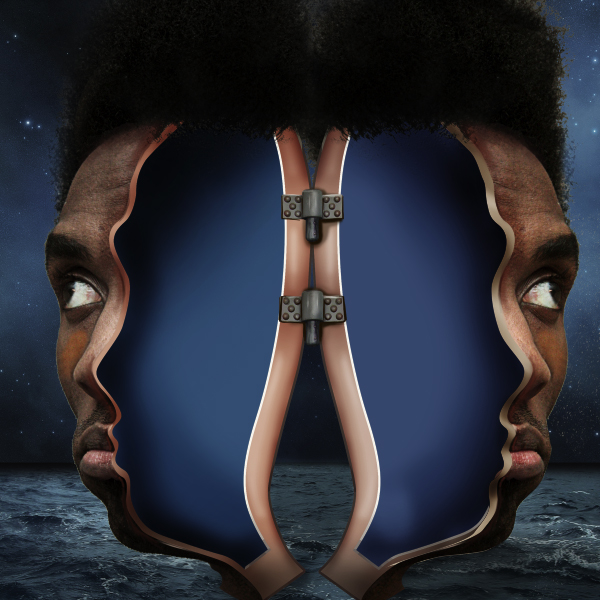
Open the hinge photo and cut it out. Place it like in the photo below. We need 2 hinges, so duplicate the layer.

Select the brush tool and add some lights with white and some shadows with a dark grey.


Step 10

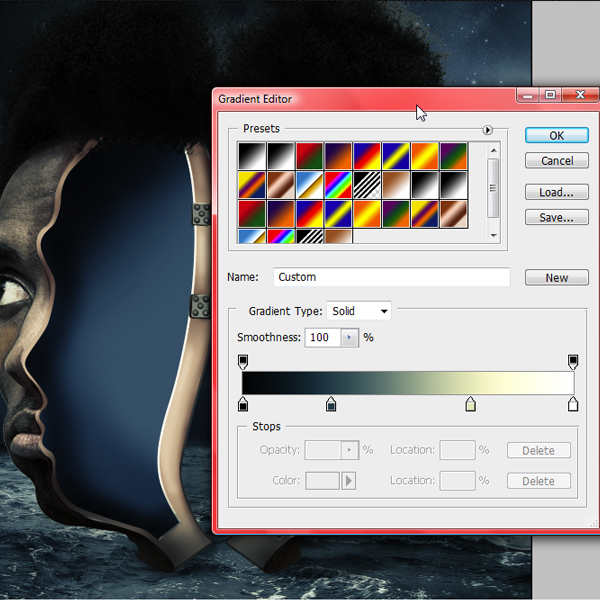
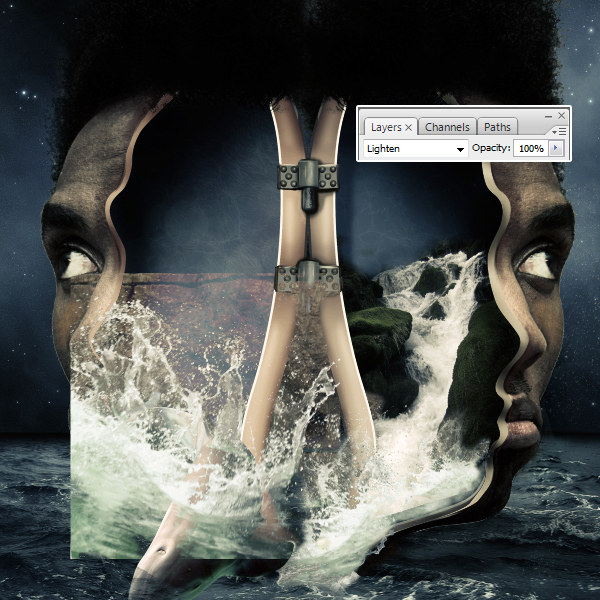
In this Step we will try to make all the objects to blend in. This is usually done in the last steps but here it helps us to see the big picture since we have so many elements. So all the layers from now on are going to be under this 3 layers. Go on top of all the layers and use the Gradient map with the color codes shown below.
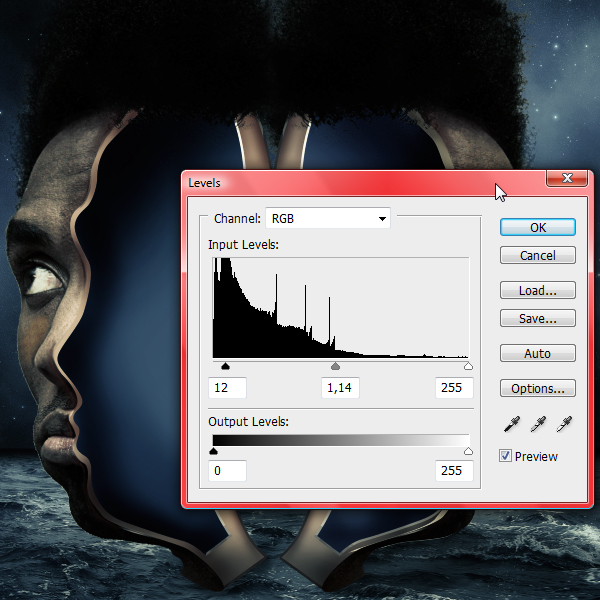

Step 11

Adjustment Layers > Levels.
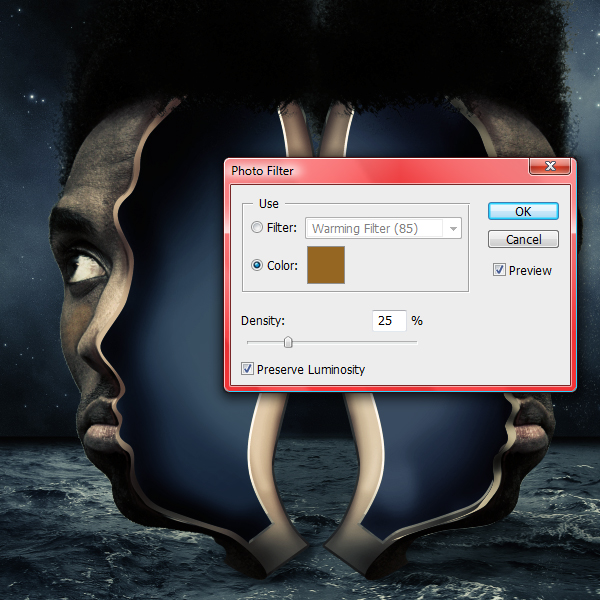

Step 12

Adjustment Layers > Photo Filter > Sepia (25%).


Step 13

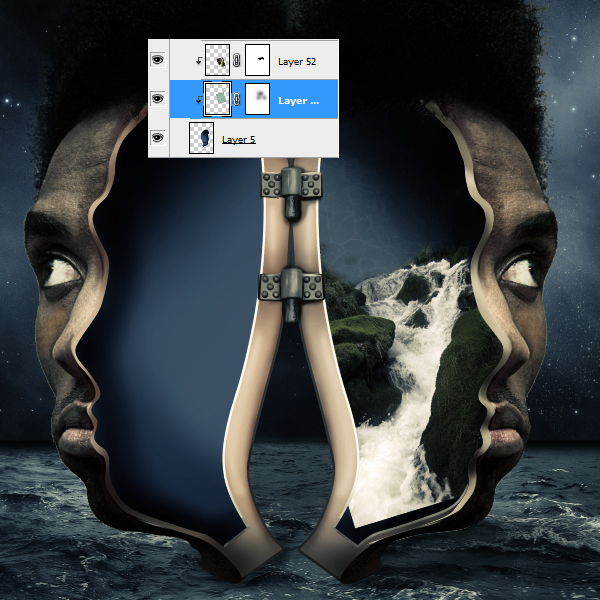
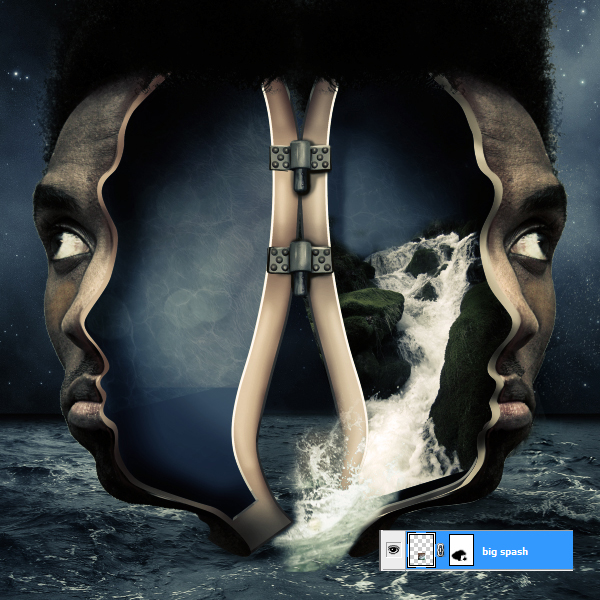
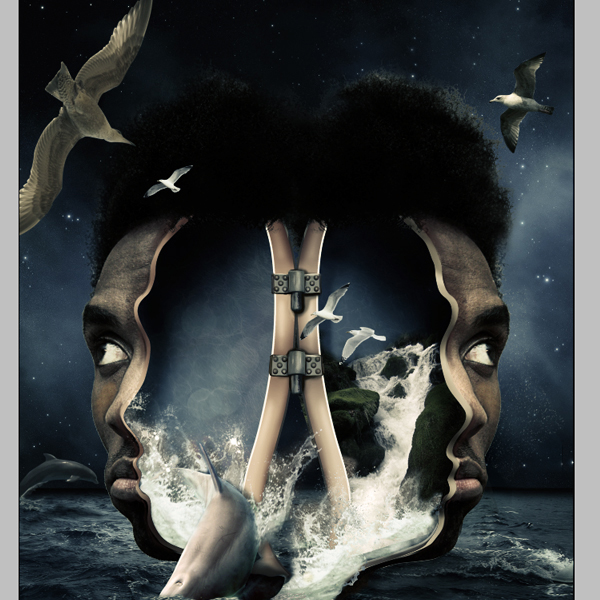
Drag in the waterfall picture. Transform it so it will fit into the right part of the head.
Place the waterfall as a clipping mask to the head.


Step 14

Next, place the water texture as a clipping mask to the head’s layer. Set its blending mode to soft light.


Step 15

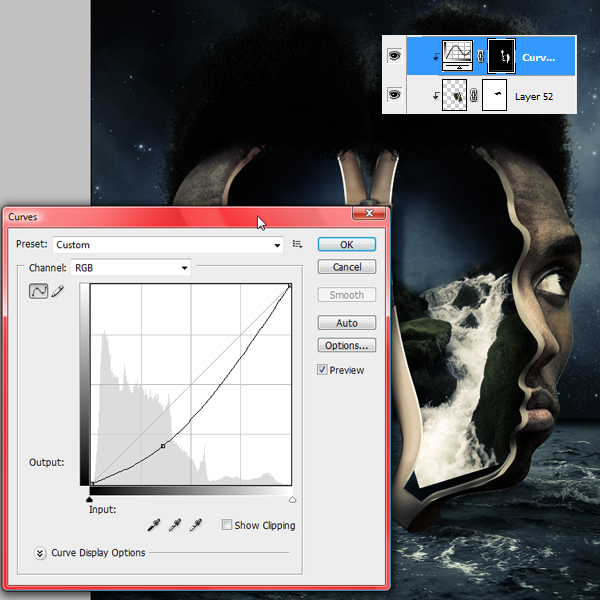
Create a new clipping mask for the Curves layer. Use this to create some shadows on the waterfall, for a sensation of depth.
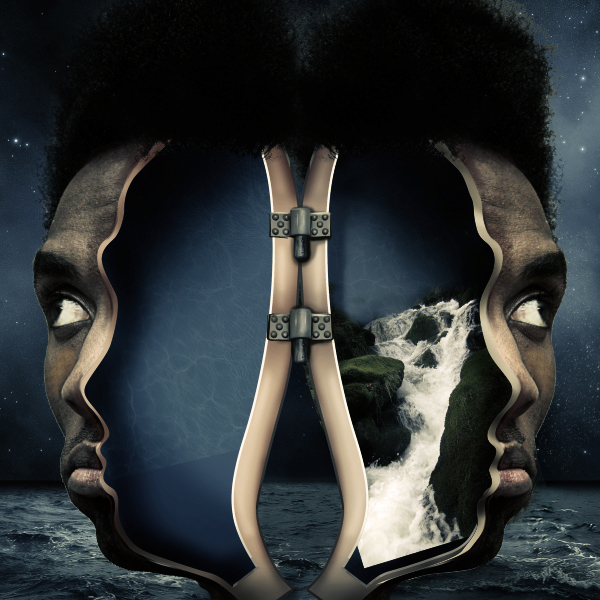

Step 16

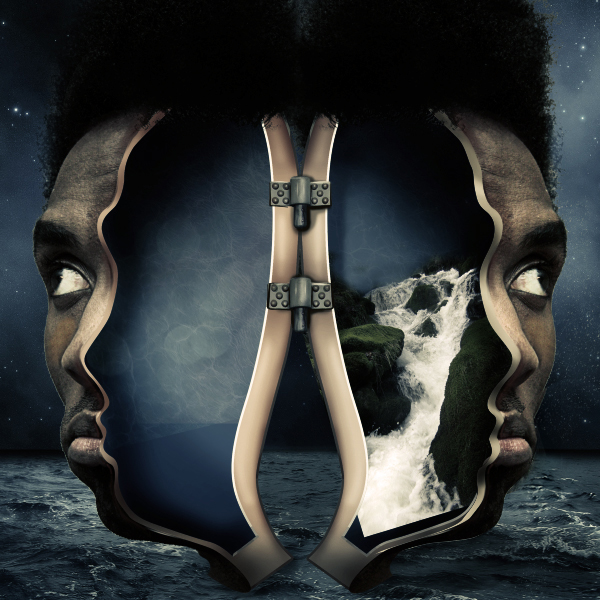
Now let’s go a bit on the left part of the head and add the same water texture as a clipping mask on the head’s layer. Set its blending mode to soft light.

Open the glitter texture and place it on top of the left part of the head as a clipping mask. Set the blending mode to soft light.


Step 17

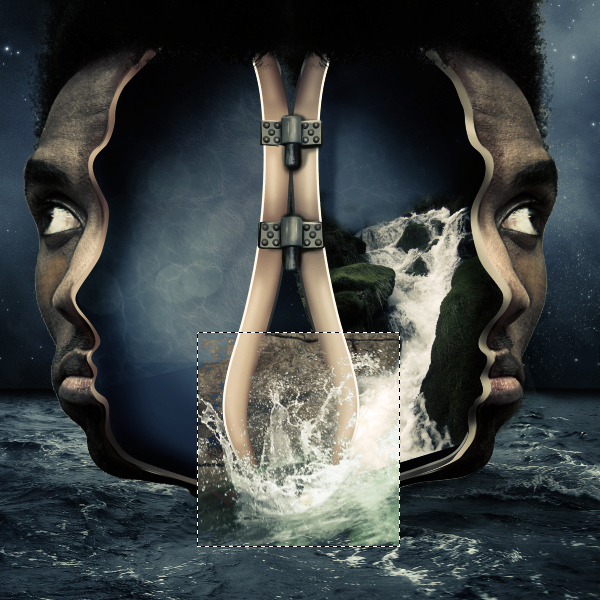
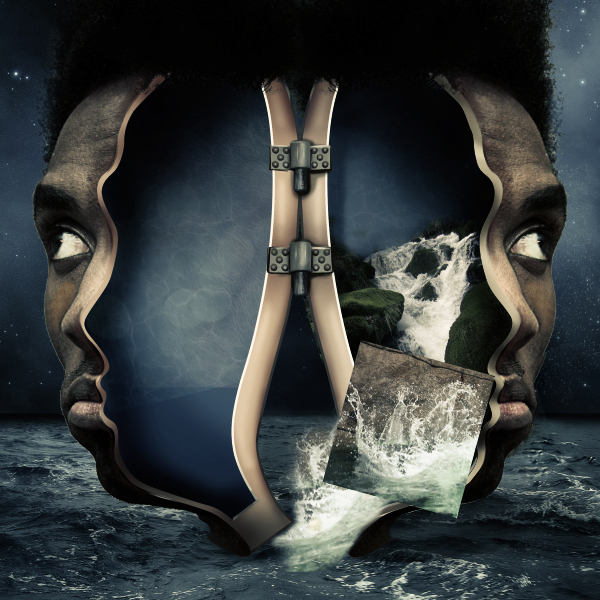
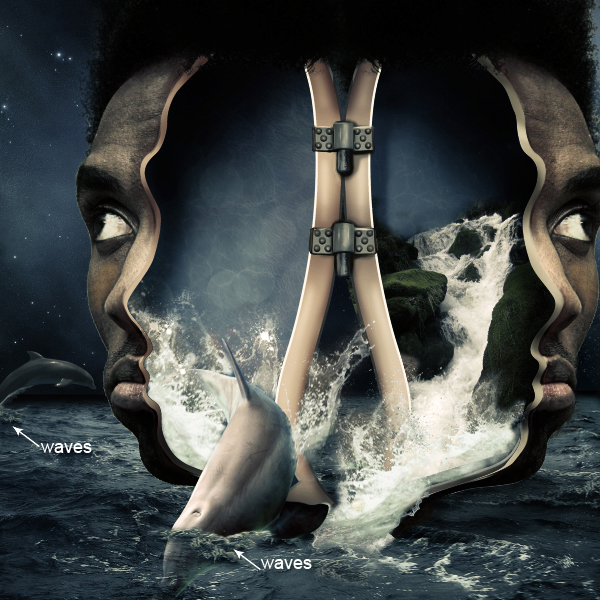
In this Step we will make the water splashes, so open the splash picture. Transform it so it will fit perfectly in the photo manipulation. This is the picture that we will use for all the splashes, we will flip it, transform it so it won’t look like a pattern. Set the blending mode to lighter color.

Duplicate the splash layer and decrease it’s size. Set the blending mode to lighter color also. Do this as many times as you like. To complete this part add some mode splash with some costume made brushes.


Step 18

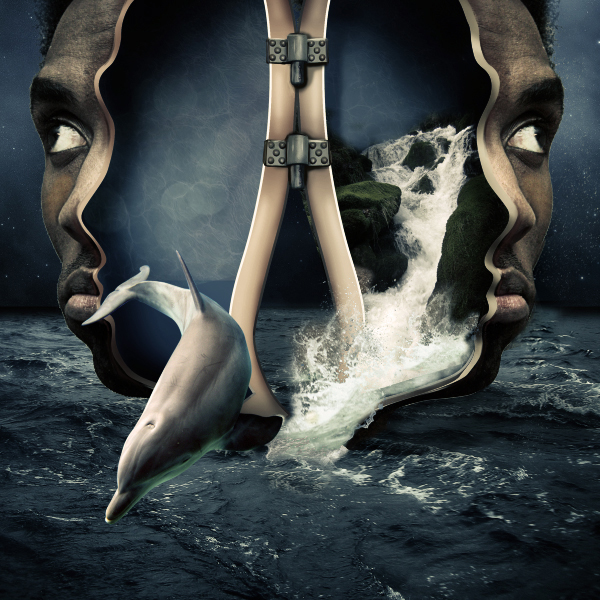
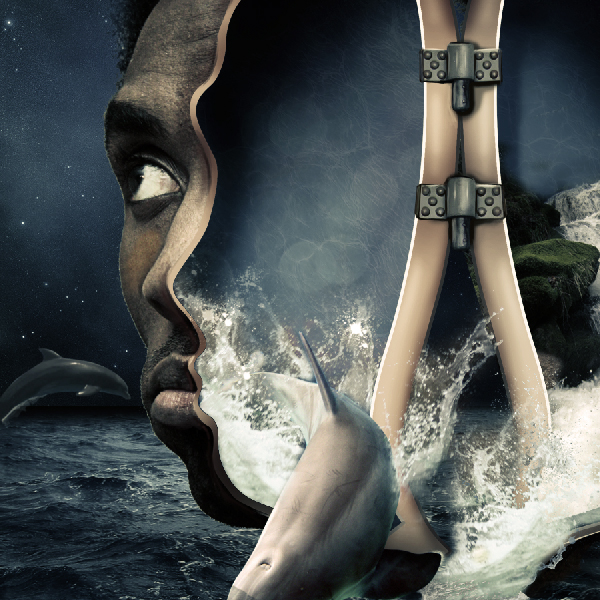
Cut out the dolphin using the pen tool and place it on top of the left part of the head.

Create a mask to this layer and, with a brush (opacity 20-30%), erase some parts so it will look like his head is under water.


Step 19

Drag in, again, the water splash image and place it on top of the dolphin. Set its blending mode to lighter color and erase, on the mask, all the edges. You should have the same result as shown in the image below.


Step 20

With the help of some splash brushes add more water. Use the image below as a reference.


Step 21

Open the second dolphin picture and cut it out with a pen tool. Drag the second dolphin in. Transform it and place it in the back.

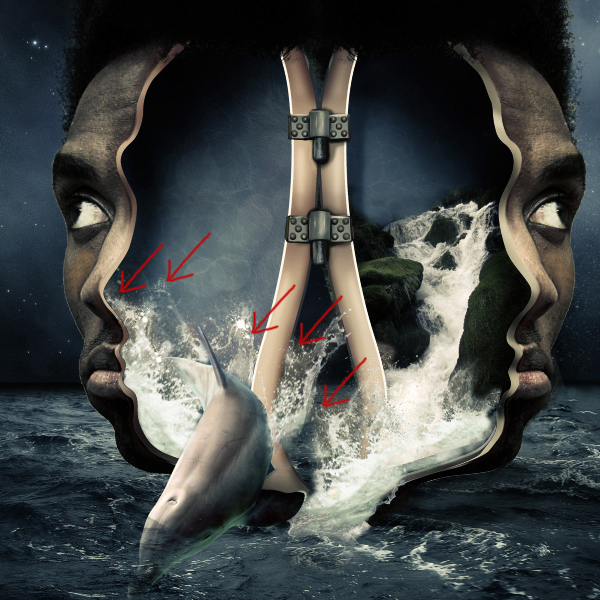
Select the clone stamp tool and create a new layer. Start adding some small waves and splashes were the big dolphin is touching the water.

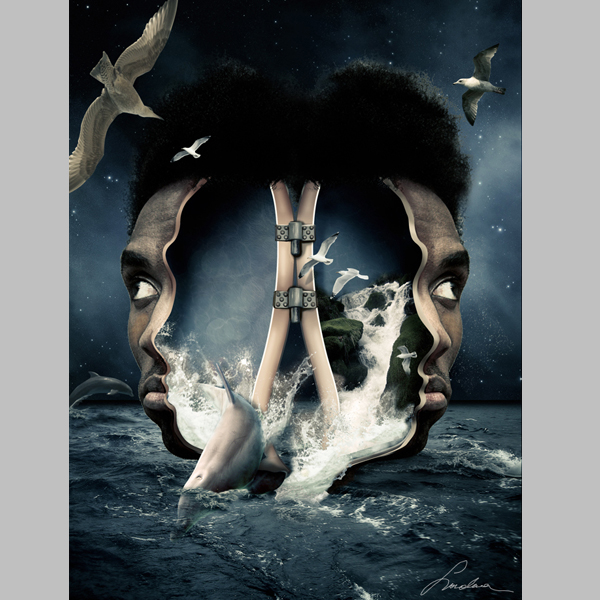
In this Step we will add some shadow for the 2 dolphins. Duplicate the 2 dolphins layers and fill them with black. Go to Filters > Blur > Gaussian blur ( 3 – 4 pix) . Transform each layer separately so it will look that the dolphins are casting a shadow.
Set the layers opacity to about 10-15%.


Step 22

Next we are going to finalize this surreal photo manipulation by adding the birds. First cut out the big bird and place it in the front of the head. Use some Gaussian Blur on the bird ( 0.3 – 0.5 pix).

Add all the other birds. Decrease their size like you see in the image below.

Add the birds’ shadows on the head so they will blend in.
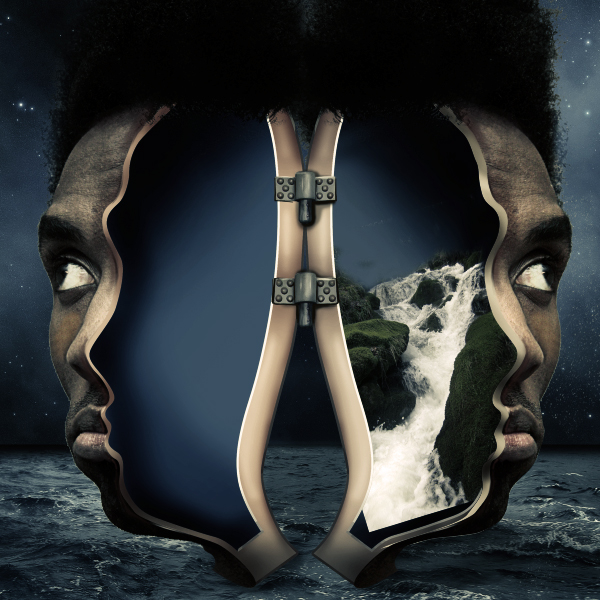

Final Image

Read More

Corona SDK: Working with the Facebook Graph API – Part 2

Welcome back to the second of a two part tutorial series on building native, social applications for mobile devices. In part 1, we created a basic application that utilized the Facebook authentication library to allow a user to sign in with their facebook credentials. The result was access to the user’s Facebook data through a […]

Read More

Thanks to Our Weekly Sponsor: Jumsoft

I’d like to take a moment to say a big thank you to this week’s sponsor, Jumsoft.

Jumsoft is comprised of an extremely talented team of people dedicated to bringing you stellar software products for the Mac. The apps that they’ve created are well known and solidly praised on this site and others: Money, Relationship, Operation, Home Business Trio and Process. Together these apps create an unbeatable collection of business utilities that cover everything from accounting to customer relations and beyond.

In addition to their prestigious line of apps, Jumsoft is also known for their line of add-ons for Keynote, Pages and Mail. If you want to make your documents, presentations and email messages look absolutely stunning, be sure to check out their site.

Because they’re just that great, Jumsoft even has a page full of free goodies for you to download and try today!

Calibre: iTunes For Your E-books

In recent years e-books have experienced a notable surge in popularity. Much of this can be attributed to devices such as Amazon’s Kindle and Apple’s iPad, which have seen a huge rise in popularity over recent years and seem to always be in those “top 10 gadget lists”. Amazon now sells more Kindle-format books than standard paper copies and the research and advisory firm mediaIDEAS forecasted that e-book readers are set to become a $25 billion market by the year 2020.

So with all these e-books floating around, you’ll need a way to manage them, right? Well, that’s where Calibre comes in. Think of it as iTunes for your e-books. Although e-book readers such as the Kindle provide their own software, it is a bit basic and you can only read books purchased from the Kindle store.

Calibre allows you to categorize all your books, convert them into different formats and upload them to your device. Although it won’t win any awards for its looks, the old adage is true, “Don’t judge a book by its cover” (or should that be e-book? Sorry, bad joke). Calibre is, to use the age-old comparison, iTunes for your e-books. Read on to find out why.

Introduction

Calibre is a free e-book manager available for both Mac and Windows. The Mac version requires an Intel processor (however a version for PowerPC is available) and can be downloaded via their website. Once you start up the app, you are greeted with the homescreen.

Calibre Main

The main screen of Calibre, showing all your e-books categorized alphabetically by title

It may look a bit complicated and clunky, but the application is relatively simple to use. The app boasts 3.2 million users since it was released in August 2009 and due to this, the developer is very active and updates are released for it extremely regularly (in fact, every time I open the program there seems to be an update!). The app is also compatible with a large number of e-book readers (the full list is available here) so most people can use it as the default software for managing their e-books.

Features

Calibre has a number of useful features which really emphasize it as a must-have program for anyone with an e-book reader.

Library Management

Any books that you add to your library in Calibre are automatically saved to a separate location (not unlike iTunes) and organized by title and author, meaning that if you do have to hunt around for a particular e-book, you can rest assured that they are all in one location.

Calibre Library

A look at the Calibre Library folder in Finder, showing the organization

In the actual app, your books can be sorted via their author, series, publisher and more. You can even add tags to your e-books to allow quick and easy searching. Upon adding an e-book, Calibre will automatically download the metadata from the Internet. This includes the blurb (description of the book’s storyline) as well as the cover and any other information relating to the book, useful if you are trying to sift through what to read next!

Calibre Metadata

The metadata shown on the book "Freakonomics" in Calibre

And if you’re really stuck for what to read, Calibre’s website has over 2,000 DRM-free (Digital Rights Management) books available for purchase, or you can try Project Gutenberg, which has over 33,000 free books available for download (if you do not live in the United States, then check the copyright restrictions in your country first before downloading).

Conversion

Calibre is able to convert both to and from many popular e-book formats, including the major ones used by most e-book readers. You can even customize the export settings, such as the font size and layout on the page (depending on your e-book reader) and it can detect chapters and the table of contents, meaning you are not flicking back and forth to find your page.

Synchronization

As mentioned above, Calibre supports a wide range of e-book readers, including Amazon’s Kindle and Barnes & Noble’s Nook range of devices. When you plug in your device, Calibre will automatically detect it and inform you whether the book is synced on both devices or not.

calibre - || Calibre Library || 3

The device view of Calibre, showing you which books are synced with your device

You can set up Calibre to automatically sync any books that aren’t on your device or you can sync them manually. Calibre can even convert books to your device’s respective format before copying them over, thereby saving the need for you to convert them yourself.

Built-in Reader

Calibre features a built-in e-book reader, allowing you to quickly scan through books before uploading them onto your device.

Calibre Ebook

The in-built e-book reader in Calibre

The reader supports tables of contents, printing, referencing, searching and more. Although it is not ideal for reading long passages of text (Stanza is the best for this), it is good if you want to skim read a few pages or quickly read the introduction of a book.

Conclusion

Calibre is an shining example of a well-thought out, well-designed program bursting with features and functionality. For anyone with an e-book reader, I could not recommend this program enough.

Although it won’t win any awards for its interface, looks aren’t everything and you’ll soon discover that Calibre does pack a mighty punch when it comes to managing your e-books.

Weekend rumor roundup: Apple Retail event, new MacBook Airs, unlocked iPhones, more

Several rumors with varying degrees of credibility came up over the weekend. According to AppleInsider, Twitter user @chronicwire (reportedly a source of past Apple leaks) reports that Apple’s retail stores are setting up to launch Apple’s annual Back to School promotion on Wednesday.

The same source initially reported that the Back to School promo will coincide with the launch of new MacBook Airs, but he has since retracted that claim. Instead, Chronic claims the part numbers he initially thought represented new MacBook Airs indicate that Apple will start selling versions of the GSM iPhone 4 that are not carrier-locked to AT&T.

Although the MacBook Air is widely expected to have a refresh soon, this is the first we’ve heard of unlocked iPhones being offered for sale in the U.S., and it’s something we’ll file under “We’ll believe it when we see it.” The iPhone is already sold free and clear of carrier locks in several markets, but GSM model iPhones sold in the U.S. remain carrier-locked to AT&T unless you jailbreak.

Chronic has also released screenshots that supposedly come from an “internal build” of iOS 5. These screenshots show that Nuance voice recognition, expected to be integrated in iOS 5 but not discussed at WWDC, is still in development. Other sources have claimed these voice recognition features weren’t ready to be shown off at WWDC but should be good to go by the time iOS 5 launches this fall.

Finally, a reader has informed us that New Zealand’s online Apple Store is now showing shipping times of 5-7 business days for the 1 TB Time Capsule and 1-2 weeks for the 2 TB model. These extended shipping times are also showing up in Apple’s Australian and UK stores, and the Canadian Apple Store is showing a 1-2 week delay for the 1 TB Time Capsule. The U.S. store and most international stores are not showing the same delay, but they’re further indicative of the Time Capsule supply constraints we reported last week, which may mean a product refresh is imminent.

We’ll be keeping a very close eye on Apple’s online store on the Tuesday overnight shift, and we’ll let you know if anything new comes up.

Weekend rumor roundup: Apple Retail event, new MacBook Airs, unlocked iPhones, more originally appeared on TUAW – The Unofficial Apple Weblog on Sun, 12 Jun 2011 23:35:00 EST. Please see our terms for use of feeds.

Source | Permalink | Email this | Comments

Rumor: Steve Jobs says iWeb and MobileMe hosting are going away

Those of us with a vested interest in iWeb have been perplexed by the lack of interest shown by Apple in the former iLife web design app. Couple this with the pending demise of MobileMe on June 30, 2012, and that confusion turns into concern. MacRumors featured a post a few hours ago about an iWeb/MobileMe fan who was so concerned about the lack of iWeb love coming from Apple that the user sent Steve Jobs an email.

In the email the iWeb user asked, “Will I need to find an alternative website builder and someone to host my sites?” The alleged response from the CEO of Apple: “Yep.”

iWeb’s discontinuation wouldn’t be completely surprising. When iLife ’11 debuted late last year, the lack of a new version of iWeb frustrated a number of users. When iCloud was announced last week, there was no indication that websites created with iWeb and hosted on MobileMe would have a migration path to the new world of Apple cloud computing.

There are many free website alternatives to a MobileMe-hosted iWeb site, such as WordPress.com, Blogger, Tumblr, and Posterous; paid options include Squarespace, Drupal Gardens and hundreds more. In addition, Facebook is an excellent alternative for both individuals or companies who just want to create a simple web presence to inform friends or customers of what’s going on. If your needs are for a straightforward yet powerful WYSIWIG web authoring environment, both RapidWeaver and Sandvox deliver much of iWeb’s power with more flexibility for non-MobileMe hosting.

For those who still want to have their websites designed in iWeb and hosted somewhere other than on MobileMe, you might want to start looking for low-cost web hosting soon.

Rumor: Steve Jobs says iWeb and MobileMe hosting are going away originally appeared on TUAW – The Unofficial Apple Weblog on Sun, 12 Jun 2011 22:00:00 EST. Please see our terms for use of feeds.

Source | Permalink | Email this | Comments

iPhone 4’s Operation Doorbell reveals mystery ringer

One of our readers sent us a story that was too good not to share. James, an iOS developer living in the UK, cleverly rigged his iPhone 4 against the peephole in his front door to catch a prankster that had been ringing his doorbell and running away every morning. His story is below.

For the past week, every single morning between 8 AM and 9 AM, someone has been ringing the doorbell to our flat several times and running away. We knew it was another resident of the flats — as the outer door is locked and requires a buzzer to get in, our doorbell is obviously next to the internal door. I tried many times to catch the culprit, but the best I could do after leaping out of bed and rushing to the door was to hear the sound of footsteps running on one of the lower floors.

I’m not a morning person, as I’m usually up late learning how to build apps. I then came up with a plan to simply wait by the door and watch through the peephole. This was a failure, as not only is craning my head to watch the peephole for an hour uncomfortable, it also prevented me from being able to carry on my usual morning routine of massive coffee consumption.

Then I had a brainwave! I noticed the camera on my iPhone 4 was the same size as the peephole. With a bit of fiddling and adjusting the zoom I was able to stick my phone to the door using blue tac, thus providing a convenient window to the outside world and the ability to capture a pic of the culprit to use as evidence.

I had planned to try and stream live video from the peephole, into my iPhone and stream it to my iPad or MacBook. Sadly, I never managed to go that far as I couldn’t find an app for that.

Sure enough though, this morning my girlfriend and I were sitting by the door, coffee in hand and able to chill out and watch the iPhone screen from a distance. As we hoped the culprit approached our door and rang the doorbell several times. I hit the camera button and got a great pic, catching him red handed. Turned out to be the kid next door on his way to school!

After grabbing the pic and quickly opening the door with a loud “HELLOOO!” and watching the poor rascal’s skeleton leap out of his body in shock, we were able to show his mother the picture and peace was restored.

Great story, James, and it only goes to show that people are finding unconventional uses for iPhones all the time.

iPhone 4’s Operation Doorbell reveals mystery ringer originally appeared on TUAW – The Unofficial Apple Weblog on Sun, 12 Jun 2011 21:20:00 EST. Please see our terms for use of feeds.

Source | Permalink | Email this | Comments

Talkcast tonight, 10pm ET: The WWDC after-party

Nursing hangovers and with brains full of iCloud, Lion, iOS 5 and other secret goodness, the worldwide community of Apple developers marks another WWDC in the books. We’ll look back at the week that was (and what a week it was!) and look ahead at the week to come; join us, won’t you?

To participate on TalkShoe, you can use the browser-only client, the embedded Facebook app, or download the classic TalkShoe Pro Java client; however, for maximum fun, you should call in. For the web UI, just click the TalkShoe Web button on our profile page at 4 HI/7 PDT/10 PM EDT Sunday. To call in on regular phone or VoIP lines (yay for free cell phone weekend minutes!): dial (724) 444-7444 and enter our talkcast ID, 45077 — during the call, you can request to talk by keying in *8.

If you’ve got a headset or microphone handy on your Mac, you can connect via the free Blink or X-Lite SIP clients; basic instructions are here (if you like Blink, the pro version is available in the Mac App Store). Skype users with SkypeOut credit can simply call the main TalkShoe number; it’s also a free call with Google Voice’s browser plugin. Talk to you tonight.

Talkcast tonight, 10pm ET: The WWDC after-party originally appeared on TUAW – The Unofficial Apple Weblog on Sun, 12 Jun 2011 16:15:00 EST. Please see our terms for use of feeds.

Source | Permalink | Email this | Comments

iPad 2 Smart Cover-compatible cases: our roundup (Updated)

Apple Smart Cover

Apple’s Smart Cover is a great, versatile screen cover for your iPad 2. It allows you to stand your tablet up, prop it up for typing in landscape and more; it even turns the iPad off automatically when you close it. But it leaves the back of the iPad 2 exposed, and as beautiful as it is, that metal can get all scratched up pretty quickly without some protection.

So, here’s a roundup of all Smart Cover-compatible back cases we could find.

Continue reading iPad 2 Smart Cover-compatible cases: our roundup (Updated)

iPad 2 Smart Cover-compatible cases: our roundup (Updated) originally appeared on TUAW – The Unofficial Apple Weblog on Sun, 12 Jun 2011 10:35:00 EST. Please see our terms for use of feeds.

Source | Permalink | Email this | Comments

Put a thousand books from the British Library on your iPad for free

I just love finding apps like this, and I think you’ll be excited too. The British Library has released 1000 books from its 19th Century collection into a free iPad app that includes novels, historical works, poetry, philosophy and scientific books.

The books have been scanned in high resolution and color so you can see the engraved illustrations, the beauty of the embossed covers, along with maps and even the texture of the paper the books were printed on.

You can search the collection, browse titles by subject, and even read commentary on some of the titles. The books can be downloaded for reading offline.

Continue reading Put a thousand books from the British Library on your iPad for free

Put a thousand books from the British Library on your iPad for free originally appeared on TUAW – The Unofficial Apple Weblog on Sun, 12 Jun 2011 08:00:00 EST. Please see our terms for use of feeds.

Source | Permalink | Email this | Comments