Optimizing Your Tutorial – Setting The Table for an Effective Tutorial

You can have 20 million users download you freemium application, but if only 2 of them spend more than 30 seconds in your app you have a problem! This week we will look at ways to prepare for defining a tutorial and putting in place the framework to effectively optimize your tutorial over time.

Don’t fly blind, analytics is essential

There are multiple ways to optimize the performance of your tutorials but it will be next to impossible without proper analytics in place. There are many “off the shelf” solutions available for tracking metrics such as Apsalar and Flurry. Developers can also take advantage by building their own.  One size/solution does not fit all and it can be somewhat overwhelming when first attempting to secure effective means of data collection. However, if there is one word to the wise it would be this: The more data you have available the more insight you can capture. Make sure you are tracking users behaviors by device ID’s or other unique, non-personally identifiable sources. It’s essential to be able to track user segments and allow for effective cohort analysis.

What to track?

The sky is the limit to what to track and when, but I would suggest prioritizing the material you look to analysis. Here are a few prioritized suggestions:

1)      Find the gaps – Track the funnel and identify any major pain point users are having. If users are making it through steps 1-3 but sharply dropping off at step 4, you know where you need to look for optimization.

2)      Find the positive – See where users are effectively progressing and determine how you might be able to apply the user experience to other parts of the game

3)      Track behavior outside of the tutorial – It’s important to analyze the behaviors of users who choose to exit the tutorial or turn away from the initial “suggested” gameplay progression. See if stricter rules need to be put in place to force user education. Or you might find that users do just fine without your help!

4)      Track user segments – Not all users are the same. Compare the behaviors of users based on the following criteria

  1. Source – Where did they come from?
  2. Device – iPhone vs iPad?
  3. Territory – UK vs US?
  4. Relative App Info – What other apps do they have?
  5. Time and date acquired – 4pm on Tuesday or 2am on a Saturday?
  6. Events Comparisons – If user X gets through level Y, they are Z% more likely to convert to a paid user

Solving the problems

Next week we will speak to specific strategies on how to review your data and take meaningful steps to test your theories based on collected data.

Do you have a question about freemium gaming or a topic you’d like us to explore? Let us know in the comments or catch us on twitter @rechargestudios or @w3i.

Matt Tubergen heads Recharge Studios, a wholly owned subsidiary of W3i that invests in the development and marketing/distribution of freemium mobile games.  W3i is a market leader in distributing and monetizing apps with over 500 million apps distributed for W3i clients. Recharge Studios is actively seeking new investment opportunities, if you have a great idea for a game contact us.

Freemium Game Blogs are published in partnership with the series on W3i’s corporate blog.

Tool: LevelHelper Level Editor With Physics

Some time ago I mentioned the excellent tool for creating spritesheets and generating usable physics code from your sprites known as SpriteHelper.  I really liked how the author paid attention to all the little details within the application.

LevelHelper is another excellent tool from Vladu Bogdan allowing you to easily create levels for your games complete with physics working directly with sprite sheets taken from SpriteHelper.  Beyond simply placing the titles for levels you can specify the physical properties of the elements, and add physics joints to elements within the scene.

You simply drag and drop the elements, change a few parameters and generate the code.  The application generates either Cocos2D or Corona SDK code.

Here’s a video showing how it works:

You can find the application here:
LevelHelper In The App Store

Azam Sharp has created a step-by-step tutorial on using LevelHelper and SpriteHelper together that you may want to check out if interested:
Tutorial Game With LevelHelper And SpriteHelper

Looks like a great tool for those creating physics/level based games.

©2011 iPhone, iOS 4, iPad SDK Development Tutorial and Programming Tips. All Rights Reserved.

.

DeliciousTwitterTechnoratiFacebookLinkedInEmail

Open Source: Easy UITableView Within A UIAlertView

A common question that I’ve seen asked is how to place a UITableView within a UIAlertView. You see this all over the place such as in Apple’s own Wifi selection, or when you hit “more apps” in many different apps.

The process of getting this workign and looking right is somewhat tedious, but fortunately Simon Blommegård has created an open source library allowing you to do this simply and easily — it also looks great. You can even get multiple selections working if desired.

Here’s a screenshot of the library in action:

You can find the Github with an example project here:
https://github.com/simonb/SBTableAlert
Looks like a good solution to a common problem.

©2011 iPhone, iOS 4, iPad SDK Development Tutorial and Programming Tips. All Rights Reserved.

.

DeliciousTwitterTechnoratiFacebookLinkedInEmail

4 Interesting and Free Music Discovery Apps You’ve Never Tried

Despite the fact that an iPhone is capable of holding a ridiculous amount of music, it’s fairly easy to grow tired of your selection of tunes. Fortunately, the App Store has never been short on ways to discover new and interesting music.

Today we’ll step away from major players like Pandora and Last.fm and take a look at a few gems that you’ve likely never tried. Each of these apps has its own unique spin on music discovery and they’re all completely free to download and use.

The Kollection

screenshot

The Kollection

If you’re sick of hearing the same fifty songs played on repeat on your local radio stations, then it might be time to explore some the indie music scene. It turns out you don’t have to wear thrift store clothing or even shun society to appreciate unsigned artists!

If you genuinely want to discover new and interesting music from artists that you’ve likely never heard before, Kollection is a good place to start. Instead of a Pandora-like experience where you flow from one song to another with little to no control, Kollection offers you a fresh selection of music to choose from that’s updated daily. You browse the day’s collection freely and can choose exactly what you do and don’t want to listen to. It’s a bit like finding someone else’s iPod.

The music selection is organized into four genres: hip hop/rap, dubstep, electro, and indie. The selection definitely leans towards the quirky so don’t be surprised if you hate everything you hear, but you just might find the change refreshing. It’s not all original either, you’ll find some unique remixes in there from artists like Nirvana and Madonna.

The interface looks great but I found the various menus and social features a little confusing. A quick in-app tutorial showing what it’s all for would go a long way.

Price: Free
Download: iTunes Link
Developer: The Kollection

8Tracks

screenshot

8Tracks

8Tracks is a web service and iPhone app that presents itself as a more social alternative to Pandora. Don’t let that description fool you though, it’s actually a very different service.

8Tracks is basically a playlist sharing service. As a listener, you browse through popular mixes created by other users, each with their own preview image (usually something quite random) and a brief description. The interesting part is that, aside from the description, there’s really no way to tell what’s inside the playlist aside from just listening to it.

The music selection seems to be a decent mix of popular and non-mainstream artists. Listen for a few hours and you’re sure to come across tons of music you’ve never heard.

The interface is fairly simple and attractive. There are ads on several screens to support the free service but they’re fairly minimal and don’t detract from the experience too much. You can download the app and listen to music without signing up for an account but you definitely get to take advantage of much more functionality if you take a second to grab a free account.

Price: Free
Download: iTunes Link
Developer: 8tracks Inc.

Hitlantis

screenshot

Hitlantis

Hitlantis is a rather bizarre music discovery service that uses a unique visualization of a sea of bubbles to help you navigate the various available artists. The color-coded bubbles tell you the genre of the artist and you can easily toggle any genre on or off in your stream.

The app looks pretty cool and makes it fun to zoom around and tap on random bubbles to hear songs. You can either navigate the sea manually or throw on the radio feature so hear random selections. The radio features an odd single button play/pause/next/previous control scheme that took me a good thirty seconds to figure out but seems pretty natural after you realize how it works.

With Hitlantis I definitely found that the interface, despite being fun at first, really made the content seem difficult to navigate. I had a particularly difficult time finding something that I thought sounded decent and wasn’t able to find any popular artists.

Price: Free
Download: iTunes Link
Developer: Cognitive Maps Ltd

AudioVroom

screenshot

AudioVroom

Out of all the apps in this list, AudioVroom was definitely the most like typical music discovery apps such as Pandora and Last.fm. The interface is pretty different, utilizing bright colors and a somewhat cluttered layout, but otherwise the concept behind the service is familiar.

The app takes a look at your music library and makes some logical assumptions about the type of music that you like. It then builds you a custom radio station to listen to based on that music. Alternatively, you can simply type in an artist to hear others that are similar (sound familiar?).

The app gives you three buttons to rate the music that you’re listening to: love, wtf? and fail. Like most of these types of services, you can only skip a few songs each hour so make sure you’re not too picky. There’s also an interesting points system that requires you to rate songs if you want to keep listening. I haven’t quite decided yet whether that’s good or simply annoying.

AudioVroom was definitely the only app here that consistently played music that I liked and had heard before. This can be good or bad depending on what you’re looking for. If you want an app that’s going to give you truly unique content that’s different from what you’re used to hearing, the other three might be a better bet. However, if you’re more into mainstream artists, this is definitely an app that you should check out.

Price: Free
Download: AudioVroom
Developer: SocialGenius, Inc.

Conclusion

Today we brought you four fresh and interesting ways to discover new music on your iPhone: The Kollection gives you a daily dose of handpicked artist-submitted music that is both fairly obscure and surprisingly good. 8Tracks allows you to browse and create brief playlists that contain both mainstream hits and indie jams. Hitlantis is a completely unique music discovery solution that will have you tapping on colored bubbles and sifting through a really interesting mix of artists. Finally, AudioVroom takes the more traditional personalized Internet radio approach and closely mirrors Pandora in both its approach and content.

Once again, all four of these apps are completely free so go download them and let us know what you think in the comment section below. Also be sure to mention any apps that you’ve found to be particularly great for discovering new music!

Tiny Wings: Flying iPhone Fowl Fun

Some people (apparently a great majority) get some wild enjoyment out of firing furious fowls into rudely constructed structures that protect a pile of prig-looking pigs. It’s not just iOS devices, but Android, Palm and other charts are topped with the best-selling physics-based destruction game “Angry Birds”. But we already knew that, so I’m always interested in seeing which new app will surface to the number 2 spot on the mobile gaming charts; and I’ve found a winner: “Tiny Wings”.

Tiny Wings features a bird with a problem: his wings aren’t big enough to fly. Your mission is simple, keep your bird in motion with high-and-long glides over the colorful hills of rolling digital islands. Start slow, sliding down a grassy slope, then let gravity and aerodynamic velocity take it from there.

Good-Looking Birds

Tiny Wings

Tiny Wings

The first thing that caught my attention about Tiny Wings was the artwork. The pastel-watercolor look really works, drawing in the gamer at first glance. From icon to island, this game radiates with attractiveness. And with more than 20 islands and procedural graphics, you’ll get plenty of new and stunning environments to keep you and your flying bird blissfully engaged for quite some time.

The Many Islands of Tiny Wings

The Many Islands of Tiny Wings

Getting Acquainted

Getting Acquainted

Getting Acquainted

Your first introduction to your bird is a menu where he/she sits proudly atop a modest nest. My recommendation: Give the bird a name. It’s infinitely more exciting to call out to your bird in encouragement as it goes gliding along. On second thought, if you’re worried about your peers and/or neighbors retaliating in frustration to the frequent shouts of “Fly Renzo, Fly!”, you might want to leave the bird anonymous… you’re choice.

Wake Up, It’s Time To Slide

Waking up to Slide

Waking up to Slide

In principle, the game is simple- slide and glide far and wide. Your only control is a sort of “dive-bomb” move that is activated by touching anywhere on the screen. On your first run, you’ll be guided through the process of hitting the hills at their optimal downward slope to be propelled the furthest as you depart from the opposite incline.

Step-by-Step Instructions For Gameplay

Step-by-Step Instructions For Gameplay

Lightspeed Ahead, Tiny Wings!

Once you’ve got the basics down, you’ll soon notice that the daylight is going fast. In the lower, left-hand corner you’ll see a small daylight clock and your points. Your immediate goal is to collect as many points as possible before the sun goes down, at which point you will fall instantly into a deep sleep (Even if you’re in the middle of an airborne glide).

Points seem to be accrued by the combination of distance traveled, coins collected, longest fever (a sort of super slide), cloud touches (high jumps), and great slides.

The End Of The Day

The End Of The Day

Nests, Objectives and Reaching For The Clouds

If you think that sliding, falling and gliding would get repetitive after awhile, then you probably haven’t spent enough time flapping your Tiny Wings. But as fun as it is help Renzo (or whatever your bird responds to) beat the day light and discover new islands, there’s more to Tiny Wings that immediately meets the eye.

You start out with a nest. It’s a small, modest nest, but it keeps your bird warm at night when it’s not shooting through hill and sky. But what does every flightless bird really crave and wish for? A bigger, better nest.

Nest Up!

Nest Up!

Build up your nest by achieving a number of objectives which you can see by tapping the “Objectives” button on the main menu screen. At the time of this writing there are 30 achievements that you can work through, building up your nest as you go.

List of Current Objectives

List of Current Objectives

As your nest grows, a point modifier grows as well. With a higher point modifier, every jump, “fever” and cloud touch gets you more points towards your ultimate high score.

Contentedly Sliding Into the Sunset

Contentedly Sliding Into the Sunset

Conclusion

With such simple gameplay, stunning visuals, and challenging objectives, Tiny Wings is sure to keep you pressing madly at your iOS device for hours. I love it!

For information, tips and tricks, and more, check out the Tiny Wings online forum at: http://tiny-wings-game.com/.

Enhanced Night Vision Goggles – Ae Premium

This tutorial deals with creating the look of Enhanced Night Vision Goggles from common source footage. I explain the theory behind it, look at some references, and show a fast workflow for completing the shot by making use of After Effects CS5′s roto brush tool.

As always this tutorial can be followed without the need for any third-party plug-ins. The difficulty is intermediate from my pacing but more or less on a beginner’s level when viewed step by step.

Again, I mention and highlight keyboard shortcuts I use to speed up the work and have a few visual jokes thrown in as always.


This is a Premium Tutorial. To view you must Join Premium.

Once you’ve joined, log-in to the Premium Dashboard with your username and password to immediately access your Premium Content. Navigate to AE Premium via ‘Premium Categories’ in the sidebar. You’ll be able to grab the tutorial videos, project files and assets in the members’ area.


Read More

How to Make a Happy and Safe Office Space

Advertise here

Lately I have been working some extraordinarily long days in front of the screen. Not only has it been exhausting it has made me think much more seriously about the importance of a proper office setup. Today I will share some tips and ideas for your office space that will make you more productive and keep the aches and pains away.

Continue reading “How to Make a Happy and Safe Office Space”

Interview with Andrea Austoni

Advertise here

Today we are going to meet our old friend, great Italian designer Andrea Austoni, who wrote some brilliant tutorials for Vectortuts+. Andrea is a many-sided personality, beside design, he is interested in music, learning foreign languages, cooking, the eastern philosophy. “Only by partaking of a large spectrum of life’s many offerings will you become a better person and thus a better designer”- he says. Learn more about Andrea, his thoughts and illustrations after the jump.

Continue reading “Interview with Andrea Austoni”

Open Mic: What’s the Best Software Synth?

Each week we open our mic to readers and lurkers alike to come out of the woodwork and tell us your thoughts and opinion, your experiences and mistakes, what you love and what you hate. We want to hear from you, and here’s your chance.

I first played with synthesizers in the 80s. They were expensive machines with only a few notes of polyphony. It’s great we can do all that and more in software today. What do you think is the best software synth, and why?


Read More

Samplitude: How to Mix and Edit Using Object Oriented Editing

Hello once again! Today I am going to introduce you to my favorite recording and editing DAW, Samplitude. While more popular in Europe than in the States, Samplitude like its big brother Sequoia offers a wide array of tools that are not exactly standard to most other DAWs.

The tool I am going to show you today is Object Oriented Editing. Usually, we edit audio in a semi nonlinear approach. The reason I call it semi nonlinear and not just nonlinear is because we only are able to cut and move around audio clips nonlinearly; effects and processing always come after on the tracks in our mixer. There is of course destructive editing like Pro Tools Audio Suite but I tend to avoid destructive editing like the plague.

In OOE however, we are able to treat every audio clip whether it is a whole song long or just a few seconds as an object that can be edited, have effects applied, etc. all before it every reaches the mixer. In addition, it does not generate fade files or additional audio files every time you split and object into more objects. This opens up a world of possibilities for editing and mixing and can make our lives as audio engineers much easier.

Let’s delve into Samplitude to see how this process works.


Step 1: Basic Training

As Samplitude is probably new to many of you we are going to briefly cover where the controls are in this DAW. For this tutorial I am going to be using a vocal sample from a track I have that needs some tweaking. Either open up a project or start a new one to load an audio file into.

  • To load a file into a new project go to File>Load/Import>Load Audio File and select the audio file you wish to load.
  • It will prompt you if you want to copy the audio file to the directory where your project file (.VIP) is located. For file maintenance purposes I would recommend this option.
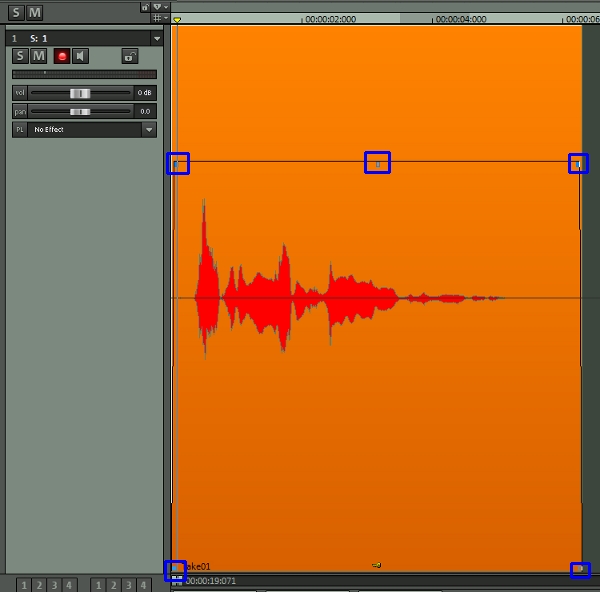
  • Upon loading the file you will see a new object appear in a track with a waveform representing your audio. To select an object click Below the zero line (your mouse will now have a crosshair next to it) and when your object is selected it should change color (default is green to orange). If your mouse is not working as it should you may need to change your mouse mode to universal by clicking on the highlighted icon in the picture below.

Now that we have our object selected you may have noticed some new options appeared in the object in the form of a few lines and some squares. These squares represent different tools for quick editing. The bottom two on the left and right sides of the object represent the range of the object; what part of the audio file the object will play (just like regions in Pro Tools and Logic). The squares in the top left and right of the object are your fade controls. If there is no adjacent object it will fade in or out from 0 but if there is an adjacent object it will instead cross fade the two objects together. Simple right?

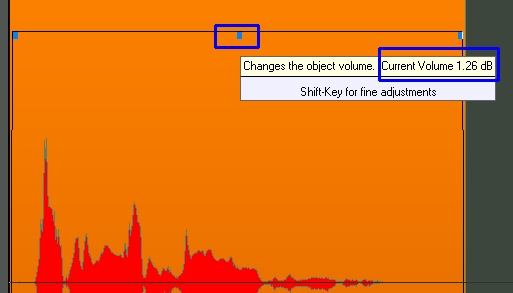
The control we are particularly concerned with is the square in the middle of the object on the new line that appeared. The center square controls the volume of that particular object. What that means is we can adjust the volume of a particular word, note, etc. without touching the track fader, master fader, or using any messy automation. The easiest way to adjust the objects volume is to click and drag the square up or down. You will see a new box appear indicating how many dBs you are adjusting the object by and the line will also move up with it.

One quick note about that line, it essentially is a volume indicator as it goes all the way down to 0 on either side of the object and helps you to get a rough idea of how long your fades are and what you max volume is for the object.

Here is the original vocal sample we will be working with:

Download audio file (step_1.mp3)


Step 2: Adjusting Object Volume

Now that we understand how to the basic volume controls work in Samplitude’s OOE let’s try and adjust the volume of the entire vocal clip to a more adequate level. I am going to increase my vocal sample by 7.15 dBs to get a more solid volume since the singer backed away part way through the song here. Remember just grab the center square and lift. You will see a new box appear that will indicate how many dBs you are changing the object by.

It is just that easy. Here is the effects of raising the objects volume:

Download audio file (step_2.mp3)


Step 3: Splitting Objects

While it is nice that that we can edit this whole audio sample, this clip is going to need some more fine tuned editing to get it where we want it. Where the singer says “Ever” I find that the “er” at the end needs to be brought down a touch as well as the “St” in the word “Stop”. However I believe that the “Oh yah baby” at the end needs to be brought out even more.

  • Put your mouse above the 0 line and left click and drag to select the “er” in “Ever”.
  • Next press T (default) to split the object into 3 new objects.

When you did this your probably will have noticed that it automatically crossfaded your objects so no clicks or pops will occur. What you may not have noticed was that the 7.15 dBs we increased earlier stayed on our object so we wouldn’t have to readjust later. Cool right?

Once you have the other parts of the vocals split we will need to adjust the volume of those objects. However I am going to show you an alternate way to adjust the volume and how to gain even more control over your objects.

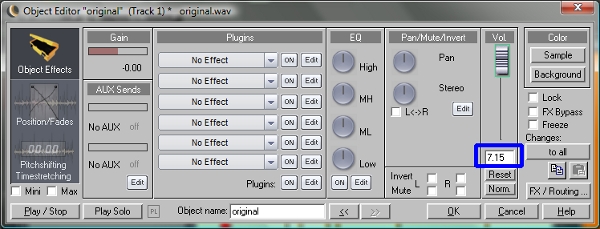
  • Click below the 0 line to select the “er” and then double click it and you will see a window pop up.
  • This window will be the Object Editor for that particular object and in the far right side you should see a fader.
  • Drag the fader down to 3.73 dBs or click in the numerical box to type it in.

Editing the volume fader inside the Object Editor is the same as adjusting the volume control on the object. However you may have noticed that the object editor had a lot more controls. Looks fun right? Well before we get to play with it. Bring the “St” down to 3.53 dBs and bring up the “Oh yah baby” to a whopping 12 dBs (you will need to type in anything over 10 dBs)

Here is what our sample sounds like now:

Download audio file (step_3.mp3)


Step 4: Object Effects

Now that we have balanced out our volumes for the vocal sample you may or may have not noticed a problem. The “Oh yah baby”, while at a better volume, has a more audible whomph in the bottom range that doesn’t match the rest of the vocal sample. It is subtle but definitely there. We could fix that phrase in the mixer with an EQ but it would affect the entire vocal track. Since we only want to edit that particular phrase, lets place an EQ inside the object.

  • Double click the object below the 0 line to bring up the Object Editor.
  • There is a section labeled “Plugins”, from the drop down menu pick your favorite EQ to go into the first plugin slot. I choose Samplitude’s EQ116 under Frequency/Filters.
  • You now will see your plugin appear on your screen. In your EQ go to around 170Hz and bring it down about 2dBs with a fairly wide Q.

If you play back the vocal sample you will notice that the whomph is gone. Try A/Bing the phrase with the plugin turned on and off if you are having issues hearing it

Download audio file (final.mp3)

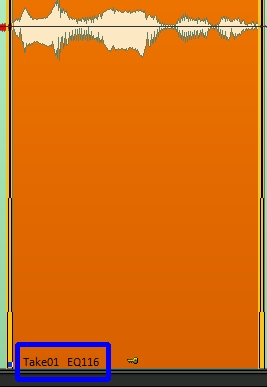
Now some of you may be wondering how you can possibly keep track of object level plugins since you will not normally have the Object Editor open. Well Samplitude has the answer for you my friend! In the bottom left corner of each object is a name. This is the name of the audio clip the object is referencing for playback and next to it will appear the plugin order for all the plugins on that object.


Conclusion

Truth be told we have only scratched the surface of what OOE can do for mixing and editing. You may have noticed that there were additional controls such pans, aux sends, pitch shifting, time shifting, etc. in the Object Editor. The amount of control this leaves you is absolutely astounding. The only limitation it leaves you is what you can think to do with it. One note to keep in mind is that if you split an object with an effect on it, the effects will also carry through as well.

I hope you all enjoyed and maybe will take a closer look at Samplitude or Sequoia in the future. If you want to see more just leave a shout out in the comments section below. Thanks!


Read More

20 Incredible Speed Painting Videos

Advertise here

Speed painting is the act of recording of an artist’s screen while they paint a scene. The recording is then sped up so that you can see the piece come together much more quickly. In this round up we have gathered some of the most impressive speed painting videos that we have seen that include paintings of well-known subjects including Scarlett Johansson, Megan Fox, and Iron Man. Take a look at them below and be amazed at how these talented artists produce these fantastic pieces of art.


Avatar Speed Painting by Mike Gore

Our first video features a speed painting of one of the most popular movies ever created, Avatar. The final product which can be seen here shows off the amazing result of 12 hours of work. The specs for this piece are posted in the video description so look it over if you are interested.


Scarlett Johansson Speed Painting by Nico Di Mattia

Our next speed painting video gives us some rather attractive visuals of the designer painting actress Scarlett Johansson. The artist
didn’t go for extreme realism on this painting but the result is still extremely accurate and amazing to see put together in such a short period of time.


Sea Monster Speed Painting

It’s hard to believe the artist who created this painting said its only a doodle, but this is probably one of the most detailed paintings in this set. The ferocious sea monster is put together in only 4 quick minutes and the result looks simply phenomenal.


Iron Man Speed Painting

This speed painting video gives us a dual shot while the designer is painting away, we can see the stock photograph of Iron man that the designer is painting from. This is very cool since we can now see how much artistic freedom was taken with the final product and you can see the artist
definitely put his own spin on how this one was painted.


Toy Story 3 Speed Painting by Nico Di Mattia

If you got a look at the finished product first before viewing the video it would be hard to tell that this wasn’t a screenshot from the movie,
that’s how good this painting looks. Everyone should check this one out for the sheer talent that this guy has.


Undead Speed Painting by Rune Bodker

Only done in an hour and a half this creepy speed painting of a zombie is nothing but awesome, the only
criticism that comes to mind is that the body isn’t as detailed as the face is but we cant really nitpick when the result still looks this good.


Kanye West Speed Painting by Williams Shamir

Kanye West gets the speed painting treatment here and the result is extremely impressive, put together in around 6 hours this designer used a nice brush touch to give this painting a smooth as well as realistic look.


Megan Fox Speed Painting by Stephanie Valentin

Megan Fox is the next celeb in this list to get painted and 6 hours worth of work culminate in another fantastic product. This almost 6 minute video zooms in on specific areas of the painting for the viewer to get a better look at the techniques used to create this.


M.I.A. Speed Painting by Salena

This off color painting features some colorful and vibrant visuals of singer M.I.A. The impressive part about it is how a whole different color
palette was used for this painting yet all of the shading and coloring still looks on point, watch this one to see some great painting techniques used.


Mechanical T-Rex Speed Painting by Chris Scalf

The thought of a mechanical dinosaur is already awesome but when you combine the idea with a talented artist who can draw it into reality makes for a mind explosion. This very cool painting was done in 3 and a half hours and although it lacks detailed coloring it still features an incredibly detailed scene.


Travis Barker Speed Painting by Sean McCoy

All the crazy tattoo art on Travis Barker make for a really fun and interesting speed painting to watch. The way this painter goes about realistically painting all of Barkers heavy
tattoo’s is incredible and the final product does not shy away from looking like a photo.


Indiana Jones Speed Painting by S. Maguire

This painter’s childhood hero and most likely many other peoples hero as well gets the speed painting treatment in this video. All of these videos including this one are instrumental and educational for artists who are looking to start digitally painting themselves, this detailed shot of Mr. Ford is a great example of something you should strive for.


Terminator Caricature Speed Painting by Nico Di Mattia

Nico Di Mattia switches gears for a second and goes towards something a little more comical and less realistic, painting the terminator in caricature form. There is not much difference in the technique used but the final product
definitely bares a resemblance to Arnold in his former role. An interesting look at how caricatures are painted.


Dr. House Caricature Speed Painting by Nico Di Mattia

This guy’s paintings are just so good we had to post a few more, here is
everyone’s favorite Doctor Dr. House in another amazing looking caricature, watch this and take notes.


Darth Maul Speed Painting

The fore was definitely with this painter when he decided to start painting Darth Maul. The complete painting which took roughly 3 hours to paint features not only Maul but also a nice backdrop that we
rarely see designers actually go into when speed painting.


Upsidedown Mona Lisa Speed Painting

Probably the coolest speed painting out of this set but also the oddest, why paint the famous Mona Lisa upside down?
I’m not sure, but it does make for an interesting 10 minute video. The result looks perfect as it has every detail the original one does, this is just a case of digital art being inspired by
rational and we can all learn from the result.


Landscape Speed Painting

No celeb or mechanical T-Rex here, just a simple yet awesome looking grungy landscape. It is interesting to see how the techniques to painting this are similar/different from those used to create some of the other paintings featured in this set, so browse through this video and be the judge of that.


Abstract Speed Painting

We cant be sure what exactly was painted in this video but we can be sure that the final product looks simply amazing. The colors work
extremely well with each other in this rather odd scene.


Samus Speed Painting

Lastly we have a speed painting of popular video game character Samus. The multicolored reflections that are on her suite make for an interesting painting that uses the best set of color
pallets possible as the final result looks like its right out of a video game.

Read More