How to Create Cityscape Concept Art

Advertise here

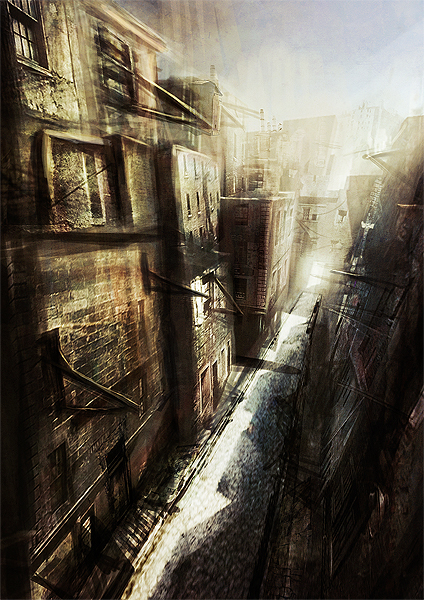
In this tutorial, I will teach you how to easily create a successful piece of cityscape concept art. We’ll be using a very basic 3D scene as a foundation for the piece, then taking it into Photoshop for some creative photo manipulation of reference photos, basic painting and adjustments. Let’s create this urban scene!

Editor’s note: This tutorial was originally published on Psdtuts in December 2009.


The Brief

The brief, in my case, was to create a historical street scene from anywhere in the world before 1914. It wasn’t to be a particular street, but the concept had to serve the purpose of seeming as though it could be a real street in the time and place I chose, to have a sense of architecture and light, and overall atmosphere.

Obviously you can do anything you want for your projects, but for the sake of the tutorial let’s roll with my choice, which was Glasgow (Scotland) in 1900.


Step 1

The first thing to do is to gather lots of visual reference. Just because you’re doing Glasgow in 1900 doesn’t mean you should only be searching for photos or paintings of Glasgow in 1900.

You should be looking at the work of traditional painting masters, contemporary painters and concept artists, photographers, sculptors, arch-vis studios, etc. This will get you thinking about color, composition, lighting, and so on. All of this can be found online, in books, television, newspapers & magazines, and generally just about anywhere. If something inspires you, retain it somehow! I could sit here boring you with lists of incredible work you should look at, but that would take up a whole article in itself…

I can’t emphasize enough how important reference material is, because without it, you’re working blindly. And more often than not, the work you make up in your head will be ten times weaker than work produced with well used reference. Just about any successful concept artist will tell you this.

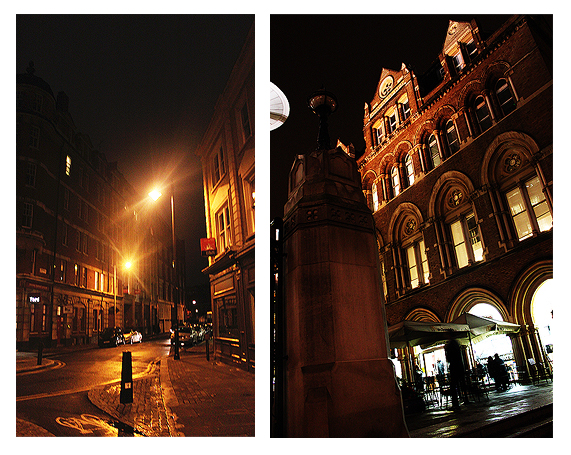
Another great way to gather visual reference, is of course to capture it yourself! Below for example, are a couple of photographs from a batch I took in London.

Step 2

Beyond the general inspirational type of reference, it’s a good idea to gather the more practical and useful type of reference material. By this, I mean actually photos of Glasgow in 1900 we can use to help build our scene in the later stages.

In my case, I found an incredible resource through the AMICA Library, which is a free service for searching all sorts of arts from all sorts of periods, but you have to pay a premium to access the full resolution images.

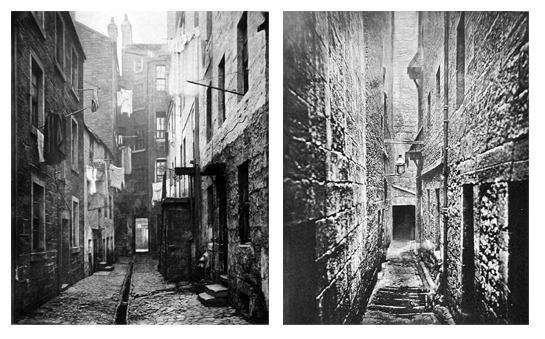
Here, you’ll see that I came across images from a fantastic book by photographer Thomas Annan called "The Old Streets and Closes of Glasgow," from 1900. It is these images precisely that we’ll eventually cut up and manipulate in order to add texture to our scene. You can find the images here.

Step 3

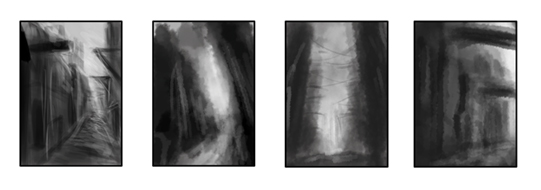
Once you have all your reference images and are roughly sure what sort of image you’d like to create, it’s a good idea to do lots of thumbnail sketches. You can use a pencil or paint directly into Photoshop. These thumbnails were painted using some of Photoshop’s default brushes set to pen opacity, but I’ll go into brushes a little later on.

For this you should work quite small, and spend the smallest amount of time on each one. Speed is key! If I can remember correctly, these were drawn in between 30 seconds and two minutes. This way you really have to figure out the composition and main idea of the image rather than getting caught up in the details.

Don’t be scared to do this step. I’m not a great painter, but you can see in some of the thumbnails below that they are simple yet complex enough to convey the idea for a scene.

Step 4

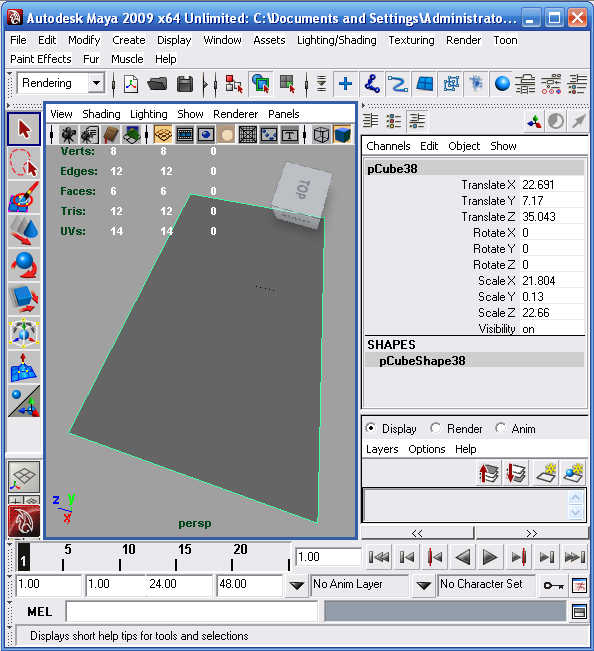
Now we’ll actually start working on our final piece. Open up Maya (or the program of your choice), then create a polygon Plane. Make it quite large, so it can act as our floor.

Step 5

Next, create a cube on top of your plane, this will be the template for our other buildings.

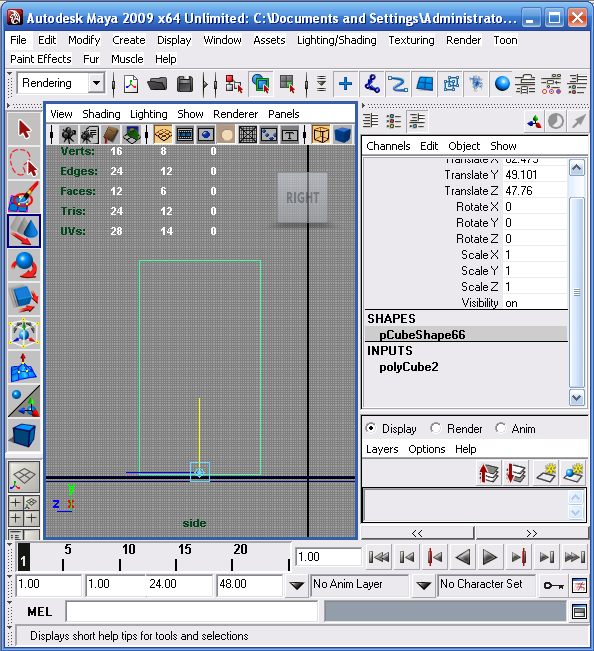
Once it’s created, press the Insert key. This will turn your manipulator into a slightly different icon, and will allow you to move just the pivot point of your object. In a side view, move the pivot point to the bottom of your cube (you can change viewports by pressing the spacebar whilst hovering the mouse over a viewport to maximize it or zoom out to 4-panel view). This will mean when you scale it, that it won’t really scale below the floor, but instead it will grow outwards from the bottom.

Once that’s done, press the Insert key again to get out of pivot point edit mode.

Step 6

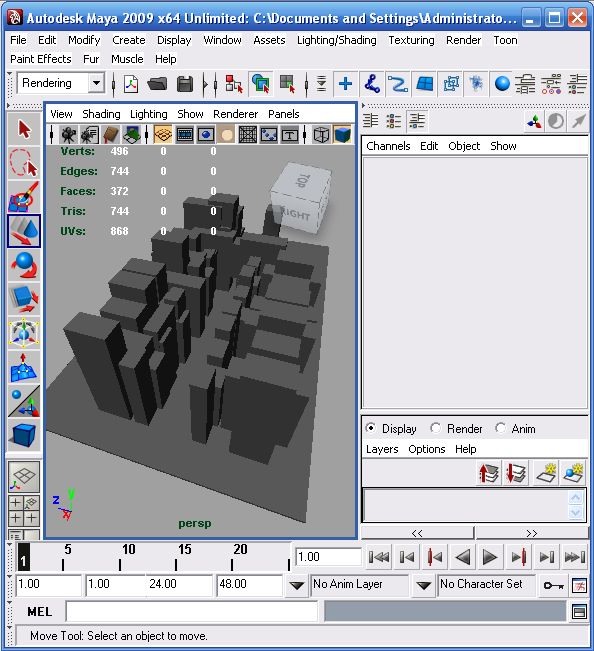
Once you have your basic cube setup, you’ll need to start placing duplicates around the scene to create the street.

To do this, select the cube and press Command + D to duplicate it, the W key to move it, and the R key to scale it. Do this enough times until you have something like the image below.

Don’t try and align things perfectly, the charm of these kinds of streets is the chaotic asymmetry and variation.

Step 7

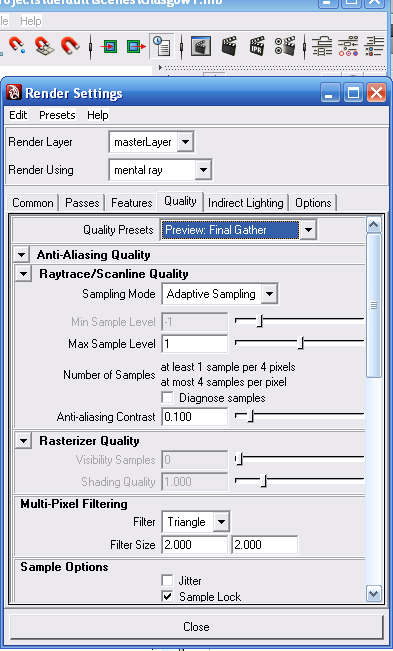
Now that we have a basic street setup, we’ll create a simple daylight system. Open up the render settings and under the Render Using drop-down, choose Mental Ray. Then, under the Quality tab, choose the Quality Preset called "Preview: Final Gather."

Step 8

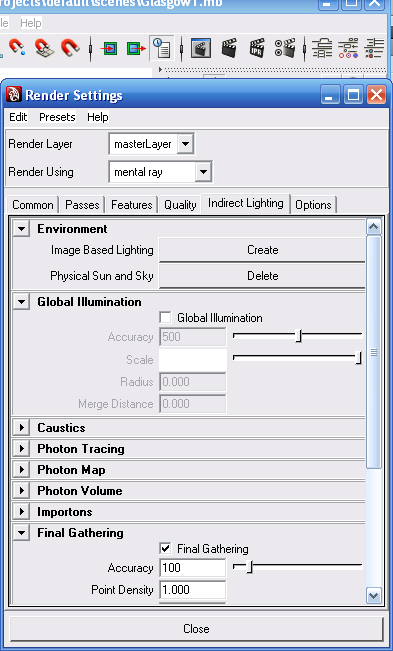
Still in the Render Settings window, go to the Indirect Lighting tab, and next to Physical Sun and Sky, press the Create button.

Step 9

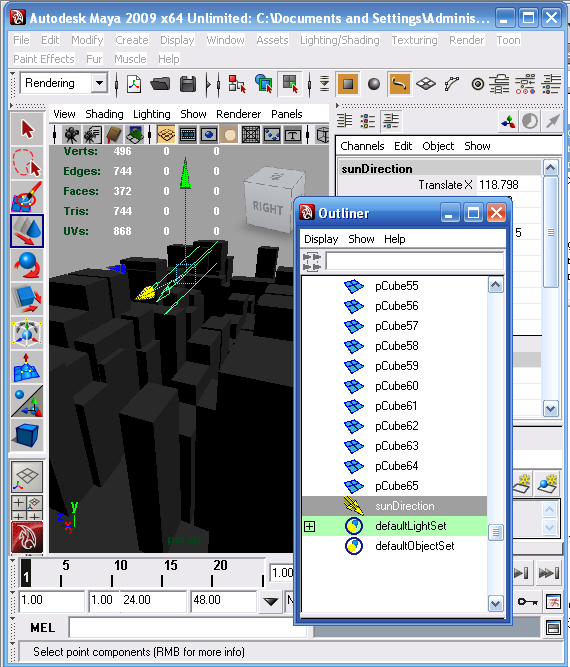
The daylight system actually created a Directional light to act as the sun. This light may be hard to find by eye, so go to Window > Outliner. In there, you can see a list of all the elements in your scene. Scroll down until you see something called “sunDirection,” then use the move and scale tools to place it somewhere a little easier to see and manipulate.

Note that these types of lights don’t change according to their size or position, only the rotation will affect the appearance of light.

So, to manipulate the light, press the number 7 on your keyboard, which activates the light preview mode in your viewport, and rotate the sun light until you are happy with it. Don’t be scared to experiment with this and produce a few test renders. I wanted my sky to be coming almost against the camera, so I positioned it similar to what you can see below.

Step 10

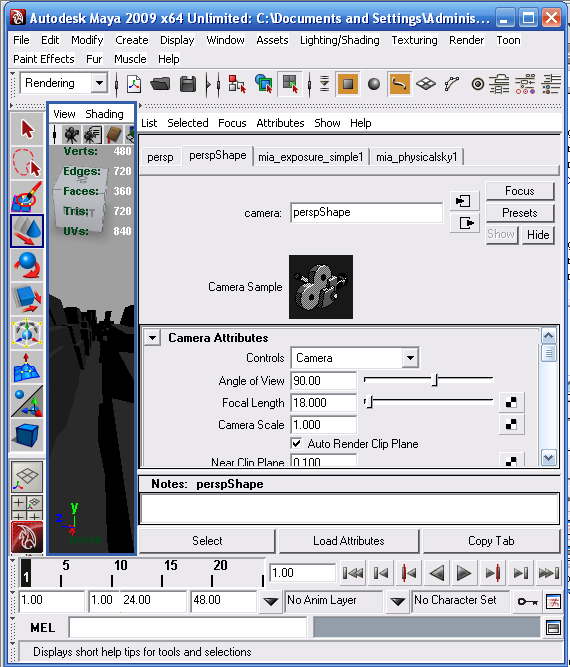
We’re going to make our camera slightly more interesting by giving it a wide-angle view. In your viewport, click on View > Select Camera.

If your Attribute Editor isn’t already up, press Command + A. Then, under Camera Attributes, type 18 in the Focal Length parameter.

Step 11

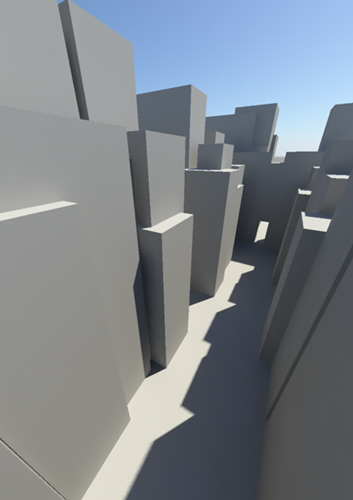
When you’re happy with your angle, go to the Render Settings once again, and under the Common tab you can change the size of your render output. In my case, I was working with A4 size, so I put those dimensions in, but feel free to choose your own.

Then under the Render menu, press Render Current Frame. You should end up with something similar to the image below!

In the Render View, press File > Save Image. Save it as a nice, high-quality Targa file.

Then, create a new Photoshop document (again, A4 size in my case) and paste your rendered image in it.

Step 12

This is where it gets fun!

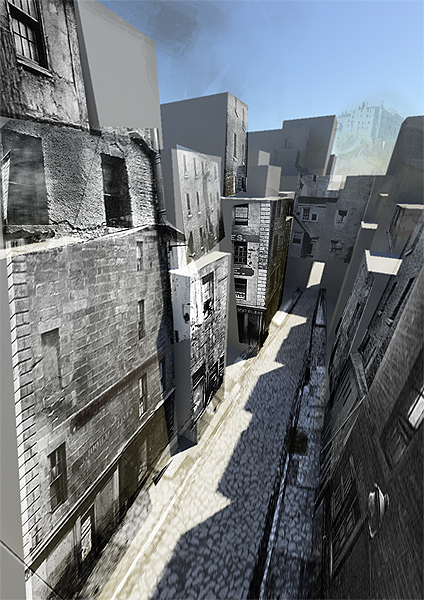
Start by opening up your reference photos, and thinking about which pieces of the photos can go where. You can then start by using the Polygonal Lasso tool to make selections around rectangular patches of your reference images that vaguely resemble the angle at which you want to paste them over your render. Once a selection is made, Command + C to copy and Command + V to paste on your document with the rendered image.

At this point, don’t worry too much about scaling up small reference images, it will hardly be noticeable in your final result. Once you have a patch of buildings pasted in to your scene, press Command + T to Free Transform, and use Command+click & drag on the corners of your sample images to manipulate their perspective roughly into place. Set the blending mode to Overlay, Multiply or whatever else works best. You can also play around with opacity.

Again, don’t feel the need to be very precise. It doesn’t matter all that much if some of the perspective appears to be wrong, it’s a very loose concept, and the images are only there to establish an idea of architecture and surface texture. These mistakes will be covered up in the later stages anyhow.

One thing you should be very cautious about is scale! Try and picture a human standing in the street (paste one in, if it helps!) and work out if there is anything too unrealistic compared to the person in scale.

This is a very organic process, I can’t tell you exactly where to paste each image, but I hope you get the idea of the process!

Step 13

The next step is where a graphics tablet really comes in handy. That’s because we’ll be doing some actual painting! The custom brushes I use 99% of the time are the "MyBroosh" and "Oil Pastel Large 3," which are included in the free brush pack kindly provided by artist Daarken on his website. You can find the brushes in his fantastic Tutorials section.


Step 14

Don’t be put off if you haven’t had any previous digital painting experience. We’re not painting a whole scene, but rather just adding bits of detail and tone to blend the photo elements together.

Make sure you work in new layers when doing things like painting, so that you can always delete all your brush strokes without damaging the material underneath.

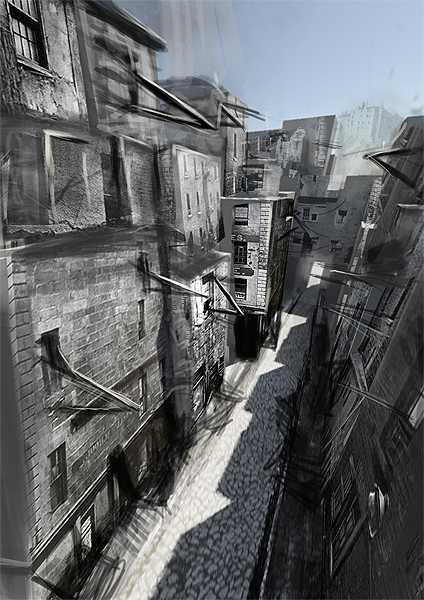
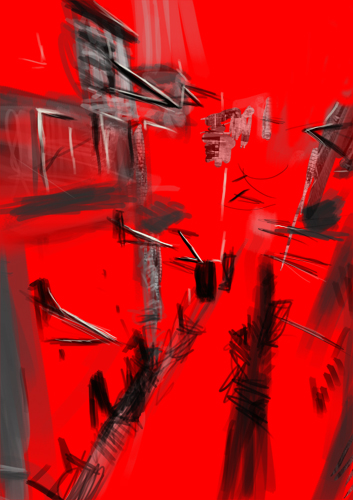
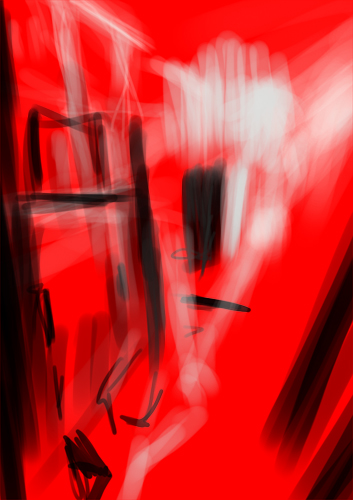
As you can see below, you just need to add random tone and detail all over your scene, without being too precise. Just remember to consider the light source, so that you add highlights and shadows in the right places. On the second image below, you can see just the painting layer pasted over red, so that you can see the black and white strokes. I hope you can see just how messy you can be with this!
Step 15

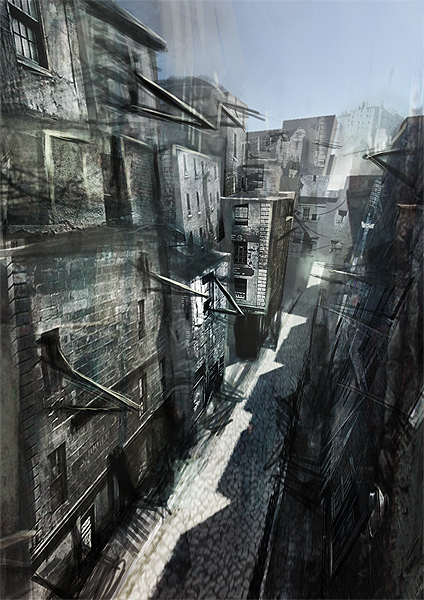
A good, cheap way to add color information without painting it, is to use existing photographs or paintings. For example, I really liked the color and light in this photograph by Leo Rubinfien, so I just pasted it over my document, stretched it to fill my whole canvas vertically and set it to Overlay, at about 67% opacity. Then, I just erased the top part of the image so that it didn’t go into the sky.

Feel free to experiment! A lot of times these experiments will go wrong, but the mistakes are worth it just for the few times when they work.

Step 16

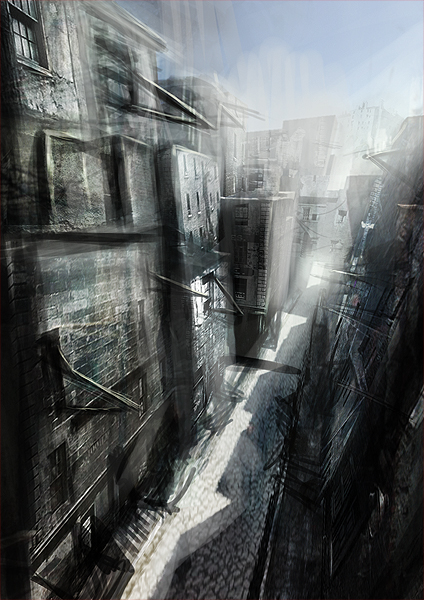
You should then start to establish the light and shadow areas a bit further, to tighten up the scene. Once again you can see just the new painted layer pasted over red. I set the opacity of this layer to around 84%.
Step 17

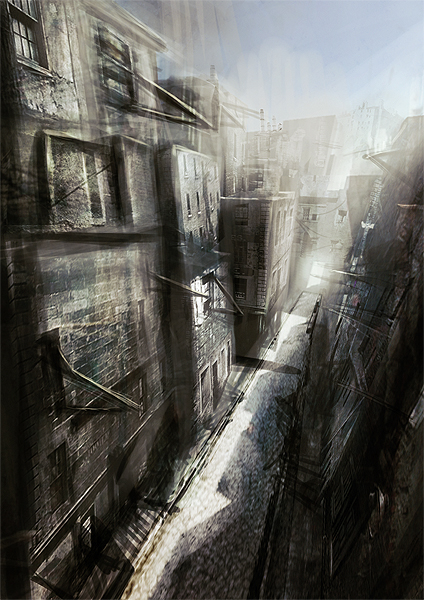
If you feel the need to, go ahead and keep adding more bits of texture and architecture to your scene. In this case, I’ve placed a few more windows and some chimneys around the scene, since it was looking a bit too box-like.

Then, start to add more tone by creating a Gradient Map adjustment layer, setting it to Soft Light and about 11-15% opacity. I used the gradient "Yellow, Violet, Orange, Blue." I also added a yellow/orange grunge texture found at designshard.com and set it to Soft Light, at about 22%.

These steps are by all means not absolute. Again, they aren’t exact values and resources that will work with every image, so by all means experiment until something works for you. I’m just hoping to share the method of creating this particular image, and that will hopefully give you ideas when creating your own.

Step 18

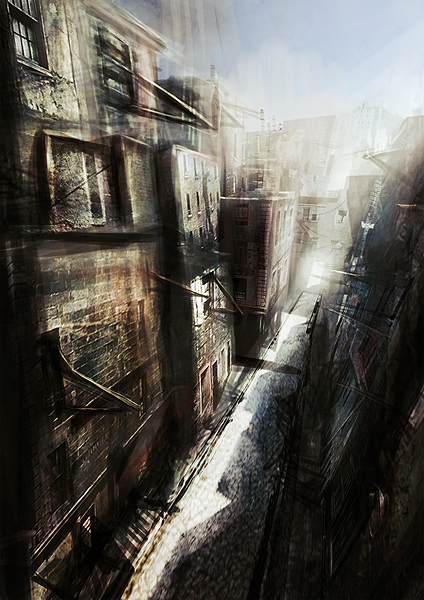
Create a new layer and start painting a few brush strokes in orange-ish and red tones, with the layer set to color, and about 40% opacity. Since the image was leaning mostly to cooler tones, I thought this could add some of color balance and variation.

Then, I add a new Curves adjustment layer, and create a slight S curve on it, to darken the shadows and brighten the highlights.

Step 19

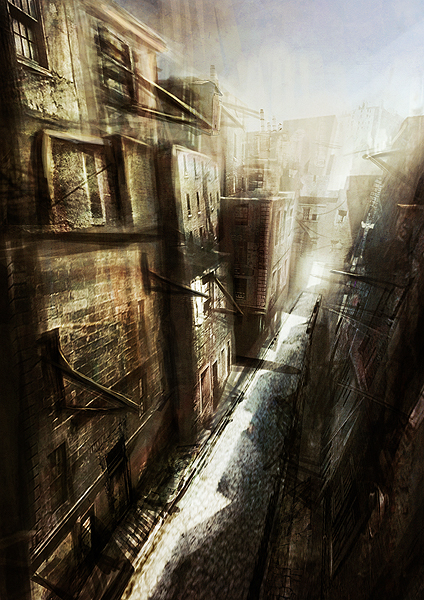
To accentuate the shadow and sun-lit tones further, create a new layer and fill it with a gradient going from an orange to a blue tone, as you can see in the image below. Then, set this layer to Overlay at around 10% opacity.

You can then add another yellow/orange grunge texture, much like the one previously mentioned, and set it to Soft Light at around 34% opacity.

I also thought I should mention that even at this stage, I kept adding architecture reference photos in where I thought they were needed to add more detail.

Step 20

We’re nearly there! Just add any last minute subtle Gradient Maps or any other adjustment layers. Then, create a new layer and fill it with Mid-Gray, and go to Filter > Noise > Add Noise. Depending on your image size, adjust the percentage so that it’s just a very subtle effect, and tick the Monochromatic box. Set this layer to Overlay at around 60-70% opacity, or until it looks right to you.

Then, flatten your image and apply an Unsharp Mask filter to taste!

Conclusion

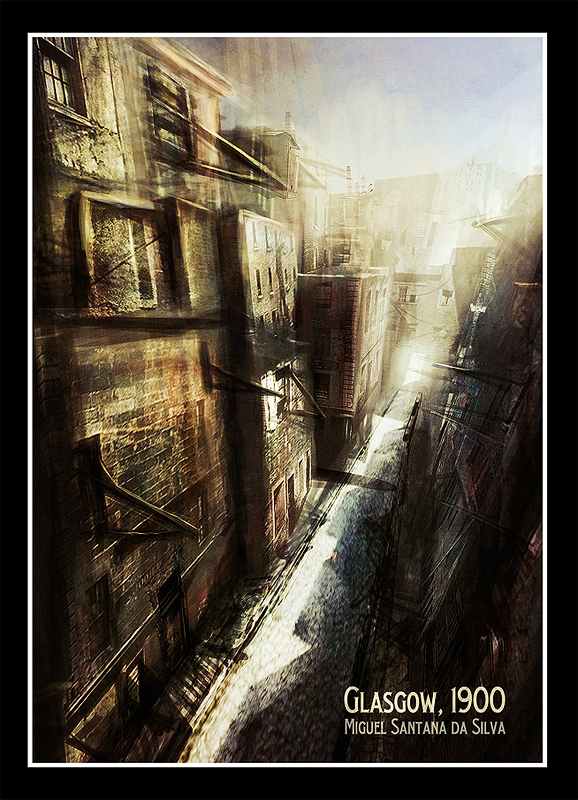
You can now do whatever you want to it, I just added a white border over a black background, and a bit of text, but the presentation is up to you.

Thank you so much for taking the time to read this. I hope this tutorial has been insightful and inspirational.

As you can see, you don’t have to be a great painter with years of experience to create successful pieces of concept art. Can’t wait to see what you guys come up with. Good luck in your future creations!
Read More

AppleScript: Automatically Create Screenshots from a List of Websites

It’s been quite a while since we’ve had any fun with AppleScript so today we’re going to build a super basic script that automatically reads a list of URLs and turns them into screenshots.

If you’re new to AppleScript, be sure to read our introduction and advanced articles! We’ll be explaining things as we go but everything will make a lot more sense once you do your homework.

The Workflow

As a full-time blogger, it’s quite often the case that I have to put together a list of well-designed websites or some other post that requires me to post screenshots of anywhere from fifty to one hundred web pages. This is an exhausting process!

Since I’m lazy and love to sit back and watch my computer do my work for me, I wrote a simple script to handle the process. Basically, we’ll be using a modified version of a TUAW script to take a screenshot and adding in some of our own code to progressively launch a list of links. Let’s get started!

Algorithm

An algorithm is just a fancy word for the general path of our script. Before you write a single line of code, you should always outline the steps that you’ll need to take to reach your goal. For this post, ours is quite simple:

  • Create a list of URLs in Text Edit (manually)
  • Count the URLs in TextEdit
  • Grab the first URL
  • Open the first URL in Safari
  • Take a screenshot
  • Repeat for the rest of the URLs

That’s not so bad is it? We should be able to knock this out in no time.

Step 1: Declare Some Variables

One of the first steps I like to take when coding is to think about the variables that I’ll need and declare them. For instance, here I know I’ll need one counter that will help me cycle through the URLs, a variable to hold the total number of URLs and a variable to hold a customizable file name for the resulting files.

To this end, we’ll declare our counter and filename first. I called the counter “whichUrl” because it will essentially be keeping track of which URL we’re on throughout the script. Notice that I’ll be using comments quite liberally throughout the script, this is a good practice to get into.

1
2
3
--Variables
set whichUrl to 1
set fileNames to "webshot"

Next up, we need to create a tell block that grabs the number of URLs from TextEdit. If we put each URL on a line of its own, AppleScript will see each URL as a paragraph, so we simply tell it to set our variable equal to the number of paragraphs in the front document. This effectively counts our URLs for us.

1
2
3
4
--Get Number of URLs
tell application "TextEdit"
	set theCount to the count of paragraphs of front document
end tell

Step 2: Create a Repeat Block

At this point of the script, we’ll have everything we need to start grabbing URLs and taking screenshots. What we need to do is create a loop of commands that will repeat for every URL. Since we took the number of URLs and put it into our “theCount” variable, we can tell AppleScript to repeat that many times.

1
2
3
4
--Repeat this for every URL
repeat theCount times
	--some code here
end repeat

Step 3: Grabbing a URL

The first step we want to do within our repeat block is to grab the first URL and put it in a variable so we can open it in Safari later. To do this, we take advantage of our whichURL variable, which is initially set to one.

1
2
3
4
5
6
7
8
9
--Repeat this for every URL
repeat theCount times
 
	--Get the next URL
	tell application "TextEdit"
		set currentUrl to paragraph whichUrl of front document as text
	end tell
 
end repeat

As you can see, we told TextEdit to grab the contents of the first paragraph and throw it into the variable “currentURL”. Admittedly, my variables are a bit confusing and could be named a bit better! Feel free to change them to something that makes more sense to you.

Step 4: Open the URL in Safari

Now that we have the URL set to a variable, it’s time to open a Safari window with the URL set to that value. Basically we just create a tell block and set the URL of document one to the variable we created in step three.

1
2
3
4
5
6
7
8
9
10
11
12
13
14
--Repeat this for every URL
repeat theCount times
 
	--Get the next URL
	tell application "TextEdit"
		set currentUrl to paragraph whichUrl of front document as text
	end tell
 
	--Open the URL in Safari
	tell application "Safari"
		activate
		set the URL of document 1 to currentUrl
	end tell
end repeat

Step 5: Take the Screenshot

One of the struggles that I had with creating this script is that the page wasn’t always fully loaded when the screenshot was taken, so the resulting file was either a blank Safari window or a half-loaded web page.

The simple solution is to insert a slight delay. If your Internet connection is slow, you might want to increase this value. After that, we then take and save the screenshot. The saving is done by determining the path to your desktop, then applying the filename variable we set up before plus a number on the end to indicate which URL it was. So the third URL should come out as “webshot-3.jpg” on your desktop.

1
2
3
4
5
6
7
8
9
10
11
12
13
14
15
16
17
18
19
--Repeat this for every URL
repeat theCount times
 
	--Get the next URL
	tell application "TextEdit"
		set currentUrl to paragraph whichUrl of front document as text
	end tell
 
	--Open the URL in Safari
	tell application "Safari"
		activate
		set the URL of document 1 to currentUrl
 
		--Wait until it loads, then take a screenshot
		delay 15
		set saveToPath to ((POSIX path of (path to desktop)) & fileNames & "-" & whichUrl & ".jpg") as string
		do shell script "screencapture -tjpg " & quoted form of saveToPath
	end tell
end repeat

Step 6: Increase the Counter

The last thing we need to do is increase the “whichURL” variable by one. This will cause the script to jump to URL #2 in your TextEdit Document and make sure the filename gets a “-2″ on the end of it.

1
2
3
4
5
6
7
8
9
10
11
12
13
14
15
16
17
18
19
20
21
22
--Repeat this for every URL
repeat theCount times
 
	--Get the next URL
	tell application "TextEdit"
		set currentUrl to paragraph whichUrl of front document as text
	end tell
 
	--Open the URL in Safari
	tell application "Safari"
		activate
		set the URL of document 1 to currentUrl
 
		--Wait until it loads, then take a screenshot
		delay 5
		set picPath to ((POSIX path of (path to desktop)) & fileNames & "-" & whichUrl & ".jpg") as string
		do shell script "screencapture -tjpg " & quoted form of picPath
	end tell
 
	--Increase the counter for next time
	set whichUrl to whichUrl + 1
end repeat

Putting it All Together

That’s it! Our script is nice and short and will save you loads of time if you ever need to take a screenshot of a webpage. Here’s the full script, feel free to copy and paste it right into AppleScript Editor.

1
2
3
4
5
6
7
8
9
10
11
12
13
14
15
16
17
18
19
20
21
22
23
24
25
26
27
28
29
30
31
--Variables
set whichUrl to 1
set fileNames to "webshot"
 
--Get Number of URLs
tell application "TextEdit"
	set theCount to the count of paragraphs of front document
end tell
 
--Repeat this for every URL
repeat theCount times
 
	--Get the next URL
	tell application "TextEdit"
		set currentUrl to paragraph whichUrl of front document as text
	end tell
 
	--Open the URL in Safari
	tell application "Safari"
		activate
		set the URL of document 1 to currentUrl
 
		--Wait until it loads, then take a screenshot
		delay 5
		set picPath to ((POSIX path of (path to desktop)) & fileNames & "-" & whichUrl & ".jpg") as string
		do shell script "screencapture -tjpg " & quoted form of picPath
	end tell
 
	--Increase the counter for next time
	set whichUrl to whichUrl + 1
end repeat

Running the Script

Before you test out the script, be sure to open TextEdit and copy in a list of links. You don’t need to save the document, just be sure that it’s the frontmost page in TextEdit and everything will work fine.

screenshot

The Requisite TextEdit Document

Also, the script works best when you have maximized Safari windows, so before you begin, open a new window in Safari and stretch it as big as it’ll go. After that, you’re all set to hit play and watch the magic happen!

Room for Improvement

As I said, this script saves me loads of time and I love using it, but I fully admit that it could stand to be improved. For starters, it’s limited to the visual portion of the page and doesn’t take a screenshot of the entire website. LittleSnapper works great for this but last I checked there wasn’t any AppleScript support (get on that RealMac).

Further, I’m not sure how to snap only preset, specific coordinates of the screen, so this script just grabs your entire screen, browser chrome, menu bar and all (check below for an alternate version). This is definitely undesirable but I always just automate the cropping as well. You could automate the crop with AppleScript but I find that it’s easier just to use Photoshop and the following steps:

  • Open one of the screenshots
  • Create a new action and hit record
  • Crop the image
  • Close/save the image
  • Stop recording
  • Go to File>Automate>Batch and run the action on your entire folder of screenshots

This is definitely a little annoying but running the script and action setup are a one-time process that can just be quickly run every time you use them. I’d definitely love to see some talented scripters make suggestions for how to improve this to be a little less clunky!

Alternative Version: Manually Selection Grab Area

If you really hate the cropping process, you can actually change the script so that you manually select the portion of the screen to capture. Everything else will stay automated, you simply have to draw a box for each capture to take place.

To accomplish this, change the shell script line near the bottom to the one shown below. All I added was a “-i” after the “screencapture” command.

1
do shell script "screencapture -i -tjpg " & quoted form of picPath

Conclusion

Taking screenshots of a huge list of websites for a roundup post can be time consuming and mind-numbing. Fortunately, with AppleScript and a little ingenuity, you can automate the entire process. Simply create your list of URLs then sit back and enjoy the show.

Leave a comment below if you have any suggestions for improving the script. Also, be sure to let me know what other tasks you find frustrating and wish you could automate, if I think it will help a lot of people, I’ll whip up a tutorial!

Free Copy of Mac App: ‘Smaller’ for 48 Hours! Reserve Your Copy Now!

Do you work with JavaScript or CSS? If so, we’ve got a treat for you! Don’t miss out! You only have 48 hours, so read on now!

Smaller is a Graphical User Interface (GUI) for the YUI Compressor. It helps you to batch minify your CSS and JavaScript files (or folders) via a sleek and simple interface for Mac.

We’re giving away copies of Smaller, developed by Chen Luo for free over the next two days! Smaller usually sells for $20, but to reserve your very own free copy, simply sign up to the recently launched AppFanatix newsletter within the next 48 hours, and that’s all there is to it!

The AppFanatix newsletter goes out to subscribers every two weeks and contains all of the latest app news and deals from around the AppStorm network. If you use Apps, you’ll love AppFanatix!

By signing up to the newsletter, not only will you get Smaller for free, but you’ll also be the first to find out all of the details on our upcoming Mac App Bundle, which will feature many more great Mac apps at an amazing price.

How To Get Your Copy!

  1. Subscribe to the AppFanatix newsletter in the following 48 hour period: Thursday 00:01am EST – Friday 11:59pm EST. If you subscribe after this period you are ineligible for the giveaway.
  2. Wait for our email at the end of the giveaway period, with your very own free copy of Smaller!

Thanks to Chen Luo for being a part of this giveaway! If you like Smaller, be sure to check out Chen’s site and his other handy apps Resize and resizeMyBrowser.

Don’t risk missing out, sign up now and reserve your free copy of Smaller now!

Vitamin R: Stay Productive with Time-Slices

We all struggle with procrastination from time to time, especially when overwhelmed with the size or scope of a project. There have been a number of studies and books written lately about the benefits of working for shorter periods of time, with regular short breaks in between. In combination with setting specific small goals to accomplish, this technique is supposed to help you stay focused on the task without getting overwhelmed, and makes you less likely to procrastinate.

The developers of Vitamin-R aimed to create an unobtrusive menu-bar app to help you manage your “time slices” and breaks, while encouraging you to stay focused on small tasks. Vitamin-R integrates many of the ideas described by these new productivity techniques into its functionality, but can it really help you stay focused?

The Philosophy

The Philosophy behind Vitamin-R is based on how the brain naturally functions. Most work environments lead us to focus on large tasks for long periods of time, while dealing with multiple interruptions and being forced to multi-task. The brain, however, works best when focusing on a single task without interruption, for shorter periods of time. Vitamin-R refers to these short periods of work as “time slices,” which should ideally be 15-25 minutes.

Large tasks can scare us into avoidance and procrastination, literally triggering the “fight or flight” response in our brains; if you instead divide large tasks into smaller sub-tasks, they goal becomes too small to scare us and we can get started.

Using Vitamin-R

Vitamin-R lives in your menu-bar, and pops out unobtrusively when clicked on. To start working, the first step is to define your objective, which is supposed to be a small chunk of the task, defined very specifically.

Next, decide how long you want your “time slice” to be, and decide what to do about other apps that may distract you. There is an option to either hide or quit a custom selection of apps that are open, which impressively managed to quit all my checked apps super fast.

Entering an objective

Entering an objective

Once you start working, a countdown timer appears in your menu bar, and clicking on it will bring up the Vitamin-R interface displaying your objective, with the options to end or pause the time slice. There are many customization options to keep you on track, like a ticking noise every minute (which I found really irritating) or having a computer voice tell you how long you have left every so often.

Personally, I don’t like the audio reminders, I found them distracting and they often startled me. I’d much prefer to see a growl alert occasionally, with a custom message.

Working on a time slice

Working on a time slice

I used Concentrate when I was in school and loved being able to set custom Growl alert with a computer voice that would read out my messages (I set it so it sounded like Stephen Hawking was berating me). Another thing I liked about Concentrate was the ability to create numerous reminders or alerts, so I could have “motivational” messages play every 15 minutes, but a growl alert reminding me to save my document every 3 minutes.

You can also set Vitamin-R to play a constant noise throughout, like a ticking noise, or white noise. I can’t imagine anyone using this feature, but you never know.

When you finish a time slice, you’re prompted to rate your concentration level, then you can decide whether to take a timed break, open-ended break, or continue straight to the next time slice.

Now & Later Boards

The philosophy behind Vitmain-R recommends ”memory dumps,” sets of notes that you quickly jot down before they leave your mind. Because we can only keep a couple “chunks” of information in our working memory at a time, Vitamin-R allows you to write down notes or ideas on either the “Now” or “Later” boards.

The Now board is for items you’re going to need while working on this time slice, like something you’ll need to add to the next paragraph of text, or perhaps a phrase you’ll need to copy and paste. The Later board is for writing down important things that need attention after you’ve completed your time slice, and don’t want to forget. By writing it down, you get it out of your mind and are able to focus better on the task at hand.


The "now" pad

The "now" pad

You can access the Now & Later pads (and a “Scratch pad” for what doesn’t fit in now or later) through system-wide keyboard shortcuts. I think a lot of us already have systems for keeping track of these kinds of notes, for example, I use Evernote to keep track of things that are important now, and add tasks to Wunderlist, so I don’t think I’d use this feature.

FastType

I found the most useful part of the Now & Later pads to be the FastType syntax, which allows you to create common formatting (like bulleted lists and horizontal lines) using easy to remember shortcuts, like typing * for a bulleted list, — for a horizontal line, etc. This is the one feature that had me tempted to switch from Evernote, but I’m hopeful Evernote picks up a similar feature soon.

Logs & Statistics

Each time you complete a time slice, Vitamin-R records information about length, objective, and concentration level. You can find this information under Tools>Logs or Tools>Statistics, and can view the information in RTF format or as a graph in the Statistics view.

RTF Vitamin-R log

RTF Vitamin-R log

Graph view

Graph view

Customization

Vitamin-R features some pretty extensive customization options, allowing you to skip or customize dialogs, set defaults, set alarms and sounds, and keyboard shortcuts, allowing you to create your own custom workflow.

Customization options

Customization options

Does It Work?

So, the philosophy sounds appealing and reasonable, but does Vitamin-R actually increase productivity? If you use it right, and it suits the way you work, then it probably will.

Working in “time-slices” is ideal for people who are easily overwhelmed by large tasks, or who constantly have too many things to do. Personally, I’m more of a “Hell yeah I’m gonna get this thing done in 8 hours straight so nobody talk to me until tomorrow!” type of worker, which suits me fine. I found that whenever a time-slice ended, I just wanted it to go away so I could get back to work.

However, the literature on this topic would tend to suggest that I’m the exception not the rule, and I can certainly see how this app could help a lot of people to overcome procrastination. The philosophy behind Vitamin-R is solid, and the functionality is very usable and customizable, despite a bit of a learning curve.

If you’re curious about the philosophy behind apps like Vitamin-R, check out the Pomodoro Technique.

Conclusion: Worth a Download?

Is it worth $20? Like I always say, that depends. Could you accomplish the same thing with a pencil, paper, and egg timer? Absolutely. But if you do most of your work on the computer, it’s certainly handy to be able to set everything up from your computer, and I doubt the patrons at your local cafe will appreciate your egg timer.

The developers of Vitamin-R frequently update the software, and released an update as recently as May 17, and a reliable update schedule is one of the main things I look for in a paid app. Vitamin-R is a well-designed app that accomplishes its goal, but its functionality may be superfluous to some people.

Machinarium: A Beautiful, Industrial Puzzle Game

Puzzle style adventure games have never exactly been my “thing”. I’m not a hardcore gamer, but when I do play, I usually stay away from these types of games. After deciding to expand my horizons, I looked around in this genre and spotted Machinarium. The screenshots of the game immediately drew my attention. The visuals were absolutely stunning and enough to get me to venture off into the realm of puzzle/adventure gaming.

Machinarium is a point and click game that takes place in a magical industrial environment full of amazing sights and sounds. You must solve puzzles of varying complexity within the environment in order to move forward in the game. Does the gameplay measure up to the graphics? Read on to find out.

Design

Machinarium is a point and click adventure puzzle solving style game and the world in which this game takes place is completely amazing. I found myself just looking around the beautifully designed levels. The detail on the illustrations and animations is definitely something to pay attention to. I can see how this could hinder the gameplay, but overall I think there is a nice balance. We’ll talk more about the actual gameplay here in a bit, but first up let’s talk about the world that is Machinarium.

Environment

The world is interesting enough to keep you fully immersed, which certainly adds to the game. This isn’t a non-stop action game so you do have some time to “smell the roses” (or maybe oil in this case) so to speak. The hand-drawn, dark, industrial landscapes are beautiful to look at and fit with the concept of the game. The ambient, electronic soundtrack has an oddly peaceful yet industrial feel to it and adds a whole other level of immersion.

Opening landscape

Opening landscape

Subtle animations pop up everywhere in this beautiful environment. Some are simply background animations and just flat out look cool while others are actually part of the game. Whether moving a crane, pulling a crank or pushing a dumpster, it is all done very well and fits seamlessly with the rest of this little world. I was wowed by what I saw on more than one occasion.

Another beautiful landscape

Another beautiful landscape

Something else that is a bit interesting about the environment Machinarium takes place in is that there is no spoken or written language anywhere. The storyline is conveyed through dreams and thoughts that you’ll see in comic style idea bubbles. It is an interesting way to let the story unfold, it adds some mysteriousness and even a bit of humor to the environment.

Really, the game is worth checking out just because of its beautiful landscapes. Each new screen feels like it could be a painting hanging on my wall. It is just flat out visually stunning.

Characters

The characters in this game are robots of all varying types and sizes. You’ll encounter many different types of robots on your quest that all do different things and have their own personalities. Though the game does have a somewhat dark feel about it, there is absolutely some underlying humor. The characters are quite funny not only in how they look but how they act.

In fact as I’m writing this I’m just watching a couple characters wait for me to return to the game play. They are making all sorts of entertaining movements and the main character has even been dreaming (line drawing style dreaming of course). The game designers did a wonderful job giving these characters personality and have used no words at all. You’re able to get a sense for what our main character is all about just by his mannerisms and thoughts. This makes you take a bit more ownership in the story.

The main character and the wine making robot

The main character and the wine making robot

It’s worth mentioning the animation of the characters in Machinarium here as well. Like everything else you’ll see throughout the environment, the character animations fit well and are quite entertaining. Like I mentioned, the game does have a bit of a dark feel, but the personality and the humor really comes out with how the characters interact with the space around them and with each other. Honestly it’s a little difficult to explain a lot of the exact interactions, but let’s just say you will be cracking smiles frequently. Even the way the robots walk around is amusing. It’s just done really well, and adds a ton of personality to the game.

The main character dreaming about something

The main character dreaming about something

Gameplay

I think the easiest way to go about this is to just walk you through some typical gameplay and discuss what exactly is going on. The story begins in a mucky looking junk pile where the pieces of your robot are tossed about. You put yourself together and begin your journey. Right from the start, what exactly you’ll be doing on your journey isn’t apparent. The story will continue to unfold through your character’s thoughts and dreams. From the beginning you’ll get the feeling that your character has always been the peweny robot in the junkyard and has always gotten pushed around. It’s that classic “little guy can do it” sort of story. It’s easy to get on board with the plight of this little guy.

It is a point and click type of game so you’ll be doing doing a lot that as you work your way through. You click to where you want the little guy to walk and off he goes to that spot. You’ll be able to interact with various items as you move along. Hovering your mouse over the item will indicate if it is something you can interact with. Picking up items is also possible and is actually crucial part of the game. These items are needed to perform certain tasks and to solve certain puzzles. To add a level of complexity items may be combined and then used. So things get tricky pretty quickly. There is a lot to interact with.

Moving about in this world is pretty progressive, meaning you’ll mainly be moving forward from one screen to the next while sometimes jumping back a screen or two in an effort to solve a puzzle. You’ll spend the game attempting to move forward. There is always something blocking your way and you need to figure out what you can do to move past it.

The game is essentially one puzzle after another. There are even some smaller interwoven puzzles that you’ll need to solve along the way. For example, you may need to lower a crane and the controls to do so aren’t exactly straight forward. You need to figure out which buttons need to be lit up. That’s a pretty basic example, but you get the idea. They aren’t incredibly tough, but there were plenty tricky enough to hang my non-puzzle-tuned mind up pretty good.

In game mini-puzzle

In game mini-puzzle

Overall, solving the puzzles was challenging, but not impossible. I definitely got hung up and there were even some times of frustration. If you are struggling, you are able to use a couple hints in each space. Checking a hint will pop up an idea bubble for your robot illustrating a part of what needs to be done next.

You’re only able to view a certain amount of these in each area so you need to use them sparingly. Most of the time these are enough to give you that little kick forward but sometimes you may need a bit more. In those situations you can play a mini arcade game to unlock a book that will show you some sketches of the process to solve puzzle. The arcade games aren’t difficult, but it is a pain to go through that process every time you want to look at the cheat sheet.

The cheat book

The cheat book

I was a little skeptical that a game like this would grab my attention but Machinarium’s gameplay really did. The environment, combined with the animation and the way you interact with everything, is really very engaging. And there’s nothing like a good brain teaser to get a person mildly obsessed.

Conclusion

I’m not a huge gamer, and this is not the typical type of game that I go for when I’m looking for one. When I saw Machinarium by chance browsing the App Store the imagery caught my eye immediately. Admittedly that is what brought me in, but the actual world that has been created by the developers and the gameplay within it is what kept my attention.

I’ve always thought of the purpose of a video game as being something that can temporarily transport to you another world and take your thoughts and troubles out of your mind for a bit. I wasn’t expecting this quite as much from this type of game, but I was very wrong.

The ambient sounds and the overall feel of the environment does an absolutely amazing job of transporting you into that world. That combined with working through the puzzles is more than enough to keep your mind occupied and give you a bit of a break from the rigors of real life. It serves as a wonderful mind escape and also a sleep depriver as you may find yourself saying things like “I just want to get past this one thing before I go to bed” over and over.

Machinarium is in that wonderful space of being a beautifully designed game while also being very entertaining and engaging. You will lose yourself in the beautiful landscapes, be challenged by the puzzles, get a laugh from the characters and animation and have a great time each step of the way.

10.6.8 build 10K540 seeded to developers

The latest build of Mac OS X 10.6.8 has been seeded to developers. This build lists no known issues, and it has the exact same focus areas as an earlier build: AirPort, Networking, Graphics Drivers, the Mac App Store, QuickTime, and VPN.

There’s no indication of when 10.6.8 will see public release, but with OS X Lion due next month, it’s likely it will be one of the last major updates to Snow Leopard.

10.6.8 build 10K540 seeded to developers originally appeared on TUAW – The Unofficial Apple Weblog on Fri, 17 Jun 2011 00:00:00 EST. Please see our terms for use of feeds.

Source | Permalink | Email this | Comments

Facebook is preparing an iPad app

According to the New York Times, Facebook is finally making an official iPad app. While Facebook’s iPhone app has been in the App Store from day one, it’s been a long, long wait for an iPad version of the popular social networking site. When asked about the possibility of an iPad app last November, Facebook founder Mark Zuckerberg reportedly said such an app wasn’t in the works because “The iPad isn’t mobile.”

It looks like that was an ephemeral “no” worthy of Steve Jobs. According to the Times, Facebook’s iPad app has been in testing for nearly a year, and Zuckerberg himself has been closely involved in its development. People familiar with the app’s development say its design is “slick” and well-optimized for the iPad’s screen, and it includes photo/video uploading features tied directly to the iPad 2’s built-in cameras.

Thus far, iPad users unsatisfied with the way Facebook’s site functions on a touchscreen-based device have had to make do with third-party applications. I’ve been using Friendly for iPad, but I’m still curious to see how Facebook’s official app turns out. As we heard earlier, Facebook is also planning an HTML5 application platform called “Project Spartan,” but according to the Times’ source that is intended to “supplement” the iPad app rather than compete with it.

Like the iPhone app, Facebook for iPad will be free. It is expected to debut on the App Store within the next few weeks.

Facebook is preparing an iPad app originally appeared on TUAW – The Unofficial Apple Weblog on Thu, 16 Jun 2011 23:00:00 EST. Please see our terms for use of feeds.

Source | Permalink | Email this | Comments

WWDC Interview: blueHula Studios

I sat down to talk WWDC keynote reaction with the chief dude at blueHula Studios, Craig Vanderzwaag. BlueHula makes Beer Timer, an app to keep you from freezing your beer until it explodes. Pretty neat idea, and as Craig explains, they actually put research into it!

TUAW and MacTech Magazine teamed up to speak to developers at WWDC 2011 about the keynote and how Apple’s new technologies will help them and their customers. Over the next couple of weeks, we’ll bring you those videos here, MacTech.com and MacNews.com. Also, check out the free trial subscription offer for MacTech Magazine here.

WWDC Interview: blueHula Studios originally appeared on TUAW – The Unofficial Apple Weblog on Thu, 16 Jun 2011 22:00:00 EST. Please see our terms for use of feeds.

Source | Permalink | Email this | Comments