Best Resouces In iOS Development – June 20th 2011

Another great week has gone by with many developers still learning the ins and outs of the new iOS 5 SDK.

While the iOS 5 SDK is still underway many great resources were featured on this site this week, with the most popular being open source libraries for easy user interface enhancement, and game engine updates, and tool releases.  A new book on Cocos2D is also being released soon, that looks terrific.

Here are the top new resources on this site from the past week ordered by popularity:

Open Source: Easy UITableView Within A UIAlertView – An extremely useful library that allows you add perfect looking UITableViews within a UIAlertView, even allows for multiple selections.

Sparrow Framework Adds Particle System – The excellent Sparrow Framework iOS game engien has added a very easy to use particle system that even supports the Particle Designer tool.

Open Source: Library For An Easy To Implement Copyable UITableViewCell – Useful library that allows for you to easily create UITableView cells from which the user can copy/paste data.

Learn Cocos2D Book From Ray Wenderlich And Rod Strougo Nears Release – A new Cocos2D book is being released featuring the creation of a fully featured game from start to finish.

Tool: LevelHelper Level Editor With Physics – An excellent level editor tool allowing for easy level creation and physics within multiple environments (eg. Cocos2D, Cocos2D-X, and Corona SDK)

Tutorial: Dynamic Textures In Cocos2D – Excellent tutorial explaining how to create textures within Cocos2D that can change dynamically.

Open Source: Multitude Of Useful Cocos2D Extensions – A new library featuring many small, but useful extensions for the Cocos2D game engine.

Comparison Of iOS Crash Report Managers – Listing and comparison of several different iOS crash report managers.

Thanks for reading, please bookmark and share this post!

©2011 iPhone, iOS 4, iPad SDK Development Tutorial and Programming Tips. All Rights Reserved.

.

DeliciousTwitterTechnoratiFacebookLinkedInEmail

ScrollView Example in iPhone

In this application we will see how to TextField implement in the ScrollView. So let see how it will worked. Another ScrollView example you can find out from here ScrollView Example

Step 1: Open the Xcode, Create a new project using View Base application. Give the application “ScrollView_Example”.

Step 2: Xcode automatically creates the directory structure and adds essential frameworks to it. You can explore the directory structure to check out the content of the directory.

Step 3: Open the ScrollView_ExampleViewController.h file and make the following changes:

#import <UIKit/UIKit.h>

@interface ScrollView_ExampleViewController : UIViewController {

IBOutlet UIScrollView *scrollView;

IBOutlet UITextField *textfield1;
IBOutlet UITextField *textfield2;
IBOutlet UITextField *textfield3;
IBOutlet UITextField *textfield4;
IBOutlet UITextField *textfield5;
IBOutlet UITextField *textfield6;
IBOutlet UITextField *textfield7;
IBOutlet UITextField *textfield8;

}

@end

Step 4: Double click the ScrollView_ExampleViewController.xib file and open it to the Interface Builder. First drag the ScrollView from the library and place it to the view window. Next drag eight Label and eight UITextField from the library and place it to the view window (See the figure 1). Select the ScrollView from the view and bring up Size Inspector and changed the y position (-200) (See figure 2). Now Save the ScrollView_ExampleViewController.xib file , close it and go back to the Xcode.


Figure 1


Figure 2

Step 5: In the ScrollView_ExampleViewController.m file make the following changes:

#import "ScrollView_ExampleViewController.h"

@implementation ScrollView_ExampleViewController

(void)dealloc
{
[super dealloc];
}

(void)didReceiveMemoryWarning
{
[super didReceiveMemoryWarning];

}

#pragma mark – View lifecycle

// Implement viewDidLoad to do additional setup after loading the view, typically from a nib.
(void)viewDidLoad
{

[super viewDidLoad];

scrollView.frame = CGRectMake(0, 0, 320, 460);
[scrollView setContentSize:CGSizeMake(320, 678)];

}

(BOOL)textFieldShouldReturn:(UITextField *)textField{
[textField resignFirstResponder];
return YES;
}

(void)viewDidUnload
{
[super viewDidUnload];
// Release any retained subviews of the main view.
// e.g. self.myOutlet = nil;
}

(BOOL)shouldAutorotateToInterfaceOrientation:(UIInterfaceOrientation)interfaceOrientation
{
return (interfaceOrientation == UIInterfaceOrientationPortrait);
}

@end

Step 6: Now compile and run the application on the Simulator.

You can Download SourceCode from here ScrollView_Example

Manually Migrating to a new Mac

This article gives an ordered checklist of things to do (or think about) if you’re manually migrating to a new Mac. When I say “manually”, I mean not using Migration Assistant, or restoring from a clone or other backup. This is the first in a series of ‘Guide’ articles, giving advice for common and/or interesting situations you might encounter when using your Mac.

This checklist is for situations where you want to start fresh with a clean installation of OS X and just your essential apps and files, which can provide a general speed boost and may also be a useful preparation for a major new version of OS X (at time of writing, 10.7 Lion is just a few weeks away from release). You may find this approach particularly advantageous if you’re moving from a single-drive HDD-only machine to a dual-drive, SSD plus HDD setup. I’ve written a separate guide with some specifics on a good SSD plus HDD configuration, which I’ll publish in due course.

Your situation and preferences will differ, but this should be of interest at least as a possible approach and a checklist of things to think about when making the move. I’ve written the checklist in what I believe to be a sensible order, letting you finish up with the old machine and move the new machine into place as we go. This guide assumes you have both the old and new machines in the same location, both powered up and running, and that you have at least a factory installation of Mac OS X on the new Mac.

Just a small warning to my regular readers: this isn’t a breezy, opinionated, entertaining article you can read with your coffee; you’ll probably only ever want to read this if you’re actually migrating to a new Mac. By all means plough ahead anyway if you want to, of course.

Things to have

If you’re extremely organised and are reading this before you’re ready to begin (or perhaps even before your new machine has arrived), you might want to make sure you have:

  • An ethernet cable. Regular is fine; it doesn’t have to be crossover. Make sure it can reach between your old Mac and the new one, as you’ll at least temporarily have both sitting in close proximity.
  • A multi-socket extension cord or cube, if you’ve run out of power sockets.
  • A paper notepad and pen. There are always a few things it’ll be easier to scribble down and re-type.

If you’re going to be using Time Machine with the new Mac (and you should), I advise considering a Firewire 800 drive. It’s noticeably faster than USB2, and Time Machine can really drive you to distraction if the hourly backups are slow. If your Mac won’t arrive for a day or two, consider ordering one now.

When you have your Mac and the items listed above, let’s proceed.

Backup the old Mac

Hopefully, you already have a backup schedule, and you’re up to date. Even if you’re retiring the old Mac and keeping its contents intact, you’ll still want a full backup – the original copy doesn’t count as a backup, naturally. Furthermore, if you need to dip into your old files to get something you missed, it’ll be easier to do that from an external drive or from the cloud than to set up the old Mac again.

Time Machine is fine, but I also always keep a full clone of the internal drives; the app I use for this is SuperDuper. So, checklist points:

  • Allow a full sync to your cloud services to occur on the old Mac. MobileMe, Dropbox, Google Calendar; whatever you use.
  • Take a full backup of the internal hard drives, ideally bootable clones.

Initial setup of new Mac

  • Make the most basic System Preferences settings that you need to be able to use the machine relatively comfortably, perhaps including:
    • Mouse or trackpad behaviour. Tap to click? Secondary click/tap? You’ll know what’s missing within the first couple of minutes.
    • Dock behaviour.
    • Full Keyboard Access, if your brain/fingers depend on it.

Most of the rest can wait for later. The only other really critical thing at this point is networking:

  • Get onto your wi-fi network.
  • Ensure your ethernet interface is a higher priority than the AirPort hardware.
  • Set up the machine’s network name to suit your preferred naming scheme.
  • Enable file sharing and perhaps screen sharing, at least temporarily.

Copy essential files

This is a clean build, so take this opportunity to be selective and trim down some of the clutter from the old Mac that you don’t need. The new build should have everything you need, and nothing you don’t; lean and fast. You’ll want to consider the folders below, and copy their contents into the same place in your account on the new Mac.

I recommend you directly connect the two machines via ethernet for the best transfer speed; use any old ethernet cable, and both Macs will auto-sense that they need to operate in crossover mode. You should also ensure that, when the ethernet cable is connected to both Macs, that Ethernet appears before AirPort (or Wi-Fi) in the list in the Network pane of System Preferences. This will mean that your Mac will prioritise that interface for copying the files. Mount your home directory from the new Mac (if you’ve enabled File Sharing on it) on the old Mac, and copy in batches. You may want:

  • Documents folder.
    • Perhaps including any virtual machines you use.
  • Music folder, for your iTunes library and GarageBand compositions.
  • Pictures folder, if you have important photos and/or graphic work. Your iPhoto and Aperture libraries also live here.
  • Remember to pick any anything on your Desktop.
  • Movies, if you have a video or TV library. Your iMovie projects are here too.
  • Depending on how you use it, you may want to copy some of the contents of your Downloads folder.
  • Other home-level folders you may have:
    • Applications?
    • bin?
    • Development/Code, if you keep it there?
    • Anything application-specific that you need.
  • Consider invisible files and folders. You can ignore most of it, but do strongly consider:
    • .ssh folder, for your keys.
    • configuration (and history) files pertaining to your preferred shell, such as .bash_profile and .bash_history.
    • any local repositories you may have, either for source control, command-line software installation, or such.
    • You can copy these files on the Terminal if you have the new Mac mounted; its mounted volumes are reachable in /Volumes.

If you have the patience, I also recommend taking a copy of your Library folder (from your home directory on the old Mac), and putting it on your new Mac – not in your new home directory, however. Just keep it someplace, as something to refer to and cherry-pick settings and configurations from as you go. Keep your lean, clean new Library folder, but have the old one around for a while – you’ll be amazed all the little things in there that you’ll probably want to grab, such as fonts, desktop pictures, sounds, Growl and Adium themes, and lots of other bits and pieces.

If you have a repository of your purchased serial numbers or licenses for apps which isn’t already included in the list above (or isn’t in your email), be sure to copy it over also.

Finally, you may want to take screenshots (or notes, either electronic or on paper) of relevant settings from the old machine that you’ll want to configure on the new one. There should be relatively few of these, but you may want to take special note of:

  • Any special network settings you’re using, such as a fixed IP or custom DNS servers.
  • Time Machine exclusions.
  • Spotlight Privacy exclusions.
  • Printers and Scanners, particularly for sharing.
  • Any keyboard shortcuts you’ve added in the Keyboard pane of System Preferences.
  • Settings pertaining to any third-party System Preferences panes you’ve installed. You’ll also want a list of such panes.
  • Login items from the Accounts pane in System Preferences. A list of these can remind you what to install on the new Mac.
  • Any custom status items you have installed in the menubar, and a note of which apps provide them.
  • A screenshot of the contents of the Recent Items submenu in the Apple menu. It’ll make it easier to remember what apps are essential to reinstall on the new machine.

If you’re particularly fastidious and/or obsessive, you may also want to take screenshots of:

  • The contents of your Dock, making note of the identity of any anonymous-looking folders and Stacks.
  • The arrangement of files on your Desktop.

You’ll also probably want a copy of your user account photo/icon, unless you took a new one via the FaceTime camera on your new Mac during setup.

These should help you make yourself at home more quickly on the new machine.

It’s much easier to screenshot these than to try to extract them from mysterious configuration files later. Finally, unmount any shared volumes from the new Mac and disconnect the ethernet cable.

Prepare to wind down the old Mac

We’re nearly ready to switch off the old Mac, or at least move the new Mac into place to start building it into our primary machine. Some quick housekeeping tasks:

  • If you’re retiring the old Mac, consider deactivating any automated backup systems, like Time Machine or scheduled clones.
  • Consider de-authorising the machine for iTunes if you’re not going to have it running. You have a 5-machine limit per account, and you’ll need a slot for the new machine.

You can now shutdown your old Mac, disconnect peripherals, move the old Mac away, and prepare to move your new Mac into place. Take the opportunity to route power and connection cables even if you’re not actually setting up peripherals yet (we’ll do that later). If necessary, power the new Mac back on.

Continue setup of new Mac

Let’s proceed with setting up the new Mac. You can probably spend most of a day tweaking various settings, but for now, focus on the basics:

  • Configure your cloud sync accounts (MobileMe etc) and allow them to proceed with an initial full sync.
  • Configure your iTunes account, and authorise the computer. You have already copied your iTunes library; ensure it’s found.
  • Configure sharing options to your liking.

Boot Camp partition

If you ever plan to use Boot Camp, now is the best and safest time to use Boot Camp Assistant to create a suitable partition. It’s non-destructive to existing partitions, and your machine is in a pristine state, so it’ll take only moments. You can create the partition and then quit Boot Camp Assistant, and go back later to actually install Windows. If your new Mac has multiple internal drives, Boot Camp Assistant will allow you to choose which one to partition for Windows.

The size is a personal decision; you’ll probably want a minimum of 60 GB or so unless you have an ultra-minimal need. For Windows 7 and a few big games and heavy apps, 100 GB is a good guideline size. If you’re a hardcore gamer planning to put a huge Steam library on it, you’ll want even more.

Connect and configure peripherals

It’s time to hook everything up to the new Mac. In the root of the boot drive you’ll find a folder (actually, an alias to a folder) containing various user guides, including one introducing you to your new machine. The guide is a fully resizable/scaleable PDF, and it includes diagrams of the various ports and connectors on your Mac. If you have a desktop Mac, it’s handy to zoom into those port diagrams and take a screenshot, so you have a reference card for when you’re fumbling behind the machine to find the right socket for a cable. I usually name the file “ports”, and put it in my Pictures folder; you can then pull it up by entering “ports” into Spotlight whenever you need it.

  • Attach, power on and/or mount all relevant peripherals and drives.
  • If you have network-attached devices, make sure they’re visible.
  • Consider whether you need to re-share local devices to the network, like printers or scanners.
  • Sync your iOS devices to the new Mac, allowing them to be backed up.

Install applications and utilities

This is the part that almost put you off making a clean, manual migration – installing your apps. My advice is to take a look at the screenshots of both your Dock and your Recent Items menu from the old Mac (you did take those, didn’t you?), and of course your status items. What constitutes an “essential” app will be different for everyone, but for my usual readership of developers and designers, you may wish to consider:

  • Developer tools, such as your IDE and your favourite text editor(s) like BBEdit or TextMate.
  • Graphic design tools, such as Adobe Creative Suite applications or otherwise.
  • Your chosen virtualisation software, such as VMware Fusion or Parallels.
  • Media-management applications, like Aperture or Lightroom.
  • Productivity applications, such as iWork, Microsoft Office and the various Omni Group apps.
  • Social media and messaging applications, like your email, IM and IRC apps, and Skype.
  • Utilities like Growl, Printopia, Dropbox, Little Snitch, SuperDuper, VLC and so forth.
  • Codecs, plugins and helpers, like Perian or Adobe Flash (boo!)
  • Additional web browsers, like Chrome or Firefox.
  • Steam, if you’re a gamer.
  • Your preferred peer-to-peer networking applications.

Remember that if you’ve purchased software on the Mac App Store, you can re-download it to your new machine using the Purchased tab in the App Store app.

Once you’ve installed and re-registered everything, you’ll want to check for updates. Most apps will have their own internal update checking mechanism, but you’ll also want to check via:

  • Software Update, in the Apple menu
  • The Updates tab in the Mac App Store app
  • Microsoft AutoUpdate, for Office
  • Adobe Update Manager, for Creative Suite

That’s the most arduous part over.

Configure backups

Time to create a robust backup strategy. We’re professionals, and this isn’t optional. My recommendation is to have at least two forms of backup:

  • Daily clones of the entire contents of your Mac’s internal drive(s).
  • Hourly incremental backups via Time Machine.

For cloning, I use SuperDuper as mentioned previously, and a USB2 drive is more than sufficient. Make sure to set SuperDuper to Smart Update the clones, which means it’ll copy on what’s changed to create an up-to-date clone, not re-copying everything each time. You can of course use a Time Capsule or other NAS instead, in whatever disk configuration you prefer. For Time Machine, as previously stated, I strongly recommend a Firewire 800 drive instead of USB2.

If you’ve purchased or erased a large drive to use for backups, consider taking this opportunity to partition it. Some thoughts:

  • Time Machine volumes should be as large as you can provide. TM gets slow when it has little free space, and more space means more backup versions being saved.
  • Clone volumes should be no larger than the maximum capacity of the volume they’re cloning, naturally.
  • It’s always very handy to have one or two smaller partitions for miscellaneous use. A 20 GB partition is very handy for running other versions of Mac OS X, for example.

Configure your clone(s) and schedule them to run when you won’t be using your machine heavily. Overnight is ideal, but dinnertime might be fine too. Consider leaving the machine on overnight at least for the initial full clone, which will be time-consuming. Set a reminder for the next morning to check that the clone(s) successfully completed, and at least weekly try to boot from them or otherwise check their integrity.

You should now connect and configure your Time Machine backups. For minimal intrusion each hour, and given that you have a nightly full clone anyway, you may wish to make some exclusions in the Time Machine options sheet. The specific exclusions are up to you, but you may want to consider some of the following:

  • All volumes of your backup and cloning drives. These should be excluded automatically.
  • /Applications (changes here will often be large, and will be caught by the nightly clone)
  • ~/Library/Caches (frequent changes, which aren’t essential to keep)
  • /Developer (trivial to recreate)
  • ~/Downloads (very frequent changes, and often containing very temporary items)
  • ~/Dropbox (this is already backed up in the cloud, by the very nature of how it works)
  • ~/Library/FileSync (can have very frequent changes)
  • ~/Music/iTunes/iTunes Music [sometimes “iTunes Media” instead] (caught by clone, and probably already on multiple devices)
  • ~/Library/Logs (frequent changes, not usually essential)
  • ~/Library/Mail (sometimes used for local caches of mail by some clients; presumably already online)
  • ~/Documents/Microsoft User Data (can change frequently, and in large chunks, if you use Outlook or Entourage)
  • ~/Movies (changes are often large, but you shouldn’t exclude it if you work in iMovie)
  • ~/Documents/Virtual Machines [or wherever you keep VMs] (changes can be very large, depending on virtual disk schemes used)

You may also want to consider online backups, or rotating your backup drives and storing non-active ones off-site. Be sure to pay attention to your workplace policy regarding the storage of data outside business premises if you do.

Lastly, be sure to exclude your clone (and probably Time Machine) volumes from Spotlight, using the Spotlight pane in System Preferences.

Install Windows on the Boot Camp partition

You can do this at any time, so feel free to leave it until later. When you do proceed, you’ll need:

  • The Boot Camp installation instructions, either printed on paper (via Boot Camp Assistant) or electronically on another Mac or device.
  • The installation media for a legal copy of Windows.
  • Your Windows license key.
  • Either the original Mac OS X installation DVD which came with your specific Mac, or a blank CD onto which Boot Camp Assistant will place some drivers.
  • At least half an hour (often nearer an hour) of time without needing access to OS X on the machine.

Use Boot Camp Assistant to begin the Windows installation process, then follow the Windows setup instructions. Be very sure to follow the step regarding formatting the Boot Camp partition; it’s the only step which isn’t abundantly obvious from the on-screen instructions. In essence: tell the Windows setup wizard to format the “BOOTCAMP” partition; the default settings for that are fine.

Once Windows is installed, you’ll want to:

  • Install the Boot Camp drivers from either your Mac OS X disc or the disc you burned from Boot Camp Assistant.
  • Configure the screen-size, mouse/trackpad options etc appropriately (after the drivers have been installed).
  • Allow Windows to update itself appropriately.
  • Install some anti-virus/anti-malware software. Microsoft has a free one, for example.
  • Configure Windows to your liking, including installing any apps or games you need.

Security

Common-sense tips:

  • Ensure you’re using a strong password.
  • Ensure auto-login is disabled.
  • Configure File Vault, screen savers, password locking and the firewall to your taste.
  • Consider installing remote monitoring software in case of theft. If this is a lab/classroom machine or similar, consider Apple Remote Desktop.
  • Consider physical security. Do you need a Kensington lock cable, or similar system?

Health and safety

If this machine has a different form-factor and/or input devices than your previous Mac, consider ergonomics:

  • Does your seat need to be adjusted?
  • Do you need a wrist-rest of some kind, or to get rid of one?
  • Is your line of sight to the screen still sensible?
  • Does the machine need to be elevated to provide a comfortable viewing angle?
  • Is the new total load on your desk within tolerances?

Also be sure to consider electrical safety:

  • Is the Mac plugged into a surge-protected power brick?
  • Do the premises have a master circuit-breaker or similar device?
  • If the machine is not a laptop and/or requires to be permanently on, do you need an Uninterruptible Power Supply unit?

Warranty

If you purchased AppleCare cover, double-check that the machine is registered and that your coverage is active; you can do so on the Apple site using your Apple ID. Keep a copy of the Mac’s serial number (it’ll in About This Mac in the Apple menu if you click the OS X version number twice, and it’ll be on labels attached to the shipping box, and likely engraved or printed on the casing somewhere unobtrusive too). If you have a different warranty/coverage provider, ensure that they know about the new machine.

Insurance

Ensure that your new Mac is covered on your contents insurance for the premises. Make sure the monetary value and starting date are correct. Check if you need to pay an increased premium, and if so then ensure it’s paid.

Accounting

If the machine is for business use, make sure it’s logged as a capital expenditure in the appropriate tax year, so you can claim back a portion of the cost as a deduction. Consult your own local tax laws and a professional to help you with that if you’re unsure.

You’re done!

That should pretty much be it. Keep the old Mac around for a little while, and keep the box for the new one for a little while longer. If you’re storing the box somewhere that’s not easy to get to, first remove the installation and hardware test DVDs, and keep them near your desk. If you’ve upgraded the RAM on your Mac such that you no longer require the factory-installed chips, it can be wise to keep them around for a little while too, just in case.

Now go and enjoy the new machine.

Casey’s Contraptions: A Cartoon Conundrum

From the Classroom to the Backyard, the Bedroom and beyond (coming soon), you must plot, scheme, build and solve your way through puzzles involving balloons, slingshots, paper airplanes, skateboards and remote-controlled trucks. How do you do it? Casey’s Contraptions.

This app rocks! The puzzles are increasingly more challenging (the first levels give you a nice, quick introduction to the key concepts of gameplay), and the themed experience feels finely perfected down to the last note of the jazzy theme song. My favorite part? Read on and I’ll tell you all about it.

Starting in Class

The Classroom

The Classroom

The classroom was never the most learning-conducive environment for my younger self, but in Casey’s Contraptions it’s the perfect place to learn all the fundamentals you’ll need for solving those childhood contraption conundrums.

The principle is simple: arrange various fun objects so that they interact with each other to solve some dilemma. Pop balloons, put the toys away and collect stars while you do it.

The real, yet cartoonish physics make each contraption a new challenge that just might leave you shaking your iPad in fervent efforts to affect in-game gravity. (Disclaimer: While that process will not work for the game, it may help relieve the inner-frustration of being beaten by a puzzle meant for an eight year old.)

Take it Outside

The Backyard

The Backyard

After the first eight challenges that make up “The Classroom” level, you move on to “The Backyard.”  Your collection of toys and tools will grow as you beat various challenges, and the possible solutions will begin to increase as well. Make sure you’re collecting all three stars when you solve each contraption, as you’ll need sixty in order to access the third level.

While there are only three levels right now, the app promises levels four and five to be coming soon, so there’s even more puzzle-solving to look forward too.

It’s Give-and-Take

Share

Share

So you’ve just created the most elegantly complex, yet mind-bendingly simple solution for your puzzle, it would be a pity not to show someone (or everyone) else what you’ve done. With Game Center integration, it’s just too convenient to find friends and share your solutions, it’d be a shame not to use it.

If you have no friends however, you can rest assured that Casey will be there with his solution just in case. So if you get really stuck, don’t just throw your iPad into a garbage compactor like Luke, Han, Leia and Chewie, just head on over to see what Casey did and you’ll be back on your conquest of the galaxy (or backyard) in no time.

Make it On Your Own

Create New Levels

Create New Levels

My favorite feature of all however, is the in-game level editor. You can create your own contraptions to play yourself or share with friends using the same level editor that was used to make the built-in levels in the game. You’ll have access to a toolbox filled with the items you’ve collected throughout your gameplay: balls, books, boxes, balloons, baskets and more. You can change the location of your contraption by flicking to the left or right through the backgrounds you’ve unlocked as well.

Add even more levels and manage them in your notebook

Add even more levels and manage them in your notebook

Once you’ve finished your contraption, you will confirm that you’ve got three stars to be won, you can test your level and finally share it to challenge your friends.

Conclusion

Conclusion

Conclusion

Loaded with fun, this is a game to have in your collection whether you’re the same age as the game’s eight-year-old character, or an eighty-year-old hipster with an iPad.

And finally, some quick facts from one of the game’s creators Noel Llopis:

  • iPhone/iPod Touch version planned, but no release date set yet.
  • Updates already planned. Not just new puzzles, but new locations and items as well.
  • Featured by Apple as iPad Game of the Week worldwide.
  • Top ten game in 22 countries

Casey’s Contraptions is fun for gamers of all ages, so get it now.

The AppStorm Freelance Mac App Bundle is on Sale!

Over $330 of Value for Just $49!

I’m incredibly excited to let you know that we have just launched our first ever bundle! The Freelance Mac App Bundle is an unbeatable deal for freelancers, giving you eight awesome Mac apps, three bonus files from the marketplaces, and two inspiring eBooks – all for just $49!

Which Apps Are Included?

We’re featuring eight awesome applications that can make your life easier, and more enjoyable, as a freelancer. These are:

  • Billings – Powerful time billing and invoicing for anyone (Usually $39.99)
  • TextExpander – Save time and keystrokes with frequently used “snippet” abbreviations (Usually $34.95)
  • WriteRoom – The best distraction-free writing environment (Usually $24.99)
  • Radium – The easiest way to listen to internet radio on Mac (Usually $9.99)
  • Arq – Online backup built especially for the Mac (Usually $29)
  • LittleSnapper – Build up your own versatile design scrapbook (Usually $29)
  • 1Password – Have you ever forgotten a password? Never again (Usually $39.99)
  • Alarms – Prioritise and track your daily tasks (Usually $16.80)

Each of these is a piece of software that we wouldn’t hesitate to recommend, and every single one would be a great addition to a freelancer’s arsenal of apps. This week is your chance to get your hands on the whole package for a ridiculously low price!

But That’s Not All!

In addition to the above apps, we’re also throwing in a few fantastic Envato marketplace items that can help spruce up your personal website, manage clients more effectively, and craft a funky business card to promote yourself:

One More Thing…

Finally, we’re excited to let you know that anyone can grab a free copy of Smashing Magazine’s Successful Freelancing eBook, worth $9.95, just for sending out a tweet about the bundle! Head over to the bundle page to find out more, and grab your free eBook.

Don’t Miss Out! Grab the Bundle Today

This awesome offer will only be available for just over a week, so don’t miss your chance to bag your collection of fantastic apps and resources!

Quick Look: ABC Zoo: Learn by Playing

Quick Look posts are paid submissions offering only a brief overview of an app. Vote in the polls below if you think this app is worth an in-depth AppStorm review!

In this Quick Look, we’re highlighting ABC Zoo: Learn by playing. The developer describes ABC Zoo: Learn by playing as an iOS application orientated to teach children the alphabet in a fun and exciting way. Kids will be able to browse through beautiful hand drawings of animals and letters, paint on top of every space in the screen with their fingers, share their creations anywhere they choose to, or simply enjoy a funny tune.

To learn more, check out this video.

Read on for more information and screenshots!

Screenshots

ABC Zoo

ABC Zoo

ABC Zoo

ABC Zoo

About the App

Here are the top five features you can expect to see in the latest version:

  • Beautiful hand drawn images of animals from A to Z.
  • Helps children learn the alphabet.
  • Entertains your children.
  • Universal application, works great on every device.
  • Easy to use.

Requirements: 4+

Price: 0.99

Developer: Raúl Riera

Vote for a Review

Would you like to see us write a full review of ABC Zoo: Learn by playing? Have your say in our poll:

Would you like to see ABC Zoo: Learn by Playing reviewed in-depth on AppStorm?Market Research

Quick Look posts are paid submissions offering only a brief overview of an app. Vote in the poll if you think this app is worth an in-depth AppStorm review! If you’re a developer and would like to have your app profiled, you can submit it here.

What Is iMessage and How Do I Use It?

There’s been a lot of excitement over the recent iOS 5 announcements. A new notifications center, a promising new Reminder app and Wifi Sync are just a few of the awesome features that we can look forward to this fall.

One feature that I’ve been getting a lot of questions about is iMessage. What is it? Will there be two messaging apps now or will it be integrated into the current messaging system? If you’re wondering about the answers to these questions, read on.

Doesn’t the iPhone Already Have a Messaging App?

The first question that needs to be answered is “What is iMessage?” There’s already a messaging app on the iPhone that handles both SMS and MMS messages. What else do we need?

The answer is one that iPod Touch and iPad owners can be excited about. The general idea is that there are tons of iOS users out there not using a 3G enabled device. iPods and some iPads only utilize Wifi for data. What this has meant up to this point is that only iPhone users get the messaging app and these other users get left out.

Apple wanted to create a way for all iOS users, regardless of device (as long as it runs iOS 5), to be able to quickly message each other in a free and simple way. The parallels to BBM are clear and unavoidable. You have to be “in the club” to utilize it but as we’ll see, you won’t really have to worry so much about who does and doesn’t have it.

screenshot

iMessage

What Does It Do?

The features here are pretty straightforward. You can send unlimited free text messages from any iOS device to any iOS device over Wifi or 3G. Technically, you can also send pictures, movies, etc. without being charged but keep in mind that if you are using 3G some data fees may apply (this pretty much depends on your data contract).

All of these messages have associated “receipts” which is pretty much a little line of text with the time and/or date for the message. Unlike with normal SMS messages, iMessage shows you when your party is typing a reply.

Another great feature here is group messaging. You can invite several people to participate in a single conversation and see all the replies in a threaded conversation. This will really save you some back and forth time, assuming all your friends have iPhones.

So This Is a New App?

Many iPhone users are concerned that this will make their lives complicated. Are there two messaging apps now? How will we know if a friend does or doesn’t have iMessage?

Fortunately, it seems that the iOS team did a solid job of integrating this new messaging system seamlessly into the old one. So there’s still only one messaging app, and it looks and works a lot like your old one!

When you’re in the iMessage app, you’ll create a new message just like you do now, only there will be little icons and some color differences to indicate who does and doesn’t have iMessage. You can still message anyone who doesn’t have iMessage, it will just use your carrier’s SMS system instead and won’t give you access to iMessage-only features like group messaging.

Does It Work with iChat?

For those of you who aren’t iChat users, and that’s probably most of you, I apologize for bringing this up again but I’m truly baffled as to what’s going on with iChat lately. Here we have an Internet-powered messaging app that features both text and media that looks like iChat, acts like iChat, heck even sounds like iChat, and yet as far as I can tell, no Lion iChat integration is planned.

This problem is compounded by FaceTime, a face-to-face video conferencing app that exists on both Mac and iPhone. Between iMessage and FaceTime, Apple has chopped up the features of iChat and spread them across two separate apps, neither of which can successfully integrate with iChat.

Back in the day, a lot of the appeal of iChat was that it was compatible with the AIM network, which was where all the IM users were at the time. I can see why Apple would want to start backing away from that in favor of their own initiatives, but why not at least offer integration with the messaging app that some of us have been using daily for the past several years?

screenshot

They sure look like they can talk to each other!

Apple users now have an awkward trio of iChat, FaceTime and iMessage to handle communication that could’ve easily been thrown into one cross-platform “iChat” application for iOS and OS X. As it currently stands, it looks a lot like Apple is just going to abandon iChat altogether.

Once again, this seems to be a very personal rant as I haven’t talked to a single other person who really gives a rip about iChat. Most of the Mac users I know have never even opened the app. Still, I’ll bet that lots of users will wish there was a way to continue their iMessage conversations on a Mac.

Conclusion

To sum up, iMessage is a new way for everyone with a device running iOS 5 to communicate freely through simple text and multimedia. It’s tightly integrated into the current messaging system so there’s little to no learning curve and you don’t have to worry about confusing the two.

Leave a message below and let us know what you think of iMessage. Is it something you’ll use?

Capture A Digital Satellite Government Surveillance Shot

Today’s tutorial is stocked full of all sorts of handy quick helpers as we talk about how to pull off a shot similar to the satellite perspective shot from the movie The Crazies. We’re going to talk about how to capture the best “satellite” looking images and finish by creating a digital style treatment…. Don’t look up! :)


Tutorial

Download Tutorial .flv

File size: 446 MB

Additional Aetuts+ Resources


Read More

Working with Track Changes: InDesign CS5

Advertise here

The Track Changes panel is a handy feature that gives the user the ability to view all significant changes made to an existing story. Changes can be kept for reference or discarded once checked and approved. The feature can also be useful when there is more than one contributor working on the same document.

Continue reading “Working with Track Changes: InDesign CS5”

Workshop #186: Welcome to Paris by AxelVV

This track has been submitted for your friendly, constructive criticism. What useful feedback can you give the artist? The floor is yours to talk about the track and how they can fix problems in and improve upon the mix and the song.

Download audio file (WelcometoParisOrignalMixM.mp3)

Description of the track:

Hey! I posted my first track a few month ago! So I’ve been working with the feedback I had, and now I give a new track which is radically different! I’m waiting for feedback! This track is also free to download on my Soundcloud page!

Artist’s website: soundcloud.com/AxelVV

Terms of Use: I allow this track to be made available for download.

Have a listen to the track and offer your constructive criticism for this Workshop in the comments section.

  • Do you enjoy the song or track itself? Does it have potential?
  • Can the arrangement be improved?
  • How did you find the mix? What would you do differently?
  • What do you enjoy about the rhythm track? What can be done to improve it?
  • Is the choice of instruments relevant and effective for the style/song?
  • Are the lyrics (if any) effective? Does the style, arrangement and genre of the song suit them?
  • Can you suggest any specific techniques that might improve the track?
  • Do you have any other constructive feedback?

Need constructive criticism on your own tracks? Submit them for a workshop using this form.


Read More

Exporting Your Mixes for Disc-at-once Gapless CD Authoring – Part 2

This entry is part 2 of 2 in the series Exporting Your Mixes for Disc-at-once Gapless CD Authoring

In Part 1, we examined one way of preparing a mix for Disc-at-once gapless CD authoring. We exported our mix from Ableton Live. Then, we imported the mix into Sony Sound forge 10 and used the software’s professional tools to author a professional CD ready for sending it as a premaster to a duplication house, to record labels or even your friends.

In Part 2, we are going to use Sony CD Architect 5.2d software to author our CD. CD Architect provides very precise audio CD mastering and burning tools and it also produces results that are fully compatible with Red Book specification.


Adjusting Preferences

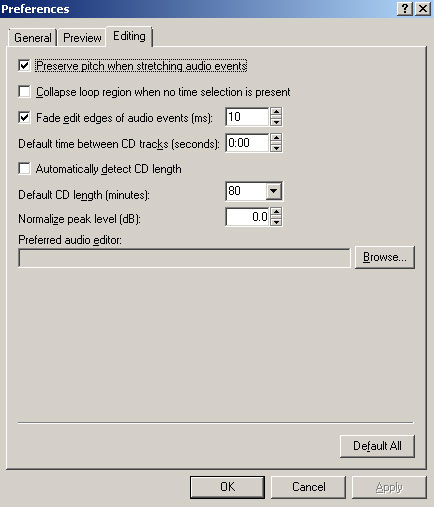
Open up CD Architect and go to Options->Preferences. Click the General tab. Check the Use strict Red Book specification checking option, if it’s not already checked. Click the Editing tab. Select 0 as Default time between CD tracks (seconds) since we are aiming for a gapless playback. Set Default CD length (minutes) to whatever value you desire. If you remember, my mix was almost 80 minutes long. The Normalize peak level (dB) value can range from -12dB to 0dB. Set that accordingly.

CD Architect’s Preferences dialogue box


Authoring – Method 1

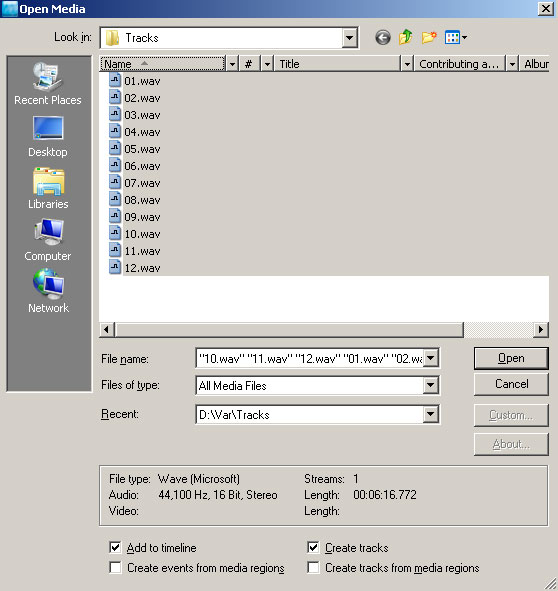
Select File->Open Media. Navigate to the folder with your audio files and select them all(CTRL+A). Further down the dialogue box, put a check mark on Add to timeline and Create tracks options and click Open.

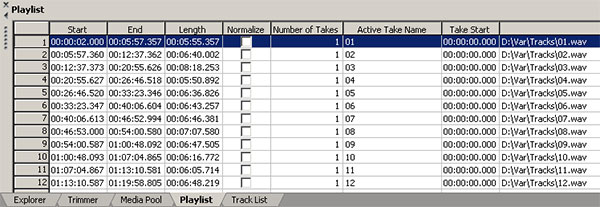
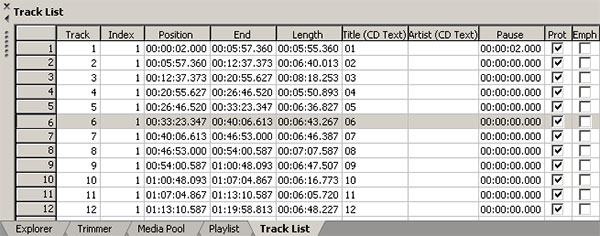
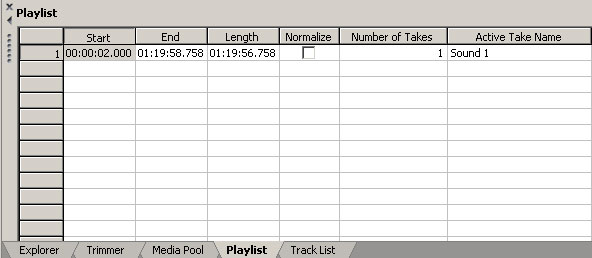
All audio files appear as tracks. Also tabs at the bottom reveal valuable information about our playlist and track list. On the Playlist tab, we can normalize each track and rearrange the playlist order. On the Track List tab we can rearrange the tracklist, enter Title and Artist name as CD Text, enter ISRC information and adjust Pause time amongst other things.

Playlist tab

Track List tab

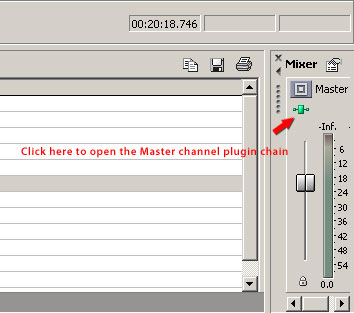
Of course, 16 bit dither needs to be also applied. CD Architect attaches a dither plugin by default on the Master channel located at the bottom right of the application with a Quantization Depth of 16 bit but you can open the plugin chain and attach a plugin of you own liking.


Authoring – Method 2

One of the downsides of the method I’ve just described is that we are only able to adjust normalization on a per track basis. What if we wanted to normalize the whole mix as one? In order to do that, we need to do some simple adjustments in Sound forge.

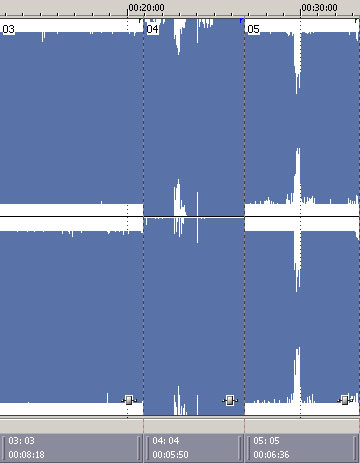
Track 4 normalized independent of other tracks

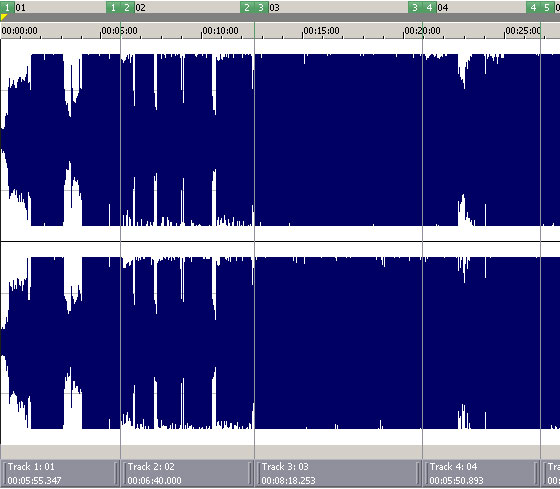
Back in Sound forge load up your tracks as described in Part 1 of this tutorial. Now select Edit->Track List->Create Regions from CD Tracks. Region markers are created on the crossover points of each track. Sow select File->Save As and save the whole mix as a wav file on your hard drive.

Region markers created between CD tracks

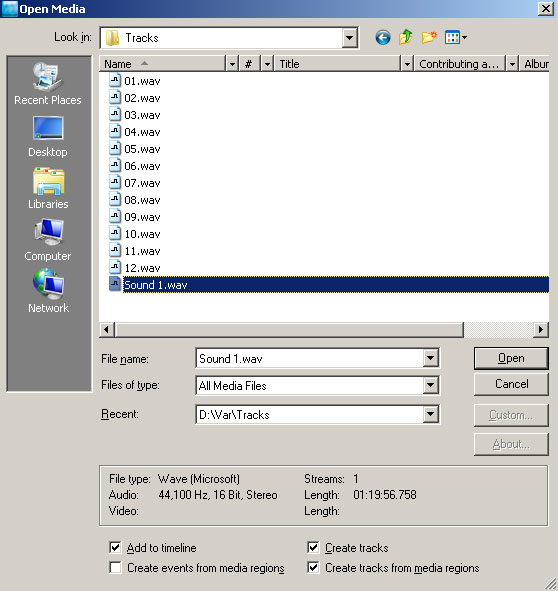
Back in CD Architect, select File->Open Media and select the file you just saved in Sound forge. Further down the dialogue box, put a check mark on Add to timeline, Create tracks and Create tracks from media regions boxes. Click Open.

Open Media dialogue box

The mix loads up as before with a Track List generated but this time on the Playlist tab, there is only one file that can easily be normalized as a whole by putting a check mark on the box under the Normalize column.


Burning

We can proceed on burning our compilation now. Insert a blank CD and click the Burn CD icon at the top of the application window.

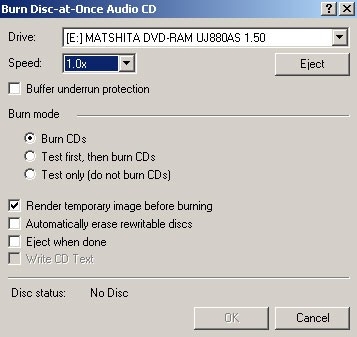
Again, if your disc length exceeds 74 minutes you will get a warning saying just that. Click Write CD. On the new dialogue box, set Speed to the smallest value available to avoid burning errors in higher speeds. The Buffer underrun protection can also be selected but ONLY if you plan to do a one off burning. If you plan on sending the CD as a premaster to a duplication plant or make further copies of it, it’s best not to activate this option since it’s possible that it will introduce a small amount of errors. Another great and recommended option to choose, though, is to Render a temporary image before burning since the software will first render an image on your hard drive before starting to burn the disk thus taking the strain off your processor during the burning process. You can also test the burn before burning it or just test it without burning it to disk. Hit OK when you are done!

And that concludes the tutorial. I hope you got something out of it and realized how easy it is to professionally author an audio CD-ROM utilizing all these great tools available to us!


Read More

Win a Free Copy of Filter Forge (x3)

Advertise here

When most people open Photoshop for the first time, one of the first features they tend to use are filters. Filters are a powerful way to make edits to your photos and images but let’s be honest; some of the default filters in Photoshop can be a bit cheesy. The great thing about Photoshop however is that it allows you to install and use excellent third party plugins and filters. Today, we are partnering with Filter Forge to give away 3 copies of Filter Forge Basic Edition.

Filter Forge is a versatile Photoshop plugin which allows both novice and expert users create a wide variety of realistic and abstract textures and effects. Users can take instant advantage of over 8100 free community-created filters in the online filter library, or create their own filters in the visual filter editor by assembling them from components such as blurs, gradients, color adjustments, noises, distortions, or blends – without writing a single line of code.

In this image Filter Forge was used to create the snakeskin: Pattern maps, bumpmaps, and normal maps. The 3D model was made in Microstation V8i, rendered with Luxology Render. No post work.

On the surface, Filter Forge is just a Photoshop plugin, a pack of filters that generate textures, create visual effects, enhance photos, and process images. However, there are some things that make Filter Forge unique:

  1. You can create your own filters. Filter Forge comes with a visual node-based editor allowing you to create your own filters – textures, effects, distortions, backgrounds, frames, you name it. All filters automatically support 16- and 32-bit modes in Photoshop, real-world HDRI lighting, bump and normal maps, huge resolutions, and most filters can be seamlessly tiled.
  2. You get free access to over 8100 user-created filters. Anyone can contribute their textures and effects to the online filter collection so it grows with every submitted filter. This means the more people use Filter Forge, the better it gets.

To win a free copy of Filter Forge, all you need to do is leave a comment below and tell us how you would like to use this plugin.


Up For Grabs

  • 1 copy of Filter Forge Basic to 3 readers

Rules

  • To enter, leave a comment below and tell us what you would do with your copy of Filter Forge
  • You may only enter once.
  • Make sure to enter a valid email address so that we can contact you.
  • Entries will be accepted until Friday, June 24, 2011 at 11:59 PM, EST.

To learn more about Filter Forge, visit their website, download the demo version of the software, and check out their gallery.

Editor’s note: This post was sponsored by Filter Forge.

Read More

Create a Surreal Upside Down Mountain Painting in Photoshop

Advertise here

In this tutorial we will demonstrate how to create a surreal upside down mountain illustration using digital painting techniques in Photoshop. This piece was part of SlashThree’s latest Paradigm Shift Exhibition.


Tutorial Assets

The following assets were used during the production of this tutorial.


Before You Begin

This piece has been completely done with the help of a graphic tablet, to be precise a Wacom Bamboo Fun. Since I know that some of you don’t have one, I’ll try to explain during the whole tutorial, when it’s needed, how to achieve the same results using a mouse (and a lot of patience).


Brushes Used

These are the brushes used in this tutorial. The first two are standard brushes. The others can be downloaded above.


Step 1 – The Sketch

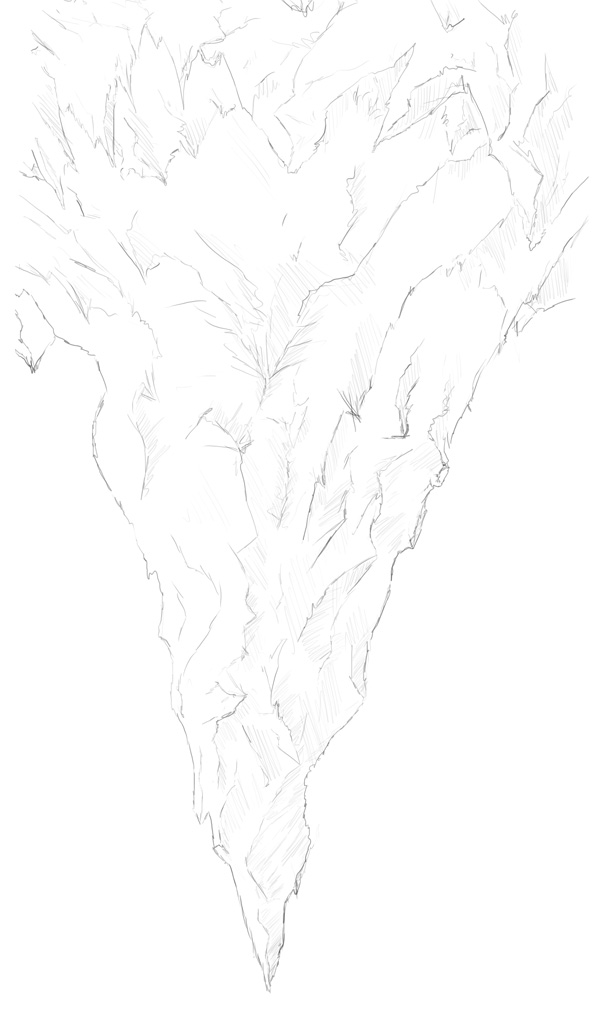
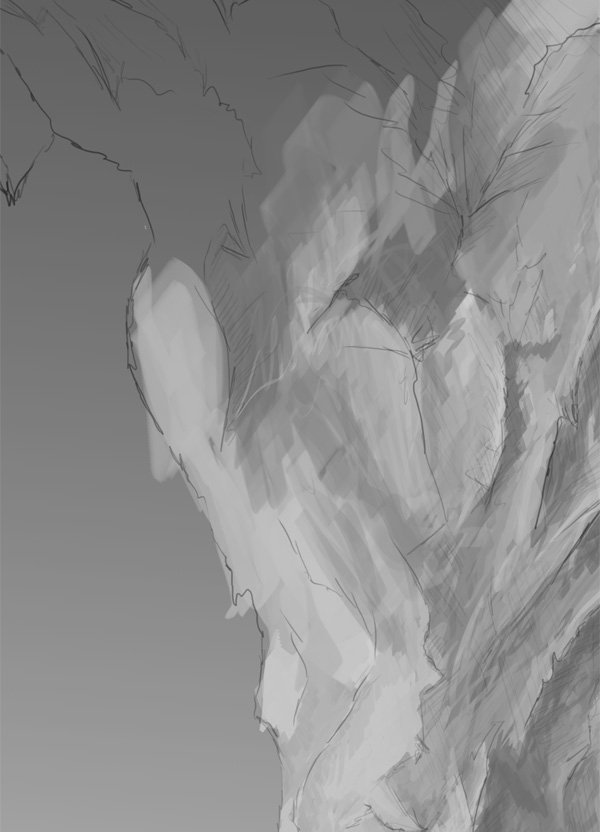
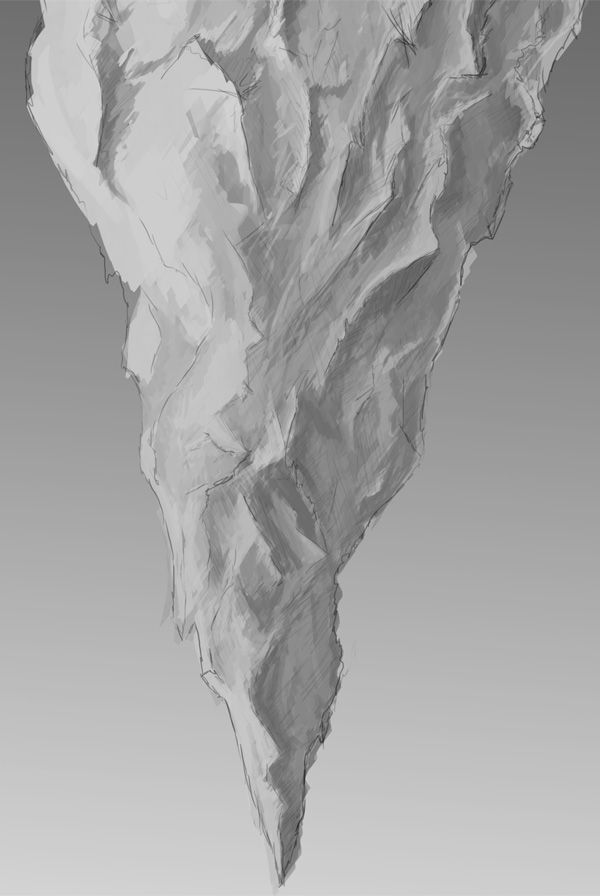
This sketch was made directly in Photoshop using a tablet and a small round brush. If you don’t own a tablet and want a sketch like this, just do it on paper. You can always use a scanner and then import it on Photoshop.

You don’t have to be the best artist in the world to do this. It’s a mountain; it’s made of rock. Rocks are not perfectly shaped!

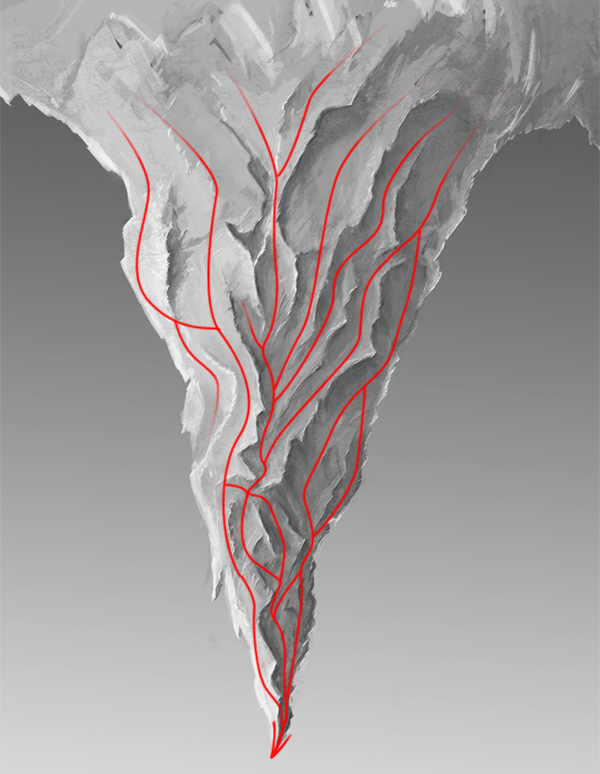
I made this piece by thinking about how I could make a mountain that could work as the focus of the piece. I drew a lot of sharp cliffs, I tried to make them interesting to the eye. I also made a lot of small "paths" starting from the top of the piece and leading to the bottom, at the tip of the mountain. This was made in order to give to the viewer’s brain something to follow. If you’re occidental, you read from left to right; if you’re oriental, from right to left; but everyone reads starting from the top. This is the key: our eyes will start looking at our piece, even if it’s only for a tenth of a second, from the top. When they (our eyes) do this, they will be looking for a road, which is, for our brain, a logical connection to something. So our brain starts following those roads, they’re a lot, but whatever road the brain chose, it will eventually lead to only one point. That point is where I wanted to have the full attention of the viewer, where he or she had to focus the most.

This will be more obvious once the painting is completed, in step number 2.


Step 2 – The Mountain

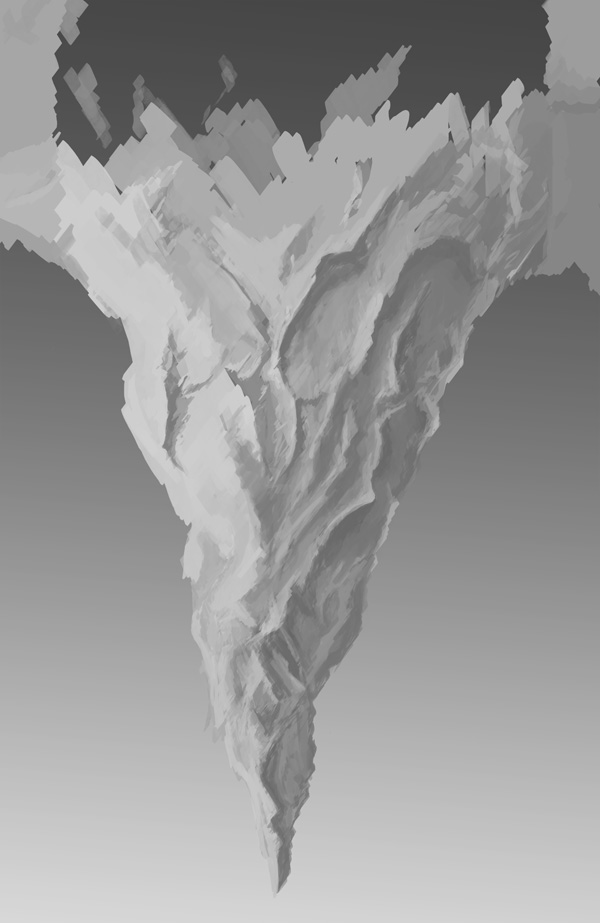
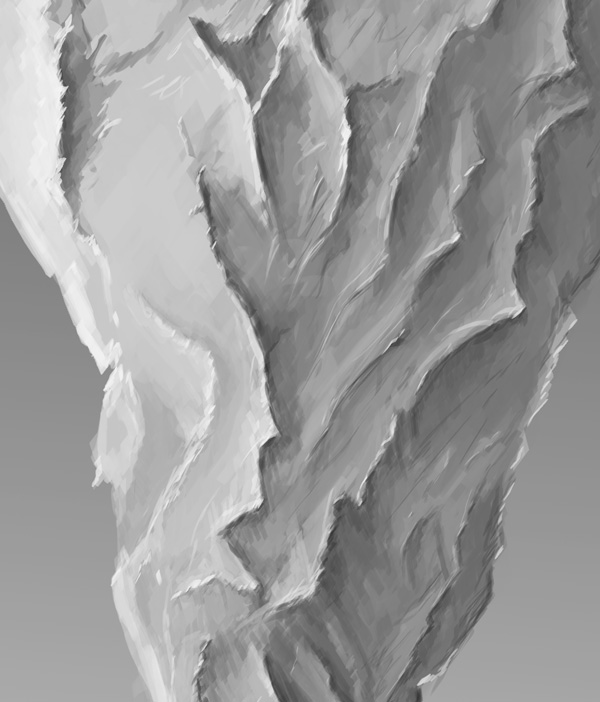
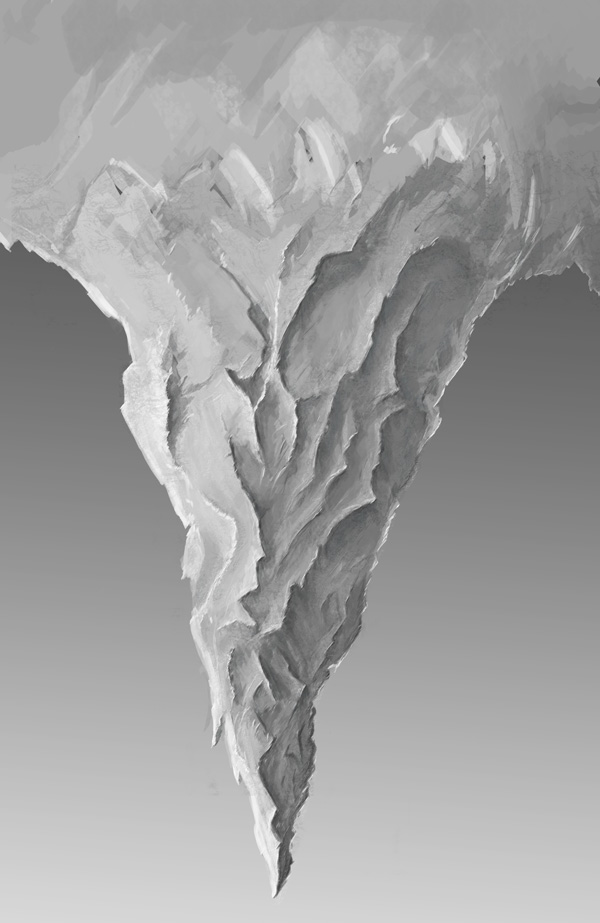
Sketch is done, we’ve put some thought into it, let’s start painting. I decided to start this in black and white, colors were added later. It helped me focus only on the painting action, without worrying too much about other things.

I made a new layer and moved it under the sketch layer so I’m able to see the sketch while I’m painting. If you’ve sketched over a white layer (or a piece of paper) just set the layer on Darken or Multiply.

Using the Brush tool (B) and the brush number 2 I started painting the mountain. I used a light gray for the light areas and a dark gray for the shaded areas.

Don’t spend too much on details, they will be added later. At the moment just try to block the shapes, decide where’ll be shadows and where there’ll be light.

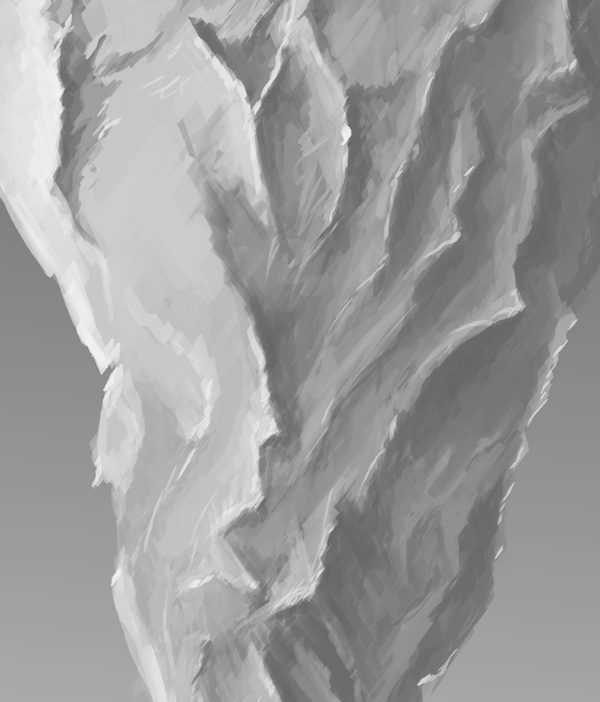
Now you can start to add some contrast and value to the cliffs. Using a lighter gray I made the highlights, and with a darker gray, almost black, the shadows.

Using the same brush I painted the bottom of the mountain and started painting details. I also added some textures at low opacity to add further details. Just have fun in this step: I love adding small details. Take your time, don’t rush it. If you feel that a tiny brush stroke is needed, do it. Even though it’s been two hours since you started adding those tiny brush strokes.

Remember when I talked about the paths? This is what I meant:


Step 3 – Upside-down

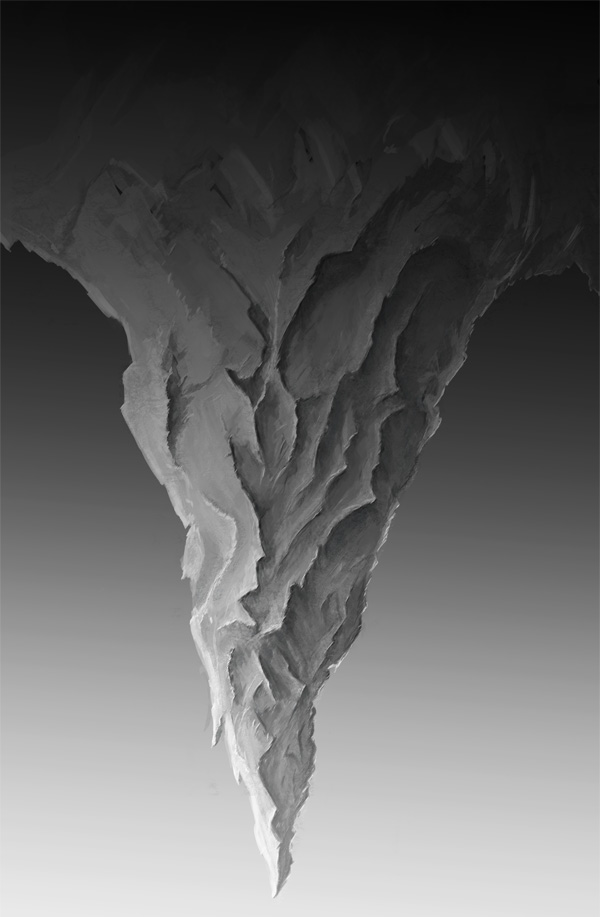
Atmosphere in this piece, so far, works like this: the tip of the mountain is darker, the top of the piece\bottom of the mountain, however, is lighter. That’s because atmosphere, from our point of view, is more affective in the sky than on the ground. But the piece is called Upside Down, right?

Using a black and white linear gradient (G) set on Hard Light, I reversed the effects of the atmosphere. The reason is simple: I wanted that, when you’re looking at it, you wonder if it’s correctly orientated, if, maybe, you actually need to turn it upside-down to see how it actually is, because it might be that’s not the mountain that isn’t in the right place.

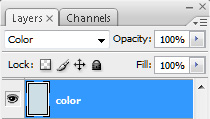
Now using the Paint Bucket Tool (G) I filled a layer with a cyan color, #cedee4 to be precise. Then, I set it to Color.


Step 4 – The Ground

Using the Pen Tool (P) I created the shape of the ground. To remove the flatness of the layer, I used a Gradient (G) (#95a5ab to #b9c9cf) and a Clipping Mask (right click on the layer > Create clipping Mask).

Using another Clipping Mask, I painted over the ground with the brush number 5 some mist.

The curious stick man down here has been made using brush Number 1. I added some details to him, but actually they were all completely unnecessary, since they’re so small that when the piece is resized they disappear. Don’t waste time on them as I did.

Using brush number 2, I painted some far mountains. Keep them simple, if you want to add some details just add some light cyan, almost white, to the tips of the mountains, for the snow.


Step 5 – The Clouds

The technique I used for the clouds is very simple, but still very nice. You need to alternate continuously the Brush tool (B) and the Eraser tool (E), always using brush number 5 for painting and number 5 or 4 for erasing. If you’re using a mouse, remember to vary the opacity!

Paint the clouds using a light cyan and then, with the Eraser tool, erase the undesired areas. In this painting I made two different kinds of clouds, as you can see from the image below. The technique is the same, the only thing that change from the top clouds and the bottom ones is the brush I used to erase, which is number 4 for the clouds at the bottom.

Using the same brushes I painted some clouds over the mountain.

Using brush number 1 I added some details to the “edges” of the clouds.


Step 6 – The Snow

Using a hard round brush (number 1) at a variable diameter (10 to 40) I made these "balls" all over the piece.

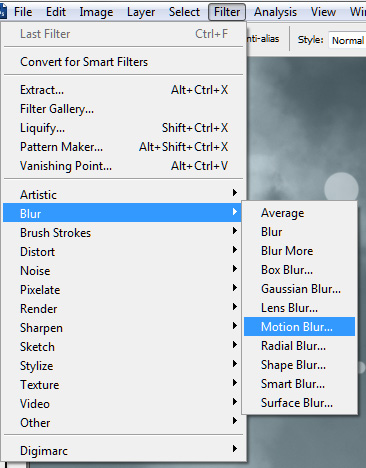
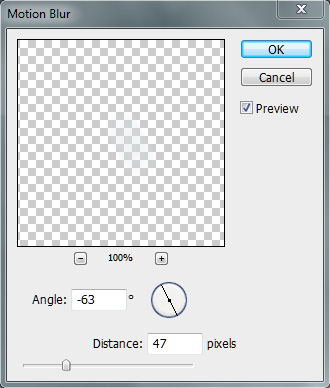
For making the snow look like it was falling, I used the Motion Blur Filter (Filter > Blur > Motion Blur…).

Erase the snowflakes you don’t like and make new ones if you feel that in some places are missing. I also lowered the opacity of the layer to 63%.


Final Image

Read More