Workshop #188: Serenity by Senin

This track has been submitted for your friendly, constructive criticism. What useful feedback can you give the artist? The floor is yours to talk about the track and how they can fix problems in and improve upon the mix and the song.

Download audio file (Serenity4.mp3)

Description of the track:

Ambient Drum & Bass composed using FL Studio 8.

Terms of Use: Okay to stream. No downloading, no redistribution unless credit is given to the original artist, Senin.

Have a listen to the track and offer your constructive criticism for this Workshop in the comments section.

  • Do you enjoy the song or track itself? Does it have potential?
  • Can the arrangement be improved?
  • How did you find the mix? What would you do differently?
  • What do you enjoy about the rhythm track? What can be done to improve it?
  • Is the choice of instruments relevant and effective for the style/song?
  • Are the lyrics (if any) effective? Does the style, arrangement and genre of the song suit them?
  • Can you suggest any specific techniques that might improve the track?
  • Do you have any other constructive feedback?

Need constructive criticism on your own tracks? Submit them for a workshop using this form.


{excerpt}
Read More

Open Mic: What Tutorials Would You Like to See on Audiotuts+?

Each week we open our mic to readers and lurkers alike to come out of the woodwork and tell us your thoughts and opinion, your experiences and mistakes, what you love and what you hate. We want to hear from you, and here’s your chance.

We’re about half way through the year—a great time to ask your advice. What tutorials would you like to see in the second half of 2011?


{excerpt}
Read More

Getting Started With Garageband On The iPad

So you’ve just got a shiny new iPad and you want to make some music. To be honest you now have quite a few choices when it comes to music creation apps and the list continues to grow. To keep things simple let’s take a look at the most obvious choice… Apple’s very own GarageBand.

In this tutorial I’ll give you a step by step account of how I built my first loop in GarageBand and hopefully this will give you a nice overview of what the app is capable of. The audio and the actual Garageband project file is available to download, so you can take a closer look in your own time.


Step 1: A ‘Smart’ Beat

GarageBand on the iPad is capable of producing eight simultaneous tracks of audio (or instruments). These eight tracks can be made up of various sound sources, you can record your own audio via the microphone or audio input, you can use built in Apple loops or your own samples and you can also use any of GarageBand’s excellent built in instruments.

I’ve tried to mix things up a little throughout this mini project but I thought I’d start with some of the instruments that are included with the purchased app. On pressing the ‘Instruments’ button you are presented with a slideshow of instrument icons. Amongst these you’ll find everything you’ll need to create your track.

if you are slight musically challenged, or just want a quick melodic fix then you should opt for the ‘Smart’ instruments. These are basically keyboards, drum kits and guitars that go some way to programming themselves.

The Smart Beat programming section is a lot of fun to use.

To give you an example of this my first track is created with the ‘Smart Drums’ instrument. Using this feature you have the ability to choose a drum machine type and program a beat using a grid that displays values such as ‘Complexity, Volume and Drum Type’. Let’s be honest it doesn’t get any more simple than this!

Using the ‘Hip Hop Drum Machine’ I was able to construct a simple beat in about five minutes. The results are below…

The first part I recorded is isolated.

Download audio file (1.mp3)

The new beat plays back


Step 2: Even Smarter Guitar

Continuing on the Smart instrument tip I proceeded to lay down a guitar line using the ‘Smart Guitar’. The instrument is really impressive, giving you choice of basic guitar models and the ability to playback single notes or chords with a single touch of the screen.

I went for the classic clean with some delay and quickly hammered out a pleasing chord sequence to go with my drum part. Once recorded you can navigate back to the main arrange page to see your part recorded. I applied a little quantisation via the settings menu in the top right and cut and pasted the part, to create two copies.

The Smart Guitar allowed me to program a part quickly.

Now this is where I have to say GarageBand really let me down. You can’t actually edit notes once they have been recorded. You can see them within the parts but there is no way of getting inside and altering note positions or lengths etc.

I guess this must be a user interface limitation but it’s a real shame. In it’s current state GarageBand requires you to actually delete and re-record a part if you play in a bum note or incorrect sequence. Here’s hoping they’ll fix this in the future.

Download audio file (2.mp3)

The new guitar part is mixed


Step 3: D.I.Y. Synth Bass

Next I thought I’d take a more D.I.Y approach and use a straight forward instrument to record my Bass part. I loaded up one of the Synth Bass models and got playing. The keyboard was pretty easy to use and the keys can be changed in size pretty quickly.

The Retro Bass was simple to locate and load.

With a few tweaks of the synth patch itself, a re-record or two and some quantisation, I had a useable bass line. You can hear the first three parts playing together below…

A few adjustments and the bass is done.

Download audio file (3.mp3)

The bass, guitar and drum parts together.


Step 4: The Creation Continues

I continued to create parts in the same way using various sound sources, an Apple loop or two (accessed via the loop logo in the top right), a drum machine and two more virtual analog synths.

Extra parts being created

After some work I had created a bongo loop, vocal effect, synths strings and some new high hats. You can hear these parts below in isolation.

Another synth part being added

It’s worth adding that you can add effects (delay and reverb) to any of your parts using the sends in the mix area, also located in the top right of the interface.

Download audio file (4.mp3)

The new parts in isolation


Step 5: Exporting The Finished Article

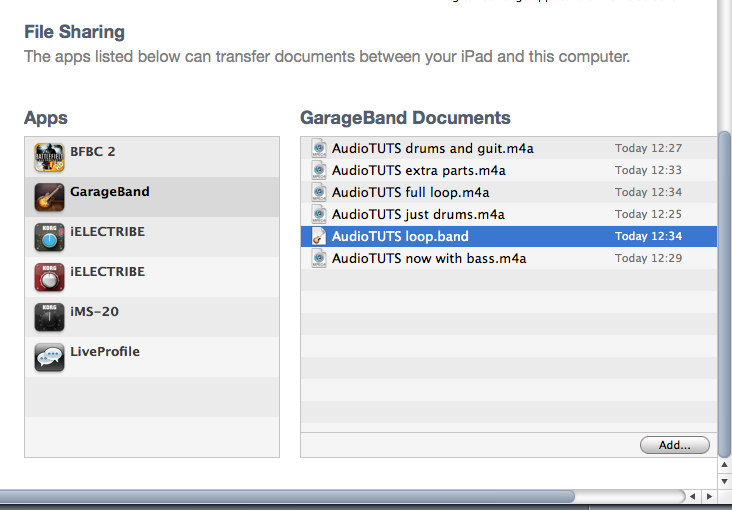
When I was done (and after adding an extra synth lead part) I exported the project to iTunes. On connecting the iPad to my MacBook Pro all the parts were visible in the area at the bottom of the ‘Apps’ page. These can then be dragged on to your desktop.

The new loop being exported to iTunes

You can export audio or the entire project file

You can save individual parts or the whole project in Garageband format. This means you can load it up in the full versions of GarageBand for extra editing and arrangement. GarageBand will actually download an update to ensure 100% compatibility.

The parts exported show up in iTunes on any computer

Download audio file (5.mp3)

The final loop that was exported plays back

All in all I have to say this was an extremely straight forward, fun way to create a small electronic project. For £2.99 you really can’t go wrong and it’s really a no brainer for any iPad owner. Better still if you invest in a few accessories you’ll be able to record vocals and guitar directly into the app transforming it into a true mobile multi-tracker.

If you have any projects created in this app (or any other) on your iPad let us hear them. Be great to know how everybody is using their portable hardware to create music.


{excerpt}
Read More

How to Go About Planning Your Home Studio – Audio Premium

In this week’s double-length Audio Premium content, Mike Elliott gets you started planning where you want to go with your home studio. Don’t forget, if you’re not a premium member you can grab it (and all premium tuts) for only $1 from the Tuts+ Marketplace until the end of June.

To learn more about what you get as part of Audio Premium, read this. To take a peek inside this tutorial, hit the jump!

I think it is safe to say most everyone wishes they had their own studio. But alas the amount of money required to invest in a commercial recording studio is out of reach for many. However, most of us would be satisfied and if not elated to have our own personal home studio and that my friends is perfectly in reach. But without careful forethought and planning, it can easily become a disaster. Come with me as we analyze the different kinds of home studios, what their needs are, and how to effectively plan out these studios out so that you can easily upgrade them as your acquire more pieces to the puzzle. Ready? I thought so!

Table of Contents

  • Pick a Studio any Studio
  • Pick a Studio any Studio: Music Studio
  • Pick a Studio any Studio: Recording Studio
  • Pick a Studio any Studio: Post Production Studio
  • Pick a Studio any Studio: Review
  • Gear Priorities
  • Gear Priorities: Music Studio
  • Gear Priorities: Recording Studio
  • Gear Priorities: Post Studio
  • Gear Priorities: Review
  • Upgrade Paths
  • Upgrade Paths: Upgrade Me Captain
  • Upgrade Paths: Invaluable
  • Upgrade Paths: The Replacements
  • Upgrade Paths: Review
  • Final Considerations
  • Conclusion

Existing Premium members can log-in and download. Not a Plus member? Join now.


{excerpt}
Read More

Getting Started With Garageband On The iPad

So you’ve just got a shiny new iPad and you want to make some music. To be honest you now have quite a few choices when it comes to music creation apps and the list continues to grow. To keep things simple let’s take a look at the most obvious choice… Apple’s very own GarageBand.

In this tutorial I’ll give you a step by step account of how I built my first loop in GarageBand and hopefully this will give you a nice overview of what the app is capable of. The audio and the actual Garageband project file is available to download, so you can take a closer look in your own time.


Step 1: A ‘Smart’ Beat

GarageBand on the iPad is capable of producing eight simultaneous tracks of audio (or instruments). These eight tracks can be made up of various sound sources, you can record your own audio via the microphone or audio input, you can use built in Apple loops or your own samples and you can also use any of GarageBand’s excellent built in instruments.

I’ve tried to mix things up a little throughout this mini project but I thought I’d start with some of the instruments that are included with the purchased app. On pressing the ‘Instruments’ button you are presented with a slideshow of instrument icons. Amongst these you’ll find everything you’ll need to create your track.

if you are slight musically challenged, or just want a quick melodic fix then you should opt for the ‘Smart’ instruments. These are basically keyboards, drum kits and guitars that go some way to programming themselves.

The Smart Beat programming section is a lot of fun to use.

To give you an example of this my first track is created with the ‘Smart Drums’ instrument. Using this feature you have the ability to choose a drum machine type and program a beat using a grid that displays values such as ‘Complexity, Volume and Drum Type’. Let’s be honest it doesn’t get any more simple than this!

Using the ‘Hip Hop Drum Machine’ I was able to construct a simple beat in about five minutes. The results are below…

The first part I recorded is isolated.

Download audio file (1.mp3)

The new beat plays back


Step 2: Even Smarter Guitar

Continuing on the Smart instrument tip I proceeded to lay down a guitar line using the ‘Smart Guitar’. The instrument is really impressive, giving you choice of basic guitar models and the ability to playback single notes or chords with a single touch of the screen.

I went for the classic clean with some delay and quickly hammered out a pleasing chord sequence to go with my drum part. Once recorded you can navigate back to the main arrange page to see your part recorded. I applied a little quantisation via the settings menu in the top right and cut and pasted the part, to create two copies.

The Smart Guitar allowed me to program a part quickly.

Now this is where I have to say GarageBand really let me down. You can’t actually edit notes once they have been recorded. You can see them within the parts but there is no way of getting inside and altering note positions or lengths etc.

I guess this must be a user interface limitation but it’s a real shame. In it’s current state GarageBand requires you to actually delete and re-record a part if you play in a bum note or incorrect sequence. Here’s hoping they’ll fix this in the future.

Download audio file (2.mp3)

The new guitar part is mixed


Step 3: D.I.Y. Synth Bass

Next I thought I’d take a more D.I.Y approach and use a straight forward instrument to record my Bass part. I loaded up one of the Synth Bass models and got playing. The keyboard was pretty easy to use and the keys can be changed in size pretty quickly.

The Retro Bass was simple to locate and load.

With a few tweaks of the synth patch itself, a re-record or two and some quantisation, I had a useable bass line. You can hear the first three parts playing together below…

A few adjustments and the bass is done.

Download audio file (3.mp3)

The bass, guitar and drum parts together.


Step 4: The Creation Continues

I continued to create parts in the same way using various sound sources, an Apple loop or two (accessed via the loop logo in the top right), a drum machine and two more virtual analog synths.

Extra parts being created

After some work I had created a bongo loop, vocal effect, synths strings and some new high hats. You can hear these parts below in isolation.

Another synth part being added

It’s worth adding that you can add effects (delay and reverb) to any of your parts using the sends in the mix area, also located in the top right of the interface.

Download audio file (4.mp3)

The new parts in isolation


Step 5: Exporting The Finished Article

When I was done (and after adding an extra synth lead part) I exported the project to iTunes. On connecting the iPad to my MacBook Pro all the parts were visible in the area at the bottom of the ‘Apps’ page. These can then be dragged on to your desktop.

The new loop being exported to iTunes

You can export audio or the entire project file

You can save individual parts or the whole project in Garageband format. This means you can load it up in the full versions of GarageBand for extra editing and arrangement. GarageBand will actually download an update to ensure 100% compatibility.

The parts exported show up in iTunes on any computer

Download audio file (5.mp3)

The final loop that was exported plays back

All in all I have to say this was an extremely straight forward, fun way to create a small electronic project. For £2.99 you really can’t go wrong and it’s really a no brainer for any iPad owner. Better still if you invest in a few accessories you’ll be able to record vocals and guitar directly into the app transforming it into a true mobile multi-tracker.

If you have any projects created in this app (or any other) on your iPad let us hear them. Be great to know how everybody is using their portable hardware to create music.


{excerpt}
Read More

Workshop #188: Serenity by Senin

This track has been submitted for your friendly, constructive criticism. What useful feedback can you give the artist? The floor is yours to talk about the track and how they can fix problems in and improve upon the mix and the song.

Download audio file (Serenity4.mp3)

Description of the track:

Ambient Drum & Bass composed using FL Studio 8.

Terms of Use: Okay to stream. No downloading, no redistribution unless credit is given to the original artist, Senin.

Have a listen to the track and offer your constructive criticism for this Workshop in the comments section.

  • Do you enjoy the song or track itself? Does it have potential?
  • Can the arrangement be improved?
  • How did you find the mix? What would you do differently?
  • What do you enjoy about the rhythm track? What can be done to improve it?
  • Is the choice of instruments relevant and effective for the style/song?
  • Are the lyrics (if any) effective? Does the style, arrangement and genre of the song suit them?
  • Can you suggest any specific techniques that might improve the track?
  • Do you have any other constructive feedback?

Need constructive criticism on your own tracks? Submit them for a workshop using this form.


{excerpt}
Read More

Say Hello to the All-New Wptuts+ (And Win WordPress Goodies)!

I’m incredibly excited to let you know about the latest addition to the ever-expanding Tuts+ networkWptuts+! Focusing on everything WordPress, the site will be bringing you top-notch tutorials on developing WordPress themes, plugins and widgets, scaling your site, the business of selling WordPress themes, and general advice on how to become an expert at using the platform!

Whether you’ve always wanted to learn more about WordPress (but never known where to start), or are a seasoned expert looking for advanced tips and tricks, Wptuts+ has you covered. Read on to find out more, meet our expert editor, and hear about how to win $1,000+ of WordPress goodies!


WordPress Tutorials, Tips and Advice

WordPress Tutorials, Tips and Advice

Wptuts+ will provide the amazing quality of tutorials you’ve come to expect from Tuts+, focused toward teaching you everything you need to become a WordPress expert. We have some fantastic content in the works, and you can subscribe in the following ways to ensure you don’t miss out!

After working as the editor of Webdesigntuts+ for the past few months, your editor — Brandon Jones — will be moving over to share his incredible wealth of WordPress knowledge on Wptuts+!

Brandon Jones is currently the third highest-selling author on ThemeForest, Envato’s marketplace for buying and selling website themes. He couldn’t be more qualified to head up Wptuts+, and I hope you’re looking forward to receiving tips from one of the most successful WordPress developers we’ve ever had the pleasure of working with.


$1,200 of Prizes and Goodies Up For Grabs!

To celebrate the launch of our latest Tuts+ site, we’ve organised a fantastic giveaway with some brilliant prizes for anyone who loves WordPress! With a total value of over $1,200, it’s a fantastic collection of resources and subscriptions. Check out the full details, and take part in the contest!

Finally, if you have any feedback or ideas for Wptuts+, we’d love to hear them. Head over to the site and let us know what you’d like to see!


{excerpt}
Read More

Workshop #188: Serenity by Senin

This track has been submitted for your friendly, constructive criticism. What useful feedback can you give the artist? The floor is yours to talk about the track and how they can fix problems in and improve upon the mix and the song.

Download audio file (Serenity4.mp3)

Description of the track:

Ambient Drum & Bass composed using FL Studio 8.

Terms of Use: Okay to stream. No downloading, no redistribution unless credit is given to the original artist, Senin.

Have a listen to the track and offer your constructive criticism for this Workshop in the comments section.

  • Do you enjoy the song or track itself? Does it have potential?
  • Can the arrangement be improved?
  • How did you find the mix? What would you do differently?
  • What do you enjoy about the rhythm track? What can be done to improve it?
  • Is the choice of instruments relevant and effective for the style/song?
  • Are the lyrics (if any) effective? Does the style, arrangement and genre of the song suit them?
  • Can you suggest any specific techniques that might improve the track?
  • Do you have any other constructive feedback?

Need constructive criticism on your own tracks? Submit them for a workshop using this form.


{excerpt}
Read More

How to Go About Planning Your Home Studio – Audio Premium

In this week’s double-length Audio Premium content, Mike Elliott gets you started planning where you want to go with your home studio. Don’t forget, if you’re not a premium member you can grab it (and all premium tuts) for only $1 from the Tuts+ Marketplace until the end of June.

To learn more about what you get as part of Audio Premium, read this. To take a peek inside this tutorial, hit the jump!

I think it is safe to say most everyone wishes they had their own studio. But alas the amount of money required to invest in a commercial recording studio is out of reach for many. However, most of us would be satisfied and if not elated to have our own personal home studio and that my friends is perfectly in reach. But without careful forethought and planning, it can easily become a disaster. Come with me as we analyze the different kinds of home studios, what their needs are, and how to effectively plan out these studios out so that you can easily upgrade them as your acquire more pieces to the puzzle. Ready? I thought so!

Table of Contents

  • Pick a Studio any Studio
  • Pick a Studio any Studio: Music Studio
  • Pick a Studio any Studio: Recording Studio
  • Pick a Studio any Studio: Post Production Studio
  • Pick a Studio any Studio: Review
  • Gear Priorities
  • Gear Priorities: Music Studio
  • Gear Priorities: Recording Studio
  • Gear Priorities: Post Studio
  • Gear Priorities: Review
  • Upgrade Paths
  • Upgrade Paths: Upgrade Me Captain
  • Upgrade Paths: Invaluable
  • Upgrade Paths: The Replacements
  • Upgrade Paths: Review
  • Final Considerations
  • Conclusion

Existing Premium members can log-in and download. Not a Plus member? Join now.


{excerpt}
Read More

Replacing Electric Guitar Pickups

I remember my first electric guitar. I liked its design—it had great playability and was comfortable. It was a Stratocaster copy with three single coil pickups.

One thing I didn’t like was the sound that came from the bridge pickup. It was too thin, and at that time I needed a pretty thick sound. So it sounded fat when played through Tube Screamer and Marshall amps. A few months later I replaced it with a single coil stack Humbucker and was happy with the results.

The good thing is that a good pickup can make a cheaper guitar sound good and a good guitar sound excellent. Less hum, more tone, singing harmonics, at a fraction of the cost of replacing the instrument.


What Is a Pickup?

Electric guitar pickups are made with one or more magnets, and wire. The pickup consists of a magnet surrounded by a coil of copper wire with a certain number of turns that will result a magnetic field. When the strings vibrate, this affects the pickup’s magnetic field, and turns it into a signal. This is then sent to an amplifier by cable. This is how a technology is turned into art.

Most pickup belong to one of two styles: single coil and Humbucker. I will explain the main types of guitar pickups that we usually found.


Pickup Sizes

Single Coil

A common guitar that uses single coil pickups is the Fender Stratocaster. They come with either white, cream or black plastic covers, and have six pole pieces of magnets. Some have staggered magnets which compensate for the sharper radius of vintage fretboards and different string thicknesses. Traditional single coil pickups produce a bright, cutting tone rich in higher harmonics, have a lower power output, and give off a fair amount of hum. This is normal and is called the 60 cycle hum caused by the very nature of electricity.

strat

Traditional single coil pickup on a Fender Stratocaster guitar. Rock’n’roll guitar hero Jimi Hendrix used this guitar to produce his unique sound.

Modern day innovations have done well to overcome this. There are pickups that are designed to be hum-cancelling or “bucking,” but which retain the essential single-coil sound. This pickup is single coil size, but have the dual coils of a Humbucker—they are stacked so that the pickup has the dimensions of a single coil. They also retain the sound of a traditional single coil, but without the hum. This pickup is called “single coil size stack Humbucker”.

Single coil size stack Humbucker (also known as single coil noiseless) physically looks just like a traditional single coil, and has six pole pieces. But this single coil pickup use a two pole pieces stack that are useful for producing traditional single coil sound without the hum. Revolutionary design injects tunable “negative hum” into the pickup circuit.

noiseless

Fender noiseless pickups produce single coil sound without hum. The dimensions of this pickup are just like a traditional single coil pickup.

Another single coil size with a Humbucker sound is the single coil sized side-by-side Humbucker. This single coil pickup is different to the single coil stack Humbucker. While the single coil stack Humbucker has minimal hum and single coil size, it can produce sounds like full Humbucker pickups.

The single coil sized side-by-side Humbucker comes with two styles. One uses thin blades ceramics, the other uses magnetic pole pieces side by side. Usually single coil sized side-by-side Humbucker use adjustable pole pieces to emulate the magnetic field of a full size Humbucker, and allow you to fine tune the balance of your strings.

side by side

The Seymour Duncan “Hot Rails” is a Humbucker pickup in a single coil size. This single coil size pickup uses side-by-side coils with thin blade ceramic pole pieces.

Single coil sized Humbucker pickups are usually more powerful than standard single coils. This is useful for someone who has a guitar with single coil routing, but want a single coil sound with smaller noise, or want a sound like Humbucker pickup without additional routing.

Humbucker

A common guitar that uses Humbucker pickups is the Gibson Les Paul. Humbuckers are also known as dual-coil, double-coil, or hum-canceling pickups. They are a bit more complex, with two coils and sets of magnets in a clever arrangement which cancels out most of the hum that the coils pick up. They are more powerful than single coil pickups, with a bassier, smoother sound.

Because they have two coils and four wires to play with, Humbuckers give a variety of wiring options. Since there are double the coils, the amount of impedance and output can be doubled as well, creating high-output, bass and mid-heavy pickups. However, not all Humbuckers are the same, and many have different tones and outputs. Just like single coil size Humbucker, some modern Humbuckers are made full-size but are designed to sound more like single-coils.

paf

The PAF Humbucker is the world’s first Humbucker guitar pickup.

P90

The P90 is a single coil pickup design. It has brighter sound, and is more transparent than a Humbucker pickup. Though it is not quite as crisp and snappy as single coil pickups.

P90 pickups are divided into three variations: First is the P90 Soapbar, which can be found in several Gibson Les Pauls—including the Gibson Les Paul Goldtop series—and comes with black or cream covers. One thing that is unique in this pickup is that the mounting screws are contained within the coil perimeter, positioned between the pole pieces, between strings 2 and 3, and between strings 4 and 5, creating an unusual pattern.

The second variation is the P90 Dogear, which is commonly mounted on Gibson hollow body guitars. The shape is similar to the Soapbar, but the mounting screws are located at the edge of the pickup. The pickup is called “Dogear” because the location of the mounting screws.

The last variation is the P90 Humbucker sized, have a P90 sound with a Humbucker size. If you wanted to install a P90 in a guitar routed for Humbucker pickups, the existing route in the body would have to be modified. But, with this pickup you can install without routing the body.

goldtop

A P90 Soapbar pickup in a Gibson Les Paul Goldtop.

dogear

A Dogear P90. The difference between a P90 Soapbar and a P90 Dogear is the location of the pickup mounting screws.

p90

A P90 pickup in Humbucker size. The best way to install a P90 pickup in the guitar routed for Humbucker size.

There are actually many more pickup types, such as mini Humbucker pickup, lipstick pickups, single coil style Z etc. However, essentially all of these are single coil pickups, P90s, or Humbucker pickups.

Next I will explain the things you should consider before you replace your guitar pickups.


Step 1: Sound

Some pickup companies have a sound sample demo. Check whether they have the sound you want. This can help you in determining which pickups that match what you need.

Also check the pickup description so you know whether they are suitable for the style of music you play—rock, jazz or pop? Or maybe all around?

Is the pickup output high, medium or vintage?

Is the pickup specialized for guitars with a certain material?


Step 2: Pickup Position

Which is the best position for the pickup? The bridge position, neck position or for all positions? Some pickups are designed for certain position. For best results, put it in the recommended position. Some pickup companies suggest to install the pickup with their pair for best results. For example Seymour Duncan JB SH 4 (for bridge) is often paired with Seymour Duncan ’59 SH 1 (for neck).


Step 3: Temporary or Permanent

Think about whether you are replacing your pickup temporarily or permanently. If you want to change your guitar pickup from single coil size to Humbucker size, you need additional routing to the body. Remember, you can’t go back. Consider this if the guitar is a vintage instrument—modifying it can change its value. If you change from Humbucker size into single coil size you will need some adapter.


Step 4: Different Spacing

If your guitar has a tremolo system (for example, Floyd Rose), you need an F-spaced pickup (the same as the Trembucker) for that. Any guitar that uses a 25 1/2″ scale (most Fender guitars) have a wider string spacing at the bridge than a guitar that uses a 24 3/4″ scale (most Gibson guitars), regardless of whether or not it has a tremolo.

24 3/4″ scale guitars that use a Floyd have a wider string spacing as well, as that is just the way the Floyd was designed. You can’t get a Floyd in a different spacing. If your new pickup has blade pole pieces, you can install it no matter if your guitar has a tremolo system or fixed bridge.


Step 5: Other Functions

Some pickups offer functions such as phasing, coil taps or dual mode sound, to switch between modes. You need push/pull pots or mini switches. Installing mini switches will require additional routing to the body. If you don’t want to route your guitar body you can install push/pull pots. Installing push/pull pots can save space and save guitar value if someday you want to sell it or restore it to its original setup.


Step 6: Active Pickup

Active pickups require a place to put a 9V battery. You can hide the battery inside the cavity control, or you can install a battery case in the cavity control so its easier to replace the battery. If there no place to put the battery, you need additional routing body for the battery case. Usually when you install active pickups you will need some new pots, and a 1/4 stereo jack (to turn battery on and off).


Conclusion

You need to buy a guitar pickup before you can try it. You won’t find every available type of pickup at your guitar center. You may be able to search for information over the Internet to hear the sound of the pickup. And there are many pickup revoiews on YouTube that can help you choose the right pickup for you. But it could produce a different sound after you buy it because of differences in guitar wood material, amps, or effects used.

Keep in mind: I can’t decide which pickup is best for you. Always go to your local music store for advice on pickups, and always play guitars that have that particular type of pickup in them. If you don’t know how to change pickups by yourself, then have a store tech do it for you.

Good luck!


{excerpt}
Read More

Say Hello to the All-New Wptuts+ (And Win WordPress Goodies)!

I’m incredibly excited to let you know about the latest addition to the ever-expanding Tuts+ networkWptuts+! Focusing on everything WordPress, the site will be bringing you top-notch tutorials on developing WordPress themes, plugins and widgets, scaling your site, the business of selling WordPress themes, and general advice on how to become an expert at using the platform!

Whether you’ve always wanted to learn more about WordPress (but never known where to start), or are a seasoned expert looking for advanced tips and tricks, Wptuts+ has you covered. Read on to find out more, meet our expert editor, and hear about how to win $1,000+ of WordPress goodies!


WordPress Tutorials, Tips and Advice

WordPress Tutorials, Tips and Advice

Wptuts+ will provide the amazing quality of tutorials you’ve come to expect from Tuts+, focused toward teaching you everything you need to become a WordPress expert. We have some fantastic content in the works, and you can subscribe in the following ways to ensure you don’t miss out!

After working as the editor of Webdesigntuts+ for the past few months, your editor — Brandon Jones — will be moving over to share his incredible wealth of WordPress knowledge on Wptuts+!

Brandon Jones is currently the third highest-selling author on ThemeForest, Envato’s marketplace for buying and selling website themes. He couldn’t be more qualified to head up Wptuts+, and I hope you’re looking forward to receiving tips from one of the most successful WordPress developers we’ve ever had the pleasure of working with.


$1,200 of Prizes and Goodies Up For Grabs!

To celebrate the launch of our latest Tuts+ site, we’ve organised a fantastic giveaway with some brilliant prizes for anyone who loves WordPress! With a total value of over $1,200, it’s a fantastic collection of resources and subscriptions. Check out the full details, and take part in the contest!

Finally, if you have any feedback or ideas for Wptuts+, we’d love to hear them. Head over to the site and let us know what you’d like to see!


{excerpt}
Read More