Category: Tutorials
Tutorials,freelance,projects,joomla,php,mysql,wordpress,blancer.com
13 Top After Effects Project Templates for Creative Marketing Video in 2020
{excerpt}
Read More
10 Top Logo Reveal (Animation) Templates for Premiere Pro
{excerpt}
Read More
37 Cool Photoshop Text Effects, Actions & Styles for 2020
Find a text effect and Photoshop text styles that are fun and simple to use! Check out this list of premium resources below.
37 Cool Photoshop Text Effects, Actions & Styles
Create inspiring quotes with graphics that sell! Working in Photoshop has gotten a whole lot easier thanks to designers all over the world sharing their high-quality text effect templates.
These templates feature cool and exciting Photoshop text effects, Photoshop styles, actions, and PSD layer styles to save valuable time and energy.
That’s why we’ve put together another great selection of premium resources to help make your titles, headers, and quotes come to life. This collection has been handpicked from the amazing sections of Envato Elements and Envato Market, and it features the latest trends in design for 2020.
Want to see these resources in action? Check out our examples below.
Make Amazing Titles Fast: See Our Examples!
To give you an idea of how easy it is to use these resources, here are two fun examples we’ve tried out!
80s Style Text Effect
Create fantastic retro-inspired text effects like this fun 80s style. Featuring 16 amazing Photoshop styles with incredible neon and metallic colors, this template was super fun to edit.

Using the pink reflection Photoshop layer style, I simply changed the word “reflection” to “80s Style.” Just switch out the text or font and save the image right away! You’ll love this one.

3D Retro Text Creator
Our next example features this cool retro text creator inspired by various vintage styles. Transform your flat text into beautiful 3D typography that works well for many projects.

To run this action, simply load it from the Actions window, and then select the style you need and hit play. It’s that simple! Here is my final result below.

Want to see more options? Check out the rest of these amazing resources below.
ShinyPixel’s Text Effect No. 01
Check out this trendy aesthetic! This effect isn’t limited to text either—apply it to shapes and other vector content too! Just pop them into the smart object and voila! You’ve got yourself an eye-catching visual effect!

Epic Text Effects for Adobe Photoshop
This set of text effects comes with eight different PSD files for Adobe Photoshop! Create a wide variety of different titles and text effects—it’s as easy as placing your content into a smart object!

Smoke Logo Text Effect
Doesn’t this effect look amazing? It’s hard to believe that something so visually stunning is so easy to use! Check out the instructions—smart objects make using this effect a breeze! Place, save, and check out the results.

Colorful Text Effects for Adobe Photoshop
There are so many fun effects to choose from in this set of text effects for Adobe Photoshop! This is another one that’s not limited to text—try out other shapes and vector objects too! These effects would be a great addition to any collection.

Doodles Text Effect
How fun are these doodle effects? There are 16 different effects here to choose from, so not only do you have a lot to play with, but a lot to mix and match, too! Create an organic, hand-drawn aesthetic, perfect for informal, friendly projects.

Salt and Sugar Generator – Photoshop Actions
The textures in these Photoshop Actions are amazing! Not only can you build words and shapes out of “salt” or “sugar”—you can do so inverted too! Carve your words out of a pile of salt! How cool is that?

3D Cartoon Text Effects
Fun and full of personality, this set of text effects has so much to offer! Whether you’re looking for something cartoony, bubbly, or just something different and memorable, this set is definitely worth checking out.

Photoshop Retro Text Effects
If you’re looking for a lovely set of retro effects, look no further! There are 12 to choose from here, each with a lovely, three-dimensional look and feel.

Vintage Letterpress Texture Effects
The textures in these effects are so lovely. Enjoy ten different Photoshop files here, and test these effects out with your favorite type, shapes, and vector content! Check out the different styles in the examples!

Liquid Tasty Text Effects
Doesn’t this text look squishy and sticky? It’s hard to believe how easy it is to use this effect! Whether your goal is sticky juice, liquid metal, or green slime, this text effect is super fun to use!

3D Foil Balloon Text Effects for Photoshop
The foil balloon effect is trending right now on Instagram! Add delightful party balloons to your designs in a few simple steps. This download comes with five Photoshop files with fully editable layers you can customize fast. Try it out!

Retrica: Vintage Text Effects Pack
Relive the charm of nostalgic, vintage text. This brilliant text effects pack is fun and easy to use. It includes ten vintage text effects with wonderful options like 3D effects and more. Get fully editable files that are easy to update. Use them for posters and print work!

Real 3D Text Mockups
You don’t have to be a 3D expert to enjoy fantastic text. This premium mockup pack features six Photoshop files with fully editable 3D smart objects. Easily change the text and font to your favorites and take advantage of the stunning backgrounds also included!

Neon Underground Photoshop Effect
Recreate the magical underground vibes of your favorite restaurant or dive bar! This new neon set features incredible neon light effects for text, shapes, and more. Also included is an extra pack of backgrounds to use in your designs. Download it today!

Glitch Text Effects Collection
Love the glitch trend? Incorporate glitch effects into your typography with this awesome collection. This text effect bundle includes simple smart object replacements for incredible glitch effects. Make powerful, vibrant effects and edit them to your liking!

Gold Text Effects
Gold text effects make your work look luxurious and expensive. Transform your titles and stationery with this fabulous set of premium gold text effects. This pack features ten Photoshop files with beautiful metallic textures, including various gold and silver options!

3D Wood Creation Text Effect
Get crafty with this cool text effect! This 3D wood creator turns your logos or titles into realistic wooden letters! It features two 3D text effects and 32 wooden textures, so you’ll be able to combine your favorite natural textures for one phenomenal result. Give it a try!

3D Retro Sculpting Text Actions
You don’t have to be a Photoshop professional to get access to amazing retro 3D text. This next Photoshop action pack includes four actions with realistic sculpting effects for remarkable logos and more. Use them for an authentic retro look.

Cinematic 3D Movie Mockups
Working on a new indie project or short film? Try out these stunning cinematic layer styles, perfect for any Photoshop lover. This pack includes six Photoshop files that are simple and easy to use. Simply follow the instructions also included in the ready-to-use help file.

3D Color Metal Photoshop Action
Want a pristine metal effect for your text? Try this epic 3D color Photoshop action. With ten color presets, this Photoshop action adds green, gold, and many more beautiful colors to your metal effect. A helpful PDF guide is also included. Check it out!

18 Marble Text Effects
Marble effects aren’t just for your home! Get the most out of this gorgeous pattern with this pack of marble text effects. Including 18 effects with various colors, these text effects feature realistic marbling with high-quality textures. Use them on logos and more!

Halloween Horror Photoshop Layer Styles
Get messy with this Halloween-inspired set of Photoshop layer styles. Apply them to your text for a one-of-a-kind party flyer. This pack includes amazing styles like slime, mummy, and epic night-time vibes. Update your flyers and posters with cool text!

Neon Layer Styles
Light up your graphics with these incredible layer styles. Featuring a retro-inspired neon effect, these styles include over 70 light effects for top-quality imagery. Choose from 63 color variations and 15 realistic backgrounds.

Fantastic 3D Text Effects
3D text effects are great for movie titles and more! Check out this fantastic set packed with ten premium styles you’ll definitely enjoy. Mix and match the styles for more intensity and add amazing realistic colors and textures. Use them for text, shapes, and logos!

Old Movie Title Text Effects
Relive the classics with this vintage set of old movie title effects. Inspired by the silent movie era and the beginning of film, these text effects feature six different looks that are fully editable. Just switch out the words with your favorite quote or movie title.

Bokeh Text Effect Photoshop Actions
Love bokeh effects? Now you can apply them to all your titles and text with this Photoshop action. Make unlimited combinations for a bright and energetic effect that fits many styles of photography. Check out more previews at the link!

10 Creative Text Effects
Choose from ten creative text effects to make your headers stand out with this awesome package! Including fully scalable letters and effects, this pack features high-resolution layer styles that are easy to use. Simply add your favorite effect with just one click!

Christmas Text Effect Photoshop Action
Are you in the holiday spirit? Add sparkly effects to your holiday invites with this super pretty Photoshop action. Create magical, Christmas-inspired text that will fit all your holiday cheer. Enjoy this one-click action for less than $10. Add it to your collection!

Vintage Comics Text Effects
Our next text effect bundle includes ten high-quality Photoshop files for exciting comic effects. Inspired by the famous 20th-century comic book industry, this pack makes funny, romantic and thrilling text effects for your visuals. Add them to your collection!

Glitter Type
Design fabulous headers for stationery, websites and more with this extraordinary glitter type. It includes 49 characters of letters, numbers, and symbols, so you can mix and match each character for an incredible result. Change the brightness and colors easily to save time!

Illustrative 3D Styles
Add fun patterns and textures to your work quickly and easily! This illustrative 3D styles set includes three different styles at four different angles each! Make sure to install the pattern and action files included in order to make the most out of this package!

3D Ice Cool, Freeze & Snow Text Effects
Create ice-cool text effects with the click of a button! This awesome Photoshop text effect is a new addition, with exciting frozen elements. Mimic the look of snow, frozen letters and so much more in less time! Get 40 different styles with incredible 3D effects.

The X-Ray Type
See right through your messages with this creative x-ray type. Inspired by real-life x-rays, this set includes a full set of letters created as adjustable smart objects. Enjoy using it with Photoshop or getting access to high-quality JPEGs. You’ll love the result!

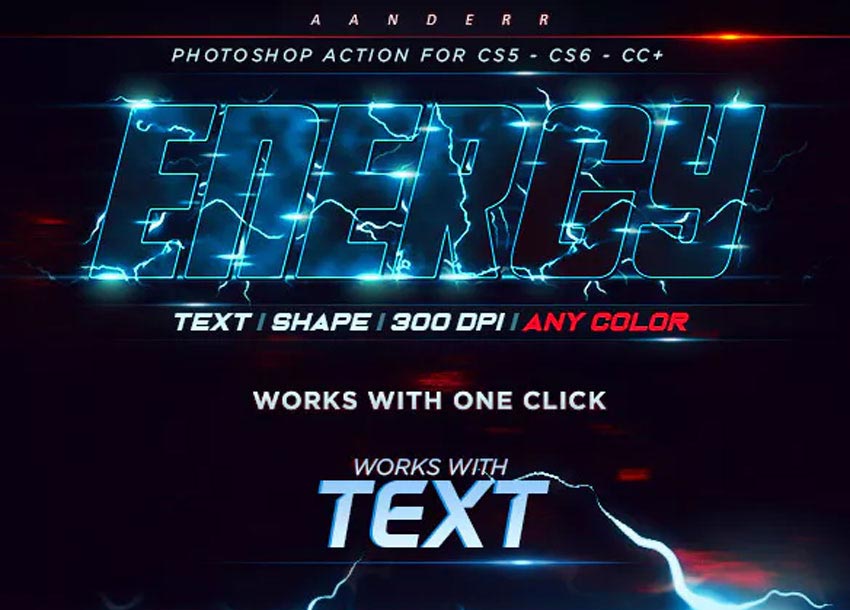
Energy Text Photoshop Action
There are endless color possibilities with this next energetic action. Energy is a text effect action that is perfect for movie titles, typography and more. Create electrifying text effects with Photoshop versions CS5 and above. Check it out!
Text Effects Bundle
Need an epic text effects bundle? Try this incredible suite. It includes many trendy effects inspired by cosmic, underwater, and retro themes. Edit the shadows and light effects for brilliant, custom results. A quick PDF help guide is also included for more information.

Show Us Your Text Effect Designs!
Tried any of these assets? Let us know! Tell us your favorite text effects in the comments below.
This has been a collection of premium resources perfect for the avid designer. For more cool Photoshop text effects, check out Envato Market and Envato Elements, or enlist the help of our talented professionals at Envato Studio. Happy designing!
Love text effects and Photoshop actions? Check out these tutorials to further get in on the fun!
 Text EffectsHow to Create an Underwater Text Effect in PhotoshopDaisy Ein
 Text EffectsHow to Create a Flame Text Effect in Adobe PhotoshopRose
 Adobe IllustratorNew Course: Create an Isometric Text Effect in Adobe IllustratorAndrew Blackman
 Text EffectsHow to Create a Cartoon Rainbow Text Effect in PhotoshopDaisy Ein

{excerpt}
Read More
How to Make a Video for World AIDS Day (December 1st)
{excerpt}
Read More
3 Top Product Promo Video Templates for Premiere Pro
{excerpt}
Read More
How to Design With Grids and Break Them
In this article, we’ll talk about grids, what they are, their history, and how to master them.
Grids are the foundation of all visual design. These invisible lines help organize elements on a page to create a clean, organized, and cohesive layout. Sticking to a grid will create safe designs, and it can eventually be boring to abide by the rules. But once you’ve mastered designing with grids, you can break the system.
In this article, we’ll take a look at the history of grids, how they evolved through history, and how to create them. We’ll take a look at the types of grids, how to break them, and a few InDesign templates examples that demonstrate how an organization can be achieved without the design looking boring.
If you are looking for grid inspiration, be sure to check out Envato Elements. It’s a great resource of inspiration and InDesign magazine templates.
The History of Grids
Renaissance paintings are famous for using perspective. Many paintings included a subtle grid that started in the center of the artwork and extended to the edges, which makes them look very symmetrical.
Masolino Da Panicale’s painting, Healing of the Cripple and Raising of Tabitha (1426-27) is heavily reliant on perspective. You’ll notice this mainly on the lines of the buildings in the foreground. We can create imaginary lines, and they all meet in the center of the painting.
-R.jpg)
Ancient manuscripts contained help lines or what we now call a baseline grid. These lines helped scribes create straight and evenly spaced lines of text in order to be readable as manuscripts were handwritten. The first western book printed with movable type, the Gutenberg Bible (1455), used a two-column grid on each page.
Another concept, which started in the 13th century, was the golden rectangle. The diagram was developed by an architect called Villard De Honnecourt. It consisted of a page divided into logical and harmonious parts. So if you resized the diagram to a page, it would provide you with a fixed margin that was considered visually harmonious to its size.
The Early 20th Century
Earlier adopters of the grid and where it’s more evident are De Stijl and the Bauhaus movements. The discovery and use of the grid catapulted modernism and minimalism not only in graphic design but in many other forms of art. De Stijl proposed ultimate abstraction to express the utopian idea of harmony and order by using simple geometric forms and pure colors. De Stijl was also the name of a magazine that Theo Van Doesburg, founder of the movement, published. The layout was one of the most significant works of graphic design that influenced its development in history.

The Bauhaus movement used a philosophical approach in its discipline. It developed in three different cities in Germany and, while short-lived due to the Nazi political party, it had a big influence on the art and design field. The Bauhaus movement focused on functionality and taking down the elitist idea of art. Herbert Bayer’s poster includes the Bauhaus logo designed by Oskar Schlemmer. The logo is a clear representation of what the Bauhaus stood for. The poster is clearly grid-based down to the geometric sans serif type.

The Swiss Take Over
Inspired by the modernist ideas from the early 20th Century, the Swiss style found beauty in simplicity. Grid systems came in full force during the 1940s and 1950s to help create a logical organization of information on a page. Josef Müller-Brockmann and Armin Hofmann are a couple of creators of the well-known International Typographic Style. Both used strict grids but allowed themselves to create playful layouts by rotating type, using colors and sometimes a few supporting elements. Josef Müller-Brockmann released a book called Grid Systems in which he provides guidelines and rules for different systems. While the text was written way before computers existed, it still remains one of the most important graphic design works that help us understand design.

Types of Grids
There are many different kinds of grids, and each has different functions in the way they hold and organize content. I believe it really depends on the number of elements and how detailed you’d like to be.
Multi-Column Grid
Single-column grids work for simple documents like paperback novels or pocket-size books as the size doesn’t allow for more columns that would keep the text pleasantly legible.
Multi-column grids are mainly used for wider-page publications that include more elements than just text, like images and other hierarchical text. This type of grid will allow you to be flexible with how you arrange the content. For instance, images can occupy one column or span right across the page. The same goes for text, depending on what type of information you are working with: headlines, body copy, or captions.

Modular Grid
The difference between multicolumn grids and modular grids are the horizontal divisions spanning from left to right. The extra rows provide even more structure to a layout by allowing only a restricted amount of space not only vertically but also horizontally.

Baseline Grid
If you are working with long forms of text, baseline grids can help you align all the text lines for a clean and organized look. Baseline grids are based on the type size and leading being used in the text. The line space will dictate the increment of the baseline grid, and you can adjust where the grid starts—at the margin or the very top of the page. A baseline grid is great to use in multi-column documents because it makes the text much easier for the reader to follow.

How to Construct a Grid
If you are interested in using grids in your design, make sure to use a grid even before setting up the document. If you have a sketching and planning phase, this is where a grid should first appear. Once you are ready to move to digital, you can set up grids easily in InDesign. When you create a new document, you can already create multiple columns to help you organize content from the get-go.

If you wish to add modular grids, head over to Layout > Create Guides. In the option window you’ll be able to select the number of rows you’d like to add. For instance, below I added 5 rows over the 3 columns I created at the beginning of the document.
To create a baseline grid, you’ll need to know what font, size, and line space or leading you’ll be using. In this case, I’ll be using Bw Nista Grotesk at 10 pt size and 12 pt leading. Head over to Preferences by pressing Command-K. Select the Grids option from the menu on the left side. Under Baseline Grid, set Increment Every to 12 pt.

In the document, press Option-Command-‘ to bring up the Baseline Grid. If the baseline grid doesn’t align with the horizontal grids, feel free to change the rows and gutter values. Select the text box, head over to the Paragraph panel and select the Align to Baseline Grid button.

The Revolution and How to Break the Grid
By the 1970s, graphic designers reacted against the neat International Typographic Style. Post-modernism was flexible with the grid and resulted in complex designs. Designers didn’t completely reject the grid, but they pushed the boundaries. David Carson is one of the most famous designers of the Punk/New Wave era, and his designs are highly experimental.
Breaking the grid is easy, but breaking it in a way that makes sense and creates a visually pleasing result is the main point. Layering is a great way to break the grid. Always do start off with a grid and then break the rules where they need to be broken. Extremes are never good, so try to find a balance that creates harmony.
Here are some awesome InDesign templates that use and break the grid:
Minimalist Flyer Design
This flyer design template is created on a grid but breaks it by layering multiple elements. For instance, there are two photos, and some of the main text is overlaid, creating depth and a sense that there are grids overlapping in the design.

Design Conference Poster/Flyer
This Swiss-inspired poster design also includes many overlapping elements. The background is composed of multiple images with a red overlay. The overlay is smart to subdue the intensity of the images and avoid different tones. The information over the background takes a higher hierarchical level due to the color choice and size.

Dance Flyer
This awesome dance flyer template is neatly organized. The grid allows the text boxes to align and create a cohesive and harmonious unit. The large text and the image in the center are a great way to break the grid. They not only create movement but also break the rigidity of the grid.

Global Warming Conference
Using large bleeding type breaks many of the rules created by the International Typographic Style. In this template, it adds edginess and interest to the design. Otherwise, it could look very plain. The large text also adds texture to the page so that the design doesn’t fall flat.

Inspiration Catalog
This template is another great example of using multiple grids to overlay a number of different elements. The design looks interesting, organized, and clean, without looking plain. Adding smaller elements like folios or picture captions over the image helps break the grid.

It’s Your Turn!
In this article, we showed you the evolution and brief history of grids. For centuries, grids have influenced many art and design fields to create organization and build up cohesive works of art.
The grid is the most essential element in design that all designs are built upon. The understanding of its concept can make or break a designer’s career. While it’s been loved for decades and hated for others, there’s no denying grids have always had a part in the design world. In order to break the grid, you need to master it and understand its function. Now it’s your turn to show us how you are breaking the grid!
If you are looking for more inspiration, be sure to check out Envato Elements for InDesign templates and InDesign magazine templates.
If you liked this article, you might like these:
 Adobe IllustratorIllustrator in 60 Seconds: The Perspective GridAndrei Stefan
 Design TheoryThe Basic Elements of DesignLaura Keung
 Adobe InDesign10 Essential Tips in Creating Print DesignLaura Keung
 Print Design10 Design Tips for Creating Mouth-Watering MenusGrace Fussell
 Adobe InDesign9 Top Tips for Making Creative InDesign TemplatesLaura Keung
 FontsVintage Trend: Best Mid-Century FontsLaura Keung

{excerpt}
Read More
How to Animate Text in After Effects
{excerpt}
Read More
How to Make, Save and Load Gradients in Adobe Illustrator

Welcome to How to Make a Gradient in Illustrator! In this tutorial, you will learn the step-by-step process of how to create basic gradients in Adobe Illustrator.
1. How to Make a Gradient in Illustrator
Step 1
To create a gradient, you must first have access to the Gradient panel. This should be located in the toolbar on the right. You can also access this by going to Window > Gradient.

Step 2
Clicking in the Gradient panel for the first time will select a white and black gradient by default (otherwise, the last used gradient will be applied by default). To apply a gradient to an object, first select the object to which you want to apply the gradient by clicking on it. Then simply click on the Gradient Box or the Gradient Bar inside the Gradient panel.
This will automatically apply the gradient to the object. By editing the look of the gradient in the Gradient panel, you will also change the gradient of the selected object.

Step 3
To define the gradient colors, double-click on one of the color stops under the gradient bar. This will open up some options to choose a color. When you choose a color, it will automatically be applied to the gradient.

Step 4
Define an ending color by clicking on the color stop on the right of the bar.

Step 5
Once the colors have been defined, you can choose to adjust the location of the starting point and/or the end point. This will change the look and smoothness of the gradient. To do this, click and drag the color stop left or right until you are happy with the result.

Step 6
To edit the look of the gradient further, you can adjust the location of the midpoint (represented by the diamond icon). This is where the gradient displays an even mix of both the starting and ending colors. To do this, simply drag the diamond left or right.

Step 7
You can also add extra colors to your gradient. To do this, click below the gradient bar to create another color stop. Choose a color as you did previously and use the mouse to click and drag a location for the color stop. Repeat this technique to create more color stops.

Step 8
To delete a color stop, simply select it with the mouse and click on the Delete Stop button or click and drag the color stop downwards.

Step 9
You can also adjust the angle of the gradient by choosing a value in the Angle Dropbox or by entering a value.
The angle will be automatically applied if you have an object selected.

Step 10
To adjust the opacity of a color stop, click on the color stop and use the Opacity Dropbox underneath the Gradient Bar. You can either type a value into the box or move the Opacity slider in the control panel.
The opacity of a color is represented by a checkered pattern when the value is below 100%.

Step 11
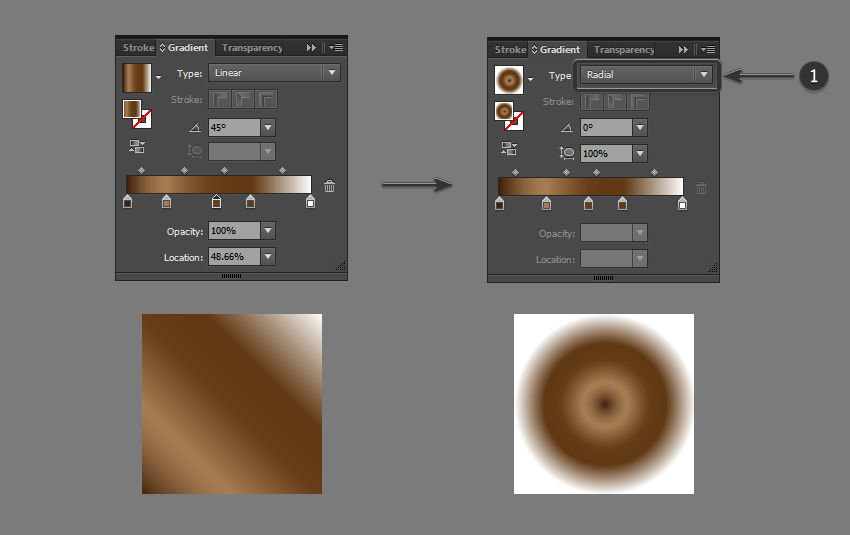
You can also choose the Gradient Type by clicking on one of the options at the top of the Gradient panel.
2. How to Save a Gradient in Illustrator
Step 1
To save a new gradient that you have created, you must add it to the Swatches. To do this, open up the Swatches panel (Window > Swatches).

Step 2
With the gradient still selected, click on the New Swatch button.

Step 3
Name the swatch in the popup window and click OK. This will create a new swatch with the gradient that you have created. You can also click and drag the gradient fill box from the Gradient panel into the Swatches panel.
For example, we have named the new gradient ‘Dark Bronze’. Every new swatch you create will appear at the end of the list.

Step 4
To save the swatch library, click on the library button on the bottom left and select Save Swatches. Enter a file name and click Save. This will save your current swatches library in the default location for Illustrator, although you can specify a new location if you wish.

3. How to Load a Gradient in Illustrator
Step 1
Illustrator provides a preset range of gradients that you can use in the Gradient panel or the Swatches panel. All the gradients you create will also be found in the Swatches panel.
Open the Swatches panel by going to Window > Swatches.
Step 2
Click on the library button on the bottom left. This will open up all the swatch options for you to choose from. To choose one of the preset gradients, navigate to Gradients and choose from a wide range of options such as metals, seasons, sky, water, and earth tones.

Step 3
To load the swatch library that you have created and saved previously, navigate to User Defined, and select the saved file name from the list.

Awesome! You’re Finished!
Congratulations! You have successfully completed this tutorial. I hope you found this tutorial helpful and that you’ve learned many new tips and tricks that you can use for your future illustrations and designs. See you next time!

Learn More Gradient Skills!
Now that you have learnt the basics of creating, saving and loading gradients, check out the tutorials below! Expand your expertise by going through these in-depth guides. Happy designing!
-

How to Create 5 Awesome Gradient Effects in Adobe InDesign
Gradient effects are super easy to achieve in InDesign, and they’re an instant way of bringing your layouts bang up-to-date. -

How to Create Transparent Water Droplets With Gradient Mesh in Adobe Illustrator
In this tutorial, you’ll learn how to create a vector set of transparent water droplets using the Mesh Tool and Transparency effects in Adobe Illustrator! -

How to Create a Cartoon Gradient Text Effect in Adobe Photoshop
In this tutorial I want to show you how to create a gradient text effect in Adobe Photoshop. -

How to Draw an Abstract Gold Background in Adobe Illustrator Using Gradient Mesh
Today you will learn how to create a vector abstract background using just the Mesh Tool in Adobe Illustrator!

{excerpt}
Read More
15 Best Royalty-Free Electronica Music Packs of 2019
In this article, I’ve collected 15 of the best royalty-free Electronica tracks on AudioJungle that you can add to your projects.
1. Concert
First up on our list is an electronica music pack that is sure to get your audience interested in your multimedia project. The high energy tracks are sure to be a crowd favorite, so add these three tracks to your collection now.
2. Japan Pack
This music pack blends traditional motifs with today’s electronic music trends to create a unique experience for your audience. These tracks will work great in YouTube videos, podcasts, and commercials.
3. Fashion Chill House Pack
Funky guitars, pianos, and tropical house melodies are what you can expect from this feel-good royalty-free music pack. Create a relaxed atmosphere in your next project with these chilled out tunes.
4. Electronic Pack
Bring energy, power, and attitude to your latest multimedia project with this royalty-free electronic music pack. These three diverse tracks are sure to impress, so download the pack now!
5. In Future Bass Pack
“In Future Bass Pack” contains three energetic and fresh electronic tracks in the Future Bass genre. These tracks make the perfect accompaniment to advertisements, YouTube videos, presentations, and sports videos.

6. In that EDM Pack
Give your next multimedia project an electronic festival-like atmosphere with the “In that EDM pack.” Big synths, chunky beats, and soaring melodies are what you can expect in this uplifting pack.
7. Congress
The three music tracks in “Congress” are best suited for presentations, vlogs, ads, and Youtube videos. The tracks in this pack contain modern productions in various electronic music genres such as dubstep, and future bass.
8. Extreme Sports Intro Pack
Bring power and ferocity to your next audiovisual project with this extreme electronica music pack. The driving bass-lines and earth-shaking drums are sure to excite your audience.
9. Dubstep Rock Pack
Dubstep and rock genres are a match made in heaven. This pack contains three grime-y and heavy-hitting dubstep rock tracks that will give your next multimedia project with energy.
10. 80s Pack
“80s Pack” features three retro-style dark synthwave tracks. Any project that needs to have that retro and spacious vibe will benefit from this high-quality royalty-free electronica music pack.
11. Dubstep 8-Bit Pack
Bring your next audiovisual project to life with this bright and playful royalty-free music pack. The blend of dubstep and 8-bit will add that extra bit of flare that all projects are needing.
12. Positive and Energetic EDM Pack
“Positive and Energetic EDM Pack” contains three melodic electronic dance music tracks that will draw in the attention of your audience. Let the good vibes take over!
13. Technology and Sports Pack
Energy, energy and more energy are what this royalty-free electronica music pack will give you. Buzzing bass-lines, melodic plucks, and heavy-hitting beats are what the three tracks in this pack contain.
14. The 80s Synthwave Pack
Bring back the classic sound of the 80’s with “The 80s Synthwave Pack.” The four on the floor beat, bouncy bass-lines, melodic guitars, and 80s synths are sure to be a crowd-pleaser.
15. Summer Dance Guitar Pack
Let the good times roll with “Summer Dance Guitar Pack.” If you are looking to inject positivity, energy, and a beach-like atmosphere, this pack is for you.
Conclusion
The 15 royalty-free electronica music packs listed above are representative of a very small selection of the thousands of electronica music tracks and packs available at AudioJungle.
Head on over to AudioJungle and browse through the large library for more royalty-free tracks and music packs.
If you’re looking to improve your own skills in creating or editing your own music, then be sure to check out all the in-depth tutorials on Envato Tuts+ Music & Audio.

{excerpt}
Read More
How to Create a Sparkle Overlay Effect in Photoshop

Do you know how to create particle effects in Photoshop? You can use this technique for many magical photo effects, in many different ways. In this tutorial, I’ll show you how to create a sparkle overlay effect—a special texture that you can use to add a sparkle effect to any photo!
Follow along with us over on our Envato Tuts+ YouTube channel:
How to Create a Sparkle Overlay Effect in Photoshop
Step 1
First, create a New File. Use these dimensions:

Step 2
Use the Rectangle Tool (U) to make the background three-colored—this will help us adjust the effect to every level of brightness.

Step 3
Create a New Layer. Fill it with black using the Paint Bucket Tool (G). Then go to Filter > Noise > Add Noise. Use these settings.

Step 4
Add a Curves adjustment layer (Layer > New Adjustment Layer > Curves). Drag both ends of the curve towards the “hill” in the background. Then click between these points and drag this new point down, to increase the contrast.


Step 5
Go back to the noise layer and go to Filter > Blur > Gaussian Blur. Adjust the Radius to turn the noise into a starry sky.


Step 6
Click the curves layer and press Control-Shift-Alt-E twice to create two merged versions of the whole image. Hide the layers below and one of the copies.

Step 7
Press Control-T and make the stars five times larger.

Step 8
Go to the Channels tab, hold Control, and click any of the thumbnails. Then go back to the Layers tab, create a New Layer, and fill it with white. If you delete the lower layer now, you’ll see the black background has been removed. Name this layer “Big Sparkles”.


Step 9
Duplicate Big Sparkles by pressing Control-J. Go to Filter > Blur > Motion Blur. Adjust the settings to create a subtle smudge.


Step 10
Duplicate Big Sparkles again and add Motion Blur to it. This time, make the smudge longer. Lower its Opacity to make the effect more natural.


Step 11
Repeat the process once more, this time using an opposite angle. Don’t forget to lower the Opacity each time!


Step 12
Select all the sparkles by holding Shift, and make a group out of them (Control-G). Name the group Big Sparkles. Add a Layer Mask to the group.

Step 13
Go to Filter > Render > Clouds. This will add a little variety to the sparkles. To make it more visible, press Control-L and drag the right marker to the left.


Step 14
Duplicate the group. Right-click it and select Merge Group, and then right-click the Layer Mask and select Apply Layer Mask. Go to Filter > Blur > Gaussian Blur and adjust the Radius to create a nice glow around the sparkles.


Step 15
Let’s add some smaller sparkles now. Show the second merged layer you created at the beginning, make it twice as large, and remove its black background the same way we did before. Name this layer Small Sparkles.

Step 16
Hold Alt and drag the Layer Mask of the Big Sparkles group to Small Sparkles. Then go to Filter > Blur > Lens Blur. The preview will not tell us much, but experiment with Brightness and Threshold and see how it works.

Step 17
Duplicate this layer and make it four times larger. You may need to duplicate it once or twice to see the effect better.

Step 18
All right, the sparkles are done, but they’re completely invisible on the light background. Let’s fix it by adding a black filled layer on the bottom. Add a Layer Mask to it and paint with a soft black brush in the middle. Then lower the Opacity to around 50%.


Step 19
The sparkle overlay effect is done! Now simply hide the background to make it ready to use.

Step 20
If you want to add this sparkle effect to a photo, just open your photo, go to File > Place, and select this file. Resize it to your needs. If you want to adjust something, just double-click the Smart Object and you’ll get a chance to edit everything once again.


Photoshop Particle Effects
Sparkle Photoshop Action
To add this sparkle overlay effect to any photo, just brush over the selected areas and play the action—colorful sparkles will appear automatically!

Glitterstorm Photoshop Action
Turn your photo into glitter with this action! You can convert the whole photo, or create a trendy Photoshop dispersion effect with it.

Shimmer Photoshop Action
If you want to add a dust particle effect, with this action you only need to paint over the selected area and press play!

Magic Bokeh – Animated Photoshop Action
This professional Photoshop action will allow you to create stunning animated light effects from your photos with a lot of options to customise and improve them. You can save the result as a static image, a video for social media, or an animated GIF file. Create an animated sparkle effect in no time!

Sparkler Photoshop Action
With this action, you can turn any line into sparkler art! Just draw your outlines over the photo and play the action.

Good Job!
Now you know how to create a sparkle overlay effect in Photoshop! You can modify this technique to create other photo effects as well—add snow, create bokeh, or add dust particles. Photoshop makes it all easy!

And if you need other types of sparkle photo effects, try one of these tutorials as well:
 Photoshop ActionsHow to Create a Sparkle Effect Photoshop ActionMarko Kožokar
 Photo ManipulationHow to Add Lights to a Tree With a Photoshop ActionMarko Kožokar
 Photoshop ActionsHow to Create a Sparkling Action in Adobe PhotoshopMarko Kožokar
 Text EffectsHow to Create a Quick Sparkling Diamonds Text Effect in Adobe PhotoshopRose
 Layer StylesHow to Apply Outer Glow to Layer Styles in PhotoshopJohn Shaver

{excerpt}
Read More
AI determines how much help Shakespeare had writing a play

Pennsylvania court rules suspect can’t be forced to provide his password

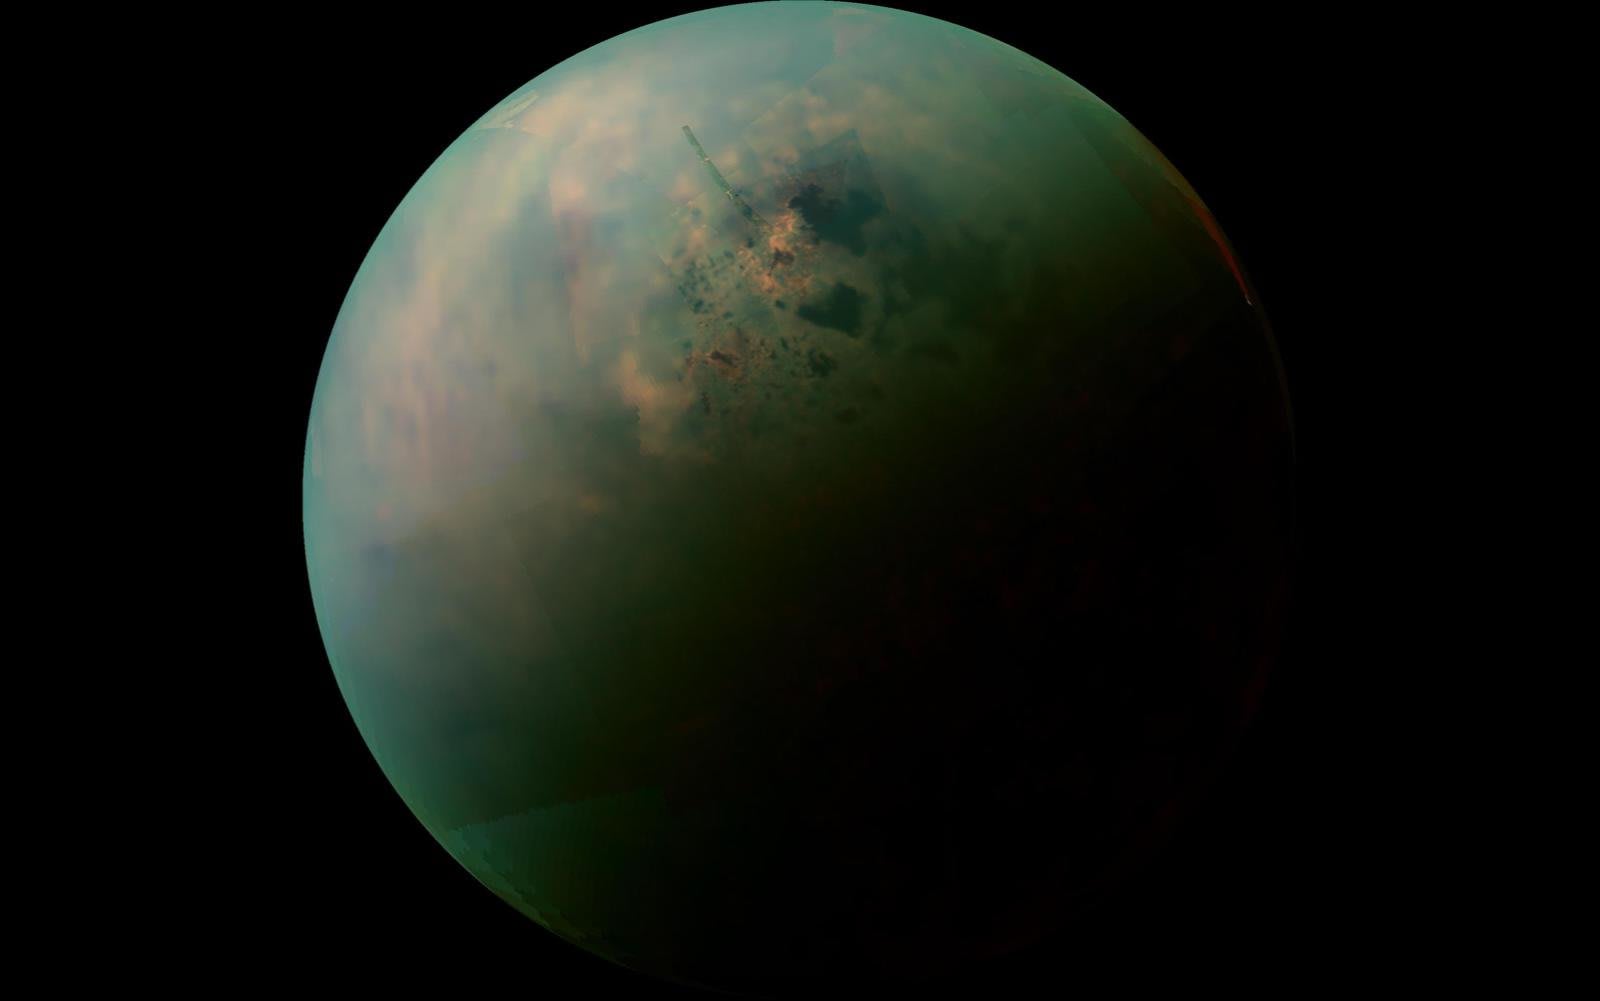
Astronomers create first global map of Saturn’s moon Titan
Microsoft gets US license to resume selling software to Huawei