42 Best Hoodie Mockups (PSD, Video & Hoodie Mockup Generators!)

Hoodies are one of the favoured pieces of clothing in the 21st century, so it’s no surprise that designers love to use them as canvases for their designs. This has led to a growing demand for hoodie mockup templates to showcase designs on social media platforms, online stores, and blogs. 

Hoodie Mockups
Top-Quality Mockup Hoodies found at Envato Elements and Placeit

Today, we’re featuring a selection of the 42 best hoodie templates available at Envato Elements and Placeit. Take a look! You’re bound to find something you like. 

Premium Mockup Hoodie Design Templates at Envato Elements

If you’re proficient in Adobe Photoshop, Elements is a great source for a wide range of hoodie mockups in PSD file format. And you can download as many as you want, as often as you want, for one flat monthly fee

Premium Mockup Hoodie Design Templates at Envato Elements

That monthly fee also allows you to access thousands of other premium digital assets like fonts, logos, graphic templates, photos, and much more. Here are the best hoodie mockups in PSD format found at Elements.

10+ Blank Hoodie Templates From Envato Elements

Hoodie Design Template

Hoodie Design Template

Looking for a wonderfully stylish blank hoodie template to test your design? This one offers seven different PSD templates with the model shot from different angles. The files are all organised in layers, with easy-to-use smart objects. 

Color Hoodie Sweatshirt Mockup

Color Hoodie Sweatshirt Mockup

Use these hoodie sweatshirt mockups to display your newly created logos and/or designs. The mockups are printed in 13 high-resolution PSD files that are neatly organised in clearly named layers. Editing is made easy using smart objects. A PDF guide is included in case you get stuck.

Pullover Hoodie Mockup Templates

Pullover Hoodie Mockup Templates

Looking for the right pullover hoodie mockup templates to showcase your latest designs? Then check out this collection of hoodie mockups in PSD file format. You can change just about everything about these images—backgrounds, reflections, shadows, colours, etc.—to create just the right look for your project.

Hoodie Sweatshirt Mockup

Hoodie Sweatshirt Mockup

This hoodie design template contains 12 high-res, well-organised PSD files that you can edit to reflect your taste and needs. As the preview images above show, there is quite a good variety of poses and locations to choose from, so choose your favourite(s) and get to work customising. 

Blank Hoodie Template for Children

Blank Hoodie Template for Children

If your target audience is children or parents of children, then you’ll love this blank hoodie template for children. The set offers you four downloadable hoodie mockups in PSD format. The files are all high res and fully layered to make editing easy. 

Black Zip Hoodie Template

Black Zip Hoodie Template

Looking for a black zip hoodie template? Well, this is the mockup for you. There are three different views and eight different backgrounds to choose from, and editing is super easy using smart objects. Add your design and then mix and match angles and backgrounds to create a look that’s uniquely yours.

Hoodie Sweatshirt Mockup / Studio Edition

Hoodie Sweatshirt Mockup  Studio Edition

Check out these premium hoodie sweatshirt mockups. They’re ideal for adding to your social media, website, or catalogue. There are ten mockup templates included, with both male and female models. All images are in high resolution and easily edited via smart objects. 

6 Mockup Hoodies

6 Mockup Hoodies

These six hoodie design templates are presented in well-organised layers with smart objects, which make them very easy to customise. Apart from adding your own design, you can change the backgrounds, colours, shadows, effects, etc.

Download Hoodie Mockup PSD

Download Hoodie Mockup PSD

This black zip hoodie template contains the three files you see pictured here. Upload your design to the front and/or back and customise the template as needed using the smart objects available. 

Hoodie Mockup PSD

Hoodie Mockup PSD

These pullover hoodie mockup templates are great for e-commerce sites, catalogues or even magazine layouts. The six photorealistic mockups are organised in clearly named layers that are fast and easy to edit. 

Pullover Hoodie Mockup Templates

Pullover Hoodie Mockup Templates

Download this hoodie mockup PSD file and customise by adding your own logo or designs, modifying the colours, background, etc. The mockup comes in three views—front, back, and three-quarter view. All layers are well organised, and all editing is done through smart objects. 

Premium Hoodie Design Templates at Placeit

Premium Hoodie Design Templates at Placeit

For those of you who don’t feel confident about your Photoshop skills or want an easier approach to customising a mockup, there’s Placeit. Placeit is an affordable online design generator that makes professional branding, promotion, and marketing tools accessible to everyone.

It does this by providing high-quality designs, logos, videos, and mockups that you can customise online and download in a matter of seconds.

This means that you can design all your branding and marketing materials directly from your browser, without needing complicated software. Let’s take a look at how easy it is to create a hoodie mockup in no time at all using the Hoodie Mockup Generator.

How to Create a Hoodie Mockup in Minutes

1. Navigate to Placeit and Search for Hoodie Mockups

Navigate to Placeit and search for Hoodie Mockups

2. Select a Mockup & Upload Your Design

Select A Mockup Hoodie  Upload Your Design

3. Select a Colour for Your Hoodie Template

 Select a Colour for Your Hoodie Template

4. Add Text to Your Hoodie Design Template If You Need It

Add Text To Your Hoodie Design Template If You Need It

5. Download Your Hoodie Design Template for a Small Fee

Download Your Hoodie Design Template For a Small Fee

And that’s how you customise a hoodie template in five easy steps. Now let’s take a look at a selection of the best hoodie mockups available at Placeit. 

31 Best Hoodie Mockups  

Hoodie Template

Hoodie Template

With Placeit, you can customise your favourite hoodie template in just seconds. This template allows you to change the colour of the hoodie as well as the colour of the background to create just the right image for your needs. 

Pullover Hoodie Mockup Templates Featuring Three Women

Pullover Hoodie Mockup Templates Featuring Three Women

These blank hoodie templates give you a great way to show off three different designs, the same design in different colours, or three variations of the same design. 

Tank Top Mockup and Blank Hoodie Template

Tank Top Mockup and Blank Hoodie Template

How sweet is this mum and daughter yoga duo? The template features a sleeveless tank mockup for mum and a pullover hoodie mockup template for daughter. You can upload the same design to both templates or choose completely different ones.

Mockup Hoodie for LGBTQIA Pride Parade

Mockup Hoodie for LGBTQIA Pride Parade

Creating designs and logos for Pride or for the LGBTQIA community? Check out this wonderfully joyous pride mockup hoodie. All you need to do to add your design is hit the upload button to the left of the template.

Hoodie Mockup of a Man Leaning on a Wooden Wall

Hoodie Mockup of a Man Leaning on a Wooden Wall

Pitching hoodie design ideas to a club or business? Why not use a hoodie sweatshirt mockup to bring your work to life? It will help your client to see exactly how your design will look in real life once completed. 

Mockup Hoodie Design Template of a Woman with a Hijab

Mockup Hoodie Design Template of a Woman with a Hijab

Hijabistas and designers targeting modest dressers, we’ve got some cool hoodie templates for you to display your designs and logos, like this one with its stylish model and awesome geometric background. Adding your designs is easy with the online hoodie mockup generator.

Cool Pullover Hoodie Mockup Template

Cool Pullover Hoodie Mockup Template

What could be more awesome than this mockup hoodie, pairing a leather jacket with the hoodie? And what’s truly great is that the jacket doesn’t obscure your design in any way—rather it frames it, which only heightens the focus on it.

Hoodie Sweatshirt Mockup with Neon Lights

Hoodie Sweatshirt Mockup with Neon Lights

Capture the grittiness of the urban jungle with this night-time and neon mockup hoodie template that features a young woman standing outside a cafe, illuminated by the neon lights all around her.

Pullover Hoodie Mockup Template in Studio

Pullover Hoodie Mockup Template in Studio

Appeal to the now generation with this mockup, which not only keeps your design front and centre but allows you to change the background to any colour needed or to make it transparent so you can blend your mockup with the background of your choice. 

Folded Mockup Hoodie

Folded Mockup Hoodie

Sometimes, all you need is a simple flatlay to get the message across. For those times, there is this terrific pullover hoodie mockup template. The template, which is surrounded by a camera and glasses, shows the area your design will go clearly and boldly. 

Skater Hoodie Mockup Template

Skater Hoodie Mockup Template

Do you design cool gear for skaters? Well, this is the perfect mockup hoodie to showcase your designs. 

Hoodie Sweatshirt Mockup Template

Hoodie Sweatshirt Mockup Template

The thing about creating designs specifically for designers is that you can really create beautiful and meaningful art or logos and then use a wonderful blank hoodie template like this one to showcase your art.

Pullover Hoodie Mockup Template of a Man Playing Guitar

Pullover Hoodie Mockup Template of a Man Playing Guitar

This mockup hoodie of a man strumming a guitar is perfect for those whose designs are created for musicians of every type. Upload your design quickly, and your mockup is ready to be downloaded and used. 

Awesome Blank Hoodie Template

Awesome Blank Hoodie Template

If you need a pullover hoodie mockup template for a special project that’s sober and sincere, this template is a great choice. Use the mockup generator to upload your image, and in no time at all your download is ready to use. 

Hoodie Mockup Template at Public Pool

Hoodie Mockup Template at Public Pool

Designing a logo for a swimming club? Then show your client how their logo will look in real life when you add it to this mockup hoodie. What’s truly great about Placeit hoodie templates is that you don’t have to mess about with complicated software. Instead, the software is incorporated into the template, and customisation is possible in a couple of clicks. 

Hoodie Sweatshirt Mockup for Kids

Hoodie Sweatshirt Mockup for Kids

Designers of logos and art for kids, this one is for you. It features a young boy standing on and between two bumping cars and laughing his head off. A great template for showing off your designs. 

Pullover Hoodie Mockup Template with Two Women Chatting

Pullover Hoodie Mockup Template with Two Women Chatting

Two is better than one, and that’s why Placeit has a wide selection of terrific templates that offer you two mockup hoodies, like this one featuring two women chatting over cups of tea in a cafe.

Cowgirl Pullover Hoodie Mockup Template

Cowgirl Pullover HoodieMockup Template

“I’m gonna take my horse to the old town road… ” Of course, we have to include mockup hoodies for today’s cow women, who combine traditional and contemporary styles effortlessly. Just hit the upload button to the left of the template to upload your design, and your mockup hoodie is ready to download and use as you want.

Coffee Mug Mockup with Blank Hoodie Template

Coffee Mug Mockup with Blank Hoodie Template

This blank hoodie template is a great mockup for a cafe or coffee shop logo. It allows designers to double down by adding their logo creations to both a coffee mug and a sweatshirt hoodie.

Hoodie Pullover Mockup Template for Holloween 

Hoodie Pullover Mockup Template for Holloween

Need a hoodie mockup template with a Halloween theme? We’ve got you covered with templates like this one featuring a young woman with heavy makeup and a black hat carrying a candle lantern. Add your Halloween-inspired design to complete the picture.

Hoodie Sweatshirt Mockup in Studio

Hoodie Sweatshirt Mockup in Studio

Here’s a mockup hoodie that will keep the viewer’s attention fully focused on your design. With its plain background—you can change the background colour—and the model’s position facing the camera squarely, your design will hold pride of place, front and centre.

Hoodie Mockup Template of a Man Throwing a Football

Hoodie Mockup Template of a Man Throwing a Football

If you design sports logos, then you will need plenty of sports-related blank hoodie templates. Placeit has you covered. This is just one of the awesome sports-themed mockup hoodies Placeit has in its collection.

Back View Mockup Hoodie in Nature

Back View Mockup Hoodie in Nature

If your designs target lovers of the great outdoors, then this is an excellent hoodie template for you. It features a back view of the hoodie, which is great because of the view we can see over the subject’s shoulders. 

Cropped Hoodie Design Template

Cropped Hoodie Design Template

For those looking for a youthful update to the hoodie, we’ve included this cropped hoodie template, which hopefully leaves just about enough room for your design. 

Hoodie Mockup Featuring a Woman Posing With a Camera

Hoodie Mockup Featuring a Woman Posing With a Camera

Playful, cheeky, fun, this great image will guarantee that all eyes will be on your blank hoodie template once you add your design and customise the colours. 

Mockup of a Woman Wearing a Hoodie at a Radio Booth

Mockup of a Woman Wearing a Hoodie at a Radio Booth

Looking for pullover hoodie mockup templates that will appeal to the YouTube and Podcast generation? Look no further. This template is perfect for displaying logos and designs for all sorts of content. So just hit that upload button to the left of the template to add your design, and your job is done.

Placeit Hoodie Video Templates

Hoodie Video Featuring a Happy LGBT Couple Taking a Selfie


This is the age of video, and Placeit has tons of hoodie video templates to satisfy designers who are looking for videos with hoodie mockups. This one features an LGBTQIA couple taking a selfie. 

Video of a Woman with Bangs Wearing a Hoodie


Upload your design to this mockup hoodie video the same way you would with still hoodie templates, by using the upload button to the left of the template. It’s as easy as that.

Hoodie Video of a Tall Man in a Warehouse


This video hoodie mockup featuring a young man standing in a warehouse offers two views: the medium shot you see here and a closeup shot of the logo/design area. Upload your logo or design using the upload button to the left of the template, download your video, and it’s ready to use. 

Video of a Boy Wearing a Pullover Hoodie in His House


If your target audience is kids, this awesome hooded sweatshirt mockup is perfect for you. This one is even more adorable because it includes a mother and son. The mockup is a great choice for beautiful child-friendly designs, uplifting quotations for kids, or commercial advertising.

Pullover Hoodie Video of Man Posing Against a Plain Background


The neutral background of this video is a great asset because it makes the mockup hoodie video super versatile. You can use the video to display creative designs, fashion brands, logos, or inspirational quotes. 

Choose Your Favourite Hoodie Template Today 

Envato Elements is an excellent source for downloadable hoodie mockups in PSD file formats. If you regularly need fonts, icons, and other design resources, Elements offers unlimited downloads for one low monthly fee. 

Alternatively, if you don’t use Photoshop or are looking for an easier option for customising hoodie mockups, then Placeit is the perfect choice for you. Its online hoodie mockup generator is easy to use and will allow you to customise a blank hoodie template in a matter of minutes. 

Finally, if you want more information on other terrific mockups, check out these resources below: 

{excerpt}
Read More

How to Create Patterns in Affinity Designer

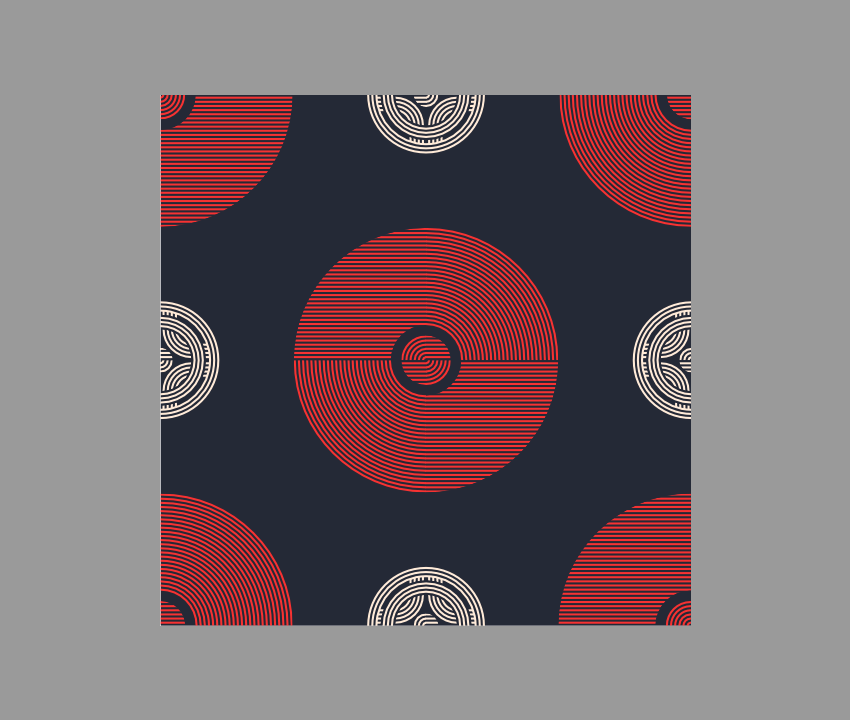
Final product image
What You’ll Be Creating

In today’s
tutorial, we’re going to learn how to make a pattern in Affinity Designer. We’ll explore three different methods in order to
see which one is the best.

Also, don’t forget you can always expand your pattern library by heading over to Envato Elements, where you’ll find a great selection of vector patterns.

That being said, grab a fresh cup of that hot bean juice, and let’s create an Affinity Designer pattern fill!

Follow along with us over on our Envato Tuts+ YouTube channel:

1. How to Set Up a
New Project File for an Affinity Designer Repeat Pattern

To create a pattern tool, we’re going to start by setting up a New Document by heading over to File > New (or by using the Control-N
keyboard shortcut), which we will adjust as follows:

  • Type:
    Web
  • Document
    Units:
    Pixels
  • Create
    artboard:
    checked
  • Page
    Width:
    514 px
  • Page
    Height:
    514 px
  • DPI: 72
setting up a new document

2. How to Create
the Main Repeating Pattern Segment

Now that we’ve
finished creating our project file, we’re going to start working on the
repeating pattern segment, which we will use later on in order to compare the
three pattern building methods.

Step 1

Create the main shape for the background using a 514 x 514 px square, which we will color using #1F2433 and then
center align to the underlying page using the Arrange panel’s Align Center
and Align Middle options.

creating and positioning the background

Step 2

Start working on the inner section of the center decorative circle by creating
a 6 x 6 px circle with a 2 pt thick Stroke (#F72F2F), which we will center align to the page as we did
with the background.

creating the main shape for the inner section of the larger decorative circle

Step 3

Create five 2 pt thick
concentric circles (#F72F2F), making sure to maintain a 2 px gap (which is the thickness of the actual circles) between
them, as seen in the reference image. Once you’re done, select and group all six
of them together using the Control-G
keyboard shortcut.

adding the remaining circles to the inner section of the larger decorative circle

Step 4

Next, we’re going to need to create the clipping mask for the circles’
top-left quarters, using a 24 x 24 px square
(highlighted with green) which we will align to the outer circle’s left and top
edges.

creating the mask for the circles of the inner section

Step 5

Once we have the mask in place, all we have to do is open up the Layers panel and drag the grouped
circles onto the shape (the green square), which will produce the following
result.

example of masking the circles of the inner section

Step 6

Since we want the mask to be completely see-through, we’re going to
first select it in the Layers
panel and then remove its Fill from the Color panel.

removing the clipping masks fill

Step 7

Create a copy (Control-C >
Control-V
) of the section that we’ve just masked, and then position it as
seen in the reference image, making sure to adjust it by flipping it both
horizontally and vertically (Transform
> Flip Horizontal & Flip Vertical
).

creating the bottom-right quarters

Step 8

Next, we’re going to grab the Pen
Tool (P)
 and use it to draw two groups (Control-G) of six 24 px wide
2 pt thick horizontal stroke lines
(#F72F2F), which we will vertically stack 2 px from one another and then position on the sides of the
circle quarters so that they overlap, as seen in the reference image.

adding the horizontal lines to the inner section of the larger circle

Step 9

Mask the horizontal lines that we’ve just created using a 48 x 48 px circle, by opening up the Layers panel and then simply dragging
them over the larger shape. Once you’re done, select and mask all of the
current section’s composing shapes using the Control-G keyboard shortcut, making sure to give the resulting
group a descriptive label so that you can easily identify it later on.

masking the horizontal lines of the inner section

Step 10

Start working on the decorative circle’s outer section, by creating the
bottom-left quarters using 24 2
pt
thick concentric circles (#F72F2F), starting with a 70 x 70 px one and going all the way up to a 254 x 254 px one. Once you have all the shapes, group (Control-G) and then center align them
to the page, making sure to mask them using a 128 x 128 px square.

creating the lower-left quarters of the outer section

Step 11

Create the top-right quarter using a copy (Control-C > Control-V) of the one that we’ve just masked, which
we will adjust by flipping it both horizontally and vertically (right click > Transform > Flip
Horizontal & Flip Vertical
) and positioning it as seen in the reference
image.

adding the top-right quarters to the outer section

Step 12

Add the horizontal detail lines using two groups (Control-G) of 32 128
px
wide 2 pt thick Stroke lines (#F72F2F), which we will
vertically stack 2 px from one
another, making sure to position them over the quarters so that they overlap.

adding the horizontal detail lines to the outer section

Step 13

Create the clipping mask for the horizontal lines using a 256 x 256 px circle (highlighted with
green) which we will center align to the page and then adjust by cutting out a
smaller 68 x 68 px circle
(highlighted with red) from its center using the Subtract shape operation.

creating the clipping mask for the outer section

Step 14

As soon as you’ve created the mask,
open up the Layers panel and then
simply select and drag the two groups of horizontal lines on top of its shape,
making sure to remove its fill afterwards from within the Color panel. Once you’re done, select and group all of the current
decorative circle’s composing sections using the Control-G keyboard shortcut.

adjusting the clipping mask for the larger outer section

Step 15

Create four copies (Control-C
> Control-V
four times) of the shapes that we’ve just grouped and then  position
them at the center of the page’s corners, as seen in the reference image.

adding the remaining larger decorative circles

Step 16

Start working on the smaller decorative circle by creating three concentric circles: one 6
x 6 px
circle with a 2 pt thick Stroke (#FFEBD9), followed by a 14 x 14 px one (#FFEBD9) and another
slightly bigger 22 x 22 px one (#FFEBD9). Then select and group all three of them together using the Control-G keyboard shortcut.

creating the main shapes for the inner section of the smaller decorative circle

Step 17

Mask the circles’ top left quarters using a 12 x 12 px square, making sure to add the bottom-right ones using a
copy (Control-C > Control-V) of
the resulting mask, which we will adjust by flipping it both horizontally and
vertically (right click > Transform
> Flip Horizontal & Flip Vertical
) and then positioning it as seen
in the reference image.

masking the quarters of the smaller inner section

Step 18

Add the horizontal detail lines using two groups of three 12 x 12 px Strokes (#FFEBD9) with a 2 pt Width, vertically stacked 2 px from one another, which we will
overlap with the top and bottom quarters, making sure to mask them afterwards
using a 24 x 24 px circle. Once
you’re done, select and group all of the current section’s composing shapes
using the Control-G keyboard
shortcut.

adding the horizontal detail lines to the smaller inner section

Step 19

Create four groups of four concentric circles with a 2 pt thick Stroke (#FFEBD9): one 30 x
30 px
, followed by a 38 x 38 px one,
a 46 x 46 px one and a larger 54 x 54 px one. Then position them around the previous section, as seen in the reference image.

adding the circle groups to the smaller inner section

Step 20

Take a couple of moments and mask the shapes that we’ve just created
using a 60 x 60 px circle, by simply
dragging them over the larger shape from within the Layers panel.

masking the circle groups of the smaller inner section

Step 21

Add the outer rings using a group of three
concentric circles with a 2 pt thick
Stroke (#FFEBD9): one small 66 x 66 px one, followed by a 74 x 74 px one and a slightly bigger 82 x 82 px one. Then center
align them to the shapes that we’ve just masked.

adding the middle rings to the smaller inner section

Step 22

Create the horizontal detail lines using two groups of four 104 px wide 2 pt thick Strokes (#FFEBD9)
vertically stacked 2 px from one
another, followed by the vertical ones using two groups of 104 px tall 2 pt thick Strokes (#FFEBD9) horizontally
spaced 2 px from one another,
which we will position so that they overlap the paths of the masked circles.

adding the horizontal and vertical lines to the smaller inner section

Step 23

Mask the resulting shapes using a 96 x 96 px circle, which we will adjust
by cutting out a smaller 88 x 88 px one
using the Subtract shape operation.

masking the horizontal and vertical detail lines

Step 24

Add the outer rings using three concentric
circles with a 2 pt thick Stroke (#FFEBD9): one 96 x 96 px one, followed by another 104 x 104 px one and a slightly bigger 112 x 112 px one. Then position them as seen in the reference image. Once you’re done, make sure
you select and group all of the decorative circle’s composing sections using
the Control-G keyboard shortcut.

adding the outer rings to the smaller inner section

Step 25

Finish off the pattern segment by adding three copies (Control-C > Control-V three times)
of the shapes that we’ve just grouped, which we will position in the center of
the page’s remaining edges.

adding the remaining smaller decorative circles

Step 26

Now that we’ve finished putting together all the different sections of
our little pattern, we’ll want to select and group (Control-G) them together, making sure to mask them afterwards using
a 514 x 514 px square.            

masking-the-repeating-pattern-segment

3. How to Make a Pattern Design Using the Copy-and-Paste Method

So up to this point, we’ve been putting together the
repeating pattern segment. Now we’re going to put it to work and see how we can
create a pattern in Affinity Designer using the first method.

Step 1

You’ll want to start by creating a New Document by heading over to File > New (or by using the Control-N keyboard shortcut) and then
entering the desired Width and Height values (I went with a
1600 x 1600 px square).

setting up a larger document

Step 2

To create a pattern tool, make a copy (Control-C) of the pattern segment that we’ve just masked, and then paste
it (Control-V) within the new
document, which should by default align it to the page’s top-left corner.

pasting the pattern segment onto the larger document

Step 3

Next, we’re going to populate the page with a couple of horizontal and
vertical copies. Normally, I would use the click-and-drag method where you
create the copy by selecting the shape that you want to duplicate and then
holding down Alt (to create the
copy) and Shift (in order to drag in
a straight line) while dragging using the mouse. 

The problem is that, when you do this, the software won’t properly snap
the copy to the original segment’s edges, which is what we want it to do. To
fix this, you’ll have to create the copy using the Control-C > Control-V keyboard shortcuts, and then select and
drag it until it snaps into place.

Also, don’t worry about the pattern being all over the place, since we’re
going to fix that in the next step.

populating the larger document using the copy and paste method

Step 4

Select all of the pattern segments using the Control-A keyboard shortcut, and then group them together using the
Control-G keyboard shortcut, making
sure to center align the resulting group to the underlying page which will
ensure that the pattern will be uniformly applied.

center aligning the copy and paste pattern

Step 5

While the Copy-and-Paste method is really easy to
use, it can sometimes prove not to be your best choice, especially if you want to
make adjustments to one of the composing segments, since the software won’t
carry them across the entire pattern. This means that if you need to change the
color or size of an element, you’ll have to take the time and adjust each of the
pattern’s composing segments in order for the change to be uniformly applied.

The next method overcomes this problem using a simple solution, as we
will see in the following moments. 

adjusting the color of a composing shape of the copy and paste pattern

4. How to Create an Affinity Designer Seamless Pattern Using the Symbols Method

If you plan on
adjusting the pattern later on, this second method of creating an Affinity Designer pattern should prove to be a better choice,
since it allows you to do that in a very simple manner. 

Step 1

Start out by creating a 1600 x
1600 px
document, onto which we will paste (Control-V) a copy of the repeating pattern segment.

pasting the repeating pattern onto the larger artboard for the symbols method

Step 2

Instead of
immediately starting to populate the page with copies of the pattern segment as
we did a few moments ago, we’re going to turn it into a symbol which will allow
us to carry out any desired adjustment at a global level. To do this, you first
have to enable the Symbols panel, by
heading over to View > Studio where
you’ll want to click on Symbols.

Now that the panel is visible, you’ll want to select the pattern segment
and then simply click Create, which
should turn it into a symbol. This will be indicated on the Layers panel.

example of turning a pattern segment into a symbol

Step 3

Once we’ve turned our pattern segment into a symbol, we can take the
time to populate the page using a couple of horizontal and vertical copies (Control-C > Control-V) as we did
with the previous method, making sure to group (Control-G) and then center align the resulting pattern using the Arrange panel’s Align Horizontally and Vertically
options.

center aligning the pattern for the symbols method

Step 4

If you ever need to make adjustments to the resulting pattern, you can
easily do so by adjusting one of its composing segments, and the software will
carry them out across all the other ones.

adjusting the color of a composing shape for the symbols method

5. How to Create
the Affinity Designer Pattern Fill Using the Power Duplicate Method 

This third and
last method is probably the best one, since it allows you to
populate the page a lot faster compared to the Copy-and-Paste method, while letting you easily edit it as you can with the Symbols method.

Step 1

As we did with all the previous methods, start by creating a 1600 x 1600 px document and then
pasting (Control-V) a copy of the
repeating segment onto it.

pasting the repeating pattern for the power duplicate method

Step 2

Quickly turn the pattern segment into a symbol, so that you can carry
out adjustments later, when and if you need to.

turning a pattern segment into a symbol for the power duplicate method

Step 3

With the pattern segment selected use the Control-J keyboard shortcut to create a duplicate, which we will then position on the original’s right side,
by clicking and dragging while holding down the Alt and Shift keys.

creating the first pattern segment copy using the duplicate function

Step 4

Quickly create the first row of copies by using the Control-J keyboard shortcut twice instead of the more manual
copy-and-paste method, which will duplicate the first action of positioning the
pattern segment using the same spacing value.

creating the first row of copies using the power duplicate method

Step 5

Once you have the first row, create a duplicate after it using the Control-J keyboard shortcut, and then
drag and position the copies below the original row, filling in the page by
pressing the Control-J shortcut
twice.

Then, simply group (Control-G) and center align the resulting pattern to the underlying
page.

center aligning the pattern for the power duplicate method

Great Job!

As always, I hope
you had fun working on the project and managed to learn something new and
useful along the way.

That being said, if you have any questions, feel free to post them within
the comments section, and I’ll get back to you as soon as I can!

finished pattern segment preview

Awesome Collection of Affinity Designer Repeat Patterns and Much More

In case you are looking for a high-quality Affinity Designer seamless pattern collection, check out these awesome resources available on Envato Elements:

Vibrant Watercolor Patterns (EPS, JPG, PNG)

Vibrant Watercolor Patterns

This pattern Affinity Designer pack is full of colorful abstract shapes handcrafted with watercolor paints, suitable for creating vintage-style 90s fashion or decorative elements. This Affinity Designer seamless pattern collection is brought to you in both vector and bitmap formats.

Tropical Patterns (AI, EPS, JPG)

Tropical Patterns

Floral patterns and elements are always on-trend! This Affinity Designer repeat pattern package contains nine different seamless patterns in three different file formats. All the elements are hand-drawn, and they would be perfect for your invitations, advertisements, greeting cards, and any other DIY projects. Just fill the shape with a pattern from the Affinity Designer tropical pack, and see how lovely they become.       

Dotted Vector Patterns & Tiles (AI, EPS, JPG, PNG)

Dotted Vector Patterns  Tiles

This Affinity tile design pattern collection is the best choice if you are looking for simple and neat geometric patterns made by hand. It could be used for backgrounds, fabrics, fashion apparel, and much more! All the patterns are fully editable and come in both vector and raster file formats.

50 Abstract Doodle Seamless Patterns (JPG, PNG, AI, EPS)

50 Abstract Doodle Seamless Patterns

Do you want to boost your design tool collection with a pack of 50 Affinity Designer seamless patterns? Check out these fully editable doodles suitable for creating awesome backgrounds, wallpaper, and websites. This is a great selection of different shapes, from geometric polygons to topographic maps and wavy stripes, to give you great creative opportunities.

Ceramic Glaze Pattern Kit (AI, PSD, PNG)

Ceramic Glaze Pattern Kit

Here’s another pattern Affinity Designer pack with hand-painted elements in modern styles of pottery and ceramic design. These patterns are suitable for branding projects, product design, and even for creating backgrounds. All patterns are fully editable and come in three file formats.

Pop 3D Geo Patterns (EPS, JPG, PDF, PNG, SVG)

Pop 3D Geo Patterns

This pack of Affinity tile designs is one of my favorites, as it contains amazing modern geometric patterns with different shapes in funky colors. You could use these patterns for creating fabric and art prints, postcards, gift wrap, and much more. The 12 patterns come in both raster and vector file formats. 

Colorful Chaotic Rounded Shapes Seamless Patterns (AI, EPS, JPG, PNG)

Colorful Chaotic Rounded Shapes Seamless Patterns

Want to learn how to make a pattern design for wrapping paper to make your product stand out of the crowd? Check this cool bundle of three patterns in different styles: polka dots, organic rounded lines, and rounded sticks. These vintage-looking patterns are also useful for graphic and web design, and you could easily customize the colors.

Toffee Patterns (EPS, PNG, JPG)

Toffee Patterns

Looking for a simple and cute Affinity Designer pattern fill? We’ve got this toffee pattern pack for you! These hand-drawn graphics are perfect for any print design as well as for digital art. They look really great on the white background and give you this cool pastel look. The eight patterns come in three different file formats, and besides that, you will also find 20 PNG flowers in the archive.

Water Plants Patterns (PAT, PNG)

Water Plants Patterns

Water Plants Patterns is a real treasure for lovers of botanical design! Carefully handcrafted, these patterns featuring high-detailed plants could be a great tool for creating posters and different types of printable cards. The patterns come in PNG and PAT file formats, but you should not be worried about it, as the resolution of each pattern is 4000 x 4000 px and 300 dpi.

Tea Time Patterns (PNG, AFDESIGN)

Tea Time Patterns

Planning a tea party with your friends? Then try to create a greeting card with an unusual and interesting form, and then fill the shape with a pattern from this Affinity Designer pack of cakes, teapots, and cups! “Tea Time Patterns” includes six seamless patterns and 16 PNG files with all the elements of the patterns.

Want to Expand Your Affinity Designer Skills?

If you want not only learn how to make a pattern in Affinity Designer but also expand your skills and know more tips and tricks, then check out these awesome tutorials:

{excerpt}
Read More

How to Design a Vintage Book Cover

Final product image
What You’ll Be Creating

In today’s tutorial, I’ll show you how to make a fairy-tale book cover with a vintage-inspired look. 

Vintage-style covers are big news in publishing right now, and clothbound covers are enjoying a well-deserved resurgence. Here you’ll learn how to make a vintage book cover and recreate the look with woodcut-style illustrations and calligraphy type. We’ll look at how to make a fairy-tale book front cover and decorative spine step by step, using Adobe Illustrator, Adobe Photoshop, and Adobe InDesign to put the artwork together. 

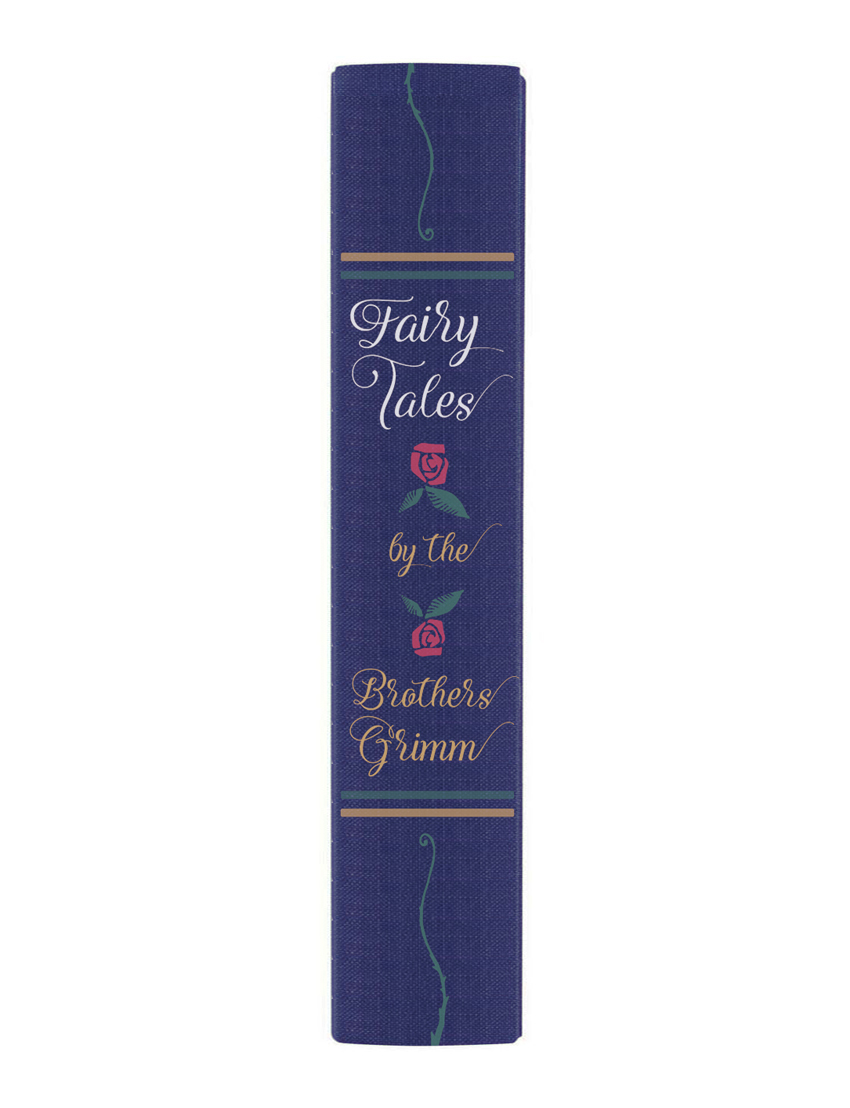
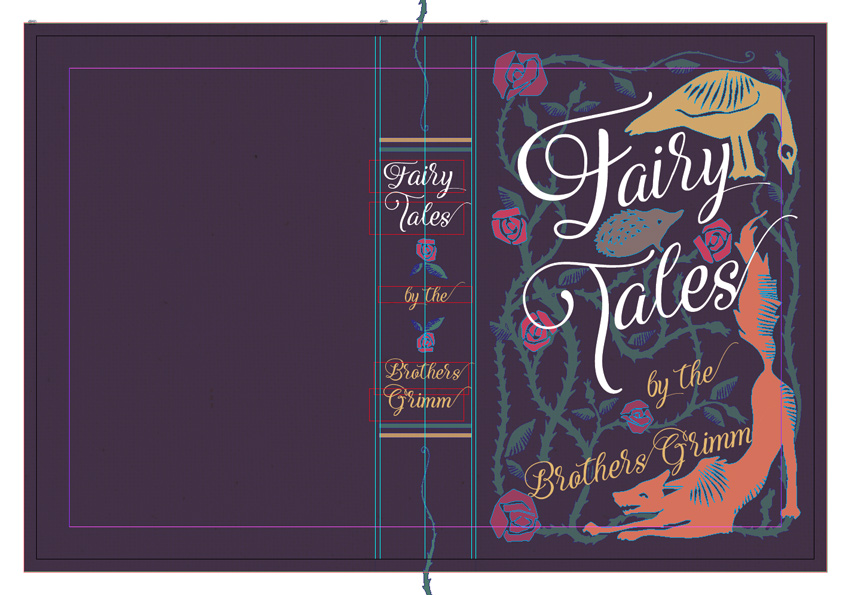
complete spine of fairy tale book design

We’ll also be revisiting some drawing skills, so make sure to have a pencil, pen, and paper to hand too!

Ready? Fantastic, let’s get started…

What You Will Learn in This Fairy-Tale Book Cover Design Tutorial

  • How to plan and make a vintage book cover in InDesign
  • How you can vectorize artwork in Photoshop
  • How to add linocut details in Illustrator
  • How to finalize the fairy-tale book cover design in InDesign
  • How to create a decorative spine in InDesign

What Will I Need to Make a Vintage Book Cover? 

For this fairy-tale book cover design tutorial, you’ll need access to the following programs:

  • Adobe InDesign
  • Adobe Illustrator 
  • Adobe Photoshop…

… plus pencil, pen, and paper.

To recreate the fairy-tale book design pictured, you’ll also need to download the following images, brushes, and fonts:

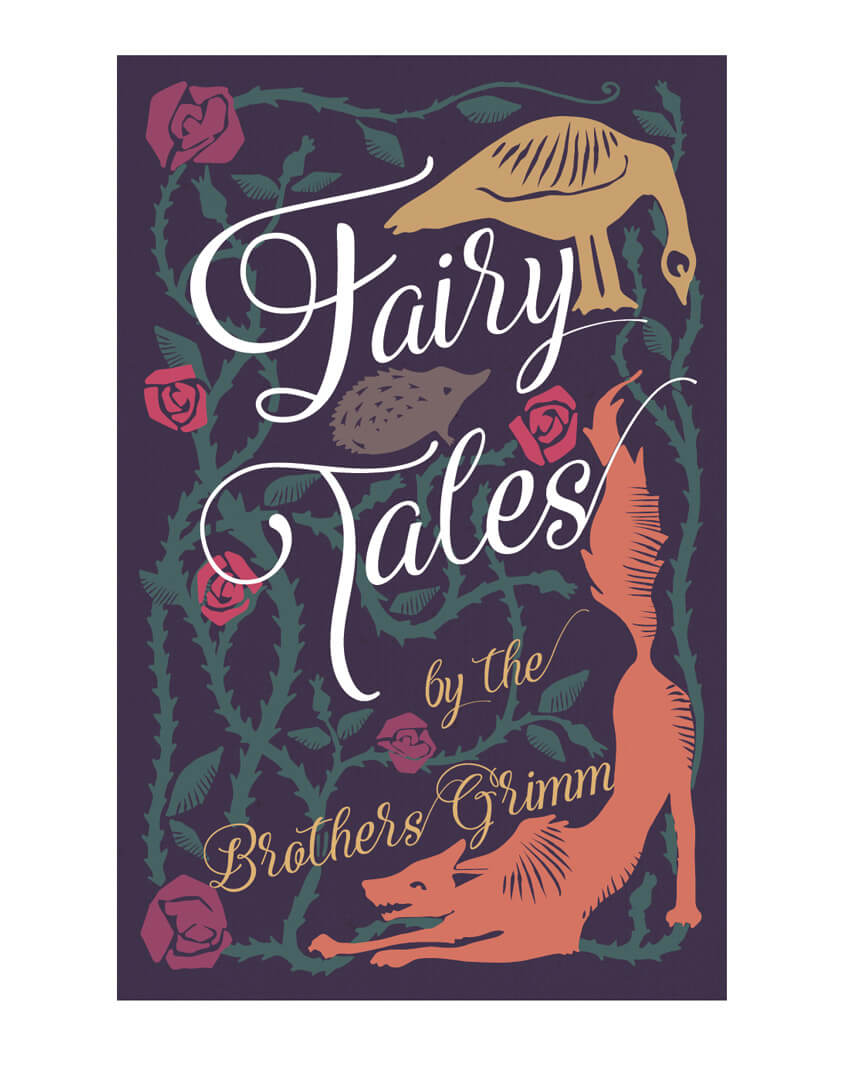
finished fairy tale book cover

1. How Should I Plan My Cover Design?

Illustrative cover designs require a bit of forward thinking—the fairy-tale book design will look more seamless and beautiful if we map out the cover first. 

In this tutorial, I’ll show you how I created the design pictured below, but you can apply the same techniques to your own designs and illustrations if you like. It’s a great opportunity to flex your creative muscles!

front fairy tale antique book cover design

First up, let’s start mapping out the typography for the front cover…

Step 1

We’ll start in Adobe InDesign—open up the program and go to File > New > Document.

Set the Intent to Print and Number of Pages to 1

Under Page Size, set the Width to 132 mm and Height to 204 mm. This is equivalent to a trade-standard B-Format hardback size.

Keep the Margins to their default value (12.7 mm) and add a Bleed of 5 mm. 

how to make a fairy tale book cover new document

Click OK.

how to make a fairy tale book cover new document

Step 2

Take the Line Tool (\) and drag onto the page to create a short, slightly diagonal line from left to right. The idea is to create several lines of italic text, using the lines as text paths.

how to make a vintage book cover line tool

Switch to the Type on a Path Tool (Shift-T), and click onto the line (when you can see a “+” sign appear next to your type cursor). 

how to make a vintage book cover type on a path

Type in “airy”. From the top Controls panel, adjust the Stroke Color of the path to [None].

how to make vintage book covers airy text step

Highlight the text and open up the Character panel (Window > Type & Tables > Character). Set the Font to Adorabelle Regular, Size 120 pt. Apply a Skew (false italic) of .

how to make a fairy tale book cover adorabelle text

Expand the Swatches panel (Window > Color > Swatches) and click on the New Swatch button at the bottom of the panel. Set the Type to Process, Mode to CMYK, and levels to C=13 M=29 Y=66 K=0. Rename the swatch Gold and click OK

gold swatch

Apply the new swatch to the Font Color of “airy”.

how to make vintage book covers gold text

Step 3

Select the type path and Edit > Copy, Edit > Paste, positioning it slightly below the first, to the left side. Adjust the text to read just “F”, and increase the Font Size to 200 pt.

fairy text

Step 4

Continue to Copy and Paste paths and adjust them to read the rest of the title, in this case “F”, “airy”, “T”, “ales”, “by the”, “Brothers Grimm”, setting the text in Adorabelle and adjusting the Font Size to create a hierarchy.

text paths

Make sure you’re completely happy with the text arrangement on the page—once you begin illustrating around the type, you won’t be able to move it. Once you’re happy, go to File > Print and print out the cover to size onto a piece of A4- or Letter-sized paper.

You may find it helpful to use the Rectangle Tool (M) first, to mark out the trim edge of the paper in black, so you can see where the cover ends.

completed text

Step 5

Once you have your typography printed out, you’re ready to start illustrating your fairy-tale cover.

Illustrations in a woodcut style will add the perfect look to your old book design cover. With simple chunky edges and solid silhouettes, these images will look incredibly charming on your fairy-tale book design. 

Google “woodcut art” to browse examples of the style and find inspiration for your cover. Some woodcut designs are very complex, but we’re aiming for more simplistic, naive designs, which not only look great on antique book cover designs but are also easy to create.

Grab your pencil and get started! 

Start with the larger features of the design—here I wanted to have a wolf curved around one corner of the old book design cover and a goose at the top right: both popular subjects in the Grimm fairy tales. 

drawn animals

Then I start to think about the smaller details of the design. Intertwining rose stems are easy to draw and create a beautiful framing effect for the rest of the content. I decorate the tops of stems with simple rosehip silhouettes and add leaves to some of the sides.

I continue to build up the design in pencil, adding roses in the corners and a little hedgehog between the text of the title. 

completed drawing

Allow some of the design to cross in front of and behind the curves of the text—this will help to create a more unified, fluid design.

2. How Do I Vectorize My Artwork?

Step 1

When you’ve finished your pencil design, you need to think about which areas of the design you’d like to pull out in different colors for your fairy-tale cover. 

Ultimately, I want the rose stems and leaves to be a different color from the rest of the design. To do this, I’ll need to pull them out in a strong color by hand, and then scan the design and edit it in Photoshop.

Pick your first one-color feature and take a black ink pen. Color in the whole element in black, trying to keep the silhouette as solid as possible.

black pen

Scan the drawing into your computer, or take a high-resolution digital photo on a phone or camera. Open up the image in Adobe Photoshop.

scan

Duplicate the Background layer to create a copy of the image, and switch off the visibility of the background layer. 

Add a Levels Adjustment Layer, and drag the sliders to the far right of the graph to bring out the black of the inked image in high contrast. 

levels

Then File > Save As the image as a PSD file. Name it after the element, e.g. “Thorns.psd”.

Step 2

Minimize Photoshop for now, and open up Adobe Illustrator. Create a New Document, 132 mm in Width and 204 mm in Height to match the cover dimensions. 

new document

File > Place the image of your edited image, in this case “Thorns.psd”. Resize it to fit the cover. 

resized cover

Go to Window > Image Trace to open up the Image Trace panel. Select the image and, in the panel, set the Mode to Black and White. Check the Preview box to view the result. 

From the Advanced options, select Snap Curves to Lines and Ignore White. Adjust the Threshold, Paths, Corners, and Noise sliders until you’re happy with the result. 

image trace

Then go to Object > Image Trace > Expand to transform the image into a vector.

expand

Right-Click (Windows) or Control-Click (Mac) > Ungroup to make all the parts of the vector editable.

ungroup

Delete any background remaining, and any extra unwanted bits picked up by Image Trace. You’ll end up with a beautiful vector version of your image, true to size.

image trace

Step 3

Now we need to repeat the process for the remaining elements on our pencil design. So head back to your paper design, and seek out a contrasting color pen—a striking red or blue would be ideal!

Color in the remaining elements on your design in a contrasting color, and then scan the image into your computer. 

red pen

Open up the image in Photoshop, duplicate the Background layer, and go to Select > Color Range

color range

Click onto the colored areas to pick up that color alone, and then Edit > Copy and Edit > Paste, moving just this color onto a different layer. Applying a white rectangle onto a layer below this will help you to see the isolated artwork more clearly. 

Then apply a Levels Adjustment Layer, as before, pulling the sliders across to the extreme right side, transforming your elements to high-contrast black. 

levels

File > Save As the image as a PSD file, with a name like “Animals.eps”.

Step 4

Return to your Illustrator file and create a New Layer from the Layers panel. File > Place the “Animals.eps” file onto this layer. 

animals layer

Trace the image and vectorize it using the process described in Step 2, above.

vectorized image trace
ungroup
final trace

3. How Do I Add Linocut Details?

Good brushwork can go a long way in making an authentic antique book cover design. To give the illustrations a more accurate woodcut look, we can add brush details to our vectorized elements.

Make sure you have opened up the Lino Cut Brushes set in Illustrator, so they’re ready at hand.

Step 1

We’ll just work on the larger elements of the fairy-tale book cover design for now (here, the animals), so make sure the layer below is locked or not visible. You can apply a temporary bit of color to the elements too, if you like. This can help to make your brush strokes appear more visible if set in black.

Take the Paintbrush Tool (B) and select one of the linocut brushes. Experiment with different brushes until you find a style that suits a particular element on your design.

lino cut brushes

When you’re happy with the brush stroke, go to Object > Path > Outline Stroke.

outline stroke

Then Right-Click (Windows) or Control-Click (Mac) > Ungroup the different parts of the texture, if required.

ungroup

Select both the silhouetted image and the brush-stroke elements, and Right-Click (Windows) or Control-Click (Mac) > Make Compound Path. The brush-stroke elements will be cut out of the silhouette to create that lovely woodcut effect.

compound path

Step 2

Repeat the process with the other larger elements, as I’ve done with this wolf illustration. Dashed shading looks great on larger elements to break up a solid silhouette.

lino cut brushes

Outline the stroke; Ungroup the elements, and Make Compound Path.

make compound path
final result

Use the Eraser Tool (Shift-E) to separate any outlying parts of the brush strokes from the main silhouette. 

eraser tool

Select them and delete them to make a neat and tidy design.

deleted

Step 3

Repeat the same process for the elements on the layer below, adding small linocut brush strokes to small items like leaves to add detail and interest.

lino cut leaf
lino cut effect

4. How Can I Finalize the Front Cover in InDesign?

Now that we’ve vectorized the illustrations for the fairy-tale cover, we’re ready to lift the designs into InDesign and finalize the cover design.

Step 1

Make sure the bottom layer of your Illustrator file is the only one unlocked, and then select everything on the page and Edit > Copy.

Return to your original InDesign file, with your original typography design. Expand the Layers panel (Window > Layers) and double-click on Layer 1 to open the Layer Options window. Rename the layer Typography in Front.

layer options

Click on the New Layer button at the bottom of the panel to create a new layer and rename this Texture. Drag it down to sit below the Typography in Front layer.

texture layer

Create a second new layer, above Texture and below Typography in Front, and rename it Background.

background layer

Step 2

Lock both the Typography in Front and Background layers, and click on Texture to activate it. 

Take the Rectangle Frame Tool (F) and drag onto the page to create an image frame that extends across the page, up to the edges of the bleed on the top, right, and bottom sides.

File > Place, and choose the canvas texture image you downloaded earlier. Position it so that it fills the image frame completely.

fairy tale book cover canvas texture

Step 3

Expand the Swatches panel and create a new CMYK Process swatch. Name it Background Purple and set the values to C=95 M=100 Y=59 K=24.

purrple swatch

Lock the Texture layer and unlock the next layer up, Background. Select the Rectangle Tool (M) and drag to create a rectangle that matches the dimensions of the canvas image frame below. Set the Fill Color to Background Purple. Go to Object > Effects > Transparency and set the Mode to Multiply and Opacity to 90% to pull through some of the canvas texture below.

multiply
background color

Step 4

Create a new CMYK Process swatch. Name it Green and set the values to C=74 M=37 Y=57 K=15.

green swatch

Lock the Background layer, and then create a new layer called Thorns to sit above Background and below Typography in Front. Edit > Paste to drop the copied thorns vector onto the page. You can resize it if needed, and then hop up to Object > Effects > Transparency, reducing the Opacity to 70%.

transparency
thorns layer

Step 5

Create a new layer, Typography Behind, and position this above Thorns and below Typography in Front. If you want any of the text elements to sit behind larger elements of the design, such as animals or roses, drag text paths from the Typography in Front layer onto this layer below. This is completely optional, but can help your design to feel more layered and 3D.

I’ve also pulled out the main title in a contrasting bright white Font Color (choose [Paper] from the Swatches panel).

typography behind

Step 6

Return to your Illustrator document, and lock the bottom layer. Unlock the top layer, containing the vectorized version of the larger elements on your design, and sweep your mouse across the page to select everything. Edit > Copy.

Return to your InDesign document and create a new layer, Animals and Roses, and place this between the Typography in Front and Typography Behind layers.

Edit > Paste to drop the vectorized animals and roses onto the page. Readjust the position and size if needed.

animals and roses

Step 7

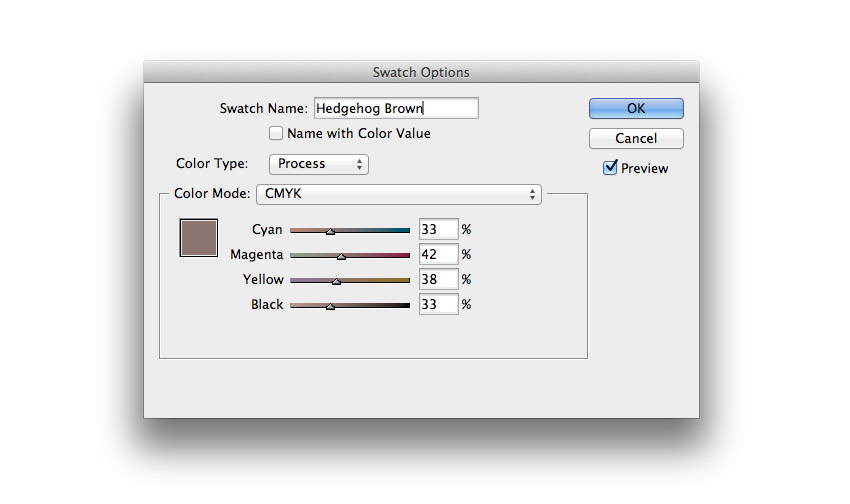
Create a new CMYK Process swatch, C=33 M=42 Y=38 K=33, and name it Hedgehog Brown. 

brown swatch

Create a second new CMYK Process swatch, C=12 M=65 Y=64 K=0, and name it Orange.

orange swatch

Create a third new CMYK Process swatch, C=47 M=88 Y=49 K=0, and name it Dark Pink.

dark pink

Create a final new CMYK Process swatch, C=21 M=88 Y=49 K=0, and name it Pink.

pink

You can use these colors as you wish to apply to your own designs, or if you’re recreating the design pictured here, you can apply the Hedgehog Brown to the hedgehog vector, Orange to the wolf, and Dark Pink and Pink to the roses, varying the two tones to create depth.

Step 8

Some of the larger silhouettes will benefit from having some of the texture on the layers beneath being more visible through them. To do this, select a vector shape, go to Object > Effects > Transparency, and set the Opacity to 90%.

effects
final front cover

Feel free to add further details to the design if you feel it needs something more. Here, I’ve added a few extra small roses set in Pink and Dark Pink to add more detail to the left side of the old book design cover.

extra roses

Your front cover design is finished—great work! If you’re planning on using the cover digitally for an EPUB, your job is pretty much done—you can File > Export the artwork as an Interactive PDF.

If you want to find out how to create a decorative spine for your fairy-tale book cover and expand the design into a full wraparound cover, read on…

5. How Do I Create a Decorative Spine?

Step 1

This is a good time to File > Save your InDesign artwork, so make sure to do that now before proceeding.

Expand the Pages panel and click on the Create New Page button at the bottom of the panel.

pages panel

This page will be our full clothbound cover design and will include space for a back cover, spine, and front cover. 

To work out the correct width of the page, we need to know the correct spine width for the book. Let’s say we’ll be working with 500 pages on 130 gsm coated paper. Using this helpful online spine calculator, you can work out that this will mean we have to accommodate a 36 mm spine, plus add an extra 3 mm to allow for the extra wraparound required on a hardback’s spine.

Once you’ve figured out the spine width, you can calculate the full width of your old book design cover:

Front Cover Width + Back Cover Width + Spine + 3 mm (for hardback) = Total Cover Width

So for this cover, that will mean…

132 mm + 132 mm + 36 mm + 3 mm = 303 mm

Select the Page Tool (Shift-P) and click onto Page 2 of your document to select it. Type 303 mm into the Width text box at the top-left corner of the Controls panel.

controls panel
expanded page

Step 2

Ensure the rulers are visible (View > Show Rulers) and pull out a vertical guide from the left-hand ruler to 151.5 mm, to mark out the center point of the spine.

rulers

Pull out guides to 133.5 mm and 169.5 mm to mark out the edges of the 36 mm spine.

guides

Finally, pull out guides to 132 mm and 171 mm to mark out the extra space needed around the spine edge for folding.

guides

Step 3

Unlock only the Texture layer, keeping the other layers locked, and Edit > Copy the canvas texture image frame on Page 1. Edit > Paste in Place onto Page 2.

canvas texture

Paste again, positioning it over on the left side of the page.

texture on back

Paste a final time, resizing the width to fit the remaining spine gap.

spine canvas

Step 4

Lock the Texture layer and unlock all other layers. Drag your mouse over the whole of Page 1 to select all the front cover artwork and Edit > Copy.

copy

Scroll down to Page 2 and Edit > Paste. Position it over on the right-hand side, making sure it fits to the bleed edges perfectly. 

paste

Then select only the background color rectangle and extend the width so that it reaches to the far left edge of the bleed.

background color
final cover

Step 5

Zoom in on the spine of the cover, using the guides as a reference. Lock all layers except the Typography in Front layer. Take the Type Tool (T) and create a staggered group of text frames. Type in the words of the title and author names, in a similar arrangement to that shown. Set the Font to Adorabelle, and match the colors to the front cover.

spine type

Step 6

Lock the Typography in Front layer and unlock the Thorns layer. 

Use the Rectangle Tool (M) to create a thin rectangle 36 mm in Width. Set the Fill Color to Gold, and go to Object > Corner Options. Add a 5 mm Round shape on all corners and click OK.

corner options

Move the bar above the title on the spine, and Copy and Paste to create a copy directly below, which you can put in a different color, like Green

Copy and Paste the pair and position below the author’s name, as shown. This gives the cover an authentic hardcover look.

bars on spine

Select all the bars and go to Object > Effects > Transparency, reducing the Opacity to 80%.

normal mode

Step 7

Now you can add some more creative details to the spine. You can either create a custom design for the spine, as we did for the front cover, or simply borrow individual vector elements from the front cover and give them a new twist.

Here, I’ve taken the curvy tip of one of the rose stems, separated it, and placed it at the top and bottom of the spine.

vine tip
vine tips

I also took individual rose vectors and placed them, alongside some leaves, above and below “by the” on the center of the spine.

roses
final spine

You’ll end up with a cover complete with decorative spine and front cover design!

final spine

Your Finished Fairy-Tale Cover

In this tutorial, we’ve looked at how to make a vintage book cover for a book of fairy tales. Using hand-drawn illustrations and then editing them in Photoshop and Illustrator, we’ve been able to learn how to make a fairy-tale book cover and recreate a gorgeous woodcut style that looks really charming and beautiful.

final cover

You can be as creative as you like with the back cover too—why not create an illustrated design to surround a blurb or give a bit of a decorative flourish to the edges of a barcode? The only limits are your imagination, so get creating! You can share your final results in the comments below.

Once you’ve completed your cover, you can export it as a Press-Quality PDF by going to File > Export. Make sure to include the bleed if you’re sending it off for professional printing and binding.

We’ve covered a range of skills in this tutorial, applicable to professional publishing and self-publishing design. You should now feel more confident in:

  • ‘mapping out’ typography for illustrative cover designs in Adobe InDesign
  • creating hand-drawn woodcut illustrations with simple, chunky silhouettes for high impact
  • preparing hand-drawn artwork for vectorizing in Adobe Photoshop
  • vectorizing and adding linocut brush details to your artwork
  • building up texture and color in your front cover artwork
  • expanding your cover design to a full wrap-around cover, complete with a decorative spine

That’s fantastic work—congratulations! If you’d like to share your cover artwork in the comments below, I’d love to see them!

Create a Vintage Fairy-Tale Book Cover With Placeit 

You can also check out Placeit’s library of book cover templates for an easy way to design a book cover right in your browser. It has everything from fairy-tale book cover designs to crime covers. You can find the perfect book cover maker, like the below fantasy novel cover, for your latest work.

Placeit Antique Book Cover Design

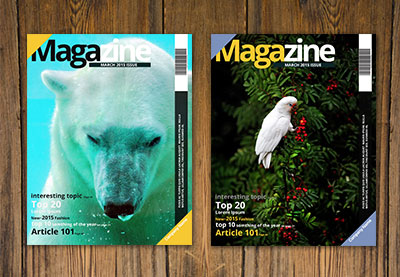
And if you liked learning how to make vintage book covers, Envato Tuts+ has more great book and magazine tutorials that you can try out too!

{excerpt}
Read More

40+ Best Photoshop Sports Templates (PSDs for Your Team or Club!)

Photoshop sports templates come in all shapes and sizes, and we’ve got plenty of great options for you today. Settle in for a selection of templates for sports banners, flyers, posters, and more!

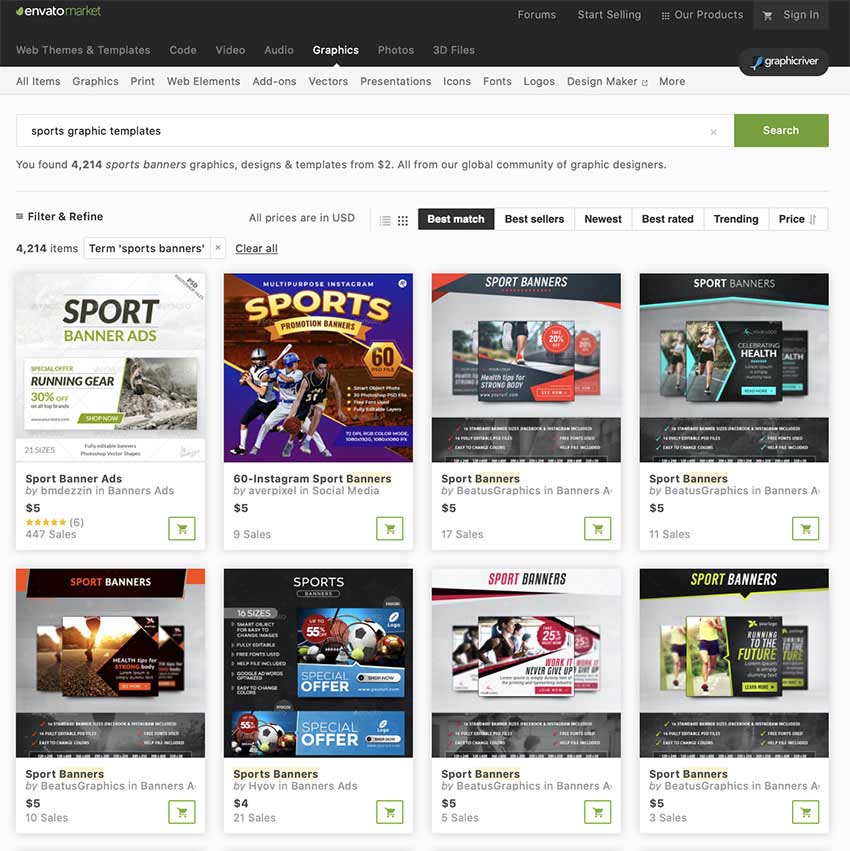
Check out the wide selection of premium sports templates offered at both Envato Elements and GraphicRiver

Photoshop Sports Templates From Envato Elements & GraphicRiver

Both Envato Elements and Graphic River offer high-quality Photoshop Sports Templates to help you create outstanding banners, certificates, posters, flyers, and more for your sports teams and clubs. 

Photoshop Sports Templates from Envato Elements

What makes Envato Elements outstanding is that it offers thousands of premium resources for one low monthly fee. And best of all, you can also download as many as you want, as often as you want.

Photoshop Sports Templates from GraphicRiver

GraphicRiver is another service that offers thousands of premium resources, but it works differently from Elements. GraphicRiver is better for those who are on a budget and only want to buy one specific resource at a time. So if you’re interested in purchasing just one sports certificate template or sports banner template, instead of experimenting with several, then GraphicRiver may be a better choice for you. 

Let’s now take a look at some of the awesome sports templates offered by both services. 

10 Sports Banner Templates

Instagram Sports Banner Templates (PSD, JPG)

Instagram Sports Banner Templates

Make a banner for your Instagram account with this fabulous template. In fact, you can make a whole series of banners, because this pack includes 15 layered designs to give you plenty of options for your next social media marketing campaign. It’s ideal for gyms and fitness centres, but could be adapted to other uses as well.

Yoga Web Banner (JPG, PSD)

Yoga Web Banner

Stay centred and calm throughout your next ad campaign by using this amazing set of 18 sports banner templates. It’s perfect for a yoga studio or instructor, and the images are sized for Facebook and Instagram ads, as well as Google AdWords. The banners are fully customisable, so you can really make them your own.

20 Facebook Sports Banner Templates (PSD)

20 Facebook Sports Banner Templates

These sports graphics templates are designed for use as Facebook banners. You get 20 layered PSD files in ten different styles, all well organised and fully customisable. The sample graphics are not included, but you want to use your own images anyway, right?

Sport Banner Templates (AI, PSD, SKETCH)

Sport Banner Templates

Lifestyle and fitness bloggers, take note! This set of templates will really give your Instagram accounts a boost. It would be ideal for any sports-related campaign, and the best part is that you can edit the files in Photoshop, Illustrator, or Sketch: your choice!

Sports Graphics Templates (EPS, PSD)

Sports Graphics Templates

This big set of sports banners will really catch your viewers’ attention in the crowded world of social media. You get 21 sports banner templates in both vector and layered PSD files. Use them to draw more clicks for your sales, promotions, blog posts, giveaways, and more.

Roll-Up Sports Banner Templates (PSD)

Roll-Up Sports Banner Templates

We’ve seen a lot of web banners so far, but what about a real-life roll-up banner? You see these all the time in gyms and other sports clubs, so why not make your own with these layered Photoshop sports templates? The perfect way to advertise a sale or promotion to your customers or prospects.

Yoga Roll Sports Banner Templates  (PSD)

Yoga Roll Sports Banner Templates

Here’s another roll-up banner, but this time with a yoga theme. The design combines different elements, in the style of a sports photo collage template in Photoshop. It comes in a size of 80 cm x 200 cm, and it’s 100% ready to print.

Sports Banner Templates (AI, EPS, JPG, PSD)

Sports Banner Templates

Layered Photoshop sports templates don’t come much better than this. The design is crisp and clean, and the files are well organised, so they’re easy to customise. Just drop in your own images and text, and your banners are ready! And there’s also an Illustrator file if you prefer.

Sport Banner Template 24 (PSD)

Sport Banner Template 24

These three layered Photoshop sports templates use the same design but in different colours, allowing you to create a cohesive ad campaign for your fitness centre or other sports-related business. The banners are 30 x 70 inches and are fully print-ready. Customisation is easy, but there’s also a help file just in case.

Sports Banners – Updated (PSD)

Sports Banners - Updated

For the last of our sports banner templates, here’s a set of 18 awesome banners specially sized for Facebook and Google ads. The image is not included, but this template gives you everything you need to create your own attention-grabbing ad layouts quickly and easily.

15 Sports Flyer Templates

Cricket Sports Flyer Templates (PSD)

Cricket Sports Flyer Templates

Cricket has never looked so exciting! This flyer is perfect for advertising a cricket competition or other event. With a little adaptation, you could also use it as a sports card Photoshop template. It’s a fully editable PSD file with loads of flexibility!

Basketball Sports Flyer Template  (PSD)

BasketBall Sports Flyer Template

Are you hosting a basketball-themed event? Try this flyer template to spread the word about your party, match, tournament, or other event. It’s easy to change the colours, text, images, and more, so that you can start with this flyer and end up with your own unique design.

Freestyle Swimming Sports Flyer Templates (PSD)

Freestyle Swimming Sports Flyer Templates

Flyers often come in portrait orientation, but why not try this landscape layout instead? The model image is not included, but everything else is, and the file is well organised for easy customisation. This could also make a great sports card template.

Basketball Madness Sports Flyer Templates  (PSD)

Basketball Madness Sports Flyer Templates

March Madness is a big event in the USA, and you can tap into it with this striking basketball flyer template. It’s fully customisable, of course, so you can use it at any time of the year for any other type of event too. Unlike many flyers, this one is square, so why not use it to make your flyer stand out?

Tennis Sports Flyer Templates (PSD)

Tennis Sports Flyer Templates

The great thing about these templates is their flexibility. This one bills itself as a tennis flyer template, but if you change the image, you could use it for any type of event. You could even change things up more and use it as a sports ticket template in Photoshop. The sky’s the limit!

Football Sports Flyer Templates (PSD)

Football Sports Flyer Templates

This sports photo template will help you make a great flyer for your next event. It’s designed for a football theme (soccer in the USA), but as with most of these templates, you could easily adapt it for other sporting events too. All the images are smart objects, so they’re easy to replace, and the help file walks you through the whole process.

Boxing – Sports Flyer Templates (PSD)

Football Sports Flyer Templates

Advertise a boxing match with this flyer template, or why not use it to create a spoof boxing flyer for a different purpose altogether? The only limit is your imagination. Everything can be replaced easily using smart objects, and you’ll end up with a print-ready 4×6 inch flyer at 300 dpi, ready to print!

Extreme Sports Flyer Templates (PSD)

Extreme Sports Flyer Templates

Extreme sports are growing in popularity all the time, so why not use this flyer to advertise your next event or activity? It’s a US Letter size file that you can customise as you want, so you could even convert it to a sports magazine cover template in Photoshop. It comes in three alternative colour schemes, and you can change as much or as little as you like.

Sports Flyer Templates – Football (PSD)

Sports Flyer Templates - Football

Looking for sports graphics templates that you can use for football events? This detailed flyer template lets you spread the word about an upcoming match and boost attendance. You can print it out and/or post it on social media. It comes in A4 size, and it uses free photos and fonts. Or why not adapt it for use as a sports ticket template in Photoshop?

Gym & Fitness Sports Flyer Templates (PSD)

Gym  Fitness Sports Flyer Templates

Some sports graphics templates don’t include certain images like photos or fonts, but with this one, everything’s included! So you can just focus on making it the best flyer you can, without worrying about finding new resources. Of course, you can also change things out if you prefer, or you can just use it as is!

General Sports Flyer Templates (AI, PSD)

General Sports Flyer Templates

This simple flyer could also double as a sports card Photoshop template, with its striking design and strong design elements. You get both Photoshop and Illustrator files, in A4 size and easy to customise and print. Save time on your next flyer design with this excellent template.

Sport Flyer Template (PSD)

Sport Flyer Template

This template is all about the design. With its crisp, elegant layout, you could use it as a sports magazine cover template in Photoshop. It’s 100% customisable, so you can change the image, resize the shapes, edit the text, and more. There’s documentation to help you out if you need it.

Motorcross Sports Flyer Templates (PSD)

Motorcross Sports Flyer Templates

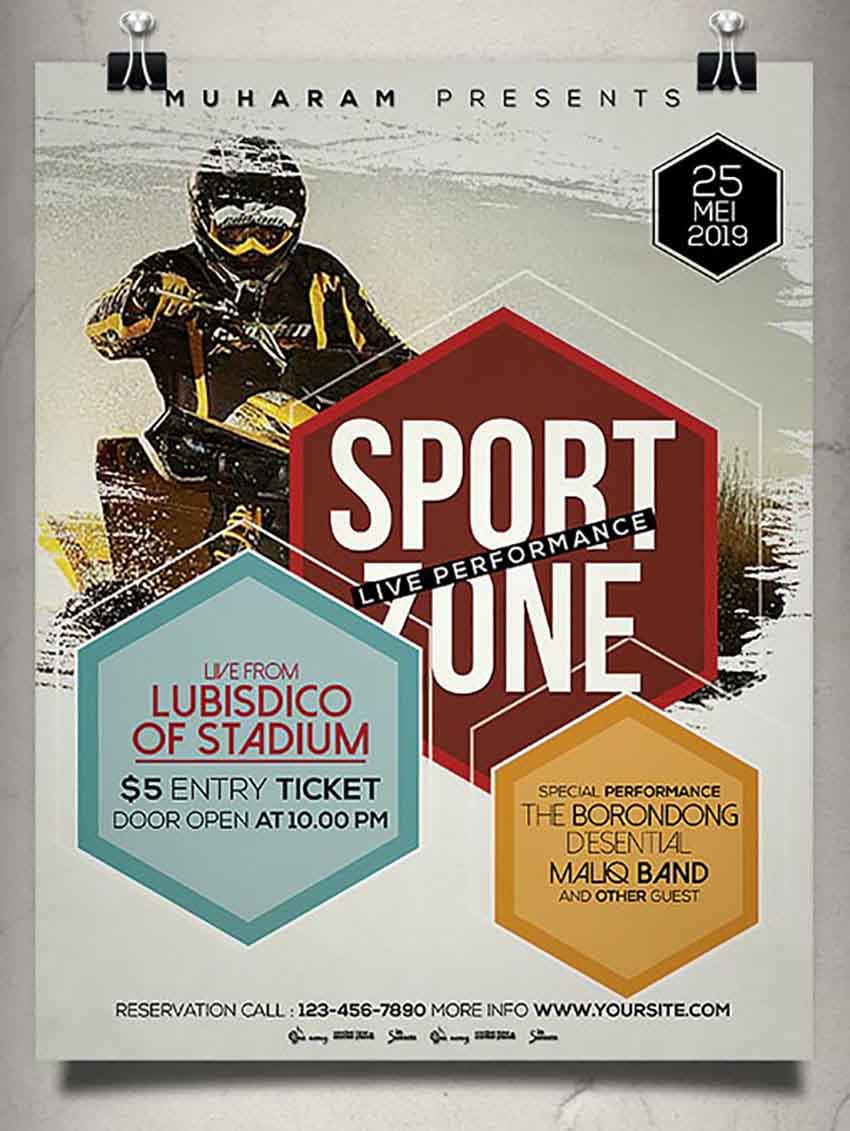
Here’s a strong, dynamic design that’s ideal for extreme sports events. Just drop in a new image as a smart object, customise the text, and you’re good to go. The texture is included, along with three alternative colour schemes for extra variety.

Skiing Sports Flyer Templates (PSD)

Skiing Sports Flyer Templates

Or embrace the allure of winter with this skiing flyer template. Everything from the image to the cool blue colour scheme makes it perfect for winter sports, but as always, you can always change things up if you want. This fresh, modern design will give you lots of options for creating a standout flyer.

Winter Sports Flyer Templates (PSD)

Winter Sports Flyer Templates

Or here’s a more minimalist option for winter sports lovers. The image looks as if it’s just appeared after someone wiped the ice off a frosted window. As sports photo templates go, this one is a winner! Download it, customise it as much or as little as you want, and it’s ready to print.

10 Sports Poster Templates Photoshop

Athletics Sports Poster Templates Photoshop (PSD)

Athletics Sports Poster Templates Photoshop

This poster is ideal for advertising an athletics event, but you could also use it as a sports program template or as a poster for other types of sporting events. The PSD file comes with well-organised layers and is easy to customise and print.

Sports Poster Templates Photoshop (PSD)

Sports Poster Templates Photoshop

Here’s another eye-catching poster design for you. Can you imagine your own images and text in this beautiful geometric design? If so, just download it and start customising it! You’ll find it easier than you think to create the sports poster of your dreams.

Climbing Sports Poster Templates Photoshop (PSD)

Climbing Sports Poster Templates Photoshop

You can really see how this poster would look great when posted out on the street, can’t you? Its professional design provides plenty of space for a striking image, while also prioritising your message in the centre, and then leaving room for icons and other details. It comes in a large B1 size, perfect for outdoor advertising campaigns.

Sports Poster Templates Photoshop – Movies  (PSD)

Sports Poster Templates Photoshop - Movies

Want to publicise a sports movie? Or maybe you want to use your own photos and names to mimic a boxing match. Either way, this sports movie poster template will help you create a unique and striking poster. Download it and try it out today!

Yoga Sports Poster Templates Photoshop (PSD)

Yoga Sports Poster Templates Photoshop

Publicise your yoga studio, classes, or other events with this template. As with the other choices we’ve looked at today, this one would be easy to adapt to other uses is you switch out the imagery and change the text. The PSD file comes in CMYK colours at a size of 18 x 24 inches, ready to print.

Fitness Layered Photoshop Sports Templates (PSD)

Fitness Layered Photoshop Sports Templates

Some templates are more minimalist, but this one gives you plenty of text fields to publicise every detail of your offering. It would be great for fitness centres or classes, making it easy to create stunning posters quickly and easily in Photoshop.

Niles Sports Poster Templates Photoshop (AI, EPS, PSD, JPG)

Niles Sports Poster Templates Photoshop

Are you ready for the big match? This fully customisable poster template will get your fans excited about the upcoming game. And it could also fall into the category of sports program templates—wouldn’t this make an eye-catching program cover?

Gregory Sports Poster Templates Photoshop (AI, EPS, PSD, JPG)

Gregory Sports Poster Templates Photoshop

Capture the dynamism of high-level competitive cycling with this template. It gives you all the ingredients you need for a classy poster, and it comes in a variety of formats for easy customisation in Photoshop or Illustrator. Download it today!

Aegeus Layered Photoshop Sports Templates (AI, EPS, PSD, JPG)

Aegeus Layered Photoshop Sports Templates

There are plenty of sports photo collage templates in Photoshop, but this one really stands out with its creative use of the photo on top of the text. See if you can make it work by positioning the photo to keep your text legible.

Sports Poster Templates Photoshop (PSD)

Sports Poster Templates Photoshop

Now it’s time for a rugby flyer! This creative design would work beautifully for a range of sports occasions, and if you use a different image, it could represent a different sport altogether. The template is easy to edit: replace or resize the images and shapes, edit the text with the Text Tool, and you’re done!

6 Sports Certificate Templates

Professional Sports Certificate Templates (AI, EPS, JPG, PSD)

Professional Sports Certificate Templates

What better way to reward participants in your sporting event than with a classy certificate like this one? You could also adapt it to be a sports card template if you want. It’s easy to customise it in Photoshop or Illustrator to match your brand and event details.

Basketball Sports Certificate Templates (PSD)

Basketball Sports Certificate Templates

If you’re running a basketball tournament, you can’t do better than this elegant certificate featuring a basketball on a wood-textured background. The template comes in A4 or US Letter size, ready for you to customise and print.

Football Sports Certificate Templates (PSD)

Do you call it football or soccer? It doesn’t matter because the image of a ball nestling in the back of the net will instantly tell your recipients what this certificate is all about. The slick design and glowing points of light also help to make this a certificate that people will be proud to display on their wall.

Runner Sports Certificate Template (AI, EPS, PSD, JPG)

This is billed as a running certificate, and it would indeed be perfect for recognising the winners or participants in a long-distance race or other athletic event. But switch up the text and illustration, and you could also use it for a different kind of sporting event. These layered Photoshop sports templates are so flexible!

Sports Certificate Template (AI, EPS, PDF, JPG)

This sports certificate template comes in both portrait and landscape A4 size, so you can choose which orientation works best for you. It’s easy to change up the colour scheme and graphics, and to edit the text to create as many different types of certificates as you want!

Sports Certificate Template (AI, EPS, PSD, PDF)

This certificate would look great on someone’s wall. And you can use it for any sport—just switch the football image in the bottom-left corner for another sporting icon, and you’re ready to go! You get Illustrator and Photoshop files, both well organised in layers to make customisation a cinch.

Choose Your Favourite Sports Graphics Templates Today 

Envato Elements is an excellent resource for a wide range of premium Photoshop sports templates and offers unlimited downloads for one low monthly fee. 

Alternatively, if you just want to buy a single sports graphics template, then GraphicRiver is a better choice. Head over to either site today to choose your favourite template.

And finally, if you want more information on other high-quality graphic resources, check out these really helpful articles below:

{excerpt}
Read More