You might be happily employed with a dream of starting a lucrative side hustle — or want to eventually leave your current role to start the shop of your dreams. While online stores have taken out some of the burden of starting a brick and mortar vent…
Category: Tutorials
Tutorials,freelance,projects,joomla,php,mysql,wordpress,blancer.com
The remaster of the ’90s ‘Blade Runner’ game has been delayed
Fans of Westwood’s classic 1997 Blade Runner adventure game will have to wait to play its Enhanced Edition rerelease. The remaster had been slated to come out later this year, but it’s now delayed until at the earliest 2021. In an interview with Euro…
This week’s best deals: $25 off the Apple Watch Series 6 and more
October is coming to a close soon and that means even more deals are popping up as we officially enter the holiday shopping season. Amazon basically kicked things off early with Prime Day last week (and Best Buy, Walmart and other retailers followed…
EA delays ‘Apex Legends’ on Switch to next year
Apex Legends was supposed to arrive on Nintendo Switch this fall, but that’s no longer the case. EA and Respawn have delayed the battle royale’s Switch release date to sometime next year, so you’ll need to wait a bit longer to get your Apex fix while…
30+ Awesome Affinity Designer Textures, Assets, & Resources (Free & Premium!)
The award-winning Affinity Designer is one of the most powerful yet user-friendly vector design applications to emerge in recent years, and these two strengths are the reason its popularity grows by the day. Whether you’re just getting into using the
software or you’re already a dab hand, you’re sure to find some resources you love in our collection below.
20 Affinity Designer Brushes, Templates, and Illustrations
Let’s begin with a collection of 20 awesome brushes, illustrations, icons, and templates that have full, native Affinity Designer compatibility, and don’t rely on attempting to convert file formats meant for other software.
Fantasy Forest Game Kit
This game kit provides everything you need to kick off the creation of your platformer game. Included are animated character sprites, a set of ground tiles, crystal and coin pickups, foliage props, and background images.

Robots Sci Fi Concept Kit
In this concept kit you’ll get eight complete robots, each one unique and fully editable. Along with that, you’ll receive a fully vector-based hangar and blueprint posters for all your robots.

Side Scroller Game Background Designs
Your side scroller game will start strong with these five themed backgrounds: beach, volcano era, farm/forest, mysterious swamp, and snowy mountain. Use the images just as they are, or separate them into individual props such as trees, signs, and rocks.

Big Boss Skull With Tribal Background
Perfect for a T-shirt but versatile enough to be used for any purpose, this CMYK print-ready skull illustration is fully customizable, from the colors to the text.

Space Racing Game Creation Kit
This game creation kit will get your racing or SHMUP game off to a racing start with three complete ships, a GUI for your HUD and controls, and four different ground background images. All the ships are layered so you can easily mix and match elements
to create new and unique extra ships.

Hand Crafted Tree Branches Vector
Need tree branches? Get 20 beautifully hand-crafted vector branches with full Affinity Designer compatibility in this pack. Put them to work in logos, games, or anything else that springs to mind.

DAUB Comics Basic Brushes
Cartoonists and line artists will be delighted with these free comic brushes. You’ll get four brushes that simulate pencils and four inking brushes. No more undoing and redoing to get the perfect stroke—just put your line down once, and then adjust it as
required. On top of that, the brushes are pressure- and rotation-sensitive. Not bad for free assets.

Festive Birthday Elements Flat Set
Put together beautiful birthday invitations, unique cards, and anything else you might need for a festive occasion with this colorful element set. Included are illustrations of gifts, party hats, cakes, balloons, and more.

49 Hand Illustrated Feathers
This beautiful pack of 49 hand-illustrated feathers presents all kinds of creative possibilities. Every kind of feather you could imagine is included in this collection.

20 Hand Illustrated Wood Texture Vectors
These 20 wood grain vectors were hand-illustrated with fine pen and brush pen on paper, and then vectorized to give you all the scaling and editing you might need.

Monet Style Textured Brushes
Vector illustration and traditional “Monet”-like painting might not have seemed like two things that could go hand in hand, but thanks to these free assets, you can now fuse these previously separate worlds of art with brushes.

Flat Fantasy Castle
Working on a medieval-themed game, site, or set of illustrations? This flat, colorful castle, which comes in both day-lit and night-lit styles, will fit right in.

Magicons: 160 Icons for Web & Mobile
This set of icons is huge, containing 160 items in total, with each icon available in both light and dark colors. These line-style icons are great for any website or mobile app.

50 Hand Crafted Floral Branches
Put together any kind of floral foliage you might need with this collection of leafy branch illustrations. An .afdesign file is included so you know you have full Affinity Designer compatibility for editing and coloring.

Colorful Game Icons
These bright and colorful game icons will liven up your game or gaming website. It includes 21 icons, illustrating everything from cupcakes and donuts to coins and trophies.

Color Creator Templates
This is a very clever, and totally free, tool for creating color palettes in Affinity Designer. You simply set some base colors by applying “Color Overlay” styles to some specified groups, and the template will automatically display a range of blended
colors for you to sample and add to your color palette. This template is one of many free assets that are sure to come in handy for every artist.

Flat Retro Kitchen Items
Populate your kitchen-themed project with these retro appliances, perfect for cooking websites and apps. Included are a toaster, blender, and mixer, and each illustration comes in two different pastel color schemes.

Room Scene Creator
This room scene creator kit is chock full of assets you can assemble into as many different rooms as you please. You’ll get 16 padded chairs and couches, 13 chests and drawers, 7 shelves and desks, 11 desk chairs, 7 clocks and wall attachments, 19 plants,
lamps, and other decorations, 7 monitors and other desktop items, and 10 coffee cups and other desktop foods. All items can be easily recolored, making for endless possibilities.

Creative Technology Logo
If you’re looking for a logo that combines symbolism for creativity and technology, get yourself a copy of this CMYK print-ready vector logo.

Hyper Space Racers
These two ships are organized in a highly modular way, with separate decals, flames, nuts & bolts, and lasers, making it easy to work with these illustrations for animation and customization.

10 More Awesome Affinity Designer Brushes From Envato Elements
Here are ten more bonus Affinity Designer brushes from Envato Elements that you can keep handy for your creative projects. They come in a variety of styles and will produce results that have clients from every industry happy.
1. Artista Affinity Designer Brushes (EPS, PNG, PDF)
Artista is a pack of useful Affinity resources including brushes and textures. Each of the 60 brushes offers its own artistic touches to help you complete your creative projects. You’ll find useful variations of pencils, dry brushes, sprays, and pens in this bundle. There are also grunge textures included, as well as a help file.

2. Graphic Beats: Illustrator Brushes (AI)
With more than 650 total Affinity Designer assets, Graphic Beats is a massive bundle perfect for your personal library. There are strokes, bubbles, swooshes, and plenty more assets you’ll find useful. The lighthearted and fun brush style can be used for posters, social media ads, and more.

3. Hand Drawn Brushes for Affinity Designer (AFBRUSHES, PDF)
If you’re looking for some fresh Affinity resources that have a personal touch, try out this pack of hand-drawn brushes. This bundle includes 20 pixel and vector Affinity Designer brushes across multiple styles.

4. Shader Brushes for Affinity (AFBRUSHES, EPS, PNG, PDF)
Bring your art to life with this bundle of Affinity resources. You’ll find 35 brushes that include the following styles and more:
- seven scatter brushes
- seven pressure brushes
- seven hatch brushes

5. Ink Age Brushes for Adobe Illustrator (AI)
The 120 brushes found in Ink Age were all created by hand, and that detail shines through in their quality. Each brush adds a professional ink look without coming off overly polished. If you need Affinity Designer assets with a hand-drawn look, you’ll love Ink Age.

6. Pastels Illustrator Brush-Kit (AI)
This brush kit delivers a realistic pastel look, perfect for illustrations. You’ll love experimenting with the different brush strokes and styles of the 43 included Affinity designer brushes.

7. Lighthouse Liner Affinity Brushes (AFBRUSHES, AFDESIGN, EPS)
You can find dots, lines, pats, waves, hatches, and more in the Lighthouse Liner download. This pack of Affinity Designer assets brings you 100 resources split between brushes and patterns. Try it for sketches and marketing materials.

8. Perfect Pencils – Brush Pack (AI)
Authentic pencil brush strokes are plentiful online, but very few match up with Perfect Pencils. it includes 12 high-quality Affinity Designer pencil brushes. They even come in different lead grades! Perfect Pencils also delivers six colored brushes for more flexibility.

9. Finest Vintage – Illustrator Brushes (AI)
Is it ironic that vintage art doesn’t go out of style? Probably not, but that doesn’t change the fact that Finest Vintage is a fine addition to your collection of Affinity designer brushes. Try out this bundle’s cross-hatch pen and ink brushes for that authentic, old-school art in your creative projects.

10. Cuba Illustrator Brushes (AI)
A little Latin feel and swagger go a long way with this pack of Cuba brushes. Designed for Illustrator and usable in Affinity, the Cuba bundle features 31 handmade art brushes. You can easily add quality, textured brush strokes to your personal art and professional work.

Looking for even more creative Affinity Designer brushes? Find even more useful Affinity resources in this roundup post from Envato Tuts+. It even includes links to helpful tutorials!

Affinity Designer Courses
Looking to learn more about working with Affinity Designer? We’ve got you covered with these three courses.
Affinity Designer Quick Start
If you’re brand new to Affinity Designer, this course will get you up and running fast. You’ll learn how to work with the vector persona, navigate the interface, control color, fill, and stroke, use the pixel persona, create interactions between shapes,
use effects, styles, pressure, and velocity, and use the export functions and persona. Plus you’ll get bonus lessons on typography, artboards, constraints, symbols, and the assets panel.
You can find similar video lessons and guides for other programs on our Envato Tuts+ YouTube channel.
Branding on a Budget With Elements and Affinity
This course brings together two powerful but cost-effective resources, Affinity Designer and Envato Elements, and shows you how to leverage them to create an entire branding package on a budget. You’ll create a logo, branding colors, website, social
media covers, business cards, and promotional flyers, all using Affinity Designer.
How to Design Flat Icons in Affinity Designer
This course will step you through how to create flat vector icons in Affinity Designer. By the time you’re done, you’ll have created icons illustrating a shopping bag, discount badge, coathanger, shopping basket, dress, and cargo truck, all in colorful
flat style.
Free Affinity Designer Video Tutorials
While not every course found above is free, you can still find learning Affinity resources without getting out your credit card. The Envato Tuts+ team has excellent YouTube video guides and tutorials to help you improve your Affinity Designer skillset on our channel.
1. How to Use Isometric Drawing Tools in Affinity Designer
Affinity Designer added isometric drawing tools in the 1.7 update. Working with them is not as daunting as it looks, especially with this tutorial.
2. How to Use New Affinity Designer 1.7 Features
The features included in the Affinity Designer 1.7 update are all very useful. If you want to learn where to find them and how you can use them, check out the video below.
3. Illustrator Alternatives: Affinity Designer, Inkscape, and Figma
Adobe Illustrator is a powerful program, but there are other options that can help you complete your projects. In this video breakdown, learn about three popular Illustrator alternatives and the features each of them have!
4. Everything You Need to Know About Affinity Designer Brushes
Downloading Affinity Designer brushes is a great first step, but there’s still more to learn about them. Learn everything about brushes in Affinity Designer with this video, including:
- how to set up and use vector brushes
- how to install or save brush packs
- how to use Photoshop and Illustrator brushes in Affinity Designer
5. How to Create Patterns in Affinity Designer
Patterns are a useful design element that can transform illustrations, cover art, posters, and other creations. While you can download many patterns online, this tutorial will teach you how to create them for yourself.
6. How to Set Up Grids in Affinity Designer
Grids are a key feature in design software, and they’re included in Affinity Designer. If you haven’t set them up and don’t know how, this guide will walk you through the process.
7. Branding on a Budget With Envato Elements and Affinity
Proper branding isn’t all about seven-figure budgets. You just need to combine your talent with the right Affinity resources. This is a full, free branding course from Envato Tuts+ that will help you create the brand your ideas deserve.
10 Awesome Affinity Designer Tutorials
What better way to finish off our roundup than with some more learning resources? Here are ten of our free tutorials to help you master Affinity Designer.
 Affinity DesignerTransitioning From Adobe Illustrator to Affinity DesignerAndrei Stefan
 Affinity DesignerThe A to Z of Affinity DesignerYulia Sokolova
 Affinity DesignerCreate a Fitness App Design in Affinity DesignerTom Koszyk
 Character DesignCreate a Friendly, Futuristic Robot in Affinity DesignerYulia Sokolova
 Character DesignHow to Design a Virtual Reality Kid Character in Affinity DesignerYulia Sokolova
 Game DesignHow to Design a “Match Three” Game Screen in Affinity DesignerYulia Sokolova
 Affinity DesignerCreate an Autumn Girl Illustration in Affinity DesignerYulia Sokolova
 Affinity DesignerHow to Create a Set of Flat Hiking Icons in Affinity DesignerYulia Sokolova
 Emoticon DesignHow to Create a Stylish Emoji in Affinity DesignerKamil Khadeyev
 Affinity PublisherHow to Make a Restaurant Menu Template in Affinity PublisherGrace Fussell
Show Us Your Affinity Designer Creations!
What have you been making with Affinity Designer? Share your work in the comments below!
{excerpt}
Read More
How to Make Stars in Photoshop

Ever wondered how to make stars in Adobe Photoshop? Well, wonder no more! In this quick tip tutorial, you will learn how to make stars in Photoshop quickly and easily.
For more quick tips, visit us at the Envato Tuts+ YouTube Channel:
What You’ll Learn in This Photoshop Tutorial
- How to make a star in Adobe Photoshop
- How to create a star effect in Adobe Photoshop
- How to make star trails with a brush
- How to create a shining star
- How to create a shooting star
Tutorial Assets
For this tutorial, I will be using stock photos from Envato Elements:
1. How to Make a Star in Adobe Photoshop
Step 1
In your document, go to the Polygon Menu, right-click on it, and select the Polygon Tool (U), which is a pentagon.

Step 2
Go to the Settings in the top toolbar. This will be shaped like a cog. Click on this and select the Star checkbox with the Radius set to 25%.

Step 3
Next, drag out your shape. This will give us a chunky star.

Step 4
Change the percentage to create a range of different star shapes. Simple!

2. How to Create a Star Effect in Adobe Photoshop
Step 1
Create a New Layer (Control-N) in your document and fill the layer with black.

Step 2
Next, go to Filter > Add Noise and set the Amount to 50%, select Gaussian, and check the Monochromatic box. Click OK.

Step 3
Go to Filter >Blur > Gaussian Blur and set the blur Radius to 1.5%, and click OK.

Step 4
Next, we go to Levels (Control-L) and move the arrows to the base of the curve in the Input Levels, similar to how this is below. Play with these sliders until you get a pleasing star field intensity.

Step 5
Next, set the Layer Blend Mode to Screen. To add extra intensity to your stars, simply duplicate the layer. I think this makes a really impressive star effect with not much effort.

3. How to Make Star Trails With a Brush
Step 1
Create a star of your choosing as in “Part 1. How to Make a Star in Adobe Photoshop”, and make sure that it’s set to black.
Here are the settings I used to create a star trail.
Brush Tip Shape
- Spacing to 102%
Shape Dynamics
- Size Jitter to 27% with Control set to Pen Pressure
- Angle Jitter at 70% with the Control set to Pen Pressure
- Roundness Jitter to 20%; Control: Off
- Minimum Roundness to 25%
Scattering
- Scatter is set to 196% on Both Axes; Control: Pen Pressure
- Count Jitter to 14%; Control: Pen Pressure
Transfer
- Opacity Jitter is set to 0%; Pen Pressure is set to Minimum 0%
- Flow Jitter at 0% set to Pen Pressure with Minimum at 76%
Smoothing
- On

Step 2
Now you can save your brush by clicking the square with the + sign at the bottom of the Brush Settings panel.

Step 3
Here’s how our star trail brush looks with our settings.

4. How to Create a Shining Star
Step 1
Draw out your stars using the Star Trail Brush we just created and duplicate the layer.

Step 2
On the lower layer, go to Filter > Blur > Gaussian Blur and set the Radius to 8.6 Pixels. Click OK.

5. How to Create a Shooting Star
Step 1
In the Brush Settings, select the default Hard Round Pressure Opacity brush and squeeze the tip shape to a narrow oval.

Step 2
On a New Layer (Control-N), draw out a shooting star with the tip being more intense than the trail.

Step 3
Select the Eraser (E) and use a Soft Brush to gently paint out some of the tail.

Step 4
To create a meteor shower effect, hold Alt and use the Move Tool (V) to duplicate each layer. Scale, move, and repeat as necessary. Optionally, to add depth, you can lower the opacity of some of the shooting stars.

Conclusion
Now you have learned how to make stars in Photoshop! I hope you found this quick tip useful and can use these techniques to jazz up your artwork.

If you’d like to learn more from Envato Tuts+, here are some excellent tutorials on how to get started with Adobe Photoshop, working with brushes and light effects!
 Adobe PhotoshopHow to Create a Light Particles Photoshop BrushJonathan Lam
 BrushesHow to Create and Apply a Fish Scale Brush in Adobe PhotoshopRowena Aitken
 Adobe PhotoshopHow to Get Photoshop for Free (Download It Now)Ivan Gromov
{excerpt}
Read More
How to Create an Inspirational Vector Political Poster

Learn how to create a Shepard Fairey Photoshop effect with the help of Illustrator with this poster tutorial.
This tutorial is inspired by Shepard Fairey’s famous political poster series for the Obama Democratic Party campaign in the US in 2008 and now being recreated for the Time magazine cover for November 2020, the month of the US election.
We’ll be showing you how to create this style of design. We’ll start with basic image editing techniques in Adobe Photoshop to get our guide layers set up, and then we’ll jump into Adobe Illustrator. You don’t need any fancy equipment to do this. I used an older mouse that still has the rubber ball.
Note: This tutorial has been recently updated; however, the stock image and pattern are no longer available for download. Please find the appropriate items to replace them to complete the exact end result. Envato Tuts+ does not endorse any political party in the publishing of this tutorial. Rather, this tutorial is focused on demonstrating a workflow for recreating this iconic poster.
Create the Hope Photo Effect in Seconds!
Want to save time and get a Photoshop action which will create the Hope photo effect in seconds? Try this Obama Hope Poster Generator Photoshop Action from Envato Elements.

1. Crop and Modify Your Stock Image
Step 1
For this effect, it’s best to have a portrait style picture, preferably of a subject that appears to be thinking or looking off into the distance.

Step 2
Once you have your image, you need to Open it in Photoshop and Crop it appropriately. The top of the image should be cropped to the top of your subject’s head, and the bottom should be a bit higher than chest height. The crop should have about a 2:1 ratio.

Step 3
Now we need to Posterize the image. Go to Image > Adjustments > Posterize. An appropriate posterization level for the look we are going for is 5.

Step 4
Now we’re going to create our guide layers for use in Illustrator. Start by duplicating your posterized layer, and name this new layer “Pattern Guide.” Then go to Image > Adjustments > Threshold. We’re going to slide our Point until we get something similar to below. We want it fairly dark, but still with a small amount of detail. Also, when using Threshold, it is best to use the Peaks that you see.

Step 5
Save this newly created layer as “patternguide.psd,” or something similar, as you’ll need it for Illustrator.

Step 6
We need to repeat Step 4 and Step 5 three more times. Apply a lower threshold each time, and save each new layer. Below are the settings I used—again, notice the peaks.

2. Set Up Your Document and Palettes
Step 1
Before we start to outline our layers, we need to create the horizontal blue line pattern. To do this, create a new Illustrator document. Give it a Height and Width of 4 px. Then create a rectangle filled with our light blue color (#4F919F), and cover the top half of the canvas.

Step 2
Cover the bottom half with a rectangle filled with beige. Then Select All (Control-A), and drag this over to our Swatches panel. Congratulations—you’ve made a pattern!

Step 3
Now we have to save this Swatch set so we can use it on the poster we’re about to make. In the bottom left corner of our Swatches panel, we’ll select Save Swatches from the Swatches Library Menu. Name it anything you want; I used “pattern.” You can now close this document, as we won’t need it anymore.

Step 4
Here is the color palette we’ll be using for this tutorial. There are four colors and a pattern. We’ll be using a mix of beige and light blue colors.

3. Create Your Portrait
Step 1
Now that we have our reference images and pattern created, it’s time to create a New document in Illustrator. I used a canvas size of 700 x 850 px.

Step 2
We’re going to start with our darkest guide layer—this will be our pattern layer. We’re going to outline the layer using the Pen Tool (P). So to start, we’re going to go to File > Place and select our first reference layer in Illustrator. If you’ve been following verbatim, the file to place is called “patternguide.psd”.

Step 3
Let’s stop for a moment and discuss the proper use of the Pen Tool (P) in Illustrator. This is one area where Illustrator handily trumps Photoshop, but only if you use it correctly.
For any curve, you basically have three clicks; two are anchor points, and the other is your curve point. You place your curve point at the highest point of your curve. You place the anchors where the curve starts and ends.
One click is all that’s needed when you are creating a curve. You can then change the curve points to curves after you have finished the entire shape. To convert them, use the Direct Selection Tool (A) and click on the Convert Selected Anchor Points to Smooth icon.

Step 4
Before we can outline our first layer, we need to load our pattern into the Swatches Library. To do this, select Other Library from the Swatches Library menu in the Swatches panel.

Step 5
Okay, so back to outlining our first layer. Create New Layer below the file you just placed into Illustrator. This layer will hold our outline. We place it below because it is easier to see what we’re outlining that way.
Now we grab our Pen Tool (P), giving it a stroke of null and a fill of our pattern. Then start outlining all the black areas with the Pen Tool (P). The key is to average it out—don’t follow the guide layer too closely. Just roughly outline it, and don’t worry about our curves as we’ll fix them after we create our outline.
Note: This is the most tedious part of the process.

Step 6
You might have noticed that there are lighter portions in the middle that we just went right over with outlines. Well, we’re going to fix that by outlining those using the same process. Fill those with our beige color, as shown below. We’ll do this on a new layer just above the pattern layer. After you’ve done that, you should have something similar to the following.

Step 7
Now we smooth out the shapes we just created. We want most of our points to be smooth, but I find it looks better if you leave a few the way they are. View the effect of smoothing both the pattern and the beige layer below.
Note: I made this image out of order and the pattern was wrong—don’t worry about the color difference.

Step 8
Now we just do this same thing for each layer: roughly outlining it, then outlining the highlights with the color immediately below it, and then smoothing out our outlines. The next layer should have solid light blue, followed by red, and then finally our dark blue.

Step 9
Okay, you should have something like the following. The tedious part is over. Now to make it look like a poster. First, we’ll put a beige filled rectangle below all these layers, which will serve as our background.

Step 10
Now we’ll need to put our red and light-blue halves in. We’re going to do this just above the beige rectangle layer. Use the Rectangle Tool (M) to place the two rectangles.

Step 11
Our poster is looking pretty good. Let’s create the space needed to add the inspiring text at the bottom. You’ll probably have to enlarge your canvas area. To do this, go to File > Document Setup. I added 300 px onto mine.

Step 12
Now extend your beige rectangle so that it covers the new length of your canvas. Then create a new rectangle filled with our dark blue color. It should be a quarter of the size of the main subject.

Step 13
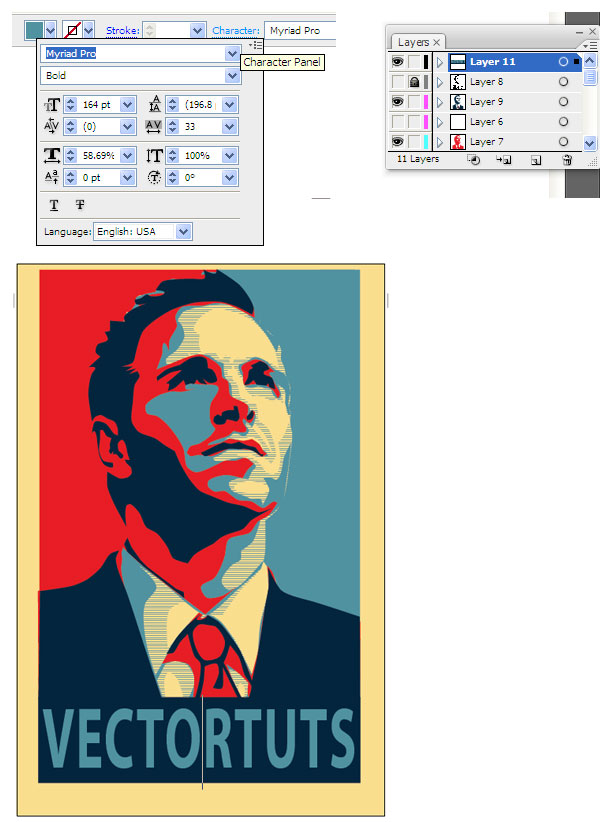
Time to add our inspiring word. We’ll use light blue for the font color, and we want to change the text settings so that the word fills most of the dark-blue rectangle. To change the spacing between the characters, use the Character panel. This is available to us when we are using the Text Tool (T). I used the font “Myriad Pro”.
Step 14
Almost finished—we just need to clean up our borders a little bit. First, select every layer except your beige layer. Then create a Group (Control-G). Then Vertically and Horizontally Align them to the artboard.

Step 15
Now we’re going to clean up the edges of our poster. Cover the layers that we grouped in a rectangle of any color. Then use the Pathfinder panel, and select Subtract Shape From Area.

Awesome Work! You’re Now Finished!
Way to go, we’re done! We managed to create a really awesome effect without needing a whole lot of artistic ability. We also learned how to efficiently use the Pen Tool, and a nice way to use Photoshop and Illustrator in tandem. This is my first tutorial, so I’m sure there will be questions. Feel free to ask in the comments, and I’ll try and answer as quickly as I can. Thanks!

Want to Learn More?
Check out the following great poster design tutorials to learn more:
 Poster DesignHow to Create a Suffragette-Inspired Poster in Adobe InDesign #100YearsGrace Fussell
 RetroHow to Create a Vintage Soviet Space Travel Poster in Adobe InDesignGrace Fussell
 SummerHow to Create an Ice-Cream Script Poster in Adobe InDesignGrace Fussell
 InDesign TemplatesHow to Create a Memphis Style Club Poster in Adobe InDesignGrace Fussell
 Poster DesignHow to Create a Chalkboard BBQ Poster in Adobe InDesignGrace Fussell
 Poster DesignMovie Poster Design 101: The Anatomy of a Movie PosterGrace Fussell
 Poster DesignHow to Create a Wanted PosterMonika Zagrobelna
{excerpt}
Read More
Hummer EV ‘supertruck’ has a UI built on Unreal Engine and runs Android
On Tuesday night GMC took the wraps off of its upcoming Hummer EV, a 1,000HP “supertruck” that’s powered by up to three electric motors and its new Ultium battery setup. But inside the new Hummer, there’s a 12.3-inch driver information display and 13…
Google Drive Plugins for WordPress
{excerpt}
Read More
How to Turn Your WordPress Website into a Mobile App
{excerpt}
Read More
Feds blame Russia, Iran for election misinformation and threatening emails
At a press conference on Wednesday evening, Director of National Intelligence John Ratcliffe told reporters that two foreign actors, Iran and Russia, have been identified as taking actions to interfere in the US elections. Ratcliffe claimed the two h…
NASA shares first images from OSIRIS-REx’s touchdown on Bennu
It made history in the span of approximately six seconds. On Tuesday afternoon, NASA’s OSIRIS-REx spacecraft successfully completed its touch-and-go meeting with 101955 Bennu. In the process, it managed to collect a sample of regolith it will now car…
Quibi confirms it’s shutting down
Barely six month after Jeff Katzenberg / Meg Whitman-lead Quibi launched, the company announced it’s closing up shop. Confirming the details leaked from a call with investors, Quibi’s leaders said in a letter that the service’s lack of success is “Li…
Tesla produced and delivered a record number of cars this quarter
Elon Musk had plenty to crow about during Tesla’s Q3 2020 earnings call on Wednesday. “Q3 was our best quarter in history!” Musk exclaimed. The company recently announced that it had produced a record 145,036 vehicles this quarter, delivering 139,300…
Adobe tries using AI to fix blurry video footage
Between things like camera shake and poor lighting, the videos you take with your phone, DSLR or mirrorless camera can end up blurry for any numbers of reasons. Worse yet, it’s difficult to sharpen a photo or video after the fact, and more often than…