Category: Tutorials
Tutorials,freelance,projects,joomla,php,mysql,wordpress,blancer.com
45 Best Blanket Mockups (Sherpa, Quilt, Fleece, Throw, and More!)
If you’re a designer who makes gorgeous patterns for bed linen and blankets, you probably need great mockups to test or showcase your designs.

Today we’ll share 45 of the best blanket mockups available at Placeit.net. With just the click of a button, you can add your design to any of these mockups and download the result in a matter of seconds.
45 Best Blanket Mockups
Duvet Cover Mockup

This Duvet Cover Mockup is an excellent choice for designers looking to display their patterns in a real-life context. It’s free to experiment on Placeit, so jump in and see how your design would look.
Blanket Mockup

Placeit offers blanket mockups in a variety of styles like this one, which features a young woman holding a mug of something hot in front of her bedroom window. Give this mockup a try today.
Fleece Blanket Mockup

Here’s a wonderful variation on the image above that uses the same model but with a different pose and props. Try both to see which you prefer.
Bed Cover Mockup

This bed cover mockup combines solid and neutral colours, allowing you to add a design with a wide variety of patterns and colours. Upload your image to see how it looks with this terrific mockup.
Throw Blanket Mockup

Use the online blanket mockup generator to add your eye-catching designs to this soft and inviting blanket to see how your design would look before you produce it. You can change the background colour to one that shows off your design to its best advantage.
Hooded Blanket Mockup

If you’re looking for a hooded blanket mockup set in the great outdoors, you’ll like this mockup. The way the hooded blanket is draped on the model offers plenty of space for your design to be seen and appreciated. Why not give it a try?
White Blanket Mockup

This white blanket mockup is perfect for those who want to display the full effect of their pattern without models, pillows, or other props involved. You can change the colour of the blanket and the background to complement your colour scheme.
Fleece Blanket Mockup

How sweet is this fleece blanket mockup, which features a little girl with her stuffed toy friend sitting on a full spread-out blanket? If your target market is children, this is an excellent mockup to experiment with.
Duvet Cover Mockup

Looking for a duvet cover mockup to add your designs to? Well, you’ll love this mockup, which features a cover in an elegantly casual bedroom setting that will help your design shine.
Duvet Cover Mockup

If you love the bedroom above but would like to add your own patterned throw cushions to the design, this is the duvet cover mockup for you. It provides a duvet cover and two throw pillows that you can add your designs to.
Bed Linen Mockup

Here’s yet another angle on the same bedroom. This one features a trio of throw pillows that you can also add your design to.
Bed Linen Mockup

And if you prefer a closeup shot of the same bedroom to really zero in on your designs, this bed linen mockup is an excellent choice.
Throw Blanket Mockup

How about this throw blanket mockup featuring a model holding up the blanket? This will give viewers a great view of your design. So upload your designs and see which one looks best with this particular mockup.
Blanket Mockup

Here’s a different take on the image above. This one offers a vertical orientation and a closer look at the pattern of your design.
Sherpa Blanket Mockup

What could be better than a sherpa made into a hooded blanket? Why, a hooded blanket with your wonderful design on it, of course! Just use the online blanket mockup generator to upload your design, and your mockup is ready to download.
Baby Blanket Mockup
What’s so wonderful about this baby blanket mockup is that you can add a complementary design to the baby’s onesie as well. How awesome is that?
Baby Blanket Mockup

If you love the mockup above but would like to see a variation on it, take a look at this mockup which offers a mockup of the same baby and scene but in a vertical orientation.
Picnic Blanket Mockup

Do you design picnic blankets? Well, Placeit’s got a number of awesome picnic blanket mockups just for you, like this one, which features your design front and centre with a picnic basket and fruit platter in the background for context.
Bed Sheet Mockup

How about this head-on shot of a bedroom featuring throw pillows and bed sheet mockups? Add your complementary design using the insert image buttons, and your mockup is ready to download.
Throw Pillow and Bed Sheet Mockup

Do you love the mockup template above but are looking for a slight variation? This bed sheet mockup template offers a vertical orientation of the horizontal template above. In addition, with this template you cannot change the pattern of the throw pillows.
Picnic Blanket Mockup

This picnic blanket mockup offers a clear view of your pattern design and a background that allows you to change the colour to complement your blanket colour scheme. You can also leave the background colour transparent if you want to add the mockup to your own background seamlessly.
Rolled up Picnic Blanket Mockup

A rolled-up picnic blanket mockup won’t work for all kinds of designs, but if your design is concentrated in one area, this is the perfect mockup for you. You can change the background colour of this template to work with your own colour scheme or leave it transparent to blend in seamlessly with your own chosen background.
Picnic Blanket Mockup

Here’s another option for a picnic blanket mockup that is quite different from the others we have highlighted so far. This one shows three women having fun together as two pose and the third takes their photo. As most of the blanket is exposed to view, if you choose this template, your design will be almost completely visible to viewers.
Throw Blanket Mockup With Bed Linen Mockup

Maybe you want to combine a throw blanket with bed linen in a mockup. If so, this is the mockup for you. It features a closeup of a beautifully made bed with a throw blanket over it.
Throw Blanket Mockup

This mockup offers a closeup of a throw blanket where we often place it, on the arm of a sofa in the living room. Upload your design carefully so you show the best aspects on the area that is visible to viewers.
Picnic Blanket Mockup

A bit or of an intimate take on the picnic blanket theme, this picnic blanket doesn’t offer a whole lot of space for your design, but if you use a repeat pattern then it is an ideal choice.
Picnic Blanket Mockup

Here’s another variation on the picnic blanket mockup featuring the same couple above but in a different pose. This one is a better choice for those whose design involves a central image as that area of the mockup is clear so your design can stand out.
Quilt Blanket Mockup

For those looking for a quilt blanket mockup, here is one that may suffice. As it is folded, it is more of a tease than a full view. You can change the background to any colour you like or leave it transparent to blend with the background of your choice.
White Blanket Mockup

If your target audience is children, you will love this white blanket mockup featuring a blanket thrown over the legs of a seated child. If you like the model and would like to see some other options with her in them, read on.
Throw Blanket Mockup

This children’s throw blanket mockup allows your audience a full view of your design. Great for repeat patterns.
Kid’s Blanket Mockup

On the other hand, if the most important part of your design is concentrated in a limited area of the blanket, then this blanket mockup might be a great choice for you.
Bed Cover Mockup

Show off your beautiful designs on this bed and pillow combination mockup. Use the online blanket mockup generator to customise your design in a matter of seconds.
Sherpa Blanket Mockup

If you’re looking for a sherpa blanket mockup, you’ll probably love this hooded blanket mockup made with a sherpa effect. This mockup is best for repeat pattern designs as there’s not a lot of area to display a design with a central motif.
Bed Cover Mockup

Show off your beautiful designs with this bed cover mockup. Adding your design to Placeit mockups is as easy as clicking a button. Try yours today.
Blanket Mockup

This very sweet blanket mockup of a little girl sitting on a day bed with her stuffed animal friends allows you to show off your child-friendly design in an engaging way.
Baby Blanket Mockup

This baby blanket mockup template offers a different take on the mockup above. Less of the blanket is on show, so this would be better for designs where the important subject is more central.
Fleece Blanket Mockup

Here’s yet another take on the blanket mockup above. This one offers an angled closeup of the blanket which would work for all types of designs.
Hooded Blanket Mockup

How would your design look on this hooded blanket mockup? Happily you don’t have to guess since it’s free to experiment on Placeit. Head on over, upload your design, and see what you think.
Duvet Cover Mockup

This duvet cover mockup is quite minimalist, which leaves a lot of room for your design to stand out. Upload your image and see how it looks in this clean and simple mockup!
Throw Blanket Mockup

Here’s another clean and simple mockup, this time for showing off your throw blanket. As the blanket is folded, it limits how much of your design will be shown, but this shouldn’t matter for repeat pattern designs.
Sherpa Blanket Mockup

Wow your audience with this sherpa blanket mockup. Nothing says cosy like a hot cup of your favourite beverage and a hooded blanket mockup. Upload your image and see how it looks in this terrific mockup.
Bed Sheet Mockup

This traditional bed frame design is perfect for traditional or country style patterns. If these are the genres you work in, then this could be a great choice for showcasing your designs.
Baby Blanket Mockup

Your baby blanket designs deserve the best mockup to showcase your work, and that’s exactly what you’ll get when you use this fabulous baby blanket mockup. Use this one to showcase your favourite design. You won’t regret it.
Bed Linen Mockup

If retro design is your thing, you’ll love this bed linen mockup with its vintage suitcase and television in the background. Use the online blanket mockup generator to insert your image, and your work is done.
Bed Sheet Mockup

This is a simple but elegant bed sheet mockup that gives your designs centre stage. What better way to show off your awesome designs than with this Placeit mockup?
Make Your Own Blanket Mockup Today
And there you have it: 45 of the best blanket mockups at Placeit. Check them out today and create your own stylish mockups that allow your designs to stand apart from the crowd.
And if you’re interested in other terrific mockups, check out these roundups of the best resources available at Placeit:
 Pillow Mockup34 Best Pillow Mockups (Using a Pillow Mockup Generator)Nona Blackman
 Product Mockup25 Must-Have Packaging Mockups for Product DesignersNona Blackman
 Product Mockup22 Best Tote Bag Mockups (Using an Online Mockup Generator)Nona Blackman
 Mockups29 Best Long-Sleeve Shirt MockupsNona Blackman
 Mac21 Best MacBook & Laptop Mockup Templates (Including iMac & MacBook Pro PNG Mockups)Nona Blackman
 FaceMask Mockups25+ Best Face Mask Mockups (PSD, Mockup Generator)Nona Blackman
 Product Mockup26 Best Coffee Mug Mockups (Using a Mug Mockup Generator)Nona Blackman
 Book Cover27 Best Book Mockups Using a Book Mockup GeneratorNona Blackman
{excerpt}
Read More
Streaming dominates Oscar nominations in a stay-at-home year
Twitter fixed a bug that suspended users for posting the word ‘Memphis’
US charges CEO of company selling encrypted devices to drug traffickers
Taiwanese horror game ‘Devotion’ returns after China controversy
9 Best WordPress Video Gallery Plugins
{excerpt}
Read More
How to Backup Your WordPress Site
{excerpt}
Read More
How to Make a Leather Texture in Photoshop
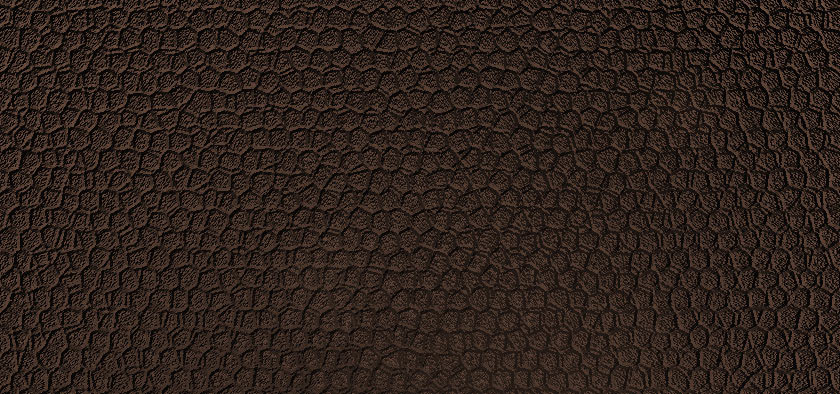
In the following steps we will demonstrate how to create a leather texture in Photoshop. Using multiple filters and lighting effects, you will learn how to make a leather texture in Photoshop in just a few minutes.
What You Will Learn in This Photoshop Leather Tutorial
- How to build a Photoshop leather style
- How to create a leather texture in Photoshop
- How to create a leather background
If you don’t have the time to learn how to make a leather texture in Photoshop, you can always try Envato Elements. Here you can find massive collections of black leather textures, white leather textures, faux leather textures, Photoshop leather overlays, Photoshop leather styles, and more.

1. How to Set Up the Document for Your Photoshop Leather Texture
Step 1
Hit Control-N to create a new document. Select Pixels from the Units drop-down menu, enter 860 in the width and height boxes, and then click that More Settings button. Select RGB for the Color Mode, set the Raster Effects to Screen (72 ppi), and then click Create Document.

Step 2
Before we start the work on our black leather texture, focus on the Layers panel (Window > Layers), hold down the Alt key, and double-click the existing layer to unlock it. Now that you’re set, let’s learn how to create a leather texture in Photoshop.

2. How to Create the Outline of a Photoshop Leather Texture
Step 1
Make sure that the foreground color is set to black and the background color is set to white (D), and then go to Filter > Filter Gallery. From the Texture category, select Stained Glass.
Set the Cell Size to 9, the Border Thickness to 4, and the Light Intensity to 3, and then click OK.

Step 2
Focus on the toolbar and swap the Foreground and Background colors. You can use that tiny arrow button or the X keyboard shortcut. Select the Paint Bucket Tool (G).
Move to the Layers panel and add a second layer using the Create a New Layer button. Fill this new layer with white, and don’t forget to lower its Opacity to 50%.

Step 3
Get back to your toolbar and swap the Foreground and Background colors again.
Make sure that your second layer is still selected and go again to Filter > Filter Gallery > Texture > Stained Glass. Keep the existing settings and click OK.

Step 4
Focus on the Layers panel, hold down the Control key to select both layers, and then right-click on one of these two layers and go to Merge Layers. Alternatively, you can use the Control-E keyboard shortcut.
Make sure that the resulting layer is selected and go to Filter > Noise > Add Noise. Set the Amount to 20%, check the Uniform and Monochromatic boxes, and then click OK.

3. How to Add Lighting for Your Photoshop Leather Texture
Step 1
Press Control-A to select the entire canvas and Control-C to copy the content.
Open the Channels panel (Window > Channels) and add a new channel using the Create a new channel button.
Press Control-V to paste the content of your layer inside this new channel.

Step 2
Keep focusing on the Channels panel and select the RGB channel.
Go to Edit > Fill and select Color from the first dropdown menu. Set the color to R=70 G=70 B=70 and click OK. Make sure that the Blending Mode is set to Normal and the Opacity to 100%, and then click OK.
Press Control-D to get rid of that selection around your entire canvas, and focus on the Layers panel. Right-click on your layer and go to Convert to Smart Object.

Step 3
With your smart object selected, go to Filter > Render > Lighting Effects.
Add a Spot for your Photoshop leather style. Scale it roughly as shown in the following image, and then enter all the settings shown below. Make sure that you select Alpha 1 for the Texture and move that Height slider to 20.

Step 4
Focus on the control panel and add a point light for your Photoshop leather style, using the Add new Point Light button.
Click and drag the edges of this point light to scale it around 300. Place it as shown in the following image and then enter all the settings shown below.

Step 5
Use that same Add new Point Light button to add a second point light for your PSD leather texture. Scale it around 300, place it as shown in the following image, and then enter all the settings shown below.

Step 6
Add a third point light for your PSD leather texture. Scale this new point light around 480, place it as shown in the following image, and then enter all the settings shown below.
Once you’re done, click that OK button from the control panel.

4. How to Color a Photoshop Leather Texture
Step 1
Go to the Layers panel, add a second layer, and make sure that it stays selected. Swap the Foreground and Background colors, and select the Gradient Tool (G).
Focus on the control panel, select the Radial Gradient button, and make sure that the gradient is set to go from white to transparent white.
Move to your canvas and, with a simple click and drag, draw some random gradients, as shown in the following image.

Step 2
Focus on the Layers panel and lower the Opacity of your selected layer to 3%.

Step 3
You can easily change the color of your PSD leather texture by adding an adjustment layer. Focus on the Layers panel, click the Create a new fill or adjustment layer button, and go to Hue/Saturation.
Check that Colorize box and move the sliders to change the color of your PSD leather texture as you wish.

Step 4
You might have noticed that the Lighting Effects filter added a small border to your leather background (just a few pixels).
To remove it, go to Image > Canvas Size (Alt-Control-C) and reduce the size of the canvas by a few pixels. Click OK, and this Photoshop leather tutorial is complete.

Congratulations! You’re Done!
Here is how your Photoshop leather overlay should look. I hope you’ve enjoyed this Photoshop leather tutorial and can apply these techniques in your future projects. Don’t hesitate to share your final leather background in the comments section.
Now that you know how to create a leather texture in Photoshop, feel free to adjust the final design and make it your own. You can find some great sources of inspiration at Envato Elements, with interesting solutions to improve your Photoshop leather overlay.

Popular Leather Textures From Envato Elements
Envato Elements is an excellent resource for Photoshop leather textures. Here’s a short list of some of the most popular leather textures and leather backgrounds that you can find.
7 Faux Leather Textures (JPG)
This set of seven colored seamless leather textures is the perfect solution if you don’t have the time to learn how to how to make a leather texture in Photoshop.

Set of 4 Leather Textures (JPG)
Save the time that you would have spent learning how to make a leather texture in Photoshop and try these detailed leather textures, which come in four color versions: black, blue, brown, red.

Luxury Leather Textures (JPG, PNG)
This set of high-resolution and high-quality leather textures consists of a leather background with ten color variations.

Black Leather Texture and White Leather Texture (JPG)
The black leather texture and white leather texture from this small pack also come with a detailed stitched effect.

Set of 9 Faux Leather Textures (JPG)
This set of nine faux leather textures comes in various shades of brown and can be used in a wide variety of designs. Create a smooth Photoshop leather overlay with just a few clicks.

Want to Learn More?
We have loads of tutorials on Envato Tuts+, from beginner to intermediate level. Take a look!
 TexturesHow to Create a Wood Grain Texture in PhotoshopMiss Chatz
 Adobe PhotoshopHow to Make an Old Paper Texture in PhotoshopIvan Gromov
 TexturesHow to Create a Dusty Texture From ScratchIvan Gromov
 Adobe PhotoshopHow to Add a Texture Overlay in PhotoshopIvan Gromov
 Photoshop Templates1,000+ Best Photoshop Textures From Envato Elements (Textures, Overlays, Brushes)Nona Blackman
 Textures1,000+ Best Wood Textures (PNGs, PSDs, Vector, EPS, Brushes, and More!)Nona Blackman
 Textures50+ Best Paper Textures and Overlays (Old, Crumpled, Creased, and Folded)Nona Blackman
 Textures32 Best Free Vector Textures (Backgrounds, to Download Now)Abbey Esparza
{excerpt}
Read More
Weekly Short Story: The Hotel
On Monday mornings, I send out a story via email: ultra-brief tales of 1,000 words or more, usually in genres including science fiction, horror, and the supernatural. Those stories collectively are called Once Upon A Time. I’ve also published three ebooks and one paperback anthology of those stories so far.
I’d love to have you as a subscriber to the weekly free story. You can subscribe via email here, or use the form below. Unsubscribe any time, from the link in every issue.
How to Create a Pamphlet Template in Illustrator

This tutorial will teach you how to create a bifold pamphlet in Adobe Illustrator. Using basic tools and effects along with some fonts and photos from Envato Elements, you’ll learn how to create this sleek travel pamphlet. Once you know how to create a pamphlet, you’ll learn how to easily save it as a PDF document.
What You’ll Learn in This Pamphlet Design Tutorial
- How to select a pamphlet format
- How to set up a pamphlet layout
- How to create a pamphlet
- How to organize the pamphlet information
- How to export a pamphlet design as a PDF
If you don’t have the time to learn how to make a pamphlet, you can always try Envato Elements. You will find a massive collection of pamphlet examples to choose from.

What You Will Need
You will need the following resources in order to learn how to make a pamphlet in Illustrator:
- Robinson Regular font
- More Sugar font
- Aerial View of Green Pine Forest photo
- The Danube photo
- Houses in Fundatica Village photo
- Peles Castle in the Carpathian Mountains photo
- Rasnov Fortress photo
1. How to Set Up the Pamphlet Format
Hit Control-N to create a new document. Select Millimeters from the Units drop-down menu, and enter 420 in the width box and 297 in the height box. Change the Orientation to Landscape, enter 2 Artboards, and set the Bleed to 3 mm, and then click the More Settings button. Select CMYK for the Color Mode, set the Raster Effects to High (300 ppi), and then click Create. Basically, for the pamphlet format, we’re going to use an A3 piece of paper folded in half.
Enable the Grid (View > Show Grid) and Snap to Grid (View > Snap to Grid). You will need a grid every 1 mm, so simply go to Edit > Preferences > Guides & Grid, and enter 1 mm in the Gridline every box and 1 in the Subdivisions box. Try not to get discouraged by all that grid—it will make your work easier, and keep in mind that you can easily enable or disable it using the Control-“ keyboard shortcut.
You can learn more about Illustrator’s grid system in this short tutorial from Andrei Stefan: Understanding Adobe Illustrator’s Grid System.
You should also open the Info panel (Window > Info) for a live preview with the size and position of your shapes. Don’t forget to set the unit of measurement to millimeters from Edit > Preferences > Units. All these options will significantly increase your work speed.

Now that you have your blank pamphlet template, let’s learn how to set up the pamphlet layout.
2. How to Set Up the Pamphlet Layout
Step 1
The red frame around your artboards defines the bleed area. The bleed is the area outside the document that’s trimmed after you print your bifold pamphlet.
Click your second artboard to select it. Pick the Artboard Tool (Shift-O) from your toolbar and drag your second artboard below the first one, as shown in the following image. Make sure that you perfectly align your two artboards.
Enable the Rulers (View > Rulers > Show Rulers or Control-R). Focus on the vertical rulers and simply click and drag to add a vertical guide for your document. Move your guide to 210 mm on the horizontal rulers to divide your pamphlet layout into two equal sides.

Step 2
Now that your pamphlet layout is set, let’s focus on the Swatches panel (Window > Swatches) and save the three colors that will be used throughout this pamphlet template tutorial.
Click the New Swatch button and change the Color Type to Spot Color. Set the color to C=100% M=92.16% Y=20.39% K=9.8%, and then click OK to add this blue color in the Swatches panel. Use the same technique to save another two spot colors, as shown in the following image: once for a yellow color and another for a red color.
The nice thing about spot colors is that you can easily edit them, and the instances where the spot color is used automatically adjust to fit the new values.

3. How to Add the Background for the Front of the Travel Pamphlet
Step 1
Now that you’re set, let’s turn this black pamphlet template into an amazing pamphlet design.
Drag this Aerial View of Green Pine Forest photo inside your blank pamphlet template, keep it selected, and focus on the control panel. Make sure that the Constrain Width and Height Proportions button is active and lower the Width to 213 mm, and then place your photo as shown in the first image.
Select the Rectangle Tool (M) from your toolbar, create a 213 x 303 mm shape, and place it as shown in the second image.

Step 2
Select the rectangle along with the photo, and go to Object > Clipping Mask > Make (Control-7).

Step 3
Again, drag this Danube photo inside your pamphlet template, lower the Width to 213 mm, and place it as shown in the first image.
Select the Rectangle Tool (M) from your toolbar, create a 213 x 303 mm shape, and place it as shown in the second image.

Step 4
Select both the rectangle and the photo, and go to Object > Clipping Mask > Make (Control-7).

4. How to Create the Left Front Side of the Travel Pamphlet
Step 1
Focus on the bottom side of the left photo and pick the Rectangle Tool (M). Create a 50 x 30 mm shape, fill it with white, and place it as shown in the first image.
Select the Type Tool (T) from your toolbar and open the Character panel (Window > Type > Character). Select the Robinson Regular font, set the size to 40 and the tracking to 100.
Simply click on your artboard to type in “2021” and replace the text color with your blue from the Swatches panel.

Step 2
Keep focusing on the Character panel and keep the Robinson Regular font active. Set the size to 150, increase the leading to 110, and lower the tracking to 0.
Click on your artboard and type “MAKE THE WORLD YOUR HOME”, with each word on a separate row. Change the color of this text to white, and remember to check the Align Center button from the control panel to nicely center your text. Place it roughly as shown in the following image.

5. How to Create the Right Front Side of the Travel Pamphlet
Step 1
Focus on the top side of the right photo and make sure that the Type Tool (T) is still active. Use the Robinson Regular font, set the size to 130 and the leading to Auto, and lower the tracking to 0.
Click on your artboard and type “TRAVELER”. Change the color of this text to white, and place it as shown in the following image.

Step 2
Switch to the Rectangle Tool (R), create a 96 x 2 mm shape, fill it with white, and place it as shown in the first image.
Reselect the Type Tool (T) and focus on the Character panel. Select the More Sugar font, and set the size to 26 and the tracking to 900. Type “Romania”, place this new text as shown in the second image, and make sure that the color is set to white.

Step 3
Switch to the Rectangle Tool (R) and create three 28 x 2 mm shapes. Fill these new shapes with your red, yellow, and blue from the Swatches panel, and then place them as shown in the first image.
Using the same tool, create two 2 mm squares. Fill both shapes with white, and place them as shown in the second image.

Step 4
Focus on the top side of the right photo, and make sure that the Rectangle Tool (M) is still active.
Create a 213 x 50 mm shape and place it as shown in the following image. Fill this new rectangle with white, lower its Opacity to 50%, and change the Blending Mode to Overlay.

Step 5
Pick the Rectangle Tool (M) and create two 1 x 14 mm shapes. Fill both rectangles with white, and place them as shown in the first image.
Switch to the Type Tool (T) and focus on the Character panel. Use the Robinson Regular font, setting the size to 40, the leading to 30, and the tracking to 0.
Add the three pieces of text shown in the second image. Make sure that the color is set to white.

Step 6
Pick the Rectangle Tool (M), create a 40 x 13 mm shape, fill it with white, and place it as shown in the first image.
Switch to the Type Tool (T) and focus on the Character panel. Use the Robinson Regular font, setting the size to 20 and the tracking to 100.
Add the “TRAVELER.COM” piece of text, set the color to black, and place it as shown in the second image.

Step 7
Select your black text along with the white rectangle, open the Transparency panel (Window > Transparency), click the Make Mask button, and don’t forget to uncheck the Clip box.

6. How to Add a Border for the Front of the Travel Pamphlet
Select the Rectangle Tool (M) and create a 210 x 297 mm shape. Remove the fill color applied to this shape and add a 6 mm white stroke. Place this large rectangle as shown in the first image.
Duplicate this shape (Control-C > Control-V) and place the copy as shown in the second image.

7. How to Add the Background for the Back of the Travel Pamphlet
Step 1
Let’s focus on the second artboard that makes up your bifold pamphlet. Drag this Houses in Fundatica Village photo inside your pamphlet template, lower the Width to 213 mm, and place it as shown in the first image.
Using the Rectangle Tool (M), create a 213 x 303 mm shape and place it as shown in the second image.
Select both the rectangle and the photo and go to Object > Clipping Mask > Make (Control-7).

Step 2
Again, drag this Peles Castle in the Carpathian Mountains photo inside your pamphlet template, lower the Width to 213 mm, and place it as shown in the first image.
Using the Rectangle Tool (M), create a 213 x 303 mm shape and place it as shown in the second image.
Select both the rectangle and the photo, and go to Object > Clipping Mask > Make (Control-7).

Step 3
Drag this Rasnov Fortress photo inside your pamphlet template, lower the Height to 220 mm, and place it as shown in the first image.
Using the Rectangle Tool (M), create a 213 x 99 mm shape and place it as shown in the second image. Switch to the Direct Selection Tool (A) and focus on the right side of this rectangle. Select the top anchor point and move it 100 mm up, as shown in the third image.

Step 4
Select both the shape and the photo added in the previous step and go to Object > Clipping Mask > Make (Control-7).

Step 5
Using the Rectangle Tool (M), create a 213 x 303 mm shape and place it as shown in the following image. Fill this new rectangle with blue and change the Blending Mode to Soft Light.

8. How to Add the Pamphlet Information
Step 1
What is a pamphlet without some information? In the following steps, we’ll add the pamphlet information.
Focus on the top side of the left photo and pick the Type Tool (T). Select the Robinson Regular font, setting the size to 130 and lower the tracking to 0.
Click on your artboard and type “TRAVELER”. Change the color of this text to blue and place it as shown in the following image.

Step 2
Pick the Rectangle Tool (M), create a 96 x16 mm shape, fill it with red, and place it as shown in the first image.
Using the same tool and settings, create two 5 x 16 mm shapes, and place them as shown in the second image.
Switch to the Type Tool (T) and focus on the Character panel. Select the More Sugar font and set the size to 30. Add the “discover Romania” text, set the color to white, and place it as shown in the third image.

Step 3
Pick the Rectangle Tool (M), create a 90 x 217 mm shape, fill it with white, and place it as shown in the following image.

Step 4
Grab the Type Tool (T) and focus on the Character panel. Select the Robinson Regular font and set the size to 100. Add the “$1500” text, set the color to red, and place it as shown in the first image.
Select only the “$” symbol from this new piece of text, return to the Character panel, and lower the font size to 80.
Using the same tool, add a small paragraph as shown in the second image. Change the text color to blue, keep the Robinson Regular font, and set the size to 22 and the leading to 20.

Step 5
Keep focusing o the blue text added in the previous step. Using the Type Tool (T), select the text highlighted in the first image and lower its Opacity to 20%.
Add two copies of this paragraph and move them below the original one, as shown in the third image.

Step 6
Select the white rectangle along with the text that lies on top of it, and duplicate them. Drag the copies to the right, as shown in the first image, and then make some small adjustments to the text.

Step 7
Pick the Rectangle Tool (M) and create a 10 x 38 mm shape. Fill it with red, place it as shown in the first image, and then go to Object > Path > Add Anchor Points.
Focus on the bottom side of this red rectangle and switch to the Direct Selection Tool (A). Select the middle anchor point and simply drag it 3 mm up.
Switch to the Type Tool (T) and focus on the Character panel. Select the More Sugar font, and set the size to 10 and the tracking to 100. Add the “BESTSELLER” text, set the color to white, rotate it 90 degrees, and then place it as shown in the third image.

Step 8
Using the Rectangle Tool (M), create a 213 x 97 mm shape, fill it with red, and place it as shown in the first image.
Switch to the Direct Selection Tool (A) and focus on the left side of this rectangle. Select the top anchor point and move it 27 mm down, as shown in the second image.

Step 9
Using the Rectangle Tool (M), create a 213 x 199 mm shape, fill it with yellow, and place it as shown in the first image.
Switch to the Delete Anchor Point Tool (-) and use it to remove the top-left anchor point, and then grab the Direct Selection Tool (A). Select the remaining top anchor point and move it 213 mm to the right, as shown in the third image.

Step 10
Using the Rectangle Tool (M), create a 213 x 70 mm shape, fill it with blue, and place it as shown in the first image.
Switch to the Delete Anchor Point Tool (-) and use it to remove the top-right anchor point.

Step 11
Using the Rectangle Tool (M), create a 70 x 30 mm shape, fill it with blue, and place it as shown in the first image.
Switch to the Type Tool (T) and focus on the Character panel. Use the Robinson Regular font, setting the size to 35 and the tracking to 100.
Add the “TRAVELER.COM” text, set the color to white, and place it as shown in the second image.

Step 12
Using the Rectangle Tool (M), create a 53 x 1 mm shape, fill it with white, and place it as shown in the first image.
Switch to the Type Tool (T) and focus on the Character panel. Use the Robinson Regular font, setting the size to 15 and the tracking to 290.
Add the “[email protected]” text, set the color to white, and place it as shown in the second image.

9. How to Create the Right Back Side of the Pamphlet Design
Step 1
Pick the Type Tool (T) and focus on the Character panel. Use the Robinson Regular font, setting the size to 100 and the tracking to 0.
Add the “AND NEW PEOPLE” text, set the color to black, and then rotate it and place it roughly as shown in the second image.

Step 2
Select your black text along with the yellow shape, go to the Transparency panel, and click that Make Mask button. Don’t forget to uncheck the Clip box.

Step 3
Reselect the Type Tool (T) and add the “DISCOVER A NEW WORLD” piece of text. Set the color to yellow, rotate the text, and place it roughly as shown in the following image.

Step 4
Using the Rectangle Tool (M), create a 15 x 65 mm shape. Fill this new rectangle with white, lower its Opacity to 50% and change the Blending Mode to Overlay, and then place it as shown in the first image.
Switch to the Type Tool (T) and focus on the Character panel. Select the More Sugar font, setting the size to 15 and the tracking to 100.
Add the “TRAVELER.COM” text, rotate it 90 degrees, set the color to white, and place it as shown in the second image.

10. How to Save Your Pamphlet as a PDF Document
Once your bifold pamphlet is ready for print, you might want to export it as a PDF document. To export your pamphlet design, simply go to File > Save a Copy.
Select Adobe PDF from the Save as type dropdown menu, type in a name for your PDF document, and click Save.

Congratulations! Your Pamphlet Design Is Complete!
I hope you’ve enjoyed this tutorial and can apply these techniques in your future pamphlet designs. Don’t hesitate to share your final result in the comments section.
Feel free to adjust the final design and make it your own. You can find some great sources of inspiration at Envato Elements, with interesting pamphlet examples to improve your design.
Now that you know how to make a pamphlet, you might want to test it inside a pamphlet mockup. What is a pamphlet mockup? A pamphlet mockup gives you the possibility to see what your design will actually look after it’s printed.
Placeit comes with a massive collection of pamphlet mockups. With just a few clicks, you can replace those blank pamphlet templates with your design.


Popular Pamphlet Examples From Envato Elements
Envato Elements is an excellent resource for pamphlet designs. Take your time to find the pamphlet format or the pamphlet layout that fits your needs. Here’s a short list of some of the most popular pamphlet examples that you can find:
Travel Bifold Pamphlet (AI, EPS, PDF, PSD)
What is a pamphlet without some nicely structured information? With this pamphlet template, your pamphlet information will be perfectly presented and organized.

Enjoy Travel Agency: Information Pamphlet (AI, EPS, PSD)
Cut the hassle of learning how to create a pamphlet and use this sleek and colorful travel pamphlet for your project.

Minimalist Tour & Travel Pamphlet (AI, PSD, EPS, JPG, PDF)
Don’t have the time to learn how to make a pamphlet? You can always use this clean and bold pamphlet template. This 100% vector design makes it really easy for you to scale or edit the design without losing any quality.

Travel Pamphlet (EPS, AI, JPG)
This creative and minimalist travel pamphlet is ideal for any type of project and can be easily customized with no quality loss.

Travel Design (AI, PSD)
Save the time that you would spend learning how to make a pamphlet and use this fully editable travel pamphlet for your project.

Want to Learn More?
We have loads of tutorials on Envato Tuts+, from beginner to intermediate level. Take a look!
 BrochureHow to Make a BrochureGrace Fussell
 Graphic DesignStandard & International Brochure Formats and DimensionsLaura Keung
 Affinity PublisherHow to Make a Tear-Off Flyer Template in Affinity Publisher (Free Flyer File to Download)Grace Fussell
 BrochureHow to Make a Trifold Brochure Pamphlet TemplateLaura Keung
 BrochureHow to Make a Tri-Fold Brochure Template in PhotoshopAbbey Esparza
 Affinity PublisherHow to Create a Tri-Fold Brochure in Affinity Publisher (Free Brochure File)Grace Fussell
 BrochureHow to Create a Product Brochure Template in Adobe InDesignGrace Fussell
 BrochureHow to Create a Science Brochure Template in Adobe InDesignGrace Fussell
 BrochureHow to Make a Business Brochure in InDesignGrace Fussell
 InDesign TemplatesHow to Make a Booklet in InDesignLaura Keung
{excerpt}
Read More
41 Best Sticker Mockup Templates (For Cars, Windows, Laptops, and More!)
Want to know how to make a sticker mockup? Check out Placeit’s sticker mockup generator.

Placeit offers a range of sticker mockup templates that you can customise in a matter of minutes. Let me show you how easy it is.
How to Make a Sticker Mockup Quickly & Easily
1. Go to Placeit.net, and Search for Sticker Mockups

Review the sticker mockup templates available.

2. Select a Sticker Mockup

3. Upload Your Design

4. Change the Stroke Colour (Colour Around Image)

5. Download Your Design for a Small Fee

And that’s how to make a sticker mockup in five easy steps. Now let’s take a look at the 41 best sticker mockup templates to be found at Placeit.

41 Best Sticker Mockup Templates
Laptop Sticker Mockup Templates

What’s great about this laptop sticker mockup is that you can not only upload the sticker design of your choice, but also add to the open laptop screens any website screenshot or image of your choice. Give this mockup a try today!
Round Sticker Mockup Templates

If you’re looking specifically for a round sticker mockup, Placeit’s got plenty for you, like this MacBook sticker mockup. Just use the online mockup generator to upload your design, and your mockup is ready to download.
Hand Holding Sticker Mockup

How about this hand holding sticker mockup? It’s a great way to focus attention on your sticker design, and of course it’s super easy to customise.
Round Sticker Mockup Template

Looking for a MacBook sticker mockup for your latest design? Here’s a super mockup template that’ll do the job. Upload your image and see how it looks on this terrific mockup.
Bumper Sticker Mockup

Bumper stickers can show your funny, political, and/or philosophical side. But before you head to the printers to get yours made up, why not try your design first to see if it works, by adding it to this bumper sticker mockup?
Rectangle Sticker Mockup

Laptop sticker mockups don’t just have to go on the cover of your laptop—they can also go on the wrist rests, as you can see here. So if you’re looking for a rectangle sticker mockup for laptops, this might be a great choice for you.
Sticker on Wall Mockup

Have you created a sticker for a wall and want to get an idea of how it’ll look? Then try out this “sticker on wall” mockup. It’s actually on a phone booth, but the principle is the same, isn’t it?
Laptop Sticker Mockup

Why reinvent the wheel by making your own template when you can use a Placeit laptop sticker mockup like this one? Think of how much time you’ll free up to focus on design.
Round Sticker Mockup

Round stickers can be placed just about anywhere. See how yours would look when added to this sticker on wall mockup.
iPhone Custom Sticker Mockup With Makeup

Create your own fashion brand stickers and use this iPhone custom sticker mockup to test how they’d look. It’s free to experiment on Placeit, so jump in and test your design on as many mockups as you care to.
iPhone Custom Sticker Mockup With Film Camera

If you like the layout above but are interested in different themes, try this custom sticker mockup, which replaces makeup and brushes with camera and film.
iPhone Sticker Mockup Template With Polaroid

And here’s yet another variation. This one goes old school as well, but replaces the film camera with a polaroid. If none of these props quite checks the right box, there are plenty of other variations on the theme that you can check out over at Placeit.
Sticker Mockup

How about adding your sticker design to a mug? This real-life custom sticker mockup gives centre stage to your sticker so that all eyes will be on it. Give this mockup a try today!
Circle Sticker Mockup

Simple and direct, this laptop sticker mockup is for those who want to show their sticker designs in a photorealistic setting, but one without too many bells and whistles.
Rectangle Sticker Mockup

What’s great about the placement of this rectangle sticker mockup is that people will only see it when you are carrying your skateboard. If you like that idea, give this mockup a trial run.
Sticker on Wall Mockup

Here’s another example of the terrific circle sticker mockups that you can use to showcase your work. This one is on the side of a parking meter machine and can be used for all sorts of projects.
Rectangle Sticker Mockup

This sticker on the wall mockup may be simple, but that’s a good thing as it allows your design to shine while giving you an idea of how it would look in a real-life scenario.
Bumper Sticker Mockup

If your design is small enough to fit only in one area of your car’s bumper, then this bumper sticker mockup may be perfect for you.
Custom Sticker Mockup

See how your latest design would look on this iPhone 11 Pro custom sticker mockup. If you don’t like this particular mockup, there are other iPhone-inspired mockups at Placeit that you can try out.
Window Sticker Mockup

The design possibilities are endless when it comes to designing stickers for cars. So why not have an endless supply of top-notch bumper and window sticker mockups, like this one from Placeit? Having professional mockups at your fingertips has never been easier.
Round Sticker Mockup

This is simple and lyrical image offers a lovely interplay of the street pole with the yellow line street marking. An excellent real-life context for your circle sticker. Try it out today!
Custom Sticker Mockup

If you prefer a sticker mockup with more of a cityscape background, then you may prefer this one.
Laptop Sticker Mockup

Bring your ideas to life with this terrific MacBook sticker mockup. Just use the online mockup generator to add your design, and download your mockup in a matter of seconds.
Rectangle Sticker Mockup

Skateboarders will love this fabulous rectangle sticker mockup, which features a shot of a skateboard and a skateboarder’s worn shoes. A great context for the sticker, which holds pride of place front and centre of the mockup.
Circle Sticker Mockup

Here’s another gorgeous circle sticker mockup, this time featuring the sticker on a door. Upload your image and see how it looks on this simple but effective mockup.
Bumper Sticker Mockup Templates

Here’s another bumper sticker mockup that may work for those who have created small to medium stickers they want to showcase.
Sticker Mockup Templates

This iPhone sticker mockup keeps all eyes on your design. A great mockup to use if you want to show clients and customers how your stickers would look in a real-life context.
Packaging Sticker Mockup Templates

If you love the vintage look of stickers on old valises, then you’ll love this sticker mockup which features a large area for you to add your own unique designs.
Packaging Sticker Mockup

Here’s another take on the sticker mockup above. This one ramps up the vintage look by including a film camera and a fedora as props. Take your pick of this one or the one above, or try both to see which appeals most.
MacBook Sticker Mockup

Wow your clients and customers with this eye-catching mockup which features an opened laptop in a cafe next to a teacup. With such a gorgeous setting, your sticker can’t help but shine.
Sticker on Wall Mockup

Not the most exciting of sticker mockups, but it certainly gets the job done. If you’re looking for a rectangle sticker mockup in an outdoor setting, this might be it.
Bumper Sticker Mockup

Here’s another option of bumper stickers for you. Use the sticker mockup generator to upload your image, and see how your design would look in a real-life context.
Circle Sticker Mockup

This one is the perfect size and shape for ‘I Voted’ stickers, but it’s also a good mockup for many other designs and slogans. Use this one to showcase your favourite design.
Circle Sticker Mockup

Never has creating a professional mockup been so easy. With Placeit’s wide range of mockups and the easy-to-use mockup generator, you can see your sticker design in many different contexts in a matter of seconds.
Round Sticker Mockup

If you like the sticker mockup above but want more control over your background image, this mockup allows you to change the background colour to any you choose. In addition, you can leave it transparent if you want to easily integrate the mockup into the background of your choice.
Circle Sticker Mockup

Here’s another variation on the “sticker on clothing” theme that you should consider. In this one, the model has removed his jacket for a more business casual look, so the sticker is on his shirt. Like the sticker mockup above, you can also change the background colour of this mockup or make it transparent.
Mobile Phone Sticker Mockup

This is an excellent mobile phone sticker mockup for showcasing your sticker design. Just use the “Insert Image” button to upload your design, and your mockup is ready to use.
Laptop Sticker Mockup

This cool flatlay is a great way to display your stickers on a laptop. So if you’re in need of a laptop sticker mockup, give this one a try, and let us know what you think in the comments below.
MacBook Sticker Mockup

Here’s another variation on the template above. This one has a more formal feel than the other, so if that look matches your sticker design style, this may be a better choice for you.
Custom Sticker Mockup

Such a comforting scene deserves just the right sticker. Use this sticker mockup to showcase your favourite design. If you love it, chances are your customers will too.
Custom Sticker Mockup

This mug sticker mockup is ideal if your target audience is school or university students, since that’s the demographic the photo suggests. The best way to know if your image will work, however, is to upload it. So jump in and get started today.
Make Your Own Sticker Mockup Today
Now you know where to find the best sticker mockups on the internet and how to make a sticker mockup in a matter of seconds. Head on over to Placeit and create your own mockup today.
And if you’re interested in other designs and cool mockups, check out these roundups of the best resources available at Placeit:
 Mockups29 Best Phone Case Mockups (Using a Generator Without Photoshop!)Nona Blackman
 Logo Mockups42 Best Logo Mockups (3D, Vector, and PSD)Nona Blackman
 T-Shirt Design25 Best T-Shirt Mockup Videos (+Free Downloads!) Using a Mockup GeneratorNona Blackman
 Poster Mockups42 Best Poster Mockups (Using an Online Mockup Generator)Nona Blackman
 iPhone Mockup30+ Best iPhone 11 & 12 Mockups (Pro & Pro Max)Nona Blackman
 Product Mockup10 Free Mockups Available on Placeit (T-Shirt, iPhone, and More!)Nona Blackman
 Product Mockup30 Best iPad Mockup Templates (PSD & PNG) With Realistic ResultsNona Blackman
-
Mac21 Best MacBook & Laptop Mockup Templates (Including iMac & MacBook Pro PNG Mockups)Nona Blackman
{excerpt}
Read More