Lime is targeting new riders by offering an app-less experience that saves you the hassle of creating an account and setting up a payment method.
Category: Tutorials
Tutorials,freelance,projects,joomla,php,mysql,wordpress,blancer.com
The Morning After: The verdict on the OnePlus 9 Pro
And the big absence of movie theaters this last year.
44 Best Halloween Fonts (Scary, Spooky Styles to Download)
Looking for spooky Halloween fonts to adorn your posters, invitations, signage, and more? We’ve got a collection you won’t be able to resist.

Today we showcase 44 of the best Halloween fonts from Envato Elements and GraphicRiver.
Unlimited Premium Fonts From Envato Elements
Envato Elements offers the best selection of high-quality fonts to help you create outstanding projects. And one of the things that makes Elements hard to beat is that you can download as many as you want, as often as you want, for one flat monthly fee.

One low monthly fee = unlimited access to the best fonts available on the internet today. What’s more, that monthly fee also allows you to access thousands of premium digital assets like logos, graphic templates, mockups, photos, business card templates, and much more.
Let’s take a look at the best Halloween fonts available at Envato Elements.
34 Best Halloween Fonts
Spooky Halloween Font (OTF, TTF, WOTF)

Check out this 3D textured puff-paint-inspired Halloween font. The spooky font is offered in three different styles: regular, outline, and grunge. It’s an excellent display font for titles, signage, and more.
Kookoo: Halloween Movie Font (OTF, TTF, WOTF)

Kookoo is a fabulous Halloween movie font that comes in four styles and offers a bonus of 80 Halloween vectors. A perfect choice for your next Halloween project.
Halloween Letters Font (OTF, TTF, WOTF)

Looking for a cool Halloween letters font for your Halloween poster? How about this terrific font, which pairs two different styles so that you can create visual interest without worrying about clashing styles.
Russely: Creepy Fonts for Halloween (OTF, TTF, WOTF)

This creepy font for Halloween is just what you need to create that Halloween feeling in your next project. The font contains both upper and lowercase characters, numbers, and punctuation. Give it a try today.
Best of Treat Halloween Font (OTF)

Looking for a spooky font for a Halloween project? Check out Best of Treat, a hand-drawn Halloween font that’s perfect for poster design, T-shirts, flyers, signage, and more. The font contains both upper and lowercase characters, numbers, and punctuation.
Nightmare Street: Spooky Letter Font (OTF, TTF, WOTF)

Nightmare Street is a creepy script font inspired by 80s horror films and is a great choice for movie posters, trailers, album covers, books, and Halloween promos. The font includes uppercase and lowercase characters, punctuation, and numerals, and it offers foreign language support as well as a full set of alternatives, underlines, and paint spills.
Melted Monsters Spooky Halloween Font (OTF, TTF, WOTF)

Melted Monsters is a layered font display with a melted style that is hard to resist if you’re looking for the right Halloween fonts for your next project. The font offers uppercase characters only, as well as numbers and punctuation. Download it and see what it can do for your next project!
Cute Halloween Font (OTF, TTF, WOTF)

Sometimes you need a Halloween font that is more cute than it is scary. For those times, there is this silhouette display font with decorative characters. The font includes both upper and lowercase characters, numbers, and punctuation. Wow your audiences with this eye-catching font today.
Happy Halloween Fonts on Cricut (OTF, TTF, WOTF)
Happy Halloween Fonts on Cricut is a great fit for those who use Silhouette Studio, Cricut Design Space, Scan N Cut, and other cutting and design programs. An excellent choice for all your logos, branding, social media, etc.
Happy Halloween Font (OTF, TTF, WOTF)

This stylish display font is an excellent choice for a variety of designs, from product packaging to quotes, labels, photography, watermarks, logos, and branding. Download this gorgeous font and let the creativity flow.
Haluween Scary Font (OTF, TTF)

This set contains two complementary fonts, a regular Haluween font and a Haluween blood font, with 36 ligatures, 36 ligature blood effects, and 17 doodle vectors. Use to enhance your Halloween party invitations, posters, movie titles, book titles, social media, logos, branding, and more.
Wani Sambat: Creepy Script Font (OTF, TTF)

Looking for a creepy script font? Well, Wani Sambat is it. This unique handwritten font is perfect for Halloween flyer designs, T-shirts, invitations, etc. The font includes upper and lowercase characters, numerals, punctuation, multilingual support, and special Halloween dingbats.
Babadook: Creepy Font for Halloween (OTF, TTF)

Babadook is the perfect Halloween font to use for posters, logos, T-shirts, and more. The font offers uppercase characters with numbers, punctuation, alternates, and ligatures.
Halloween Skull: Spooky Writing Font (OTF, TTF)

Halloween Skull is a quirky display font that’s great for posters, signage, titles, T-shirts, and more. The font contains uppercase characters, numbers, and punctuation, as well as special ligatures to help you create your own unique look.
Pumpkin Face: Cute Halloween Font (OTF, TTF, WOTF)

How sweet is this Pumpkin Face font? Handwritten to achieve a unique and engaging look, this font offers two styles: regular and display. Use them together or alone to create your next Halloween-themed project.
Spooky Font (OTF, TTF, WOTF)

Spooky is another Halloween display font with comes with two styles: regular and inline. Download it and use it for any Halloween event and promotion.
Magic House: Happy Halloween Font (OTF, TTF, WOTF)

An excellent hand-crafted Halloween font for child-friendly projects, Magic House includes both upper and lowercase characters, numbers, and punctuation, making it a great choice for a wide range of projects from book titles to movies, posters, and T-shirts.
The Witch: Halloween Movie Font (OTF, TTF, WOTF)

The Witch is a Halloween Movie Font that includes both upper and lowercase characters, numbers, and punctuation, as well as stylistic alternates, stylistic sets and ligatures to help you create one-of-a-kind movie titles, book covers, T-shirt designs, packaging, and more.
Halloween Spooky Letters Font (OTF, TTF, WOTF)

Create your own unique look with Halloween Spooky font, which includes not only the usual upper and lowercase characters, numbers, and punctuation, but also a collection of ligatures which will help you create your own special look.
Black Lagoon: Scary Halloween Font (OTF, TTF, WOTF)

Are you creating a horror film for Halloween and need the perfect scary Halloween font for the title? Check out Black Lagoon. This Halloween font is designed for displays and would look great in a movie title as well as all the other merchandising that goes along with a movie’s release.
Pumkins Cricut Halloween Font (OTF, TTF, WOTF)

Here’s another Cricut Halloween font that fans will love. Pumkins is a fun and bold font suitable for those who use Cricut Design Space, Silhouette Studio, Scan N Cut, and other cutting and design programs. Create your own Halloween product designs, labels, invitations, and more.
Ghostober Halloween Movie Font (OTF, TTF, WOTF)

Ghostober Halloween Movie Font is inspired both by Halloween and spooky art. It contains over 200 glyphs consisting of three layers: regular, inline, and shadow. It’s an excellent choice for any Halloween design project, from movie titles to invitations.
Scary Halloween Font (OTF, TTF, WOTF)

Here’s an excellent scary Halloween font made for you to ramp up the spookiness of your next project. This all-caps font offers characters in two heights, which you can access using the caps lock.
Monster Squad: Cricut Halloween Font (OTF, TTF, WOTF)

How fun is this Cricut Halloween font? A bold and fun font that’s an excellent choice for Cricut Design Space, Silhouette Studio, Scan N Cut, and other cutting and design programs, the set also includes a bonus of five Halloween monster vector objects, absolutely free.
Wombyland Halloween Font (OTF, TTF)

Wombyland is a Halloween font that strikes the perfect balance between quirky and disturbing. Use it for your Halloween invitations, posters, movie titles, and more.
The Graveyard: Creepy Font for Halloween (OTF, TTF, WOTF)

Looking for a creepy font for Halloween? Here it is: The Graveyard, a great choice for Halloween book covers, movies, posters, websites, etc. The font contains upper and lowercase characters, numbers, and punctuation.
Dark Angels: Spooky Letter Font (OTF, TTF, WOTF)

It’s all in the name: Dark Angels. This spooky letter font will increase the sense of foreboding in your Halloween party invitations, movie posters, and book titles. The font contains upper and lowercase characters, numbers, punctuation, and alternates.
Nightmare: Scary Letter Font (OTF, TTF, WOTF)

Looking for a scary letter font for your Halloween-themed poster? Nightmare could be just what you need. This Halloween font is an excellent choice when you want to reinforce the macabre. The font contains upper and lowercase characters, numbers, and punctuation.
Cricut Halloween Font (OTF, TTF)

Cricut Design Space users will love this terrific Halloween font. The font contains upper and lowercase characters, numbers, and punctuation. Download it today and try it out on your Halloween projects.
Jack Reacher: Creepy Fonts for Halloween (OTF, TTF)

This awesome Jack Reacher typeface is the embodiment of Halloween itself. It features tall, bold letters with sharp serif details for more flair and style. Add it to your Halloween posters for more magic!
Halloweb: Happy Halloween Font (OTF, TTF, WOTF)

Halloweb is a gorgeous Halloween display font that comes in regular and display styles. The font contains upper and lowercase characters, numbers, punctuation, and spider web ornamentation.
Stranger Creature: Scary Halloween Font (OTF, TTF, WOTF)

Stranger Creature Scary Halloween Font is perfectly suited to Halloween movie titles, posters, and T-shirts. The font contains upper and lowercase characters, numbers, punctuation, and foreign language support.
Monster Madness: Cute Halloween Font (OTF, TTF)

Looking for a child-friendly Halloween font for a book cover or movie title? How about Monster Madness, a super cute Halloween font that’s a little scary and a lot fun.
Halloween Letters Font (OTF, TTF, WOTF)

This uppercase Halloween letters font offers six different styles. The font has a vintage feel that would suit a wide range of different projects.
More Premium Fonts From GraphicRiver
GraphicRiver is another service that offers thousands of premium fonts, but it works differently from Envato Elements. While Elements is the best source when you want to buy many fonts and other resources, GraphicRiver is better for those who are on a budget and only want to buy one font set at a time.

So if you’re interested in purchasing just one Halloween font instead of experimenting with several, then GraphicRiver may be a better choice for you. You can download a single font for one-time use for a low fee. Let’s take a look at some of the top-quality fonts offered at GraphicRiver.
10 GraphicRiver Fonts
Halloween Secret: Spooky Writing Font (OTF, TTF)

Get your Halloween project designing off to a great start with this fun and spooky writing font. Great for the titles of children’s books, T-shirts, or movie titles.
Halloween Party Scary Font (OTF, TTF)

Planning a Halloween party? Create cool invitations with this horror-inspired font. It contains upper and lowercase characters, numbers, and punctuation in a blocky font with jagged edges that communicate distress. Extra dingbats are included.
Gloomy Halloween Letters Font (OTF, TTF)

Your Halloween projects will be anything but gloomy when you use this Halloween letters font. Add the uppercase characters font to your next project and have fun with it.
Drippy Message: Creepy Script Font (OTF, TTF, WOTF)

Use this font in your Halloween designs, and you’ll send a chill down everyone’s spine. Drippy Message is the kind of creepy script font that will catch everyone’s eye. Use it for movie titles, posters, flyers, and more.
Lost Kingdom: Halloween Movie Font (OTF, TTF, WOTF)

If you want to turn up the creepy factor in your Halloween design a notch, use Lost Kingdom. This Halloween movie font is clear enough to function well as a display font, but spooky enough to foreshadow misadventure.
Halloween Letters Font (OTF, TTF)

Have fun with your Halloween projects when you use this terrific Halloween font. The uppercase character font features a ragged, wood-like design with fun details. Give it a try today.
Creeplens: Halloween Font (OTF, TTF, WOTF)

A creepy Halloween font that includes upper and lowercase characters, numbers, and punctuation, Creeplens is great for Halloween posters, invitations, labels, logos, magazines, books, packaging, books, etc.
Scary Night Halloween Font (OTF, TTF)

Go bold with Scary Night Halloween Font. With its superb set of uppercase characters, numbers, and punctuation, it will make all your text stand out. Use it for your favourite project and wow your viewers.
Zombieland Halloween Font (OTF, TTF)

Zombieland is bound to get you. Download this Halloween font and wow your audiences.
Spooky Fingers Writing Font (OTF, TTF)

Well, you can’t say you haven’t been warned. The hint is in the title, Spooky Fingers, and that’s just what this font reminds one of. Use it to up the ante in your Halloween projects, and give everyone who sees them a chill.
Select Your Favourite Halloween Font Today
How’s that for a collection of spooky Halloween fonts? Head on over to Envato Elements and GraphicRiver today, download your favourite, and get creating.
And if you’re interested in finding other high-quality font designs, check out these resources:
 Fonts30 Horror-Inspired FontsMelody Nieves
 Fonts25+ Best Free Distressed Fonts (& Grunge Fonts)Nona Blackman
 Fonts25+ Best Free Vintage Fonts (Free & Premium to Download!)Nona Blackman
 Fonts34 Best Grotesque Fonts (Typefaces Ready to Download)Daisy Ein
 Fonts30+ Best Fancy Fonts With Decorative Alphabet Letters (2021)Melody Nieves
 Fonts25+ Best Free Gothic Fonts for Fantasy Lettering Art DesignsMelody Nieves
 Fonts29 Best Heavy Metal FontsNona Blackman
 Fonts35 Best Western Fonts (Old Western, Cowboy, and Country Style)Nona Blackman
{excerpt}
Read More
Why Use Flutter to Develop Mobile Apps?
In this article, we'll explore Flutter and look at what makes it a great platform for mobile app development.
{excerpt}
Read More
Why Use Flutter to Develop Mobile Apps?
In this article we'll explore Flutter and look at what makes it a great platform for mobile app development.
{excerpt}
Read More
A to Z of Illustrator: Tips, Tricks, & Hacks!
Get ready for some rapid-fire tips and tricks on how to use Adobe Illustrator! In this tutorial, we’ll take a look at 26 tips, tricks, and hacks, from A to Z.

For all the featured images and resources, check out Envato Elements! With one subscription, you’ll have unlimited access to assets such as graphics, video templates, and fonts. Millions of creative digital assets, with simple commercial licensing, and you can cancel at any time!
What You Will Learn
We’ll be covering many topics in this article on how to use Adobe Illustrator. Here’s a quick sample:
- How to use gradients in Adobe Illustrator
- How to save an Illustrator SVG file
- How to use Illustrator brushes
- How to use different Illustrator effects such as Outer Glow and Feather
Follow along with us over on our Envato Tuts+ YouTube channel:
A is for Actions
Use actions to automate tasks such as resizing, applying effects to an image, and saving files in a desired format. Go to Windows > Actions to access the Actions panel, which will enable you to save and load action files.
Download an action like this one from Envato Elements! Load it up by clicking on the Load Actions button, and then simply hit the play button to apply it to your image or text!

B is for Illustrator Brushes
Brushes in Illustrator let you stylize and change the appearance of paths that you create. You can apply a brush to an existing path, or use the Paintbrush Tool to draw a path and apply the brush stroke at the same time!
The brush types you’ll come across in Illustrator are:
- Calligraphic Brush
- Scatter Brush
- Art Brush
- Bristle Brush
- Pattern Brush

C is for the Crystalize Tool
This fun tool allows you to add random spiked details to the outline of your shapes and objects. To access it, simply click and hold the Width Tool and select the Crystalize Tool at the bottom.
Then use the tool by clicking and dragging over any object to create these cool random spikes around the edges.

D is for Divide Objects
Divide Objects Below is a command that acts like a cookie cutter or stencil. This is done by using a smaller object to cut through a larger object.
Once everything is in position, go to Object > Path > Divide Objects Below to cut and divide the objects successfully!

E is for the Eyedropper Tool
Use the Eyedropper Tool to copy or move appearance attributes, such as color fill and strokes.
Select the Eyedropper Tool from the toolbar on the left or by pressing I on the keyboard. If you want to only copy specific appearance attributes of an object, such as the fill or the stroke, simply go over to the Eyedropper Tool and double-click on it to bring up the Eyedropper Options. This will allow you to customize exactly what appearance attributes the tool picks up.

F is for Feather
This is a stylization effect that creates a soft blur at the edge of an object. Blurring the edges of an image de-emphasizes harsh borders and lets an object better blend in with the background.
To do this, first select an object that you wish to feather. Then click on Effect > Stylise > Feather and remember to check the Preview option to see the changes as you adjust the radius value.

G is for the Gradient Tool
You can create and modify a gradient using the Gradient Tool or the gradient panel. Use the Gradient Tool when you want to apply a gradient directly onto a piece of artwork and see the results in real time.
You can access the Gradient Tool on the toolbar or by pressing G on the keyboard.
Once you have that selected, simply navigate to the object you want to apply a gradient on and click on it. You’ll then see the gradient annotator appear on top of the object. The gradient annotator is a slider that allows you to edit the starting point, the end point, and the color stops.

H is for the Hand Tool
Want to navigate around the artboard more easily, without having to use the bottom and right scrollbars all the time?
Then the Hand Tool is going to be your best friend! This often forgotten tool will help speed up your workflow drastically! You can access it by pressing the letter H on your keyboard, where your cursor will change into the Hand Tool. Now you can just click and drag over your artboard to move around.
If you really want to speed things up, press and hold the spacebar on your keyboard to switch seamlessly between the Hand Tool and any other tool you are using at the time.

I is for Image Trace
Convert a raster image such as a JPG or PNG by selecting your imported image and going to Object > Image Trace > Make, which will convert the image into a black and white vector with the default parameters. We can then choose to expand the image, which will enable us to edit the vector objects as we normally would.

J is for the Join Tool
With this tool, you can connect two ends of a path to create a closed path. This is especially useful when we are cleaning up an illustration.
To select the Join Tool, go to the Tools panel and click and hold on the Pencil Tool to reveal and select the Join Tool. Then with the Join Tool selected, locate the area of the artwork where you would like to clean up, and then click and drag in a scrubbing motion over the two points. When you release the mouse, the two paths will be joined together into a single, complete path, with any excess trimmed off.

K is for the Knife Tool
The Knife Tool is used to cut objects along a freehand path to divide an object into separate components. To access the Knife Tool, click and hold the Eraser Tool and then select the Knife Tool from the options that appear. Then all you need to do is click and drag over an object to cut it.

L is for Live Paint
This tool can be accessed from the panel on the left or by hitting K on your keyboard. Unlike a normal fill, the Live Paint Tool can differentiate between all the different overlapping shapes.

M is for the Magic Wand Tool
This tool lets you select objects of the same color, stroke weight, stroke color, opacity, or blending mode. Simply select it from the toolbar on the left or press Y on your keyboard.
You can also customise the Magic Wand Tool to select objects based on specific attributes such as color, stroke weight, opacity, or blending mode. To do this, double-click on the Magic Wand Tool in the control panel and use the checkboxes here to specify what you are looking for.

N is for the Navigator Panel
Clicking and dragging the Navigator panel thumbnail display can quickly change the view of your artwork. The red box corresponds to the currently viewable area that you can work in.

O is for Outer Glow
This is an effect that adds a blurry glow of any color outside the edges of the object. To do this, select an object and then go to Effect > Stylize > Outer Glow. Here you can choose the color of the glow and also what opacity and how much blur the glow will have.

P is for the Pen Tool
The Pen Tool allows you to draw paths by clicking to make an anchor point, and then clicking again to join them up!
The Pen Tool allows you to create all sorts of shapes. Simply clicking between anchor points creates a straight line, whereas if you click and drag you will create a curve.

Q is for the Lasso Tool Hotkey
Q is for the hotkey Q, which gives us the Lasso Tool! This allows us to select the anchor points of an object by clicking and dragging it around the anchor points that you want to select.

R is for the Rectangle Tool
The Rectangle Tool will enable you to draw rectangles of any size. Simply select the tool from the toolbar or hit M on the keyboard. Then click and drag to create the desired rectangular shape.

S is for Illustrator SVG Files
You can save your artwork from Illustrator into an SVG file by going to File > Save As and then choosing SVG as the file type.

T is for Type on a Path
This allows you to wrap your text around a circle. Hold down the Type Tool, located on the toolbar to the left, and then select the Type on a Path Tool. Then go over and click the edge of the circle to start typing along the path!

U is for Unite
Unite allows you to combine selected objects and shapes together, taking on all the attributes of the overlapping object. You can find unite in the Pathfinder panel. Then select the objects that you want to unite and click on the Unite button to combine them together.

V is for the Vertical Type Tool
This tool allows you to create vertical type and type containers. This can be especially useful if writing out content within a given space in Chinese or Japanese, or creating a sign in a vertical format.

W is for the Warp Tool
You can find this tool in the toolbar on the left by clicking and holding the Width Tool and then choosing the Warp Tool. This allows you to manipulate an object in whatever direction you drag the tool across the object.

X is for the Hotkey X
The hotkey X and Shift-X allow you to toggle between the fill and stroke colors and switch back and forth to them. Use Shift-X to swap between fill and stroke colours, and use the X key to toggle between fill and stroke.

Y is for Control-Y
The hotkey Control-Y allows you to view your artwork so that only the outlines or paths are visible. This removes all the color and effects of your artwork and can drastically increase the performance speed if you find a complex image is slowing down your work.


Z is for Zig Zag
With Illustrator, it’s easy to create a zig-zag line or a curvy wave. Simply select the line you want to apply the effect to, and then go to Effect > Distort and Transform > Zig Zag to bring up the Zig Zag dialogue box.
From here, you can have a play with the options such as the size and the ridges to get the effect that you want.

Ready to Try More Adobe Illustrator Tutorials?
Awesome! So now that we have gone through the A to Z of Adobe Illustrator, why not check out some of our more in-depth Adobe Illustrator tutorials on Envato Tuts+ to really take your skills to the next level.
Whether you’re working on character designs, icons, infographics, or you just want to learn more, Envato Tuts+ has got you covered!
 Illustrator BrushesHow to Install and Use Brushes in Adobe IllustratorMary Winkler
 Character DesignHow to Create a MascotMiss Chatz
 VectorA Comprehensive Guide: Illustrator’s Paintbrush Tool and Brush PanelRyan Putnam
 Adobe IllustratorHow to Create a Pastel Gradient BackgroundAndrei Marius
 Adobe IllustratorHow to Convert EPS to AIJonathan Lam
{excerpt}
Read More
How to Record Your Live Broadcast Video Stream with OBS Studio (Tips and Best Settings)
{excerpt}
Read More
35 Best Company Newsletter Templates (New for 2021)
Release a monthly newsletter in 2021! Explore the list of professional newsletter templates below.
Bringing traffic to your business is a science. So make sure to arm your business with premium resources like newsletter templates.
Easily set up subscribers with exclusive access to company info, industry stats, and more.

35 Best Company Newsletter Templates for 2021
Need quality newsletter examples in 2021? Check out this list of professional newsletter templates from Envato Elements and Envato Market.
Or follow a quick tutorial! Try out this design from instructor Grace Fussell.

Top Newsletter Templates From Envato Elements (2021)
The premium all-you-can-download service Envato Elements is home to hundreds of newsletter templates for InDesign. While I can’t list them all here, I did grab more than 20 options you can start using today!
1. Yellow Company Newsletter Template (INDD, IDML, INDT)
Yellow Company features well-organized layers that make customization easy. Its layout features a nice blend of text and images. The ten pages come in A4 size, and the newsletter template is completely print-ready.

2. Corporate Newsletter Template InDesign (INDD, IDML)
Looking for a clean, professional design? Look no further! This template has ten different layouts that you can mix and match. Not only that—this design is so adaptable and versatile that it could work for a wide variety of projects!

3. InDesign Newsletter Template (INDD, IDML, DOC, DOCX, PAGES)
This design could be adapted to suit nearly any project! Customize the colors and add your own content for a quick and easy, but professionally designed composition. Or use it as a starting point to experiment with and heavily adapt!

4. Corporate Newsletter (INDD, IDML)
Looking for a bold pop of color? This one could be a great fit for the colors you associate with your professional brand. This one’s easy to edit too; change the color theme with just one click! Mix and match the eight different pages to meet your project’s needs.
5. Business Newsletter (INDD, IDML, DOC, DOCX)
Looking for an unusual take on a newsletter? Check out this fun, colorful composition! Making a memorable impression with your visuals can have a lasting impact on your audience. Customize the colors, add your own content, and mix it up!

6. InDesign Newsletter Template (INDD)
Prefer a template with more color? Check this one out! The blue and yellow are generously used on the interior spreads too; take a look! Choose between A4 and US Letter, and then customize the content to meet your project’s goals.

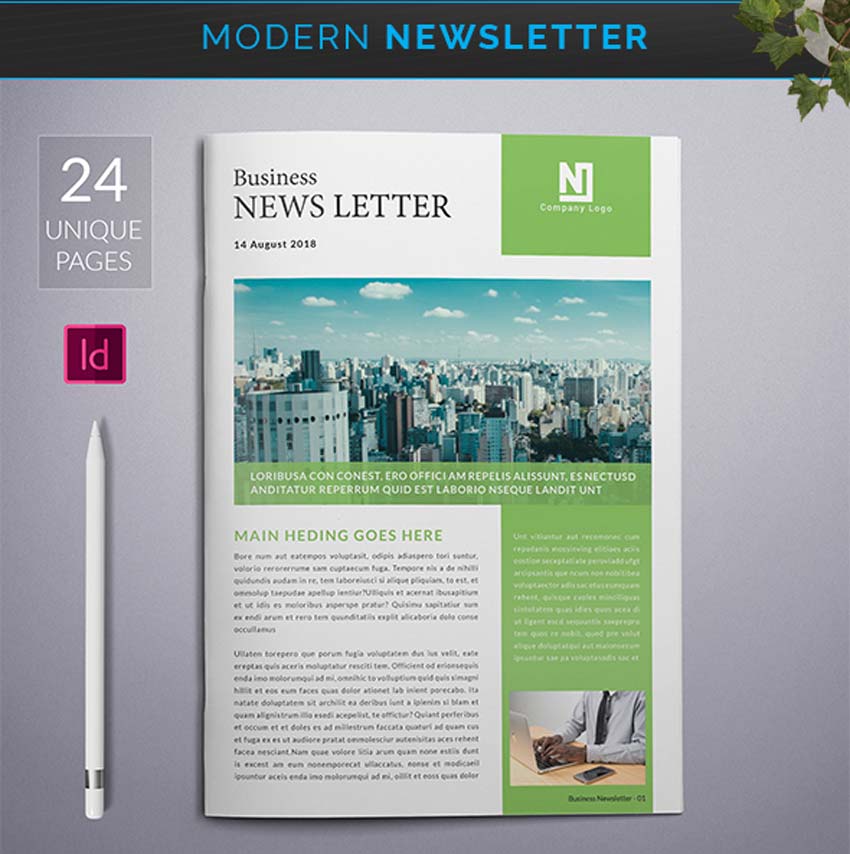
7. Company Newsletter Template (INDD, IDML)
Need a boost for your company? This multipurpose newsletter template will make any high-resolution photography shine. Use a stunning corporate skyline like the one shown below or update it with personal work. Get two colors, master pages, and ten full pages.

8. Multipurpose Newsletter (INDD)
Designing a quality newsletter can be as easy as a few simple clicks. So quickly insert your company logo, tagline, and info into this next multipurpose newsletter template. Get basic help information and industry-standard file formats with this download.

9. Newsletter Design Templates (INDD, IDML, DOCX, DOC, PAGES)
Releasing the latest issue of your work? Consider a professional newsletter template like this one. This template is suitable for just about any project. Use it to offer industry insight to your readers and create a strong brand. Try it for weekly or monthly newsletters.

10. Business Newsletter (INDD)
Feeling a little stage fright? Face your dreams with a powerful newsletter cover. This next business newsletter can be quickly updated with shots from your latest photo shoot. Complete the design with helpful tips or important headlines. Add it to your collection.

11. Newsletter Template (INDD)
Only free fonts were used in the making of this next newsletter template. Inspired by the classic styles of newspapers, this template is clean and multipurpose. It features 12 unique pages and a grid column-based layout. It’s a smart find for any business owner.

12. Clean Minimal Business Newsletter Template (INDD, IDML, INDT)
Have thoughts on the latest market conditions? Share your opinions with this stylish business newsletter template. Very easy to use and customize, this template comes with well-layered files and fully editable groups. A PDF preview is also included for style inspiration.

13. Business Newsletter (INDD)
Get your business started on the right foot. Set up an effective monthly newsletter with this next corporate template. It features eight unique layouts, editable smart objects, and free photos, so all you’ll need to do is add your own pictures. Grab it today!

14. Business Newsletter Template (INDD, IDML, DOCX)
Share your news with the world. This business newsletter features a lovely, customizable color scheme. You can alter the colors to fit your style or modify additional details like company stats and photos. Just add your logo to begin!

15. Multipurpose Newsletter (INDD, IDML)
Compatible with Adobe InDesign CS4 and above, this multipurpose newsletter may help you close more deals. Replace the headlines within the editable smart objects and adjust the colors to your liking. Explore various photos and effects to create a bold new brand.

16. Business Newsletter Brochure Template (INDD)
Take your marketing promotions to the next level with this modern business newsletter. This newsletter example is efficiently designed with reassuring colors. It offers a clean and minimal take on newsletter design and will definitely impress clients. Let us know how it works for you.

17. Law Firm Newsletter (INDD, IDML)
Are you the owner of a law firm? Keep your colleagues and associates up to date with the latest facts and industry finds. This newsletter template is great for students and law businesses. Modify the style to fit your firm using Adobe InDesign.

18. Student Newsletter Template (INDD, IDML, PSD)
When are the next bake sales or homecoming events? Share your school’s important event dates with this sleek and helpful student newsletter. This template features strong typography and ample room for images. Just update it with photos of your classmates or teachers.

19. Multipurpose Newsletter (INDD, IDML)
This next multipurpose newsletter is useful across many industries. Try it out for corporate events or as an employee newsletter. This download features high-quality files with 14 pages, free fonts, and print-ready formats. Add it to your collection soon!

20. Monthly Newsletter (INDD, IDML)
So what will be your news for the month? Celebrate local causes, community events and so much more with this next monthly newsletter template. Created for Adobe InDesign CS4 and above, this template features a nice grid-column layout and easy-to-navigate files.

21. InDesign Newsletter Template (INDD, IDML)
This final newsletter template comes from designer Squirrel92. Just in case you’re new to InDesign, it includes a helpful start guide to lead you to the best result. Try this template out for weekly, monthly, or seasonal newsletters. Check it out!

22. Multipurpose Newsletter Template Design (INDD, IDML)
Are you making a newsletter for your nonprofit, creative agency, or local business association? Whatever your needs, this multipurpose template design can meet them with ease. There are 12 auto-numbering pages in this download. With a single click, you can change the colors to match your brand.

Top Modern Newsletter Templates From GraphicRiver for 2021
GraphicRiver from Envato Market lets you make a single purchase for the assets you need. Here are some of the top newsletter templates available on the pay-as-you-go service in 2021.
1. Template Newsletter (INDD)
Add a little warmth to an old template. Not many newsletter examples offer a wide variety of color choices, but this charming template from designer Zumanuruzzal creates a new twist on a classic look. Switch out the cover photo for one of your own to get started.

2. Newsletter Design (INDD, AI, EPS)
Still undecided? Multipurpose newsletter templates like this one offer you a straightforward way of promoting your brand. This next template is compatible with Adobe InDesign versions CS5 and above. It’s fully customizable and a great starter design.

3. Modern InDesign Newsletter Template (INDD)
Do you prefer Adobe InDesign templates? Get an extraordinary newsletter template for your business for just under $20. This next design features fresh and minimal colors. You’ll get three color versions along with 24 pages for all your best news.
4. Business Newsletter (INDD, IDML)
Businesses need customers. So make sure they stay with a brilliant business newsletter. This sleek and professional design features a basic setup that will fit most corporate industries. Use it for employee information, company news, and more.

5. Newsletter Design (INDD, IDML)
Many corporate newsletters sport a calming blue color for their main theme. You can enjoy this wonderful design too with this fully editable newsletter template from OrcShape. Featuring one Adobe InDesign file, this download comes with a standard newsletter design for news, tips, and behind-the-scenes information.

6. Business Newsletter (INDD)
Stay business smart with this next newsletter template. Perfect for small business owners and students, this Adobe InDesign template is fully editable and well organized. Get access to eight pages, automatic page numbers, and a solid corporate appearance.

7. Weekly Newsletter Template (INDD)
Interested in going weekly? Create an awesome newsletter everyone will want to subscribe to. This clean and minimal layout will help welcome you to the business world. Use it for school and work scenarios or for personal projects.

8. Monthly Newsletter Template (INDD)
One of the most proven methods for retaining your audience is offering a monthly newsletter. This brilliant template is sleek and original. It features four professionally made pages with print-ready elements. Just adjust the colors and fonts to fit your needs.

9. Weekly Newsletter Template (INDD)
Simple designs go a long way, and this minimal weekly newsletter template has just enough room for your upcoming events. It was created in A4 and US Letter sizes and is fully customizable. Easily change the colors using the color swatch options within InDesign.

10. Damelan Newsletter Template (INDD)
Will you star in the next big headline? Make an impression with the extraordinary Damelan template. This newsletter design features ample space for hi-res photography, along with 12 unique pages and fully customizable layers. Try it out for just $11.

11. Damelan Newsletter Vol.01 (INDD)
Multipurpose newsletter templates just offer more variety. Check out the superb Damelan newsletter, for instance. This high-resolution layout includes 12 pages developed for A4 and US Letter pages. A standard bleed is applied, and it’s fully editable.

12. Multipurpose Newsletter Template (INDD)
Design doesn’t have to be hard. So save countless hours with this modern newsletter template. This multipurpose resource is super helpful and packed with great features. It comes with ten custom pages, master pages, and smart object placeholders.

13. Monthly Newsletter Template (INDD)
Need something clean and multipurpose? Then check out this next modern newsletter. Created for Adobe InDesign CS6 and above, this template offers a smart way to combat sales drought. Pair it with exclusive perks and upcoming sales.

More Newsletter Inspiration
The best newsletter templates are the ones that inspire you with incredible stories and ideas. So hit the pavement running with a stunning newsletter design. Bookmark this list for more information and tell us your favorites below!
Learn more about InDesign newsletter templates. Check out these links:
 Adobe InDesign9 Top Tips for Making Creative InDesign TemplatesLaura Keung
 Newsletter TemplatesHow to Create a Monthly Newsletter Template in InDesignLaura Keung
 Adobe InDesignHow to Create a Real Estate Newsletter Template in InDesignGrace Fussell
 Flyers42 Best InDesign Template TutorialsLaura Keung
 Print DesignHow to Change Page Size in InDesignLaura Keung
 Newsletter Templates22 Best Free Newsletter Templates (InDesign, PSD and Word Newsletter Templates)Nona Blackman
 Adobe InDesignHow to Make a Holiday Newsletter TemplateDaisy Ein
 Newsletter Templates32 Best School Newsletter Templates (For Classroom, Preschool, High School)Nona Blackman
This has been a selection of premium resources perfect for the avid designer. For more company newsletter templates, check out Envato Elements and Envato Market. Happy designing!
{excerpt}
Read More
Mastering Calligraphy: Making Your Own Font
In this last “Mastering Calligraphy” lesson, we’re going to apply all that we’ve learned to create our own font. No more following the rules! It’s all up to you! I’ll walk you through the basic questions you need to answer before you start and then show you how to make an alphabet that feels cohesive.
Looking for a ready-made calligraphy font with a fancy alphabet to use in your projects? Look no further than Montheylin. It’s ready to download and is included in your Envato Elements subscription:

Find even more awesome modern calligraphy script fonts from Envato Elements after the tutorial.
Are you ready to dive into this calligraphy writing tutorial? Let’s get started by looking at the necessary supplies.
What You’ll Need

Before learning how to write calligraphy letters for your own alphabet, make sure you have these tools:
- Pencil (optional)
- Eraser (optional)
- Black ink (preferably Speedball or Higgins waterproof ink)
- Practice sheet
- Pen holder (the black part of the pen above)
- Flat tipped pen nib
- Pointed pen nib
1. Choose Your Pen Tip
Before we even begin putting pen to paper, you need to decide what pen type you’d like to use.
Step 1
Test out a phrase using the pointed pen nib.

Step 2
Test out a phrase using the flat-tipped pen nib.

Personally, I’m a big fan of flat-tipped nib lettering because it feels so much more stylish. So that’s what I’m going to use from here on out. It’s up to you which one you’d like to continue with from here on out.
2. Choose Serif or Sans Serif
Okay, now you have your pen tip, and you’re ready to go! We have two more decisions to make before we start making the alphabet. One big dividing factor in fonts is serif vs. sans serif. Serifs are the fancy additions at the tops and bottoms of letters. For example, Times New Roman is a serif font, while Comic Sans is a sans serif font.
Choose whether you’re going to make a serif or sans serif font.

3. Choose Connecting or Not Connecting
All right, we have the pen tip and the type of font decided. The last thing to decide is whether your letters will connect, as they do in cursive letters, or not connect.
Choose whether you’re going to make connecting or not connecting letters.

4. Start on the Lowercase Alphabet
Now it’s time to dive into making your own lowercase alphabet. I’m going to show you how determining what two letters will look like helps you write out the rest. I would recommend using a pencil first to figure out how you want your letters to look.
Step 1
Make your own lowercase letter “e”. I’ve made several below to give you an idea of what sorts of variations there are to choose from.

Step 2
The lowercase letter “e” is very similar to the letters “c”, “o”, “g”, and “d”. Thus, once you have your “e” decided, you can make these other letters because the way you drew the curve of the “e” will match how you draw other curves in the alphabet. Whether the connecting line in the “e” is drawn as a straight line or a curve will determine the straight lines of the rest of the letters. Below I’ve put a few examples showing what letters like the “e” will look like.

Step 3
Make your own lowercase letter “h”. I’ve made several below to give you an idea of what sorts of variations there are to choose from.

Step 4
The lowercase letter “h” is very similar to the letters “b”, “k”, “i”, and “t”. Thus once you have your “h” decided, you can make these other letters because the way you drew the straight line of the “h” will be similar to how you draw the straight line of the others.
Plus, the curve or linear nature of the hump of the “h” will determine how you make the humps and curves of other letters. Below I’ve put a few examples showing what letters like the “h” will look like.

5. Write Out the Full Lowercase Alphabet
Now that you have quite a few of the letters down, it’s time to write out your whole lowercase alphabet! I’ve put two examples below. The first is more curlicue and the second much more like printed text you’d find in an old book.


6. How Fancy?
We’re moving on to creating uppercase letters for your alphabet now, and the big decision you have to make is how fancy do you want it to be?

Do you want it to be simple? Perhaps just larger versions of the lowercase letters?

Or will it have some extra flourishes?

Or will it be full of curlicues?
7. Start on the Uppercase Letters
Step 1
Now that you know how fancy your letters will be, it’s time to start! Just like with the lowercase letters, we’re going to begin with the letter “C” because how you make that letter determines the shape of many more. Below I’ve put a few examples of ways to make a unique capital letter “C”.

Step 2
The uppercase letter “C” is very similar to the letters “A”, “G”, “E”, and “O”. Thus, once you have your “C” decided, you can make these other letters because the way you drew the curve of the “C” will match how you draw other curves in the alphabet. Then the ends of your “C” will determine the ends of your other letters. Below I’ve put a few examples showing what letters like the “C” will look like.

Step 3
Make your own uppercase letter “L”. I’ve made several below to give you an idea of what sorts of variations there are to choose from.

Step 4
The uppercase letter “L” is very similar to the letters “D”, “F”, “H”, and “P”. Thus, once you have your “L” decided, you can make these other letters because the way you drew the straight line of the “L” (such as the angle) will be similar to how you draw the straight line of the others. Plus, the ends of the “L” will determine how you make the ends of other letters. Below I’ve put a few examples showing what letters like the “L” will look like.

8. Write Out the Full Uppercase Alphabet
Now that you have quite a few of the letters down, it’s time to write out your whole uppercase alphabet! I’ve put two examples below. The first is more curlicue, and the second much more like printed text you’d find in an old book.


9. Putting It All Together
Now that you have a whole alphabet of your own creation, let’s put it all together! Write out something meaningful to you, perhaps a poem or an inspirational quote. I wrote mine using two different fonts, just for fun.

Pretty Calligraphy Fonts From Envato Elements
Creating your own pointed pen or straight calligraphy fonts is a bit of a process. If you need a pretty calligraphy font download for your project instead, check out these options from Envato Elements.
1. Tsuchiya Modern Calligraphy Font (OTF, TTF)

Calligraphy as an art form has roots dating back to the Han dynasty, and Tsuchiya updates it for 2021. The stylish glyphs include uppercase and lowercase letters, as well as numbers and symbols. It’s a cool download if you’re looking for pretty calligraphy fonts.
2. Tessla: Lovely Script Font (OTF, TTF)

Tessla is here for fans of calligraphy fonts with flair. Its modern style can be seen in numbers, symbols, and of course uppercase and lowercase letters. There are also some wonderful ligatures in this download. If you like pretty calligraphy fonts with a fancy alphabet, use Tessla.
3. Badegan Calligraphy (OTF, TTF, WOFF, WOFF2, EOT, SVG)

Here’s another pretty calligraphy font that blends traditional and modern design. Badegan features a handmade style that looks great for a variety of uses. This modern calligraphy script font alphabet features more than 370 glyphs, including alternative characters. It also has web font files for online use.
4. Montheylin Calligraphy Font (OTF, TTF, WOFF)
Montheylin is a featured modern calligraphy script font alphabet for a reason. It features beautiful lines in each letter and stunning ligatures. The elegant lettering is available in TrueType and web font types. It’s also one of the many versatile pretty calligraphy fonts on Envato Elements. Use Montheylin’s handwritten style for wedding invitations, book covers, flyers, and more.
5. Designest Calligraphy (OTF, TTF, WOFF, WOFF2)

If you like the look of straight calligraphy fonts, you’ll love Designest. It’s a professionally designed calligraphy font download that’s accessible. The script features alternate glyphs and support for most Western languages. This pointed pen calligraphy font with a fancy alphabet is nice for branding, social media, and other projects.
You’ve Just Made Your Own Font!
Learning how to do calligraphy letters was much easier than you thought, right? Creating your own calligraphy script font alphabet means that you can match your lettering to the content.
If you’re writing a wedding invitation, you’ll want a fancy, curlicue alphabet. If you’re writing invitations to a monster theme party, then an angular, serif font is the best choice. Once you create one alphabet of your own, it’s easy to go through the steps again and make another!
Looking to find more resources about calligraphy fonts? Look no further than these articles from Envato Tuts+.
 Fonts35 Best Calligraphy FontsMelody Nieves
 Fonts25+ Best Free Calligraphy Fonts (Free Downloads)Nona Blackman
 Fonts25+ Best Free Hand-Lettering Style Fonts (Designs for 2021)Melody Nieves
 FontsHow to Choose the Best Wedding Fonts for Invitations and MoreGrace Fussell
 Fonts40+ Best Swash Fonts and Fonts With Tails (Download Now!)Nona Blackman
 Fonts29 Best Japanese Style Fonts (Calligraphy, Tattoo, and More!)Nona Blackman
 Fonts40 Best Blackletter and Gothic Fonts for DesignersGrace Fussell
 Fonts30+ Beautiful Modern Script Fonts (Typefaces for 2021)Melody Nieves
{excerpt}
Read More
Weekly Short Story: Piety
On Monday mornings, I send out a story via email: ultra-brief tales of 1,000 words or more, usually in genres including science fiction, horror, and the supernatural. Those stories collectively are called Once Upon A Time. I’ve also published three ebooks and one paperback anthology of those stories so far.
I’d love to have you as a subscriber to the weekly free story. You can subscribe via email here, or use the form below. Unsubscribe any time, from the link in every issue.
TikTok bans some Myanmar accounts to limit the reach of violent videos
TikTok is banning accounts from Myanmar that post violent videos, but it comes long after other sites took action.
Donald Trump plans to launch a social network in ‘two to three months’
A Donald Trump aide says the former President will launch a social network in two to three months, although it may have trouble getting the tech partners it needs.
Apple to pay $308.5 million for allegedly violating a DRM patent
Apple has been ordered to pay $308.5 million in a lawsuit alleging that the copyright protection in the App Store and Music violates PMC’s patents.
Coinbase fined $6.5 million over cryptocurrency trading claims
Regulators have fined Coinbase $6.5 million for allegedly misleading cryptocurrency buyers about trading volumes.
Apple fined $2 million in Brazil for selling iPhone 12 without a charger
Brazil has fined Apple nearly $2 million for selling the iPhone 12 and other models in the country without including a charger.