{excerpt}
Read More
Category: Tutorials
Tutorials,freelance,projects,joomla,php,mysql,wordpress,blancer.com
Online advertisers take on Google with their own third-party cookie alternative
Online advertisers have come up with their own ad tracking alternative to Google’s FLoC.
Another state has failed in its attempt at app store reform
Arizona’s app store competition bill has failed after the state Senate pulled the measure.
Porsche will offer Android Auto in new cars beginning with 2022 models
Porsche is finally offering Android Auto with new cars, starting with 2022 models like the refreshed 911.
Facebook makes it easier for users to see News Feed stories in chronological order
Facebook is rolling out a News Feed update that lets you switch off algorithmically-ranked posts in favor of a chronological timeline.
Niantic’s new 5G game demo highlights the future of AR gaming
Niantic has unveiled a new multiplayer AR demo game that it says can handle up to ten times more simultaneous players on 5G.
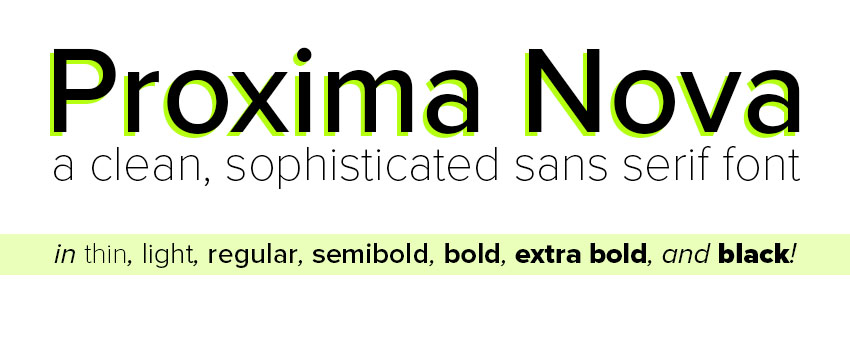
20 Fonts Similar to Proxima Nova (Alternatives to Download)
Love sans serif fonts, but you’d prefer a Proxima Nova alternative? Fonts similar to Proxima Nova share its sleek, stylish, modern look. In this article, we’ll take a look at the aesthetic of the Proxima Nova font and why it’s so successful. We’ll also take a look at some fonts like Proxima Nova that you can download now.

Looking at the Proxima Nova Font
So, what font is similar to Proxima Nova and what makes the aesthetic so attractive? Proxima Nova is a modern sans serif font designed in the mid-2000s. It has visible geometric influences, but isn’t an entirely geometric font. There’s some influence there that also looks far more humanist.
Overall, it has a neutrality that makes it very versatile in many design situations. It works well on its own and easily pairs with other fonts too.
For example, Proxima Nova bold is an excellent choice for points of emphasis. This font often includes weights of extra bold and black too.
You can also find Proxima Nova condensed, thin, and light. Use it for headlines, use it for body copy. This font family can prove to be a staple font in your font library; it’s that versatile. We also clearly see this aesthetic and influence in many other modern sans serif fonts.

When figuring out what font is similar to Proxima Nova, keep an eye out for modern sans serif qualities.
A similar font to Proxima Nova would likely have some qualities of a grotesque sans serif font, but some geometric influence too. This aesthetic is somewhere in between: not entirely geometric, but with some geometric influence.

Fonts Similar to Proxima Nova
Here are some stylish choices for a similar font to Proxima Nova. Some of them are a closer Proxima Nova lookalike, while others put a different spin on this modern aesthetic.
1. Maximus Sans: A Geometric Sans Family of 8 Fonts

Check out this beautiful sans serif font. While it’s not necessarily a direct Proxima Nova lookalike, it shares many qualities. This font family also includes a variety of different weights to experiment with.
2. Fresh Start Geometric Sans Serif Font + Web Fonts

If you’re looking for a clean sans serif font with plenty of versatility, give this one a shot. It includes three variations and looks great at a variety of sizes.
3. Albori Sans-Serif

There’s something so elegant about a modern sans serif set on photography, isn’t there? This beautifully designed sans serif font is no exception.
4. Hubhead Geometric Sans-Serif Font

Check out this stylish sans serif font. There’s some interesting variation in the strokes here. Take a look at the lower case “d”, for example. This one could be great for headlines.
5. Pulse: A Modern Sans-Serif Typeface

This is a clean, sleek font family with plenty of possibilities. There are five weights included, with matching italics. If you’re looking for a solid, all-around font, give this one a look.
6. Mriya Grotesk: Premium Sans-Serif Typeface

This font clearly takes more influence from grotesque sans serif fonts, and it makes for a really stylish look. Try this font family out in your next design project.
7. Ace Sans Modern Sans Serif Font

Isn’t this font family stylish? It has an impressive eight different weights included, so it’s a perfect fit for a number of different design projects and situations.
8. Gorga Grotesque Sans Serif Font

Here’s another stylish sans serif that openly takes inspiration from the grotesque type classification, but we still see some geometric influence in there too.
9. Daaron Sans Serif Font Family

There’s a really interesting length and curvature to this font family. Try this out in regular, bold, and round. This modern font family has a lot of potential.
10. Treyton Sans Serif Font Family

Here’s a minimalist, clean, modern sans serif font family that’s worth checking out. Try out the included seven weights in your next composition.
11. GROTESKA: Minimal & Modern Sans-Serif Typeface

Check out the shapes in this beautifully designed font family. There are some geometric and humanist vibes mixed together here. It’s a trait often seen in modern sans serifs.
12. Valued: A Deluxe Sans Serif Family

There’s something so stylish and timeless about a well-designed, modern sans serif font. Try this out in light or outline; it has some really interesting variants.
13. METZLER Minimal Sans-Serif Typeface + Web Font

Looking for a sleek, minimal font family with web fonts included? Then you should give this sans serif font a look. It’s stylish, and it’s ready for your website.
14. HEXA Modern Display Typeface

There’s a really memorable, condensed quality to this modern sans serif font. It’s a great fit for display type. Try this one out at larger sizes.
15. HERZ: Simple Sans Serif Typeface

Want to keep things simple? Then this might be the perfect font for you. This family includes three weights and web font files, and it’s got a beautifully neutral aesthetic.
16. Obadiah Pro: Modern Typeface + WebFont

This is such a stylish font. It’s got that clean sans serif look, but adds some unexpected elements that make it an excellent choice for points of interest.
17. Fonzy Sans Serif Minimal Font Pack

Here’s a minimal font family that has some really interesting variations. You get your expected weights, like thin and bold, but this one also includes an outlined version.
18. Procyon: Modern Typeface + WebFont

Clean, simple, and minimalist: that sums this font up well. It’s got a touch of geometry, but some of the strokes have a touch of contrast. Give this modern font a try today.
19. Colorado: Modern Typeface + WebFont

If you like a condensed look, this font might be just what you’re looking for. It also has a touch of a blocky vibe. It helps craft a really memorable aesthetic here.
20. Xaviera: Modern Typeface + WebFonts

This font has the potential to be a go-to choice in your font library. It’s beautifully minimalist and would pair well with a number of other fonts.
Looking for the Perfect Proxima Nova Font Pairing?
If you need a strong Proxima Nova font pairing, consider a font that will contrast with the clean look of fonts like Proxima Nova.
For example, Proxima Nova condensed (or a similar Proxima Nova alternative) could pair quite nicely with a decorative script font. The two would contrast. A similar premise could apply to fonts like Proxima Nova bold, regular, and other weights.

Check out these font collections for fonts that would pair well with modern sans serifs. There are script fonts, calligraphy fonts, serifs, and more to choose from. Given the neutrality of a modern sans serif, you have so many options.
 Fonts34 Best Slab Serif Fonts (Ready to Download Now)Daisy Ein
 Fonts30+ Beautiful Modern Script Fonts (Typefaces for 2021)Melody Nieves
 Fonts20+ Best Free Elegant Fonts (Stylish Fonts to Download)Nona Blackman
 Fonts35 Best Handwriting Fonts (Fonts That Look Like Handwriting)Nona Blackman
 FontsFonts Similar to Trajan You Can Use in Your DesignsGrace Fussell
Want to Learn More About Typography?
Typography is such a fun subject. Push your typography knowledge further with these free tutorials from Envato Tuts+. Whether you’re an absolute beginner or a seasoned designer, there’s plenty to see.
 TypographyThe Ultimate Guide to Basic TypographyLaura Keung
 Logo DesignTypography in Action: Design Simple & Effective Type LogosGrace Fussell
 FontsWhat Fonts Are Trending Now and Font Trends for 2021Grace Fussell
 Web TypographyWhat Your Web Typography Says About YouJoanna Ngai
 FontsA Brief History of Display FontsLaura Keung
Which Modern Sans Serif Fonts Are Your Favorites?
So, which modern sans serif fonts are your favorites? There are so many stylish designs out there to choose from, it can be hard to pick just one.
If you love fonts, check out Envato Elements. One low fee gets you access to a library of thousands of fonts. Download as many as you like, without limits. In fact, you get more than just fonts. This also includes stock photos, graphics, templates, and a lot more. Sign up for Envato Elements today.
Looking for even more font inspiration? There are plenty more stylish sans serif fonts out there to see. Check out these font collections today.


{excerpt}
Read More
50 Top Video Project Templates for Final Cut Pro X in 2021
{excerpt}
Read More
How to Create a Gold Foil Logo Mockup in Adobe Photoshop

Learn the process to build a photorealistic logo presentation mockup, from the right perspective to multiple layer styles. And you’ll get a final bonus tip about how to get a trendy rose gold logo! In this tutorial, I will guide you through the steps to create a photorealistic gold foil mockup with Adobe Photoshop.
We’ll use a vector badge for the purpose, so you also need to have Adobe Illustrator installed on your computer.
But first, do you need to design a logo texture in Photoshop? Check out this simple, easy-to-use online logo maker. Hundreds of smart logo templates to design your custom logo, all in one place, from Placeit.
If you’re looking for a professional logo mockup PSD, why not try this photorealistic logo type mockup, available on Envato Elements.

Follow along with us over on our Envato Tuts+ YouTube channel:
Tutorial Assets
The following assets were used during the production of this tutorial to create gold foil text in Photoshop:
If you’re looking for some alternative fonts to use, check out this list of fonts that are best suited for logo design:
1. How to Prepare the Paper Texture
Step 1
Download the paper texture and open it with Photoshop.
In the top menu, choose Layer > New > Layer From Background. Type the name “Paper Texture” and press OK.

Step 2
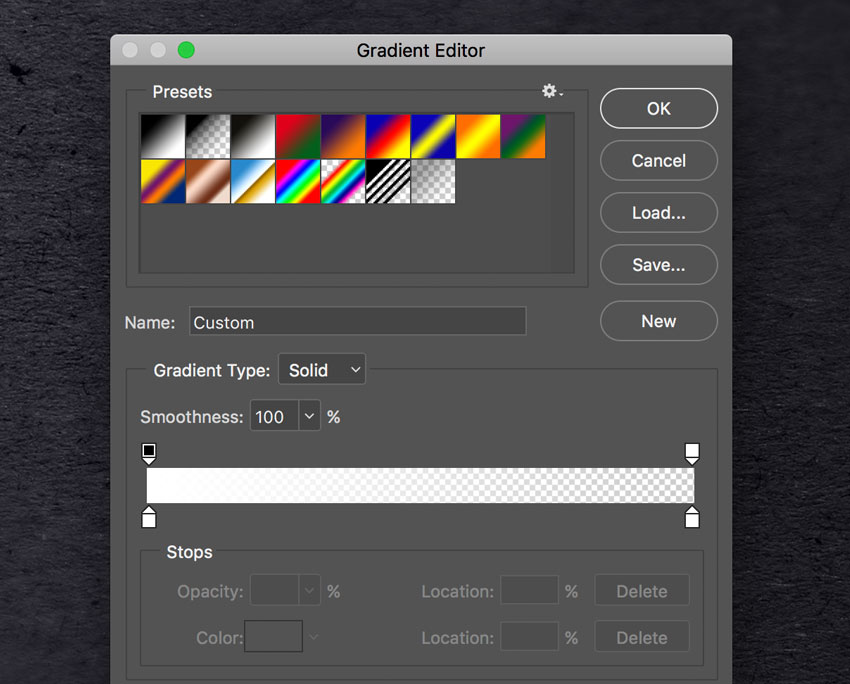
Open the Layer Style panel for the “Paper Texture” layer you just created and add a new Gradient Overlay effect. Set the options as shown in the image below:

Click on the small gradient window to edit the gradient. Set the color for the two color stops to white, and set the left opacity stop to 100% and the right to 0%.
2. How to Prepare the Smart Object
Step 1
Download the Perspective Image and open it with Photoshop.

Choose, in the top menu, Select > All, and then choose Edit > Copy to copy the selection to the clipboard.
Go back to the paper texture document and choose, in the top menu, Edit > Paste to paste the perspective image over the paper texture.
Rename the layer by double-clicking directly on the layer’s name in the Layers panel and changing it to “Perspective“.
Step 2
Set the foreground color to blue (any color other than black is good).
Then choose the Rectangle Tool, move the cursor over the canvas, and click. You’ll open a small dialog box that allows you to enter precise dimensions for your new shape. Type 1099 x 791 px and click OK.
Rename the layer by double-clicking directly on the layer’s name in the Layers panel and changing it to “Smart Object“.
With the layer “Smart Object” selected, choose, in the top menu, Layer > Smart Object > Convert to Smart Object.
Now you should have a rectangle (no matter the color) over the perspective image:

What we’re going to do now is distort the blue rectangle to fit the same shape of the black perspective rectangle.
Step 3
Choose Edit > Transform > Scale.
In this step it’s extremely important that we transform the blue rectangle using only the handles at the corners of the bounding box.
Move the mouse cursor over the handle on the top right corner, press and hold the Command button on your keyboard (the cursor will change to a small white arrow), and then click and drag the handle until you touch the top-right corner of the black perspective square with your mouse cursor:

Keep dragging the handles to cover the whole black area with the blue rectangle:

Now you can remove the “Perspective” layer by selecting it in the Layers panel and choosing Layer > Delete > Layer.
3. How to Arrange the Badge With Illustrator
We need a logo or badge to complete the scene. This badge will be a prominent element that later will be stamped on the paper texture.
Fortunately, Envato Elements offers a wide range of high-quality badges and vector elements ready for use. Subscribe to unlock unlimited, high-quality badges, templates, photos and more for one monthly fee!
In this tutorial, we’ll use a badge that comes from a great collection of 30 Vintage Style Badges and Logos:

Step 1
Open the vector .ai file with Adobe Illustrator. While you open the file, a window may pop up alerting you that the document uses fonts that are currently not available on your computer. No worries about that—all the fonts are free for use, and you can find a text file inside the folder with all the references and links to download each font.

For the purpose of this tutorial, I replaced the commercial fonts used in this badge with two free fonts:
Step 2
Once you’re done with fonts, choose the Selection Tool (V).

Now select the “Organic” badge (or whatever badge you like). Copy the badge by going to Edit > Copy or pressing Command-C.
Create a new 350 x 350 px document in Adobe Illustrator. Now paste the badge you just copied by choosing Edit > Paste or pressing Command-V.
Step 3
With the Selection Tool (V), move the badge over the grey area, out of the white canvas.

If the badge is not selected, select it by clicking on it using the Selection Tool (V).
In the top menu, choose Object > Expand Appearance. Again, choose Object > Expand. A dialog window will appear; select Object and Fill and press OK:

Step 4
Locate the Pathfinder panel. If you can’t see the panel, open it by choosing Window > Pathfinder. Click on the Trim button.

Step 5
To remove the white areas, choose the Magic Wand Tool:

Move the cursor over a white area and click to select all the white areas of the badge:

If you need to, magnify the canvas using the Zoom Tool (Z).
Now that all the white areas of the badge are selected, remove them by choosing, in the top menu, Edit > Cut.
Now the badge is ready to be imported into the Photoshop scene!
4. How to Include the Badge in the Scene
Step 1
We’re still in the Adobe Illustrator workspace. Copy the badge by going to Edit > Copy or pressing Command-C.

Step 2
Go back to Photoshop, select the Smart Object from the Layers panel, and Double-click on the Smart Objects thumbnail.
When you edit a Smart Object, the source content is opened in a new window of Photoshop. Here you can make any changes you like and, once you’re satisfied, all you need to do is save the file and the Photoshop Smart Object will be updated when you return to it.
In the Layers panel, deactivate the visibility for the blue rectangle layer, and paste the badge you just copied by choosing Edit > Paste or pressing Command-V.
From the dialog box, choose Smart Object and press OK.

Locate the top options bar and set the badge’s position to 744 x 536 px and its dimension to 771% for both the Width and Height fields. When you’re done, press Enter on your keyboard:

Step 3
Save the document by choosing File > Save or using the keyboard shortcut Command-S.
Go back to the main document, and you’ll notice that the smart object is now updated with the last changes. The badge, in fact, has taken the perspective of the smart object.

5. How to Add the Gold Foil Effect
It’s time to add some significant effects to the badge to make our 3D logo mockup feel consistent with the scene.
Step 1
Select the “Smart Object” layer and set the Fill to 0%. Duplicate the “Smart Object” three times by going to Layer > New > Layer Via Copy.
Now look at the Layers panel, and you should be in a situation like this:

Rename the layers as shown in the image below, and then group the three effect layers:

From now on, when you need to replace the badge in your smart object, you can use this layer, by clicking on it and editing the content.
Step 2
Let’s start adding some layer styles to the “Effect 1” layer in your gold logo mockup. Open the Layer Style panel and add a new Inner Shadow effect and set it as shown in the image below:

The color for the Blend Mode Color is White #ffffff.
Step 3
Add a new Color Overlay effect to your gold foil mockup and set it as shown in the image below:

The color for the Blend Mode Color is #967a2f.
Step 4
Add a new Gradient Overlay effect in the gold logo PSD and set it as shown in the image below:

Click on the small gradient window to edit the gradient. You’re halfway there in your gold foil text in Photoshop.
Set the first color stop to Location 0% and Color to #343434, and then set the second color stop to Location 45% and Color to #343434.
Set the first opacity stop to Opacity 75% and Location 0%, and then set the second opacity stop to Opacity 0% and Location 45%.

Press OK to confirm and close the Layer Style panel for your gold foil in Photoshop.
Step 5
Now let’s add some layer styles to the “Effect 2” layer. This will help you create a gold letter mockup. Open the Layer Style panel and add a new Gradient Overlay effect and set it as shown in the image below:

Click on the small gradient window to edit the gradient. Here you need to set up seven color stops as follows:
- 1# color stop: Color
#bdbbb6, Location 0% - 2# color stop: Color
#ffffff, Location 18% - 3# color stop: Color
#85816f, Location 33% - 4# color stop: Color
#ffffff, Location 46% - 5# color stop: Color
#716d54, Location 54% - 6# color stop: Color
#ffffff, Location 66% - 7# color stop: Color
#65625a, Location 82%

Step 6
Add a new Drop Shadow effect and set it as shown in the image below:

The color for the Blend Mode Color is White #ffffff.
Press OK to confirm and close the Layer Style panel.
Step 7
Finally, add some layer styles to the “Effect 3” layer in your logo texture in Photoshop.
Open the Layer Style panel and add a new Gradient Overlay effect and set it as shown in the image below:

Click on the small gradient window to edit the gradient. Here you need to set up seven color stops as follows:

Click on the small gradient window to edit the gradient. Here you need to set up seven color stops as follows:
- 1# color stop: Color
#e9e7d9, Location 0% - 2# color stop: Color
#fffdf0, Location 20% - 3# color stop: Color
#8e8366, Location 61% - 4# color stop: Color
#9e9475, Location 67% - 5# color stop: Color
#cec7b2, Location 78% - 6# color stop: Color
#69604c, Location 95%
Step 8
Add a new Drop Shadow effect in the 3D logo mockup and set it as shown in the image below:

The color for the Blend Mode Color is Black #000000.
Press OK to confirm and close the Layer Style panel.
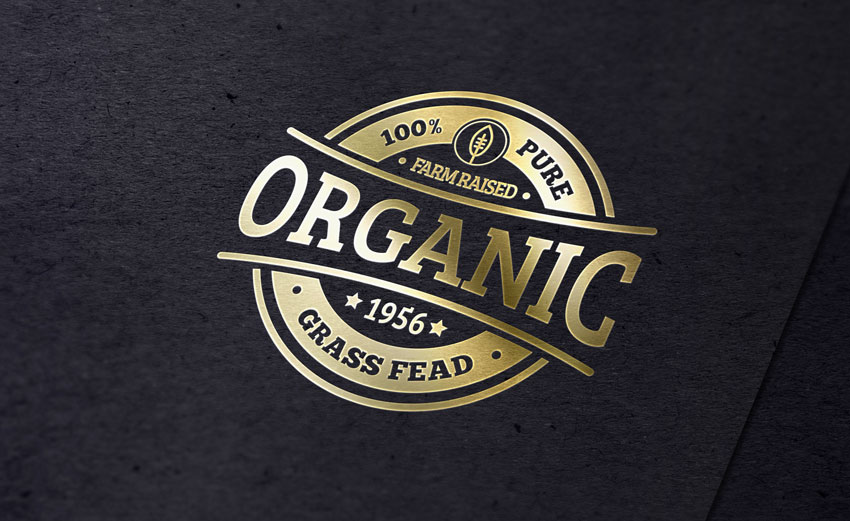
Your gold letter mockup is done!
6. Bonus Tip: How to Get the Rose Gold Tint
In case you haven’t noticed, rose gold is everywhere right now. From holiday decorations to engagement rings to the new iPhone, this pretty metallic is kicking traditional gold to the curb.
You don’t need a rose gold logo template. If you’d like to apply this trendy tint to your new Gold Foil Logo Mockup and create a rose gold logo, just do the following:
Step 1
Select the “Effect” folder in the Layers panel, and then click on the small icon at the bottom of the panel and select Solid Color. See the image below for reference:

In the Color Picker dialog, set the HEX color to #eeb5ef and press OK to confirm.

Step 2
Right click on the Color Fill layer you just created and choose Create Clipping Mask.
Change the Blend Mode to Multiply and the Opacity to 90%.

Your Rose Gold Logo Mockup is ready!

Congratulations, Your Gold Logo PSD Is Done!
In this tutorial we learned how to create a realistic gold foil logo mockup with Adobe Photoshop!
I hope that you’ve enjoyed my tutorial about creating a gold letter mockup and learned something new. Please feel free to leave your comments, suggestions, and outcomes below.
Top 5 Logo Mockup PSD Templates From Envato Elements
Now that you’ve learned how to make your own gold foil Photoshop logo from scratch, let me tell you about the all-inclusive offer Envato Elements has for you:
You can save hours of work by signing up for Envato Elements. Get access to thousands of creative graphics and templates with unlimited use. From professional logo mockup PSD templates and 3D logo mockups to royalty-free audio tracks, images, videos, and more—all for one low monthly price.

To show you what I’m talking about, below you’ll find some of our best logo type mockups and foil stamp mockups for Photoshop, so you can keep creating realistic logo textures in Photoshop in a fraction of the time.
1. Metallic Logo Mockups (PSD)

This metallic logo mockup PSD will showcase your designs on seven realistic metallic surfaces. All the mockups included in this pack have smart object layers that allow you to add your designs to your logo presentation mockup with a single click.
2. Gold Foil Mockup (PSD)

Ever wanted to quickly create realistic gold foil text in Photoshop? This gold foil Photoshop mockup is for you. To obtain a realistic logo presentation mockup, just place your design inside the smart layer and save the changes.
3. Silver Foil Logo Mockup (PSD)

On the other hand, if you prefer silver over gold, we can also help you with a foil stamp mockup. This silver foil logo mockup creates a polished and professional effect with any logo or badge. Just a few clicks and you’ll get a fantastic logo presentation mockup!
4. Gold Logo Mockup (PSD)

This gold logo PSD features smart object layers, so you can quickly do your own gold letter mockup. This gold logo mockup also includes real backgrounds and textures for a professional foil stamp mockup.
5. Rose Gold Logo Wall Mockups (PSD)

As we’ve seen, rose gold logos are everywhere this season. This rose gold logo template is included in a set of eight logo mockup PSD templates for your design.
Each template contains eight types of overlay shadows (windows, natural shadow, palm tree shadows) and five backgrounds with different wall textures.
Don’t miss out on this rose gold logo template—check out all the elements included in this set!
Discover More Logo Mockup PSD Templates
Looking for more logo textures in Photoshop? Check out the following content to learn more about logo type mockups and more:
 Product MockupHow to Create a Leather Stamp Logo Mockup in Adobe PhotoshopTom Piccarreda
 Product MockupHow to Create a Rubber Stamp Logo Mockup in Adobe PhotoshopTom Piccarreda
 Product MockupHow to Create a Pressed Paper Logo Mockup in Adobe PhotoshopTom Piccarreda
 Branding25+ Logo and Branding MockupsMelody Nieves
 Fonts40 Best Fonts for Making Monograms & Logo Designs in 2021Melody Nieves
 Product Mockup20 T-Shirt Mockup PSD Templates (With Photorealistic Results)Sean Hodge
Conclusion
We hope you’ve enjoyed our tutorial on how to create a gold foil Photoshop logo and our selection of logo type mockups. If you want more 3D logo mockups and foil stamp mockups, you can always browse our awesome library at Envato Elements!
{excerpt}
Read More
15 Top Title Templates for DaVinci Resolve
{excerpt}
Read More
Apple Maps adds information on COVID-19 measures at airports
Apple is adding a small but handy feature for those who need to travel during the pandemic.
The new ‘Mortal Kombat’ movie has been delayed one more week
The ‘Mortal Kombat’ movie premieres in theaters and on HBO Max on April 23rd.
12 Top Opener Templates for DaVinci Resolve
{excerpt}
Read More
12 Top Transition Templates for DaVinci Resolve
{excerpt}
Read More
Gocycle’s G4 e-bikes come with more powerful motors and wider tires
Gocycle its signature electric bike to add a new, more powerful motor, a redesigned carbon fork and wider tires for better comfort.