Multi Touch Tutorial 3

In this tutorial I will show how to implement the pinch feature (zoom in/out).

In this tutorial, I will show you how to use the touchesMoved event to zoom in and out the image on the UIImageView. Now, I have not exactly figured out a way to actually zoom in and out the actual image but here is the code on when to zoom in and zoom out. If anyone has figured out a way to zoom in/out the actual image, please share it everyone.

Before we can implement the touchesMoved event, we are going to declare some variables and methods in ImgViewController.h file. This is how the header file is going to look like

#import <UIKit/UIKit.h>

@interface ImgViewController : UIViewController {

IBOutlet UIImageView *imgView;
NSTimer *timer;
CGFloat initialDistance;

}

– (CGFloat)distanceBetweenTwoPoints:(CGPoint)fromPoint toPoint:(CGPoint)toPoint;
– (void) clearTouches;

@end

disanceBetweenTwoPoints is used to calculate as the method name implies, distance between two points. initialDistance is used to keep track of the distance when touchesBegan method is fired. To zoom in and zoom out, we first need to calculate the distance between the two fingers and store it in initialDistance variable. This is how the touchesBegan method will look like.

– (void)touchesBegan:(NSSet *)touches withEvent:(UIEvent *)event {

NSSet *allTouches = [event allTouches];

switch ([allTouches count]) {
case 1: { //Single touch

//Get the first touch.
UITouch *touch = [[allTouches allObjects] objectAtIndex:0];

switch ([touch tapCount])
{
case 1: //Single Tap.
{
//Start a timer for 2 seconds.
timer = [NSTimer scheduledTimerWithTimeInterval:2 target:self
selector:@selector(showAlertView:) userInfo:nil repeats:NO];

[timer retain];
} break;
case 2: {//Double tap.

//Track the initial distance between two fingers.
UITouch *touch1 = [[allTouches allObjects] objectAtIndex:0];
UITouch *touch2 = [[allTouches allObjects] objectAtIndex:1];

initialDistance = [self distanceBetweenTwoPoints:[touch1 locationInView:[self view]]
toPoint:[touch2 locationInView:[self view]]];
} break;
}
} break;
case 2: { //Double Touch

} break;
default:
break;
}

}

We get the first touch objects at index 0 and 1 and then we calculate the initial distance between the two points. This is how the distanceBetweenTwoPoints method looks like

– (CGFloat)distanceBetweenTwoPoints:(CGPoint)fromPoint toPoint:(CGPoint)toPoint {

float x = toPoint.x – fromPoint.x;
float y = toPoint.y – fromPoint.y;

return sqrt(x * x + y * y);
}

In touchesMoved event, we find out if there are at least two touches on the screen. We then get the touch object at index 0 and 1, calculate the distance between the finalDistance and the initialDistance. If the initialDistance is greater then the finalDistance then we know that the image is being zoomed out else the image is being zoomed in. This is how the source code looks like

– (void)touchesMoved:(NSSet *)touches withEvent:(UIEvent *)event {

if([timer isValid])
[timer invalidate];

NSSet *allTouches = [event allTouches];

switch ([allTouches count])
{
case 1: {

} break;
case 2: {
//The image is being zoomed in or out.

UITouch *touch1 = [[allTouches allObjects] objectAtIndex:0];
UITouch *touch2 = [[allTouches allObjects] objectAtIndex:1];

//Calculate the distance between the two fingers.
CGFloat finalDistance = [self distanceBetweenTwoPoints:[touch1 locationInView:[self view]]
toPoint:[touch2 locationInView:[self view]]];

//Check if zoom in or zoom out.
if(initialDistance > finalDistance) {
NSLog(@”Zoom Out”);
}
else {
NSLog(@”Zoom In”);
}

} break;
}

}

NSLog tells us if what we are doing is correct or not. If someone knows how to zoom in/out an actual image, please let me know.

Since we keep track of the initialDistance, we need to clear that value when touches is canceled or when touches are ended. We do this in clearTouches method, which is called from touchesEnded event and touchesCanceled event. This is how the method looks like

– (void)clearTouches {

initialDistance = -1;
}

I hope you found this tutorial a little helpful without the actual zoom in/out functionality. You can download the source code here and please leave me your comments.

Happy Programming,
iPhone SDK Articles

Navigation Controller + UIToolbar

In this tutorial we will learn how to add a UIToolbar to an app with UINavigationController.
In this tutorial we will learn how to add a UIToolbar to an app with UINavigationController. I had a requirement where I wanted to add a UIToolbar with one button. Clicking the button will load a view controller which is the same view controller when a UITableViewCell is selected and this is what I did.

This is how the final app will look like


Start by creating a new project by selecting “Navigation-Based Application”. Open the header file of “RootViewController” and create a variable of type UIToolbar and UINavigationController. This is how the file should look like, without the comments. We also create two variables of the same UIViewController and this will be explained later.

#import <UIKit/UIKit.h>

@class InfoViewController;

@interface RootViewController : UITableViewController {

UIToolbar *toolbar;
InfoViewController *ivControllerToolbar;
InfoViewController *ivControllerCell;
UINavigationController *infoNavController;
}

@end

Open the implementation file and write the following code in viewWillAppear method. This is the method which is always called when the view is going to appear.

– (void)viewWillAppear:(BOOL)animated {
[super viewWillAppear:animated];

//Initialize the toolbar
toolbar = [[UIToolbar alloc] init];
toolbar.barStyle = UIBarStyleDefault;

//Set the toolbar to fit the width of the app.
[toolbar sizeToFit];

//Caclulate the height of the toolbar
CGFloat toolbarHeight = [toolbar frame].size.height;

//Get the bounds of the parent view
CGRect rootViewBounds = self.parentViewController.view.bounds;

//Get the height of the parent view.
CGFloat rootViewHeight = CGRectGetHeight(rootViewBounds);

//Get the width of the parent view,
CGFloat rootViewWidth = CGRectGetWidth(rootViewBounds);

//Create a rectangle for the toolbar
CGRect rectArea = CGRectMake(0, rootViewHeight – toolbarHeight, rootViewWidth, toolbarHeight);

//Reposition and resize the receiver
[toolbar setFrame:rectArea];

//Create a button
UIBarButtonItem *infoButton = [[UIBarButtonItem alloc]
initWithTitle:@”Info” style:UIBarButtonItemStyleBordered target:self action:@selector(info_clicked:)];

[toolbar setItems:[NSArray arrayWithObjects:infoButton,nil]];

//Add the toolbar as a subview to the navigation controller.
[self.navigationController.view addSubview:toolbar];

//Reload the table view
[self.tableView reloadData];

}

Start by initializing the toolbar and then calculate some values. These values determine the position and the width/height of the toolbar. A button is created which will be added to the the toolbar and when the button is clicked “info_cancel” method is called. The button are added from LTR. The toolbar is then added as a subview to the navigation controller.

Add a new view using IB and I have named it “InfoView”. Create a UIViewController in XCode and name it InfoViewController and assign this class as the class to be used by the InfoView nib file. Declare a Boolean property in InfoViewController called “isViewPushed” which will be true when a view is pushed to the top of the stack and false when the view is presented as a modal view. Based on the value of this variable we add a cancel button when the view is loaded as a modal view.

This is how the info button will look like when clicked

– (void) info_clicked:(id)sender {

//Initialize the Info View Controller
if(ivControllerToolbar == nil)
ivControllerToolbar = [[InfoViewController alloc] initWithNibName:@”InfoView” bundle:[NSBundle mainBundle]];

ivControllerToolbar.isViewPushed = NO;

//Initialize the navigation controller with the info view controller
if(infoNavController == nil)
infoNavController = [[UINavigationController alloc] initWithRootViewController:ivControllerToolbar];

//Present the navigation controller.
[self.navigationController presentModalViewController:infoNavController animated:YES];

}

From the header file we know that we have declared two types of ViewControllers for the same nib file, this is because for some reason having one variable to control the same view controller results in some unexpected behavior. When the info button is clicked we first initialize the ivControllerToolbar, then we initialize the infoNavController with the ivControllerToolbar view controller. Finally, we present the infoNavController using “presentModalViewController” method of the navigationController. If we do not do this, then the infoview will be loaded without a navigation controller and we will have no graceful way of getting back to the RootViewController. Also, notice that we tell the infoviewcontroller explicitly that the controller is not pushed. This variable will be used in viewDidLoad method of the InfoViewController.

if(isViewPushed == NO) {

self.navigationItem.leftBarButtonItem = [[[UIBarButtonItem alloc]
initWithBarButtonSystemItem:UIBarButtonSystemItemCancel
target:self action:@selector(cancel_Clicked:)] autorelease];
}

Here we check if the view is pushed it is only then we add the cancel button to the left bar button item. When the button is clicked “cancel_Clicked” method is called which will dismiss the modal view presented. This is how the code looks like

-(void) cancel_Clicked:(id)sender {

[self.navigationController dismissModalViewControllerAnimated:YES];
}

Since, this is a table view a user can select a row and go to its detail view. We have some sample and this is how the didSelectRowAtIndexPath method will look like.

– (void)tableView:(UITableView *)tableView didSelectRowAtIndexPath:(NSIndexPath *)indexPath {
// Navigation logic — create and push a new view controller

//Initialize the info view controller.
if(ivControllerCell == nil)
ivControllerCell = [[InfoViewController alloc] initWithNibName:@”InfoView” bundle:[NSBundle mainBundle]];

ivControllerCell.isViewPushed = YES;

//Push the view controller to the top of the stack.
[self.navigationController pushViewController:ivControllerCell animated:YES];
}

First we initialize the info view controller called “ivControllerCell” which is specifically used to load the same view controller in didSelectRowAtIndexPath method. This time we tell the info view controller that the view will be pushed to the top of the stack.

This is the easiest way I found to add a UIToolbar to an application with UINavigationController. You can download the source code here and please leave me your comments.

Happy Programming
iPhone SDK Articles

Install Flash on iPhone 4 (Frash for iPhone 4)

Frash, the Flash for iPhone/iPad, is now ready for iPhone 4. The iPhone 4 version of Frash is compiled by Grant Pannell. In this Guide, you’ll learn how to install Flash on iPhone 4. Follow the steps below to install Flash (aka Frash) on iPhone 4.

flash iphone 4If you’ve got an iPad, we have already posted a guide on Frash for iPad which can be found here:

How to: install flash on iPad

NOTE:

Disclaimer: This guide for educational purposes only. So, try it at your own risk. We can NOT be held responsible if anything goes wrong.

How to Install Flash on iPhone 4

Assuming that your iPhone 4 is already jailbroken:

  • Open the Cydia.
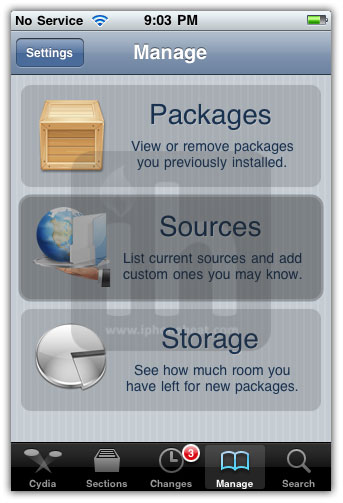
  • Go to manage Tab at bottom.
  • Hit the big Sources button.

install flash on iphone 4

  • Hit the Edit button on Top-Right
  • Then Hit the Add button on Top-Left
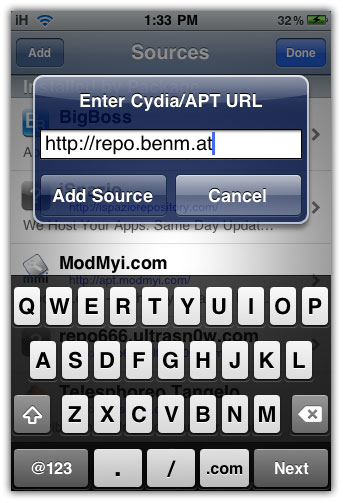
  • Then Enter the following URL: http://repo.benm.at/ and hit the Add Source button.

install flash on iphone 4

  • Once the Source is added to the Cydia, hit the big return to Cydia button at bottom of the screen and then Done button.
  • Go to Search tab and search for Frash and install it.
  • You can also install Frash Toggle. This will let you enable/disable Frash via SBsettings toggle button.

install flash on iphone 4install flash on iphone 4

install flash on iphone 4install flash on iphone 4

Also checkout:

You can follow us on Twitter, Join us at Facebook, and also Subscribed to RSS Feed to receive latest updates.

Digg
Twitter
StumbleUpon
Facebook
Reddit
del.icio.us

JailbreakMe: Jailbreak for iPhone 4.0.1 / 4, iPad 3.2.1 / 3.2 and iPod Touch 4.0.1 / 4.0

JailbreakMe is the new userland jailbreak for iPhone 4, 3GS, 3G iOS 4.0.1 / 4.0, iPad iOS 3.2.1 / 3.2, iPod Touch iOS 4. JailbreakMe 2.0 by Comex can jailbreak All iPhones, iPads and iPod Touches starting from iOS 3.1.2.

JailbreakMe is, without a doubt, the easiest iPhone, iPad and iPod Touch jailbreak on the planet. It’s a browser based jailbreak.

jailbreakme 2.0

JailbreakMe Supports

  • iPhone 4, iPhone 3GS, iPhone 3G running iOS 4.0 / 4.0.1 / 3.1.3 / 3.1.2
  • iPad iOS 3.2.1 and iPad iOS 3.2
  • All iPod Touches iOS 4.0 / 4.0.1 / 3.1.3 / 3.1.2

NOTE

  • Your iPhone MUST be activated to use JailbreakMe 2.0.
  • JailbreakMe 2.0 does NOT work on Custom Firmware.

In order to jailbreak your iPhone, iPad or iPod Touch with JailbreakMe 2.0 simply point your Safari Browser to:

http://jailbreakme.com

or

http://jailbreakme.modmyi.com/

and follow the on screen instructions. Don’t forget to share your experience. Guides will be posted soon are here:

jailbreakme 2.0

Issues / Fixes

FaceTime / MMS Issue: How to Fix

Stuck at the purple screen:

  • Go to: Settings > Safari and clear Browser History, Cookies and Cache.
  • Then Reboot your iDevice.

Hanging on slide to unlock:

  • Put it in airplane mode then turn it off.

Misc.

  • Reset Network Settings: Settings > General > Reset > Reset Network Settings

You can follow us on Twitter, Join us at Facebook, and also Subscribed to RSS Feed to receive latest updates.

Digg
Twitter
StumbleUpon
Facebook
Reddit
del.icio.us

Jailbreak iPhone 4 iOS 4.0.1 / 4 with JailbreakMe 2.0

JailbreakMe 2.0 is the new iPhone 4 jailbreak for iOS 4.0.1, 4.0 firmware. In this guide you’ll learn how to jailbreak iPhone 4 iOS 4.0.1 / 4 with JailbreakMe 2.0 jailbreak. Comex is the guy behind JailbreakMe 2.0 jailbreak for all iPhones, iPod Touches iOS 4.0.1 / 4.0 / 3.1.3 / 3.1.2 and iPad running iOS 3.2.1 / 3.2.


jailbreak iphone 4
NOTE

Warning: Some of the users are facing FaceTime/MMS issues. The developer is working on it. (hearing a few reports of people rebooting a few times and it fixing facetime issues, perhaps this is something that will resolve itself) FaceTime and MMS issue has been addressed :) For those who have already jailbroken iPhone 4 before the fix, follow the Fix linked Below.

JailbreakMe 2.0 is a userland (Web-based) jailbreak for all iDevices running firmware 3.1.2 up to 4.0.1. Lets jailbreak iPhone 4 4.0.1 / 4 firmware with JailbreakMe.

Disclaimer: This guide for educational purposes only. So, try it at your own risk. We can NOT be held responsible if anything goes wrong.

How to Jailbreak iPhone 4 iOS 4.0.1 / 4 with JailbreakMe

Step 1

Step 2

  • Make sure your iPhone is connected to the internet.
  • Open the Safari Browser from your iPhone 4 Springboard.
  • Input one of the following URLs:
    • http://jailbreakme.com
    • http://jailbreakme.modmyi.com/

Step 3

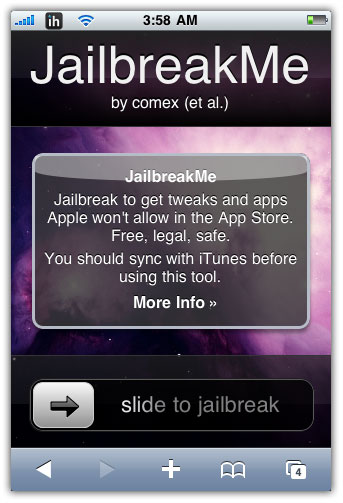
Now Slide to Jailbreak iPhone 4 on iOS 4.0.1 or 4.0 firmware.

jailbreak iphone 4 jailbreakme

  • First it will download the jailbreak data
  • then the jailbreak process will begin

jailbreak iphone 4 jailbreakmejailbreak iphone 4 jailbreakme

Once the process is complete, the following popup message will appear:

jailbreak iphone 4 jailbreakme

Hit the OK button and close Safari.

Voila! You’ve successfully jailbreak iPhone 4 with JailbreakMe userland jailbreak by Comex. Don’t forget to share your experience in the comments section below.

How to Unlock iPhone

UltraSn0w 1.0-1, the iPhone 4 unlock will be out soon after the testing on a few jailbroken iPhone 4 is complete is out now. iPhone 4, iPhone 3GS and 3G users can always use UltraSn0w:

How to: Unlock iPhone 4 with UltraSn0w 1.0-1

How to: unlock iPhone 3GS, 3G with UltraSn0w

Issues / Fixes

FaceTime / MMS Issue: How to Fix

Stuck at the purple screen:

  • Go to: Settings > Safari and clear Browser History, Cookies and Cache.
  • Then Reboot your iDevice.

Hanging on slide to unlock:

  • Put it in airplane mode then turn it off.

Misc.

  • Reset Network Settings: Settings > General > Reset > Reset Network Settings

Also checkout:

You can follow us on Twitter, Join us at Facebook, and also Subscribed to RSS Feed to receive latest updates.

Digg
Twitter
StumbleUpon
Facebook
Reddit
del.icio.us

Jailbreak iPad iOS 3.2.1 / 3.2 with JailbreakMe 2.0

Comex has released the JailbreakMe 2.0 jailbreak for iPad iOS 3.2.1 / 3.2 firmware. In this guide you’ll learn how to jailbreak iPad 3.2.1 with JailbreakMe. Both the iPad Wifi and iPad 3G can be jailbroken with JailbreakMe 2.0.


jailbreak ipad 3.2.1 jailbreakme
JailbreakMe is a browser-based userland jailbreak, means you can jailbreak your iPad from with the device. No need to run any software from your computer.

Let’s jailbreak iPad WiFi / jailbreak iPad 3G running iOS 3.2.1 / 3.2 firmware with JailbreakMe 2.0 jailbreak.

Disclaimer: This guide for educational purposes only. So, try it at your own risk. We can NOT be held responsible if anything goes wrong.

How to Jailbreak iPad (WiFi/3G) iOS 3.2.1/3.2 with JailbreakMe

Step 1

Step 2

  • Make sure your iPad is connected to the internet.
  • Open the Safari Browser from your iPad Springboard.
  • Input one of the following URLs:
    • http://jailbreakme.com
    • http://jailbreakme.modmyi.com/

jailbreak ipad 3.2.1 jailbreakme

Step 3

Now Slide to Jailbreak iPad WiFi or iPad 3G on iOS 4.0.1 or 4.0 firmware.

jailbreak ipad 3.2.1 jailbreakme

  • First it will download the jailbreak data
  • then the jailbreak process will begin

jailbreak ipad 3.2.1 jailbreakme

Once the process is complete, the following popup message will appear:

jailbreak ipad 3.2.1 jailbreakme

Hit the OK button and close Safari.

Voila! You’ve successfully jailbreak iPad with JailbreakMe userland jailbreak by Comex. Don’t forget to share your experience in the comments section below.

Issues and Fixes

Stuck at the purple screen:

  • Go to: Settings > Safari and clear Browser History, Cookies and Cache.
  • Then Reboot your iDevice.

Hanging on slide to unlock:

  • Put it in airplane mode then turn it off.

Misc.

  • Reset Network Settings: Settings > General > Reset > Reset Network Settings

Jailbreak iPhone and iPod Touch

Also Checkout:

You can follow us on Twitter, Join us at Facebook, and also Subscribed to RSS Feed to receive latest updates.

Digg
Twitter
StumbleUpon
Facebook
Reddit
del.icio.us

Jailbreak iPhone 3GS (New BootRom, Old), iPhone 3G iOS 4.0.1 / 4 with JailbreakMe

JailbreakMe 2.0 is the new iPhone 3GS, 3G jailbreak for iOS 4.0.1, 4.0 firmware. In this guide you’ll learn how to jailbreak iPhone 3GS (New BootRom, old), iPhone 3G iOS 4.0.1 / 4 with JailbreakMe 2.0 jailbreak.
jailbreak iphone 3gs 3g jailbreakme
Comex is the guy behind JailbreakMe 2.0 jailbreak. JailbreakMe is a userland (web-based) jailbreak for all iPhones, iPod Touches iOS 4.0.1 / 4.0 / 3.1.3 / 3.1.2 and iPad running iOS 3.2.1 / 3.2.

NOTE

Lets jailbreak iPhone 3GS, 3G iOS 4.0.1 / 4 firmware with JailbreakMe.

Disclaimer: This guide for educational purposes only. So, try it at your own risk. We can NOT be held responsible if anything goes wrong.

How to Jailbreak iPhone 3GS, 3G iOS 4.0.1 / 4 with JailbreakMe

Step 1

Rest of the steps to jailbreak iPhone 3GS and jailbreak iPhone 3G are exactly similar to the guide posted earlier. So, please navigate to the guide linked below and continue from Step 2 to jailbreak iPhone 3GS New bootRom, old BootRom and iPhone 3G running any firmware from 3.1.2 to 4.0.1.

How to Unlock iPhone

iPhone 3GS and 3G users can always use UltraSn0w 0.93:

Also checkout:

Digg
Twitter
StumbleUpon
Facebook
Reddit
del.icio.us

Jailbreak iPod Touch 3G, 2G (MC, non-MC) iOS 4.0.1 / 4 with with JailbreakMe 2.0

JailbreakMe 2.0 is the new iPod Touch 3G, 2G (MC, non-MC) jailbreak for iOS 4.0.1, 4.0 firmware. In this guide you’ll learn how to jailbreak iPod Touch 3G, iPhone Touch 2G iOS 4.0.1 / 4 with JailbreakMe 2.0 jailbreak.

jailbreak ipod touch jailbreakme
Comex is the guy behind JailbreakMe 2.0 jailbreak. JailbreakMe is a web-based userland jailbreak for all iPod Touches, iPhones running iOS 4.0.1 / 4.0 / 3.1.3 / 3.1.2 and iPad running iOS 3.2.1 / 3.2.

NOTE

  • JailbreakMe 2.0 can jailbreak iPod Touch 3G, 2G (MC, non-MC)
  • JailbreakMe can jailbreak  iOS 4.0.1, 4.0, 3.1.3 and 3.1.2.

Lets jailbreak iPod Touch 3G, 2G iOS 4.0.1 / 4 firmware with JailbreakMe.

Disclaimer: This guide for educational purposes only. So, try it at your own risk. We can NOT be held responsible if anything goes wrong.

How to Jailbreak iPod Touch 3G, 2G iOS 4.0.1 / 4 with JailbreakMe

Step 1

Rest of the steps to jailbreak iPod Touch 3G and jailbreak iPod Touch 2G are exactly similar to the guide posted earlier. So, please navigate to the guide linked below and continue from Step 2 to jailbreak iPod Touch 3G and iPod Touch 2G (MC, non-MC) running any firmware from 3.1.2 to 4.0.1.

Also checkout:

Digg
Twitter
StumbleUpon
Facebook
Reddit
del.icio.us

Fix FaceTime / MMS Issue on iPhone 4 After Using JailbreakMe 2.0

There are numerous reports on FaceTime / MMS issues on iPhone 4 after jailbreaking with JailbreakMe 2.0 “Star”. After jailbreaking iPhone 4 with JailbreakMe 2.0, FaceTime and MMS stopped working for some users. Within a few hours, we have a fix for MMS / FaceTime problem, thanks to Comex and the Dev-Team.

fix facetime mms jailbreakmeIf you jailbreak your iPhone now using JailbreakMe 2.0 it should work fine because the issue has been addressed in the Jailbreak as well. However if you have already jailbroken iPhone before the issue was fixed, then there are two ways to fix the issue:

Install Base Structure Update from Cydia

  1. Open the Cydia.
  2. Go to changes tab and hit refresh.
  3. There you’ll find an update available for Base Structure.
  4. Install it.
  5. Reset Network Settings: Settings > General > Reset > Reset Network Settings

Done!

Restore Firmware and re-Jailbreak

  1. Restore the firmware
  2. then re-jailbreak iPhone with JailbreakMe 2.0
    NOTE: re-jailbreaking without restoring firmware does NOT fix the FaceTime/MMS.

If you want to jailbreak your iPhone, iPad or iPod Touch, follow the guides linked below:

Update 1: How to FaceTime over 3G

Digg
Twitter
StumbleUpon
Facebook
Reddit
del.icio.us

Make FaceTime Call Over 3G on iPhone 4 with My3G

Now you can make FaceTime video calls over 3G network with My3G. My3G for iPhone 4, a jailbroken app, lets you FaceTime over 3G. My3G is exactly similar to 3G Unrestrictor, only difference is the FaceTime on 3G support. By default, Apple won’t let you make FaceTime calls over 3G network.


facetime over 3g
NOTE: Your iPhone 4 MUST be jailbroken to install My3G app. JailbreakMe 2.0 is the new jailbreak for iPhone 4. You can jailbreak iPhone 4 using the guide linked below:

My3G Description

Facetime over 3G!!!! My3G: Take back your 3G! My3G makes Apps believe that they are on WiFi instead of 3G. With My3G, you can now watch HiDef YouTube videos, use Skype/Fring/Other VOIP apps over the 3G network!

My3G Features

  • In-App popup request to enable/never ask for My3G to be enabled for that app
  • In-App indicator when My3G changes the network from 3G to WiFi
  • Ability to select which apps are My3G enabled and not.
  • Default Apps – no configuration for the most popular apps!
  • SBSettings Toggle! You can temporarily enable My3G for all apps or toggle back using your defined Apps list
  • Dynamic enablement – Higher successs rate (near 100%) then 3G Unrestrictor (which does one off solutions for apps). My3G enables 3G indicators more dynamically.

My3G is developed by the same Dev behind MyWi.

How to Install My3G

  • Go to Cydia
  • Search for My3G and install it.
  • It will also install RockApp.

My3G to enable video calls over 3G on iPhone 4 is available in both Cydia and RockApp for $3.99.

Digg
Twitter
StumbleUpon
Facebook
Reddit
del.icio.us

Jailbreak iOS 4.0.1 Firmware (iPhone 4, 3GS, 3G, iPod Touch 3G, 2G)

All guide to jailbreak iOS 4.0.1 firmware on iPhone 4, iPhone 3GS, 3G and iPod Touch 3G, 2G (MC, non-MC). JailbreakMe 2.0, the new userland jailbreak by Comex can jailbreak 4.0.1 firmware on all iPhones and iPod Touches including New BootRom devices.
jailbreak ios 4.0.1

Jailbreak iOS 4.0.1 Firmware

Follow the Guides linked under your concerned device to jailbreak it with JailbreakMe 2.0.

Jailbreak iPhone 4

How to: jailbreak iPhone 4 iOS 4.0.1 with JailbreakMe

Jailbreak iPhone 3GS

How to: jailbreak iPhone 3GS iOS 4.0.1 with JailbreakMe

Jailbreak iPhone 3G

How to: jailbreak iPhone 3G iOS 4.0.1 with JailbreakMe

Jailbreak iPod Touch 3G

How to: Jailbreak iPod Touch 3G iOS 4.0.1 with JailbreakMe

Jailbreak iPod Touch 2G

How to: Jailbreak iPod Touch 2G iOS 4.0.1 with JailbreakMe

Also checkout:

You can follow us on Twitter, Join us at Facebook, and also Subscribed to RSS Feed to receive latest updates.

Digg
Twitter
StumbleUpon
Facebook
Reddit
del.icio.us

Ultrasn0w 1.0-1, The iPhone 4 Unlock is Out Now!

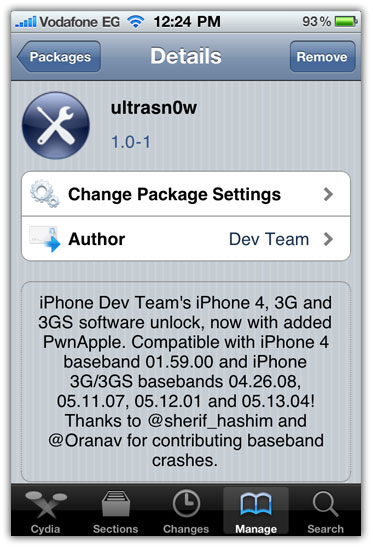
UltraSn0w 1.0-1, the iPhone 4 unlock is out now. Ultrasn0w 1.0-1 can unlock iPhone 4 iOS 4.0.1, 4.0 baseband 01.59.00 and also iPhone 3GS and 3G. Ultrasn0w 1.0-1 screenshot along with the compatibility list after the jump…

ultraSn0w 1.0-1 unlock iPhone 4, 3GS, 3G
Ultrasn0w 1.0-1 can:

  • Unlock iPhone 4 baseband 01.59.00
  • Unlock iPhone 3GS, 3G on
    • baseband 05.13.04 (iOS 4.0/4.0.1)
    • baseband 05.12.01 (3.1.3)
    • baseband 05.11.07 (3.1.2)
    • baseband 04.26.08 (3.0)

So, Ultrasn0w 1.0-1 can unlock iOS 3.0 through iOS 4.0.1. Unlock Guide right below the screenshot.

NOTE: In order to unlock iPhone 4, 3GS or 3G it MUST be jailbroken. You can jailbreak iPhones using the guides linked below with JailbreakMe. Also, don’t forget to save SHSH blobs for iOS 4.0.1 before the new firmware comes out to secure future jailbreak.

ultraSn0w 1.0-1 iphone 4 unlock

Ultrasn0w 1.0-1 image was found in Hashim Sherif’s Photobucket album (deleted now). via BlogsDNA Mobile-Geeks

Update 1: How to Unlock iPhone 4 with UltraSn0w 1.0-1

You can follow us on Twitter, Join us at Facebook, and also Subscribed to RSS Feed to receive latest updates.

Digg
Twitter
StumbleUpon
Facebook
Reddit
del.icio.us

Download iOS 4.1 Beta 3 for iPhone, iPod Touch Build 8B5097d [Dev only]

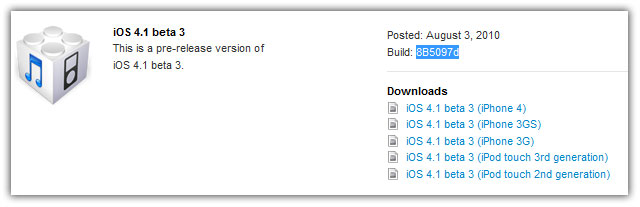
iOS 4.1 beta 3 for iPhone 4, iPhone 3GS, 3G, and iPod Touch 3G, 2G is now available for download. You can download iOS 4.1 beta 3 build 8B5097d from the iPhone Dev Center if you’re a registered Apple developer.

download ios 4.1 beta 3

What’s New in iOS 4.1 Beta 3 Firmware

GameCenter no longer in iPhone 3G. More updates to follow soon.

WARNING: Avoid the iOS 4.1 beta 3 firmware if you depend on jailbreak/unlock until further notice.

download iOS 4.1 beta 3

Download iOS 4.1 Beta 3 8B5097d

iOS 4.1 beta 3 is available to developers only. Developers can download iOS 4.1 beta 3 from the iPhone Dev Center. However, if you still want to give it a shot, Google the queries listed below. (Please don’t ask for the links)

Download iOS 4.1 for iPhone 4

  • iPhone3,1_4.1_8B5097d_Restore.ipsw
  • ios_4.1_beta_3__iphone_4__8B5097d.dmg

Download iOS 4.1 for iPhone 3GS

  • iPhone2,1_4.1_8B5097d_Restore.ipsw
  • ios_4.1_beta_3__iphone_3gs__8B5097d.dmg

Download iOS 4.1 for iPhone 3G

  • iPhone1,2_4.1_8B5097d_Restore.ipsw
  • ios_4.1_beta_3__iphone_3g__8B5097d.dmg

Download iOS 4.1 for iPod Touch 3G

  • iPod3,1_4.1_8B5097d_Restore.ipsw
  • ios_4.1_beta_3__ipod_touch__3rd_generation__8B5097d.dmg

Download iOS 4.1 for iPod Touch 2G

  • iPod2,1_4.1_8B5097d_Restore.ipsw
  • ios_4.1_beta_3__ipod_touch__2nd_generation__8B5097d.dmg

Digg
Twitter
StumbleUpon
Facebook
Reddit
del.icio.us

Unlock iPhone 4 iOS 4.0.1 with UltraSn0w 1.0-1 (Baseband 01.59.00)

UltraSn0w 1.0-1 is out to unlock for iPhone 4. This guide is on how to unlock iPhone 4 with UltraSn0w on iOS 4.0.1/4.0 baseband 01.59.00. iPhone 4 unlock instructions can be found below.


unlock iphone 4
IMPORTANT

Disclaimer: This guide is for educational and informational purposes only. Use it at your own risk. we cannot be held responsible if anything goes wrong.

Unlocking is LEGAL.

Let’s unlock iPhone 4 with UltraSn0w 1.0-1 unlock on baseband 01.59.00.

How to Unlock iPhone 4 with UltraSn0w

***T-Mobile USA users please disable 3G network first.*** Settings >General >Network and turn the “Enable 3G” switch to OFF.

Assuming that your iPhone 4 is already jailbroken:

  • Open the Cydia.
  • Go to manage Tab at bottom.
  • Hit the big Sources button.

unlock iphone 4 baseband 01.59.00

  • Hit the Edit button on Top-Right
  • Then Hit the Add button on Top-Left
  • Then Enter the following URL: http://repo666.ultrasn0w.com and hit the Add Source button.

unlock iphone 4 baseband 01.59.00

  • Once the Source is added to the Cydia, hit the big return to Cydia button at bottom of the screen and then Done button.
  • Go to Search tab and search for ultrasn0w and install it.

unlock iphone 4 baseband 01.59.00unlock iphone 4 baseband 01.59.00

Installing UltraSn0w will unlock iPhone 4 iOS 4.0.1, 4.0 with baseband 01.59.00. Once the installation is completed, reboot your iPhone 4.

Voila! You have unlocked iPhone 4 baseband 01.59.00 with UltraSn0w 1.0-1 and can use SIM from any carrier now.

If you’re an iPhone 3GS or iPhone 3G and want to jailbreak and unlock it, follow the guides linked below:

You can follow us on Twitter, Join us at Facebook, and also Subscribed to RSS Feed to receive latest updates.

Also checkout:

Download iOS 4.0.1 or Download iOS 4

How to: make FaceTime call over 3G

How to: Get free iPhone 4 case / bumper

How to: activate iPhone 4 without original SIM

iPhone 4 Specs

How to:

Digg
Twitter
StumbleUpon
Facebook
Reddit
del.icio.us

Jailbreak iPhone 3GS 4.0.1 with PwnageTool [Unofficial]

In this guide you’ll learn how to jailbreak iPhone 3GS iOS 4.0.1 firmware with PwnageTool (Unofficial). Using this guide you can jailbreak iPhone 3GS (old bootRom) and must already be jailbroken. Read the IMPORTANT part below and continue jailbreaking iPhone 3GS 4.0.1.

*** Comex Jailbreak is out now. Check the Update at the bottom. ***
jailbreak ios 4.0.1

The steps mentioned below are NOT recommended for newbies. If you’re not confident then better wait for the Comex’s Spirit jailbreak which is expected in a few days.

IMPORTANT

  • PwnageTool bundles used in this guide are unofficial (NOT from iPhone Dev-Team)
  • iPhone 3GS OLD Bootrom only.
  • iPhone 3GS MUST already be jailbroken.
  • This also hacktivated iPhone 3GS
  • Your baseband will be preserved!
  • After jailbreak, you can unlock iPhone 3GS with UltraSn0w 0.93.
  • Mac OS X only.

If you fulfill the above requirements then you can follow the step-by-step instructions below to create custom firmware 4.0.1 and then jailbreak iPhone 3GS iOS 4.

Disclaimer: This guide for educational purposes only. So, try it at your own risk. We can NOT be held responsible if anything goes wrong.

Jailbreak iPhone 3GS 4.0.1 (OLD BOOTROM)

Required Stuff

Download all the stuff linked above, create a folder “JB” on your desktop and put all the files into JB folder after extracting. Folder should look like this:

jailbreak iphone 3gs 4.0.1

STEP 1

Open the Terminal.app in your Mac and execute the following commands:

  • cd /Users/USERNAME/Desktop/JB
  • ls -al
  • mv iPhone2,1_4.0.1_8A306.bundle PwnageTool.app/Contents/Resources/FirmwareBundles/
  • exit

See the screenshot below:

You’ve added the custom bundle to PwnageTool.app

STEP 2

Now create a custom firmware 4.0.1 using the PwnageTool.app in the JB folder. Follow the step by step instruction in the guide linked below to create custom iOS 4.0.1 firmware. Make sure you select iOS 4.0.1 when PwnageTool asks for it. Then restore via iTunes.

How to: Create Custom Firmware with PwnageTool

via [Veeence][techblog.tgil]

Unlock iPhone 3GS iOS 4.0.1

After jailbreak, you can unlock iPhone 3GS with UltraSn0w. steps are exactly similar to that in the guide linked below:

How to: Unlock iPhone 3GS

Update 1

You can follow us on Twitter, Join us at Facebook, and also Subscribed to RSS Feed to receive latest updates.

Digg
Twitter
StumbleUpon
Facebook
Reddit
del.icio.us