Valve talks gaming on the Mac, says best is yet to come

Valve’s Jason Holtman and Doug Lombardi recently sat down with GamesIndustry.biz to discuss their big release of Steam on the Mac, and not only do they reiterate that great stat that games released on the Mac see a nice bump in sales, but they say that the best days of Mac gaming are yet to come. They can’t share numbers yet on just how many Mac vs. PC players there are (though they say the response has been great, and you can see Mac players in games often), but Holtman and Lombardi both say that from small game developers to big game publishers, Steam on Mac has helped everyone see just how active and important the Mac gaming scene is. There are international users on Macs, and the amount of player interest in games for the platform has made developers rethink their old plans of releasing a Mac port when they get to it rather than day and date with the PC title.

That is, in a word, awesome. And Lombardi says now that publishers are interested in the platform as whole, we’ll see some “different types of experiment on pricing and promotion and all that stuff on Mac titles,” as companies try to figure out how to make the most of this market they’ve been neglecting for so long.

Valve has already said that bringing Steam to the Mac was the most significant decision they’ve made with the service, but I’d argue that even this early in the process (even Valve admits that it doesn’t have a lot of data yet on how people use the two platforms), it was a seismic event for Mac gaming as well.

TUAWValve talks gaming on the Mac, says best is yet to come originally appeared on The Unofficial Apple Weblog (TUAW) on Fri, 06 Aug 2010 19:00:00 EST. Please see our terms for use of feeds.

Read | Permalink | Email this | Comments

Five freaking awesome FaceTime hacks — and a few handy tips

We’ve all been using FaceTime like crazy here at TUAW central — it’s really great to be able to conference with friends in real time without having to arrange things in advance. Nearly all of us have been video-conferencing-ready for years. But with the iPhone 4, there’s no more “Do you have iChat set up?” (or Skype) or “Can I call you now?” time-wasting prologues.

Instead, we can just call. Knowing that your friends have iPhone 4s makes video calling much easier. You don’t have to call or text to arrange the call, you just place it and you’re immediately good to go. We may have already had webcam equipment on hand but it’s only with the iPhone 4 that, at least here at TUAW, we’re actually using video calling.

With that in mind, we’ve been seeing how far we can push the technology. We’ve put together a list of the coolest techniques that we’ve actually tried out and tested and can confirm as working. In no particular order, here they are.

TUAWFive freaking awesome FaceTime hacks — and a few handy tips originally appeared on The Unofficial Apple Weblog (TUAW) on Fri, 06 Aug 2010 20:00:00 EST. Please see our terms for use of feeds.

Read | Permalink | Email this | Comments

Picasa find: Finder icon gets a new job on Canon digicam

That poor Finder icon. The Rodney Dangerfield of Apple products, he gets no respect. Heck, he’s nowhere to be found on the iPhone or the iPad, and he just sits down in the Dock of the Mac, getting little or no work from anybody.

It’s apparent that Mr. Finder has had his fill of Apple and the Mac, as he’s now finding work elsewhere. TUAW reader Aleksander found Mr. Finder hanging out on the back of a new Canon A3000IS digital camera, where he’s apparently used to enable a face detection function. Sure, the FInder icon has tried to cover up his face by putting on a little makeup to get rid of that two-tone blue tan, and it looks like he may have also gotten a little rhinoplasty, but it’s him.

We’re wondering just how widespread Mr. Finder’s disloyalty to Apple really is. If you happen to find him anywhere else, snap a photo of him, send it to Flickr, and tag it with TUAW so the world will know.

TUAWPicasa find: Finder icon gets a new job on Canon digicam originally appeared on The Unofficial Apple Weblog (TUAW) on Sat, 07 Aug 2010 08:00:00 EST. Please see our terms for use of feeds.

Read | Permalink | Email this | Comments

TUAW Review: Filemaker Go for iPad

Filemaker has brought its flagship product to a whole new level of portability with Filemaker Go for iPad (US$39.99) and iPhone/iPod touch ($19.99). Years ago I used Filemaker Mobile with a Palm, and this is a far cry from those early days. Here’s what I found while testing Filemaker Go on the iPad.

Design

When FileMaker Go is first launched, you’re presented with two columns: stored files on the left and remote files and hosts on the right. Configuring a remote host is easy and will be immediately familiar to anyone who’s done it before with the desktop version of FileMaker Pro. In the upper right-hand corner you’ll find two familiar icons: add a host and search for a host.

If you choose to add a host, a slip will flip into view (nice bit of eye candy there) and ask for its IP address or domain name. Optionally, you can enter the host’s name, which is helpful if you have multiple servers to keep track of (“Corporate Office” and “School Building,” for example). Note that FileMaker Go connects to databases hosted by FileMaker Server/Server Advanced 11 and 10 and FileMaker Pro/Pro Advanced 11 and 10.

TUAWTUAW Review: Filemaker Go for iPad originally appeared on The Unofficial Apple Weblog (TUAW) on Fri, 06 Aug 2010 16:00:00 EST. Please see our terms for use of feeds.

Read | Permalink | Email this | Comments

A Delta Airlines app is on the way

delta iphone iconRather recently, American Airlines released an iPhone app that offers quite a few nice features for the AA traveler, including flight status, boarding pass access and … Soduku. With the exception of that last feature, travel app Kayak offers many of these features already, though it’s not stopping other airlines from following suit.

Just the other day, a Delta executive mentioned in a short interview that a Delta iPhone app is on the horizon. It’s not clear yet what kinds of services and features the app will provide, though it’s a safe bet the American Airlines app will give you a decent guess.

What kinds of services and features would you want to see in an airline-dedicated iPhone app that’s not already present in current offerings?

TUAWA Delta Airlines app is on the way originally appeared on The Unofficial Apple Weblog (TUAW) on Fri, 06 Aug 2010 17:00:00 EST. Please see our terms for use of feeds.

Read | Permalink | Email this | Comments

iPad app store gains genius section

ipad genius app storeSometime early this morning, Apple quietly unleashed the genius section of the iPad app store, something that’s been in the iPhone app store for quite some time. It’s interesting how Apple is always “quietly” releasing new things, while making a big to-do about others. What’s also interesting is how a new feature in the app store can be made without a software update.

Not only does the new genius section of the iPad app store provide the same type of recommendations as with the iPhone, there’s a new tab titled “iPad Upgrades,” which shows you all of the iPad (aka, “HD”) versions of the iPhone apps you already have. This is a great new feature for both consumers and app developers because, previously, there was no easy way to know.

Thanks for everyone who sent this in!

TUAWiPad app store gains genius section originally appeared on The Unofficial Apple Weblog (TUAW) on Fri, 06 Aug 2010 14:00:00 EST. Please see our terms for use of feeds.

Read | Permalink | Email this | Comments

Guy moving to New York wants a roomie who doesn’t have an iPhone

An ad posted to Craigslist yesterday is from an open-minded sort of guy who wants a roommate for an apartment in Soho. Sounds typical, right? Here’s the catch: He insists that prospective roommates not have an iPhone or an iPad.

The ad states that “I refuse to live with anyone that has sold their immortal soul to Steve Jobs.” He’s also looking for a guy with Starcraft II experience, and wants any potential live-ins to post a link to their battle.net profile and to prove to him that they don’t own an iPhone.

The New York Observer found the guy, Vince Thomas, and he said he currently lives with another fellow who is a Mac fan, and Vince says he “just can’t take it anymore.” Vince has a Droid phone from Motorola, and apparently he’d rather talk about that instead.

Vince has a point. Some of us love our iPhones. In social situations I don’t bring it up unless someone asks. I’m even feeling a bit guilty about the ‘Sent from my iPhone’ tag on my mail. If I write Vince I’ll be sure to change it to ‘Sent from my wonderful Droid, which is so much better than the iPhone I ditched.’

On the other hand, I’ve been around a few Droid owners, and let me tell you, that’s no picnic either. Good luck Vince. May you find a roommate just like you.

[Via The New York Observer]

TUAWGuy moving to New York wants a roomie who doesn’t have an iPhone originally appeared on The Unofficial Apple Weblog (TUAW) on Fri, 06 Aug 2010 15:00:00 EST. Please see our terms for use of feeds.

Read | Permalink | Email this | Comments

UITableView – Indexed table view

In this tutorial you will learn how to create a simple index for the table view. This index view shows up on the right side, just like the contacts application. Click on “Read more…” to learn more

Introduction
Displaying an index for the table view is another way for the users to get the data faster. This tutorial will show you how to do that. This is the fifth tutorial in the UITableView tutorial series and borrows its code from the previous one. This is how the app will look like

Creating an Index
The first thing we need to do is create an array, which will contain the index values to display. The values in the array has to be of type NSString. The Apple documentation says that the style of the table view should be set to UITableViewStylePlain. However, it does not throw an error when the style is set to UITableViewStyleGrouped. The array is returned in sectionIndexTitlesForTableView method and this is how the code looks like

//RootViewController.m
- (NSArray *)sectionIndexTitlesForTableView:(UITableView *)tableView {

if(searching)
return nil;

NSMutableArray *tempArray = [[NSMutableArray alloc] init];
[tempArray addObject:@"1"];
[tempArray addObject:@"2"];
[tempArray addObject:@"3"];
[tempArray addObject:@"4"];
[tempArray addObject:@"5"];
[tempArray addObject:@"6"];
[tempArray addObject:@"7"];
[tempArray addObject:@"8"];
[tempArray addObject:@"9"];
[tempArray addObject:@"10"];
[tempArray addObject:@"11"];
[tempArray addObject:@"12"];
[tempArray addObject:@"13"];
[tempArray addObject:@"14"];
[tempArray addObject:@"15"];
[tempArray addObject:@"16"];
[tempArray addObject:@"17"];
[tempArray addObject:@"18"];
[tempArray addObject:@"19"];
[tempArray addObject:@"20"];
[tempArray addObject:@"21"];
[tempArray addObject:@"22"];
[tempArray addObject:@"23"];
[tempArray addObject:@"24"];
[tempArray addObject:@"25"];
[tempArray addObject:@"26"];

return tempArray;
}

The above code creates an array and returns it. You can populate this array with alphabets from ‘A’ to ‘Z’. If the user is searching the table view, then the array is not returned. This way the index view is not shown.

Handling Events
When an item in the index is clicked, the section starting with the selected index item is displayed. The event that gets called is tableView:sectionForSectionIndexTitle:atIndex, which returns an index of the section to display. Since our data source only has two sections and 26 index values, the code looks like this

//RootViewController.m
- (NSInteger)tableView:(UITableView *)tableView sectionForSectionIndexTitle:(NSString *)title atIndex:(NSInteger)index {

if(searching)
return -1;

return index % 2;
}

If the user is searching the table view, then we do not return the index of the section. The data source is changed a little to include some test objects, so the section selection is obvious. Since the index shows up very close to the accessory view, the accessory view is set to UITableViewCellAccessoryNone.

Conclusion
Just by implementing two methods, we have created an index for the table view. However, I think Apple has kept some methods private. Since we cannot display the magnifying glass like the contacts application. If you have an idea on how to get it working, please let us know.

Happy Programming,
iPhone SDK Articles


Attachments

Suggested Readings

UIPickerView – Creating a simple picker view

Apple provides a control knows as the UIPickerView, with which a user can select an item from a list. In this tutorial you will learn how to create a simple picker view. Click on “Read more…” to continueIntroduction
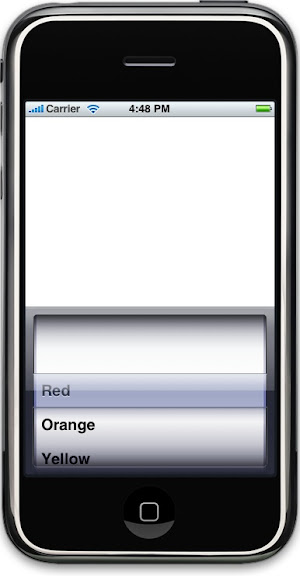
The picker view lets the user select an item from a list. In this tutorial, you will learn how easy it is to configure a picker view and respond to events. This is how the app will look like


Creating the project
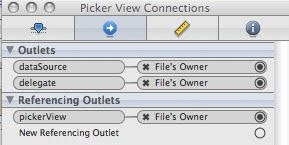
Create a new project by selecting “Windows-Based Application”, I have named my project “PickerView”. I also added another view called “PickerView” and created a view controller for the view called “PickerViewController”. Add a UIPickerView to the view and create all the right connections. The “PickerViewController” implements two protocols and this is how the header file looks like

//RootViewController.h
#import <UIKit/UIKit.h>

@interface PickerViewController : UIViewController <UIPickerViewDataSource, UIPickerViewDelegate> {

IBOutlet UIPickerView *pickerView;
NSMutableArray *arrayColors;
}

@end

The connections of the picker view looks like this

This is how the UIPickerView is added to the subview of the window.

//RootViewController.m
- (void)applicationDidFinishLaunching:(UIApplication *)application {

pvController = [[PickerViewController alloc] initWithNibName:@"PickerView" bundle:[NSBundle mainBundle]];

[window addSubview:pvController.view];

// Override point for customization after application launch
[window makeKeyAndVisible];
}

Creating the data source
Lets create a data source, with all the colors in a rainbow. The array is declared in the header file and released in the dealloc method. It is populated in viewDidLoad method and this is how the code looks like

//PickerViewController.m
- (void)viewDidLoad {
[super viewDidLoad];

arrayColors = [[NSMutableArray alloc] init];
[arrayColors addObject:@"Red"];
[arrayColors addObject:@"Orange"];
[arrayColors addObject:@"Yellow"];
[arrayColors addObject:@"Green"];
[arrayColors addObject:@"Blue"];
[arrayColors addObject:@"Indigo"];
[arrayColors addObject:@"Violet"];
}

The picker view can be divided into components, we need to specify how many components to display. This is done in numberOfComponentsInPickerView method. This is how the source code looks like

//PickerViewController.m
- (NSInteger)numberOfComponentsInPickerView:(UIPickerView *)thePickerView {

return 1;
}

Now that the picker view knows how many components it should expect, we need to specify how many rows it should display. This is done in pickerView:numberOfRowsInComponent. This is how the source code looks like

//PickerViewController.m
- (NSInteger)pickerView:(UIPickerView *)thePickerView numberOfRowsInComponent:(NSInteger)component {

return [arrayColors count];
}

The method pickerView:titleForRow:forComponent gets called n number of times, where n is the number returned in pickerView:numberOfRowsInComponent. This is how the source code looks like

//PickerViewController.m
- (NSString *)pickerView:(UIPickerView *)thePickerView titleForRow:(NSInteger)row forComponent:(NSInteger)component {

return [arrayColors objectAtIndex:row];
}

In the above code, we return the object at index using the row parameter. Here we ignored the component parameter, as we only have one component to display. If you have more then one component, then we return the row present in that given component. Run your application to see the values in the picker view.

Handling Events
The method pickerView:didSelectRow:inComponent is called when an item is selected in the picker view. In the example, I simply log the selected color and the row number. This is how the code looks like

//PickerViewController.m
- (void)pickerView:(UIPickerView *)thePickerView didSelectRow:(NSInteger)row inComponent:(NSInteger)component {

NSLog(@"Selected Color: %@. Index of selected color: %i", [arrayColors objectAtIndex:row], row);
}

Conclusion
Picker view is a perfect control to display a list of items, from which one single item can be selected. In this tutorial, we saw how easy it is to configure a picker view and respond to events. I hope this tutorial has helped you in some little way. Stay tuned for some more tutorials on the UIPickerView object.

Happy Programming,
iPhone SDK Articles


Attachments

Suggested Readings

UITableView – Adding subviews to a cell’s content view

Using the default UITableViewCell we can display a text or an image but sometimes it is not good enough. In this tutorial you will learn how to customize the UITableViewCell.

Introduction
Using the default UITableViewCell, we can display a text (using the text property) or an image (using the image property). However, we cannot display data in multiple columns or rows. This is the sixth tutorial in the UITableView tutorial series and borrows its source code from the previous one. This is how the final app will look like

We cannot achieve the display we want by setting the text property of the UITableViewCell. To solve this problem, we are going to add two labels to the content view of the cell. The labels are added in such a way that they show up one above the other by using coordinates. Apple documentation says we should add subviews to the cell’s content view, if you do not want to change the default behavior of the cell. This is the reason why we are not going to inherit from UITableViewCell.


Adding Sub Views
Instead of creating a cell by using initWithFrame:reuseIdentifier, we will create it from our own custom method. This method will be responsible for not only creating the cell but also the labels. The labels are created with specific locations in the cell using x and y coordinates. They are added to the content view of the cell as seen below

//RootViewController.h
#import <UIKit/UIKit.h>

@class OverlayViewController;

@interface RootViewController : UITableViewController {

NSMutableArray *listOfItems;
NSMutableArray *copyListOfItems;
IBOutlet UISearchBar *searchBar;
BOOL searching;
BOOL letUserSelectRow;

OverlayViewController *ovController;
}

- (UITableViewCell *) getCellContentView:(NSString *)cellIdentifier;
- (void) searchTableView;
- (void) doneSearching_Clicked:(id)sender;

@end

//RootViewController.m
- (UITableViewCell *) getCellContentView:(NSString *)cellIdentifier {

CGRect CellFrame = CGRectMake(0, 0, 300, 60);
CGRect Label1Frame = CGRectMake(10, 10, 290, 25);
CGRect Label2Frame = CGRectMake(10, 33, 290, 25);
UILabel *lblTemp;

UITableViewCell *cell = [[[UITableViewCell alloc] initWithFrame:CellFrame reuseIdentifier:cellIdentifier] autorelease];

//Initialize Label with tag 1.
lblTemp = [[UILabel alloc] initWithFrame:Label1Frame];
lblTemp.tag = 1;
[cell.contentView addSubview:lblTemp];
[lblTemp release];

//Initialize Label with tag 2.
lblTemp = [[UILabel alloc] initWithFrame:Label2Frame];
lblTemp.tag = 2;
lblTemp.font = [UIFont boldSystemFontOfSize:12];
lblTemp.textColor = [UIColor lightGrayColor];
[cell.contentView addSubview:lblTemp];
[lblTemp release];

return cell;
}

The above method creates three rectangles: one for the cell and for the two labels in the cell. We create the cell using initWithFrame:reuseIdentifier, but this time we add two labels to the content view property. Initialize the first label with “Label1Frame” coordinates, which will make this label show up at the top of the cell. Set the tag of this label to 1, so we can find it in tableView:cellForRowAtIndexPath method. Initialize the second label using “Label2″Frame” coordinates, which will make this label to show up at the bottom. The tag of this label is set to 2. The labels are added to the content view using addSubView method. Finally the cell is returned to be reused.

Displaying data

Once we have the table view cell, we can get the underlying label by passing viewWithTag message to the cell. Here the data is set to the text property of the label and not the cell. This is how the code for tableView:cellForRowAtIndexPath changes

//RootViewController.m
- (UITableViewCell *)tableView:(UITableView *)tableView cellForRowAtIndexPath:(NSIndexPath *)indexPath {

static NSString *CellIdentifier = @"Cell";

UITableViewCell *cell = [tableView dequeueReusableCellWithIdentifier:CellIdentifier];

if(cell == nil)
cell = [self getCellContentView:CellIdentifier];

UILabel *lblTemp1 = (UILabel *)[cell viewWithTag:1];
UILabel *lblTemp2 = (UILabel *)[cell viewWithTag:2];

if(searching) {

lblTemp1.text = [copyListOfItems objectAtIndex:indexPath.row];
lblTemp2.text = @"";
}
else {

//First get the dictionary object
NSDictionary *dictionary = [listOfItems objectAtIndex:indexPath.section];
NSArray *array = [dictionary objectForKey:@"Countries"];
NSString *cellValue = [array objectAtIndex:indexPath.row];

lblTemp1.text = cellValue;
lblTemp2.text = @"Sub Value";

[cellValue release];
}

return cell;
}

If you run this application now you will notice some obvious display issues, which we can resolve by specifying the height of the row. This is done in tableView:heightForRowAtIndexPath method. The code looks like this

//RootViewController.m
-(CGFloat)tableView:(UITableView *)tableView heightForRowAtIndexPath:(NSIndexPath *)indexPath {

return 60;
}

All the rows in the table view will have a height of 60. Run your app to see the changes.


Conclusion
In this tutorial we saw how easy it is to customize the table view cell. The same principle can be applied to customize the display by adding different controls to the content view. Instead of adding labels a progress bar can also be added. I hope this tutorial has helped you in some way.

Happy Programming,
iPhone SDK Articles


Attachments

Suggested Readings

SQLite Tutorial – Saving images in the database

There maybe times when you need to save more than just text in the database, like a file or an image. SQLite versions 3.0 and later allows you to store BLOB data in a column. Using the data type BLOB we can store large objects like an image or a file. Read on to learn more.

Introduction
Using BLOB data type we can store an image in the SQLite database. The data that actually gets stored in the database is the bytes that make up an image or a file. The is the sixth tutorial in SQLite tutorial series and borrows its source code from the previous one. We will change the “DetailView” by adding a new section which will be used to display or change the image. The image can only be changed when the view is in the edit mode. We will use a UIImagePickerController to display the photo album and to select an image.

Changing the database
Let’s start by adding a new column to our “Coffee” database. Name the column “CoffeeImage” and set its data type to BLOB. This is how the database schema looks like in SQLite manager


Changing the Coffee Class
Add a new property to the “Coffee” class which will hold the image from the database. This is how the header and the implementation files look like

//Coffee.h
//Complete code listing not shown
@interface Coffee : NSObject {

NSInteger coffeeID;
NSString *coffeeName;
NSDecimalNumber *price;
UIImage *coffeeImage;
//Complete Code listing not shown ...
}
@property (nonatomic, readonly) NSInteger coffeeID;
@property (nonatomic, copy) NSString *coffeeName;
@property (nonatomic, copy) NSDecimalNumber *price;
@property (nonatomic, retain) UIImage *coffeeImage;
//Complete Code listing not shown ...

The new property is synthesized and released in the dealloc method

//Coffee.m
//Complete code listing now shown
@synthesize coffeeID, coffeeName, price, isDirty, isDetailViewHydrated, coffeeImage;

- (void)setCoffeeImage:(UIImage *)theCoffeeImage {

self.isDirty = YES;
[coffeeImage release];
coffeeImage = [theCoffeeImage retain];
}

- (void) dealloc {

[coffeeImage release];
[price release];
[coffeeName release];
[super dealloc];
}

Changing the Detail View
Let’s add a new row to the detail view, which will be used to display the image or to change the image in edit mode. Since the style of the table view placed on the detail view is set to “Grouped”, we will return three sections in numberOfSectionsInTableView and this is how the source code looks like

//DetailViewController.h
- (NSInteger)numberOfSectionsInTableView:(UITableView *)tblView {
return 3;
}

Let’s also display a title for the new section in tableView:titleForHeaderInSection. The code changes like this

//DetailViewController.m
- (NSString *)tableView:(UITableView *)tblView titleForHeaderInSection:(NSInteger)section {

NSString *sectionName = nil;

switch (section) {
case 0:
sectionName = [NSString stringWithFormat:@"Coffee Name"];
break;
case 1:
sectionName = [NSString stringWithFormat:@"Price"];
break;
case 2:
sectionName = [NSString stringWithFormat:@"Coffee Image"];
break;
}

return sectionName;
}

Displaying the photo album
Now we need to display a photo album when the section is selected in edit mode. From this album we can select a image to be saved in the database. Using a UIImagePickerController we can capture an image from the camera or the photo library on the device. UIImagePickerController class manages all the user interactions and all we have to do is display and dismiss it. Before we can display the view, we need to check if the interface is supported by calling isSourceTypeAvailable class method. The delegate of the UIImagePickerController should also confirm to UINavigationControllerDelegate and UIImagePickerControllerDelegate. In this case we will set the delegate of UIImagePickerController to “DetailViewController” and this is how the header and implementation file changes

//DetailViewController.h
@class Coffee, EditViewController;

@interface DetailViewController : UIViewController <UINavigationControllerDelegate, UIImagePickerControllerDelegate, UITableViewDataSource, UITableViewDelegate> {

IBOutlet UITableView *tableView;
Coffee *coffeeObj;
NSIndexPath *selectedIndexPath;
EditViewController *evController;

UIImagePickerController *imagePickerView;
}

@property (nonatomic, retain) Coffee *coffeeObj;

@end

The variable “imagePickerView” is released in the dealloc method and the code listing is now shown here. We will initialize “imagePickerView” in viewDidLoad method and this is how the code changes

//DetailViewController.m
- (void)viewDidLoad {
[super viewDidLoad];

self.navigationItem.rightBarButtonItem = self.editButtonItem;

//Configure the UIImagePickerController
imagePickerView = [[UIImagePickerController alloc] init];
imagePickerView.delegate = self;
}

From the above code, “imagePickerView” is initialized and its delegate is set to self. This way “DetailViewController” will be notified of all the user actions on the picker controller. First, we need to display the view and it is done in tableView:didSelectRowAtIndexPath and this is how the code looks like

//DetailViewController.m
- (void)tableView:(UITableView *)tblView didSelectRowAtIndexPath:(NSIndexPath *)indexPath {

//Keep track of the row selected.
selectedIndexPath = indexPath;

if(evController == nil)
evController = [[EditViewController alloc] initWithNibName:@"EditView" bundle:nil];

//Find out which field is being edited.
switch(indexPath.section)
{
case 0:
evController.keyOfTheFieldToEdit = @"coffeeName";
evController.editValue = coffeeObj.coffeeName;

//Object being edited.
evController.objectToEdit = coffeeObj;

//Push the edit view controller on top of the stack.
[self.navigationController pushViewController:evController animated:YES];
break;
case 1:
evController.keyOfTheFieldToEdit = @"price";
evController.editValue = [coffeeObj.price stringValue];

//Object being edited.
evController.objectToEdit = coffeeObj;

//Push the edit view controller on top of the stack.
[self.navigationController pushViewController:evController animated:YES];
break;
case 2:
if([UIImagePickerController isSourceTypeAvailable:UIImagePickerControllerSourceTypePhotoLibrary])
[self presentModalViewController:imagePickerView animated:YES];
break;
}
}

First confirm if the photo library is available on the device or not, if it is then present the view to the user. The method imagePickerController:didFinishPickingImage:editingInfo is called when an image is selected. This is how the code looks like

//DetailViewController.m
- (void)imagePickerController:(UIImagePickerController *)picker didFinishPickingImage:(UIImage *)image editingInfo:(NSDictionary *)dictionary {

coffeeObj.coffeeImage = image;
[tableView reloadData];
[picker dismissModalViewControllerAnimated:YES];
}

We get the selected image and set the “coffeeImage” property of the selected coffee. The table view is then reloaded and the picker view is dismissed.

Display the coffee image
We will display the coffee image in tableView:cellForRowAtIndexPath and this is how the code looks like

//DetailViewController.m
- (UITableViewCell *)tableView:(UITableView *)tblView cellForRowAtIndexPath:(NSIndexPath *)indexPath {
static NSString *CellIdentifier = @"Cell";

UITableViewCell *cell = [tableView dequeueReusableCellWithIdentifier:CellIdentifier];
if (cell == nil) {
cell = [[[UITableViewCell alloc] initWithFrame:CGRectZero reuseIdentifier:CellIdentifier] autorelease];
}

switch(indexPath.section) {
case 0:
cell.text = coffeeObj.coffeeName;
break;
case 1:
cell.text = [NSString stringWithFormat:@"%@", coffeeObj.price];
break;
case 2:
cell.text = @"Change Image";
if(coffeeObj.coffeeImage != nil)
cell.image = coffeeObj.coffeeImage;
break;
}

return cell;
}

If the index of the section is 2 then we set the title of the cell to “Change Image” and the image to the coffee image.

Saving image in the SQLite database
Until now we haven’t saved the image in the database because we only save data when the application is being terminated or if a memory warning is received. The data is saved in “saveAllData” method as seen in the previous tutorial. Let’s change this method to save the image in the database which now has a new column called “CoffeeImage” to hold the image as bytes. This is how the code looks like

//Coffee.m
- (void) saveAllData {

if(isDirty) {

if(updateStmt == nil) {
const char *sql = "update Coffee Set CoffeeName = ?, Price = ?, CoffeeImage = ? Where CoffeeID = ?";
if(sqlite3_prepare_v2(database, sql, -1, &updateStmt, NULL) != SQLITE_OK)
NSAssert1(0, @"Error while creating update statement. '%s'", sqlite3_errmsg(database));
}

sqlite3_bind_text(updateStmt, 1, [coffeeName UTF8String], -1, SQLITE_TRANSIENT);
sqlite3_bind_double(updateStmt, 2, [price doubleValue]);

NSData *imgData = UIImagePNGRepresentation(self.coffeeImage);

int returnValue = -1;
if(self.coffeeImage != nil)
returnValue = sqlite3_bind_blob(updateStmt, 3, [imgData bytes], [imgData length], NULL);
else
returnValue = sqlite3_bind_blob(updateStmt, 3, nil, -1, NULL);

sqlite3_bind_int(updateStmt, 4, coffeeID);

if(returnValue != SQLITE_OK)
NSLog(@"Not OK!!!");

if(SQLITE_DONE != sqlite3_step(updateStmt))
NSAssert1(0, @"Error while updating. '%s'", sqlite3_errmsg(database));

sqlite3_reset(updateStmt);

isDirty = NO;
}

//Reclaim all memory here.
[coffeeName release];
coffeeName = nil;
[price release];
price = nil;

isDetailViewHydrated = NO;
}

We first rewrite the update query to include the CoffeeImage column. We also need a way to get the image data as bytes and this is where UIImagePNGRepresentation method helps us. We then bind the BLOB parameter using sqlite3_bind_blob method. The first parameter takes the update statement, the second parameter takes the index of the parameter value, the third one is the actual data itself, the fourth one is the length of the data which is being saved, and a pointer to a method which is responsible to clean up the data. If sqlite3_bind_blob method does not return SQLITE_OK then we display an error in NSLog. If there is no error while saving the data then we have successfully saved the image in the SQLite database on the iPhone/iPod.

Getting an image from the SQLite database
We now have to get the data from the database when the detail view is loaded. This is done in “hydrateDetailViewData” method and this is how the code changes

//DetailViewController.m
- (void) hydrateDetailViewData {

//If the detail view is hydrated then do not get it from the database.
if(isDetailViewHydrated) return;

if(detailStmt == nil) {
const char *sql = "Select price, CoffeeImage from Coffee Where CoffeeID = ?";
if(sqlite3_prepare_v2(database, sql, -1, &detailStmt, NULL) != SQLITE_OK)
NSAssert1(0, @"Error while creating detail view statement. '%s'", sqlite3_errmsg(database));
}

sqlite3_bind_int(detailStmt, 1, coffeeID);

if(SQLITE_DONE != sqlite3_step(detailStmt)) {

//Get the price in a temporary variable.
NSDecimalNumber *priceDN = [[NSDecimalNumber alloc] initWithDouble:sqlite3_column_double(detailStmt, 0)];

//Assign the price. The price value will be copied, since the property is declared with "copy" attribute.
self.price = priceDN;

NSData *data = [[NSData alloc] initWithBytes:sqlite3_column_blob(detailStmt, 1) length:sqlite3_column_bytes(detailStmt, 1)];

if(data == nil)
NSLog(@"No image found.");
else
self.coffeeImage = [UIImage imageWithData:data];

//Release the temporary variable. Since we created it using alloc, we have own it.
[priceDN release];
}
else
NSAssert1(0, @"Error while getting the price of coffee. '%s'", sqlite3_errmsg(database));

//Reset the detail statement.
sqlite3_reset(detailStmt);

//Set isDetailViewHydrated as YES, so we do not get it again from the database.
isDetailViewHydrated = YES;
}

The select query is changed to include CoffeeImage column and we use sqlite3_column_blob method to load the BLOB data into variable of type NSData. WE create an image of type NSData from imageWithData class method. The rest of the code works as described above.

This tutorial wasn’t designed to display imags anywhere and is a direct result of all the emails I got asking, how to save images in the SQLite database. So if you choose an image which does not fit in the section, it will take up all the space on the view.

Conclusion
This tutorial explains how to save and read images from a SQLite database. We can use the same functionality to save files in the database. I hope you had fun and learnt something new with this tutorial.

Happy Programming,
iPhone SDK Articles


Attachments

Suggested Readings

UITableView – Drill down table view tutorial

Until now we saw how to create a simple table but there are times when we need to show another table view when a row is selected. This kind of a flow is called “drill down” and in this tutorial we learn how to create a drill down table view. Click on “Read more…” to learn more

Introduction
Using a drill down table view we can display some primary level of items, where a selected row will result in displaying a new table view with data related to the item selected. The process is repeated until an item has no sub level categories and it is then we display a detail view which is not a UITableView. This is the seventh tutorial in the UITableView series and does NOT inherit its source code from the previous tutorial.

Creating the project
Create a new project in XCode by selecting “Navigation-Based Application”, I have named my project “DrillDownApp” which is used in this tutorial.

Using nothing but a single UITableView
Instead of creating 3 different UITableView’s to display three different levels, we will use the same table view and the same table view controller. This philosophy is borrowed from web programming, where we only have one page to display a list of products.

Designing the flow
Before we start writing any code, let’s decide the flow of the application with some specifics. Below is a table of how the data movies when we select an item.

First Level Second Level Third Level Fourth Level Fifth Level Sixth Level
Item 1 Screen A Detail View N/A N/A N/A
Item 2 Screen B Screen C Detail View N/A N/A
Item 3 Screen D Screen E Screen F Detail View N/A
Item 4 Screen G Screen H Screen I Screen J Detail View

When the application is launched we will see the following items; “Item 1”, “Item 2”, “Item 3”, and “Item 4”. If “Item 1” is selected then we see the table view display “Screen A” and upon selecting “Screen A” we will see the detail view load. The same goes for “Item 2”, which will load a table view with one value called “Screen B” -> “Screen C” -> Detail view and so on so forth for the remaining values in the first table view.

Creating the data source
The data source for this tutorial will come from an XML file or a plist file. Create a new file under the “Resource” folder by clicking on File -> New File -> (Under MAC OS X) select Other -> Property List and save this new file by giving it a name of “Data.plist”. Let’s start by adding values to this property list file.

Select the “Root” element and create a new item by clicking on the arrows at the right.


Name the item “Rows” and change its type to “Array”. This is the array which will contain all the primary level items with its children. The user should be able to select an item in a table view and load another table view with all items under the selected item in the first table view. For us to achieve this, our array should contain a dictionary with at least two types of fields; string and a array. The string type will hold the value of the cell and the array will hold the children rows, which again will contain a n number of dictionaries where n is the number of children rows an item will have.

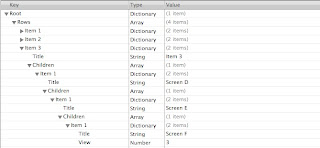
Create a new item “Rows” and set its type to “Dictionary”, you do not have to change the key of the dictionary. Select the dictionary item and create a new item and set its data type to string and name the key to “Title”. The name of the key which should not be changed throughout the property list file, since this is the key which will contain the value of the cell which shows up in the UITableViewCell. Set its value to “Item 1” since this is the first item that shows up in the table view. From the above table we know that selecting “Item 1” should reload the table view to display “Screen A”. Create another field under “Item 1” and change its type to an Array and set its key to “Children”. Under the “Children” item create another item of type “Dictionary” which will only contain a string value called “Screen A” with its key set to “Title”. If “Screen A” is selected we load the detail view; so we do not have to add any children at this level. Add the remaining items from the table in the property list and when you are done the property list should look like this.

Populating the data source
Now that we have created the data source, the next step is to populate it which will be done in the application delegate. Since the root element of data.plist is of type “Dictionary”, we will create a variable of type NSDictionary to hold all the data from the property list file. The header file of the application delegate changes like this

//DrillDownAppDelegate.h
@interface DrillDownAppAppDelegate : NSObject <UIApplicationDelegate> {

UIWindow *window;
UINavigationController *navigationController;

NSDictionary *data;
}

@property (nonatomic, retain) IBOutlet UIWindow *window;
@property (nonatomic, retain) IBOutlet UINavigationController *navigationController;

@property (nonatomic, retain) NSDictionary *data;

@end

The variable “data” will hold our data source which is also synthesized in the implementation file and released in the dealloc method (code not shown here).

This is how the data is populated in applicationDidFinishLaunching method

//DrillDownAppDelegate.m
- (void)applicationDidFinishLaunching:(UIApplication *)application {

NSString *Path = [[NSBundle mainBundle] bundlePath];
NSString *DataPath = [Path stringByAppendingPathComponent:@"data.plist"];

NSDictionary *tempDict = [[NSDictionary alloc] initWithContentsOfFile:DataPath];
self.data = tempDict;
[tempDict release];

// Configure and show the window
[window addSubview:[navigationController view]];
[window makeKeyAndVisible];
}

We read the “data.plist” file and read all of its data in a dictionary object using initWithContentsOfFile message which is present in the NSDictionary class.

Display the data in the table view
Since we will be using the same table view to display data at level, we need; an array to hold the data for the current level, a string to hold the item selected in the parent level and an integer value to tell us if this is the first level or not. This is how the header file for RootViewController changes

//RootViewController.h
@interface RootViewController : UITableViewController {

NSArray *tableDataSource;
NSString *CurrentTitle;
NSInteger CurrentLevel;
}

@property (nonatomic, retain) NSArray *tableDataSource;
@property (nonatomic, retain) NSString *CurrentTitle;
@property (nonatomic, readwrite) NSInteger CurrentLevel;

@end

The property “tableDataSource” contains the present level data source and mimicks the property list file. The array will contain n number of dictionary objects, where n is the number of rows at any given level. A dictionary will contain a title and an array containing the children of the present item. All the properties have been synthesized and the “tableDataSource” and “CurrentTitle” have been released in the dealloc method.

The method viewDidLoad changes like this

//RootViewController.m
- (void)viewDidLoad {
[super viewDidLoad];

if(CurrentLevel == 0) {

//Initialize our table data source
NSArray *tempArray = [[NSArray alloc] init];
self.tableDataSource = tempArray;
[tempArray release];

DrillDownAppAppDelegate *AppDelegate = (DrillDownAppAppDelegate *)[[UIApplication sharedApplication] delegate];
self.tableDataSource = [AppDelegate.data objectForKey:@"Rows"];

self.navigationItem.title = @"Root";
}
else
self.navigationItem.title = CurrentTitle;
}

If the value of the “CurrentLevel” is zero (which it will be when the application is launched) then the array is initialized and populated from the application delegate. Here we get the array whose key is set to “Rows” which will contain the primary level data and the children of every item. The title of the navigation item is set to “Root” in this case, if not the title is set to the “CurrentTitle” variable and the “tableDataSource” is left untouched. These two properties are set in tableView:didSelectRowAtIndexPath method which will look at it later.

Displaying data
In tableView:numberOfRowsInSection return the count of the array like this

//RootViewController.m
- (NSInteger)tableView:(UITableView *)tableView numberOfRowsInSection:(NSInteger)section {
return [self.tableDataSource count];
}

The method tableView:cellForRowAtIndexPath changes like this

//RootViewController.m
- (UITableViewCell *)tableView:(UITableView *)tableView cellForRowAtIndexPath:(NSIndexPath *)indexPath {

static NSString *CellIdentifier = @"Cell";

UITableViewCell *cell = [tableView dequeueReusableCellWithIdentifier:CellIdentifier];
if (cell == nil) {
cell = [[[UITableViewCell alloc] initWithFrame:CGRectZero reuseIdentifier:CellIdentifier] autorelease];
}

// Set up the cell...
NSDictionary *dictionary = [self.tableDataSource objectAtIndex:indexPath.row];
cell.text = [dictionary objectForKey:@"Title"];

return cell;
}

From the data source that we created, we know that every array has at least one element of type “Dictionary” and that has at least one element with the key “Title” which is the string that gets displayed in the table view cell. After the UITableView cell is created, we get the dictionary object from the array and the value for the key “Title”, which is set to the text property of the cell.

Select a row
When a row is selected tableView:didSelectRowAtIndexPath method is called and this is how it looks like

//RootViewController.m
- (void)tableView:(UITableView *)tableView didSelectRowAtIndexPath:(NSIndexPath *)indexPath {

//Get the dictionary of the selected data source.
NSDictionary *dictionary = [self.tableDataSource objectAtIndex:indexPath.row];

//Get the children of the present item.
NSArray *Children = [dictionary objectForKey:@"Children"];

if([Children count] == 0) {

}
else {

//Prepare to tableview.
RootViewController *rvController = [[RootViewController alloc] initWithNibName:@"RootViewController" bundle:[NSBundle mainBundle]];

//Increment the Current View
rvController.CurrentLevel += 1;

//Set the title;
rvController.CurrentTitle = [dictionary objectForKey:@"Title"];

//Push the new table view on the stack
[self.navigationController pushViewController:rvController animated:YES];

rvController.tableDataSource = Children;

[rvController release];
}
}

We first get dictionary object of the selected row and then get its children into an array. If the present level does not have any children we do not do anything for now, but if it does; we load the same table view with different set of data. We initialized the same “RootViewcontroller”, increment the “CurrentLevel” value so it is not zero, set the selected cell’s text as the “CurrentTitle”, push the view controller on the top of the stack and set the new data source to the “tableDataSource” property.

Try it out and you will be able to drill down by selecting a row.

Loading the detail view
Create a new view (using IB) and name it “DetailView”, remember the views get stored under the “Resources” folder. Create a new UIViewController in Xcode under the “Classes” folder and name it DetailViewController. Set the class of File’s owner of the “DetailView” to “DetailViewController” and connect the view outlet to the object in the view in the nib file. Please refer to this tutorial on how to load a detail view.

In viewDidLoad method of the “DetailViewController” set the title of the view to “Detail View”. This is how the code looks like

//DetailViewController.m
- (void)viewDidLoad {
[super viewDidLoad];

self.navigationItem.title = @"Detail View";
}

We will load the detail view when an item does not have any children. The tableView:didSelectRowAtIndexPath method changes like this

//RootViewController.m
- (void)tableView:(UITableView *)tableView didSelectRowAtIndexPath:(NSIndexPath *)indexPath {

//Get the dictionary of the selected data source.
NSDictionary *dictionary = [self.tableDataSource objectAtIndex:indexPath.row];

//Get the children of the present item.
NSArray *Children = [dictionary objectForKey:@"Children"];

if([Children count] == 0) {

DetailViewController *dvController = [[DetailViewController alloc] initWithNibName:@"DetailView" bundle:[NSBundle mainBundle]];
[self.navigationController pushViewController:dvController animated:YES];
[dvController release];
}
else {

//Prepare to tableview.
RootViewController *rvController = [[RootViewController alloc] initWithNibName:@"RootViewController" bundle:[NSBundle mainBundle]];

//Increment the Current View
rvController.CurrentLevel += 1;

//Set the title;
rvController.CurrentTitle = [dictionary objectForKey:@"Title"];

//Push the new table view on the stack
[self.navigationController pushViewController:rvController animated:YES];

rvController.tableDataSource = Children;

[rvController release];
}
}


Conclusion

Using this design we can add any number of children to an item without changing the code. If we have to add data to the sixth level we need not create another table view, all we have to do is add another item in our data source and the code will handle the change. This design does use n number of table view objects like the example provided by Apple.

I hope you had fun reading this article as much as I had writing it. Please let me know what you think.

Happy Programming,
iPhone SDK Articles


Attachments

Suggested Readings

SQLite and CoreData

Yes, Apple has finally ported Core Data to the iPhone which means using SQLite in an application is not the best approach. Once the OS 3.0 is officially released, I will be posting more tutorials on using Core Data. Thank you for all your continued support.

Yes, Apple has finally ported Core Data to the iPhone which means using SQLite in an application is not the best approach. Once the OS 3.0 is officially released, I will be posting more tutorials on using Core Data. Thank you for all your continued support. continued support.

Happy Programming,
iPhone SDK Articles

Drill down table view with a detail view

Since I published my drill down table view tutorial, I got a lot of positive feedback but with one common request. How do I load a different detail view for an item or how do I load a UITabBarController in the detail view. In this tutorial I will show how to load a different detail view.

Introduction
Using a drill down table view we can display hierarchical data where the last view is responsible of displaying some detail information. This view in which the detail information is displayed can be the same for all the data in the table view (like my last tutorial) or it can be different based on the path that the user took. In this tutorial I will show you how to add a different detail view based on the path the user took to get to the last item. This tutorial is based on the UITableView – Drill down table view tutorial and borrows its source code.

This is how one of the detail view looks like
Loading a detail view
Let’s take a step back and think about the browser and the HTML it renders. The browser doesn’t know what it is going to display and it does not even know the style it should set for the HTML. All that information is present in the HTML and the browser simply renders everything on the screen.

Does this mean that to display different data, I need different views even though the view looks the same? No, if the view looks the same you can reuse the same view again to display different data.

Let us think about the navigation controller as the browser and the data in the plist file as the HTML. If we want to tell the browser to style certain elements of the page, we would put that information in the HTML. In a similar fashion, we can put the detail view information in the plist file which the navigation controller will display. You only need to set this information in the last node of the plist file. When it is time to display the detail view, the code can look at this field and show the right detail view to the user.

Let us change the plist file from the last tutorial to include some information about the detail view.

Changing the plist file
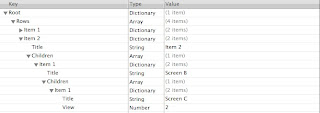
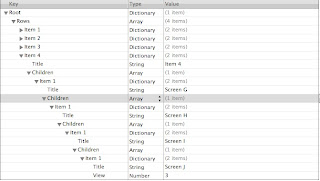
Here we will add a new item to the last child; the title that gets displayed before the detail view is shown. The item will have a title of “View”, type will be number and the value will be 1, 2, or 3. Where 1 = display a UITabBarController in the detail view, 2 = display a detail view with an image in it, and 3 = display a simple detail view.

Your plist file should look like this for the four items

Recap
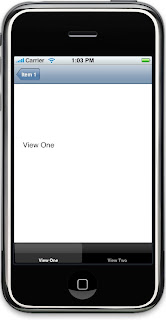
We have added an extra item at the end of called “View” whose type is integer and value is either 1, 2, or 3. Where 1 = load a detail view UITabBarController, 2 = load a detail view with an image and 3 = load a simple detail view. Let’s see how to add a detail view with a UITabBarController

Adding a UITabBarController to the detail view
Let’s add a UITabBarController to the detail view. We will need an outlet of type UITabBarController, so lets create that in the header file of RootViewController. The code changes like this

//RootViewController.h
@interface RootViewController : UITableViewController {

NSArray *tableDataSource;
NSString *CurrentTitle;
NSInteger CurrentLevel;
IBOutlet UITabBarController *tbController;
}

@property (nonatomic, retain) NSArray *tableDataSource;
@property (nonatomic, retain) NSString *CurrentTitle;
@property (nonatomic, readwrite) NSInteger CurrentLevel;

@end

The dealloc method changes like this

//RootViewController.m
- (void)dealloc {
[tbController release];
[CurrentTitle release];
[tableDataSource release];
[super dealloc];
}

Launch Interface Builder by double clicking “RootViewController.xib” file and drag and drop a UITabBarController in the nib file. Select File’s Owner and select the outlet “tbController” and drag it over to the UITabBarController and release. Now we have connected the outlet tbController to the UITabBarController. Add two views in the UITabBarController and change the title of the UITabBarItems to say “View One” and “View Two”. Also add a label to both the views which would say “View One” for the first and “View Two” for the second. This is all you have to do in the Interface Builder.

Display the detail view
We now have to display the UITabBarController as a detail view when an item is selected in the UITableView. Before we do that let’s stop for a while and see what we did. We added a UITabBarController in the same nib file as the RootViewController instead of creating a different nib file. When displaying a detail view, normally we would initialize the view controller and push it on top of the navigation controller. If we try to do the same here we would see the same table view again, which we do not want. The trick here is to switch the view of the RootViewController from the table view to the view of the tbController. Let’s see how to do this; the code for tableView:didSelectRowAtIndexPath changes like this

//RootViewController.m
- (void)tableView:(UITableView *)tableView didSelectRowAtIndexPath:(NSIndexPath *)indexPath {

//Get the dictionary of the selected data source.
NSDictionary *dictionary = [self.tableDataSource objectAtIndex:indexPath.row];

//Get the children of the present item.
NSArray *Children = [dictionary objectForKey:@"Children"];

if([Children count] == 0) {
NSInteger ViewNumber = [[dictionary objectForKey:@"View"] integerValue];
switch (ViewNumber) {
case 1: {
RootViewController *rvc = [[RootViewController alloc] initWithNibName:@"RootViewController" bundle:[NSBundle mainBundle]];
//Switch the view here
rvc.view = tbController.view;
[self.navigationController pushViewController:rvc animated:YES];
[rvc release];
}
break;
case 2:
break;
case 3: {
DetailViewController *dvController = [[DetailViewController alloc] initWithNibName:@"DetailView" bundle:[NSBundle mainBundle]];
[self.navigationController pushViewController:dvController animated:YES];
[dvController release];
}
break;
default: {
DetailViewController *dvController = [[DetailViewController alloc] initWithNibName:@"DetailView" bundle:[NSBundle mainBundle]];
[self.navigationController pushViewController:dvController animated:YES];
[dvController release];
}
break;
}
}
else {

//Prepare to tableview.
RootViewController *rvController = [[RootViewController alloc] initWithNibName:@"RootViewController" bundle:[NSBundle mainBundle]];

//Increment the Current View
rvController.CurrentLevel += 1;

//Set the title;
rvController.CurrentTitle = [dictionary objectForKey:@"Title"];

//Push the new table view on the stack
[self.navigationController pushViewController:rvController animated:YES];

rvController.tableDataSource = Children;

[rvController release];
}
}

That is the complete code listing for tableView:didSelectRowAtIndexPath method but it does a lot of things and we only need to concentrate on some of the code, so teh condensed version is listed below

//RootViewController.m - tableView:didSelectRowAtIndexPath
if([Children count] == 0) {
NSInteger ViewNumber = [[dictionary objectForKey:@"View"] integerValue];
switch (ViewNumber) {
case 1: {
RootViewController *rvc = [[RootViewController alloc] initWithNibName:@"RootViewController" bundle:[NSBundle mainBundle]];
//Switch the view here
rvc.view = tbController.view;
[self.navigationController pushViewController:rvc animated:YES];
[rvc release];
}
break;
case 2:
break;
case 3: {
DetailViewController *dvController = [[DetailViewController alloc] initWithNibName:@"DetailView" bundle:[NSBundle mainBundle]];
[self.navigationController pushViewController:dvController animated:YES];
[dvController release];
}
break;
default: {
DetailViewController *dvController = [[DetailViewController alloc] initWithNibName:@"DetailView" bundle:[NSBundle mainBundle]];
[self.navigationController pushViewController:dvController animated:YES];
[dvController release];
}
break;
}
}

The above code first checks if the present item has any children or not, if it doesn’t then we look for the value of the item “View”. If it is 1, we know that we have to display a detail view with a UITabBarController. As mentioned before we need to switch the view property of the controller to the view of the tab bar controller, which we do after initializing the controller. At last we ask the navigation controller to display our view which is connected to the controller.

Test it out to see how it works.

We also mentioned that if the “View” has a value of 3 then we would display the simple detail view. So drill down Item 3/4 and see the result. Don’t do that with Item 2 yet because it will not work.

Adding a detail view which will display an image.

Hopefully by now you have a clear idea of how to display different detail views when working with a drill down app.

To display a view with an image create a new view and a new view controller and name the view “ImageView” and the view controller “ImageViewController”. Open the ImageView in IB and set the class to be “ImageViewController” and connect the view outlet from the File’s Owner to the view. Drag and drop a UIImageView from the library on the view. We will set the image of this UIImageView when the view loads and the name of the image will be passed from the root view controller. Since we need to display an image in the image view from Xcode we need an outlet of type UIImageView in the Interface Builder. The header file of “ImageViewController” changes like this

//ImageViewController.m
@interface ImageViewController : UIViewController {

IBOutlet UIImageView *imgView;
NSString *ImageName;
}

@property (nonatomic, retain) NSString *ImageName;

@end

We have also declared a property called “ImageName” which the root view controller will use to pass the name of the image to the image view controller and the image view controller will display the image in the image view.

This is how the viewDidLoad method changes

//ImageViewController.m
- (void)viewDidLoad {
[super viewDidLoad];

NSString *Path = [[NSBundle mainBundle] bundlePath];
NSString *ImagePath = [Path stringByAppendingPathComponent:ImageName];
UIImage *tempImg = [[UIImage alloc] initWithContentsOfFile:ImagePath];
[imgView setImage:tempImg];
[tempImg release];
}

The dealloc method looks like this

//ImageViewController.m
- (void)dealloc {
[ImageName release];
[imgView release];
[super dealloc];
}

Displaying the detail view
Let’s go back to the RootViewController.m file and import “ImageViewController.h” file at the top and it should look like this

//RootViewController.m
#import "RootViewController.h"
#import "DrillDownAppAppDelegate.h"
#import "DetailViewController.h"
#import "ImageViewController.h"

@implementation RootViewController
...

In tableView:didSelectRowAtIndexPath we will now display the image detail view when the “ViewNumber” is set to 2. This is how the code looks like

//RootViewController.m - tableView:didSelectRowAtIndexPath method
case 2: {
ImageViewController *ivc = [[ImageViewController alloc] initWithNibName:@"ImageView" bundle:[NSBundle mainBundle]];
ivc.ImageName = @"Image.jpg";
[self.navigationController pushViewController:ivc animated:YES];
[ivc release];
}
break;

In the above code we initialize the “ImageViewController” and set the name of the image that it should display and ask the navigation controller to display it. Do not forget to place an image in the “Resources” folder.

Build and Run to see how it works.

Conclusion
I hope this helps you in some way on how to load a detail view with a UITabBarController. If you have any questions on loading a different detail view please take a look at this tutorial. Comments are most welcome and if you have any questions please send me an email at iphonearticles[@]gmail[dot]com.

Happy Programming,
iPhone SDK Articles


Attachments

Suggested Readings

UITableView – Searching table view

If the user has to scroll often to get to access the data, providing a search bar to search the table view helps in making the process faster. To learn more on searching, click on “Read more”…

Introduction
In this tutorial, you will learn how to search the contents of the table view. This is the fourth tutorial in the UITableView tutorial series and borrows its code from the previous one. This is how the final app looks like

Adding the search bar
Let’s get started by adding the search bar to our existing sectioned table view app. Open Interface Builder by double clicking “RootViewController.nib” file. Drag and drop a UISearchBar object in the nib file. In XCode, open RootViewController.h file declare a variable of type UISearchBar called “searchBar” and declare it with the keyword “IBoutlet” so it is visible in IB. Connect the variable to the UISearchBar object and set the delegate of UISearchBar to File’s Owner. This way the “RootViewController” gets notified of all the events generated on the search bar. This is how the header file looks like, where I have added some more variables and method which will help us in searching.

//RootViewController.h
@interface RootViewController : UITableViewController {

NSMutableArray *listOfItems;
NSMutableArray *copyListOfItems;
IBOutlet UISearchBar *searchBar;
BOOL searching;
BOOL letUserSelectRow;
}

- (void) searchTableView;
- (void) doneSearching_Clicked:(id)sender;

@end

The search bar is added to the header of the table view in “viewDidLoad” method and this how the code looks like

//RootViewController.m
- (void)viewDidLoad {
[super viewDidLoad];

//Initialize the array.
listOfItems = [[NSMutableArray alloc] init];

NSArray *countriesToLiveInArray = [NSArray arrayWithObjects:@"Iceland", @"Greenland", @"Switzerland", @"Norway", @"New Zealand", @"Greece", @"Rome", @"Ireland", nil];
NSDictionary *countriesToLiveInDict = [NSDictionary dictionaryWithObject:countriesToLiveInArray forKey:@"Countries"];

NSArray *countriesLivedInArray = [NSArray arrayWithObjects:@"India", @"U.S.A", nil];
NSDictionary *countriesLivedInDict = [NSDictionary dictionaryWithObject:countriesLivedInArray forKey:@"Countries"];

[listOfItems addObject:countriesToLiveInDict];
[listOfItems addObject:countriesLivedInDict];

//Initialize the copy array.
copyListOfItems = [[NSMutableArray alloc] init];

//Set the title
self.navigationItem.title = @"Countries";

//Add the search bar
self.tableView.tableHeaderView = searchBar;
searchBar.autocorrectionType = UITextAutocorrectionTypeNo;

searching = NO;
letUserSelectRow = YES;
}

Here we also set some boolean variables which will help us in searching. More about this later in the tutorial. The search bar is added to the “tableHeaderView” property of the table view. I also have another mutable array called “copyListOfItems”, which is used to store the search results. It used as the data source of the table view when searching. Run your application to see the search bar added to the top of the table view. The search bar is also released in the dealloc method (source code not provided here).

How the search will work
Before we proceed with any code, lets review some things we will do. When the user begins searching by clicking the search text box, we will do the following:

  1. Set the “searching” variable to YES.
  2. Set the “letUserSelectRow” variable to NO, since we do not want the user to select a row when the search box is empty.
  3. Disable scrolling of the table view. This is done to avoid an error that is raised, when the user scrolls the table view after the search bar is clicked.
  4. Display a done button on the right bar.
  5. Start searching as the user starts typing, this time allowing the user to select a row.
  6. Use a different data source to bind the table, which display’s the search reults.
  7. Search results are displayed in a single list and they are not grouped.
  8. Hide the keyboard and finish searching, when the user clicks on done.

Handling events
The first event that gets raised, is when the user touches the search bar to bring up the keyboard. The method searchBarTextDidBeginEditing is called and this is where we set the table view in search mode. The code looks like this

//RootViewController.m
- (void) searchBarTextDidBeginEditing:(UISearchBar *)theSearchBar {

searching = YES;
letUserSelectRow = NO;
self.tableView.scrollEnabled = NO;

//Add the done button.
self.navigationItem.rightBarButtonItem = [[[UIBarButtonItem alloc]
initWithBarButtonSystemItem:UIBarButtonSystemItemDone
target:self action:@selector(doneSearching_Clicked:)] autorelease];
}

Set the “searching” variable to YES, so we know the table view is in search mode. The variable “letUserSelectRow” is set to NO, so we can prohibit the user from selecting a row. Scrolling of the table view is also disabled which will help us when we add a overlay above the view. This is done in tableView:willSelectRowAtIndexPath method and this is how the code looks like

//RootViewController.m
- (NSIndexPath *)tableView :(UITableView *)theTableView willSelectRowAtIndexPath:(NSIndexPath *)indexPath {

if(letUserSelectRow)
return indexPath;
else
return nil;
}

The above code prevents the user from selecting a row if the variable “letUserSelectRow” is set to true.

The method “doneSearching_Clicked” is called when the user clicks the done method. The code for this method is shown later in this tutorial.

Searching the table view
The method searchBar:textDidChange is called when the user starts typing in the search field. This is how the search code looks like

//RootViewController.m
- (void)searchBar:(UISearchBar *)theSearchBar textDidChange:(NSString *)searchText {

//Remove all objects first.
[copyListOfItems removeAllObjects];

if([searchText length] > 0) {

searching = YES;
letUserSelectRow = YES;
self.tableView.scrollEnabled = YES;
[self searchTableView];
}
else {

searching = NO;
letUserSelectRow = NO;
self.tableView.scrollEnabled = NO;
}

[self.tableView reloadData];
}

There is a lot of stuff going on in the code above, so let’s look at it line by line

  1. We first empty the array, which is used as the data source to the table view when searching.
  2. If the search bar has some text then we continue searching, by calling “searchTableView” method. This time we let the user select a row to see its detail view.
  3. The method “searchTableView” is responsible to search the table view based on the search text and populate the search results in the array “copyListOfItems”.
  4. If the search bar is empty then, disable scrolling, set the searching variable to NO, and prohibit the user from selecting a row.
  5. At last we refresh the table view.

Before we jump to understand how the table view is able to display the search results, let’s review what happens when the user clicks the search button and the “searchTableView” method.

The method “searchBarSearchButtonClicked” is called and this is how the code looks like, where we simply call “searchTableView” method.

//RootViewController.m
- (void) searchBarSearchButtonClicked:(UISearchBar *)theSearchBar {

[self searchTableView];
}

- (void) searchTableView {

NSString *searchText = searchBar.text;
NSMutableArray *searchArray = [[NSMutableArray alloc] init];

for (NSDictionary *dictionary in listOfItems)
{
NSArray *array = [dictionary objectForKey:@"Countries"];
[searchArray addObjectsFromArray:array];
}

for (NSString *sTemp in searchArray)
{
NSRange titleResultsRange = [sTemp rangeOfString:searchText options:NSCaseInsensitiveSearch];

if (titleResultsRange.length > 0)
[copyListOfItems addObject:sTemp];
}

[searchArray release];
searchArray = nil;
}

Let’s review what goes on in “searchTableView” method. We first create a temporary search array, which we will fill it all the objects from the original data source. We loop through the dictionary objects, and add all the array objects to “searchArray”. We then loop through all the items in “searchArray” and compare it with the search text. We add the string object to the “copyListOfItems” if we find the search text in one of the countries.

Finish Searching
The following method “doneSearching_Clicked” is called when the user clicks the done button and this is how the code looks like

//RootViewController.m
- (void) doneSearching_Clicked:(id)sender {

searchBar.text = @"";
[searchBar resignFirstResponder];

letUserSelectRow = YES;
searching = NO;
self.navigationItem.rightBarButtonItem = nil;
self.tableView.scrollEnabled = YES;

[self.tableView reloadData];
}

We hide the keyboard, let the user select a row, set “searching” to false and hide the right bar button item.

Displaying search results
The search results are stored in “copyListOfItems” array and the table view is refreshed by calling reloadData. We also set the variable “searching” to YES when the user is searching, so we know to display the search results. To display results results we have to change few methods. The code changes for the following methods “numberOfSectionsInTableView“, “tableView:numberOfRowsInSection“, “tableView:titleForHeaderInSection“, “tableView:cellForRowAtIndexPath“, and “tableView:didSelectRowAtIndexPath“. We have to display data from “copyListOfItems” is the variable “searching” is set to YES else we display data as before. Let’s look at the code of all these methods

//RootViewController.m
- (NSInteger)numberOfSectionsInTableView:(UITableView *)tableView {

if (searching)
return 1;
else
return [listOfItems count];
}

// Customize the number of rows in the table view.
- (NSInteger)tableView:(UITableView *)tableView numberOfRowsInSection:(NSInteger)section {

if (searching)
return [copyListOfItems count];
else {

//Number of rows it should expect should be based on the section
NSDictionary *dictionary = [listOfItems objectAtIndex:section];
NSArray *array = [dictionary objectForKey:@"Countries"];
return [array count];
}
}

- (NSString *)tableView:(UITableView *)tableView titleForHeaderInSection:(NSInteger)section {

if(searching)
return @"";

if(section == 0)
return @"Countries to visit";
else
return @"Countries visited";
}

// Customize the appearance of table view cells.
- (UITableViewCell *)tableView:(UITableView *)tableView cellForRowAtIndexPath:(NSIndexPath *)indexPath {

static NSString *CellIdentifier = @"Cell";

UITableViewCell *cell = [tableView dequeueReusableCellWithIdentifier:CellIdentifier];
if (cell == nil) {
cell = [[[UITableViewCell alloc] initWithFrame:CGRectZero reuseIdentifier:CellIdentifier] autorelease];
}

// Set up the cell...

if(searching)
cell.text = [copyListOfItems objectAtIndex:indexPath.row];
else {

//First get the dictionary object
NSDictionary *dictionary = [listOfItems objectAtIndex:indexPath.section];
NSArray *array = [dictionary objectForKey:@"Countries"];
NSString *cellValue = [array objectAtIndex:indexPath.row];
cell.text = cellValue;
}

return cell;
}

- (void)tableView:(UITableView *)tableView didSelectRowAtIndexPath:(NSIndexPath *)indexPath {

//Get the selected country

NSString *selectedCountry = nil;

if(searching)
selectedCountry = [copyListOfItems objectAtIndex:indexPath.row];
else {

NSDictionary *dictionary = [listOfItems objectAtIndex:indexPath.section];
NSArray *array = [dictionary objectForKey:@"Countries"];
selectedCountry = [array objectAtIndex:indexPath.row];
}

//Initialize the detail view controller and display it.
DetailViewController *dvController = [[DetailViewController alloc] initWithNibName:@"DetailView" bundle:[NSBundle mainBundle]];
dvController.selectedCountry = selectedCountry;
[self.navigationController pushViewController:dvController animated:YES];
[dvController release];
dvController = nil;
}

In “numberOfSectionsInTableView” we return 1 if we are searching because the search results are not displayed in sections. In tableView:numberOfRowsInSection we return the count of the search results array, if we are searching. We return the text “Search Results” when searching in tableView:titleForHeaderInSection method. We get the data from the search results array when displaying text in tableView:cellForRowAtIndexPath method. The same logic is used to get the selected country in tableView:didSelectRowAtIndexPath method.

Adding an overlay
If you do a search in the contacts application, the table view gets a gray overlay above the table view and the search is canceled if the user touches the table view. We can do this same, by adding an overlay view above the table view.

Let’s adding another view under resource and name it “OverlayView”. Create a view controller called “OverlayViewController” in XCode. Open the nib file in IB and set the class of File’s Owner to “OverlayViewController” and create all the appropriate connections. Make sure that the view is able to respond to touches.

Now let’s add the overlay above the table view. We do this in “searchBarTextDidBeginEditing” and this is how the code looks like

//RootViewController.m
- (void) searchBarTextDidBeginEditing:(UISearchBar *)theSearchBar {

//Add the overlay view.
if(ovController == nil)
ovController = [[OverlayViewController alloc] initWithNibName:@"OverlayView" bundle:[NSBundle mainBundle]];

CGFloat yaxis = self.navigationController.navigationBar.frame.size.height;
CGFloat width = self.view.frame.size.width;
CGFloat height = self.view.frame.size.height;

//Parameters x = origion on x-axis, y = origon on y-axis.
CGRect frame = CGRectMake(0, yaxis, width, height);
ovController.view.frame = frame;
ovController.view.backgroundColor = [UIColor grayColor];
ovController.view.alpha = 0.5;

ovController.rvController = self;

[self.tableView insertSubview:ovController.view aboveSubview:self.parentViewController.view];

searching = YES;
letUserSelectRow = NO;
self.tableView.scrollEnabled = NO;

//Add the done button.
self.navigationItem.rightBarButtonItem = [[[UIBarButtonItem alloc]
initWithBarButtonSystemItem:UIBarButtonSystemItemDone
target:self action:@selector(doneSearching_Clicked:)] autorelease];
}

We have changed the header file “RootViewController.h” to add a variable “ovController” of type “OverLayViewController” and the header file is added to the top of RootViewController.m file.

Start by initializing the overlay view controller with the nib name “OverlayView”. We perform some calculations to find out where the search bar ends, as we want the overlay view to show up below the search bar. We set the frame of the view which will redraw the view on the screen. We set the background color and its transparency. The next line of code says that the self is assigned to the “rvController” property. The view is inserted above the table view, using insertSubView method.

We have declared a variable called “rvController” of type “RootViewController” in “OverlayViewController”. The reason it is done because, we want a reference to the root view controller from the overlay controller. This is how the header file and implementation file of the “OverlayController” looks like

//OverlayViewController.h
@class RootViewController;

@interface OverlayViewController : UIViewController {

RootViewController *rvController;
}

@property (nonatomic, retain) RootViewController *rvController;

@end

//OverlayViewController.m
#import "OverlayViewController.h"
#import "RootViewController.h"

@implementation OverlayViewController

@synthesize rvController;

- (void)touchesBegan:(NSSet *)touches withEvent:(UIEvent *)event {

[rvController doneSearching_Clicked:nil];
}

- (void)didReceiveMemoryWarning {
[super didReceiveMemoryWarning]; // Releases the view if it doesn't have a superview
// Release anything that's not essential, such as cached data
}

- (void)dealloc {
[rvController release];
[super dealloc];
}

Let’s look at the method touchesBegan:withEvent which is called when the user touches the overlay view. A call is made to the “doneSearching_Clicked” method defined in “RootViewController”. This is possible because we have a reference to the root view controller.

Now that that a overlay shows up when the user clicks the search bar, it should be hidden when the user starts searching. The method searchBar:textDidChange method now changes accordingly

//RootViewController.m
- (void)searchBar:(UISearchBar *)theSearchBar textDidChange:(NSString *)searchText {

//Remove all objects first.
[copyListOfItems removeAllObjects];

if([searchText length] > 0) {

[ovController.view removeFromSuperview];
searching = YES;
letUserSelectRow = YES;
self.tableView.scrollEnabled = YES;
[self searchTableView];
}
else {

[self.tableView insertSubview:ovController.view aboveSubview:self.parentViewController.view];

searching = NO;
letUserSelectRow = NO;
self.tableView.scrollEnabled = NO;
}

[self.tableView reloadData];
}

We remove the view if the user starts searching and add it back if the search bar is empty. The overlay view is removed and released when the user clicks the done button. This is how the code for “doneSearching_Clicked” is changed

//RootViewController.m
- (void) doneSearching_Clicked:(id)sender {

searchBar.text = @"";
[searchBar resignFirstResponder];

letUserSelectRow = YES;
searching = NO;
self.navigationItem.rightBarButtonItem = nil;
self.tableView.scrollEnabled = YES;

[ovController.view removeFromSuperview];
[ovController release];
ovController = nil;

[self.tableView reloadData];
}

The overlay is removed, released and set to nil. Run the app to see the search work.

Conclusion
Providing a search feature to the table view is a good option, if the user has to scroll a lot to select a row. I hope you had fun reading this tutorial as much as I had writing it. Don’t forget to leave a comment.

Happy Programming,
iPhone SDK Articles


Attachments

Suggested Readings