TUAW’s Daily App: The Incident

The Incident makes for one of the best reasons to be a gamer and own an iPhone — it’s a purely indie affair, with excellent pixel graphics and game design by Neven Mrgan and Matt Comi and terrific chiptunes by Cabel Sasser. And it’s a wacky little concoction that doesn’t sound like it will work, but of course does, and well. You play a little guy who, standing in the street one day, is suddenly assaulted by falling objects from above. There’s a little bit more to uncover, but that’s really all you need — you can tilt the iPhone back and forth to move your guy around in 2D, and tap on the screen to jump out of the way of falling objects above, marked by a warning flash on top of the screen.

It sounds strange, and it is, but it works. The controls are responsive, the graphics are colorful, and the game perfectly captures that “one more try” feeling as you ascend through the seven levels, climbing up on the fallen objects all the way to the top of the sky. There are lots of coins, med packs, and extra lives to collect as you go, but the tough part is just staying out of the way — three hits on the noggin costs you a life (and gives you a trophy to remember what wacky object killed you). There are many, many objects in the game, too, and you’ll undoubtedly be surprised by what falls on you next.

It’s a great game, worth every cent of the US $1.99 they’re selling it for in the App Store. Terrific little indie games like this are what make the iPhone platform really shine.

TUAWTUAW’s Daily App: The Incident originally appeared on The Unofficial Apple Weblog (TUAW) on Wed, 11 Aug 2010 08:00:00 EST. Please see our terms for use of feeds.

Read | Permalink | Email this | Comments

Flash 10.1 updated: hardware acceleration now available on newer Macs

Adobe has released an update for its Flash player that, for the first time, enables hardware decoding of Flash video on certain models of Macs. With this update, supported Macs can leverage the power of their Graphics Processing Units (GPUs) in decoding H.264 content “wrapped” in a Flash layer. The end result for Mac users: substantially reduced CPU load when running Flash content, better Flash performance, and possibly better battery life for portable Macs.

Adobe released Flash 10.1 in June with hardware acceleration for Windows. It’s only now that the feature is available on OS X in a non-beta release despite Apple opening the hardware acceleration APIs for certain models of GPUs several months ago, way back in April. Even now, this release only supports hardware acceleration on Macs made in the last couple of years — although in fairness, that’s more Apple’s fault than Adobe’s. The list below, sourced from Flash’s engineers and with clarification from us, shows which models of Mac will be able to take advantage of Flash’s new hardware acceleration feature:

– MacBooks shipped after January 21st, 2009. In other words, MacBooks with an NVIDIA GeForce 9400M or higher; Intel’s integrated GPUs aren’t supported.
– Mac Minis shipped after March 3rd, 2009, which have the same GPU situation as the MacBook; earlier Mac Minis had the unsupported Intel GMA 950 GPU.
– MacBook Pros shipped after October 14th, 2008 — note that this only means the unibody MacBook Pros. The 17″ late 2008 MacBook Pro with the old-style non-unibody enclosure has an unsupported NVIDIA 8600M GT GPU.
– iMacs which shipped after the first quarter of 2009; again, NVIDIA GeForce 9400M or higher GPU.

Absent from Adobe’s list are the MacBook Air and the Mac Pro. MacBook Airs with an NVIDIA GeForce 9400M GPU should be able to run hardware-accelerated Flash, as that model of GPU supports the feature. The Mac Pro is a much odder omission — sadly, none of its GPUs are listed in Apple’s technical notes concerning its hardware acceleration framework — but as powerful as the Mac Pro already is, a lack of hardware-accelerated Flash doesn’t hurt it as much as other models.

Hardware-accelerated Flash won’t be coming to Macs that came out earlier than those listed above, but only because Apple hasn’t opened the APIs for those Macs’ GPUs. The integrated Intel chipsets of earlier MacBooks, Mac Minis, and the first model of MacBook Air probably couldn’t handle the load anyway, but it’s disappointing that my Early 2008 MacBook Pro’s GPU isn’t allowed to do the heavy lifting, either.

Let us know how the update goes for you, and, if you have one of the supported Macs, whether you’re seeing better Flash performance now.

[Via Mac Rumors]

TUAWFlash 10.1 updated: hardware acceleration now available on newer Macs originally appeared on The Unofficial Apple Weblog (TUAW) on Wed, 11 Aug 2010 09:00:00 EST. Please see our terms for use of feeds.

Read | Permalink | Email this | Comments

Apple patents "Exciter" technology for devices, including a "cyclocomputer"

Patently Apple has news of a new patent filed by Apple for a technology that it calls the Exciter. At present, wirelessly trading information between iPhones can be a bit of a hassle, since both phones have to find each other and then sync up. But the “Exciter” technology would simply keep an eye out for another phone that’s willing to share information, and then when a certain signal is detected (it could be light-based, sound-based, or any other type of emitted information), the two devices would share information (contacts, calendar information, photos, or text) as necessary.

It’s an interesting idea, but the application is even more interesting. Along with the usual suspects for possible Apple devices that would use this app or technology, Apple has listed a “cyclocomputer,” which is yet another hint that Apple is working on some kind of bike-related mobile device. In this case, two bikers would pass each other, their devices would recognize that there is a device to share information with, and the exchange would take place.

It sounds intriguing. Unfortunately, as with all of these patents, Apple is just locking down any ideas that it has. Just because this technology is outlined and listed in a patent application doesn’t mean that there’s a project right around the corner; it doesn’t guarantee that we’ll definitely see this product. But as always, it’s fascinating to see where Apple’s thinking is going. The company that originally released the Mac has now become the world’s biggest portable device company, and it certainly seems like it plans to continue moving in that direction.

TUAWApple patents “Exciter” technology for devices, including a “cyclocomputer” originally appeared on The Unofficial Apple Weblog (TUAW) on Wed, 11 Aug 2010 10:00:00 EST. Please see our terms for use of feeds.

Read | Permalink | Email this | Comments

Download iOS 3.2.2 for iPad 3G, iPad WiFi [Firmware]

Apple pushes iOS 3.2.2 for iPad 3G and iPad WiFi. You can download iOS 3.2.2 firmware from links below. iPad iOS 3.2.2 7B500 build for iPad WiFi and iPad 3G patches the PDF exploit in Safari used in JailbreakMe 2.0 to jailbreak iPhone and iPod Touch.

download ios 3.2.2 ipad

Warning

Now that exploit used in JailbreakMe to jailbreak iPad iOS 3.2.1/3.2 has been patched in iPad iOS 3.2.2 firmware, so, jailbreakers are highly recommended to avoid updating their iPad firmware to 3.2.2 and wait for the jailbreak tool update.

Download iOS 3.2.2 for iPad 3G, iPad WiFi

iOS 3.2.2 is compatible with both the iPad 3G and iPad WiFi models. You can install iOS 3.2.2 on iPad by connecting it to iTunes, then click the Update button on the Summary tab to update the software. You can also download iOS 3.2.2 firmware from the link below:

iPhone iOS 4.0.2 and 4.1 beta are also available for download. Follow the links below:

RECOMMENDED: Save SHSH blobs for iPad iOS 3.2.2

You can follow us on Twitter, Join us at Facebook, and also Subscribed to RSS Feed to receive latest updates

Digg
Twitter
StumbleUpon
Facebook
Reddit
del.icio.us

Jailbreak iPhone 3G iOS 4.0.2 with RedSn0w 0.9.5b5-5

iOS 4.0.2 is now available for download. You can jailbreak iPhone 3G iOS 4.0.2 with RedSn0w 0.9.5b5-5. iPhone 3G running iOS 4.0.2 jailbreak instructions can be found below. RedSn0w 0.9.5b5-5 can only jailbreak iPhone 3G and iPod Touch 2G (non-MC) only.

jailbreak iphone 3g ios 4.0.2 redsn0w

NOTE: JailbreakMe that was released to jailbreak iOS 4.0.1 on iPhone 4, 3GS, 3G and all iPod Touch 3G, 2G, doesn’t work on iOS 4.0.2. However, existing version of RedSn0w jailbreak can still jailbreak iPhone 3G and iPod Touch 2G (non-MC) on iOS 4.0.2 firmware.

  • This guide is for iPhone 3G users only.
  • RedSn0w 0.9.5b5-5 is a jailbreak, NOT an unlock.
  • iOS 4.0.2 does NOT update baseband so you can Unlock iPhone 3G with UltraSn0w after jailbreak.
  • RedSn0w hacktivates iPhone 3G iOS 4.0.2.

Let’s jailbreak iPhone 3G running iOS 4.0.2 firmware with RedSn0w 0.9.5b5-5.

Disclaimer: This guide for educational purposes only. So, try it at your own risk. We can NOT be held responsible if anything goes wrong.

Jailbreak iPhone 3G iOS 4.0.2 with RedSn0w

Step 1

Download the the required stuff linked at the bottom. Download both the firmware 4.0 and 4.0.2.

Step 2

Restore iOS 4.0.2 on your iPhone 3G. you need iTunes 9.2.1 to do that. (Links below)

Step 3

  1. Run the downloaded redsn0w 0.9.5 beta.
  2. Hit the Browser button. Select the iOS 4.0 IPSW file. (Yes iOS 4.0 NOT 4.0.1, that’s the tricky part)
  3. Check mark Cydia and hit next button.
  4. Check mark Enable Multitasking and Wallpaper (uncheck if you don’t want to enable these options because these slow down the iPhone)
  5. You’ll be instructed to put your iPhone into DFU Mode to install jailbreak.
  6. When your iPhone 3G comes back up, you’ll notice Cydia has a blank white icon. Allow Cydia to reorganize, then accept the update it offers. When Cydia restarts, you should see its real logo now.

that’s it. You’ve successfully jailbroken iPhone 3G iOS 4.0.2 firmware with RedSn0w.

Downloads

Digg
Twitter
StumbleUpon
Facebook
Reddit
del.icio.us

Download iOS 4.0.2 Firmware for iPhone and iPod Touch

Apple has released iOS 4.0.2 firmware for iPhone 4, 3GS, 3G, and iPod Touch. You can download iOS 4.0.2 8A400 build from below. iPhone iOS 4.0.2 firmware Patches PDF exploit used in JailbreakMe jailbreak.

download ios 4.0.2

WARNING

Jailbreakers and unlockers MUST stay away from iOS 4.0.2 update as it patches the exploit used in iOS 4.0.1 firmware. There’s no iPhone baseband update in this release but your iPhone needs to be jailbroken in order to unlock. So, Avoid iOS 4.0.2.

Download iOS 4.0.2 Firmware

You can download iOS 4.0.2 firmware (IPSW files) for iPhone 4, iPhone 3GS and iPhone 3G from the links below

Download iOS 4.0.2 for iPhone 4

Download iOS 4.0.2 for iPhone 3GS

Download iOS 4.0.2 for iPhone 3G

Download iOS 4.0.2 for iPod Touch 3G

Download iOS 4.0.2 for iPod Touch 2G

Download iTunes 9.2.1

You can follow us on Twitter, Join us at Facebook, and also Subscribed to RSS Feed to receive latest updates.

Digg
Twitter
StumbleUpon
Facebook
Reddit
del.icio.us

Locktopus : Password Protect Your iPhone Apps

Locktopus, a jailbreak app, lets you password protect your iPhone apps (individually) in order to prevent unauthorized access. Using Locktopus, you can password protect specific application right from the Springboard.

locktopus

Locktopus Compatibility

  • Locktopus app works fine on iPhone and iPod Touches running iOS 4.x and 3.x.
  • Locktopus also works with the multitasking bar on 4.x.
  • Jailbroken iDevices only.

How to Password Protect an application with Locktopus

Step 1 – Jailbreak iDevice

Your iPhone or iPod Touch Must be jailbroken. You can jailbreak iPhone and iPod Touch running iOS 3.1.24.0.1 firmware using JailbreakMe 2.0. Follow the guides linked below:

Step 2 – Install Locktopus

Locktopus is available in Cydia Store for $2. In order to purchase and download Locktopus;

  • Open Cydia and go to Search tab
  • Search for Locktopus. then Purchase and install it.
  • Close the Cydia.

Step 3 – Enable protection

Unlike LockDown, Locktopus does not require you to open another application and then respring to enable password protection. To password protect an application with Locktopus:

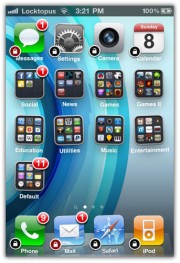
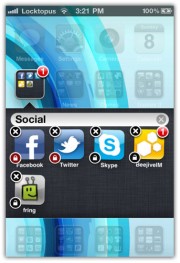
  • Tap and hold an app icon until it starts wiggling (Wiggle Mode)
  • Then tap the “lock” badge on the icon to lock it.
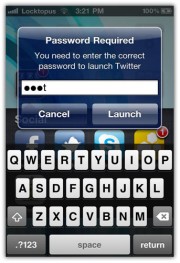
  • Now whenever you launch that app, it will ask for the password. (Your default Locktopus pass is: password. You can change Locktopus password from the Settings app)

Forgot your Locktopus password?

Reinstall this extension with Cydia. If you locked Cydia, you must disable this extension with SBSettings, or by manually renaming or removing it via SSH. Upon the doing so, you can open Cydia and reinstall.

If you don’t know, LockDown is a free alternate to Locktopus and can be downloaded from Cydia store. Checkout the complete LockDown guide here:

How to: Password protect iPhone apps with LockDown

locktopus password protect iphone appslocktopus password protect iphone appslocktopus password protect iphone apps

You can follow us on Twitter, Join us at Facebook, and also Subscribed to RSS Feed to receive latest updates.

Digg
Twitter
StumbleUpon
Facebook
Reddit
del.icio.us

Getting Your App Made Even If You’re Not A Programmer

If you have been struggling to learn iPhone and iPad development, or you want to develop an app — but don’t want to do any programming.  You’re not alone.

I found this great article today that goes through how to get that iOS app done.  The article goes into discovering what you as a non-programmer can bring to the table.

From what I’ve seen the key, which is also emphasized  in this article is to have a really awesome prototype.

I’ve even seen an artist develop an excellent prototype, take that to a meetup group for developers and literally have developers begging to work on the app.  That’s the position you want to be in if you’re a not a programmer.   Even if you can’t find a programmer for free being able to show exactly how the app should look and work will drive down your costs.

You can read the article from Mike Berg here:
How to get your game made, even if you’re not a programmer

If you do look for a developer take heed of Mike’s warning at the end:

Don’t: Go to a programmer and say, “Hey, I’ve got this awesome idea for an iPhone app, wanna make it for me and split it 50-50?” They only hear: “You do all the work, I’ll take half the money.”

If you liked this, please share it!

©2010 iPhone iOS 4 iTV iPad SDK Development Tutorials, Programming Tips, News. All Rights Reserved.

.

Share and Enjoy:

RSS
Twitter
Facebook
DZone
HackerNews
del.icio.us
FriendFeed

iTV – Another Platform For iOS Apps?

For some time now there has been speculation that the Apple TV platform would be upgraded and be capable of handling apps.  This has been the next logical step for AppleTV and it comes as no surprise that it appears things have come to fruition.  Apparently it will be known as iTV.

Television would provide yet another great outlet, and drive iOS app sales even further.  It’s no secret that consoles, and console game revenue dwarf that of the iPhone and iPad app stores.  It will be very interesting to see the pricing dynamic once  iTV starts hitting the shelves..

An exclusive report is available at Engadget.  It seems that one of the more interesting aspects (unconfirmed) is that iTV will only provide 720p playback.  This makes no sense whatsoever and it will be interesting to see how truthful that is.

You can read Engadget’s previous report on iTV here which suggested a $99 price point.

[Source: Engadget]

©2010 iPhone iOS 4 iTV iPad SDK Development Tutorials, Programming Tips, News. All Rights Reserved.

.

Share and Enjoy:

RSS
Twitter
Facebook
DZone
HackerNews
del.icio.us
FriendFeed

SingleComponent Picker in iPad

This is the Single Component Picker application. In this application we will see how to add Single Component in iPad.

Step 1: Create a View base application using template. Give the application name  ”SingleComponent_iPad”.

Step 2: Xcode automatically creates the directory structure and adds essential frameworks to it. You can explore the directory structure to check out the content of the directory.

Step 3: Expand classes and notice Interface Builder created the SingleComponent_iPadViewController class for you. Expand Resources and notice the template generated a separate nib, SingleComponent_iPadViewController.xib, for the “SingleComponent_iPad”.

Step 4: In the SingleComponent_iPadViewController.h file , we have added DataSource and delegate protocol. Create an instance of UIPickerView class and add one IBAction method. So make the following changes.

#import <UIKit/UIKit.h>

@interface SingleComponent_iPadViewController : UIViewController
<UIPickerViewDataSource , UIPickerViewDelegate>
{
        IBOutlet UIPickerView *singlePickerComponent;
        NSArray *pickerData;
}

@property(nonatomic , retain) UIPickerView *singlePickerComponent;
@property(nonatomic , retain) NSArray *pickerData;

(IBAction)buttonPressed;

Step 5: Double click the SingleComponent_iPadViewController.xib file, open it to the Interface Builder. First drag the Picker view from the library and place it to the view window and drag round rect button from the library and place it to the view window. Select the picker from the view window and bring up connection inspector and drag from the datasource to the file’s owner icon, do the same thing for delegate protocol. Select the round rect button and bring up Connection Inspector and drag from the Touch Up Inside to the File’s Owner icon and select buttonPressed: action. Now save the SingleComponent_iPadViewController.xib file, close it and go back to the Xcode.

Step 6: Open the SingleComponent_iPadViewController.m file and make the following changes in the file.

(IBAction)buttonPressed
{
        NSInteger row = [singlePickerComponent selectedRowInComponent:0];
        NSString *selected = [pickerData objectAtIndex:row];
        NSString *title = [[NSString alloc] initWithFormat:
                                           @"you selected %@!", selected];
    UIAlertView *alert = [[UIAlertView alloc] initWithTitle:title
                                                                                                   message : @"Thank you for choosing."
                                                                                                   delegate:nil
                                                                                 cancelButtonTitle :@"You are Welcome"            
                                                                                 otherButtonTitles :nil];
        [alert show];
        [alert release];
        [title release];
}

// Implement viewDidLoad to do additional setup after loading the view, typically from a nib.
(void)viewDidLoad {
        NSArray *array = [[NSArray alloc] initWithObjects:@"SunDay",@"MonDay",@"TuesDay",@"WednesDay",@"ThusDay",
                                          @"FriDay",@"SaturDay",nil];
        self.pickerData = array;
        [array release];
    [super viewDidLoad];
}

(NSInteger)numberOfComponentsInPickerView:(UIPickerView *)pickerView
{
        return 1;
}

(NSInteger)pickerView:(UIPickerView *)pickerView
numberOfRowsInComponent:(NSInteger)component
{
        return [pickerData count];
}

(NSString *)pickerView:(UIPickerView *)pickerView
                        titleForRow:(NSInteger)row
                   forComponent:(NSInteger)component
{
        return[pickerData objectAtIndex:row];
}

Step 7: Now Compile and run the application in the Simulator.

You can Download SourceCode from here SingleComponent_iPad

iPad mod recalls old TV

Here’s an iPad mod of questionable usefulness, but it looks nice. Artist Jonas Damon built an enclosure for his iPad that resembles an old cathode-ray television (just like grandma used to have). He only used parts he found lying around his apartment. Even the rear of the case has been built to resemble those old TV’s case design, where it bulged to accommodate those huge tubes.

Topping it all off is the video of “snow” that the iPad is playing. Of course, such a case limits the iPad’s portability to say the least, but now it’s a great video/game station. You’ll see that the dock connector cable is protruding from the back so I can still be connected to a computer for synchronization.

Someone pass the Yoo-Hoo and Little Debbie snack cakes. I want to watch a little TV.

TUAWiPad mod recalls old TV originally appeared on The Unofficial Apple Weblog (TUAW) on Tue, 10 Aug 2010 14:00:00 EST. Please see our terms for use of feeds.

Read | Permalink | Email this | Comments

Box.net adds caching and update notifications to mobile apps

The folks at Box.net have announced new features that will be a part of a soon-to-be-release update to both their iPad and iPhone apps. Specifically, caching will allow for offline access to files and update notifications will keep track of file versions.

The first is exciting for users like me without 3G iPads. Now we can browse our files while offline. Imagine no more rushing around to find a Wi-Fi network just so you can reference a document.

Also, the update will let you know when a colleague has made a change to a document. You’ll see an alert and get the option to update your local version or not. This way you can sync saved files with updated version. Finally, caching will make file previews much faster.

The folks at Box.net expect these updates to drop at any time, so be sure to watch their page in the App Store.

TUAWBox.net adds caching and update notifications to mobile apps originally appeared on The Unofficial Apple Weblog (TUAW) on Tue, 10 Aug 2010 15:00:00 EST. Please see our terms for use of feeds.

Read | Permalink | Email this | Comments

Eight ways to get a killer ‘iBike’

Even though the “iBike” is nothing more than a patent application, the folks at Unplggd have described how they’d outdo Apple’s offering to the world of bike computers. We must admit, the result includes some seriously geeky, tricked-out options.

For example, this DIY USB charger uses a dynamo attached to the rear wheel to keep your devices charged. I say “devices,” because this rig produces enough power to keep two devices running.

Additionally, this DIY waterproof iPhone cover is as brilliant as it is simple. Basically, it’s at 20oz. soda bottle with the pouring end sawed off. It slips over the mounted iPhone with the open end facing the rider.

They also went on to list the gizmos you’ll always want to bring with you while biking, including a GPS device, phone and camera. Fortunately, the iPhone is all three. There’s more to the article, of course, and we suggest you read the whole thing. If you do trick out your bike like this, be sure to send us pictures!

That bike patent is about a year old, and big companies like Apple often patent ideas that will never see production. But hey, Nike+ was a surprise, too — maybe we will be riding around one day on a two-wheeled Apple product.

TUAWEight ways to get a killer ‘iBike’ originally appeared on The Unofficial Apple Weblog (TUAW) on Tue, 10 Aug 2010 16:00:00 EST. Please see our terms for use of feeds.

Read | Permalink | Email this | Comments