Buy things Steve liked, help cancer research

One of the interesting things that has come out of Steve’s passing is all the ways various Apple fans have found to honor his memory. From MythBusters to cake pops, we’ve seen a number of ways people have paid tribute. Now there’s a new way you can pay tribute, by actually paying.

The new site, Steve’s Favorites, is not only a spot where you can pick up a few of the music or book titles that Steve liked (according to his biography), but you can do so through an affiliate link and all of the affiliate payments will be donated to cancer research.

This looks pretty fab to me, honestly. I like knowing they are things Steve liked, but I wish there were a bit of an expansion, like the mock turtlenecks that we also happen to know he enjoyed. I know there probably aren’t affiliate links for those, but having them all in one place would be pretty handy.

This site was put together by iOS dev group Villain, makers of Archetype. A very nice idea, and I probably have a shortage of at least one of the artists in the list, so I’ll probably grab an album to do my part to help. If your iTunes library is low on Dylan or the Beatles, you just might be in luck.

Buy things Steve liked, help cancer research originally appeared on TUAW – The Unofficial Apple Weblog on Mon, 07 Nov 2011 09:30:00 EST. Please see our terms for use of feeds.

Source | Permalink | Email this | Comments

Daily iPhone App: Poker Pals

I’ll admit it: I never got into Words with Friends. I know it’s a very popular and well-done game, but for some reason, Scrabble-style titles never appealed to me. But Poker Pals, a social title recently published by Chillingo and developed by Aspyr, scratches the same itch for me.

Instead of using titles to spell words, you instead use them to make poker hands, and you get points for making the rarest ones. There are joker cards on each of the four corners that will line up to match whatever you put near them, and since the board is a little smaller than the standard Scrabble board (not to mention that every “hand” you make is five cards), I find it a little faster and more interesting than word-making games.

Poker Pals is integrated with Game Center, and asynchronous play is smooth and well-done. The one big issue with the game is that Chillingo is still clinging to their own social network, Crystal, so the achievements and leaderboards are all tied up in that. It’s a pain having to run two social networks, and frankly I haven’t even bothered with a Crystal account, so I have no idea where I rate on the leaderboards. I’ve also only played the game on one platform so far, but the iTunes reviews for it say you can’t sync accounts across two devices. That’s a bummer if you want to play on iPad and the iPhone at the same time.

But outside of the issues with the metagame, the core game is a lot of fun (especially as an asynchronous title), and you can start games with friends right through Game Center anyway. Poker Pals is available on the iPhone for just a buck, on the iPad in HD for $1.99, or as a free trial version on either platform.

Daily iPhone App: Poker Pals originally appeared on TUAW – The Unofficial Apple Weblog on Mon, 07 Nov 2011 08:00:00 EST. Please see our terms for use of feeds.

Source | Permalink | Email this | Comments

7 Ways to Have a Top Grossing App – How 4 Apps did it

With almost half a million apps in the App Store, the Gold Rush is officially over. 90% of the revenue made on the app Store is made by 10% of the apps on the App store. What are the secrets of the 10%? They must be doing something right, after all they are not super-heroes.

I set out to interview 4 developers who are in the Top Grossing Apps in their respective categories to find out how they got the Top Grossing badge. Not some feel good, non-actionable tips but stuff you can apply to your app today and see results.

Here they are.

No one cares about you – Give your customers what they want

The business school speak for this is “Identify a market need”. Your app needs to solve a problem your customer has. Not a problem you think they have but a problem they tell you they have. Yes, there are iFart-equivalent apps that make millions, they are the exception.

You should be running a long-lasting business on the app store, not a hobby project. Here is what Ken Case, CEO of OmniGroup (makers of OmniFocus) had to say.

“We believe OmniFocus maintains high rankings because it solves a specific problem that our customers are trying to address – personal productivity. We have put a lot of work into making sure that it meets that need comprehensively” – Ken Case OmniFocus, Top Grossing in the Productivity category

“The largest factor for my success in the App Store is identifying a huge market that existed outside of the mobile platform and bringing it to every iOS device” – Rob Philips, developer of iHunt Sounds and Calls. Top Grossing in the Sports Category

Never Skimp on Quality

Customers downloading your app have come to expect a certain level of quality. It doesn’t matter if your app costs 99c or it is free. This is evident from the higher number of 1-star ratings for free apps.

Issues such as frequent crashes and a bad UI experience will have your customers reaching for the delete button or worse heading over to the App store to leave a bad review. This is made evident by what Doug, one of two developers of Chat Time told me.

“The biggest factors that have contributed to our high ranking is the quality of the app and our responsive customer support which have led to great reviews on the Appstore and excellent customer loyalty. This has led to increased repeat purchases and higher rankings.” – Doug, one of two developers of ChatTime, Top Grossing in the Productivity Category

Smule, makers of I am T-Pain amongst other apps put a spin on it. They deliver quality in terms of magic. I will let Jodi Ropert, CMO at Smule to put it in his own words.

At Smule, we are inspired by Arthur C. Clarke’s famous quote: “any sufficiently advanced technology is indistinguishable from magic”

We take this to heart every day, and first and foremost we attempt to create unique apps that delight users. We take a lot of time on the details – the fit and finish, the overall aesthetic, the core mechanic, and how the app feels. We ask ourselves everyday, ‘is it magical?’

If we do a great job inventing ‘magical’ apps that our customers love, hopefully they’ll keep coming back. And, importantly, they’ll be more likely to tell their friends about it.
– Jodi Ropert, Smule Top Grossing in the Entertainment Category.

Keep It Simple, Stupid

We have all had our fair share of apps with 200 buttons on the interface. This is mostly evident when a developer is trying to bring a desktop app to the mobile screen. It just doesn’t work.

A great app will ideally not need a user guide. Strive to make your app as intuitive as possible and your users will love you for it. Talking to the guys at Outfit 7, makers of Talking Tom Cat, they had this to say.

“We develop apps that are simple, no directions to read, nothing to “figure out”… simply talk and touch. Understanding how people use the phone, quick snips of play time, we also try to appeal to people of all ages playing alone or often times together.” – Outfit 7 – Developers of Talking Tom Cat, Top Grossing in the Entertainment Category

Give your Users An Addiction To Keep Coming Back To

More than a quarter of apps get used only once. If your app is free and is dependent on the user making an in-app purchase, your app is literally dead on arrival (DOA). They simply will not get to the point of making that purchase, which means not revenue for you.

Make sure to include a reason to come back. If your app satisfies a market need, you are implicitly satisfying the “come back” requirement because users will come back to get their fix.

For the Talking Tom Cat developers, it was a character that people could connect with. For the developers of Chat Time, it was offering free or dirt cheap phone-calls to family and friends.

“Most apps are novelty items that people use once and throw away, think about creating something that people will come back to again and again.

For us it was creating lovable characters that people can interact with, our apps transcend cultural barriers and appeal to a wide global audience. Our product goes everywhere our customers go and delivers easy always deliver instant fun.

This is the key, the app needs to deliver something fun immediately.

Finally, try to find a way that using the features of the app not only deliver fun every time but they also serve as a marketing too every time. For us the use of video was the solution to this objective. With the ideas above we’ve been able to build a worldwide network full of loyal users at a quick rate due to these factors. “
– Outfit 7 – Developers of Talking Tom Cat, Top Grossing in the Entertainment Category

“Our revenue model is based on users purchasing: pre-paid calling credits in $9.99, $24.99 or $99.99 increments OR subscribing to an unlimited calling plan for a monthly fee from $4.99 to $14.99. Our revenue is growing at an average of 42% month to month since January 2011 and we hit the Top 10 Grossing Rank in the USA in April of this year in Social Networking and have maintained it ever since. We are typically in the Top 10 Grossing in at least 5 other major countries outside of the USA”
– Doug, one of two developers of ChatTime, Top Grossing in the Productivity Category

Shock and Awe by Over-delivering

The App Store is getting crowded and one way to make your app stand out is to offer so much value, your competition is blown out of the water. A lot of traditional Web apps use this tactic effectively by either offering a 1 year money-back guarantee instead of 30-days or offering features that the competition cannot match.

Here is Rob Phillips again showing how it can be done

“For instance, all other hunting apps before me had really poor quality hunting calls and only offered around 10 to 20 animal calls for $2.99. With iHunt Sounds & Calls, you now get an app with 32 animals, over 500 high quality animal calls, and the ability to create your own custom hunting playlists to generate hunting calls that no animal has ever heard before. No one else in the iTunes Store can match that.”
-Rob Philips, developer of iHunt Sounds and Calls. Top Grossing in the Sports Category

Offer a test drive with In-App purchases

This revenue model has now solved the chicken and egg problem of letting your users try out your app for free and then you have the opportunity to convert them into buyers. App developers are now cashing in by making effective use of this not-so-secret weapon.

A good example of this is Chat Time. They have uniquely positioned their app to make use of this strategy.

“Our revenue model is based on users purchasing, pre-paid calling credits in $9.99, $24.99 or $99.99 increments OR subscribing to an unlimited calling plan for a monthly fee from $4.99 to $14.99.”

“The app is free to download and the first call is free so it’s a try before buy model.
We launched on October of 2010 when the app was a paid download (we got very few downloads) and we made the app free in mid-December which started the growth. So free download with the app being free to try (includes $1 of free calling credit) with the option for users to buy credit after trying it was definitely a key part of the success.”
– Doug, from Chat Time

Keep your users happy and they will reward you for it

If they are happy, they will tell their friends about your app and buy other apps you offer. Period. The best and most effective way to keep your users happy is to offer great support.

You will not succeed by throwing your app on the App store and waiting for the money to roll. Set-it and forget it is not a long term business model with Apps.

“We back up our app with a robust standard of one-on-one technical support via phone and email. Along with prompt software updates that respond both to user feedback and new technology from Apple, we feel we have a winning formula for customer loyalty and satisfaction.”
-Ken Case, CEO Of OmniGroup, makers of OmniFocus

“Customer support with frequent updates has been key to maintaining customer loyalty and earning referrals.”
– Doug, Chat Time

Bonus Tip: Plan Around Events

Yes, I know I promised 7 tips but here is an 8th one as a bonus. The launch of a new device, new features on iOS or any Apple marketing event is an opportunity for new sales. If you implement one of the new features on iOS for example, all of a sudden you have a reason to issue another press release, contact your customers to upgrade and tell their friends etc. The Health and Fitness App used this strategy by preparing the app to feature in Newsstand.

“We had our app ready for a big Apple feature launch – Newsstand was a new icon, given space on the iPhone and iPad homescreen, which is priceless. As a developer, you need to be aware of what Apple is planning, and make sure you’re ready at launch. I think it also helps to have your app be available for both iPhone and iPad, too”
– Dennis Watson, Head of App Development, Health and Fitness App

Will your app be a success?

We have now gone through all the 7 ways to get your app on that coveted Top Grossing list. Success in the App store comes at a price and only developers that see app publishing as a business not a hobby will succeed. This is because the economics of the app store is now mature and is no more the wild-west that is once was where you could throw any app on it and profit.

The good news is these are tips that others have used and had success with. The only thing standing in your way is your ability to take action and implement them also.

+Tope Abayomi is Chief Vault Custodian at App Design Vault where you get great iPhone App Design that will help make your app a Top-seller without hiring expensive designers.

Open Source iOS Color Picker Components Roundup

Color picker’s are used in many different apps and it is somewhat surprising that Apple has not added in their own color picking control.

Over time I’ve seen quite a few searches for a color picker component on this site so I decided to create this roundup of favorite color picker components.

There have been many different color picker components available, but some have not been updated in as long as 2 years.  I chose these as they work and have been actively update.

1.Color Picker For iOS

This first component from Matthew Eager is based on a component has been designed to work within the UINavigationController stack, and has been tested to work  inside a UIPopoverController without any issues.  It also includes utility methods for color conversions between the HSV, RGB, and HEX color spaces.

You can find the Github repository for Color Picker for iOS here.

Source

2. iPhone Color Picker

This component is used in several iPhone and iPad apps, and is very similar to Color Picker for iOS as both are based on the same older component.  This component does not have as many added features as Color Picker for iOS, but also looks like a great choice.

You can find the Google code site for iPhone Color Picker here.

3.  InfColorPicker

This third component has a completely different look from the other components.  This control is very simple,  has no frills, just a basic color picker component for your iPhone and iPad apps.

You can find the Github repository here.

4. Color Picker For iPhone

In my opinion this is the best looking component of the bunch.  This component is for iPhone apps, and subclasses UIView.

You can find the Github repository here.

Source (Japanese)

If you need to add a color picker into your apps – you can do so quickly and easily with one of the above libraries.

©2011 iPhone, iOS 5, iPad SDK Development Tutorial and Programming Tips. All Rights Reserved.

.

DeliciousTwitterTechnoratiFacebookLinkedInEmail


Ayopa Games

My friends over at the newly launched Ayopa Games have published their first two games, Chicken Rescue and W.E.L.D.E.R. Johnny and Elliott who run Ayopa Games have years of industry experience each let alone between them. I spent some time with them when I was last in San Francisco and the plans they have plus […]

VTM Sneak Peak 2

I’ve put up another video showing the latest version of the game prototype I’ll be using as VTM on 12/13 November in Boston. This shows the 3D particle emitter I’ve implemented which I’m using for sparks on the hull of the ships as they are hit by gun fire, the ship explosions and the plasma […]

Talkcast tonight, 10pm ET/7pm PT: Sandboxed in

I’ll be hosting the TUAW Talkcast this evening over on our usual TalkShoe meeting place, and as always, you’re invited to join in both by listening along, and even by jumping in on the conversation. We’ll be chatting live about the most popular Apple topics of the last week, including the upcoming sandbox restrictions on Mac App Store apps, more cool things you can do with Siri (and if they’re worth doing), and the hazy future of the Mac Pro. It should be a lot of fun and the discussion is always interesting as well.

To participate, you can use the browser-only Talkshoe client, the embedded Facebook app, or download the classic TalkShoe Pro Java client; however, for +5 Interactivity, you should call in. For the web UI, just click the Talkshoe Web button on our profile page at 4 HI/7 PDT/10 pm EDT Sunday. To call in on regular phone or VoIP lines: dial (724) 444-7444 and enter our talkcast ID, 45077 — during the call, you can request to talk by keying in *8. We’ll get started as usual around 10pm ET, which is 7pm PT, and don’t forget about daylight savings from last night. Did you Fall back?

If you’ve got a headset or microphone handy on your Mac, you can connect via the free Blink or X-Lite SIP clients. Talk to you tonight!

Talkcast tonight, 10pm ET/7pm PT: Sandboxed in originally appeared on TUAW – The Unofficial Apple Weblog on Sun, 06 Nov 2011 18:00:00 EST. Please see our terms for use of feeds.

Source | Permalink | Email this | Comments

Quick Look: Fast Analytics

Quick Look posts are paid submissions offering only a brief overview of an app. Vote in the polls below if you think this app is worth an in-depth AppStorm review!

In this Quick Look, we’re highlighting Fast Analytics. The developer describes Fast Analytics as the premier app for viewing Google Analytics™ data on your mobile. We make it fast, simple and fun to see the numbers you need, when you need them.

We give you easy access to headline visitor data, with the most intuitive Google Analytics™ app on the market. It really is a pleasure to use and built by a team that values your feedback so we can make the app even better!

Read on for more information and screenshots!

Screenshots

Fast Fwd

Fast Fwd

About the App

Here are the top five features you can expect to see in the latest version:

  • Easily switch between multiple Google Analytics accounts and websites.
  • Fantastic dashboard for fast access to common stats.
  • View stats over 1 day, 1 week, 1 month or 1 year time periods.
  • Traffic sources and search engine keywords report.
  • Visitor browser and country report.

Requirements: iOS 4.3 and above

Price: 0.99

Developer: Fast Fwd Multmedia Ltd.

Vote for a Review

Would you like to see us write a full review of Fast Analytics? Have your say in our poll:

Would you like to see Fast Analytics reviewed in-depth on AppStorm?

Quick Look posts are paid submissions offering only a brief overview of an app. Vote in the poll if you think this app is worth an in-depth AppStorm review! If you’re a developer and would like to have your app profiled, you can submit it here.

iCloud Is Broken and It Needs to Be Fixed

Many years ago, back before I was a convert to the world of Macs, I wanted to find a way to sync the contacts on my various computers, that way I always had the right phone number on hand. To do that, I used a new online service, which didn’t really work the way I expected it to. I always found myself with doubles or missing contacts, which essentially defeated the purpose.

Today we have iCloud, which is supposed to be an improvement on the problems we had with MobileMe. But with those improvements comes a problem — relying on the system. And when it doesn’t work, then there’s a problem. A big one.

Adventures in MobileMe

I started with MobileMe once I bought my first iPhone, the iPhone 3G, back in the day. I had problems with it right off the bat, and eventually, even escalated the problem to Apple support and an email to Steve Jobs. An hour later I had a phone call from Apple who apologized for the problem and gave me some options for fixing the issue.

And for the most part, things were fixed and even though there were a few outages here and there, I didn’t really have any problems with the service and I started to rely on it. I knew with confidence that anytime I added a contact or put in a calendar listing, it would be synced automatically to my iPad, iMac, MacBook Pro and iPhone, no sweat. That built confidence in the system, and I was very happy with re-upping with the service when it came due. Up until recently, I didn’t worry at all about anything being in sync, because it always worked. No worries at all.

The iCloud Transfer

After various keynote presentations by the big guys at Apple talking about the problems with MobileMe, I figured that the transition to iCloud would be fairly straight forward. After all, it was essentially the same thing — contacts, calendars, mail, etc — just like MobileMe, and that was working just fine for me. Why should I expect this to be anything but easy?

Since the transfer, I’ve had tons of issues. Calendar posts not publishing to the people who share it, contacts only partially updating if they appear at all, and there’s no consistency across platforms.

When it works, it's awesome. When it doesn't, it can be devastating.

When it works, it's awesome. When it doesn't, it can be devastating.

For example, I added an image to one of my contacts on my Mac. I waited a little bit for it to sync to my iPhone, and it never happened. Figuring it was a fluke, I waited a day or two and forgot about it, then checked again today. The image is on my Mac, on my iCloud account on the web, but nowhere to be found on my iPhone. And unlike MobileMe, there’s no Sync button to push to make sure the syncing is actually happen. There’s no way to confirm it’s working — and since it’s obviously not, what do I do?

As if that wasn’t bad enough, there is no Snow Leopard support for iCloud at all. I have a four-year-old iMac which I use for my iTunes library, and because of some of the older software on that machine, I’m not quite ready to make the leap to Lion. Because of that, my iMac is no longer in sync with any of my stuff, which is yet another strike against the system for me. I know plenty of people still running 10.6, and I know Apple wants everyone on the newest OS — but why not support it at least in the beginning?

Losing The Trust

I figured I was the only person who was having that problem, but it turns out that it’s pretty widespread — and when Dan Frakes, the editor of Macworld is having problems, well that’s a little embarrassing for Apple.

For me, it means that I’m losing my trust in the Apple syncing system, something I’ve relied on heavily for years. If this continues down this path without resolution, then I’m just not going to use it anymore for risk of losing something important. I schedule my work, my home life and everything else on my calendar app, who wants to lose all that? Who wants to have doubled contacts? How can I trust the system if it keeps screwing up on me?

I would love iCloud to work this well.

I would love iCloud to work this well.

But this problem is bigger than just me, it’s potentially a problem for anyone on the iCloud network, which right now is a whole ton of people. If Apple thought that MobileMe was a PR nightmare, iCloud stands to be multiple times bigger. It’s the basis for where Apple wants to be in the future, and if it’s a flawed product, then that’s a big issue.

Where We Go From Here

I don’t know how the technical side of things works, and I don’t pretend to understand how Apple does syncing. Here’s what I do know.

1. MobileMe worked. Maybe not all the time, maybe it wasn’t perfect, but more often than not, it worked — at least for me, your mileage may vary.

2. Something changed. Somewhere in the transition to iCloud, Apple changed the system. Why? Maybe it had to do with iTunes Match, or possibly it was about losing iWeb and iDisk. Whatever it was, it changed.

Now all of these problems could’ve happened because the amount of people on the network swelled substantially, or because of a line of code that’s off just a little bit — again, I don’t know the logistics of how it works, I just know that it doesn’t.

Final Thoughts

Apple is always under the spotlight, and the more people that have problems and publicize it, the more issues that Apple is going to have in the press. It doesn’t take a genius to understand that they don’t want that to happen, so this problem will get resolved. But unless it gets fixed soon, me and many other people are just going to stop trusting the system.

Part of the reason I love Apple products so much is because I trust them. I never trusted my PC. I always expected it to break at one point or another, and more often than not it complied with my fears. With Apple, I know stuff works, so I trust it. ICloud needs to be trusted, and right now, it’s not.

When people lose that trust, they start to stop believing in the other products they have. Why would I sign up for iTunes Match when I can’t trust iCloud? Why would I pay for extra iCloud storage if it doesn’t work anyways? This is not a path Apple wants to go down.

It may seem like I’m blowing this out of proportion, but once you begin to rely on a system, you need it to work. I have full faith that Apple will fix the issue and that it will get resolved quickly, but until it does, I know I don’t feel that my data is secure.

Do you?

100+ Spectacular iPad Wallpapers

If you’re lucky enough to also own an iPad, it’s definitely worth heading over to iPad.AppStorm and checking out the recent, and unashamedly spectacular, collection of wallpapers!

We all love to beautify our devices, and one of the simplest ways to do this is by loading it up with some gorgeous wallpapers. If you’re looking for iPad wallpaper delights, then this is the roundup you’ve been waiting for!

Head over to iPad.AppStorm and get stuck in!

Make Money Using Your iPhone With Field Agent

Everyone knows that buying an iPhone isn’t cheap. Even if you pay the subsidized pricing, you’re handing over $200 to become the owner of the best smartphone available today. To ease the burden of such a cost, it would be a helpful if a service was available for your iPhone that would allow you to make a little, if not all, of that money back.

Enter Field Agent, a company that offers information collection for clients in which you are the information gatherer. After the jump I’ll explain how ridiculously easy it is to earn a few dollars by completing a Field Agent job.

What is Mystery Shopping?

At the heart of it, Field Agent is a company that provides mystery shopping services. Mystery shopping is a tool used by companies to determine if company standards are being followed. Therefore, your task as an Agent is to go to a store and determine if said standards are being adhered to. Specifically, your task more often than not will be to determine if if a manufacturer’s product is being displayed in a specific manner. You’ll also run into jobs in which you’ll look for a product demonstration (typically in grocery stores) and answer a series of questions based on your experience.

Signing-Up

When you open the app for the first time, you’ll need to create an account. The app will prompt you to enter your name and email address, and to choose a password. Then, a notification will pop-up informing you that you’ll need to answer several survey questions before you’re eligible to complete jobs. The survey inquires about general information (gender, race, education, household income, etc.) and asks specific questions about your shopping habits. All in all, the survey should take around five minutes to complete.

The first step you'll need to perform is creating an account and answering various survey questions.

The first step you'll need to perform is creating an account and answering various survey questions.

Finding & Accepting Jobs

After saving your profile, a splash screen will appear welcoming you to Field Agent and providing basic information regarding app navigation. There are four tabs in the bottom navigation bar — Jobs, Execute, Stats and Settings. The first page you’ll be taken to after tapping Get Started on the splash screen is Jobs.

The splash screen gives you a basic run down of the app's navigation.

The splash screen gives you a basic run down of the app's navigation.

The Jobs page displays a list of jobs in your area. The top navigation bar features two buttons — Near Me and Zip Code. By default, it will list available jobs within 30 miles of your current location, which can be altered on the setting page. If you tap the Zip Code button, jobs within 30 miles of the zip code you provided in your survey will be listed.

The Jobs page lists all the available jobs based on your search parameters.

The Jobs page lists all the available jobs based on your search parameters.

For each job listed, you’ll be provided with the job’s pay, distance from your current location and icons detailing what type of information you will need to collect. By tapping the Tips tab at the bottom of the page, a screen will pop-up and explain what each icon represents. For example, if a job displays a camera icon, you’ll be required to capture a photo.

The Tips pop-up screen identifies what each job icon represents.

The Tips pop-up screen identifies what each job icon represents.

To learn more about a job, tap the green Details button. The Details page provides the same information on the previous screen, but also offers a set of instructions regarding requirements for the job, such as what store you must visit and between what hours you must perform the job. If you want to perform a job, tap the Accept Job button at the bottom of the page. A new page will pop-up asking if you’re sure you’d like to perform a job, and it is hard to back out once it has been accepted.

When you're ready to accept a job, you'll need to confirm that you indeed want it.

When you're ready to accept a job, you'll need to confirm that you indeed want it.

Completing Jobs

When you arrive at the store and are ready to complete your job, tap the Execute button in the bottom navigation bar, and then tap the Complete button next to the job, which will be followed by another“are you sure” screen. The process for completing a job is extremely easy, as the app provides all the information you need.

Due to the apps use of GPS, you'll be notified if you're at the wrong location when you attempt to complete the job.

Due to the apps use of GPS, you'll be notified if you're at the wrong location when you attempt to complete the job.

Specifically, each step of your job includes a Request and Instructions. The Request is an outline for that particular step of the job, such as taking a photo of a product. The Instructions field will provide a list of information in regards to the Request. Using the previous display photo as an example, the Instructions field might tell you to go to a department in which you should find the product and the type of display on which it should be present.

After reading the Request and Instructions, you'll go to a second page in which you perform the requested task.

After reading the Request and Instructions, you'll go to a second page in which you perform the requested task.

As you go through each step, you will always have the option of going back to previous questions, if needed, by tapping the Previous arrow at the bottom of the page. Once you’ve completed each step, you’ll be taken to a page to confirm your answers. If you like what you see, tap the Complete arrow and the information will be sent to Field Agent for review.

Once you've completed your job, you'll be give the thumbs up to signify that your job was been received successfully.

Once you've completed your job, you'll be give the thumbs up to signify that your job was been received successfully.

Job Status

After completing a job, it usually takes a day or two to pass through Field Agent’s editing process. To determine if your job has been accepted, go to the Stats page. In addition to displaying Jobs that are “getting the okay” (displayed at the bottom of the page), you can also see your Agent Score, the number of jobs accepted/completed and how much money you’ve earned.

Your Agent Score raises each time one of your jobs has been accepted.

Your Agent Score raises each time one of your jobs has been accepted.

Collecting Your Money

The money you earn from completing jobs will stay stored in your account until you’re ready to cash out. It’s worth noting that there is no deadline for cashing out, so you can keep accruing money for as long as you like. When you’re ready to collect your money, you’ll need to visit the Field Agent website and click the big Cash Out button on the right side of the page. You’ll then have to enter an email address associated with your PayPal account (the only method for payment at this time).

You'll need to login to the Field Agent website to collect your money.

You'll need to login to the Field Agent website to collect your money.

Final Thoughts

I have a lot of experience with mystery shopping and I have to say that compared to other mystery shopping companies, Field Agent definitely offers the most pain-free method of making a few extra dollars. Most mystery shopping companies require you to go through several steps before you are able to perform a job, and the jobs are typically far more complicated and pay about the same amount of money as Field Agent’s.

In addition, a lot of people are under the notion that mystery shopping is a scam, but rest assured that Field Agent is free to use and you are never under any obligation to perform a job, unless of course you have agreed to complete one. If you’re interested in earning some additional income, Field Agent is definitely worth taking a look at.

iPhone Game Friday: New Releases

As the weather gets chillier, you might find yourselves wanting to snuggle up at home with your iPhone and a hot beverage rather than face the elements. We don’t blame you, and luckily we have a number of addictive new games out this week to spend time with by the fire …

Dark Incursion

Dark Incursion

With remarkable agility, Big Blue Bubble has released and updated their newest title, Dark Incursion. With the initial control issues resolved, the game now stands as one of the finer hack-and-slash side-scrollers on the App Store, channeling the spirit of Castlevania with its steampunk style.

Playing as Anya, you navigate an alternate 1800s universe where a military laboratory is plotting to create and use a sinister biological weapon. Bent on stopping them, you’ll find yourself up against all manner of creative enemies. Luckily, you’re well equipped with weapons and can make use of a “fuse” system (similar to powerup schemes in Castlevania) to augment your abilities with extra speed or elemental force. Fuses are not infinite, which means you have to manage them well, adding an extra layer of strategy to the otherwise straight-forward gameplay.

Dark Incursion is both stylish and fun to play, and as more content gets added to the game, it’s sure to become a cult favourite among steampunk fans of the iOS realm.

Price: $2.99
Developer: Big Blue Bubble
Download: App Store


Whale Trail

Whale Trail

A recent favourite on the App Store, Whale Trail follows in the footsteps of the various flying animal franchises and replaces the birds with … a whale. Somewhat less aerodynamic, one would think, but Willow — the main character — is a special whale whose rainbow tail trail keeps him aloft.

That tail power is the key to your survival, so you’ll spend most of the game zipping through the air collecting bubbles to replenish it. All the while, you’ll have to look out for ominous (ok, they’re actually adorable) thunderclouds and perform acrobatic loops to reach speed boosts and perform bubble combos.

Sometimes a game comes along that balances charm and simplicity with such effortless enthusiasm that it seems destined to succeed, and Whale Trail is among them. This is a completely recommendable game that’s perfect for casual gamers.

Price: $0.99
Developer: ustwo
Download: App Store


Modern Combat 3: Fallen Nation

Modern Combat 3: Fallen Nation

Right alongside its console cousins, the iOS shore series Modern Combat has recently seen the release of its latest sequel: Modern Combat 3: Fallen Nation.

Gameloft’s latest iteration in the series is a strong and gorgeous FPS experience that carries many of the typical genre tropes over to the mobile world. Incredible visuals bring to life a conflicted world where you’ll fight across 13 campaign missions. Controls are familiar, but have been refined to include the ability to sprint and even slide, though you’re likely to find those abilities more useful in the extensive multiplayer segment of the game.

12 players at a time can join the multiplayer matches, and a competitive system of collecting experience points determines what equipment you have access to. This ensures plenty of replay value, and since your game data is saved in the Gameloft cloud rather than your device, you can log in from any device and pick up right where you left off. If you like shooters and demand the best even while you’re on the go, you should check out Modern Combat 3.

Price: $6.99
Developer: Gameloft
Download: App Store


Robo5

Robo5

Robo5 is the story of a robot seeking its purpose and identity. The simple premise is supported by visuals with a strong steampunk personality, a terrific box-based puzzle mechanic, and a number of extras to augment the core levels.

The object of the game is to reach the top of each level, and to do this you’ll need to shift and manipulate boxes to construct a path. Thankfully, the controls are extremely straight-forward and never get in the way, which means the focus is always on the actual challenge of the puzzle — and make no mistake, Robo5 is no walk in the park. Not only are there special blocks with differing abilities, some levels also have a limit on the number of moves you can make, or on the time you have to complete the puzzle.

All these elements come together into an extremely compelling whole that gives puzzle fans a lot to chew on. Good play is rewarded through special diaries that reveal more of the story, and some diaries come with hidden levels as well, meaning there’s a lot to explore. Don’t miss this one!

Price: $0.99
Developer: Buyi Xu
Download: App Store


Galaxy Pirate Adventure

Galaxy Pirate Adventure

For those who are still hung up on the demise of Freelancer or any of the other classic sci-fi space sims, you’re in luck: Sunfish Studio brings you Galaxy Pirate Adventure.

If you’re on an iPhone 4S, the first thing you’ll probably notice is that the graphics are incredible. The high-resolution textures and shading effects are among the best you’ll see on the App Store, and the eye candy helps cement a sense of immersion in the game’s sprawling world of 10 star systems. You play as the son of a pirate king, and while that may sound like an intriguing setup, the story struggles to be interesting and is often impeded by awkward English.

That being said, Galaxy Pirate Adventure is still a very fun game with a huge amount of content to explore and a thorough system of tweaking and upgrading ships as you build your fleet. It’s no EVE Online, but it’s about as close as you can get on your iPhone.

Price: $4.99
Developer: Sunfish Studio Limited
Download: App Store


What Have You Been Playing?

We always love hearing from you, so jump into the comments if you have something to say about our game selection for this week, or if you have another title to suggest for us. See you next time!

Simple Sqlite Database Interaction Using FMDB

Introduction

In the age where Core Data is king, the database that started it all is often overlooked. I’m talking of course about sqlite. As you may or may not know, prior to core data, sqlite was the preferred method of storing relational data on iOS devices.

Although, most developers don’t interact with sqlite directly, they still use it under the hood as the primary data store for core data. This is great and all, but there are often times when raw sqlite is still the preferred storage method.

A few of these might include:

  • Caching
  • Preferences
  • Simple objects
  • Portability
  • Cross platform applications

Recently, I have had to make heave use of raw sqlite as a caching strategy in a new project that I’m working on. Being that we are developing a framework for other developers to include in their projects, we can’t always assume that they have their environment set up to use core data. When I was but a n00b iOS developer I did all of the crazy sqlite management by hand. See This post series, but don’t spend too much time there because it’s embarrassing.

Gross right? Now, there is a much easier way to manage and interact with your sqlite databases. This library has been around for quite some time and I wish I had known about it earyly on.

FMDB

FMDB stands for Flying Meat Database. What a great name… This project aims to be a fully featured wrapper for sqlite.

You can clone their repository on their github.

This tutorial will give you a brief introduction to using FMDB to create a database, create a table, insert, fetch, and delete data.

Project Set Up

The first step is to download/clone fmdb from the url above. Once downloaded drag everything inside of the src folder into your project except fmdb.m. That file contains unit tests and a main, which will cause some conflicts in your project.

The next step is to link in the sqlite library. To do this:

  1. Click your project in the left column of XCode
  2. Click the main target in the middle column. In our case it’s “FMDBTest”
  3. Click the “Build Phases” tab in the third column
  4. Expand the arrow next to “Link Binary With Libraries”
  5. Click the “+” button
  6. Search for libsqlite3.0.dylib and double click it

When you are all done, it should look like this:

Screenshot

Now, that we have the library in place, let’s write some code.

Creating A Database

Obviously where you create your database is up to you, but we are going to do it in the appDelegate.

In addition to working with existing databases, fmdb can easily create any number of databases for you on the fly. After importing FMDatabase.h in our AppDelegate.m file, we can add the following code to the application:didFinishLaunching method.

NSArray *paths = NSSearchPathForDirectoriesInDomains(NSDocumentDirectory, NSUserDomainMask, YES);
NSString *docsPath = [paths objectAtIndex:0];
NSString *path = [docsPath stringByAppendingPathComponent:@"database.sqlite"];
 
FMDatabase *database = [FMDatabase databaseWithPath:path];

First, we resolve the path to the documents directory. Be careful, if you don’t need your database to be backed up, use the cache directory instead. When you send a path to the databaseWithPath method of fmdb, it first checks if the database exists, and if not, it creates it. Similarly, we could copy an existing database to the documents directory and source it the exact same way.

Opening The Database And Creating Tables

In order to perform any action on the database, it must first be opened. Here is the code to open the database and create a users table. Don’t worry about closing it right now, we will do that when we are all done.

[database open];
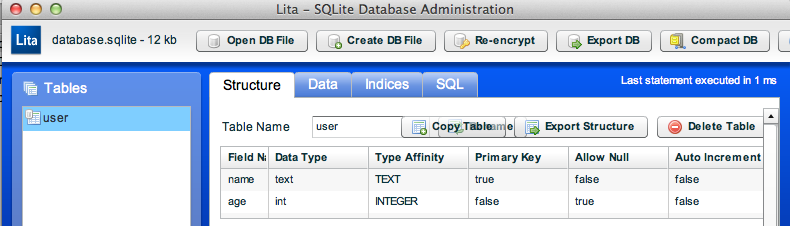
[database executeUpdate:@"create table user(name text primary key, age int)"];

Here we first call the open method of the database to open it. Next, we use the executeUpdate method to create the table. Make sure you use this method and not executeQuery when creating a table. This is a common error. The database should look like this after our update:

Screenshot

After we are all done here we close the database.

Inserting And Deleting Data

Inserting data using sqlite is very straight forward. You can either build your strings and pass them in directly OR use the sqlite format using “?’s” and letting fmdb do the work. Below is an example of each:

// Building the string ourself
NSString *query = [NSString stringWithFormat:@"insert into user values ('%@', %d)",
@"brandontreb", 25];
[database executeUpdate:query];
 
// Let fmdb do the work
[database executeUpdate:@"insert into user(name, age) values(?,?)",
@"cruffenach",[NSNumber numberWithInt:25],nil];

Generally, the second route is preferred as fmdb will do some of the sanitizing for your (such as add slashes to single quotes).

Now that we have some data in our database, let’s delete it. The following code will delete all users with an age of 25:

[database executeUpdate:@"delete from user where age = 25"];

And that should remove both of the records that we inserted.

Querying The Database

Querying the database is a bit more tricky than inserting and deleting. FMDB has some great utility methods for helping us out in certain circumstances, but for this tutorial, we will assume the don’t exist and show you how to fetch data out. If you are following along in a sample application, put this code before your delete code (so that we actually have some data to work with).

Below is an example of fetching all users from the database:

FMResultSet *results = [database executeQuery:@"select * from user"];
while([results next]) {
    NSString *name = [results stringForColumn:@"name"];
    NSInteger age  = [results intForColumn:@"age"];        
    NSLog(@"User: %@ - %d",name, age);
}
[database close];

We first query the database using the executeQuery method. This returns to us an FMResultsSet. Next we start a while loop that continues while there are results to be retrieved and fetch out each of our data points. Finally, we just print out each user.

And finally, our database gets close…

Conclusion

This concludes our sqlite using fmdb tutorial. As always, if you have any questions, please leave them here or write me on twitter.

You can download the source for this tutorial here

Happy iCoding!

Deep dive: Aperture and Photo Stream, how do they work?

I’m a bit of a shutterbug, so Photo Stream is something I was really interested in when it was announced as part of iOS 5‘s feature set way back in June. Frictionless, automated sending of photos from my phone to my computer? Sign me up!

Of course, as is too often the case with Apple, the nitty gritty of how this would work wasn’t explained in any detail — particularly for Aperture, which often takes a back seat to iPhoto when Apple is showing off its apps.

Hopefully, this article will answer all your questions about how these two products interact. If not, please leave a comment pointing out what I’ve overlooked.

Before we start, some basic housekeeping. Photo Stream isn’t going to appear in your Aperture at all if you don’t first upgrade to v3.2. You’ll also need OS X 10.7.2 or later, and iOS 5 on your iPhone, iPad, or iPod touch. If you’ve done all that, you’re all set.

Accessing Photo Stream within Aperture

This is Photo Stream’s marquee feature: snap a photo with your iOS device and have it show up on your Mac.

It’s easy to do, though it comes with one small wrinkle. In Aperture, go into Preferences | Photo Stream and tick the appropriate boxes. The caveat is that you can only have Photo Stream active for iPhoto or Aperture, not both at once. Turning it on in one app turns it off in the other.

With that setting in place, a Photo Stream entry should appear in your Aperture Library list.

Clicking on this will show you all the photos in your Photo Stream, which you can look through. You can’t make any edits, however, until you import them into your library:

Clicking “import photo” brings the photo into your library and allows you to do all the usual range of Aperture adjustments to it.

Note that the Photo Stream implementation on your iOS devices will only be active when they are connected to a Wi-Fi network. If you only have cellular 3G access, no photos will be transferred in either direction. However, don’t forget that tethering creates a Wifi network. In a pinch, you could use an iPhone to create a tethered network and connect a second iOS device to it. That would give the second device full Photo Stream access.

Note also that “Automatic Import” means Aperture is constantly copying Photo Stream pictures to your Aperture library. It creates a series of Projects, one per month. As long as you start Aperture at least once per month and once per 1000 photos, this guarantees you can never lose a photo placed in Photo Stream.

Non-destructive editing

Here’s a neat trick that isn’t immediately obvious. If you take a photo on the iPhone and use the new built-in photo editing features of iOS 5, when you bring the photo over to Aperture the edits are preserved as edits, in the usual Aperture master-and-version-file manner. So you can choose to change them as you please, perhaps replacing iOS’s rather crude “enhance” wizard with Aperture’s fine-grained adjustments.

I would very much like to see this functionality available to third-party devs. It’d be great if the likes of Instagram and Camera+ were able to save clean copies of their filtered output without cluttering up your camera roll with duplicate versions. Of course, as those filters aren’t directly comparable to Aperture’s, that would only be possible via a single image file that is basically just two JPGs stuck together — whereas I imagine the native Photos app is doing something more sophisticated.

Putting photos into Photo Stream from within Aperture

By default, when the third checkbox in my first screen grab above is ticked, all new photos imported into Aperture are automatically added to the Photo Stream by default. More on this “feature” in a second. If you untick that box, you can still manually choose to add specific versions by dragging and dropping them within Aperture to the Photo Stream entry in the navigation tree.
However, before you go adding files en masse, remember that by default everything in the Photo Stream is going to be downloaded to all your iOS devices; that there’s no way to delete images from Photo Stream except for a full purge; and that Photo Stream only deletes images when it’s holding more than 1000 pictures or after 30 days.

This can add to create quite a headache. It means that if you pull 400 1.5 MB JPG shots into Aperture, it’s going to immediately upload 6 GB of data to iCloud. If you’re not on fast, unmetered Internet, that could be at best inconvenient (as it’ll choke your Internet connection up for a prolonged period) and at worst expensive (if you go over your ISP’s bandwidth cap). It’s then going to download all of those photos, albeit at an “optimised resolution” to each of your iOS devices, exacerbating the problem. Testing on my iPhone 4 and iPad showed that Photo Stream optimised images are around 500 KB each. Continuing our example, then, if you have an iPhone and an iPad that’s a further 4 GB download for 10 GB of bandwidth used overall.

This can also lead to problems with your iOS devices running out of disk space, which then has knock on effects that can start deleting app data you wanted. Overall, it’s probably a good idea to leave “automatically upload imports to Photo Stream” to the iPhoto-using casual shooters. I’d go so far as to question Apple’s decision to enable this feature by default in Aperture.

RAW files and Photo Stream

The problems with Photo Stream and bandwidth get worse when you examine how it handles RAW files.

According to the Aperture documentation, how RAW interacts with Photo Stream isn’t immediately obvious — but it is very important that you understand it. If you send a RAW file from Aperture to Photo Stream — either automatically via the “import all” checkbox, or manually — and if that RAW file has no edits applied, then it’s the full-sized original RAW that ends up in Photo Stream. On the other hand, if it has had edits applied then Photo Stream ends up holding a JPG copy instead.

This surprising handling also applies to RAW files imported to the iPad via the Camera Connection Kit. This is a common workflow for me when I am travelling, as I typically do not bring a laptop. Several times a day, I import all the images from my cameras into my iPad, partly for proofing but also partly for backup purposes. It’s not unusual for me to shoot 15-20 GB of photos on a week long vacation (I’m very much a statistical photographer). With Photo Stream enabled, this means I’ll be choking up the hotel’s Internet connection for hours on end as well as making my iPad run slowly as it manages the upload process in a background task I cannot control or suspend. In my experience, hotel Wi-Fi isn’t either the fastest or most reliable, so this could become quite hard to manage.

Note, however, that as Apple states here, RAW files (like full resolution JPGs) are never delivered to iOS devices. If you put a RAW file onto the iPad or if you tell Aperture to add one to Photo Stream, it’s a around-500-KB optimised JPG that ends up synced on the other iOS devices.

Most irritating of all is it is that unlike in Aperture, the Photo Stream option for iOS doesn’t have a “download all photos but do not automatically upload new ones” option. It’s on/off only. So I have to micro-manage the setting depending on whether I’m using my iPad to import photos from my camera en masse (in which case I want it disabled) or work with iPhone snapshots (when it has to be enabled).

There’s also a subtle interaction with the “automatic import” setting in Aperture. Files brought in like this are managed copies, i.e. with the master file living inside the Aperture library. If (like me) you maintain your Aperture library file on a small laptop drive and use external reference masters held on a network share or a larger external drive, then allowing Aperture to import a lot of RAWs through Photo Stream may cause you to suddenly run out of room on your laptop’s drive.

Now, it’s only fair of me to note that if you are in the luxurious position of not caring about upstream Internet bandwidth, then there is an significant upside to this — cloud-based backup of your photos. Even if you managed to lose your camera, your memory cards, and your iPad, up to 1000 RAW files are still safely in Photo Stream ready to be pulled into Aperture when you get home. There’s definitely perks to this system, I just wish Apple had given the end users a little more control because we don’t all live in Infinite Bandwidth Land.

Remember also that Photo Stream storage does not come out of your main iCloud disk space allocation (the 5 GB you get free or any extra you pay for). That’s admirably generous of Apple — a full stream of RAW files could easily be 10-20 GB depending on your camera.

Photo Stream and Apple IDs

One final note. I’ve seen a few professional photographers around the web getting excited about using Photo Stream as a sort of low-rent proofing service — for example, to consolidate work from multiple cameras tethered to laptops onto a single workstation back at the office where another member of staff is compiling picks in real time, or for a supervisor to keep an eye on pictures taken on a shoot in real time.

Remember that for this to work well, you’re going to need a lot of bandwidth at the shooting site — particularly upstream bandwidth, which is often not that fast on low-end and medium range Internet connections.

It also requires all the different devices and Aperture installs to be connected to the same Apple ID. Depending on the setup you are contemplating, that might not matter at all, or it could be a significant limitation.

Deep dive: Aperture and Photo Stream, how do they work? originally appeared on TUAW – The Unofficial Apple Weblog on Sun, 06 Nov 2011 08:00:00 EST. Please see our terms for use of feeds.

Source | Permalink | Email this | Comments