Caterpillars with AdMob and Leaderboard (Games)

Run on platforms and collect coins. Avoid collisions with caterpillars. Every time when each caterpillar goes into the pipe all next caterpillars will move faster. You can jump and push platforms under the caterpillar and crash it. Enjoy!

Try demo on Google Play

Features

  • LibGDX framework used
  • Hillmix Game Map Editor used
  • AdMob Banner integrated
  • AdMob Interstitial integrated
  • Google Play Games Leaderboard integrated
  • Clear graphics
  • Optimized for tablets
  • Background music and sounds

How to Setup and Reskin

  • Install latest Android SDK
  • Open Gradle project in Android Studio
  • Change Package ID, App Name, icons, graphics and sounds
  • Set up Google Play Games Services
  • Set up AdMob ID, Google Play Games App ID and Leaderboard ID
  • Build an APK file

Download Caterpillars with AdMob and Leaderboard (Games)

Triple Hop (Games)

Triple Jump is a very interesting game, in which you have to jump as much as three times to avoid colliding with obstacles. Number of downloads for this games has crossed 1500 in one week or so, and numbers are counting.The premise of the game is simple: the game spawns obstacles after a constant interval of time and the player which is a ball, has to jump those obstacles to survive and collect coins. Score is updated on every successful jump. Features such as InApp purchases, Facebook and twitter sharing, chartboost along with others give this game template an edge over other templates. Another plus point of the game is that, it can be reskin very easily, Everyone who has a little knowledge of programming can reskin it with ease.

Download Triple Hop (Games)

Ship Lander with AdMob and Leaderboard (Games)

Fly through all obstacles and gently land the ship on the finish platform. Game has 10 levels. Enjoy!

Try demo on Google Play

Features

  • LibGDX framework used
  • Hillmix Game Map Editor used
  • AdMob Banner integrated
  • AdMob Interstitial integrated
  • Google Play Games Leaderboard integrated
  • Clear graphics
  • Optimized for tablets
  • Background music and sounds

How to Setup and Reskin

  • Install latest Android SDK
  • Open Gradle project in Android Studio
  • Change Package ID, App Name, icons, graphics and sounds
  • Set up Google Play Games Services
  • Set up AdMob ID, Google Play Games App ID and Leaderboard ID
  • Build an APK file

Credits

Background music: “Crowd Hammer” Kevin MacLeod (incompetech.com)

Download Ship Lander with AdMob and Leaderboard (Games)

2 Squares – HTML5Game (Games)

About the Game:

2 Squares

There are two squares attached to each other at the center of the screen. They are in two different colors, blue and red and you can turn them by touching sides of the screen. There are also squares entering from different sides of the screen with the same blue or red colors. You have to turn the center squares so that squares with the same color match each other when they reach the center. If you fail to do so, you will lose.

How to Play:

For playing this game, you can use touch in mobile devices and mouse or keyboard in computer.

Features:

» HTML5 game
» Supports touch
» Works on all HTML5 browsers
» Can be used in mobile devices & websites
» Easy to personalize the game’s appearance
» Easy to personalize the game’s sounds
» Includes Construct 2 project file
» Made with Construct 2
» Auto-resize (Responsive)

We will be happy to hear your ideas and opinions about the game, so if you like write a comment or send it to our e-mail:
[email protected]
And if you liked it, don’t forget to rate it!

Come & See Our Website: www.01Smile.com

Flag Counter

Download 2 Squares – HTML5Game (Games)

WavePlayer – a WordPress audio plugin (Media)

What is WavePlayer?

WavePlayer is a fully customizable, responsive HTML5 audio plugin for WordPress. Its interface is built around the waveform of the audio file that is playing back.

Here is a list of the main features:

  • responsive interface, with a modern looking style
  • HTML5 support
  • four different sizes that automatically adapt to your page
  • full integration with the WordPress Media Manager
  • Visual Editor in WordPress Post Editor
  • archival of peak files for an instantaneous access to the waveforms

How to install WavePlayer

for a visual guide CLICK HERE

Step 1 – In WordPress Plugins section, click on the Add new button, right beside the Plugins page title.

Step 2 – Click on the Upload Plugin button, right beside the Add Plugins page title.

Step 3 – Click on the Choose file button in order to select the location of your waveplayer.zip file.

Step 4a – Browse to the location where you downloaded the waveplayer.zip file.

Step 4b – Click on the Open button.

Step 5 – The plugin is now active. You can click on the Settings link right below its name or go to Settings -> WavePlayer to configure its options.

Step 6 – Once WordPress has finished uploading the plugin files, click on the Activate Plugin link.

Step 7 – The plugin is now active. You can click on the Settings link right below its name or go to Settings -> WavePlayer to configure its options.

How to use it?

WordPress Media Manager

Starting from version 3.9, WordPress makes it possible to create audio playlists directly from the WordPress Media Manager. WavePlayer takes full advantage of this capability introducing a waveplayer shortcode that extends the default playlist shortcode. This new shortcode offers the users a more modern interface for their audio tracks, while keeping the same ease of operation in creating their favorite playlists. In addition to that, WavePlayer also overrides the built-in audio shortcode, so that you will automatically find a single-track instance of WavePlayer wherever you have already an audio shortcode in your pages. Even in the backend!

wvpl-wpmediamanager

How to create a new instance of WavePlayer

for a visual guide CLICK HERE

Step 1 – In order to create a new instance of WavePlayer, simply create or edit the Post or the Page where you want to add the WavePlayer and click on the Add Media button, right above the Visual Editor toolbars.

Step 2 – In the left sidebar, together with all the other elements WordPress allows you to create, you will find a menu to create a new instance of WavePlayer. Click on Create Waveplayer.

Step 3 – If you have already uploaded some audio files, you can select it here. Otherwise, click on the Upload files tab, in order to upload new audio files.
(WordPress allows you to attach a featured image to audio tracks as well as to any other post type. When you set the feature image of an audio track, WavePlayer will use it as the thumbnail of that track in the player).

Step 4 – Upload your audio tracks dragging them to WordPress drop area or Selecting files from your local drives.

Step 5 – The files uploaded while you are in the process of creating a new Waveplayer instance get automatically selected for the instance’s playlist.

Step 6a – While the uploading is still processing, you can select more tracks already present in your Media Library

Step 6b – When the upload is complete and you are happy with you selection, you can finally create a new instance of WavePlayer clicking on the Create a new WavePlayer button.

Step 7a – Now, you can edit your instance of WavePlayer, starting with the order of the tracks. In order to change the order, simply drag and drop their thumbnails around.

Step 7b – In the WavePlayer Settings panel, you can change the default settings of the player, that will alter the aspect of this instance in the page.

Step 7c – When you are happy with your configuration, click on the Insert WavePlayer button to insert the instance you have just created in your page or post.

Step 8 – You can immediately preview the instance you have just inserted in the post editor. You can even playback the audio tracks!

WavePlayer allows you to work with a visually complete and fully interactive rendition of the player right in the post editor, thus saving you the time to go back and forth between the post editor and the actual page in the front end.

If you want to make changes to the selected instance, simply click on the button.

Step 9 – If you want to add more tracks to your playlist, click on the Add to Waveplayer menu item.

Step 10a – When altering an instance of WavePlayer that you have previously inserted in your post, you can still add more audio tracks, selecting them from the Media Library or even uploading new files, the exact same way you did when originally creating the player.

Step 10b – When you are happy with your selection, click on the Add to WavePlayer button to see your new tracks added to the previous playlist of the player.

Step 11 – Of course, you can still change the order of the tracks (draggind the files around) or the aspect of the player (altering the WavePlayer settings).

When you are done with you editing, click on the Update WavePlayer button to make your changes effective.

Step 12 – Click on the Publish (for newly created posts or pages) or the Update button (for already published posts or pages) to finalize your changes.

Now it is time for you to visit the page with your final result!

Shortcode

Although the waveplayer shortcode with all its parameters is created automatically when inserting the Waveplayer through the Add Media frame, it is useful to understand its structure that is composed as follows:

[ waveplayer ids = "comma separated IDs of the selected tracks" 
             mp3 = "" 
            size = "lg" | "md" | "sm" | "xs" 
           style = "light" | "dark" 
           shape = "square" | "circle" | "rounded" 
        autoplay = "true" | "false" 
      repeat_all = "true" | "false" 
         shuffle = "true" | "false" 
      wave_color = "#ddd" 
    wave_color_2 = "#666" 
  progress_color = "#59f" 
progress_color_2 = "#05a" 
   hover_opacity = "0.4" 
    cursor_color = "#ee2" 
  cursor_color_2 = "#d93" 
    cursor_width = "2" 
       wave_mode = "4" 
       gap_width = "1" 
wave_compression = "2" 
  wave_asymmetry = "2" ]
Parameters

ids – This is the only required parameter and it gets automatically populated with the IDs of the tracks selected in the Add Media frame. If left blank together with the following parameter mp3, this instance of the Waveplayer will be hidden.

mp3 – If the ids parameter is left blank, you can provide a URL to an mp3 file through this parameter. If the file is local, Waveplayer will try to access the IDS tags information and show them in the info bar of the player.

size – Defines the size of the player. Accepted values are: lg, md, sm and xs. If left blank, the player will be displayed at the default size setting, according to the corresponding option of Settings –> Waveplayer.

style – Can be set to light or dark and defines the coloring of the area where the information of the current track are displayed. Furthermore, Waveplayer is fully customizable through the Custom CSS option of Settings –> Waveplayer. If left blank, the player will use the default style setting, according to the corresponding option of Settings –> Waveplayer.

shape – Can be set to square, circle or rounded and defines the shape of the thumbnail where the playback controls are located. If left blank, the player will use the default shape setting, according to the corresponding option of Settings –> Waveplayer.

autoplay – If set to true, the player will start to playback the track as soon as the page completes loading. If set to false, the user will have to start the playback manually. If left blank, the player will use the default autoplay setting, according to the corresponding option of Settings –> Waveplayer.

repeat_all – If set to true, the player will keep playing back the tracks continuously, restarting from the first track when the last one has ended. If set to false, the playback will stop after the last track has ended. If left blank, the player will use the default repeat_all setting, according to the corresponding option of Settings –> Waveplayer.

shuffle – If set to true, the player will shuffle the tracks every time the visitor reloads the page. If set to false, the order of the tracks will be the one provided with the ids parameter. If left blank, the player will use the default shuffle setting, according to the corresponding option of Settings –> Waveplayer.

wave_color, wave_color_2 – Defines the starting and ending color of the vertical gradient filling the waveform. If left blank, the player will use the default wave_color and wave_color_2 settings, according to the corresponding option of Settings –> Waveplayer. For a better understanding of the waveform coloring scheme, please refer to the Waveform Options section of the Settings.

progress_color, progress_color_2 – Defines the starting and ending color of the vertical gradient filling the performed portion of the waveform. If left blank, the player will use the default progress_color and progress_color_2 settings, according to the corresponding option of Settings –> Waveplayer. For a better understanding of the waveform coloring scheme, please refer to the Waveform Options section of the Settings.

hover_opacity – Defines the opacity of the wave overlay when the user moves the pointer over the wave. Set this parameter to 0 to have a regular continuous waveform. If left blank, the player will use the default hover_opacity setting, according to the corresponding option of Settings –> Waveplayer.

cursor_color, cursor_color_2 – Defines the starting and ending colors of a vertical gradient for the cursor scrolling over the waveform. If left blank, the player will use the default cursor_color and cursor_color_2 settings, according to the corresponding option of Settings –> Waveplayer. For a better understanding of the waveform coloring scheme, please refer to the Waveform Options section of the Settings.

cursor_width – Defines the width of the bars displaying the waveform. Set this parameter to 0 to have a regular continuous waveform. If left blank, the player will use the default cursor_width setting, according to the corresponding option of Settings –> Waveplayer.

wave_mode – Defines the visualization mode of the wave. If set to 0 (‘Continuous’ in the settings page), the waveform will be displayed as a regular continuous waveform. Any other setting from 1 to 10 represents the width a the bars used to display the waveform in a histogram fashion. If left blank, the player will use the default wave_mode setting, according to the corresponding option of Settings –> Waveplayer.

gap_width – If wave_mode is set to any value other than 0 (‘Continuous’), this parameter defines the width of the gap between the bars representing the waveform. If left blank, the player will use the default gap_width setting, according to the corresponding option of Settings –> Waveplayer.

wave_compression – Defines the compression of the wave. This option does not affect the file of the audio, but only the way its waveform gets displayed. A lower level of compression shows a more evident difference between low intensity and high intensity in the waveform. Conversely, a higher level of compression flattens those differences, showing a more uniform wave. If left blank, the player will use the default wave_compression setting, according to the corresponding option of Settings –> Waveplayer.

wave_asymmetry – Defines the ratio between the height of the top half of the wave and the height of the bottom part of the waves. If left blank, the player will use the default wave_asymmetry setting, according to the corresponding option of Settings –> Waveplayer.

Settings

WavePlayer settings – located at the Settings –> WavePlayer page of the WordPress Admin area – define how to display a shortcode with no parameters provided other than the IDs of the audio tracks you want to included in that particular instance of the player, like the following one:

Please note that changing any of these settings will affect the way each instance with ANY missing parameter will be displayed on your website.

Default player options
for a visual guide CLICK HERE

In the first panel of the WavePlayer Settings you can define the default options for the size, style, shape, autoplay, repeat_all and shuffle parameters. Whenever you insert an instance of the Waveplayer without providing any of these parameters, the instance will be displayed according to these settings.

Default waveform options and color scheme
for a visual guide CLICK HERE

In the second panel of the WavePlayer Settings you can set all the default values that define how the waveform is going to be rendered. Whenever you insert an instance of the Waveplayer without providing any of these parameters in the shortcode, the instance will be displayed according to these settings.

Through these options you can have the waveform perfectly matching your current WordPress theme and thanks to the realtime preview, you can see the result of your changes without even the need to save the settings.

Furthermore, all these settings can be added as parameters to each Waveplayer shortcode, customizing each instance of the player, regardless of these default settings.

HTML & CSS Customization
for a visual guide CLICK HERE

In the last panel you will find two different textareas.

The first one, Info bar template, allows you to customize the information shown in the info bar when a track starts playing back. You can use pretty much every ID3 tag you know are saved in the audio file you uploaded. Simply write you HTML template including each tag surrounded by a “%” character. For example, if you want to show the title of the song followed by the artist name, you can write the following HTML code in the textarea:

%title% by %artist%

The second textarea, Custom CSS, allows you to add your own CSS rules to the default stylesheet that comes with the plugin. You can either customize the default CSS rules or create your own set of rules to be added in the info bar template.

Maintenance
for a visual guide CLICK HERE

A peak file is saved by WavePlayer in the ‘peaks‘ subfolder of the plugin, whenever an audio track is loaded for the first time. This allows WavePlayer to render the waveform of each audio file much faster the following times.

If you delete an audio track that was previously used in WavePlayer, the peak file remains unused forever in the peak subfolder of the plugin. Although peak files are very small in size (usually around 30 kB), it can be a waste of your hosting space if you happen to upload and delete audio attachments regularly. It is recommended to delete orphan peak files clicking on the Delete orphan peak files button every time you delete a massive amount of audio attachments from your website.

If, for any reason, you want to make sure WavePlayer regenerates all the peak files, you have to delete them using the Delete all peak files button.

Credits

WavePlayer makes use of the following projects:

wavesurfer.js – The waveform design capability you find in WavePlayer is built around waveform.js, by katspaugh, optimized to a more efficient management of the canvas capabilities and extended to be integrated as a WordPress plugin. You can learn more about that project at the Wavesurfer.js Official Page or at the Wavesurfer.js GitHub Ppage. Wavesurfer.js is licensed under a Creative Commons Attribution 3.0 Unported License.

Font-Awesome – Buttons and icons featured in WavePlayer are provided by Font Awesome, a CSS toolkit based on an iconic font. The font is released under a SIL OFL 1.1 License. The CSS code is released under a MIT License.

Changelog

v1.0.18
* First release

Download WavePlayer – a WordPress audio plugin (Media)

Zombie Shooter iOS +Admob // iAds +Game Center (Games)

Tested with iPhone 6s iOS 9.2 – CHECK VIDEO – CLICK THE BUTTON ABOVE!

features2 low

Shoot as many zombies as possible, control your character with two controllers for moving and shooting. Collect and use power-ups (increased speed, power ammo). Post your scores via global leaderboards.

Included:

  • ADMOB or iAds interstitials
  • GAME CENTER leaderboards – best highscores
  • ASK FOR RATE popup
  • ready for music and sounds
  • easily change game parameters like number of zombies spawning

Made with free to use Corona sdk – tested with version 2015.2795.

Download Zombie Shooter iOS +Admob // iAds +Game Center (Games)

Leadash – Material Design Lead Generation Dashboard using AngularJS + Laravel 5 (Project Management Tools)

Leadash is a fully functional responsive dashboard created using MaterializeCSS and AngularJS at the front-end and the Laravel framework at the back-end.

With this dashboard, managing your leads has never been easier.

Demo:

Email: [email protected]

Password: admin

Features

Below are some functionalities of the dashboard:

PROJECTS

Projects are your websites where your customer/leads are coming from either by signing up or by subscribing.

  • Create New Project
  • Configure Project – Configure what types of information would you like to get from your customers/leads.
  • Generate Signup Forms – Generate forms which you can embed on any of your website pages.
  • View Project Leads – All your project leads will be displayed in a tabular format which you can download as Excel files.
  • Add New Lead – You can manually add lead to your project if you want.
  • View Project Members – Project members are the persons who can see, edit and view the leads depending on their roles. You can add different members on each project. By default you are the superadmin of the projects, meaning you can perform all of the possible actions a user can do on the dashboard. A member can be an admin, an agent or a supplier.

LEAD

A lead is a customer that signed up on your website. The lead information will be displayed according to what questions you created when you configure the project.

Actions performed on each lead will be recorded and displayed as activity logs on the sidebar when viewing the lead.

SCHEDULES

You can set schedules for each lead when you need to contact them in the future. When that day arrives, you will be notified by the dashboard.

You could also see upcoming schedules by clicking the calendar icon on the header part.

NOTIFICATIONS

A notification will be shown when a new lead is created or signed up or when some of your team members changed the status of any lead on the project.

AND A LOT MORE…

The dashboard also included quick tours and tips which will help you familiarize the dashboard easily.

Need Help? No Problem!

We’ll be happy to help you if you need technical support or have any question. Don’t hesitate to contact us via our user contact form or in the comments section of our product.

Posts are typically responded to within 24 hours Monday through Friday. We try to give our customers the best support possible. If you need any help , please let us know.

Support

  • Availability of the author to answer questions
  • Answering technical questions about item’s functionalities features
  • Assistance with reported bugs and issues

Download Leadash – Material Design Lead Generation Dashboard using AngularJS + Laravel 5 (Project Management Tools)

List Importer for Buzzy (Add-ons)

Introduction

“List Importer for Buzzy” is an add-on and must have tool for anyone using “Buzzy – News, Viral Lists, Polls and Videos”.

Note: This is an add-on for Buzzy script which will work only if you have installed Buzzy.

AMAZON S3: This importer does not work with amazon s3 storage option of buzzy. If you are using amazon s3, please do not buy it.

If you are not familiar with the “Buzzy” script, here is the link:

http://codecanyon.net/item/buzzy-news-viral-lists-polls-and-videos/13300279

Thousands of viral lists are ready to import from the top viral websites viz. Likes, BuzzFeed and BoredPanda

For more details, visit demo page http://buzzy.xpertscripts.com/listimporter

For front-end, visit: http://buzzy.xpertscripts.com

SALIENT FEATURES

  • Select User

    Choose different users before import. Users list will be available in a drop-down select box.

  • Select Category

    Select desired category from the list before hitting import button. You may add new categories from Buzzy’s Admin Panel.

  • Auto Publish or Save as Draft

    You may choose whether you want to auto-publish the imported item or save it as DRAFT (to be activated later from admin panel).

  • Credits

    There are plenty of options to give attribution to the author. You may choose whether you want to give credits or not. And,
    if you want to give credits, there are different templates to customize the text of “credits note”.
    To know more about credits settings, click here.

If you have any questions, please feel free to contact via contact form:
http://codecanyon.net/user/xpertscripts#contact

Download List Importer for Buzzy (Add-ons)

WooCommerce Wholesale Bundle (WooCommerce)

WooCommerce Wholesale Bundle

WooCommerce Wholesale Bundle – A bundle which contains WooCommerce Wholesale Pricing and WooCommerce Wholesale Pricing Register.

WooCommerce Wholesale Prices

A extension for WooCommerce, which adds multiple levels of wholesale pricing to your store depending on the user role.

An extra field will be added to your product data tab for each role, where you can add a “wholesale” price. This is applied to simple products, as well as variations.

Once a price has been entered, it will override the default product price with the new wholesale price you entered for that role. Wholesale prices will only be shown if the current user has a role that has been specified in the options page.

Features

  • Quick and easy installation
  • Supports simple and variable products
  • NEW Select multiple user roles to activate different pricing
  • Show wholesale customers how much they save
  • NEW Set minimum / maximum checkout quantities

WooCommerce Wholesale Pricing Register

WooCommerce Wholesale Pricing Register – An addon for for WooCommerce Wholesale Pricing, which adds functionality so your customers can register as a Wholesale Customer.

The long awaited addon for WooCommerce Wholesale Pricing! An easy to use (install and off you go) addon!

Let you customers apply for a wholesale account when registering. Admin can control who is accepeted as a wholesaler and who isnt. Easy admin page to manage your customers.

A must have addon if you use WooCommerce Wholesale Pricing!

Features

  • Quick & easy installation
  • Options page to manage wholesale customers
  • Add customer role drop-down to registration form

Changelog

v1.0 
- First stable release

Support

http://support.codeden.co.uk

Download WooCommerce Wholesale Bundle (WooCommerce)

WP User Cleaner (Utilities)

For most WordPress site owners, spam registrations are the biggest issue they have to deal with. Daily they receive hundreds new registrations despite of active Captcha Plugins.

Having a lot of users in your database can dramatically slow down your site and affect your search engine ranking.

Cleaning your user database is a challenging task and it needs a lot of time to identify Spam or inactive users. WP User Cleaner will help you to get your WordPress clean. It will detect inactive users and you can delete thousands of users with just a single click.

WP User Cleaner will work perfectly with WooCommerce, too. For example you can delete all users who have never purchased a product and who have not logged in for a defined number of days.

WP User Cleaner comes with a very simple drag & drop Dashboard with several useful widgets:

Stats

Stats

  • TOTAL USERS section displays the total number of registered users on your site.
  • TOTAL CUSTOMERS will show up if you have WooCommerce installed and it displayed the total number of users who have completed at least one order.
  • ACTIVE USERS shows how many users have logged in on your site within a defined number of days (See settings section).
  • INACTIVE USERS shows how many users have not been logged in within a defined number of days (See settings section).
  • DELETED USERS shows how many inactive users have already been deleted.
  • BLOCKED REGISTRATIONS will count all users that have tried to register on your site by using a temporary email address. This will only work if you set “Temporary Email” to “Disallow” on the settings section.

Blocked Registrations

Blocked Registrations Graph

On this section you will see a graph that shows how many users registrations have been blocked within the last 7 days

User Cleaner Rule

This section allows you to clean up your user database by generating your own rules.

User Cleaner Rule

Settings

On this section you are able to adjust plugin settings.

Settings

  • Temporary Emails: Here you can allow or disallow registrations with temporary email addresses (like mailtothis.com, imgof.com, trashymail.com, example.com…). Currently WP User Cleaner will check 140+ temporary email providers.
  • Inactivity Limit: Set after how many days of inactivity a user should me marked as inactive.

Users

WP User Cleaner will add two new columns on your User’s overview page: Last Login and Status

Users

  • Last Login will display the date when the user has logged in the last time
  • Status will display if the user has been active since the defined number of days (See settings section).

Registrations

If you disallow registrations with temporary email addresses then users who try to register with such an email address will get an error message during the registration.

Register Error

Changelog

v1.0.0 - 2016-01-04
  - Initial Release

Download WP User Cleaner (Utilities)

QWIKIA – ask and answer platform (Social Networking)

QWIKIA

Questions and answers platform based on topics similar with Quora. Application is developed on clean PHP, without using any framework.

But, try to create new account to see all functions. In demo are disabled some functions.

Some features:

  • Question topics, with grouped questions. Unlimited number of topics, added by admin.
  • SEO optimised pages. Questions are page`s url. Google will find visitors itself.
  • Asking questions. With searching similar question before adding new one and adding description and image.
  • Answer question via text editor and user mentions. By using text editor your answers will be very informative.
  • Editing questions and answers. With possibility to change everything. For user and admin.
  • Follow topics, questions and answer likes system. Follow topic and you will see new questions in your feed from that topic. With following question – you will be informed about new answers. And with answers like – you can rate useful answers
  • Stream with filtered type of questions. Questions like answered, unanswered, popular and followed. Questions with AJAX loading and notifications about new questions/answers.
  • Web and mobile version. Not responsive version with a lot of information, but lite version with delimited functions from web version.
  • AdSense web and mobile. Just insert code in admin panel.
  • Admin panel with full control over website. With possibility to manage users, questions, answers, topics, reports, page and some informational graphs. As admin you can change site settings every time you will want.
  • Notifications system with filtered categories, with possibility to receive emails.
  • Easy and automatic installation. Just 3 steps and application run.
  • Sign in via Facebook and Twitter. Or sign up via email with confirm email possibility.
  • Points system for leaderboard.
  • Reports system for questions and answers.
  • User profiles with own questions, answers, points log and topic lists.
  • Search function over all questions, answer, topics and users. With AJAX search user will see results before they will finish word.

Requirements:

  • PHP 5.4+
  • MySQL database
  • PDO Extension
  • GD PHP Extension
  • PHP OpenSSL Extension

Web version:

Mobile version:


Download QWIKIA – ask and answer platform (Social Networking)

Advanced Analytics – Buttons X Add-on (Add-ons)


Note: This is an add-on that works only with Buttons X – Powerful Button Builder For WordPress.

Advanced Analytics for Buttons X provides you detailed information on each click made to a button. You get exact click time, Visitor I.P. Address, Button Outgoing/Outbound link, Service Provider, Visitor Country, Visitor State and Visitor Town.

Please note that click is recorded instantly but click count and IP related details are updated every hour.

Analytics report page

report

Analytics on button edit page

single-button

You will also see side meta box showcasing the total number of clicks on that particular button.

Analytics on dashboard

On dashboard it shows 10 latest button clicks.

dashboard

Support

World Class Support!

We manage technical queries through the item page and are proud of our One Day Turnaround!

Changelog

Initial Release.

Download Advanced Analytics – Buttons X Add-on (Add-ons)

PimpMyWoo – WooCommerce Styler Plugin (WooCommerce)

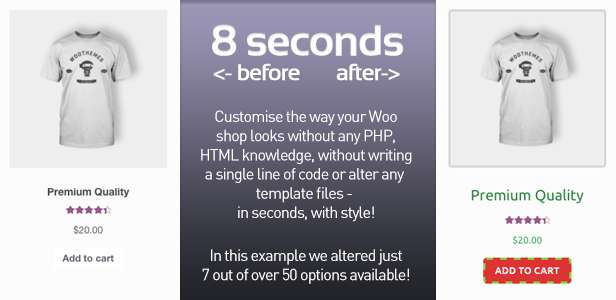
PimpMyWoo helps you customise the way your WooCommerce shop looks without writing a single line of code or modify any template! PimpMyWoo is designed to facilitate online shop owners, web developers and web designers (from newbies to highly experienced ones), with the whole WooCommerce customisation process. Start pimping your WooCommerce right now!

The Benefits Of Using PimpMyWoo

  • you can change virtually any aspect of your default listing pages or product page in seconds
  • you can change virtually the whole image of your shop in minutes
  • you get premium support from a highly motivated and enthusiastic team
  • it works with ANY WordPress theme (free or paid)
  • no programming or design skills required

Other highlights include multi-language ready (pot file provided), extremely easy to install and use, intuitive interface, and many many more.

What I Can Customise?

You can customise virtually everything like fonts (Google Fonts), colours, backgrounds, borders (including radius), line heights, letter spacing, paddings, and many more. All those new styles can be applied to Add to Cart buttons, product titles, prices, badges etc., on default WooCommerce product listing pages (shop page, archives, etc.), WooCommerce widget listings (recently viewed products, products from categories, etc.) and the Cart page.

Think of Xmas for example. With PimpMyWoo, in just few seconds you can get yourself some good looking Add to Cart buttons that will definitely increase your conversion rate. A red button, green dashed border with let’s say 5px width and you’re done. In no more than 8 seconds you’re ready to rock! Pimp your WooCommerce now!

PimpMyWoo - WooCommerce Styler / Customizer WordPress Plugin

Of course you can do all those things in seconds, having ANY WordPress theme, without any HTML, CSS knowledge, without writing a single line of code, for any event that you can think of like Christmas, Halloween, Easter, Valentine’s Day, Summer Holiday, Winter Holiday and so on.

Who Is PimpMyWoo For?

PimpMyWoo – WooCommerce Styler Plugin is for shop owners because they can easily customise their online shop without any HTML, CSS or JS knowledge, as long as they know how to login into their WooCommerce admin dashboard.

PimpMyWoo – WooCommerce Styler Plugin is for professionals (web developers and web designers) because they can easily use this plugin to speed up the development process and to focus on their actual job.

What About Support And Ongoing Development?

PimpMyWoo – WooCommerce Styler Plugin is well maintained and supported. We have a very big list of new features to include in our next planned releases but we also hear you, our valuable customer. We will definitely take into consideration every pertinent suggestion that you will send us.

For demo please go to PimpMyWoo – WooCommerce Styler Plugin page. PimpMyWoo is developed by SCGC (check out the portfolio).

Changelog

v1.1.0 (10 January, 2016) – [New feature] – WooCommerce Cart Page
v1.0.1 (7 January, 2016) – [Bug fix] – Fixed some internal links
v1.0.0 (5 January, 2016) – Initial release

Download PimpMyWoo – WooCommerce Styler Plugin (WooCommerce)

True Number (Games)

-“True Number made on Construct 2 game engine.
-Responsive on all device
-Easy to reskin
-Included all the source file ready to export for mobile and web game (html5, cordova, cocoonjs) and .CAPX file

-Flexible event system

Features

-Construct 219+
-Play on desktop and device
-Easy export to HTML5 for website
-Ready to export for Android, iOS with Cordova platform such as intel XDK, phonegap, CocoonJS – Ludei.
-AdmobAds integration
-Touch & Mouse
-Share on Facebook, Twitter, Google plus

Download True Number (Games)

Cat Adventures – AdMob and Game Center (Games)

Introduction

Cat is trying to survive and you’ll salvageable from the obstacles and collect points and compete with your friends

GIF preview:

Features:

  • Xcode 7
  • iOS 9 Compatible
  • Universal (iPhone & iPad)
  • AdMob Banner
  • Game Center
  • Endless Game

Ad Network:

  • AdMob banner.
  • AdMob interstitial.

Download Cat Adventures – AdMob and Game Center (Games)