Peekaboo Timer is a handy wordpress plugin which allows web sites owners to control visibility of the content in accordance with various time-related criteria.
You can choose to automatically display or hide content through time using any of the 28 shortcodes, and thus make your WordPress site more dynamic and “intelligent”.
Hide or show the content on specified days of the week, months, days of the month, time periods, date intervals, etc…
Shortcodes can be combined for even more specific and precise time frames.
They can be used in text widgets as well.
Many criteria can be set to use either blog time (specified in the admin dashboard of the WP site) or visitors’ times.
Even though the total of 28 shortcodes and the variety of attributes make this a Swiss army knife of plugins, using it is extremely easy and user-friendly because it comes with an intuitive set of click-through dialogs and friendly forms integrated in the WordPress’s text editor.
INSTALLATION
- Unzip the package
- Upload the whole directory into your Plugins folder of WordPress. Make sure you keep the name of the directory and the filenames intact.
- Activate the plugin in the Admin Dashboard of your WP site.
- There is no step four
BASICS OF THE USAGE
Peekaboo Timer uses shortcodes for marking the parts of the content you wish to have affected. There are two sets of shortcodes: one set is consisted from the shortcodes that are meant to HIDE the selected content, and the other set is consisted of the shortcodes that will DISPLAY the content to visitors, both according to various time-related criteria. Every HIDE function has it’s SHOW counterpart.
There are 14 shortcodes in each set, which makes a respectable total of 28 shortcodes, but fear not – you don’t have to remember the exact syntax for any of them, as Peekaboo Timer comes with a user-friendly extension for WP’s text editor and an intuitive click-through dialog for setting the shortcodes and their parameters.
Once you install the plugin, you will see a couple of new buttons in the text editor.
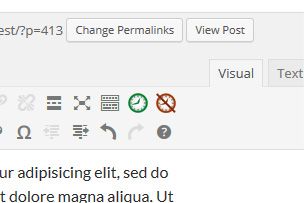
Selecting a part of the text and then clicking on an icon opens up a modal dialog where you can choose which criterion for displaying/hiding content you want to use.
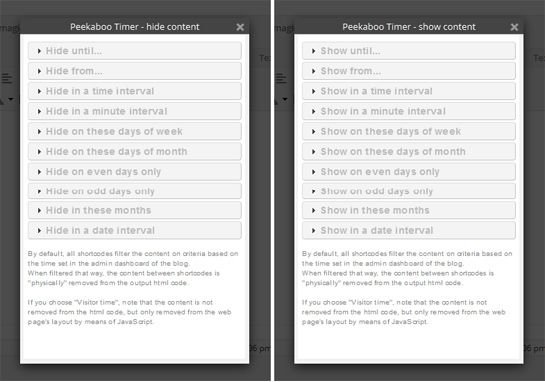
Clicking on an item from the list opens the accordion and reveals options for tailoring the shortcode to your needs.
Like this:
SHORTCODES
Show until… / Hide until…
SHORTCODE: pbt_show_until and pbt_hide_until
ATTRIBUTES: date and time
These shortcodes display/hide content until a specied moment in future – date and time. The time attribute value is not included in the interval.
[pbt_show_until date=”23-Jun-2014” time=”16:45”]This content will be visible to visitors until 23rd of July 2014, at 16:45[/pbt_show_until]
[pbt_hide_until date=”15-Nov-2015” time=”9:13”]This content will be visible to visitors until 15th of November 2015, at 9:13[/pbt_hide_until]
Show from… / Hide from…
SHORTCODE: pbt_show_from and pbt_hide_from
ATTRIBUTES: date and time
These shortcodes display/hide content from a specied moment in future (date and time) onward. The time attribute value is included in the interval.
[pbt_show_from date=”10-May-2015” time=”23:20”]This content will be visible to visitors from 23rd of May 2015, at 23:20[/pbt_show_from]
[pbt_hide_from date=”25-Apr-2015” time=”12:10”]This content will be hidden from visitors from 25th of April 2015, at 12:10[/pbt_hide_from]
Show in a time interval / Hide in a time interval
SHORTCODE: pbt_show_time and pbt_hide_time
ATTRIBUTES: start and end
These shortcodes display/hide content during a time period each day. There are four spinners in the dialog, which allow you to choose the parameters. The final minute is not included in the interval.
[pbt_show_time start=”9:45” end=”17:30”]This content will be visible to users from 9:45 to 17:30, every day.[/pbt_show_time]
[pbt_hide_time start=”22:10” end=”2:35”]This content will be hidden from visitors from 22:10 to 2:35 next day, every day.[/pbt_hide_time]
Show in a time interval / Hide in a time interval – CLIENT TIME
SHORTCODE: pbt_show_time_visitor and pbt_hide_time_visitor
ATTRIBUTES: date and time
These shortcodes display/hide content during a time period each day, according to the time set in the client’s operating system. The final minute is not included in the interval.
[pbt_show_time_visitor start=”9:45” end=”17:30”]This content will be visible to visitors from 9:45 to 17:30 - their times.[/pbt_show_time_visitor]
[pbt_hide_time_visitor start=”22:10” end=”2:35”]This content will be hidden from visitors from 22:10 to 2:35 next day - their times.[/pbt_hide_time_visitor]
Show in a minute interval / Hide in a minute interval
SHORTCODE: pbt_show_minute and pbt_hide_minute
ATTRIBUTES: start and end
These shortcodes display/hide content during a time period every hour, 24 times a day. The ending minute is not included in the interval.
[pbt_show_minute start=”50” end=”15”]This content will be visible to users every hour from the 50th minute to the 15th minute in the next hour.[/pbt_show_minute]
[pbt_hide_minute start=”23” end=”42”]This content will be hidden from visitors from 23rd to 42nd minute, every hour.[/pbt_hide_minute]
Show in a minute interval / Hide in a minute interval – CLIENT TIME
SHORTCODE: pbt_show_minute_visitor and pbt_hide_minute_visitor
ATTRIBUTES: start and end
These shortcodes display/hide content during a time period every hour, 24 times a day, according to the time zone set on the client’s computer. The ending minute is not included in the interval.
[pbt_show_minute_visitor start=”50” end=”15”]This content will be visible to users every hour from the 50th minute to the 15th minute in the next hour - users’ times.[/pbt_show_minute_visitor]
[pbt_hide_minute_visitor start=”23” end=”42”]This content will be hidden from visitors from 23rd to 42nd minute, every hour, users’ times.[/pbt_hide_minute_visitor]
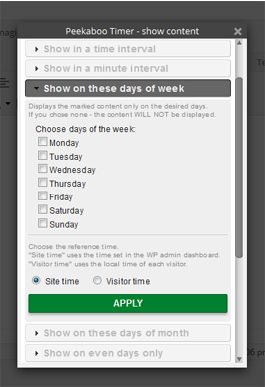
Show on these days of the week / Hide on these days of the week
SHORTCODE: pbt_show_week and pbt_hide_week
ATTRIBUTE: days
These shortcodes display/hide content only on the selected days of the week. Attribute values have to be in the form of 3-letter abbreviations.
[pbt_show_week days=”Sat, Sun”]This content will be visible to visitors only on Saturdays and Sundays.[/pbt_show_week]
[pbt_hide_week days=”Mon, Wed, Fri”]This content will be hidden from visitors only on Mondays, Wednesdays and Fridays[/pbt_hide_week]
Show on these days of the week / Hide on these days of the week – CLIENT TIME
SHORTCODE: pbt_show_week_visitor and pbt_hide_week_visitor
ATTRIBUTE: days
These shortcodes display/hide content only on the selected days of the week, according to the time zone set on the client’s computer. Attribute values have to be in the form of 3-letter abbreviations.
[pbt_show_week_vistor days=”Sat, Sun”]This content will be visible to visitors only on Saturdays and Sundays, their times.[/pbt_show_week_visitor]
[pbt_hide_week_visitor days=”Mon”]This content will be hidden from visitors only on Mondays, their times. [/pbt_hide_week_visitor]
Show on these days of the month / Hide on these days of the month
SHORTCODE: pbt_show_day and pbt_hide_day
ATTRIBUTE: days
These shortcodes display/hide content only on the selected days of month (1-31).
[pbt_show_days days=”1, 10, 21”]This content will be visible to visitors only on 1st, 10th and 21st day in each month.[/pbt_show_days]
[pbt_hide_days days=”7, 14, 21, 28”]This content will be hidden from visitors only 7th, 14th, 21st and 28th day in each month.[/pbt_hide_days]
Show on even days only / Hide on even days only
SHORTCODE: pbt_show_even and pbt_hide_even
ATTRIBUTE: –
These shortcodes display/hide content only on even days of the month (2nd, 4th, 6th,…, 30th). No attribute is needed.
[pbt_show_even]This content will be visible to visitors only on even days of the month.[/pbt_show_even]
[pbt_hide_even]This content will be hidden from visitors only on even days of the month.[/pbt_hide_even]
Show on odd days only / Hide on odd days only
SHORTCODE: pbt_show_odd and pbt_hide_odd
ATTRIBUTE: –
These shortcodes display/hide content only on odd days of the month (1st, 3rd, 5th,…, 31st). No attribute is needed.
[pbt_show_odd]This content will be visible to visitors only on odd days of the month.[/pbt_show_odd]
[pbt_hide_odd]This content will be hidden from visitors only on odd days of the month.[/pbt_hide_odd]
Show in these months / Hide in these months
SHORTCODE: pbt_show_month and pbt_hide_month
ATTRIBUTES: months
These shortcodes display/hide content only on the selected months. For the attribute’s value use months’ ordinals (01, 02, 03, …, 12), or 3-letter abbreviations (jan, feb, mar, …, dec)… or simply use this friendly form with checkboxes.
[pbt_show_month months=”01, 03”]This content will be visible to visitors only in January and March.[/pbt_show_month]
[pbt_hide_month months=”sep, oct, may”]This content will be hidden from visitors only in September, October and May[/pbt_hide_month]
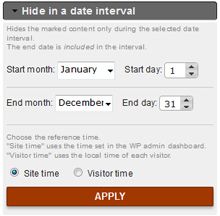
Show in a date interval / Hide in a date interval
SHORTCODE: pbt_show_dates and pbt_hide_dates
ATTRIBUTES: start_month, start_day, end_month and end_day
These shortcodes display/hide content only during the desired date interval each year.
Use dropdown lists and spinners to select the start and the end date. The starting date can be earlier than the end one, which means that the interval will span into the next year.
Use 3-letter abbreviations (jan – dec) or ordinals (1 – 12) for start_month and end_month attributes’ values. The end day is included in the interval.
[pbt_show_dates start_month=”jan” start_day=”21” end_month=”may” end_day=”1”]This content will be visible to visitors only from 21st January to 1st May.[/pbt_show_dates]
[pbt_hide_dates start_month=”8” start_day=”15” end_month=”12” end_day=”10”]This content will be hidden from visitors only from 15th August to 10th December[/pbt_hide_dates]
Show in a date interval / Hide in a date interval – CLIENT TIME
SHORTCODE: pbt_show_dates_visitor and pbt_hide_dates_visitor
ATTRIBUTES: start_month, start_day, end_month and end_day
These shortcodes display/hide content only during the desired date interval each year, according to the time zone set by the visitor.
Use dropdown lists and spinners to select the start and the end date. The starting date can be earlier than the end one, which means that the interval will span into the next year.
Use 3-letter abbreviations (jan – dec) or ordinals (1 – 12) for start_month and end_month attributes’ values.
The end day is included in the interval.
[pbt_show_dates_visitor start_month=”4” start_day=”15” end_month=”sep” end_day=”20”]This content will be visible to visitors only from 15th April to 20th September - their times.[/pbt_show_dates_visitor]
[pbt_hide_dates_visitor start_month=”Jun” start_day=”24” end_month=”oct” end_day=”3”]This content will be hidden from visitors only from 24th June to 3rd October - their times.[/pbt_hide_dates_visitor]
ADDITIONAL INFO
– functions that use visitor time do not “physically” remove the marked content from the HTML code, but only from the layout of the web page. Bear that in mind if you want to make sure the non-displayed content is unreachable from a user’s side.
– feel free to combine and nest Peekaboo Timer shortcodes
[pbt_show_until date=”15-apr-2015” time=”8:30”][pbt_show_odd]This is going to be visible on odd dats of month only, until 15th April 2015, at half past nine in the morning.[/pbt_show_odd][/pbt_show_until]
[pbt_show_month months=”apr”]
[pbt_show_week days=”sat, sun”]
[pbt_show_time_visitor start=”13:30” end=”20:00”]
This is going to be visible only on weekends in april, from 13:30 to 8 in the evening, user’s time zone.
[/pbt_show_time_visitor]
[/pbt_show_week]
[/pbt_show_month]
– you can use Peekaboo Timer shortcodes in text widgets
FINAL NOTES
If you like Peekaboo Timer, please rate it with 5 stars.
Before assigning it a mark lesser than 5* please feel free to contact us and let us know what you didn’t like about our plugin. We will do are best to fix it ASAP.
Thank you!
Download Peekaboo Timer (Utilities)


