I need a functioning website that contains the exact or better features than http://www.starnow.co.uk Please let me if you be interested in this project.

Blancer.com Tutorials and projects
Freelance Projects, Design and Programming Tutorials
I need a functioning website that contains the exact or better features than http://www.starnow.co.uk Please let me if you be interested in this project.
I need a basic facebook application created using PHP. The purpose of this project is to create a framework that I can customize for different types of “poking” applications.
It will have a list of messages that facebook users can send to their friends wall.
Need to capture users e-mail, and some other data from their profiles when they authorize the app.
I’ll clean it up and do all the fun stuff like adding the real content, and making it look good. Just need you to deliver the framework that runs it all.
Testing of successful messaging and capturing of data will be required to finish this project. Please let me know how long you think it will take in your bid please or you will be ignored.
Seeking a SEO Expert to build high quality links to our website which the optimal goal is to increase page ranking which currently is 0 to a page ranking of 2.
-Manually Post in only dofollow Forums with pagerank of 4 or higher
-Manually Commenting in only dofollow blogs with pagerank of 4 or higher
-Obtain 600 permanent Forum profile links: By creating a a profile and adding a link to our website on each of the profile.
-Obtain 30 permanent relevant links: By finding related sites with page rank of 4 or better to content and leaving comments.
-Obtain only permanent one way links
-submit our site in DMOZ directory
-only white hat methods
-no linking to unethical sites such as porn, gambling, etc
This will be a 30 day project so the link building comes out natural to the search engine.
This could lead to an ongoing monthly job.
Please bid and provide me with a list of what you would do for our website if selected. Also, give me a couple of examples of successful link building websites jobs that you accomplished. Our site is an entertainment and video sharing drupal site, in which the url will be provided to the winner.
Happy Bidding,
VC
Project for eperfections
Project for eperfections
I want to create directory sites like these
http://www.newcastleplumbers .com .au
http://www.sunshinecoastplumbers .com .au
http://www.brisbaneplumbers .com .au
http://www.canberraplumbers .com .au
http://www.adelaideplumbers .com .au
http://www.gosfordplumbers .com .au
http://www.hobartplumbers .com .au
http://www.darwinplumbers .com .au
http://www.goldcoastplumbers .com .au
http://www.cairnsplumbers .com .au
http://www.wollongongplumbers .com .au
http://www.perthplumbers .com .au
http://www.newcastlepainters .com .au
http://www.melbourneelectrician .com .au
I would like to try out eDirectory to see if it can achieve the same functionality.
I have a scripted that I want installed and configured to try and achieve this.
The script I have is a V7 script but not the latest (7.5) one.
i have many wordpress job (30+ wordpress site need to create every month), most wordpress site is very simple, (have 4-5 static page and a optin from..etc), i need to find 2-3 wordpress experts who can finish one simple wordpress site in one day.(! this is very important, if you can’t finish such simple wp site in one day, please don’t bid).
aslo my budget for every site is $10 and (bonus on end of month)
this is long term work, i only consider honest wp programmer, $10 is basic price, because i need to know your ability at the start , if you do good work we will give you high bonus at the end of each month.
thanks
happy biding
This is the first of a three part tutorial on one of the most useful plug-in around when it comes to working with audio – “Sound Keys“.
In this part I will introduce you to the sound keys interface with and we will take a look at the very basic ways you can apply it to your work .
File size 153MB
In this tutorial you will learn how to create a Bluetooth device using some of the basic tools in found in Adobe Illustrator. To build this great looking device you will be using Round Corners, Offset Path and Pathfinder.
Continue reading “How to Make a Bluetooth Device With a Cover”
I’ve decided to explore some of the choice new features of Reason 5 and Record 1.5 in a series of screencasts. These will be bite sized videos giving real time exempts of what can be achieved with the newest instruments in both apps.
This screencast concentrates on the new editing system in the fantastic Dr. OctoRex. I hope you enjoy my ramblings and let me know if you have any requests for future screencasts.
One of the best things about Photoshop is that it allows us to create some pretty amazing images from some of the most surprising objects. Today, we will create a fantasy flying ship from a photo of a banana. Let’s get started!
The following assets were used during the production of this tutorial.
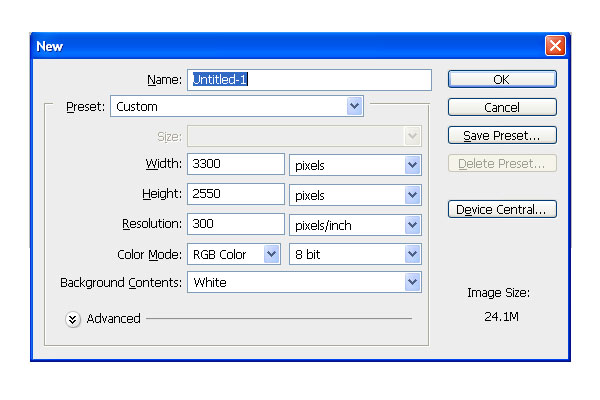
First, create a file 3300 x 2550 px with a resolution of 300 ppi.
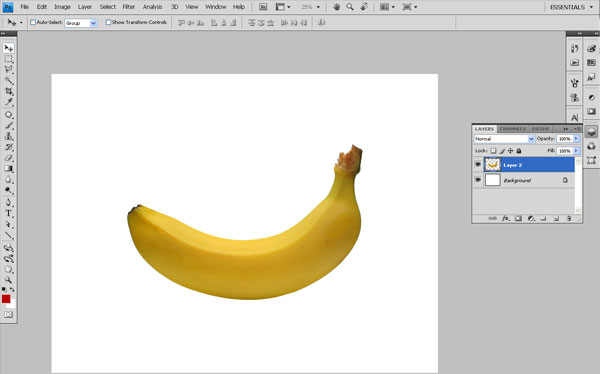
Open "banana.jpeg", select Magic Wand Tool (W) and remove its background. Now import this image to your document and name the layer "banana".
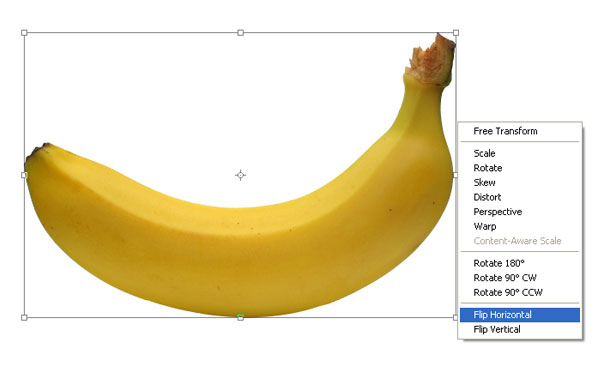
Press Cmd/Ctrl + T to transform banana layer. Then, Right click > Flip Horizontal to change the direction of layer.
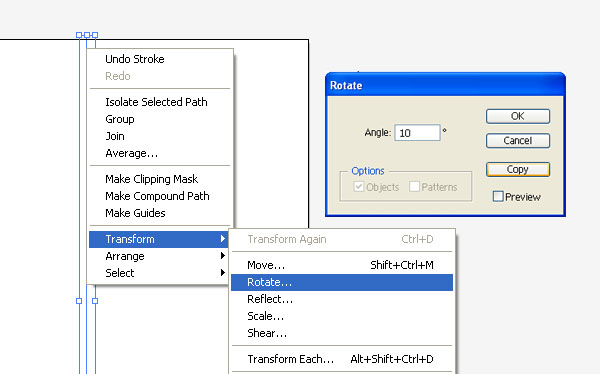
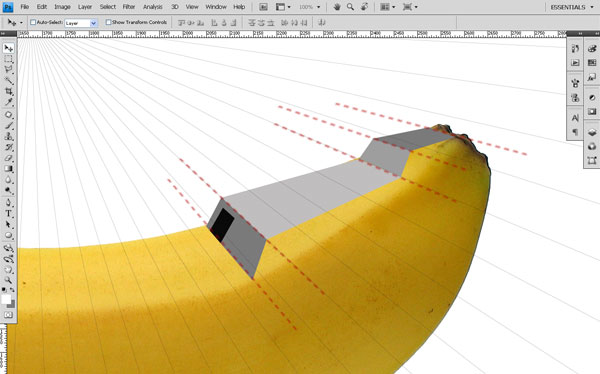
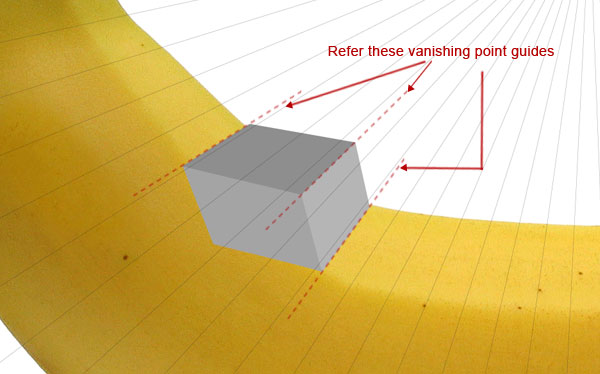
Now to make our art proportionally balanced, set a vanishing point. This is a one vanishing point image. To create vanishing point open Adobe Illustrator and choose a blank document. Select Line Segment Tool (\) and create line of length 30cm, keep its weight 0.25 pt then select the line and go to Right click > Transform > Rotate, set the angle to 10 and press "Copy" button.
Press Cmd/Ctrl + D to duplicate line for 17 times. It’s Vanishing Point (VP) for our document.
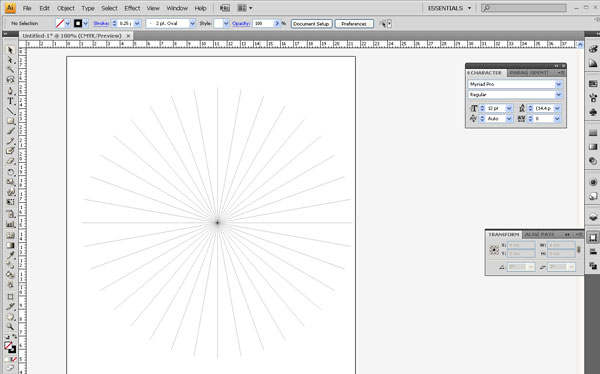
Copy this VP (Vanishing Point) by pressing Cmd/Ctrl + C, go to Photoshop file and pest it by pressing Cmd/Ctrl + V.
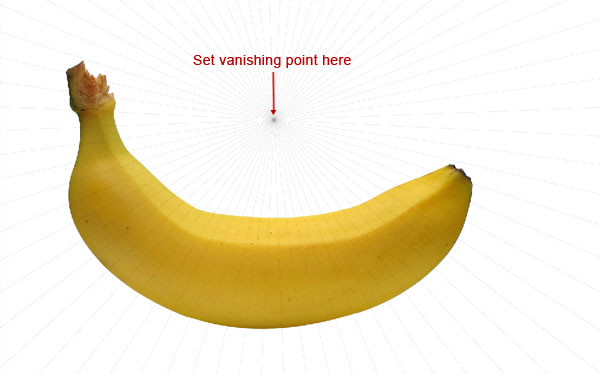
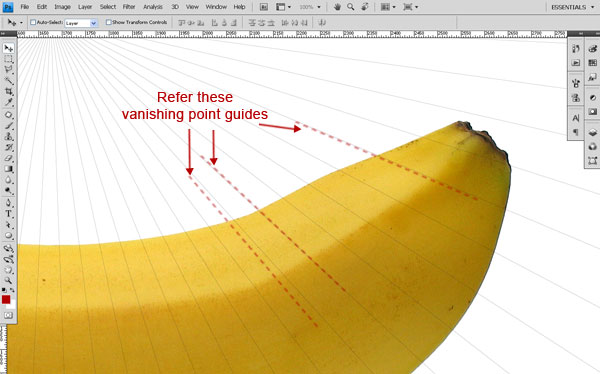
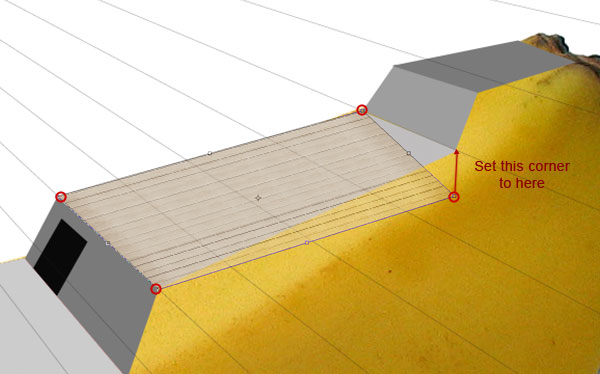
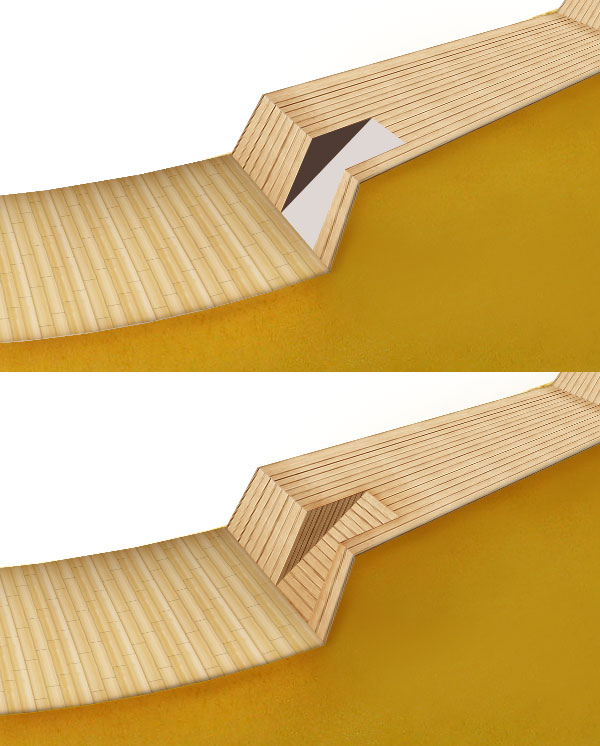
We are now done setting the vanishing point. After that, we’ll draw a rough structure of deck. Let’s start from the front part, create a layer group and name it "Front Part" after that create a dotted line in Illustrator and import it into the Photoshop file. Decide the area where floors to be made.
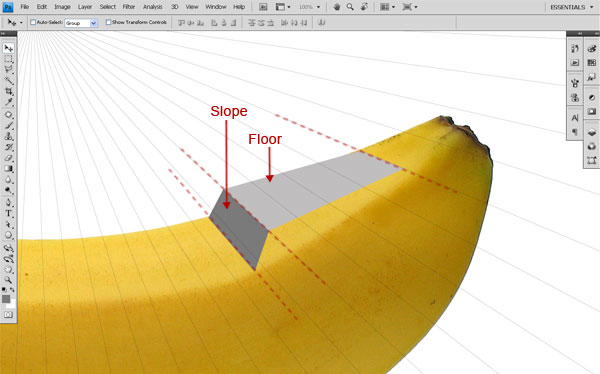
After doing that, select the pen tool by pressing P and create rectangle in perspective, name this shape layer as "slope". Make sure to turn the Shape layer on because we’ll use it later & create another rectangle to make floor and name it "floor".
Repeat Step 8 and create another Slope and Floor. Name layers as "Upper Slope" & "Upper Floor". Also create a door on layer "Slope" & name it as "Door".
Now, we will create the back part of the deck. Repeat Steps 7 and 8 to create the back part. Don’t forget to turn on the shape layer option.
Repeat Step 10 to create Upper Floor then create three doors and name them "Back Door 1", "Back Door 2" & "Back Door 3".
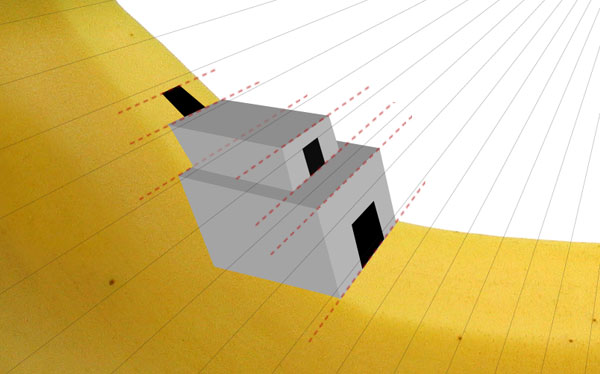
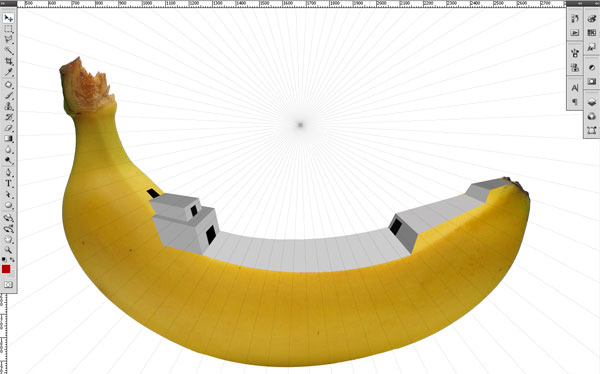
Next, create the middle floor by Pen Tool (P), now the whole deck structure is ready for texturing and it will look like this.
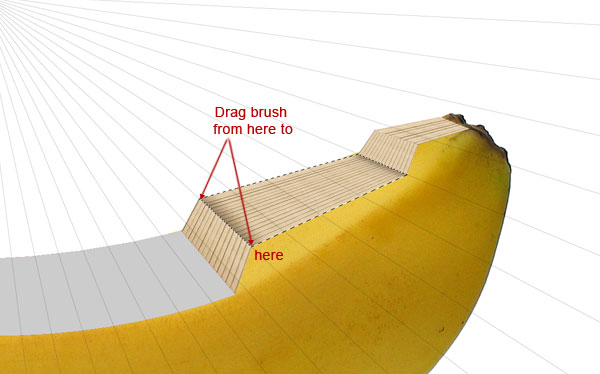
Now its time for texturing the deck. Open "wood 3.jpeg" and import it into document and name this layer "wood floor". Press Cmd/Ctrl + T to Free Transform this layer, press Cmd/Ctrl and click on corners and transform it to make wooden floor.
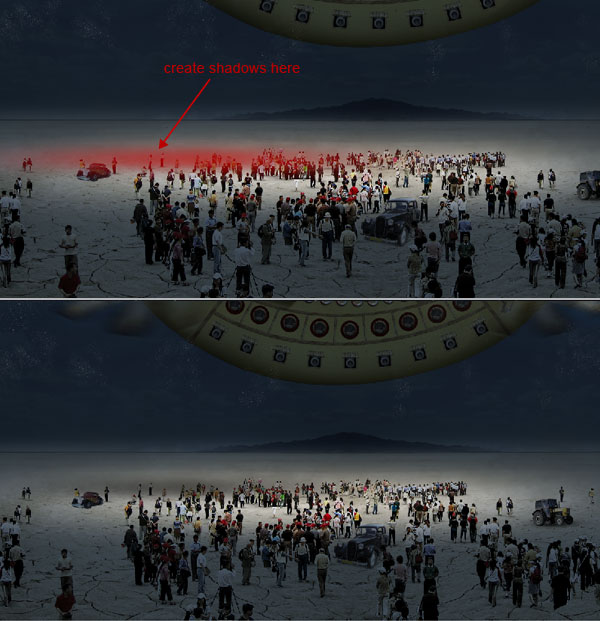
Now repeat Step 13 and create the flooring and walls of the front and back part of the ship deck. Select a soft brush of size 70 px with opacity 30% and color black, create the shadow wherever needed.
Now repeat Steps 13 and 14 to texture back part. The image will look like this.

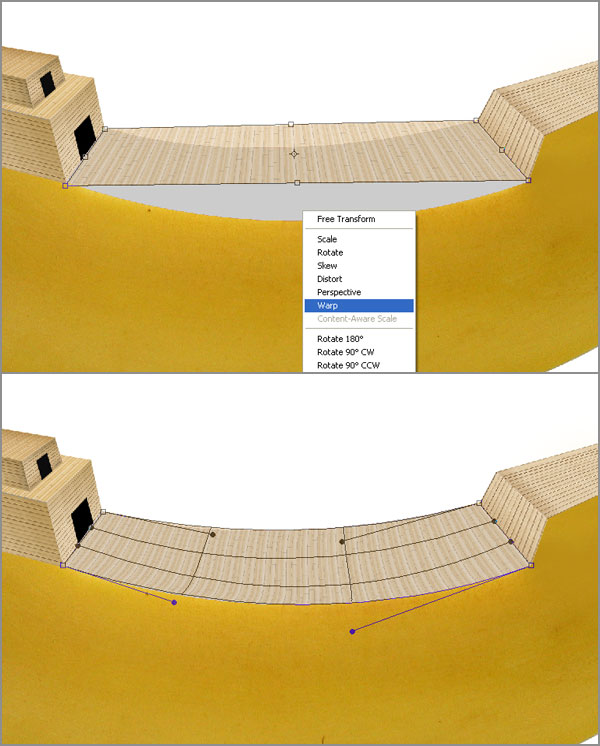
For the middle part, open the file "wood.jpeg". Free Transform (Cmd/Ctrl + T) and align corners with layer of middle part then Right click and click Warp then set it with middle part. Name this layer as "middle".
Duplicate "middle" layer, set opacity to 50% and blending mode to overlay. Create a new layer and name it "middle shadow 1"; to make a selection of middle layer press Cmd/Ctrl + click. Select brush size 100px and color #ece1ce, brush the edges to darken shadow area. Duplicate the layer "middle shadow 1", select foreground color to black and press Alt + delete to fill black color in layer. Set blending mode to multiply with opacity 100% and rename it to "middle shadow 2".
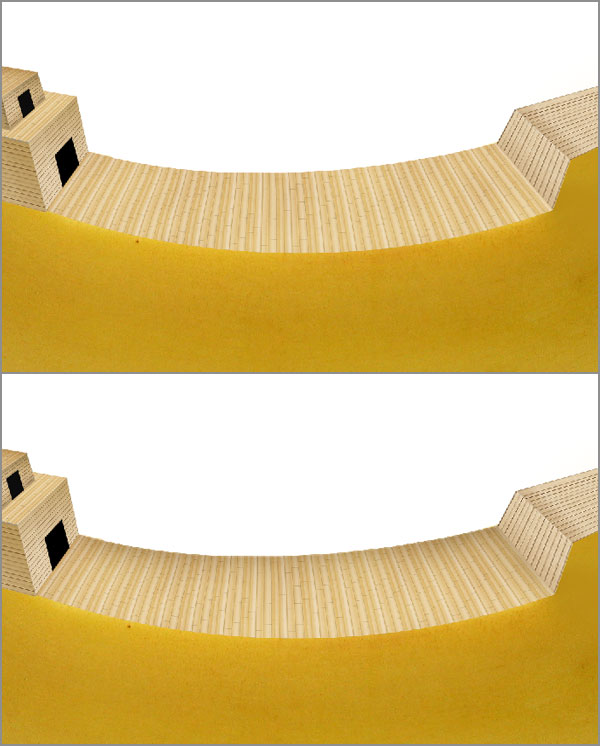
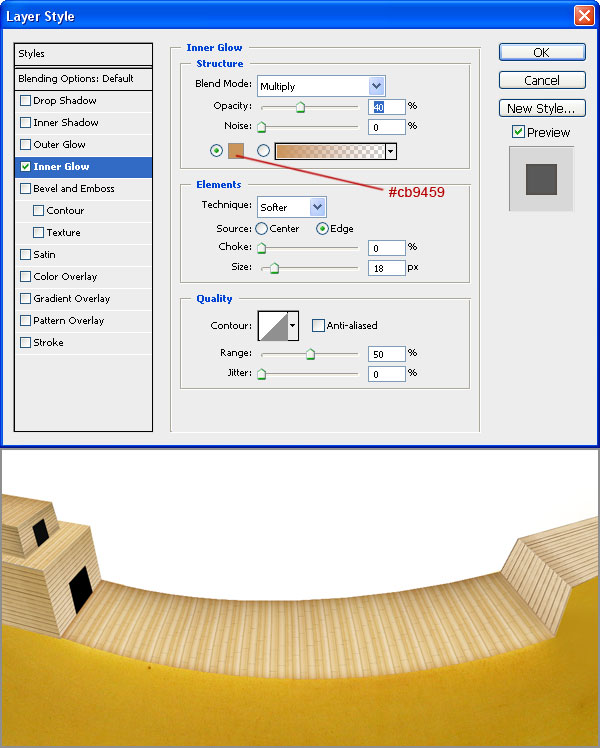
Select the layer "middle". Apply inner glow layer style with color #cb9459 & opacity 40%. The middle part will look like this.
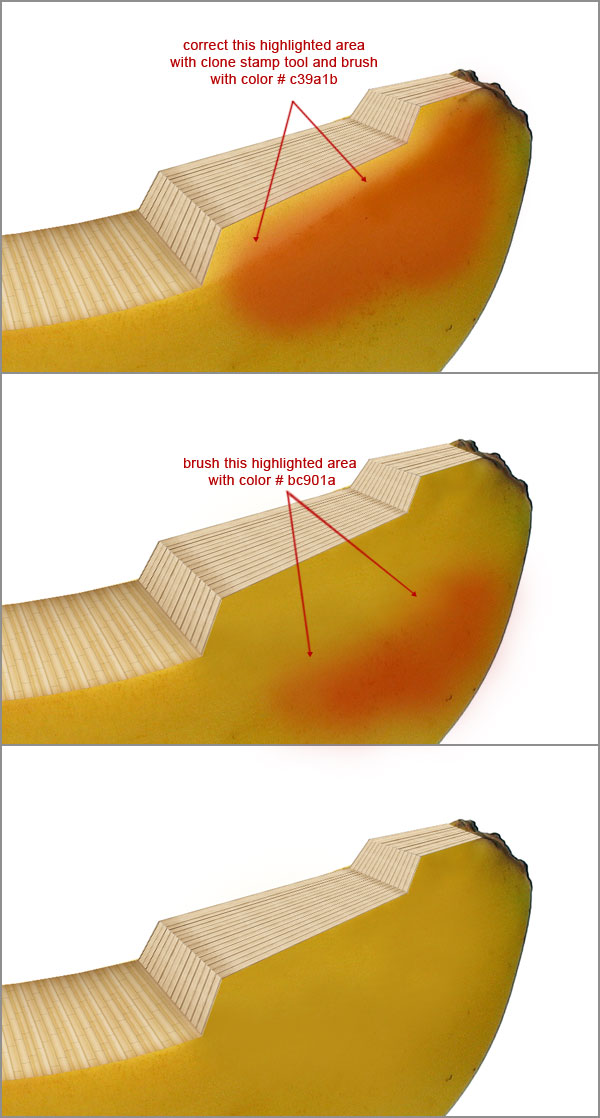
For the front part, create a new layer, select brush of size 100px and color #c39a1b, paint bright yellow area to match with rest part. Name this layer "color 1", use clone stamp tool if needed. Again select same brush with color #bc901a and paint on a new layer to make painting edges disappear, which we have created in previous color. Name this layer "color 2" and set blending mode to lighten.
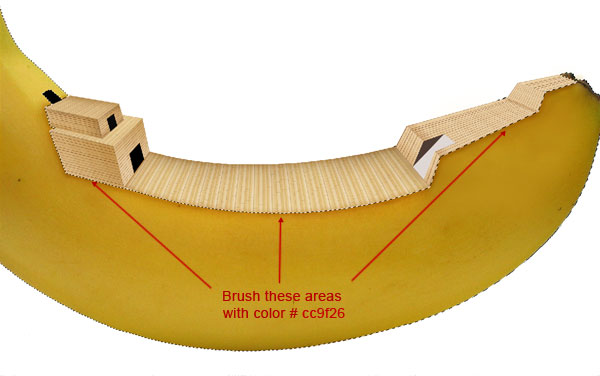
Group all wooden deck layers and then duplicate the group and merge it, name this layer "ship deck". Cmd/Ctrl + click the "banana" layer, then press Cmd/Ctrl + Alt and click the "ship deck" layer. You’ll get a selection of ship’s lower part. Now select a soft brush of color #cc9f26 and paint through the edges of ship deck, name this layer "deck shadow". Set its blending mode to multiply with opacity 70%.
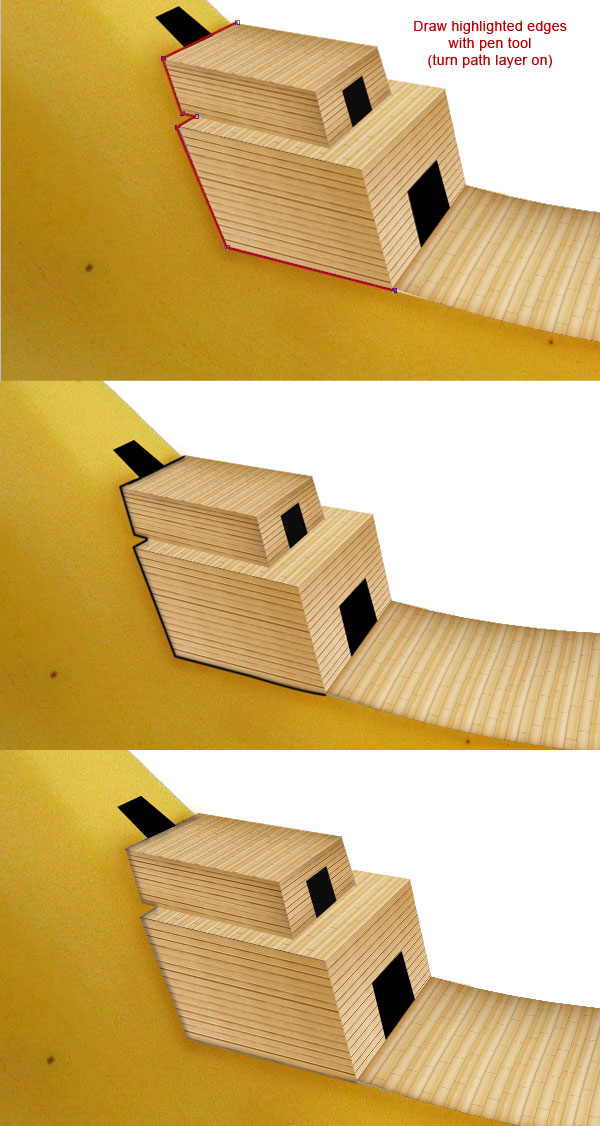
Next, select the Pen Tool (P) and create the back edges (Remember to turn on path layer). Select brush of size 3 px, hardness 100% and color black. Select pen tool again, right click on path and click on Stroke Path. Apply Gaussian Blur filter of radius 3px, set blending mode to multiply and opacity 50%. Name this layer "back shadow".
Create stairs on the front part of ship and texture it in same way as in Steps 13 and 14.
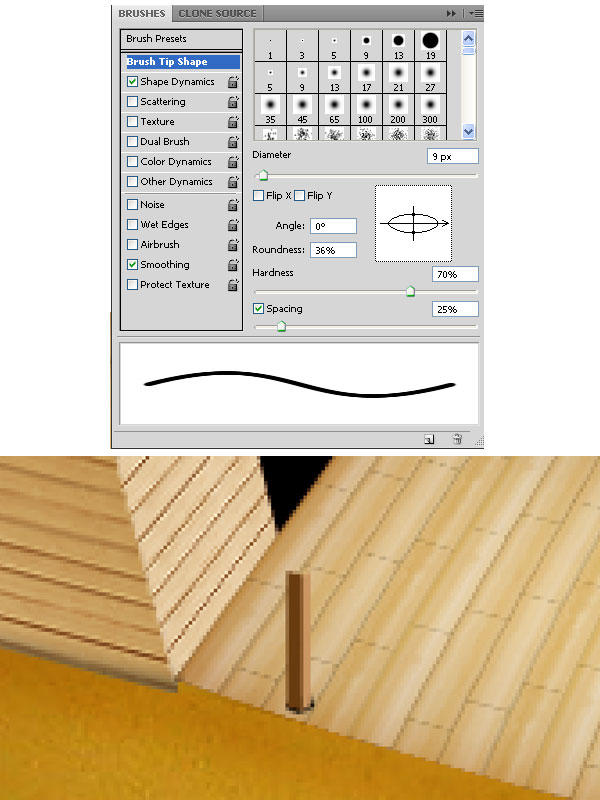
Now it’s time to create deck railings. Let’s start with middle part, turn on shape layer and select Rectangle Tool (U). Then go to Geometry Options > Rectangle Options > Fixed Size and set the width 4.5px and height 38px. Fill this rectangle with color #693b0f and name this layer to "front bar". Duplicate this layer and rename it "back bar", drag this layer behind "front bar" layer and change the color to #ca9561 then Group both layer and name group "vertical bar".

Create a new layer in the group "vertical bar", select brush of size 9px, roundedness 30% and hardness 70% with color black. Click once in the base of the vertical bar to create shadow.
Duplicate the group "vertical bar" up to 13 times. Select Pen Tool, create a horizontal bar of color #693b0f and name it "Upper bar front". Duplicate this layer, fill it with color #ca9561 and rename layer to "Upper bar back", & drag this layer to back of "Upper bar front" layer then Group both layers and rename the group to "Upper horizontal bar". In next step duplicate the group "Upper horizontal bar" and rename it "Lower horizontal bar," drag it below "Upper horizontal bar" group. Add Layer Mask to hide the area where "Vertical bar" & "Horizontal bar" overlap. Group all railing layers and rename it to "Middle railing front".
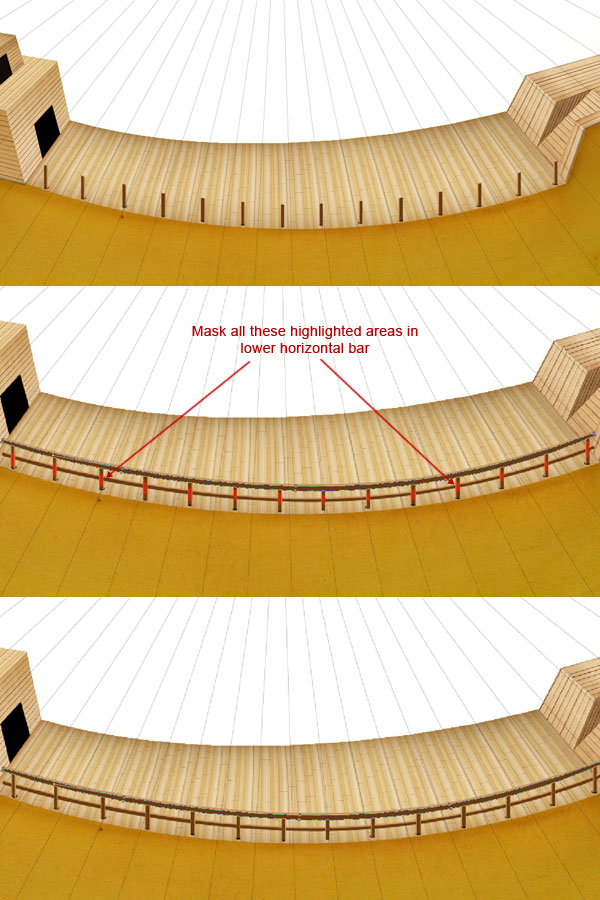
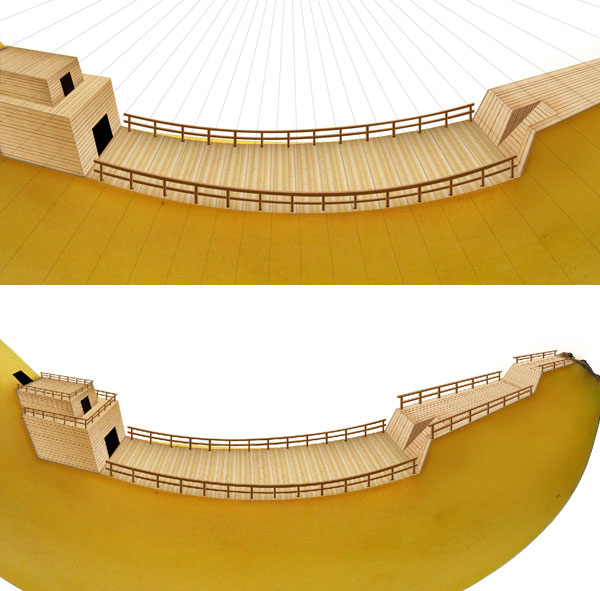
Duplicate the group "Middle railing front" and drag it to behind the previous group and resize it to make middle part back railing. Repeat the Step 25 to create rest part of railings. The deck will look like the image shown below.
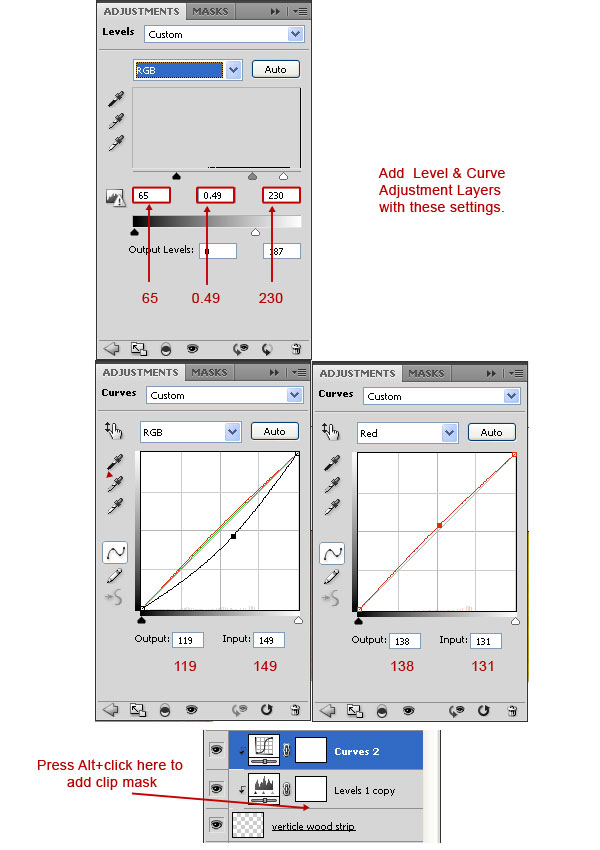
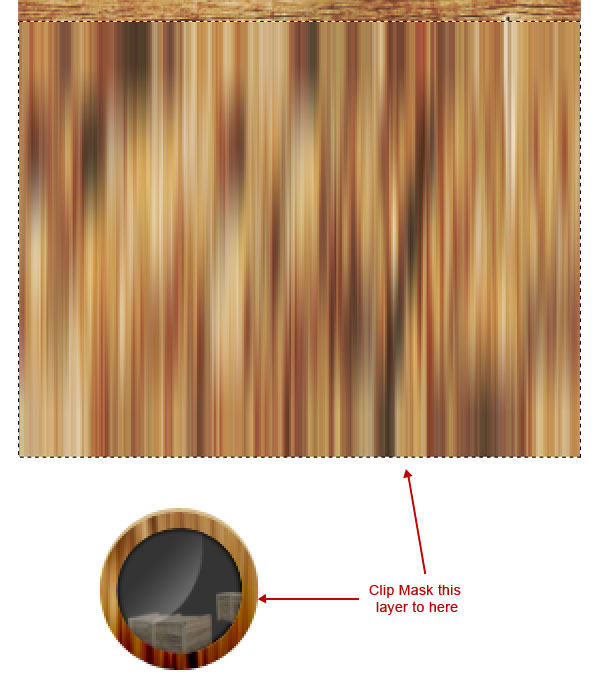
In this step we’ll create the lower part of the ship. Crop a section from file "wood 3.jpeg", copy & paste this to our main file with name "Strip". Add Level and Curve adjustment layer with these settings; Level: RGB – 65, 0.49, 230. Curve: RGB – Output-119, Input-149, Red – Output-138, Input-131. Then clip mask both adjustment layers to "Strip" layer.
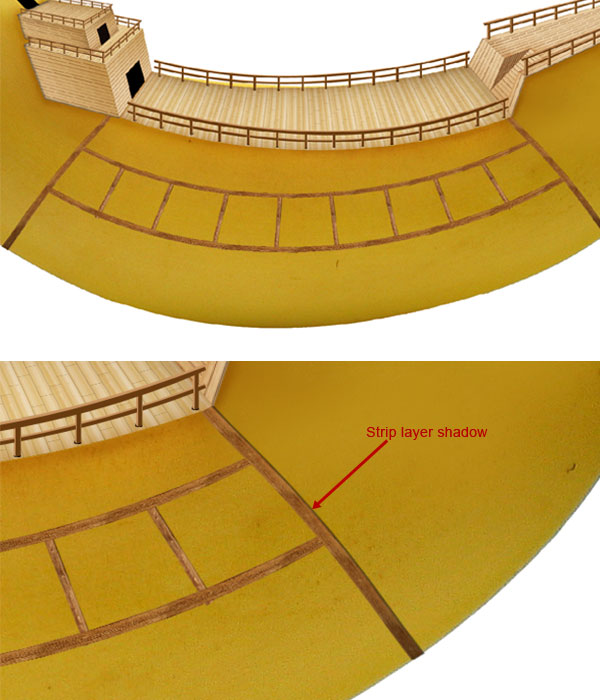
Duplicate layer "Strip" to extend to its length and create strips of lower part of the ship. Transform & wrap wherever needed. Create new layers just below strip layers, Cmd/Ctrl + click to get the selection of strip layer, fill it with black color & apply Gaussian Blur of 1px and set blending mode to multiply. Name this layer to "Strip shadow". Repeat same step to create shadow of other strips.
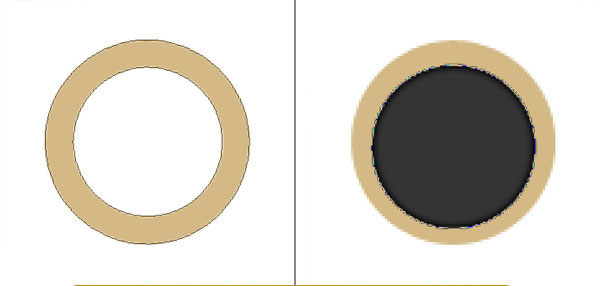
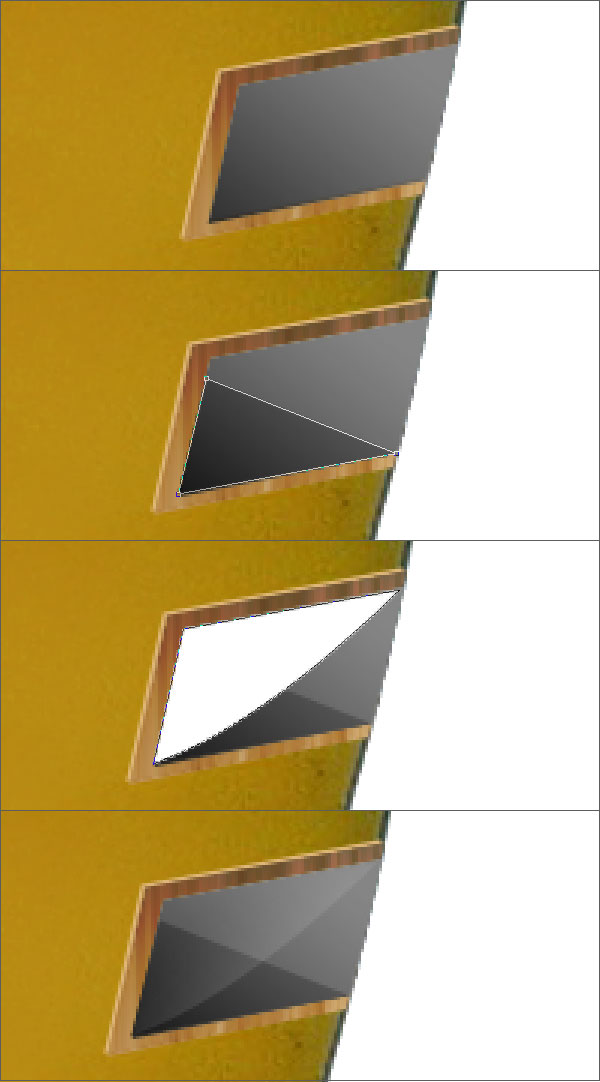
Create a new Photoshop file, select Ellipse Tool (U) and create an Ellipse of width & height 79px and color #d3b986. Press Alt and create small ellipse inside large ellipse, this will subtract small ellipse area from large ellipse. Name this shape layer to "Window back". Create another black ellipse of dimension 64px above "Window back" layer; name this as "Glass".
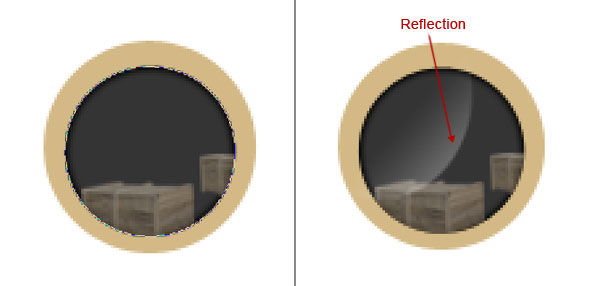
Open "wooden box.jpeg", remove its background and transform it so that it can fit inside "glass" layer. Duplicate 2-3 times to create more boxes. Select Ellipse Marquee Tool (M) and create a new ellipse of color white above glass layer. Add vector mask to layer, press D to set foreground color black & background color white. Select Gradient Tool (G) and drag diagonally from top left to down right. This will create a reflection on glass, set its opacity to 40% and name this layer to "reflection".
Duplicate "Window back" layer and rename it "Frame". Next, open "wood 2.jpeg", duplicate layer and set blending mode to color burn with opacity 30%. Now merge both layers, copy and paste this layer to main file. Create a thin selection by Rectangular Marquee Tool (M), press Cmd/Ctrl + T and stretch it vertically to create wood texture for window frame. Name this layer to "Texture". Keep this layer just above frame layer and Cmd/Ctrl + Click "frame". Add gradient layer style to the layer "frame" with opacity 50% and blending mode to color burn.
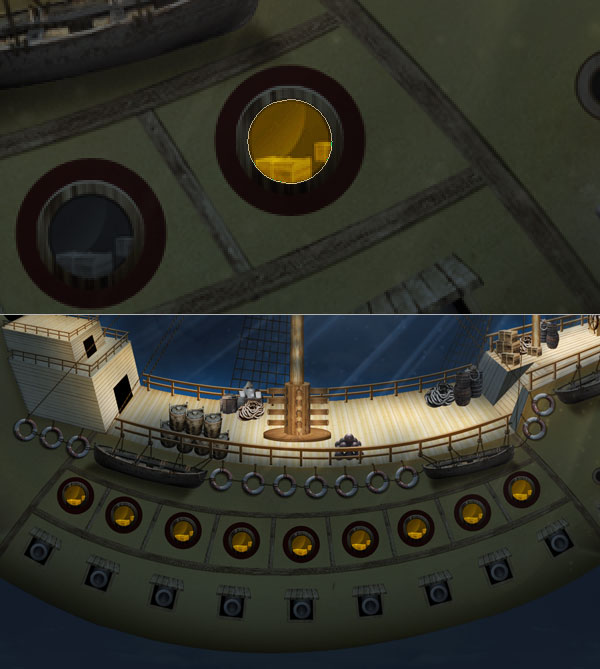
Group all window layers and name it "Window", convert it into a smart object and paste to main file to create Windows. Select Ellipse Tool (U) and create an ellipse of color #d40000 below window layer, set its blending mode to multiply and windows are ready.
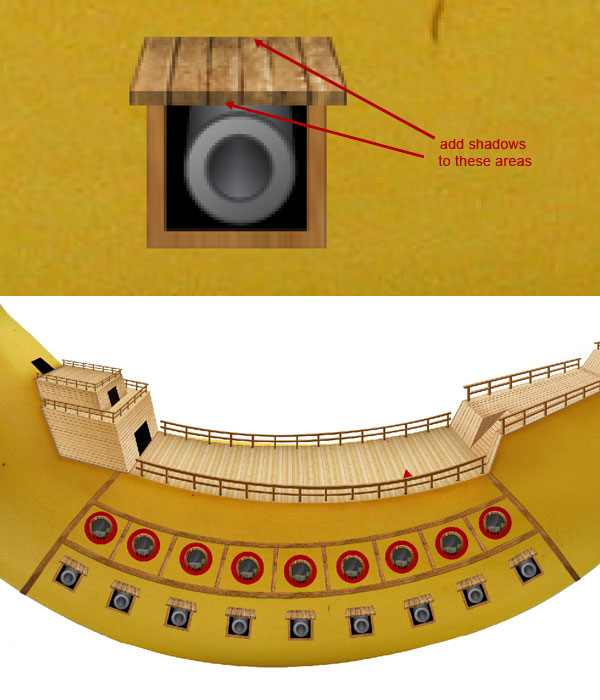
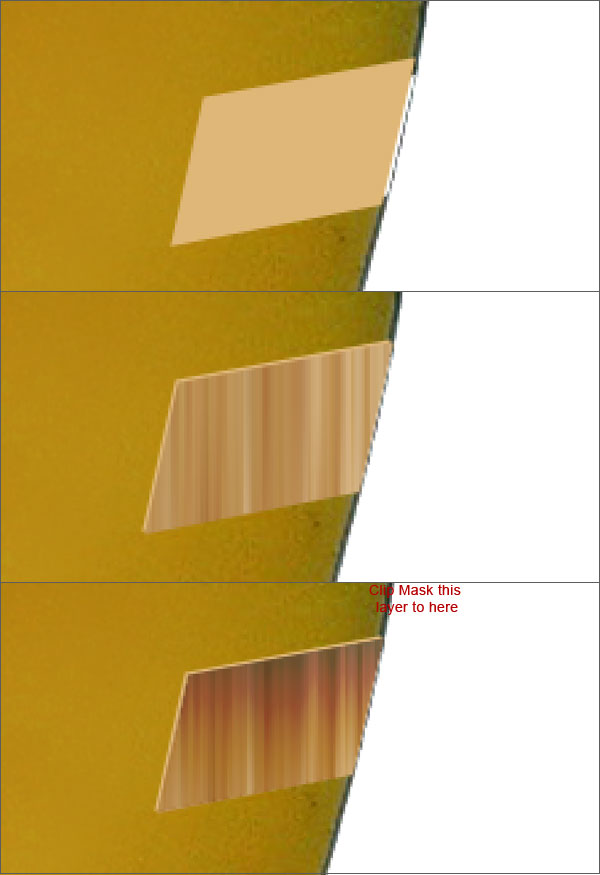
Go to File > Place and select "cannon.ai", create a rectangle of color #dfc8a4 and name it "Cannon window frame". Duplicate "Texture" layer and place just above cannon window texture & set blending mode to multiply and clip mask this layer with "Cannon window frame". To create window roof, open "wood 2.jpeg" and transform it to create cannon window roof. Use burn tool to create roof shadows then group all cannon window layer and name this group as "Cannon window". Duplicate cannon windows to create more windows.
In this step we will create windows in front and rear part. Let’s start with the front part, create a rectangle of color #dfb777, duplicate it and shift to 2px right then down. After placing it correctly, then change its color to white and name layer "Front window frame", duplicate texture layer on it and set its blending mode to multiply, clip mask this layer in "Front window frame" layer. Create a linear gradient of color black & white and set its blending mode to color burn and opacity 40%.
Create another black rectangle with 90% opacity, apply gradient layer style with colors #000000 & #787878, and name it "Front window glass". Press Cmd/Ctrl + click on the layer and mask area in the "Front window frame" and "banana" layer. Create another shape by pen tool of color black below "Front window glass" layer. Again create a new shape of color white and opacity 40%, apply layer mask to hide unwanted area, name this layer as "glass reflection".
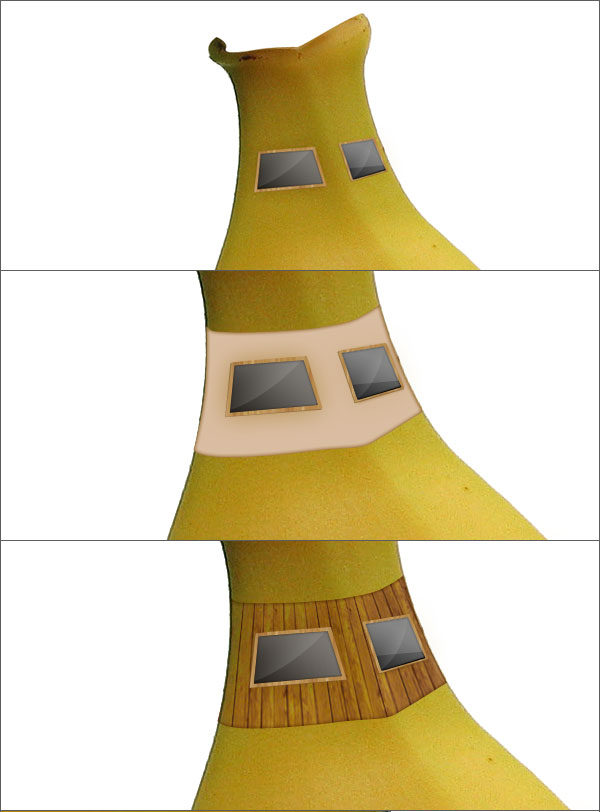
Repeat Step 35 to create windows on back part. Now we will create some texturing in this part. Create a shape of color #d9bda1, apply inner glow layer style with these settings; color #aa8640, opacity 75%, multiply. Name this layer to "wooden wall". Open "wood 2.jpeg" and create wood texture for window part, clip these texture layers to layer "wooden wall" then change its blending mode to darken.
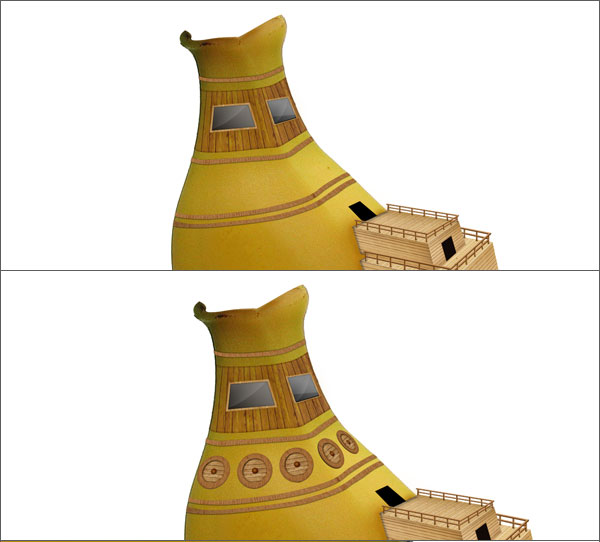
Create some decoration on back window area follow Steps 27 and 28 to create strips. Open "wooden shield.jpeg" and use it to decorate the back part.
Open "boat.jpeg", remove its background and place 2-3 boats on the ship. Draw some shadows to make it more realistic.
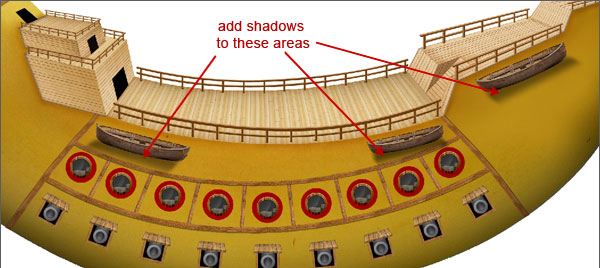
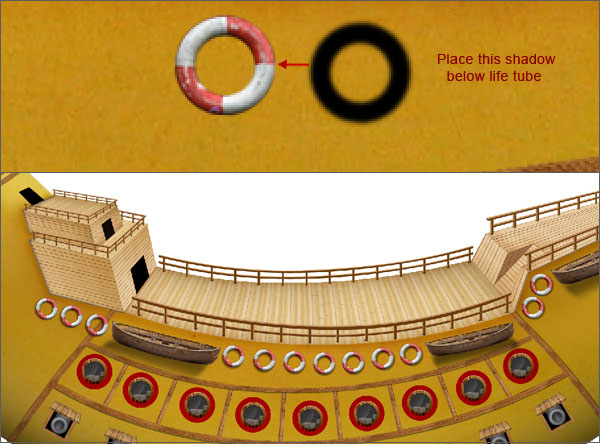
Again, open "life tube.jpeg" and place it on ship, name this layer "life tube". Press Cmd/Ctrl then click on "life tube" layer to create new layer and fill it with color black. Apply Gaussian blur of 1 px, set blending mode multiply with opacity 40%. Name this layer to "Life tube shadow" and place this layer below Life tube layer. Group both layer and duplicate to create more lifeboats.
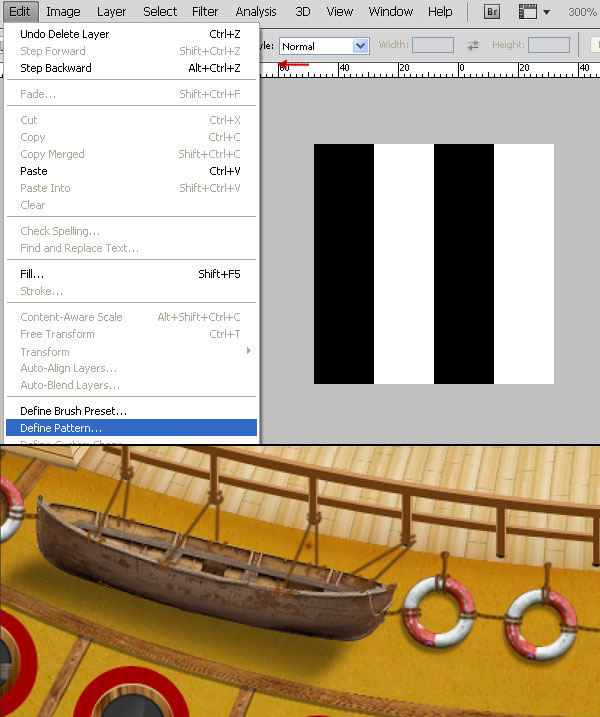
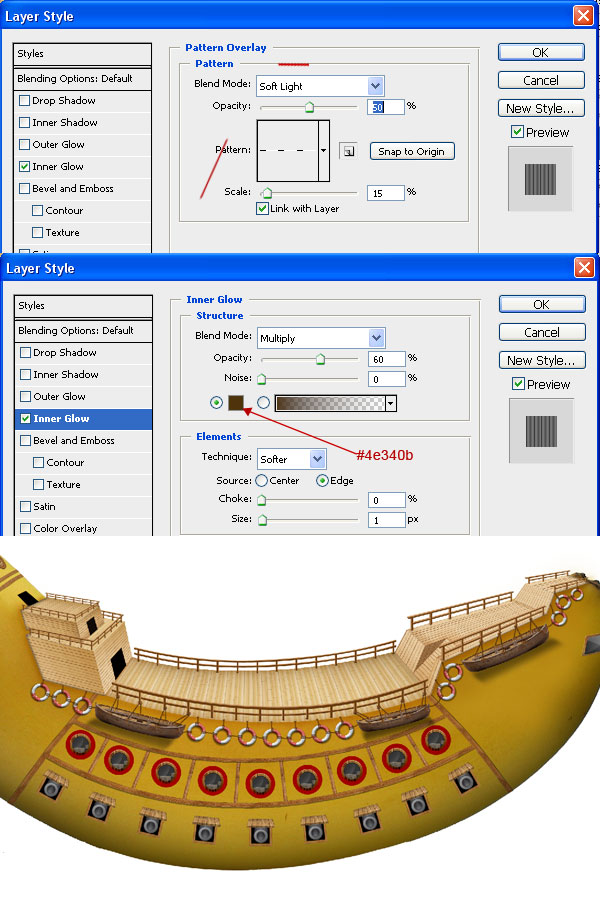
Now we will create ropes to bounding boats and life tubes. Create a new file of dimension 80 x 80 px, create two vertical bar of width 20 px and height 80 px. Merge all layer and go to Edit > Define Patten and save it. Go to our main file create new layer, select brush of size 3 px, hardness 100% & color to #6e4215 and draw ropes bounding boat and life tubes to ship. Name this layer to "rope".
Apply inner glow and pattern overlay layer styles in layer "rope".
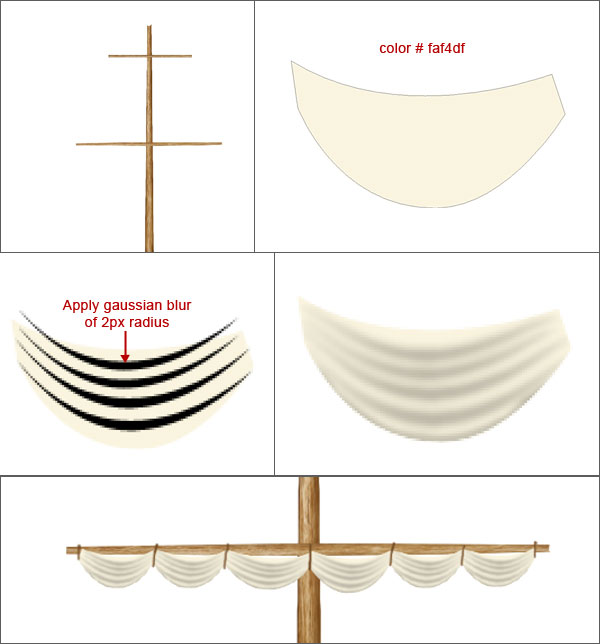
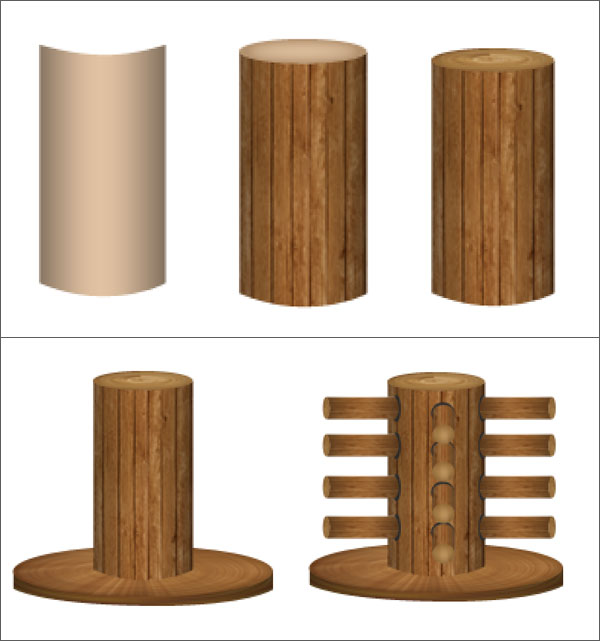
Cut a section of wood from "wood 2.jpeg", extend its texture by copying and transform it to create centre pole. Select soft brush of color black and darken from edges to give it depth. Now we will create curtain of pole, make a shape of color #faf4df, and turn on Shape Layer. Next create some black arc and apply Gaussian blur of radius 2px. Group these layers and name it "Cloth". Duplicate to create curtain on horizontal poles.
Then create some ropes in the same way that we have done in Step 40 to balance pole. Group all layers by creating pole and duplicate it to create another pole.

In this step we will create a rotating wooden wheel, for this make a rectangle of color #e1c2a2, open "wood 2.jpeg", clip this image to rectangle and set blending mode to multiply. Create an ellipse of color #elc2a2, open "wood cross section.jpeg" and clip this image to ellipse. Set its blending mode to darken, select wooden beam layers, group them and name group to "beam". Create lower base of beam, next duplicate group "beam" and resize it to create rotating handles. Group these layers and name it "Rotating wheel".
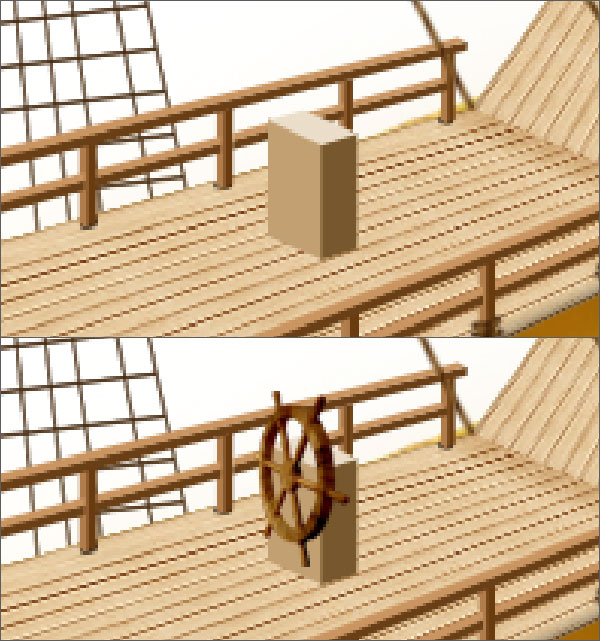
Now create the control steering wheel of ship, make a box by rectangle tools then open "wheel.jpeg", remove its background and name this layer as "wheel". Open "wood 2.jpeg" and clip this layer to "wheel" layer and set blending mode to multiply. Our control wheel is ready.
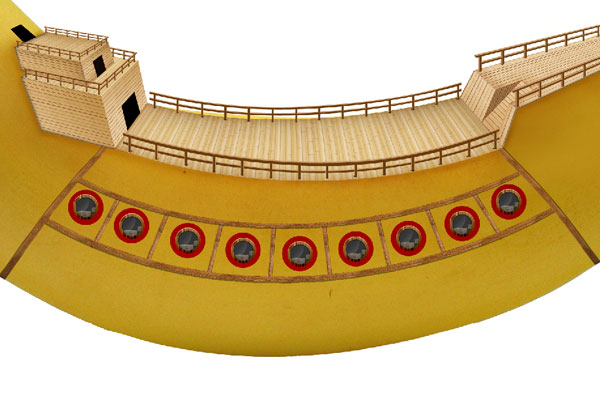
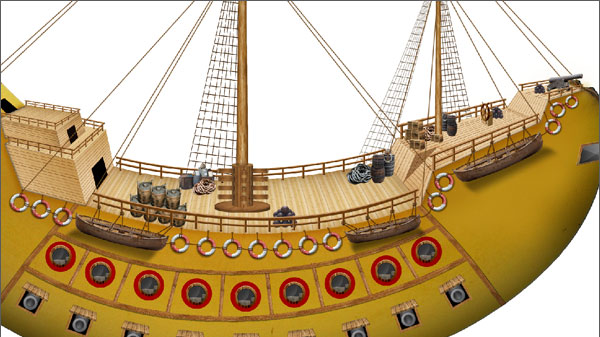
Enhance the deck by adding some stuff like barrels, boxes, ropes, cannons etc.
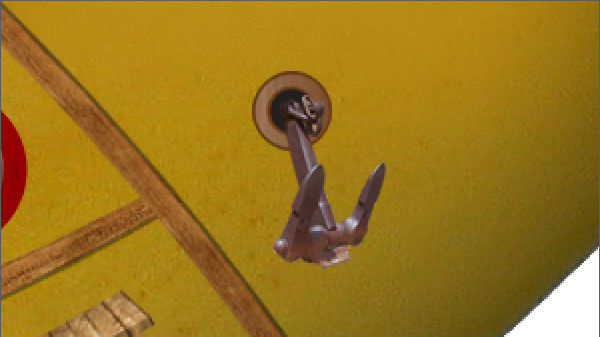
In next step open "anchor.jpeg", remove background and create a hole in front part of ship and place anchor into hole.
To create wings of Ship, first make a wing hole where wings will be attached in next step make a ellipse of color #694d2b, apply inner glow and outer glow layer style with these settings – Inner glow: blending mode – multiply, opacity – 50%, color – #9f7845, size – 13px. Outer glow: blending mode – screen, opacity – 20%, color – #ffffbe, size – 32px.
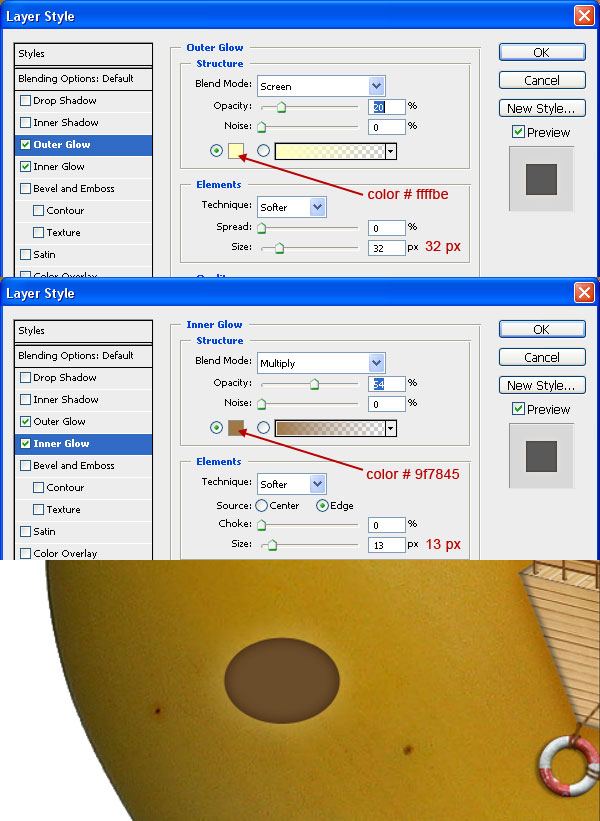
Clip "wood 2.jpeg" to ellipse, set blending mode to soft light, create another ellipse of color #43310e and clip another ellipse of color black inside it, group layers and name it "wing hole". Open "dragon fly.jpeg", isolate wing and place it in wing hole. Duplicate wing layer and apply motion blur of angle -24 degree and distance 60px, name this layer to "motion". Duplicate "motion" layer, transform & rotate it, set "wing" and "motion" layer’s opacity to 60%. Select Gradient Tool (G) with color black and white and mask tip area of "wing" layer. Our wings are ready.
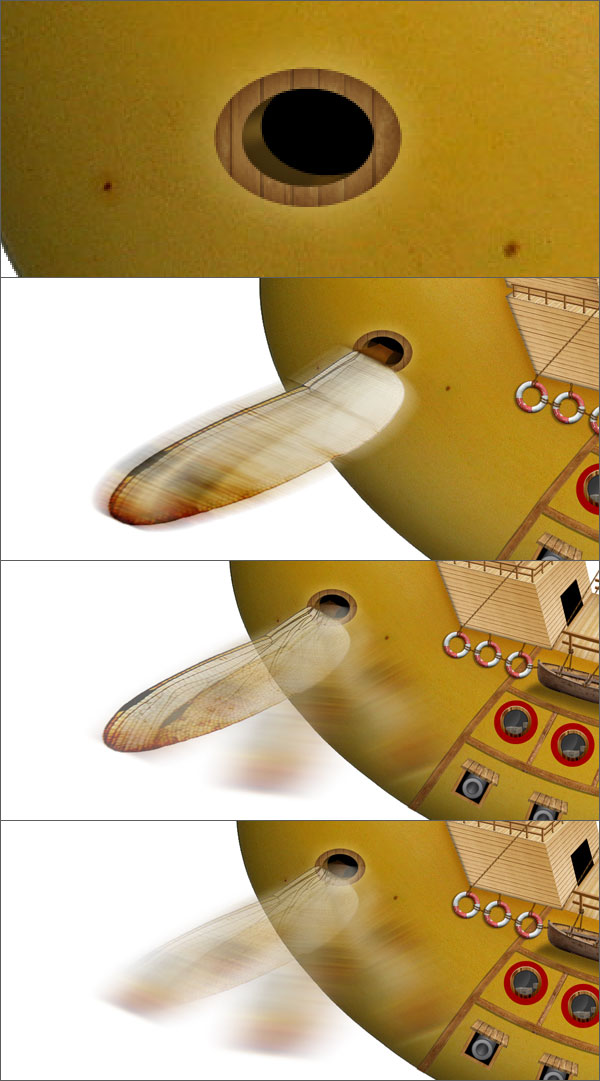
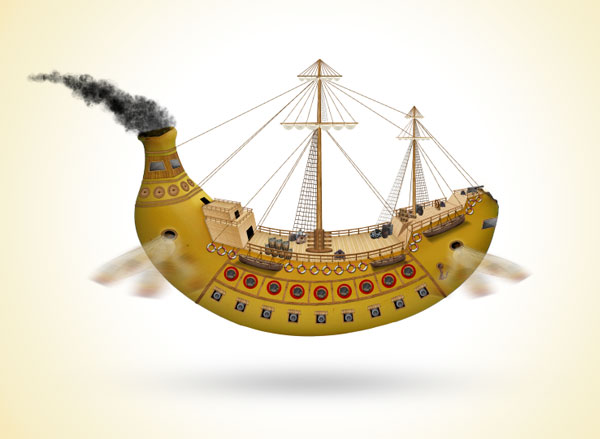
Group wing layer and name it "Wing", duplicate it to create wings on front part. Now the last step is to create smoke at the back of the ship, for this, load "smoky_mist.abr" and choose any smoke brushes to create smoke. You can make it from custom smoke brushes also. Congratulations! You’ve finished with the flying ship!
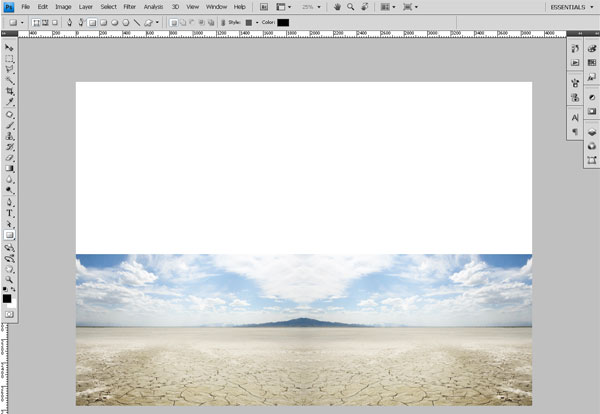
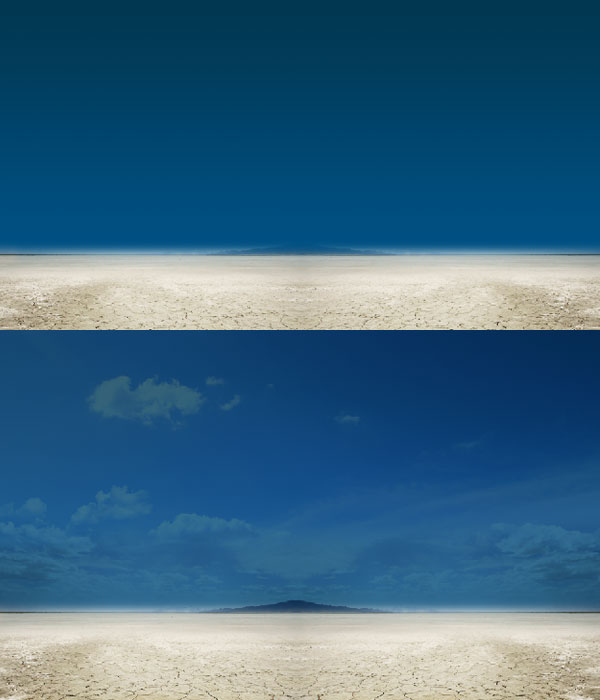
Open "land.jpeg" in a new file of size 3300 x 2500 px, duplicate it and extend to maximum width. Merge the layer, duplicate it and set blending mode to screen. Merge layers and name these layers as "land".
Next open the "cloud.jpeg", add layer mask to hide the lower part of the image.

Select Brush Tool (B), and load a set of cloud brushes. You can find a nice set of free cloud brushes here.
Select Gradient Tool (G) and create a gradient of color #004f82 & #00364f. Add layer mask and hide the lower part to show land. Set its blending mode to multiply and opacity 80%.
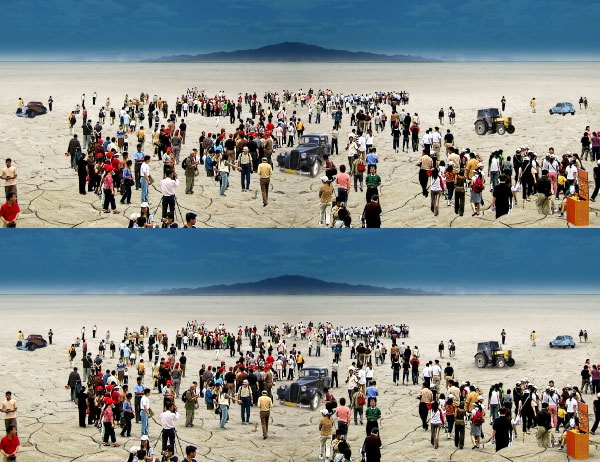
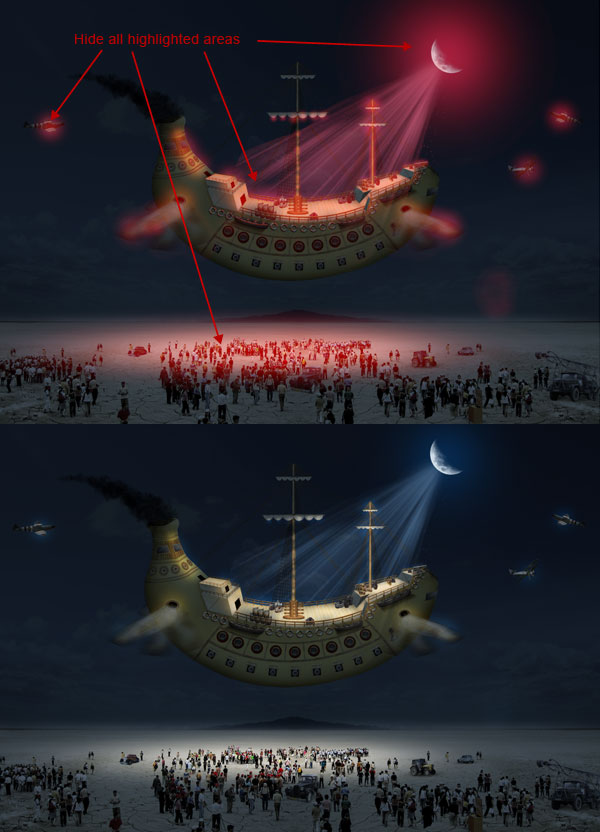
Go to File > Place and import banana ship to document. Open "aircraft 1.jpeg", "aircraft 2.jpeg" and "aircraft 3.jpeg", remove the backgrounds of the images and place them in sky. Again open "crowd.jpeg", remove its background and place it on the the land perspectively.

Open "car.jpeg", "black car.jpeg", "truck.jpeg" and "tractor.jpeg". Place them with crowd and create shadows carefully.
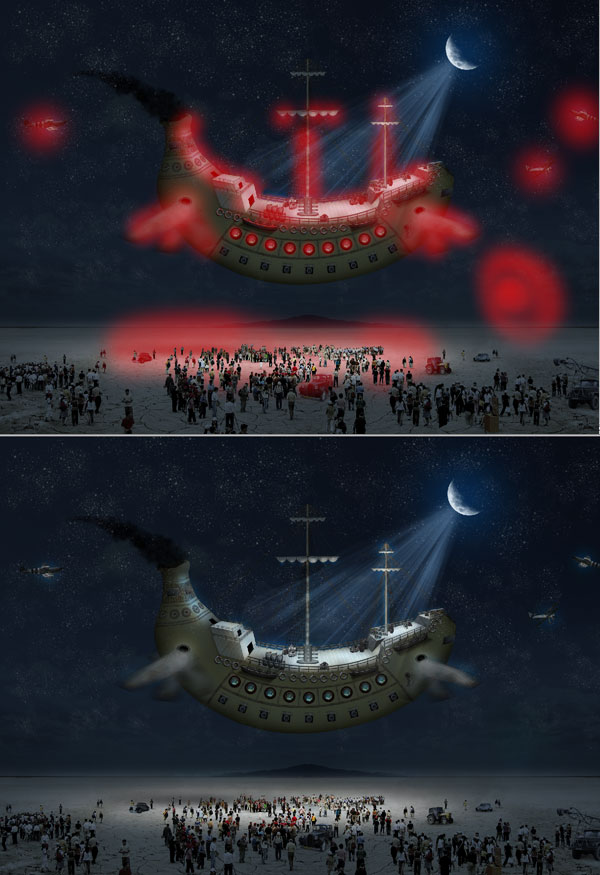
Create a rectangle of document size and color #325170. Set its blending mode to multiply. Again create another rectangle of document size and color #afafaf, set its blending mode to Hue and opacity 60%. Group both layer and name the group "night".
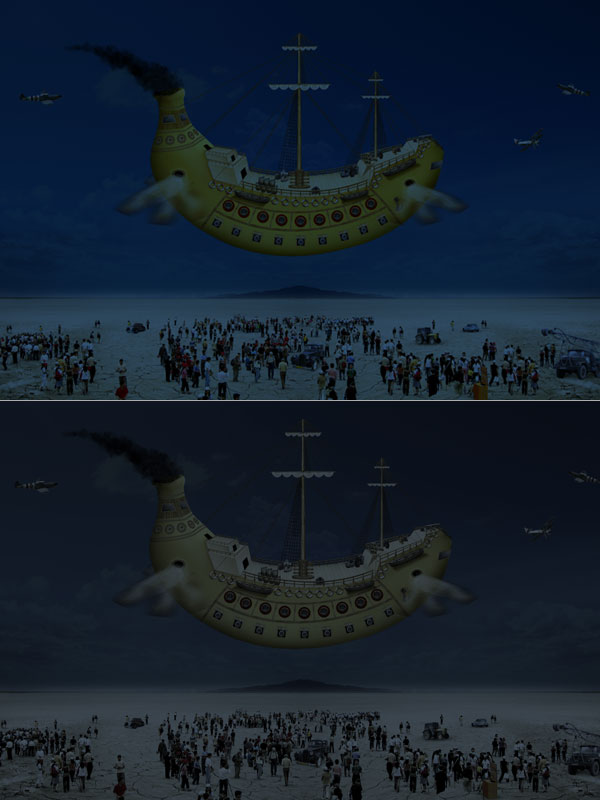
Select brush tool and load a set of moon brushes, set foreground color white and create a moon on sky. Next we will create moon rays so a set of light ray brushes, set the opacity 30%. Add layer mask to the group "night", select foreground color black and hide areas where light is falling from light source.
Add layer mask to the group "night", select foreground color black and hide areas to create light coming from moon. Create lights in every place where moonlight falls eg. rope, pole, boxes, floors, etc.
Now we will create window light coming from inside. Create an ellipse of color #ffd200 and set blending mode to overlay. Duplicate this ellipse, again duplicate the ellipse and now set its opacity to 30%. Group all ellipses and name it "window light", duplicate this group to give light other windows too.
Create stars in the sky and name this layer to sky. Apply layer mask to this layer and hide some stars to give it natural look.
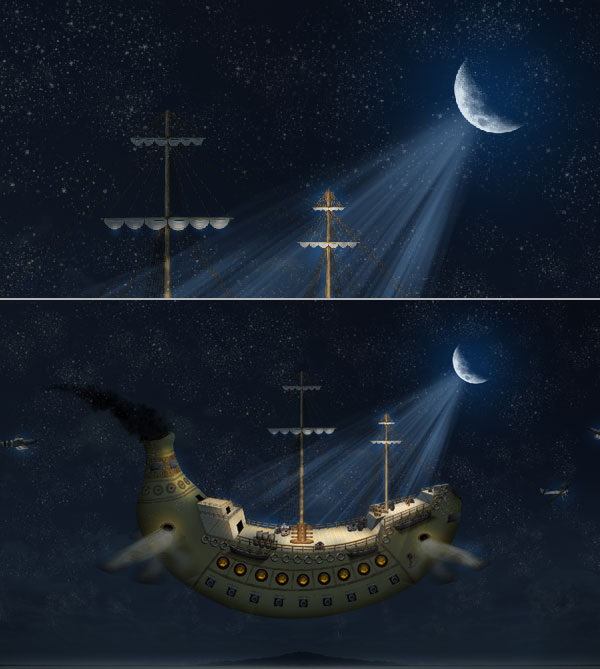
Now we will create ship’s shadow falling in the land left side of ship. Select a soft brush of size 1200px, roundedness 20%, color black and create ship’s shadow.
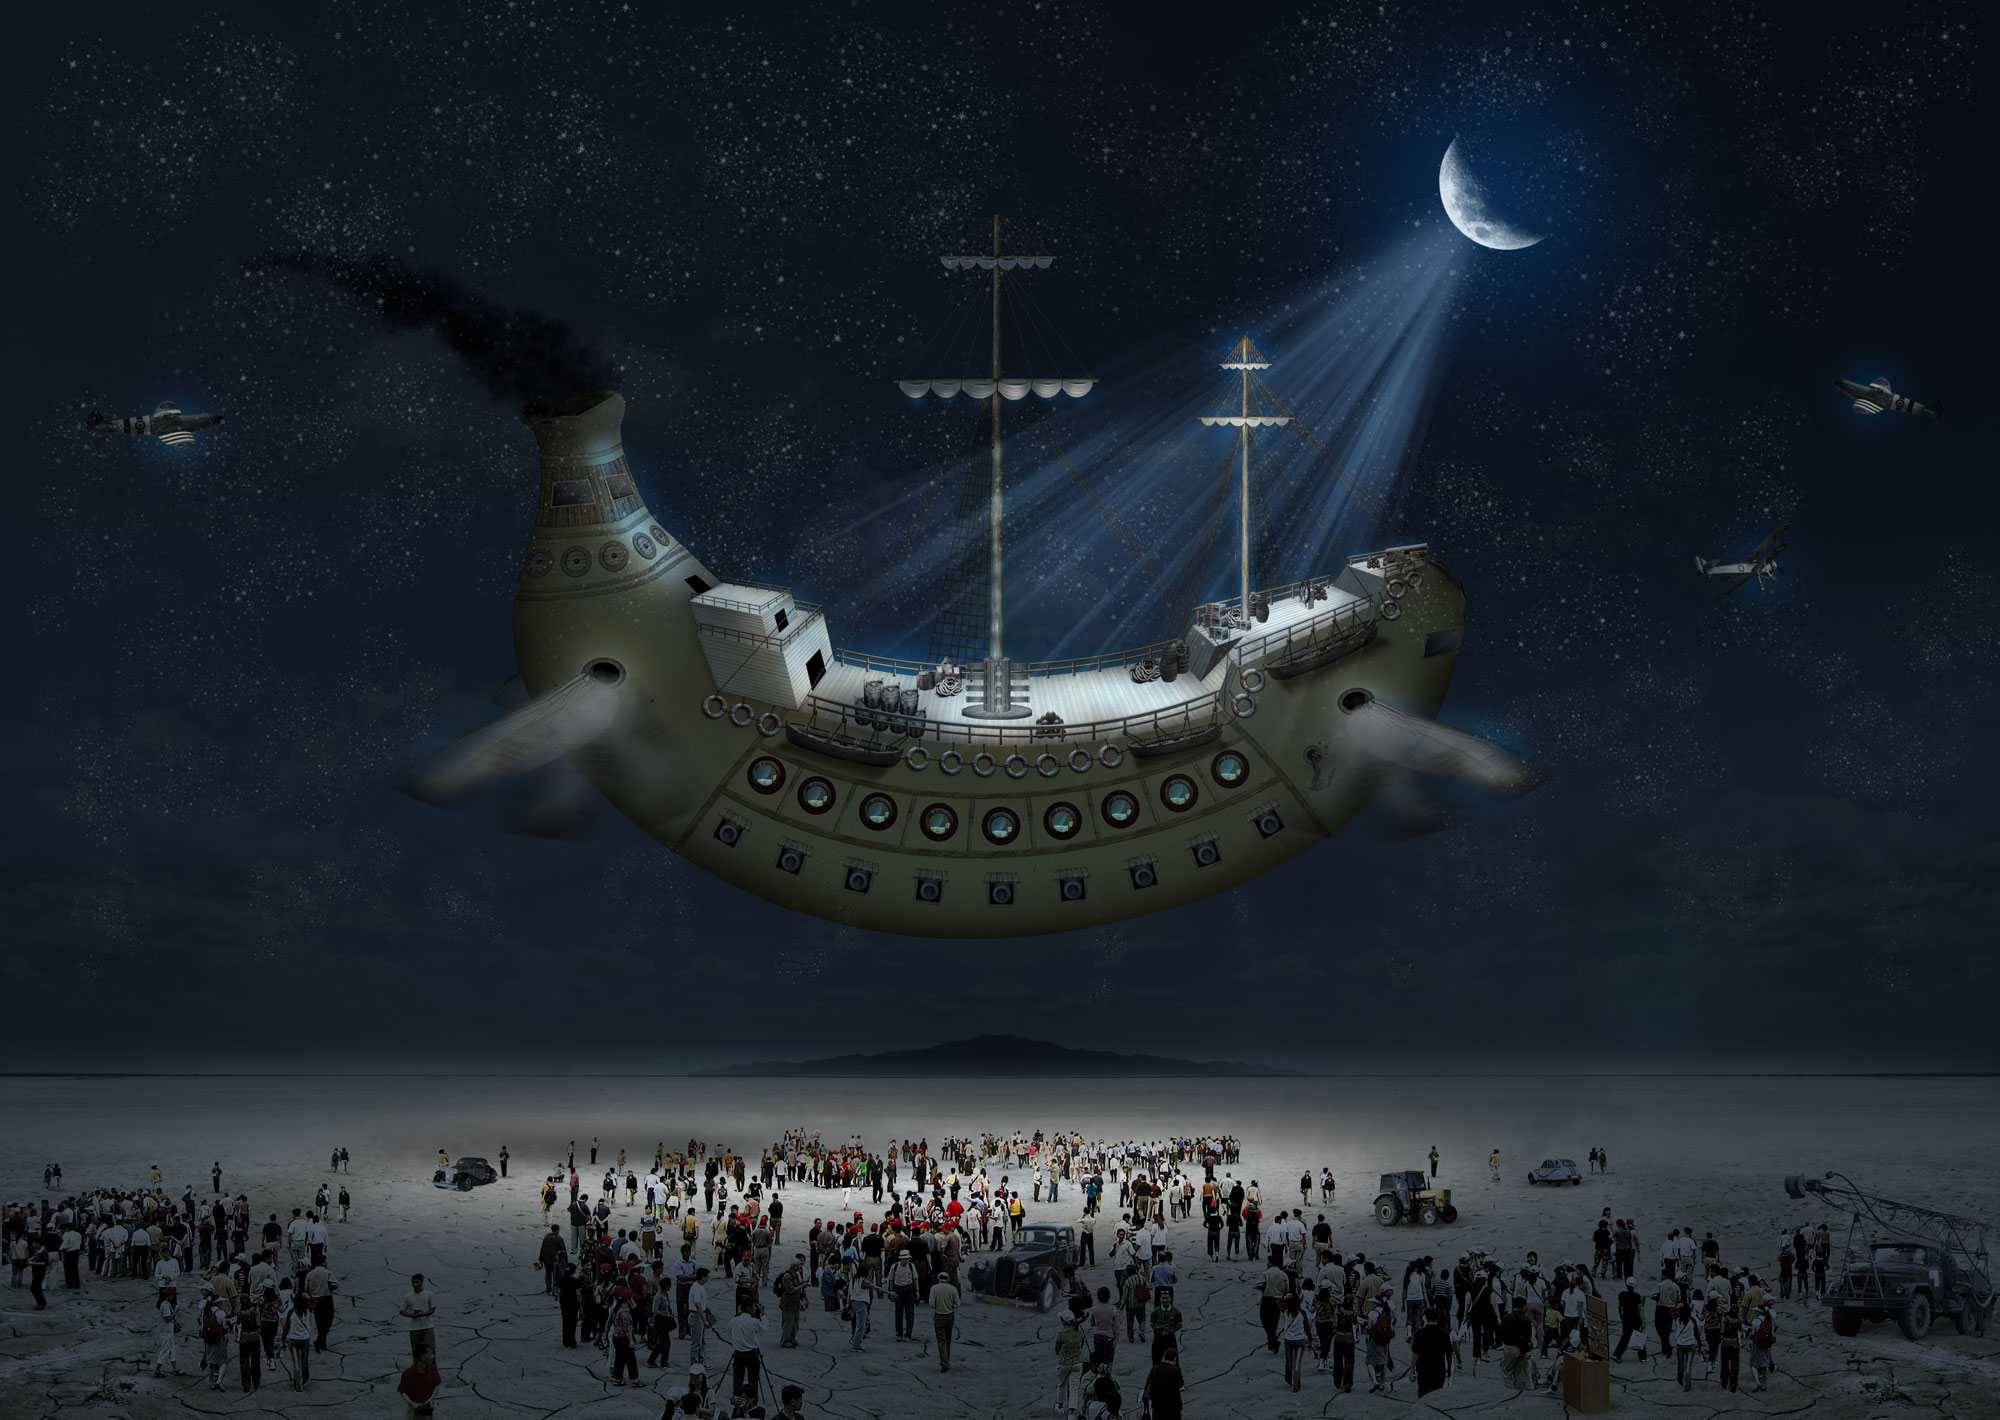
This is our last step so create another large rectangle same size of document size. Change its color to #5ebdff and set blending mode to Hue. Apply layer mask and hide areas where moon light falling and we have finished, this is our final result. Congratulations!
Need a program that will automatically input stock price and stock volume (with a time stamp) pulled from online real time quotes onto an excel spreadsheet for up to 15 individual stocks at intervals that can be easily set by the user ranging from 1 to 31 minute intervals.
I have a facebook application that has been offline for almost 1 year now and would like to have it working again.
I have all the facebook files, images, coding, etc, but it needs editing to work with the current facebook settings and my website.
I also require you to have knowledge of photoshop with experience in .psd images. The facebook app has a design already, but it was done poorly and will require help to make things smooth.
I may need extra facebook features added into the application, but hopefully it won’t cost me anything because I have all the basic structure.
I can do escrow, but will only deposit 50% first and 50% after full completion and satisfaction. My budget for this project is low, but reasonable because I have the coding already and basically just need edits to make it work again.
I’m looking at a cost of around $20-50, but I will give bonus/extra if i want a lot of extra features added.
need a simple easy to implement wordpress subscription setup plugin,
1. Form setup,
2. CSS setup
3. sumbit url
4. widget implementation
5. PHP implementation.
Please see the PMB for project details and project assignment.
We are working to develop a tool on Google App Engine accessed via API, also running through ZOHO. We are having data model issues and are looking for someone who can help to re-design the model as well as optimize the queries for exceptional performance. The documents attached are very detailed and should explain everything in full. If you have any questions feel free to reach out. We are looking for someone will strong experience who can fully explain their approach and start immediately. Thanks.
I need a desktop program written that pulls my ebay auctions and my competitors auctions. Then compares the data to see what matches up and what doesn’t. I need to program to take the competitors quantity and prices. With the prices I need some formulas written so I know how much to buy the items at. I need to be able to print out what data they I have and I don’t. There are some rules that need to be set up so that titles will match up for example I have Spider-man #1-A the title my competitor will have is Spider-man #1A.