Creating a document centric iPhone/iPad application with own file format using ZipArchive
If I need to predict one thing about where the App Store is heading to, now that the iPad has been released, I would say “It’s going to be less about farting apps and much more about productivity apps” Yes – the iPad has already changed the game drastically – with an almost real life size keyboard, large beautiful screen and file sharing direct in iTunes you can achieve much more than before. But hey, iPhone OS 4.0 is just around the corner, and I bet one of those new features will be the same file sharing you get on the iPad.
The problem
Assuming you are already familiar with Objective-C and Cocoa Touch, today I’ll be discussing how to create a productivity application which can read and write multimedia files – custom format files which will be a mixture of image and text data. If you look at the most of the Apple’s productivity applications you’ll notice they all use bundles as their output format. For those not familiar with the concept – the bundle is an actual file directory, which then holds different files, but to the user it’s presented as a single file – easier to copy around and in general to work with. I am going to be doing the same today by making my example application create different text and image files and then zip them together in a single file – this way the user could then copy this single file over trough iTunes via the file sharing feature.
ZipArchive overview
The star of today’s article is ZipArchive – the Objective-C library I’m going to use for compressing and uncompressing my custom zip files. It is completely free and you can download it from : http://code.google.com/p/ziparchive/
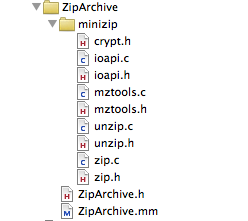
To use ZipArchive I download the library and add it to my Xcode project.
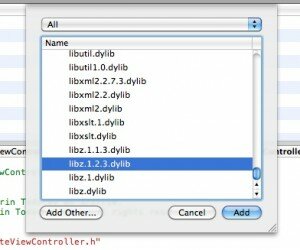
Now that I added the ZipArchive sources I am almost ready to create and extract zip archives. In fact ZipArchive uses the libz framework, so I need to add this framework to my XCode project too. Add->Existing Frameworks and I choose “libz.1.2.3.dylib”
ZipArchive is very straightforward to use, also because it offers just a handful of methods, let’s have a look together at what’s inside:
Creating a ZipArchive instance is super simple.
#import “ZipArchive.h”

ZipArchive* zip = [[ZipArchive alloc] init];
Create zip archives
Call CreateZipFile2: to create an empty zip archive file, or call CreateZipFile:Password: to create an empty zip archive which is password protected (the latter makes creating encrypted files really easy). NB: If your application is creating password protected zip files in general it uses encryption, so you would need to tick the encryption checkbox when you submit it to the App Store.
Once you create a zip archive you can add as many files as you like by calling addFileToZip:newname: and when you are done call CloseZipFile2. Or as they say “a line of code is worth thousand words”:
ZipArchive *zip = [[ZipArchive alloc] init];

[zip CreateZipFile2:@”archive.zip”];

[zip addFileToZip:@”photo1.png” newname: @”photo1.png”];

[zip addFileToZip:@”photo2.png” newname: @”photo2.png”];

[zip addFileToZip:@”../../test/IMG_0001.png” newname: @”photo3.png”];

[zip CloseZipFile2];
Now I really don’t think creating a zip archive gets any simpler than that. All of those methods return a boolean result, which you can check to see if the operation was successful, so you can implement also your error handling code along. To create a password protected file call:
[zip CreateZipFile2:@”archive.zip” Password: @”plaintextpassword”];
(I should really admit that ZipArchive’s the naming convention is strange: some names are CamelCase: , some camelCase:, some camel:Case: , some camelCase:case:, and sometimes a capital in the middle of the word “overWrite” – and this is a class with only 8 methods :)
Extracting zip archives
Extracting files from a zip archive is as simple as creating one. You open an archive using UnzipOpenFile: or UnzipOpenFile:Password: Now pay attention to the result of that operation- if the file exists, but UnzipOpenFile: returns NO, it might mean the archive is password protected. If the archive file has been successfully opened it means ZipArchive can read the contents and you can proceed to extracting the files to a destination of your choice by using UnzipFileTo:overWrite: If you pass YES as the second argument, the extracting operation will overwrite files at the target location.
ZipArchive *zip = [[ZipArchive alloc] init];

if ( [zip UnzipOpenFile:@”archive.zip”] ) {

[zip UnzipFileTo:@”tempFolder” overWrite:YES];

}

[zip UnzipCloseFile];
To gain a bit more control over what ZipArchive does you can set a class of yours as a delegate, here is the ZipArchiveDelegate protocol:
@protocol ZipArchiveDelegate <NSObject>

@optional

-(void) ErrorMessage:(NSString*) msg;

-(BOOL) OverWriteOperation:(NSString*) file;

@end
Now that you know everything there is to know about ZipArchive, I can start with my super duper productivity application …
Creating simple custom file format with ZipArchive
I’ll first create a class called CustomFile, which will be my data model – it will be responsible for reading and writing data to the file system. I’ll need few ivars and properties for them:
NSString* filePath;

//the file contents

NSString* title;

NSString* text;

UIImage* photo;
In filePath I’ll keep the absolute path to the location the file will be written to or red from. The rest of the ivars will be my file contents – 2 texts and 1 image. Now let me explain what this custom file format will be about – I will want to store in my files short articles – much similar to blog posts – my files will hold the title, the full text and a photo (if attached) of an article.
Some of you will ask why do I need a custom format for my files … can’t I just save a text file with the text and the image somewhere on my disk and then save their names in a sqlite database and done ? Nope, think trends, think iPad / iPhone 4.0 and think file sharing: as I said things are moving beyond apps which sole purpose is to amuse their users for about 5 to 10 minutes. If my app saves separate files of text and images, when the user wants to copy them from his iPad to his wife’s iPad he might miss one of those files and that will ruin the integrity of his document… So let’s look further what I have in mind:
My model’s initializer:
-(id)initWithFilePath:(NSString*)initPath

{

self = [super init];

if (self != nil) {

//set the file path

if (initPath != nil) {

self.filePath = initPath;

}

}

return self;

}
Nothing special, just making sure every instance of the model is related to a file path. So since all the file contents are also class properties, I can use them to fill in my file’s instance with content and then I will need a save method to save to the file system. And what I’d need is create a temp folder, save all my data as files there, and them zip’em! If you have a look in the code below, now that you know how to use ZipArchive the code is actually very straightforward:
-(void)saveFile

{

//create a temp directory

NSFileManager* fileManager = [NSFileManager defaultManager];

NSString* documentsDir = [filePath stringByDeletingLastPathComponent];

NSString *tmpPath = [documentsDir stringByAppendingPathComponent:@"tmp"];

[fileManager createDirectoryAtPath:tmpPath attributes:nil];

ZipArchive *zip = [[ZipArchive alloc] init];

[zip CreateZipFile2:self.filePath];

//save the texts

NSDictionary* texts = [NSDictionary dictionaryWithObjectsAndKeys:self.title,@"title",self.text,@"text",nil];

NSString* textsFile = [tmpPath stringByAppendingPathComponent:@"texts.plist"];

//save the image and add them to the zip file

if (self.photo!=nil) {

NSString* photoFile = [tmpPath stringByAppendingPathComponent:@"photo0.png"];

NSData *imageData = [NSData dataWithData:UIImagePNGRepresentation(self.photo)];

[imageData writeToFile:photoFile atomically:YES];

[zip addFileToZip:photoFile newname:@"photo0.png"];

[fileManager removeItemAtPath:photoFile error:NULL];

}

[texts writeToFile:textsFile atomically:YES];

[zip addFileToZip:textsFile newname:@"texts.plist"];

[fileManager removeItemAtPath:textsFile error:NULL];

if( ![zip CloseZipFile2] )

{

// error handler here

}

[fileManager removeItemAtPath:tmpPath error:NULL];

[zip release];

}
I am just putting the texts in a NSDictionary and saving it as a plist file, and then saving the image as a separate PNG file. Then I zip everything and remove all traces. Note how I create my temporary folder in the same location where the file is going to be saved (assuming it is indeed writable) Your own document centric application is probably much greater than putting together some texts and an image, but I’m sure this example already gives you the right direction.
Now that I have already my saving method, it’s very easy to put together also the one that reads the data from the file system.
-(BOOL)loadFile

{

//create a temp directory

NSFileManager* fileManager = [NSFileManager defaultManager];

NSString* documentsDir = [filePath stringByDeletingLastPathComponent];

NSString *tmpPath = [documentsDir stringByAppendingPathComponent:@"tmp"];

[fileManager createDirectoryAtPath:tmpPath attributes:nil];

ZipArchive *zip = [[ZipArchive alloc] init];

BOOL result = NO;

if([zip UnzipOpenFile:filePath]) {

//zip file is there

if ([zip UnzipFileTo:tmpPath overWrite:YES]) {

//unzipped successfully

NSLog(@"Archive unzip Success");

result= YES;

} else {

NSLog(@"Failure To Extract Archive, maybe password?");

}

} else  {

NSLog(@"Failure To Open Archive");

}
To load the file contents I have very similar approach: I get the directory of the file and create a temp folder in the same place and then I unzip it inside. Spoiler alert: All my documents are going to be saved in the Documents folder which is always writable, so no worries whether this little temp folder of mine can be crated or not. I chose for the Documents folder as this is the folder which you application can share with your computer via iTunes (in OS 3.2+)
Then onwards is also very simple, now the contents are extracted just load them back into the class instance:
if (result==YES) {

NSString* textFile = [tmpPath stringByAppendingPathComponent:@"texts.plist"];

NSDictionary* texts = [NSDictionary dictionaryWithContentsOfFile:textFile];

self.title = (NSString*)[texts objectForKey:@"title"];

self.text  = (NSString*)[texts objectForKey:@"text"];

NSString* tmpPhotoPath = [tmpPath stringByAppendingPathComponent:@"photo0.png"];

if ( [fileManager fileExistsAtPath:tmpPhotoPath] ) {

self.photo = [UIImage imageWithData: [NSData dataWithContentsOfFile:tmpPhotoPath] ];

}

}

//do cleanup

[fileManager removeItemAtPath:tmpPath error:NULL];

[zip release];

return result;

}
Now that I have my model working (a simple class to read and write my custom file format) I’ll create also the GUI of my example application – I assume you are already familiar with creating UITableControllers and binding GUI elements to your classes so I won’t go into details about those. I’ll just quickly make a resume of the app’s idea and let you dig into the source code, which is available for download at the end of the article.
I’ll create my main view controller to load the names of all files in my Documents directory which have extension “.mtt” – those are the files my application create and show them in a table:
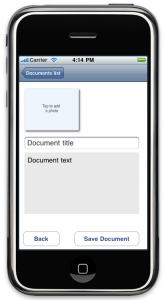
My second view controller will be the application work area – a screen where you can load an image from your photo gallery and enter some texts (again if you are not familiar with the techniques to do all these, read a more introductiory article about iPhone programming)
So the idea of the demo app is simple, initially shows you a list of the available documents, if you click on one of them, the CustomFile class unarchives it and loads its contents into the second view controller, there you can change the contents and hit Save Document. If you want to create a new document you just choose the “New Document …” item from the list and this will just load the details view controller empty, so you can edit and save. Just download the source and run the app to get a feeling of the app and make sure to check the source to see how ZipArchive is being used.
Wrap up
I hope this article has been useful – I showcased ZipArchive and also did put some ideas together on how to create more elaborate document centric applications. The custom file format can be developed a lot further and the interface for editing multimedia contents could be improved dramatically on the iPad’s big screen.
The full source code of the demo application you can download here.
If you have comments or questions, please write in the comments below or ping me in twitter!
I wish you happy iCoding !
Marin Todorov


