In this introduction to the JavaScript for Flash (JSFL) scripting language, you’ll learn how to automate repetitive tasks and add new commands to the Flash authoring environment.
Introduction
We’ll start by exploring JSFL in general, seeing what it can do, then building up to a useful application of it: a command that can turn text into a button (with its hit area set correctly) in a single click.

Step 1: Create a JSFL File
Open Flash and click File > New. Select Flash JavaScript File from the list, and save your new document as example.jsfl, anywhere you like.
JSFL is a plain text format, so you can open JSFL files in any text editor.
Step 2: Create a FLA
We’ll need a blank FLA to test our scripts, so create one of these, too. You don’t even have to save it; it’s just for testing.
Step 3: Write Some Script
In your JSFL file, paste the following code:
fl.getDocumentDOM().addNewOval({left:100, top:150, right:150, bottom:200});
Even if you’ve never used JavaScript before, the syntax is similar enough to ActionScript that you can guess what it does:
- fl is an object representing the Flash application itself
- getDocumentDOM() returns the currently open FLA
- addNewOval() draws an oval to the FLA, with the parameters given
Step 4: Run the Script
If you’re editing the JSFL in Flash, run the script by clicking the big triangular Play button in the toolbar. Otherwise, double-click the JSFL file on your computer and it will automatically run in Flash.
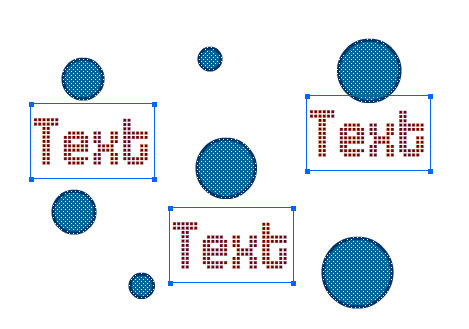
You should see a circle appear, using whatever colors you had selected. Great! Now whenever you need to draw a 50px circle centered at (125, 125), you don’t even need to draw it.
Step 5: Make the Script More Codey
This is kind of a dull result, though. Let’s make things more complex:
for (i=0; i<8; i++)
{
    fl.getDocumentDOM().addNewOval({left:(i*50), top:(i*50), right:(i*50)+50, bottom:(i*50)+50});
}
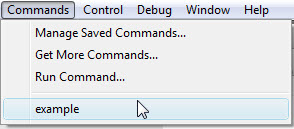
Yep – JavaScript has for-loops too. This time, run the JSFL by switching to your FLA, clicking Commands > Run Command, then finding your script file on your hard drive.
Check out the result:
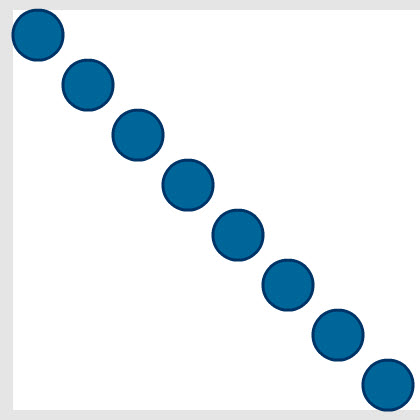
Already it’s clear that this can be very useful for taking care of repetitive, precise tasks. For example, it would be easy to modify that code to create a grid of circles… and from there it’s a small step to creating a grid of buttons. No more copying, pasting, and gently nudging symbols around the stage to line them up properly.
Step 6: Trace
It’s always good to have a trace() command available when you’re testing something new. In JSFL, we have the fl.trace() function, which takes a single string (unlike AS3’s trace(), which can take several at once) and prints it to the Output panel. Try it out:
for ( var i = 0; i < 8; i++ ) {
    fl.getDocumentDOM().addNewOval({left:(i*50), top:(i*50), right:(i*50)+50, bottom:(i*50)+50});
	fl.trace( "i is: " + i.toString() );
}
The result:
i is: 0
i is: 1
i is: 2
i is: 3
i is: 4
i is: 5
i is: 6
i is: 7
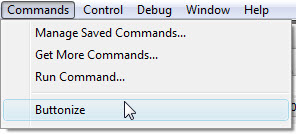
Step 7: Add the Command to the Menu
Having to keep the JSFL open or browse to it whenever you want to use it would be a real pain. Instead, you can add it to the Commands menu so it’s just a couple of clicks away. (And once it’s there, you could even assign it a keyboard shortcut.)
All you have to do is move your example.jsfl file to Flash’s \Command\ folder. The location of this folder depends on your OS, though:
- Mac OS X: [hard drive]/Users/userName/Library/Application Support/Adobe/Flash CS3/language/Configuration/Commands
- Windows XP: [boot drive]\Documents and Settings\username\Local Settings\Application Data\Adobe\Flash CS3\language\Configuration\Commands
- Windows Vista: [boot drive]\Users\username\Local Settings\Application Data\Adobe\Flash CS3\language\Configuration\Commands
- Windows Vista (alt): [boot drive]\Users\username\AppData\Local\Adobe\Flash CS3\language\Configuration\Commands
- Windows 7: [boot drive]\Users\username\Local Settings\Application Data\Adobe\Flash CS3\language\Configuration\Commands
- Windows 7 (alt): [boot drive]\Users\username\AppData\Local\Adobe\Flash CS3\language\Configuration\Commands
The username folder will match the name you use to log in with, language will change depending on what you picked when you installed Flash (for English speakers it’ll probably be en-us or just en), and if you’re using a newer version of Flash than CS3, that folder will change too.
Once saved in that folder, it will appear in the Commands menu, using the name of the JSFL file:
Just click to run it. You can now edit the JSFL file inside the Commands folder, to speed things up.
Step 8: Retrieve Information from the FLA
JSFL can do more than run lists of commands. It can also get information about the FLA and the items in it, and make decisions based on that info.
For example, we could write a script to trace how many items are currently selected:
fl.trace( fl.getDocumentDOM().selection.length )
The selection object is actually an array, with each element containing one of the selected objects. That’s why selection.length gives us the number of objects selected.
This simple script gives an insight into how Flash works: try drawing a few circles, selecting them all, and running the script. It’ll return “1″. Create a few text fields, select them all, and run the script, and it’ll return a number equal to the number of text fields.
Step 9: Find the Type of an Object
We can get information about the objects inside that selection, too:
for ( var i = 0; i < fl.getDocumentDOM().selection.length; i++ )
{
	fl.trace( fl.getDocumentDOM().selection[i].elementType );
}
I have two text fields and a bunch of circles selected, and this script outputs:
text
text
shape
For a full list of objects and functions, explore the Extending Flash book in the Adobe LiveDocs.
Step 10: Modify Objects on the Stage
Here's a simple script that squashes all the selected shapes on the stage - but nothing else:
for ( var i=0; i < fl.getDocumentDOM().selection.length; i++ )
{
	if ( fl.getDocumentDOM().selection[i].elementType == "shape" )
	{
		fl.getDocumentDOM().selection[i].scaleY = 2;
	}
}
Before:
...and after:

Step 11: "Buttonize" Overview
You've got the basics. Now it's time for the meat of this tutorial.
We're going to create a script that takes a text field and turns it into a button. I'll walk through the steps this script will replicate; start a new FLA and put a text field in the middle, then follow along:
- Click the text
- Convert it to a symbol
- Go into Edit Mode
- Create new keyframes: over, down, hit
- Draw a solid rectangle covering the text to define the hit area.
It's quite simple, when you see it listed like that. But how do we do all of that in JSFL? What's the script?
We could look everything up in the LiveDocs, but there is a much easier way...
Step 12: The History Panel
Click Window > Other Panels > History to bring up the History panel:
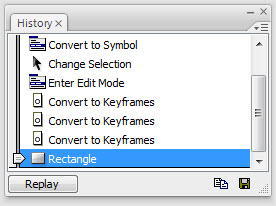
Those are all the steps we need. If only they were in JSFL...
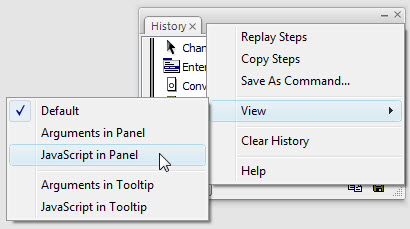
Step 13: The History Panel List in JSFL
Oh, right, they are in JSFL. Click this little button:
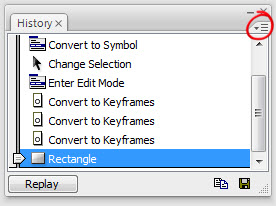
...then click View > JavaScript in Panel:
Result:
It's not exactly what we need, but it gives us some indication of where to look in the LiveDocs.
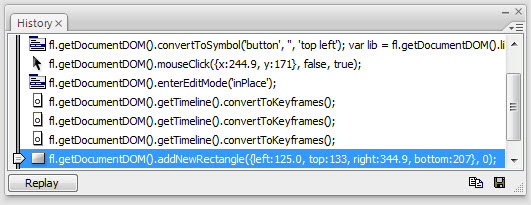
Step 14: Copy the History
Click the top history item that you need and shift-click the bottom to select all the steps in between. You can ctrl-click (cmd-click on Mac) individual items to deselect them from this list (I've removed some unnecessary mouse clicks from mine). Then, click that little menu button again and select Copy Steps. You can now paste them in to a JSFL file:
fl.getDocumentDOM().convertToSymbol('button', '', 'top left');
var lib = fl.getDocumentDOM().library;
if (lib.getItemProperty('linkageImportForRS') == true) {
lib.setItemProperty('linkageImportForRS', false);
}
else {
lib.setItemProperty('linkageExportForAS', false);
lib.setItemProperty('linkageExportForRS', false);
}
lib.setItemProperty('scalingGrid',  false);

fl.getDocumentDOM().enterEditMode('inPlace');
fl.getDocumentDOM().getTimeline().convertToKeyframes();
fl.getDocumentDOM().getTimeline().convertToKeyframes();
fl.getDocumentDOM().getTimeline().convertToKeyframes();
fl.getDocumentDOM().addNewRectangle({left:125.0, top:133, right:344.9, bottom:207}, 0);
Save this as Buttonize.jsfl.
(Alternatively, you can click the Save button to create a JSFL file in the Commands directory, in which case the script will have comments to help explain each step.)
Step 15: Test Script
Let's test the script as it is right now so that we can get a good idea of what we need to improve. Start another blank FLA, create a text field (put it in a different position, with different text), click it, and run the JSFL.
Did it work? Mine was not a success:
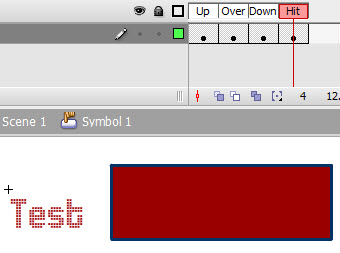
We can see that we'll need to move the box so that its size and position matches that of the text field.
Step 16: Get Text Field Dimensions
Fortunately, we already know how to get information about a selected item. We can guess what the dimension properties of the selected object will be called; let's try tracing them and see if we're right:
fl.trace( fl.getDocumentDOM().selection[0].x );
fl.trace( fl.getDocumentDOM().selection[0].y );
fl.trace( fl.getDocumentDOM().selection[0].width );
fl.trace( fl.getDocumentDOM().selection[0].height );
Surprise, surprise, yes, that works fine. Now we can use that information to draw the rectangle:
fl.getDocumentDOM().addNewRectangle({left:fl.getDocumentDOM().selection[0].x, top:fl.getDocumentDOM().selection[0].y, right:fl.getDocumentDOM().selection[0].x + fl.getDocumentDOM().selection[0].width, bottom:fl.getDocumentDOM().selection[0].y + fl.getDocumentDOM().selection[0].height}, 0);
Try it out:
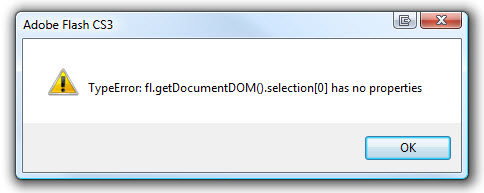
...Oh.
Step 17: Store Information before Selection Changes
What happened? Well, when the script entered Edit mode, the selection changed; we're inside the Button symbol, so we don't have it selected any more. Watch out for that sort of error when working with JSFL.
This is easy to fix, though - we just have to store the left, top, right, and bottom properties early, before the selection changes:
var textLeft = fl.getDocumentDOM().selection[0].x;
var textTop = fl.getDocumentDOM().selection[0].y;
var textRight = fl.getDocumentDOM().selection[0].x + fl.getDocumentDOM().selection[0].width;
var textBottom = fl.getDocumentDOM().selection[0].y + fl.getDocumentDOM().selection[0].height;

fl.getDocumentDOM().convertToSymbol('button', '', 'top left');
var lib = fl.getDocumentDOM().library;
if (lib.getItemProperty('linkageImportForRS') == true) {
lib.setItemProperty('linkageImportForRS', false);
}
else {
lib.setItemProperty('linkageExportForAS', false);
lib.setItemProperty('linkageExportForRS', false);
}
lib.setItemProperty('scalingGrid',  false);

fl.getDocumentDOM().enterEditMode('inPlace');
fl.getDocumentDOM().getTimeline().convertToKeyframes();
fl.getDocumentDOM().getTimeline().convertToKeyframes();
fl.getDocumentDOM().getTimeline().convertToKeyframes();
fl.getDocumentDOM().addNewRectangle({left:textLeft, top:textTop, right:textRight, bottom:textBottom}, 0);
Did it work? It did for me!
Step 18: Check for Potential Errors
What happens if we run the command without selecting the text? We get the same error as before:
We should check to see whether any objects are selected before doing anything:
if ( fl.getDocumentDOM().selection.length > 0 )
{
	var textLeft = fl.getDocumentDOM().selection[0].x;
	var textTop = fl.getDocumentDOM().selection[0].y;
	var textRight = fl.getDocumentDOM().selection[0].x + fl.getDocumentDOM().selection[0].width;
	var textBottom = fl.getDocumentDOM().selection[0].y + fl.getDocumentDOM().selection[0].height;

	fl.getDocumentDOM().convertToSymbol('button', '', 'top left');
	var lib = fl.getDocumentDOM().library;
	if (lib.getItemProperty('linkageImportForRS') == true) {
	lib.setItemProperty('linkageImportForRS', false);
	}
	else {
	lib.setItemProperty('linkageExportForAS', false);
	lib.setItemProperty('linkageExportForRS', false);
	}
	lib.setItemProperty('scalingGrid',  false);

	fl.getDocumentDOM().enterEditMode('inPlace');
	fl.getDocumentDOM().getTimeline().convertToKeyframes();
	fl.getDocumentDOM().getTimeline().convertToKeyframes();
	fl.getDocumentDOM().getTimeline().convertToKeyframes();
	fl.getDocumentDOM().addNewRectangle({left:textLeft, top:textTop, right:textRight, bottom:textBottom}, 0);
}
Actually, we can do better than that... how about checking whether exactly one text field has been selected?
if ( fl.getDocumentDOM().selection.length == 1 )
{
	if ( fl.getDocumentDOM().selection[0].elementType == "text" )
	{
		var textLeft = fl.getDocumentDOM().selection[0].x;
		var textTop = fl.getDocumentDOM().selection[0].y;
		var textRight = fl.getDocumentDOM().selection[0].x + fl.getDocumentDOM().selection[0].width;
		var textBottom = fl.getDocumentDOM().selection[0].y + fl.getDocumentDOM().selection[0].height;

		fl.getDocumentDOM().convertToSymbol('button', '', 'top left');
		var lib = fl.getDocumentDOM().library;
		if (lib.getItemProperty('linkageImportForRS') == true) {
		lib.setItemProperty('linkageImportForRS', false);
		}
		else {
		lib.setItemProperty('linkageExportForAS', false);
		lib.setItemProperty('linkageExportForRS', false);
		}
		lib.setItemProperty('scalingGrid',  false);

		fl.getDocumentDOM().enterEditMode('inPlace');
		fl.getDocumentDOM().getTimeline().convertToKeyframes();
		fl.getDocumentDOM().getTimeline().convertToKeyframes();
		fl.getDocumentDOM().getTimeline().convertToKeyframes();
		fl.getDocumentDOM().addNewRectangle({left:textLeft, top:textTop, right:textRight, bottom:textBottom}, 0);
	}
}
This opens up all sorts of other options. If several items are selected, you could loop through them all, and turn them all into buttons. If an object is selected that isn't a text field, you could treat it differently - perhaps it wouldn't need a rectangle for its Hit shape.
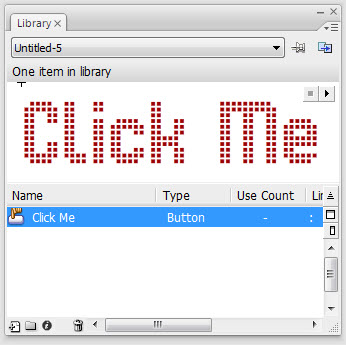
Step 19: Name the Button After the Text
A nice touch would be to give the Button symbol the same name as the text it contains. That would keep the Library tidy, too. But there's nothing in our script to suggest how we might do that.
We do know that the JSFL to convert a selection into a symbol is fl.getDocumentDOM().convertToSymbol(), thanks to the History panel. If you look that up in the LiveDocs, you'll find that the second parameter (which the History panel's script left blank) is called name, and described like so:
A string that specifies the name for the new symbol, which must be unique. You can submit an empty string to have this method create a unique symbol name for you.
Bingo! Of course, we don't know what the text says...
Step 20: Get the Text
We could have a guess:
fl.trace( fl.getDocumentDOM().selection[0].text );
Sadly, this returns undefined. Ah well.
Not to worry - a quick scan through the LiveDocs reveals this page on the Text object. In there we can find the function we're looking for: text.getTextString().
Add that to your script:
var textLeft = fl.getDocumentDOM().selection[0].x;
var textTop = fl.getDocumentDOM().selection[0].y;
var textRight = fl.getDocumentDOM().selection[0].x + fl.getDocumentDOM().selection[0].width;
var textBottom = fl.getDocumentDOM().selection[0].y + fl.getDocumentDOM().selection[0].height;
var textText = fl.getDocumentDOM().selection[0].getTextString();

fl.getDocumentDOM().convertToSymbol('button', textText, 'top left');
Test it.

Fantastic.
Wrap Up
Buttonize is a handy little command to have available if you need to mock up a UI quickly, but it wasn't the point of the tutorial. The goal was to get to grips with JSFL, and see where it could be used. I hope that the next time you're faced with an hour's work of tedious Flash chores, you'll figure out how to automate it with a script in half the time ![]()