Advertise here
The liquify tool is great for making adjustments to photographs. In this tutorial we will use the liquify tool and several image blending techniques to create a surreal and slightly creepy photo manipulation. Let’s get started!
Tutorial Assets
The following assets were used during the production of this tutorial.
Step 1
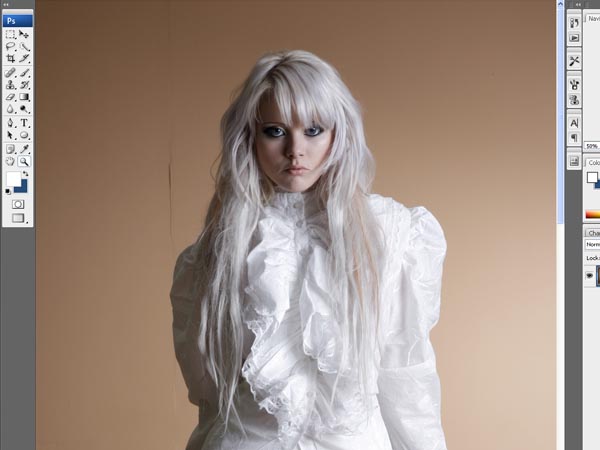
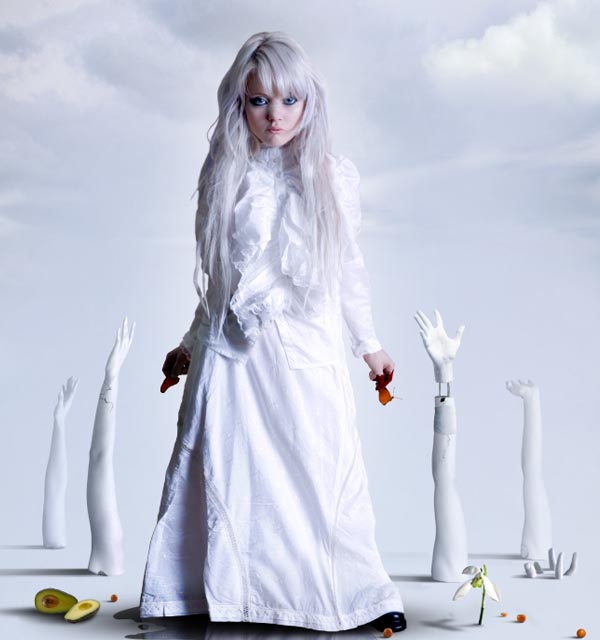
Open this image.
Step 2
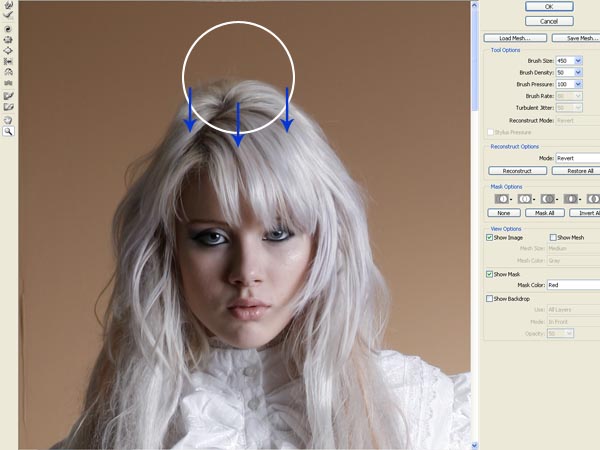
Now let’s go to the liquify filter (filter > liquify) where we’re going to change the look of our model. We can use this tool to modify the image like a clay figure. It’s important to use it carefully and slowly to preserve the quality in the original picture and trying not to distort unnecessary details. Let’s start with her face. We need a childish look, like a doll. So we need to make her head smaller. Use the Forward Warp Tool (W) and change the brush size on the left to 450, carefully slip down in the marked place on the picture. Use a smaller brush to retouch details.
Step 3
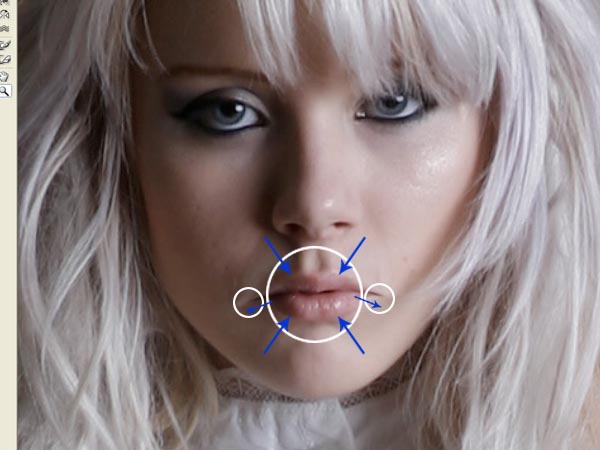
Use the Pucker Tool (S) with a size of 85 to make smaller mouth. Just apply it in the middle of her lips with subtle touches. Then use again the Forward Warp Tool (W) in the corner of her mouth with a brush in size 30 and stretch it to make longer.
Step 4
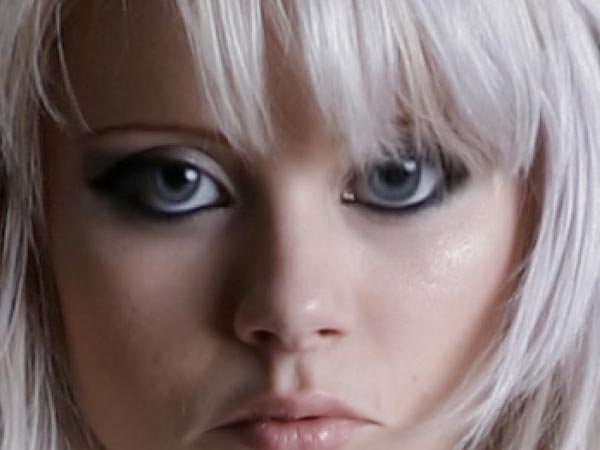
Now use the Bloat Tool (B) in her eyes. We are going to make them bigger and striking, but as always, try not to be excessive and use the tool subtly. A size of 60 will be right, use it in the center of her eyes and then touch in the corners trying not distort the shape of the eye.
Step 5
Before we have finished with the liquify filter, let’s give some last strokes with the Forward Warp Tool (W) to harmonize the shape of the head. I used it with a brush of 150 to make it a little bit wider and round. Be sure that you have not distorted details like eyebrows and then press accept to leave this window.
Step 6
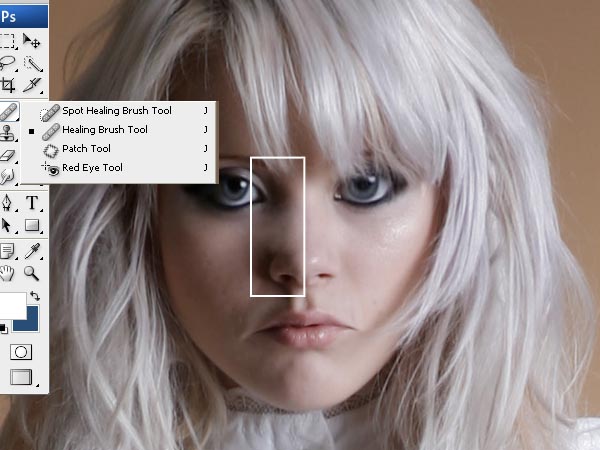
In the main window of the program, use the healing Brush Tool (J) with a size of 25 to erase the nasal septum (and the shadows in the left). That will be the final detail to get a childish look in the face of our model.
Take care into the shadows near the eye and the wing nose, try that the pass between these shadows and the light looks natural. You can use the Smudge Tool (R) to help in this step.
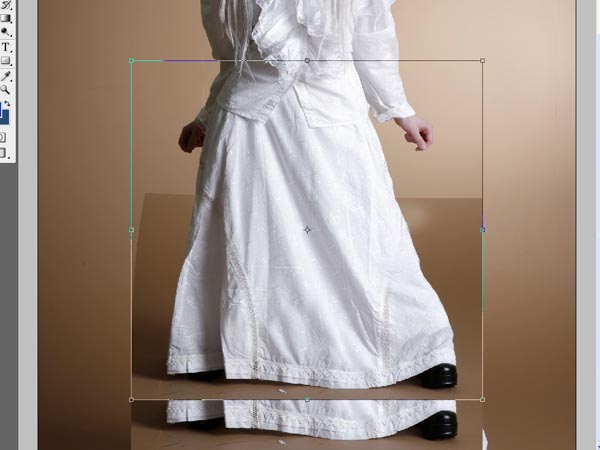
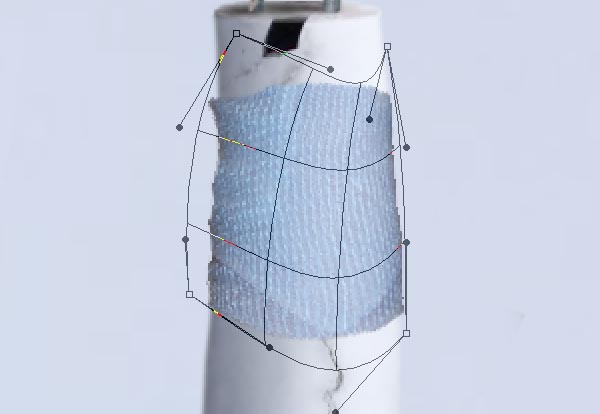
Step 7
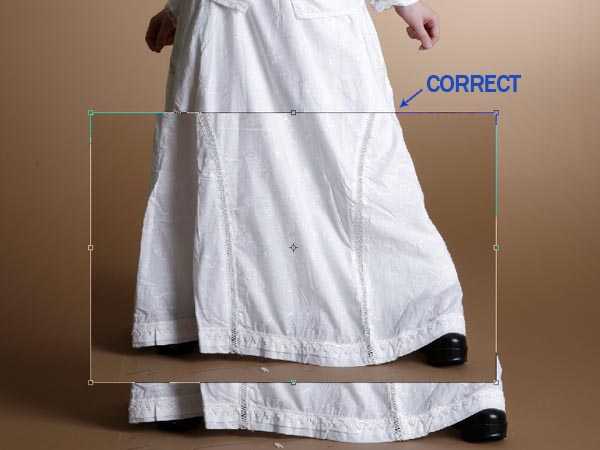
Now we need to make shorter to the model. Select the Rectangular Marquee Tool (M) and use it to select a rectangle like the one in the picture, from her feet to her knees more or less. Copy and paste this selection over the main layer and move it up to the position in the image. Rename this new layer to "Skirt".
Go to Edit > Free Transform and make it narrower until the shape of the skirt coincides in the right side.
Step 8
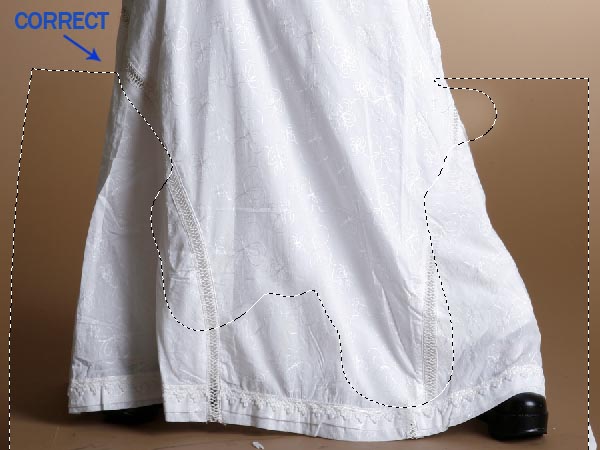
Go to Edit > Transform > Warp and use it to make coincide the left side of the skirt like in the image. Then select the Eraser Tool (E) and delete part of the layer "Skirt" to make a correct merge between the two layers. In the image you can see what I’ve preserved from the "Skirt" layer.
Step 9
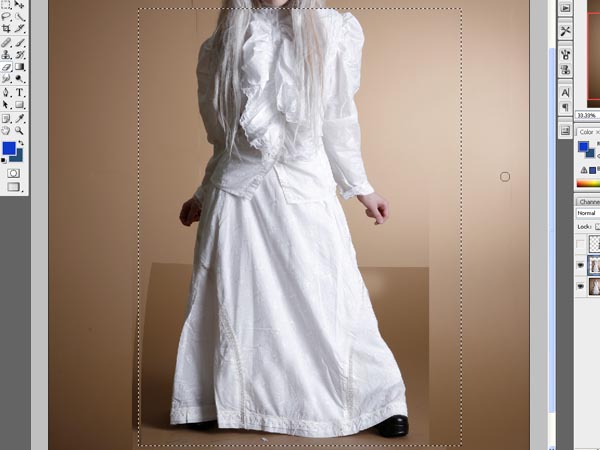
We need a model even shorter, so go to Image > Flatten Image and then select a rectangle like in the image. Copy and paste it over the main layer and then go to Edit > Free Transform. Take the box from the bottom and finally make the selection shorter like in the image.
Step 10
Merge all the layers again and one more time use the Rectangular Marquee Tool (M) to make a selection like the one in the image, then go to Layer > New > Layer via Copy. Go to Edit > Free Transform and make the new layer narrower.
Step 11
As we made in step 8, we are going to use the Eraser Tool (E) to delete part of the new layer to get a perfect merge. Check the image to look what I’ve deleted and when you have finished go to Layer > Flatten Image.
Step 12
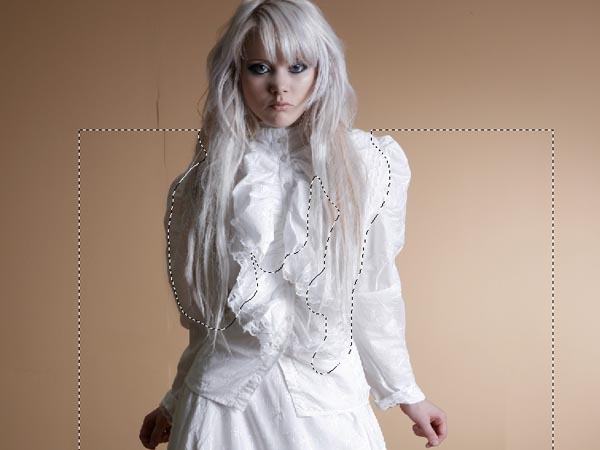
Finally go again to the liquefy filter and give the last touches to the model. I’ve used the Forward Warp Tool (W) in the shoulders and the arms in the direction that you can see o the image to make it proportional to the body. When you have finished, press "Accept".
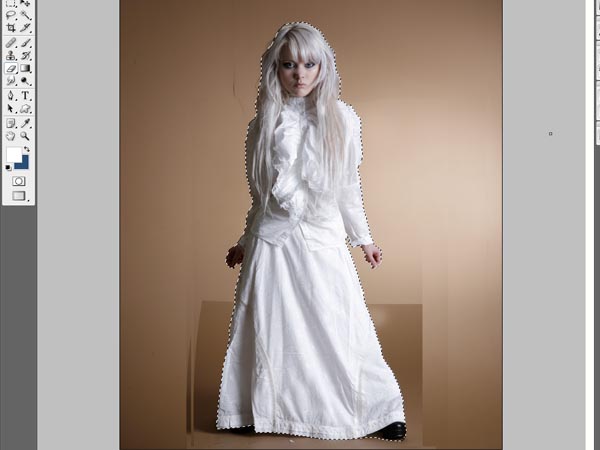
Step 13
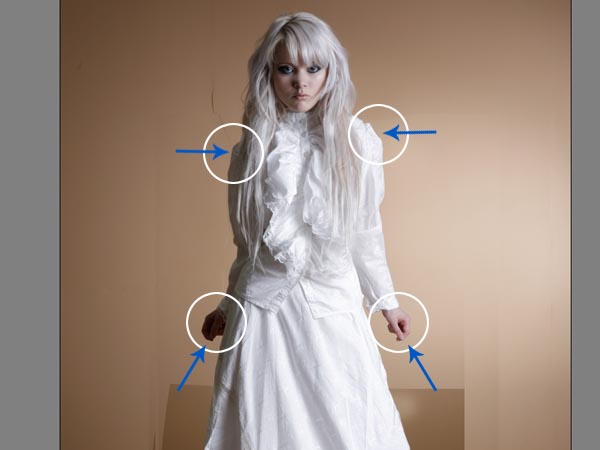
Time to select and cut our retouched model. I used the Magnetic Lasso Tool (L) and then edit the selection in the Quick Mask Mode (Q).
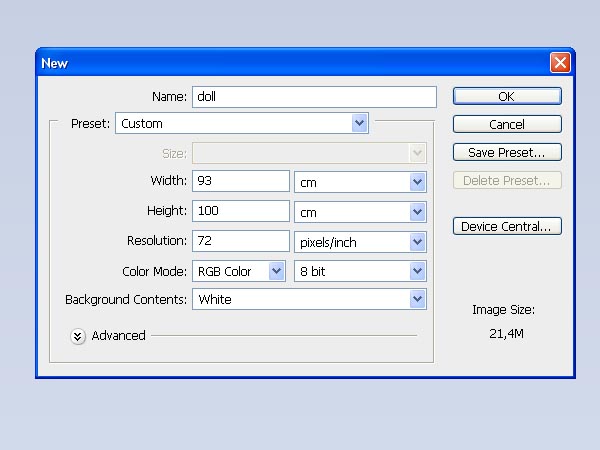
Step 14
Now open a new file with this settings:
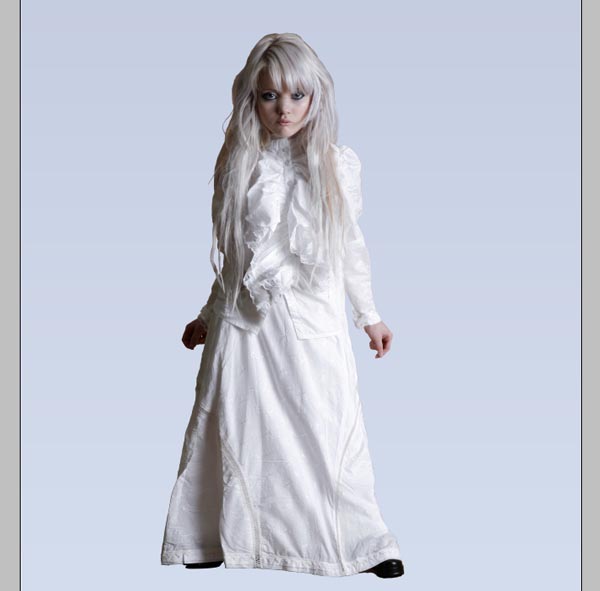
Step 15
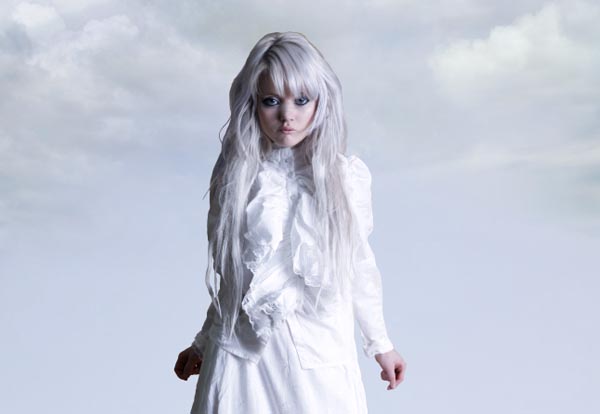
Use the Gradient Tool (G) for the background from color #d3dcec to #c5cde1 and then paste over it to our model. Call the model layer: "Girl"
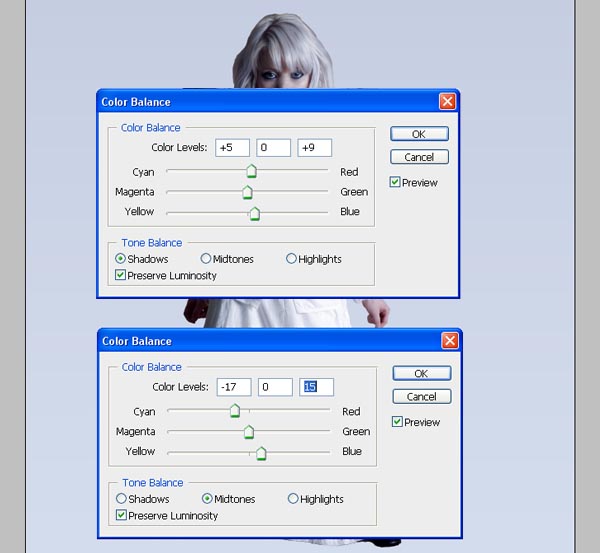
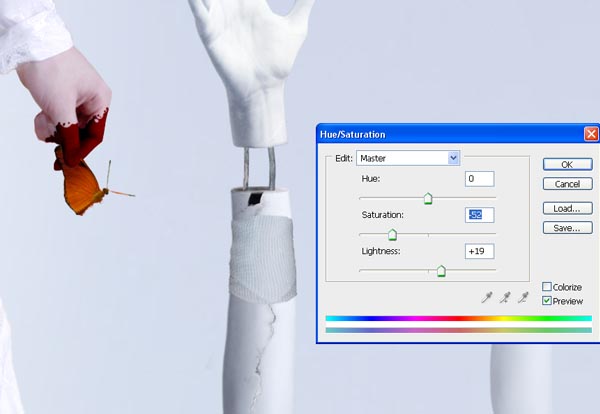
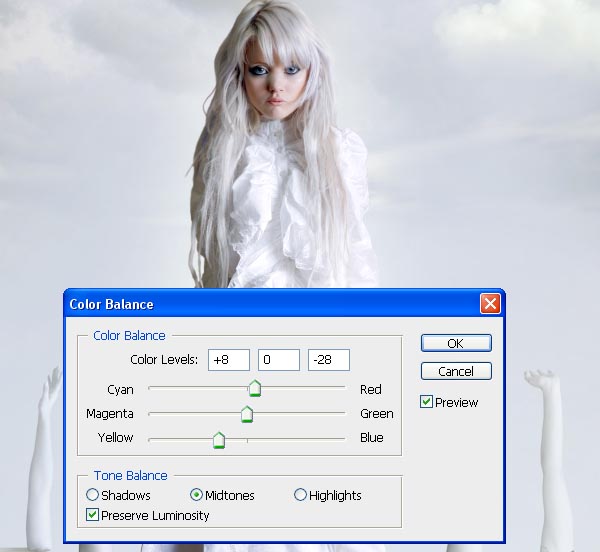
Step 16
Colours on the model doesn’t help to integrate her on the background so we need to change them a little. Go to Image > Adjustments > Color Balance and add these settings in Shadows and Midtones:
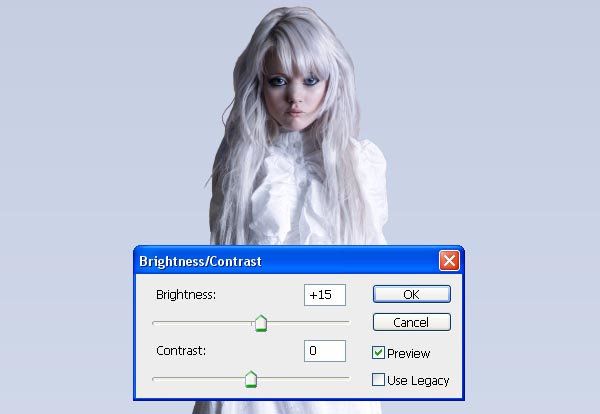
Now go to Image > Adjustments > Brightness/Contrast and add these settings:
Step 17
Let’s add some clouds in the background, use his image:
Add it between the "girl" image and the background, modify the opacity of this layer to 41% and place it on the left corner. Finally use the Eraser Tool (E) to delete the most of this layer. Use the same image to create new clouds in the opposite corner.
Step 18
Now select the Ellipse Tool (E) and draw an ellipse in white under the "Girl" layer, like the one in the image. Then apply to our ellipse a Gaussian Blur (Filter > Blur > Gaussian Blur) with a radius about 120 px.
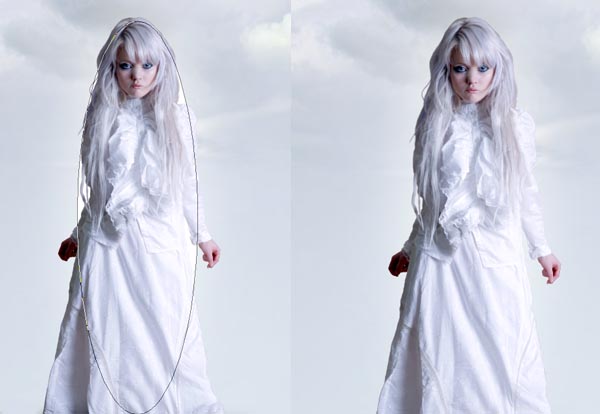
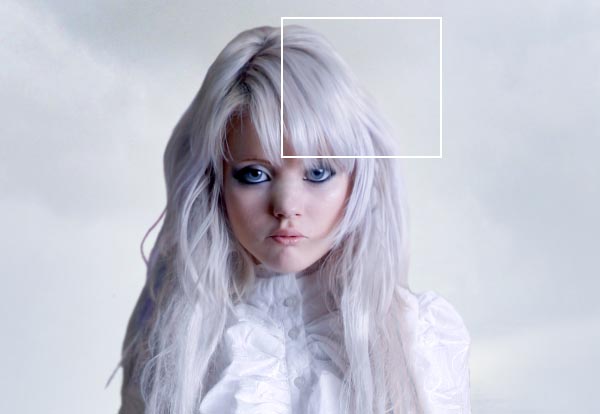
Step 19
At this point I modified some details on the hair of our model to get a better integration with the background. Use de Eraser Tool (E) with a blurred brush of 50 px in the right surroundings and then the Dodge Tool with a blurred brush of 65, range in midtones and an exposure of 50% in the same until the color of the hair looks quite similar to the color in the background.
Step 20
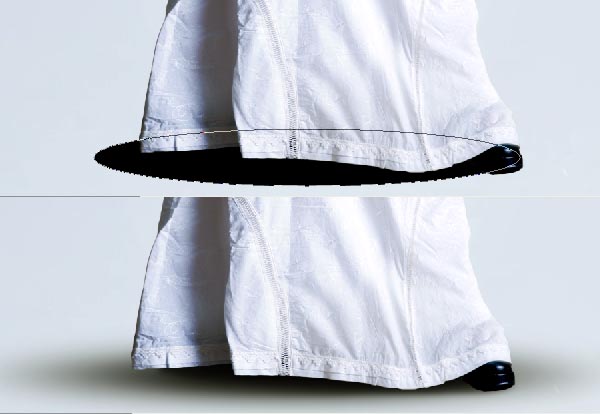
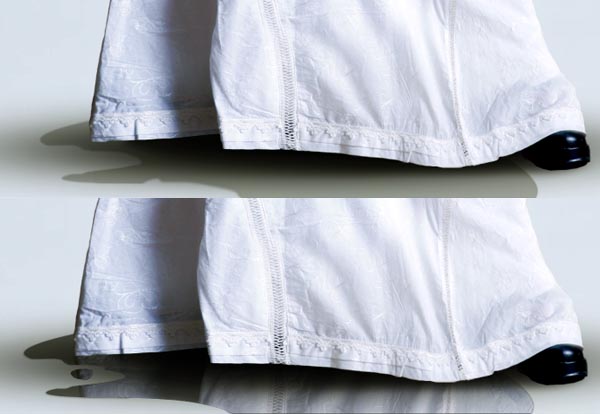
Now select again the Elipse Tool (E) and draw an ellipse in black under the "Girl" layer simulating the shadow of the girl like the one in the image. Then apply to the ellipse a Motion Blur (Filter > Blur > Motion Blur) with a radius about 600 px and an angle of 0º. Finally apply a Gaussian Blur (Filter > Blur > Gaussian Blur) with a radius about 30 px. Rename this layer to "Girl Shadow".
You can use the Eraser Tool (E) with a blurred brush to delete some parts of the shadow so it blends better with the background.
Step 21
Use the Pen Tool (P) to draw an irregular form similar to the one in the image using the #484c43 color. We’re trying to simulate a pond so the shape it’s not too important, just try it has a rounded appearance. Situate this layer under the "Girl Shadow" layer.
The second step it’s to add the reflection of the skirt into the pond. Copy the "Girl" layer, rename it as "Reflection" and change the opacity to 50%. Now go to Edit > Transform > Flip Vertical and adjust it so you can see the lower part of the skirt over the pond. Cut the "Reflection" layer and Paste into your pond layer (Edit > Paste Into).
Step 22
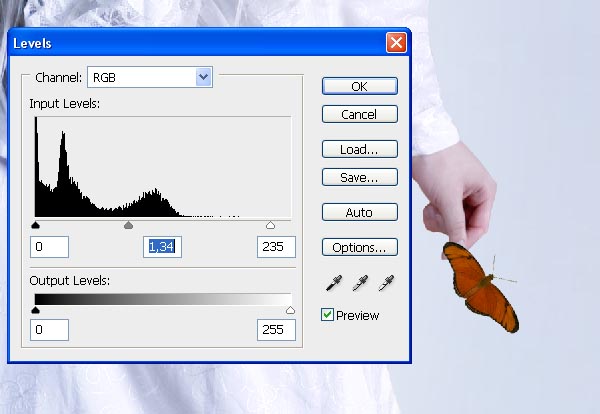
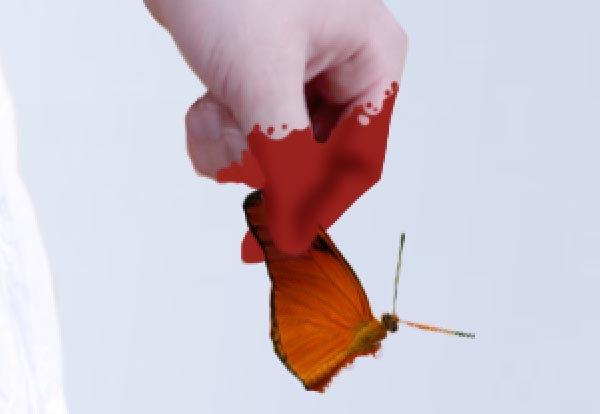
Now we will add a butterfly in the left hand of the girl. Open this image: cut the butterfly and paste it in our main image. Situate it over the "Girl" layer and then adjust its size and levels (Image > Adjustments > Levels) like in the next image.
Step 23
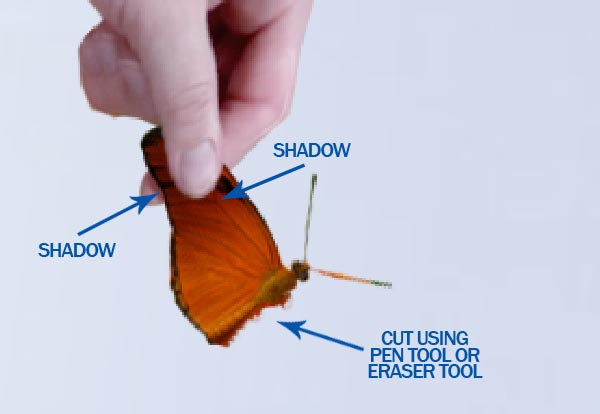
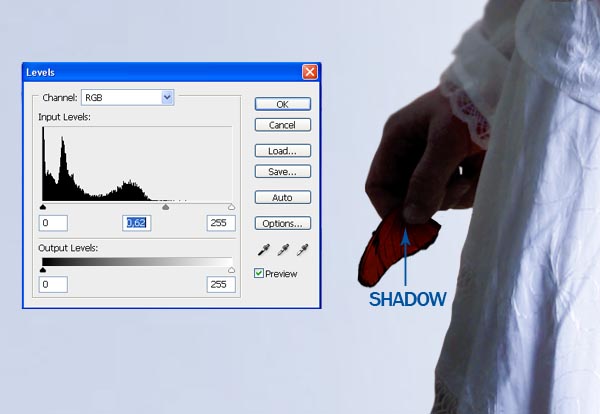
Now use the Eraser Tool (E) to delete the part of the butterfly covered by the thumb of the hand. Use the Burn Tool (O) to add a subtle shadow on the butterfly and in the hand like in the image. Finally cut the left wing of the butterfly using the Polygonal Lasso, the Eraser Tool or the Pen Tool.
Step 24
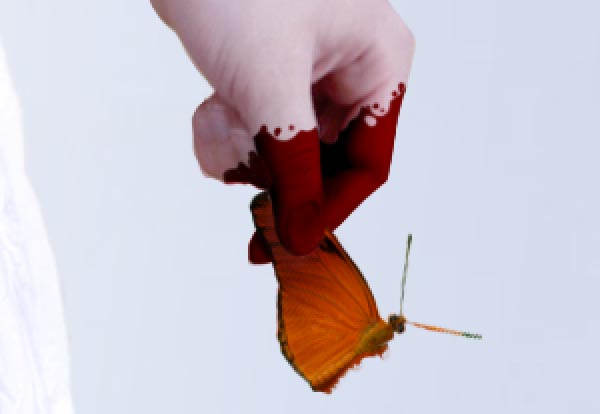
We want to add some blood in the hand of the girl. Create a new layer over the "Child" layer. Use red (#9a221e) and the Brush Tool or Pen Tool (P) to draw the shape following the shape of he fingers. Then use the Burn Tool (O) in midtones and an exposure at 25% to add some shadows like in the image.
Finally change the blending mode for the layer to linear burn.
Step 25
Move the cut wing of our butterfly to the right hand of the model. Use again the Eraser Tool to make visible her thumb and modify the levels on the wing as you can see in the image. Finally add a subtle shadow falling on the wing from the finger; you can draw it and blur with Gaussian Blur (Filters > Blur > Gaussian Blur) or use the Burn Tool (O) to underexpose.
Step 26
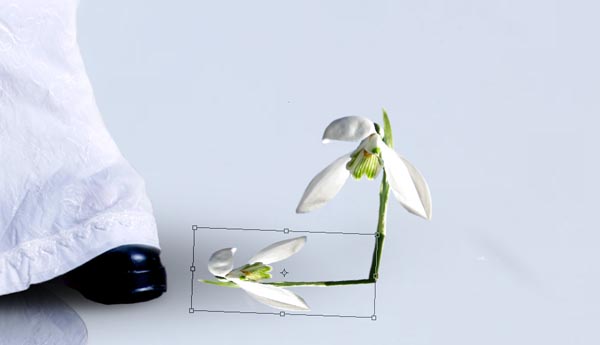
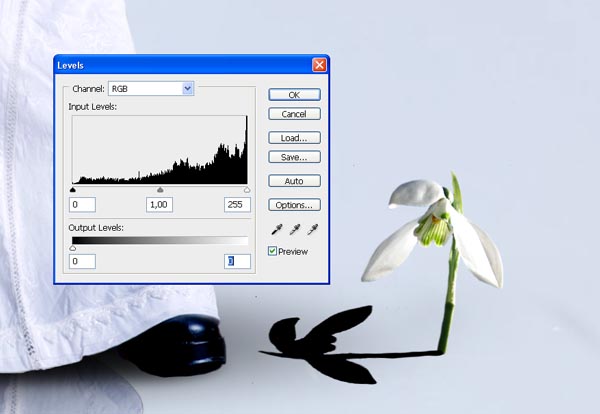
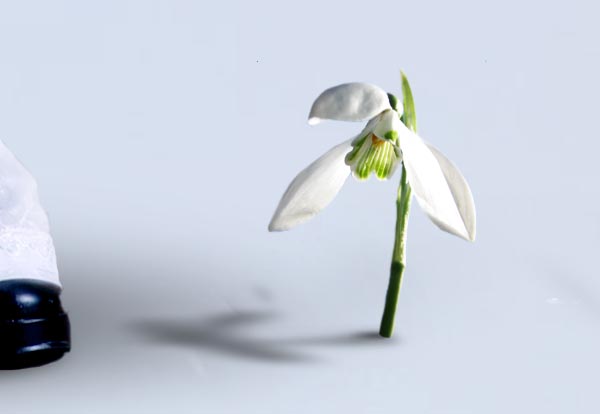
Now we want to add some details on the ground around the girl. Open this image: and cut the flower. Then copy it to our main image and then go to Edit > Transform > Flip Horizontal. Duplicate the flower layer and move it using Edit > Free Transform to situate in the same place that in this image:
Then go to Image > Adjustments > Levels and modify the Output Levels bar like here:
Finally go in the layer of the shadow to Filter > Blur > Motion Blur and apply an angle 0º and a distance of 65 px. Readjust a little the shadow using again the Free Transform (Edit > Free Transform) and the Erasing Tool (E).
Step 27
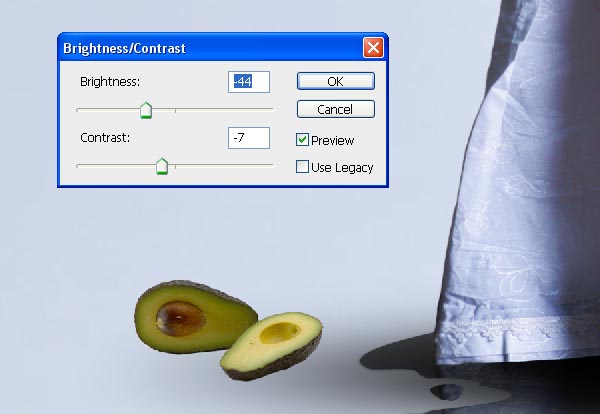
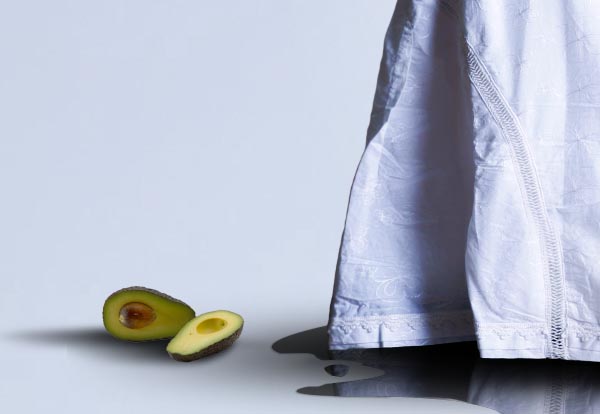
Now we want to add an avocado in the other side of the image. Open this image: and select the avocado.
Copy it in our image and change settings in Image > Adjustments > Brightness/Contrast as in the image.
Finally repeat the steps that I explained on the shadow of the flower to create the shadow of the avocado.
Step 28
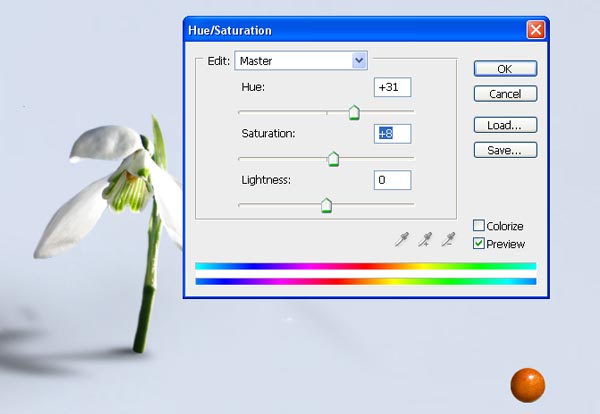
Now we will add some little orange spheres in different points on the ground. It’s really simple to do. Open this image:
Copy and paste in our image the cherry on the upright and use this settings on Image > Adjustments > Hue/Saturation.
Then add the shadow duplicating the layer, modifying the levels and finally using Filter > Blur > Motion Blur as we did before.
Step 29
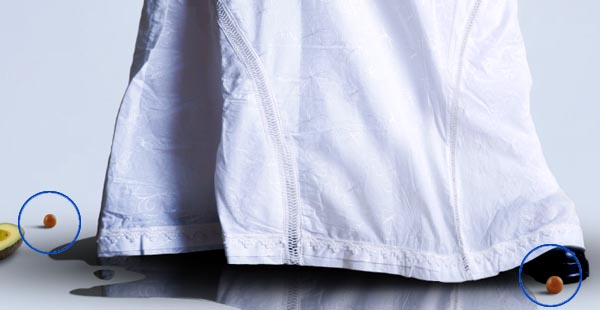
Now you can copy and move the cherry with its shadow and move to the points marked in the next image. If you prefer you can use other cherries from the image instead repeat the same one in three places.
Step 30
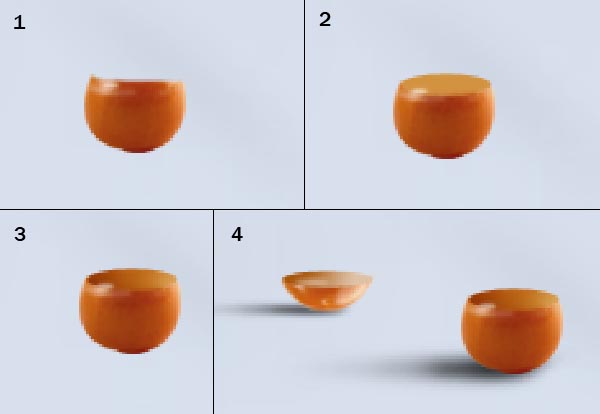
The last cherry it’s a little different because we want it broken. First step is to copy one of the previous cherries and paste it in a new layer. Then use the Elliptical Marquee Tool (M) or some similar Tool to cut the upper part of the cherry (as you can see on box 1 in next image). Then use the Ellipse Tool (E) to draw an ellipse in color #d29240 like the one in box 2. The third step is to use the Burn Tool (O) in midtones and an exposure of 25% on the left side of our orange elipse. Finally add the shadow as we have explained in other steps and repeat the steps to create the upper part of the cut cherry.
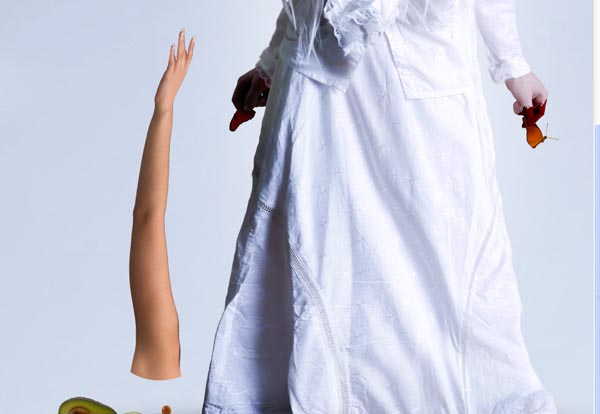
Step 31
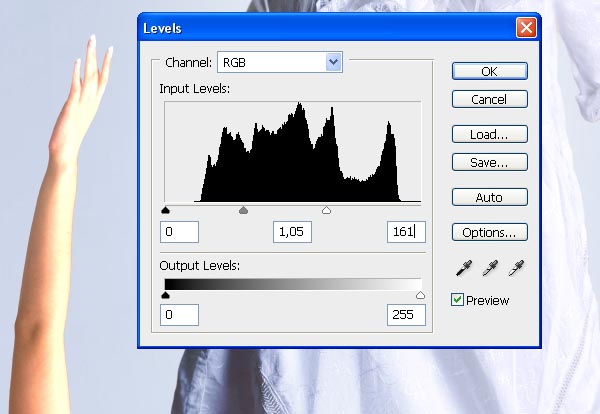
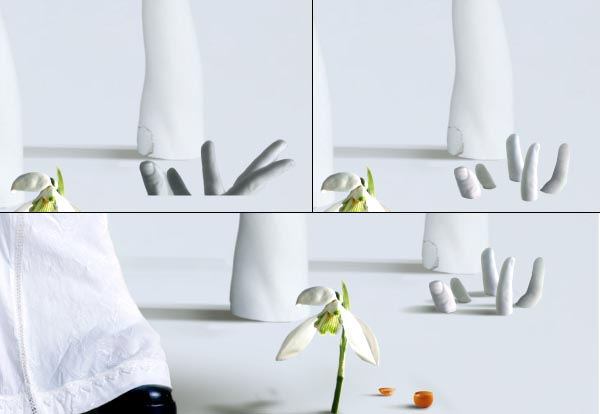
Finally, we want to add some arms coming up from the ground. To start with this, open the image: Cut the arm and paste into our image like in this picture:
Now modify its settings in levels (Image > Adjustments > Levels) like in this picture:
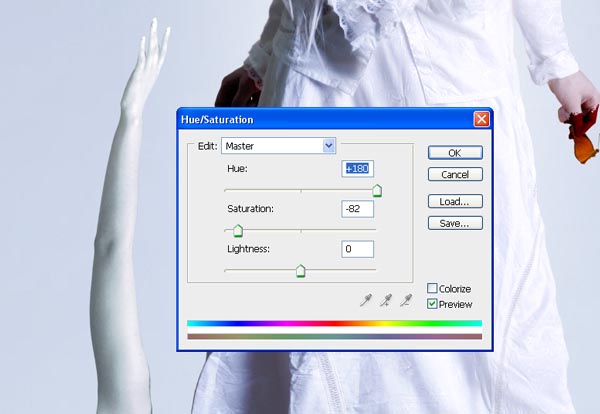
Next go to Image > Adjustments > Hue/Saturation and change the settings like below. Finally go to Image > Adjustments > Color Balance and add + 22 to Blue.
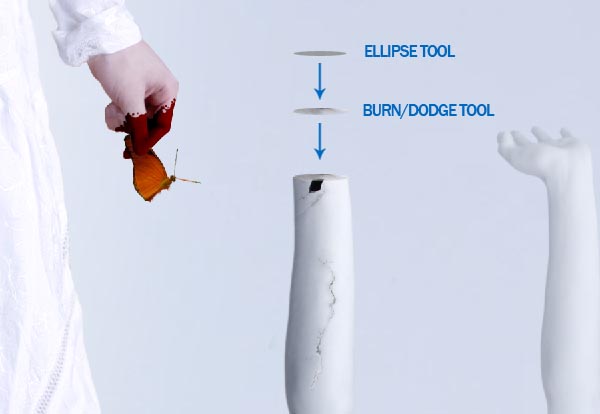
Step 32
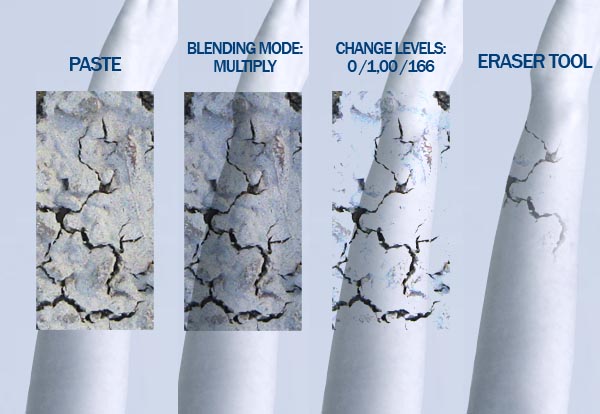
Let’s add some cracks to the arm. Open this image: and select one of the cracks, copy and paste in our image.
Now go to Image > Adjustments > Levels and modify the input levels to: 0/1,00/166. Then use the Eraser Tool (E) to delete all the broken parts that we don’t need.
I used these same steps to add another break in the down part.
Finally add the shadow as I explained for the shadow of the girl in step 18.
Step 33
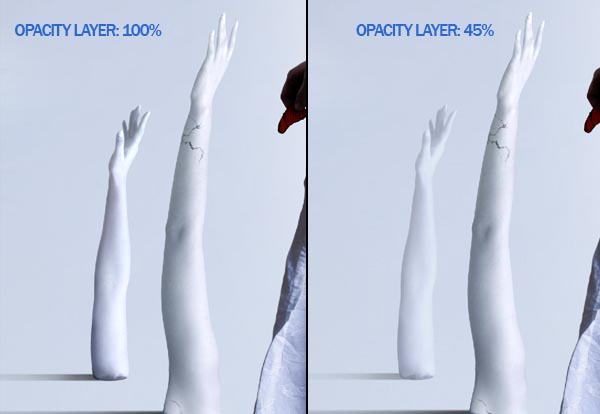
With these steps you can add the other arms to the image. Just have one thing in mind: the farther the arms are the brighter they have to look. Look at the sample below:
As you can see, to make the effect of depth we have changed the opacity layer to 47% in the layer of the arm in the background.
Following this method helps to get a better blending with the background too.
Step 34
Now we want to add some different details to one of our arms. First repeat all the steps that you did on previous arms (steps 30-31). Then we are going to broke our new arm. Cut the hand at the wrist using a Marquee Tool (M) and create an ellipse with the Ellipse Tool (U) as you did on step 29, but this time with color #98999e. Then use the Dodge Tool (O) and the Burn Tool (O) to add some lights and shadows on the ellipse, finally put it over the arm as you can see on next image and merge this layer with the arm one (Command/Ctrl + E).
Step 35
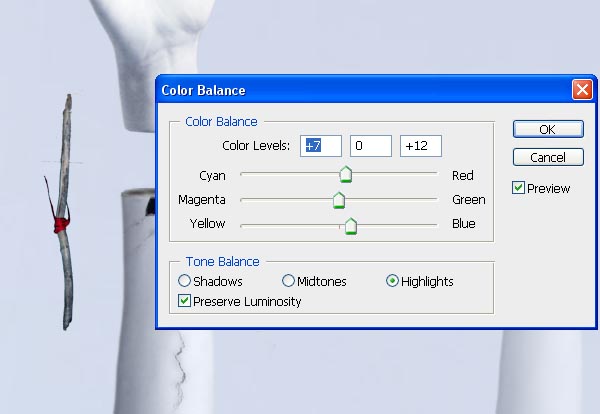
Add the hand that you cut in a new layer and open this image: Copy and paste the stick in our image. We will use it to create two little sticks that fix the hand to the arm. Change the stick Color Balance (Image > Adjustments > Color Balance) as you can see on the image:
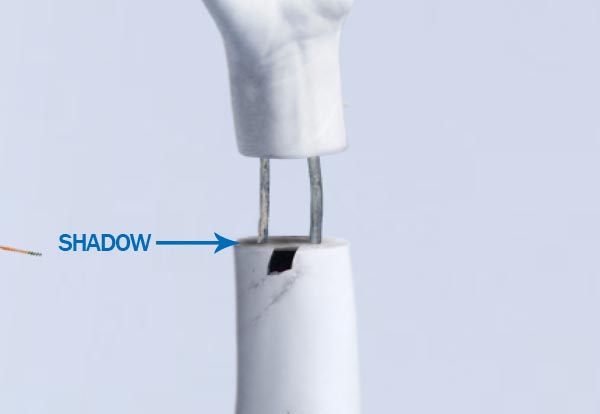
Then duplicate the stick layer and put them between the hand and the arm. Finally draw two little shadows for them.
Step 36
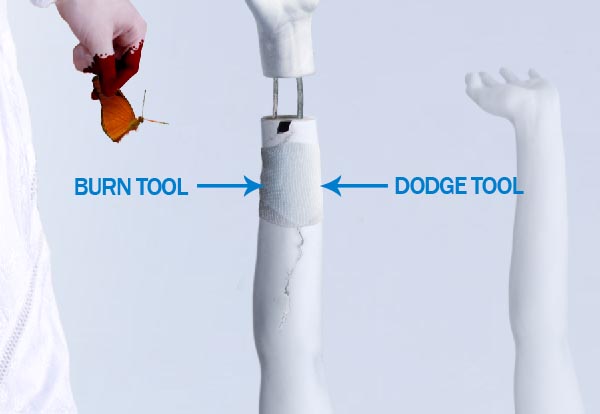
Finally we will add a bandage to the harm. Use this image:
Cut and paste in our main image and go to Edit > Transform > Warp to adapt the shape of the bandage to the arm.
Then go to Image > Adjustments > Hue/Saturation and change the settings to these ones:
Lastly use the Burn Tool (O) on midtones to make darker the left side of the bandage and the Dodge Tool (O) on midtones to make brighter the right side.
Step 37
Finally we are going to add a hand coming up from the ground. For this one I used fingers from different hands. Just be careful that the light it’s similar in all of them (for our image we need light coming from the right and shadows in the left), as I’ve explained before you can help to get a better effect on light/shadow using the Burn Tool (O) and the Dodge Tool (O).
Now we will repeat exactly the same steps that we used to add the complete arms but this time using only fingers.
So, cut and paste some fingers on our image. Modify levels (Image > Adjustments > Levels) and add some blue (Image > Adjustments > Color/Balance). Then retouch a little with Dodge/Burn Tool (O) and with Brightness/Contrast (Image > Adjustments > Brightness/Contrast) if it’s necessary.
The last step, as always, it’s to add shadows using Motion Blur (Filter > Blur > Motion Blur) at 0º and a subtle Gaussian Blur (Filter > Blur > Gaussian Blur).
Step 38
We have our image almost ready. But I would like to give it a little final touches.
Select your first layer and then go to: Layer > New Adjustments Layer > Color Balance. Press OK in next window and then add the settings that you can see on the next image.
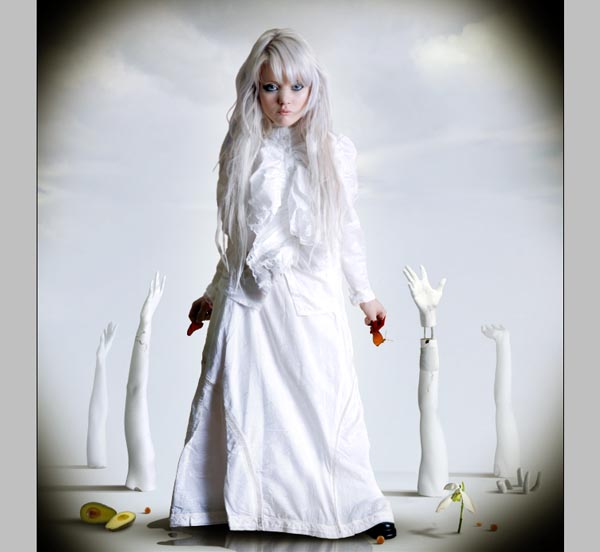
Our last step it’s to create a new layer under the Adjustment Layer and draw a little shadows on the corners of our canvas. I used the Brush Tool (B) with a blurred brush and size 900 px.
In this new layer change the opacity layer to 20% and we have finished.
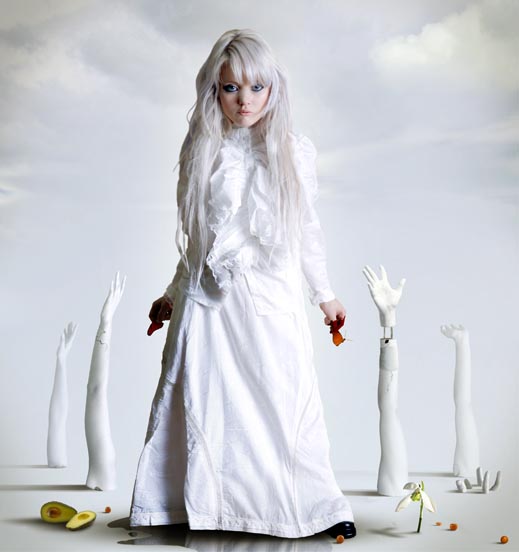
Conclusion
You can always modify details, add elements or play with concepts using this simple technique and some good stock images. The most important thing is to respect basic details like the position of light, the direction of shadows or the perspective of the elements.

 If you’ve ever spent time on hold with tech support, you’ve likely listened to a lot of tinny, cheesy music coming from your phone as you grit your teeth and count the seconds. Instead of making things better, hold music seems to make the minutes stretch into hours. Believe it or not, in the late 19th century people used to pay to listen to music over the phone. A French service called Théâtrophone was basically a steampunk version of Pandora Radio that allowed subscribers to have live music pumped into their homes at a price of 50 centimes for five minutes — roughly one or two euros in today’s money.