In this tutorial, I will show you how to add an outline to text in Photoshop and how to customize it to your needs. With this simple trick, you’ll be able to outline any font in minutes! As a bonus, I will also show you how to edit the outline separately from the letters using Layer Styles.
Follow along with me over on our Envato Tuts+ YouTube channel:
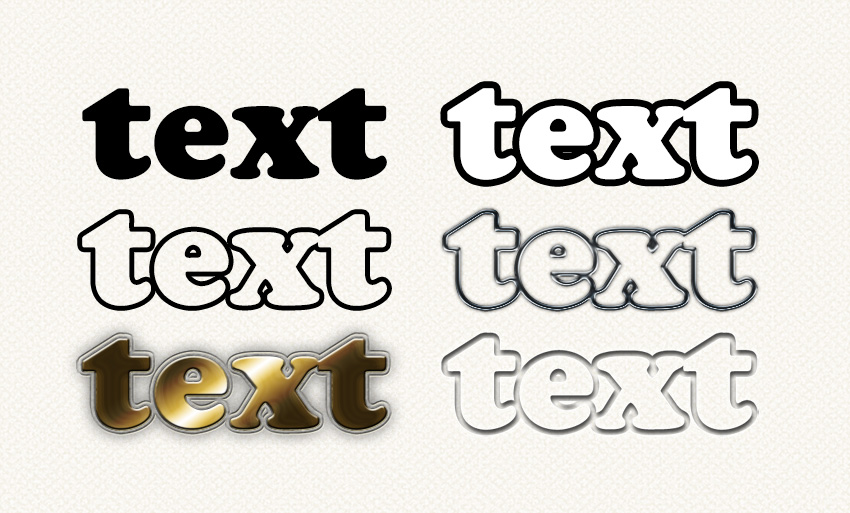
1. How to Outline Text in Photoshop
Step 1
Start by typing your text with the Type Tool (T).

Step 2
Right-click the text layer and select Blending Options.

Step 3
Check Stroke. Your text will be outlined in the default way.

Step 4
You can easily customize the outline by playing with the settings presented here. First, let’s change the Color to make it more visible, for example to white.


Step 5
The outline can also be filled with a Gradient, if you need it…


… or with a Pattern of your choice.


Step 6
You can also change the thickness of the outline…


… and change its Position towards the edge of the letters.


Step 7
If you want the outline to be subtler, you can lower its Opacity or change its Blend Mode to interact with the background.


Step 8
Finally, if you need to remove the text and keep the outline only, that’s also possible. Just go to the Blending Options and drag the Fill Opacity bar down to 0%.


2. How to Edit the Text Outline Separately
Step 1
Unfortunately, you can’t add styles directly to the outline this way. For example, if you check Drop Shadow, the shadow will be cast by the whole text, even if you make the fill transparent. If you want to edit the outline separately, you need to use a trick. Right-click the layer and select Rasterize Layer Style.

Step 2
You can now freely use all the style settings on this outline. The downside of this method is that you can no longer edit the text, since it’s been turned into a shape.


There are many ways to use Layer Styles to make your text more visually appealing, but if you want to save time, you can use ready-made text effects. Let me show you a few examples.
3D Text Effect
This 3D effect looks very complex, but it’s simple to use. Just double click the text layer to edit the text directly. It’s a Smart Object, which means that the text is saved in another file. Once you edit that separate file and save it, the main file will be automatically modified according to your changes. It can take a while if the effect is very complex, but you don’t have to do anything. Just wait for the magic to happen!

Game Logo Text Effect
You can use this method to create even very complex logos. The best thing about it is that you only need to provide the text and everything else happens without any effort on your side. This text effect, for example, allows you to create a 3D-looking logo straight from a video game.

Retro Text Effect
You can also create text in vintage style using this method. Normally it would take a lot of time and skill to create an effect like this, but it’s already done and ready to be used. Just add your own text!

Vintage Text Effect
Here’s another example of this method. Here the text becomes a part of the whole artwork, being altered to look older. It looks almost as if it was drawn manually and not simply typed in.

Good Job!
Now you know how to outline letters in Photoshop and how to customize the outline with Layer Styles. If you want to learn more about creating text effects, you may be interested in one of our other tutorials:
 Text EffectsHow to Create a Cartoon Text Effect in Adobe PhotoshopJan Stverak
 Photoshop ActionsHow to Create a Chalkboard Sign With Chalk Text in Adobe PhotoshopJohn Negoita
 Text EffectsHow to Create a Neon Flame Text Effect Action in Adobe PhotoshopAnderson Luiz
 Photoshop ActionsHow to Create a 3D Golden Cinematic Text Action in Adobe PhotoshopJan Stverak
 Text EffectsHow to Create an inFamous Inspired Text Effect in Adobe PhotoshopAnderson Luiz

{excerpt}
Read More