Learn how to create a stitched felt Photoshop text effect in just a few easy steps. This effect is great for the winter holidays.
This felt text effect is a part of the Felt Effect Photoshop Actions from my portfolio on Envato Market.

The stitched felt effect action is also included in my new Christmas Photoshop Actions Bundle. The bundle contains 10 useful actions for the winter holidays.
Tutorial Assets
To create this Photoshop text effect, I will use the following assets:
1. How to Create the Felt Background
Step 1
Create a new document in Photoshop. The size of the canvas is 850 x 600px, resolution 72 dpi. If you use another canvas size, you have to adjust the layer styles.

Step 2
Add a new layer and call it Felt Background. Fill the layer with any color you like.

Step 3
Add a Pattern Overlay layer style. Click on the arrow to Load Patterns and choose the felt-pattern.pat file.

Step 4
Add a Color Overlay (color #428fc7) to the Felt Background layer.

2. How to Create the Felt Photoshop Text Effect
Step 1
I will create the text in a new document. So make a new file and add your text. Set the size to 320 pt.

Step 2
Toggle the Character and Paragraph panels and set the tracking for the selected characters to around 200.

Step 3
Press Control-J to make two copies of the text layer.

Step 4
Add a Stroke layer style of 15 px to the Felt Text 1 layer. The color of the border is not important, so you can choose any color you want.

Step 5
Add a Stroke layer style of 10 px to the Felt Text 2 layer. The color of the border is not important, so you can choose any color you want.

Step 6
Set the Fill of the Felt Text 3 layer to 0%.
Add a Bevel and Emboss layer style (color #ffffff and #000000) to the Felt Text 3 layer.

Step 7
Go to the Felt Text 1 layer, right-click and choose Convert to Smart Object. Do the same for the Felt Text 2 and Felt Text 3 layers.

Step 8
I will hide the Felt Text 2 and Felt Text 3 layers for now.
Go to the Felt Text 1 smart object and add these layer styles:
-
Drop Shadow (color
#000000) -
Color Overlay (color
#328f1f) - Pattern Overlay (felt-pattern)
-
Bevel and Emboss (color
#ffffffand#000000)


Step 9
To expand the text, go to Filter > Other > Minimum and set the Radius to 10 px.

Step 10
Go to the Felt Text 2 smart object and add these layer styles:
-
Drop Shadow (color
#000000) -
Color Overlay (color
#c11a1a) - Pattern Overlay (felt-pattern)
-
Bevel and Emboss (color
#ffffffand#000000)


Step 11
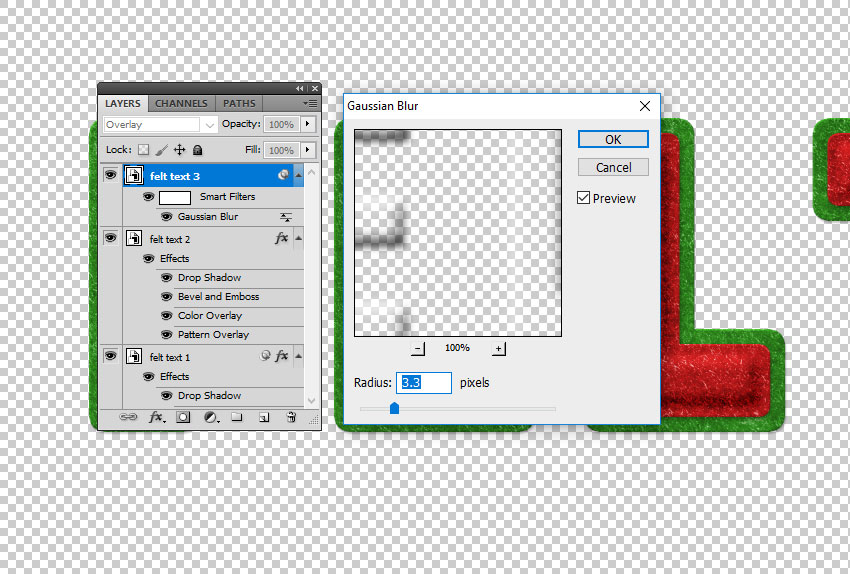
Go to the Felt Text 3 smart object and set the blend mode to Overlay.

Step 12
Go to Filter > Blur > Gaussian Blur and set the Radius to around 3.3 px.

Step 13
The felt text effect should now look like this. You can, of course, choose any colors you like for the felt pattern.

3. Create a Stitch Brush in Photoshop
Step 1
Let’s create a stitch brush for the felt Photoshop text effect.
Create a new PSD file, size 27 x 5 px. Fill the canvas with color black. Go to Edit > Define Brush Preset. Set the brush name to “stitch” and click OK.

Step 2
Choose the Brush Tool and select the “stitch” brush from the Brush Preset Picker. Toggle the Brush panel and make the following settings: Spacing 750% and set the Angle Jitter to Direction.

Step 3
Click on the top right corner of the Brush panel and choose New Brush Preset. Name the new brush “stitch2”.

You can now close the file in which you created the brush.
4. Add a Stitch Effect in Photoshop
Step 1
Press Shift-Control-N to create a new layer called Stitch Effect.
Keep the Control key pressed and click on the thumbnail of the Felt Text 2 smart object to make a selection.

Step 2
Go to Select > Modify > Contract and contract by 12 pixels.

Step 3
Go to the Path tab and choose Make Work Path from the selection.

Step 4
Create a new layer above the Felt Text 3 layer and call it Stitch Effect.
Pick the Brush Tool and select the stitch brush.

Step 5
Go to the Path tab and choose Stroke Work Path.


Step 6
Press Delete to remove the work path.

Step 7
Add these layer styles to the Stitch Effect layer:
-
Drop Shadow (color
#000000) -
Color Overlay (color
#e3dbc2) -
Bevel and Emboss (color
#ffffffand#000000)


5. Create the Felt Letters
Step 1
Select all the layers and right-click to Convert to Smart Object.

Step 2
Right-click on the Felt Text smart object and choose Duplicate Layer. For the Destination, choose the initial document, the one with the felt background.

Step 3
Make a copy of the Felt Text smart object and hide it. That way, you have the original text intact.
Rasterize the Felt Text smart object.

Step 4
Use the Rectangular Marquee Tool to select the letter F. Press Control-X and Control-V to cut and paste the letter F onto another layer.


Step 5
Do the same for all the letters. Now you have the felt text letters on separate layers.

Step 6
Press Control-T to Rotate and Move the letters as you like.

6. How to Make a Shadow in Photoshop
Step 1
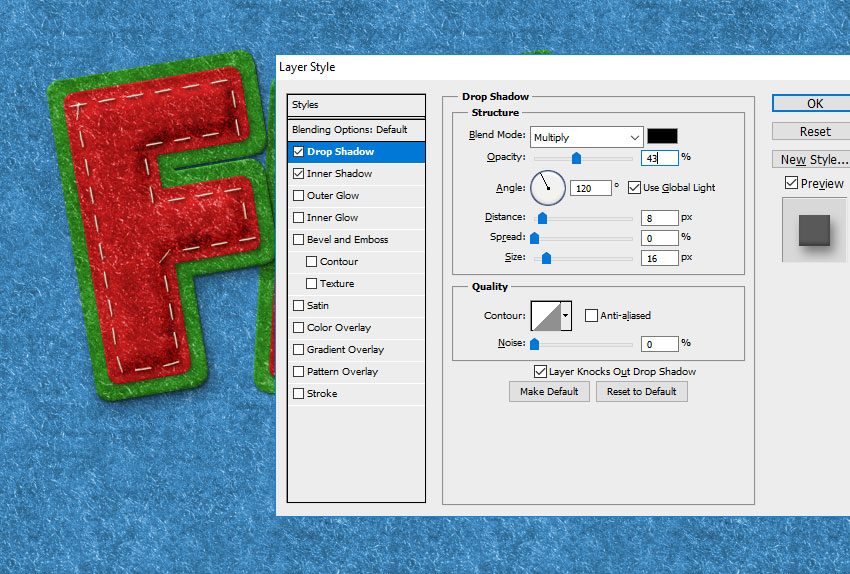
As you can see, the letters look a little flat and have the same shadow. So to make them look more realistic, add different Drop Shadow layer styles to each letter.
Start with the F layer.

Step 2
Add a Drop Shadow layer style to the E layer.

Step 3
Add a Drop Shadow layer style to the L layer.

Step 4
Add a Drop Shadow layer style to the T layer.

You can also add an Inner Shadow layer style to each layer.

7. Change the Color of the Felt Photoshop Text Effect
If you want to change the color of the felt letters, add a Hue/Saturation adjustment layer for the letter that you want to modify. If you want to change the red color, choose the Reds channel.
Click the Clip to Layer button to add the adjustment only for that layer.

In the same way, you can change any letter you want.

8. Add Felt Ornaments
Step 1
Use the Pen Tool to add shapes like trees and clouds.

Step 2
Click on the Add to Shape Area if you want to create multiple shapes on the same layer.
I made two separate layers with tree shapes and one separate layer with cloud shapes. I did that because I want to add different colors to the shapes.

Step 3
For each layer, add these layer styles:
-
Drop Shadow (color
#000000) - Color Overlay (choose the color that you like)
- Pattern Overlay (felt-pattern)
-
Bevel and Emboss (color
#ffffffand#000000)


Step 4
You can also create a new layer and use the Brush Tool to add some stitch effects using the stitch brush.

9. Create Clothes Buttons in Photoshop
Step 1
To create the clothes button, I use the Ellipse Tool. Keep the Shift key pressed and draw to create a circle.

Step 2
Click on the Subtract from Shape Area button and add a circle inside the first circle to make a hole. Do this three more times.

Step 3
Add these layer styles to the Clothes Button layer:
-
Drop Shadow (color
#000000) -
Color Overlay (color
#c8350dor choose the color that you like) -
Bevel and Emboss (color
#ffffffand#000000)


Step 4
Create a new circle shape layer. Click on the Subtract from Shape Area button and add a large circle inside the first circle to make a hole.

Step 5
Go to the Clothes Button 1 layer, right-click and choose Copy Layer Style. Go to the Clothes Button 2 layer, right-click and choose Paste Layer Style.

You can modify the layer style as you wish to create endless results. Change the Color Overlay, the Bevel and Emboss settings, etc.
Step 6
Create a new layer and call it Thread. Use the Brush Tool to create a thread.

Create another layer and call it Thread. Use the Brush Tool to create another thread.

Step 7
Add these layer styles to the Thread layers:
-
Drop Shadow (color
#000000) -
Color Overlay (color
#b9b9b9) -
Inner Shadow (color
#000000) -
Bevel and Emboss (color
#ffffffand#000000)


Step 8
In the same way, you can create more buttons with different colors and sizes.
Congratulations! You’re Done!
In this tutorial, you’ve learned how to create a felt text effect in Photoshop from scratch using brushes and patterns. Photoshop text effects are really useful, so I hope you’ve enjoyed this tutorial.

This Photoshop text effect is a part of the Felt Photoshop Actions pack from my portfolio on Envato Market.
The new Christmas Photoshop Actions Bundle contains 10 actions that you can use for the winter festive holidays. The stitched felt effect action is also included in the bundle.

-

How to Create a Rubber Stamp Effect in Adobe Photoshop
In this tutorial, I will show you how to create a realistic rubber stamp effect in Photoshop. Turn any photo into a rubber stamp in just a few quick steps. -

How to Create a Winter Snow Globe in Adobe Photoshop
In this tutorial, I will show you how to create a realistic snow globe in Photoshop with a snowfall effect using your own photos. -

How to Create a Sketch vs. Camera Effect in Adobe Photoshop
In the following tutorial, I’m going to show you how to create a pencil sketch Adobe Photoshop action with a unique twist. -

How to Turn a Photo Into Comic Book Art in Adobe Photoshop
In this tutorial, I will show you how to turn a photo into comic book art in Photoshop using filters and textures.
{excerpt}
Read More